Jetguy's Cubify Cube gen 3 experience

Jetguy
Jetguy

TheMakerGuy
You received this message because you are subscribed to the Google Groups "3D Printer Tips, Tricks and Reviews" group.
To unsubscribe from this group and stop receiving emails from it, send an email to 3dprintertipstricks...@googlegroups.com.
To post to this group, send email to 3dprintertips...@googlegroups.com.

Joseph Chiu
Jetguy
To unsubscribe from this group and stop receiving emails from it, send an email to 3dprintertipstricksreviews+unsub...@googlegroups.com.
To post to this group, send email to 3dprintertipstricksreviews@googlegroups.com.
--
You received this message because you are subscribed to the Google Groups "3D Printer Tips, Tricks and Reviews" group.
To unsubscribe from this group and stop receiving emails from it, send an email to 3dprintertipstricksreviews+unsub...@googlegroups.com.
To post to this group, send email to 3dprintertipstricksreviews@googlegroups.com.
Jetguy
On Friday, December 19, 2014 4:37:18 PM UTC-5, Jetguy wrote:
I already did, the motors, the controller, the locked to an online slicer, the chipped filament.There are tons of things to hate.For example, I got the uber cool grey one because #1 I liked the looks VS white, #2 they are rare and I had a chance at one so why not?That said, now I know why they take longer to get.ALL are actually white and they paint the grey ones. It's high quality paint and was done right, but it is another step in the process and probably isn't cheap to get them painted, and requires special handling during assembly.So the bad part about that- any scratch will show white underneath.I was hoping is was grey molded plastic all the way through.
Sure, it's a minor gripe but if you are waiting for a grey unit (because they are rare) stop and just get a white one.
On Friday, December 19, 2014 4:22:50 PM UTC-5, Joseph Chiu wrote:
To unsubscribe from this group and stop receiving emails from it, send an email to 3dprintertipstricksreviews+unsub...@googlegroups.com.
To post to this group, send email to 3dprintertipstricksreviews@googlegroups.com.
--
You received this message because you are subscribed to the Google Groups "3D Printer Tips, Tricks and Reviews" group.
To unsubscribe from this group and stop receiving emails from it, send an email to 3dprintertipstricksreviews+unsub...@googlegroups.com.
To post to this group, send email to 3dprintertipstricksreviews@googlegroups.com.
Jetguy


Jetguy
If only it ran Sailfish.......
Jetguy

Ryan Carlyle
TheMakerGuy
To post to this group, send email to 3dprintertips...@googlegroups.com.
Jetguy

On Friday, December 19, 2014 3:32:08 PM UTC-5, Jetguy wrote:

TobyCWood
Jetguy
On Friday, December 19, 2014 3:32:08 PM UTC-5, Jetguy wrote:
Ryan Carlyle
Jetguy
Jetguy
TobyCWood
I am hearing that the floor space for 3DP at CES 2015 will be twice as large as last year. It should be interesting!

Darrell jan

Christopher
Darrell jan
Jetguy

fredini
On Friday, December 19, 2014 3:32:08 PM UTC-5, Jetguy wrote:

Dan Newman
> Guess thats what you are referring to:
> https://www.youtube.com/watch?v=S5POu62l_Wo&feature=youtu.be
http://www.cnet.com/videos/the-future-of-3d-printing/
Dan

Jacob Russo
Darrell jan

3DSysTech Info
By the way, if anyone is interested, we still have ONE (1) White Cube 3 in stock at www.3DSysTech.com .

Jetguy


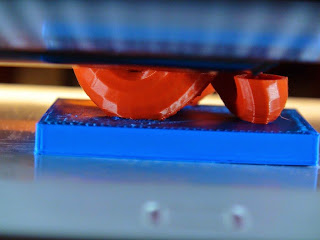
A little overhang droop


TheMakerGuy
Also she wore gloves to shake Bre's hand.
TheMakerGuy
Darrell jan
On Saturday, December 20, 2014 8:12:35 PM UTC-8, The Maker Guy wrote:
All I remembered was her teeth.
Also she wore gloves to shake Bre's hand.
On Dec 20, 2014, at 5:59 PM, Dan Newman <dan.n...@mtbaldy.us> wrote:
> On 20/12/2014 11:32 AM, Christopher wrote:
> Guess thats what you are referring to:
> https://www.youtube.com/watch?v=S5POu62l_Wo&feature=youtu.be
The original at CNET the folks who did the interview in 2012 at CES,
http://www.cnet.com/videos/the-future-of-3d-printing/
Dan
--
You received this message because you are subscribed to the Google Groups "3D Printer Tips, Tricks and Reviews" group.
To unsubscribe from this group and stop receiving emails from it, send an email to 3dprintertipstricksreviews+unsub...@googlegroups.com.
Ryan Carlyle
I think I would rather get that flashforge clone at micro center as it was just 799
- American company with high-quality hardware and a real focus on user-experience, but with closed-source IP and chipped filament
- Chinese company with mediocre knock-off hardware and stolen open-source IP used in violation of the licensing terms, but cheap and hackable
Jetguy

Also, they have this big plastic shield so that only the tiniest bit of the nozzle tip extends for safety.
It is really, really, really hard to burn yourself with this machine. Not saying you cannot, but nothing like any other printer I've seen.

Ryan Carlyle
Jetguy
Ryan Carlyle
Jetguy


Jetguy

The pointed metal tab with the hole is what mounts this to the main plastic housing.

Installed here. The nozzles poke down into and seat into the tapered hole of the heater block from the topside.

An then the cover goes over that. It has an aluminum foil heat reflector.


And then the nozzle just pokes through

This fan on the topside is what is cooling the thermal barriers and the space around the heater blocks including the mounting point.

And the air exits out the sides of the head system here just above my thumb but they are all around the backside between the white and black parts too.

Here, you can see the center curved duct that blows the center fan right at the space above the the heater blocks.

With fan

The 2 side fans are mini blowers for cooling the print. Kind of hard to see but they are the slits below the round nozzle cap plate things and blow air directly at the nozzle tips.
Jetguy


Kurt @ VR-FX
But - yeah - I DO Hear Ya - JetGuy seemed TOO Happy in the first posting. However, he's also being honest - and I appreciate that. I LOVED his Last line about Unleashing the machine from Cubify!
Go For It JetGuy!!!
-K-
Just give him time. He'll find something to grump about. :)
On Fri, Dec 19, 2014 at 1:21 PM, TheMakerGuy <thema...@gmail.com> wrote:A favorable review?OkWho are you and what did you do with Jetguy
So I got my Cube gen3 from the fine folks at http://www.3dsystech.com/ and I gotta tell you, these are hard to come by before the Holidays!!!
Anyway, So I'm bad, I took this thing apart before I ever even plugged it in.
I have to tell you I am blown away. Proper engineering went into this machine and when you see the pics I'm going to post later- I got my money's worth for under $1k. Obviously, they are subsidizing the cost of the machine into the cartridges.
The main frame is a massive cast aluminum alloy that is CNC machined all over.Precision high dollar linear ball slides used EVERYWHERE.The Z is belt drive, much like the Weistek
Controller board is as before- PIC based PIC32MX695 512L-801/PT http://ww1.microchip.com/downloads/en/DeviceDoc/61156H.pdfThere is a 4GB micro SD card onboard in a hidden slot (much like the previous CubeX series)Stepper drivers are DRV8811s http://www.ti.com/product/drv8811Wireless is Microchip MRF24WG0MA http://www.microchip.com/wwwproducts/Devices.aspx?product=MRF24WG0MABluetooth module VIPER VDBTLE24 http://fccid.net/document.php?id=2379866#axzz3MNL2Sj5QMotors for XYZ 17PM-K077BP02CN http://www.eminebea.com/en/engineering_info/rotary/steppingmotor/hybridmotor/cat/001.shtmlExtruder motors 17PM-K374BN01CN Sorry can't yet find a match for the exact motor specsPulleys XYZ are 14T GT2 2mm pitchY belt 390016-00 1024SS GT2 2mm pitch 6mm wide (need to get teeth count) (slightly shorter than X)X belt GT534 2MR 6 GT2 2mm pitch 6mm wide (need to get teeth count) (longest of all 3 belts)Y belt 390017-00 3094SS GT2 2mm pitch 6mm wide (need to get teeth count) (slightly shorter than Y)
PSU brick is Mango240-0500AY 24V 5.0A
This is one heck of a piece of hardware. I fully get why they chip the snot out of it, put the slicer online and so forth. That is to make sure you buy cartridges to pay for the machine they just sold you.
Seriously, every part is done right, milled aluminum, ball bearings everywhere, linear slides, proper motors.It's quite a work of art!
No lie, this gives any Makergear 2 a serious run for the money just in hardware!!!
And, we are of course going to unleash it from Cubify!!!!
--
You received this message because you are subscribed to the Google Groups "3D Printer Tips, Tricks and Reviews" group.
To unsubscribe from this group and stop receiving emails from it, send an email to 3dprintertipstricks...@googlegroups.com.
--
You received this message because you are subscribed to the Google Groups "3D Printer Tips, Tricks and Reviews" group.
To unsubscribe from this group and stop receiving emails from it, send an email to 3dprintertipstricks...@googlegroups.com.
--
You received this message because you are subscribed to the Google Groups "3D Printer Tips, Tricks and Reviews" group.
To unsubscribe from this group and stop receiving emails from it, send an email to 3dprintertipstricks...@googlegroups.com.
Kurt @ VR-FX
-K-
Honestly, who else is going to give you a tip like that about the paint?
I've read a lot of reviews, I intend for mine to the real deal where we kick over the stones, flip this upside down and tell you what it's really made of good or bad.
On Friday, December 19, 2014 4:37:18 PM UTC-5, Jetguy wrote:I already did, the motors, the controller, the locked to an online slicer, the chipped filament.
There are tons of things to hate.
For example, I got the uber cool grey one because #1 I liked the looks VS white, #2 they are rare and I had a chance at one so why not?
That said, now I know why they take longer to get.ALL are actually white and they paint the grey ones. It's high quality paint and was done right, but it is another step in the process and probably isn't cheap to get them painted, and requires special handling during assembly.
So the bad part about that- any scratch will show white underneath.I was hoping is was grey molded plastic all the way through.Sure, it's a minor gripe but if you are waiting for a grey unit (because they are rare) stop and just get a white one.
To unsubscribe from this group and stop receiving emails from it, send an email to 3dprintertipstricksreviews+unsub...@googlegroups.com.
To post to this group, send email to 3dprintertipstricksreviews@googlegroups.com.
--
You received this message because you are subscribed to the Google Groups "3D Printer Tips, Tricks and Reviews" group.
To unsubscribe from this group and stop receiving emails from it, send an email to 3dprintertipstricksreviews+unsub...@googlegroups.com.
To post to this group, send email to 3dprintertipstricksreviews@googlegroups.com.
Kurt @ VR-FX
Except...
And there is Always a Caveat...
If you are lacking Sleep. Then - Worst case scenario - you swapped some Wiring by mistake - and Blow the Damned thing Up! Now - Luckily my 3Doodler did NOT Blow up - but, Just sayin...
So - I'm super excited to see you got it back together and did a Print.
Saying that - I'm FREAKED By the $50/lb. price of the cartridges - that's Fucked! Hell - I should Calc. the shit and see if it actually comes out MORE Expensive than MY Mojo Cartridges! That would be funny!
Except - in My case - I Pay thru the Nose for the Machine - unlike your Cube - and so they Do NOT have to WAY OVER Charge me for Plastic - since they already GOT ME for the machine...
-K-
Ok, so I'm a Cube convert now.
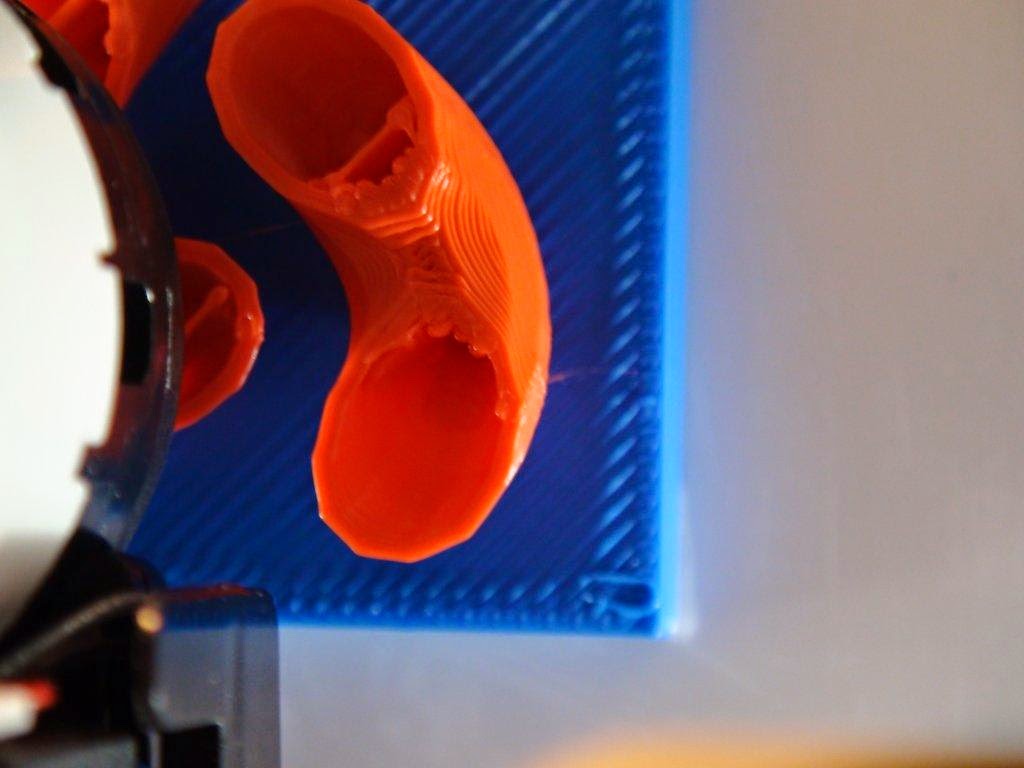
This thing is mind blowing quality on draft at 0.2mm layer height.
Now, I will say this, speed is something to be desired but it's the classic speed VS quality tradeoff.Also, I'm not sure I can live with $50 per not even a pound of filament per cartridge. Even on sale, it's obnoxious.
Sure, topfill could be better, sure, it didn't stick to the glue snot they use, but this is the first print after taken down to nearly every screw, the back is still off just for fun. Auto level, auto Z gap and let her rip.To be clear, I'm not saying this is a perfect print by any means. Just take it out of the box, be the only person ever to tear it down to the nuts and bolts, put it back together and THEN run a first print in draft mode.
Kurt @ VR-FX
However, for me - I want to print Bigger things - which, for me - is also about making things from Parts - and then Re-assembling. But, at High Plastics costs - that's not Viable for me! For instance - my Dragon. I'd love to print it again - and use a Bot that's Accurate - so I Would NOT have some of the problems that's in the current Dragon. But - I would NOT Want to do it - and have it cost my like $500 to $1000 to print it! No WAY! That would be NUTS. Only Exception - if someone Commissioned me to do it - and was will to Pay me like $3-5K for it. At that point - then $1K cost to print it would be a No Brainer!
-K-
Also, FWIW, I think John Abella said something along those lines about minor extrusion volume calibrations when I saw his at Maker Faire.
The weird thing is, On some layers, I've seen the screen door effect (tiny gaps between infill strands) and yet, on this top layer, clear slight over extrusion.
Overall, using draft mode, the prints are easily better than most folks get on other printers out of the box. It's the fine tuning aspect that being locked out of by the software (literally, there are no adjustments, just checkboxes) that some experienced user might find annoying.
So the real answer, this is marketed at the noob who knows nothing. They could buy this and print just like all the advertising tells them too. Just like inkjet printers, they pay through the nose for cartridges but if it simplifies printing, loading, and general lack of jams, then they gladly pay for the privilege. Since they don't know that one could adjust settings and fine tune out the over or under extrusion, they just accept that all 3D prints "look that way".
It's not marketed to the person who wants to tweak it for absolute best print quality. It's not for the impatient types who want a print in 2 hours.
It's slick looking, sits on a desk, looks right next to a Mac, and generally "does what it's told or else it gets the hose again".
On Saturday, December 20, 2014 11:25:11 AM UTC-5, Jetguy wrote:Except did you look at print output?Obviously it needs calibrated.
On Saturday, December 20, 2014 11:17:05 AM UTC-5, Ryan Carlyle wrote:In theory, if you have precise dimensional control over your filament, you don't need to re-calibrate extrusion volume. Good dimensional control means you can use a fixed extruder idler bearing, which means a nearly fixed bite depth. Then add control over your filament composition (hardness, toughness) and drive gear geometry. You really shouldn't need to do any end-user filament calibration.
--
Kurt @ VR-FX
and IMO that spells product success.
I admit I would not want one... but what about that school teacher that simply wants their students to be able to print their Sketchup attempts or...
that Engineer who barely has time to wipe his nose on his or her job and needs NO hassle prototypes.
-K-
Of course... we have yet to see how well it does with a range of thing complexity and challenges. However... for the closed source commercial market what I saw at CES 2014 and what Jetguy is saying is definitely on the positive side.
I am hearing that the floor space for 3DP at CES 2015 will be twice as large as last year. It should be interesting!
On Saturday, December 20, 2014 8:39:10 AM UTC-8, Jetguy wrote:Also, FWIW, I think John Abella said something along those lines about minor extrusion volume calibrations when I saw his at Maker Faire.
The weird thing is, On some layers, I've seen the screen door effect (tiny gaps between infill strands) and yet, on this top layer, clear slight over extrusion.
Overall, using draft mode, the prints are easily better than most folks get on other printers out of the box. It's the fine tuning aspect that being locked out of by the software (literally, there are no adjustments, just checkboxes) that some experienced user might find annoying.
So the real answer, this is marketed at the noob who knows nothing. They could buy this and print just like all the advertising tells them too. Just like inkjet printers, they pay through the nose for cartridges but if it simplifies printing, loading, and general lack of jams, then they gladly pay for the privilege. Since they don't know that one could adjust settings and fine tune out the over or under extrusion, they just accept that all 3D prints "look that way".
It's not marketed to the person who wants to tweak it for absolute best print quality. It's not for the impatient types who want a print in 2 hours.
It's slick looking, sits on a desk, looks right next to a Mac, and generally "does what it's told or else it gets the hose again".
On Saturday, December 20, 2014 11:25:11 AM UTC-5, Jetguy wrote:Except did you look at print output?Obviously it needs calibrated.
On Saturday, December 20, 2014 11:17:05 AM UTC-5, Ryan Carlyle wrote:In theory, if you have precise dimensional control over your filament, you don't need to re-calibrate extrusion volume. Good dimensional control means you can use a fixed extruder idler bearing, which means a nearly fixed bite depth. Then add control over your filament composition (hardness, toughness) and drive gear geometry. You really shouldn't need to do any end-user filament calibration.
Darrell jan
Darrell jan
To unsubscribe from this group and stop receiving emails from it, send an email to 3dprintertipstricksreviews+unsub...@googlegroups.com.
Kurt @ VR-FX
-K-
--
Kurt @ VR-FX
with history as our guide, the following could happen:-educational discounts for plastic cartridges sales to schools
-unapproved refill kits/chip patches
YEah - we ALL Know THAT will definitely happen!
The filament cost has always been an annoying point with the Cube. I remember for months they were too cute in dancing around the question of how much plastic was in the cartridge. Their belated worthless answer was in units of "typical models".
To unsubscribe from this group and stop receiving emails from it, send an email to 3dprintertipstricks...@googlegroups.com.
Jetguy
Jacob Russo

Enginwiz
Jacob Russo

Jetguy
Jacob Russo
Jetguy
Jetguy

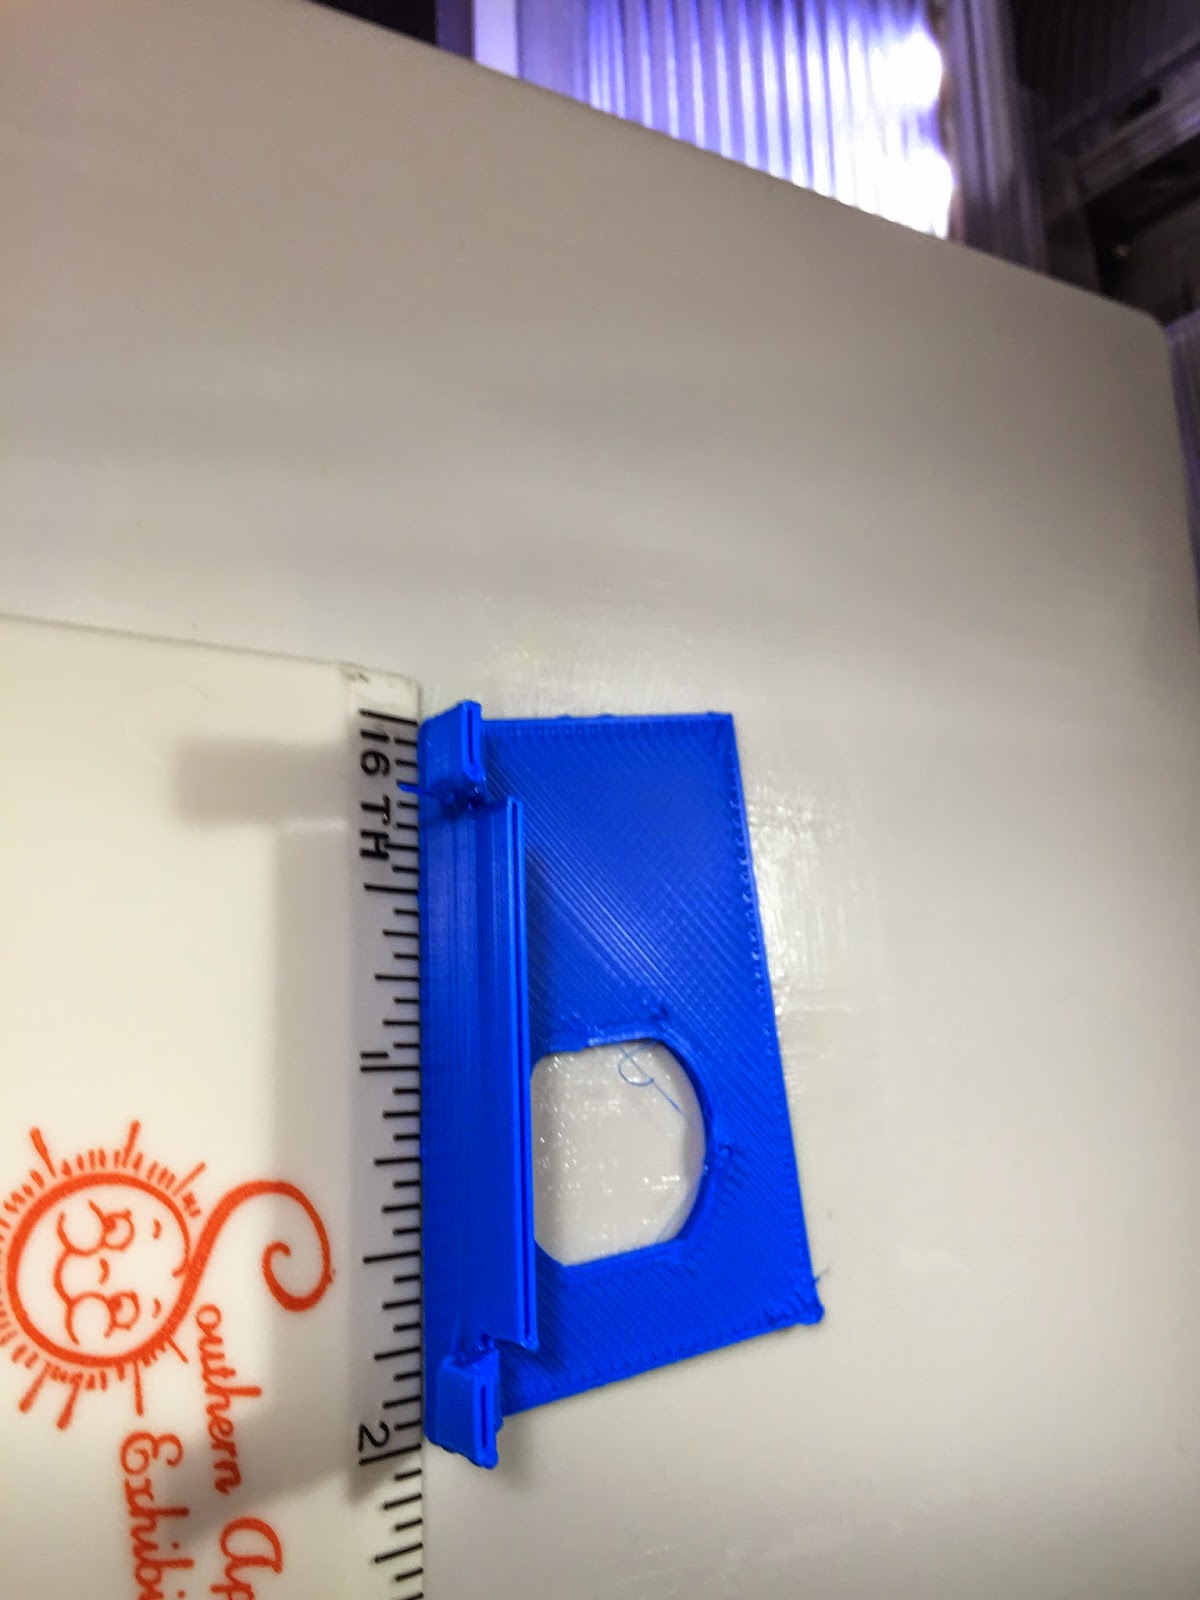
Feeding external filament

So I got tired of trying to work around the head interface termination board and just made my own harness using some plugs from old printers.
I can return to stock with little hassle.

Jetguy
Jetguy
On Tuesday, December 23, 2014 2:32:14 AM UTC-5, Jetguy wrote:
TheMakerGuy
Jetguy
To unsubscribe from this group and stop receiving emails from it, send an email to 3dprintertipstricksreviews+unsub...@googlegroups.com.
To post to this group, send email to 3dprintertipstricksreviews@googlegroups.com.

geneb
> I think you may have voided the warranty
>
g.
--
Proud owner of F-15C 80-0007
http://www.f15sim.com - The only one of its kind.
http://www.diy-cockpits.org/coll - Go Collimated or Go Home.
Some people collect things for a hobby. Geeks collect hobbies.
ScarletDME - The red hot Data Management Environment
A Multi-Value database for the masses, not the classes.
http://scarlet.deltasoft.com - Get it _today_!
Jetguy
Ryan Carlyle
Jetguy


On Tuesday, December 23, 2014 12:51:32 PM UTC-5, Ryan Carlyle wrote:
Nice!
Jetguy
On Friday, December 19, 2014 5:24:01 PM UTC-5, Jetguy wrote:
If only it ran Sailfish.......
On Friday, December 19, 2014 5:21:53 PM UTC-5, Jetguy wrote:The guts.


On Friday, December 19, 2014 4:40:00 PM UTC-5, Jetguy wrote:
Honestly, who else is going to give you a tip like that about the paint?
I've read a lot of reviews, I intend for mine to the real deal where we kick over the stones, flip this upside down and tell you what it's really made of good or bad.
On Friday, December 19, 2014 4:37:18 PM UTC-5, Jetguy wrote:
I already did, the motors, the controller, the locked to an online slicer, the chipped filament.There are tons of things to hate.For example, I got the uber cool grey one because #1 I liked the looks VS white, #2 they are rare and I had a chance at one so why not?That said, now I know why they take longer to get.ALL are actually white and they paint the grey ones. It's high quality paint and was done right, but it is another step in the process and probably isn't cheap to get them painted, and requires special handling during assembly.So the bad part about that- any scratch will show white underneath.I was hoping is was grey molded plastic all the way through.
Sure, it's a minor gripe but if you are waiting for a grey unit (because they are rare) stop and just get a white one.
On Friday, December 19, 2014 4:22:50 PM UTC-5, Joseph Chiu wrote:
Just give him time. He'll find something to grump about. :)
On Fri, Dec 19, 2014 at 1:21 PM, TheMakerGuy <thema...@gmail.com> wrote:
A favorable review?OkWho are you and what did you do with Jetguy
So I got my Cube gen3 from the fine folks at http://www.3dsystech.com/ and I gotta tell you, these are hard to come by before the Holidays!!!Anyway, So I'm bad, I took this thing apart before I ever even plugged it in.I have to tell you I am blown away. Proper engineering went into this machine and when you see the pics I'm going to post later- I got my money's worth for under $1k. Obviously, they are subsidizing the cost of the machine into the cartridges.The main frame is a massive cast aluminum alloy that is CNC machined all over.Precision high dollar linear ball slides used EVERYWHERE.The Z is belt drive, much like the WeistekController board is as before- PIC based PIC32MX695 512L-801/PT http://ww1.microchip.com/downloads/en/DeviceDoc/61156H.pdfThere is a 4GB micro SD card onboard in a hidden slot (much like the previous CubeX series)Stepper drivers are DRV8811s http://www.ti.com/product/drv8811Wireless is Microchip MRF24WG0MA http://www.microchip.com/wwwproducts/Devices.aspx?product=MRF24WG0MABluetooth module VIPER VDBTLE24 http://fccid.net/document.php?id=2379866#axzz3MNL2Sj5QMotors for XYZ 17PM-K077BP02CN http://www.eminebea.com/en/engineering_info/rotary/steppingmotor/hybridmotor/cat/001.shtmlExtruder motors 17PM-K374BN01CN Sorry can't yet find a match for the exact motor specsPulleys XYZ are 14T GT2 2mm pitchY belt 390016-00 1024SS GT2 2mm pitch 6mm wide (need to get teeth count) (slightly shorter than X)X belt GT534 2MR 6 GT2 2mm pitch 6mm wide (need to get teeth count) (longest of all 3 belts)Y belt 390017-00 3094SS GT2 2mm pitch 6mm wide (need to get teeth count) (slightly shorter than Y)PSU brick is Mango240-0500AY 24V 5.0AThis is one heck of a piece of hardware. I fully get why they chip the snot out of it, put the slicer online and so forth. That is to make sure you buy cartridges to pay for the machine they just sold you.Seriously, every part is done right, milled aluminum, ball bearings everywhere, linear slides, proper motors.It's quite a work of art!No lie, this gives any Makergear 2 a serious run for the money just in hardware!!!And, we are of course going to unleash it from Cubify!!!!
--
You received this message because you are subscribed to the Google Groups "3D Printer Tips, Tricks and Reviews" group.
To unsubscribe from this group and stop receiving emails from it, send an email to 3dprintertipstricksreviews+unsub...@googlegroups.com.
To post to this group, send email to 3dprintertipstricksreviews@googlegroups.com.

Brad Hopper
Ryan Carlyle
Jetguy
Jetguy
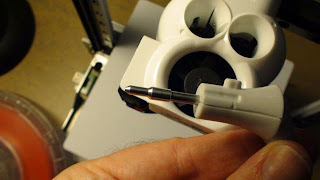
The pointed metal tab with the hole is what mounts this to the main plastic housing.
Installed here. The nozzles poke down into and seat into the tapered hole of the heater block from the topside.
An then the cover goes over that. It has an aluminum foil heat reflector.
And then the nozzle just pokes through
This fan on the topside is what is cooling the thermal barriers and the space around the heater blocks including the mounting point.
And the air exits out the sides of the head system here just above my thumb but they are all around the backside between the white and black parts too.
Here, you can see the center curved duct that blows the center fan right at the space above the the heater blocks.
With fan
The 2 side fans are mini blowers for cooling the print. Kind of hard to see but they are the slits below the round nozzle cap plate things and blow air directly at the nozzle tips.
Brad Hopper
On Sunday, January 4, 2015 9:24:21 PM UTC-5, Jetguy wrote:
Nozzle tips are pretty simple and 0.3mm diameter (guessing and testing say that is pretty close).....
Dan Newman
> Oh, thanks for the details, pretty interesting. Seems like a lot of extra
> work goes into trying to make the filament be *not* user supplied.
has a very low support cost for the manufacturer, then greatly restricting the filaments
used makes sense (provided that the filament is of good and consistent quality).
Dan
Jacob Russo
"I have to tell you I am blown away. Proper engineering went into this machine and when you see the pics I'm going to post later- I got my money's worth for under $1k"
Jetguy
http://www.3dsystech.com/
On Sunday, January 4, 2015 11:25:37 PM UTC-5, Jacob Russo wrote:
Yes, the idea of having a "controlled" environment prevents users from many of the sins of 3D printing. And their filament quality has been impressively consistent.1. It is extremely difficult to "bend" the filament in a way that would prevent it from loading. It just loads every single time. And the LCD guides you through the process. It is so easy that we end up changing filament types and colors often.2. As mentioned before, you get a fresh head with each cartridge.3. It intelligently detects if the bed should be Auto-Leveled and suggests Auto Leveling and Z-Gap adjustment. But both can be adjusted manually too.4. It knows what material (ABS/PLA) you have loaded and what colors.5. It will NOT allow printing with PLA if you have configured the print job as ABS, and vice versa.6. It will warn you if you have a different color filament loaded than the one the job was configured for.7. It automatically adds minimal infill if it detects that a "hollow" build will be impossible without it.8. The print bed lighting is superb with powerful LED's.9. The filament lasts a lot longer than they say it does. We've printed like crazy just to try to run out. And it takes a heck of a long time. This is mainly because there is very little waste.10. Firmware updates can be done extremely easily via WiFi or USB with a couple of touches on the LCD screen.11. Their WiFi works flawlessly every single time. Both the LCD and Cubify software show the print progress graphically.
Anyway, I could go on... but just be aware that this is a truly stellar machine both in design and functionality for people who just want to print. My partner and I were so excited with this machine we decided to resell the 3D Systems Cube and CubePro machines as www3DSysTech.com . As Jetguy said in his extremely honest and candid review;
Jacob Russo

Jay Raxter
Jetguy
Enginwiz
Jetguy
Jetguy
On Sunday, January 11, 2015 at 3:32:21 PM UTC-5, Jetguy wrote:
Jetguy


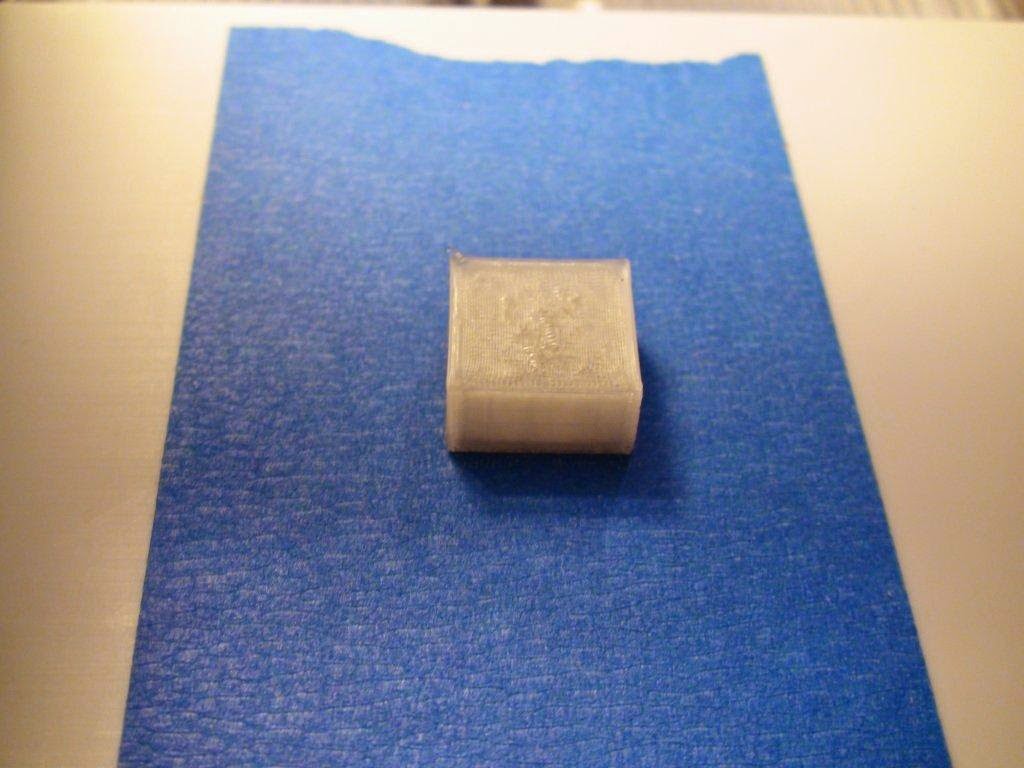
To give you a sense of scale to kind of justify the tiny artifacts and leftover support material marks here's the cube glue bottle next to it.


Ok, so the support material left some marks but remember at was scale and resolution is here 0.07mm layer height.


Jetguy
On Tuesday, February 3, 2015 at 6:32:12 AM UTC-5, Jetguy wrote:
Slacking lately so here's more of the show-n-tell. I went back to stock, not because I coun't make Sailfish work or a new controller work, it simply came down to form factor.
Yes, I could use external filament. Yes, you can use a stock cartridge in a way to feed external filament. The system does work. But, from a UI perspective, there isn't a touch LCD for MakerBot mightyboard. The mightyboard cannot fit into the frame with the covers on. It's a shame to cripple the optical assisted leveling and homing.So I put it all back stock (which honestly, was not that bad of an operation as I was extremely careful when I went doing the mods in the first place.No wires cut or anything,Folks were asking about 0.07mm fine layer height prints.WARNING NSFWAs Borat would say- Very Nice!!!!!
To give you a sense of scale to kind of justify the tiny artifacts and leftover support material marks here's the cube glue bottle next to it.
Ok, so the support material left some marks but remember at was scale and resolution is here 0.07mm layer height.
On Friday, January 16, 2015 at 12:25:36 AM UTC-5, Jetguy wrote:
TheMakerGuy
To give you a sense of scale to kind of justify the tiny artifacts and leftover support material marks here's the cube glue bottle next to it.
Ok, so the support material left some marks but remember at was scale and resolution is here 0.07mm layer height.
On Friday, January 16, 2015 at 12:25:36 AM UTC-5, Jetguy wrote:
To post to this group, send email to 3dprintertips...@googlegroups.com.
Jacob Russo
Jetguy
Jetguy
Ok, again lets say you want to print the amazing Toyota engine by Eric http://www.thingiverse.com/thing:644933 which is way cooler than anything I found thus far in Cubify content (we already went off about that rant).
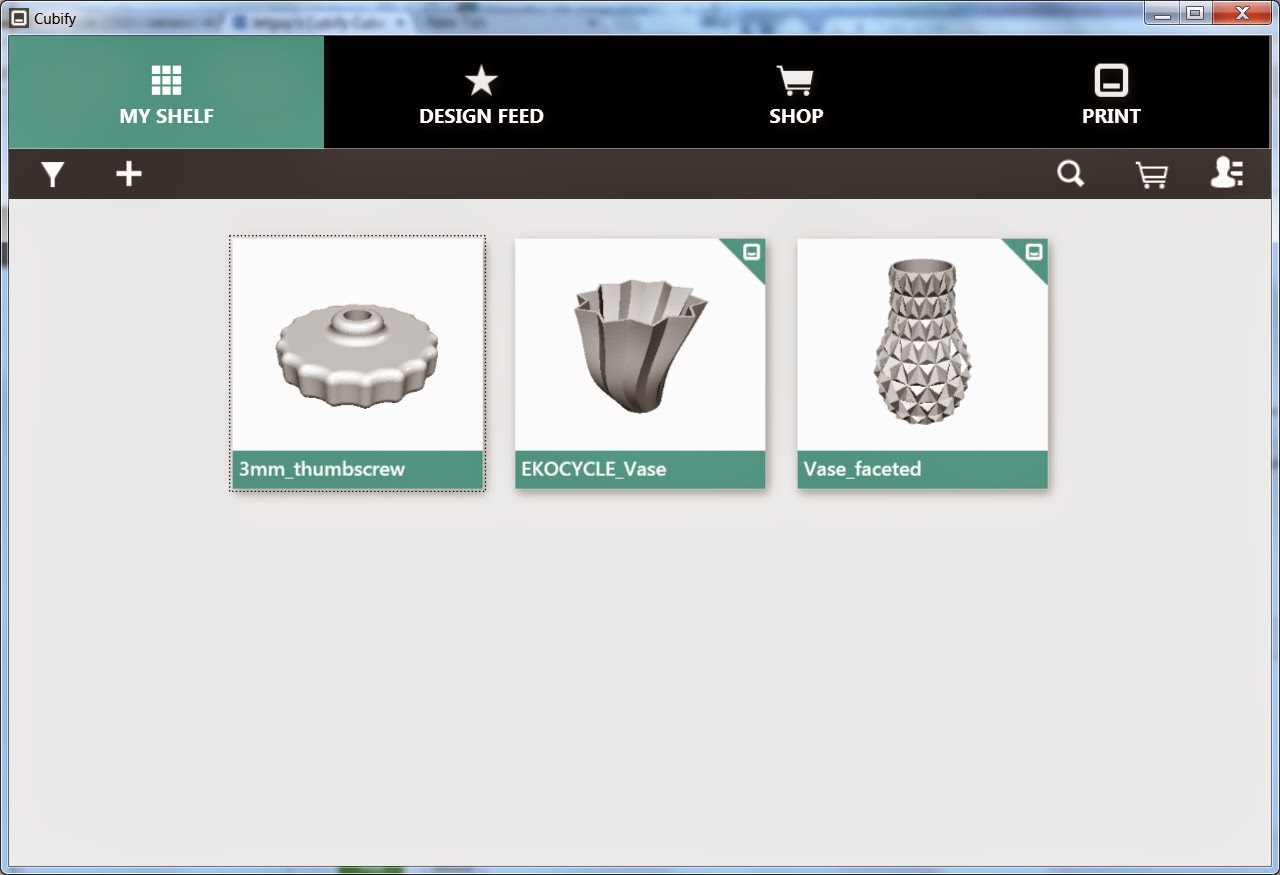
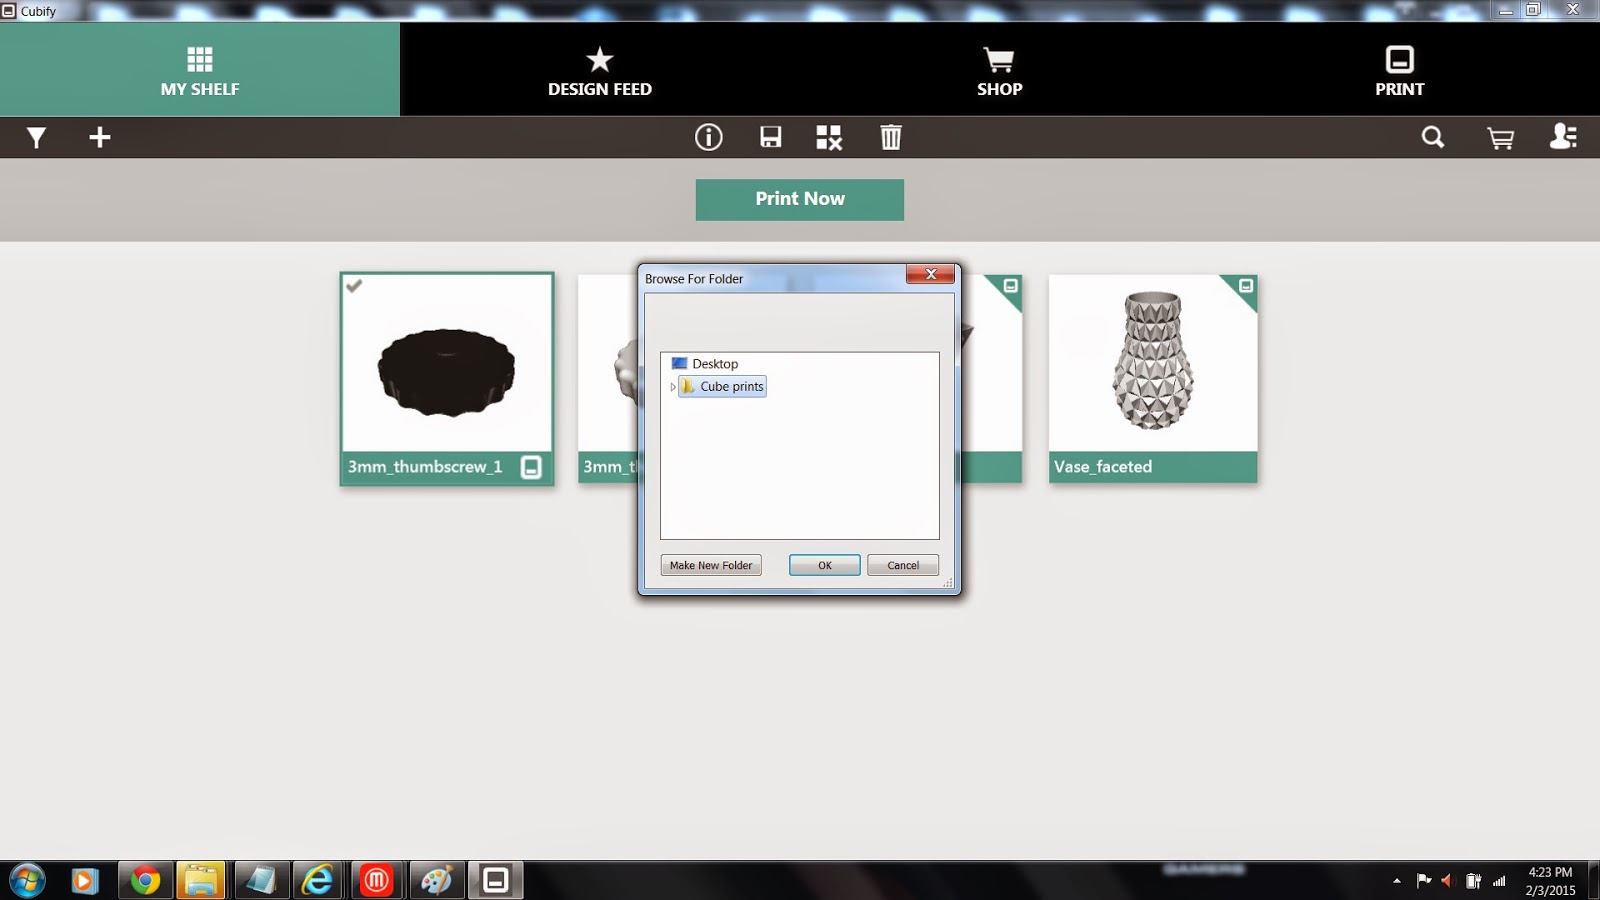
You download the whole zip folder and unzip to a folder somewhere for nice easy organization because there's a ton of parts. To print them, you have to add to the "My Shelf" but before you do that, again remember that there's a ton of parts here. You might have some files in "My shelf" from a previous project. So you want to sort or organize your shelf. I see now way to make a folder or organize My shelf other than simply not showing print files or STLS or sort by date or somehow by name.
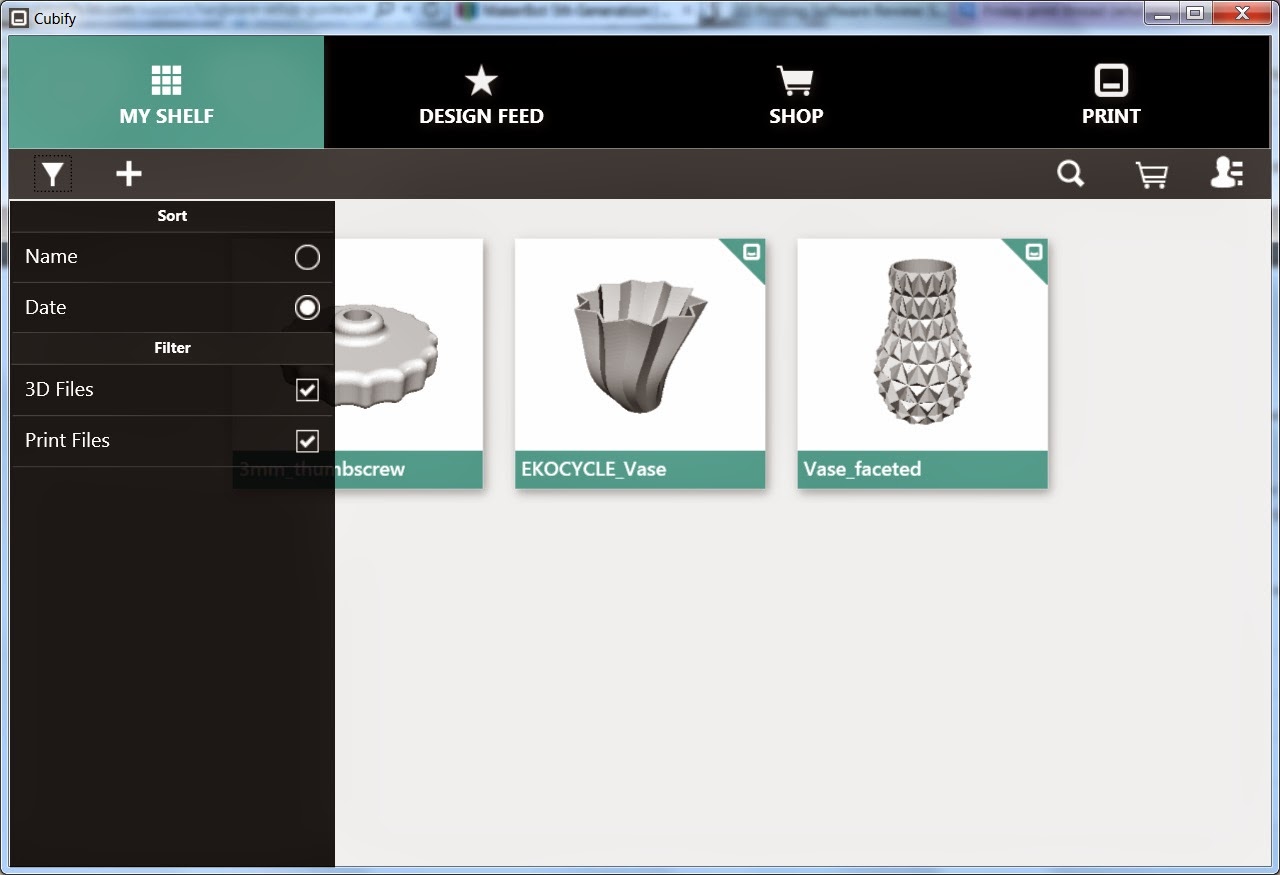
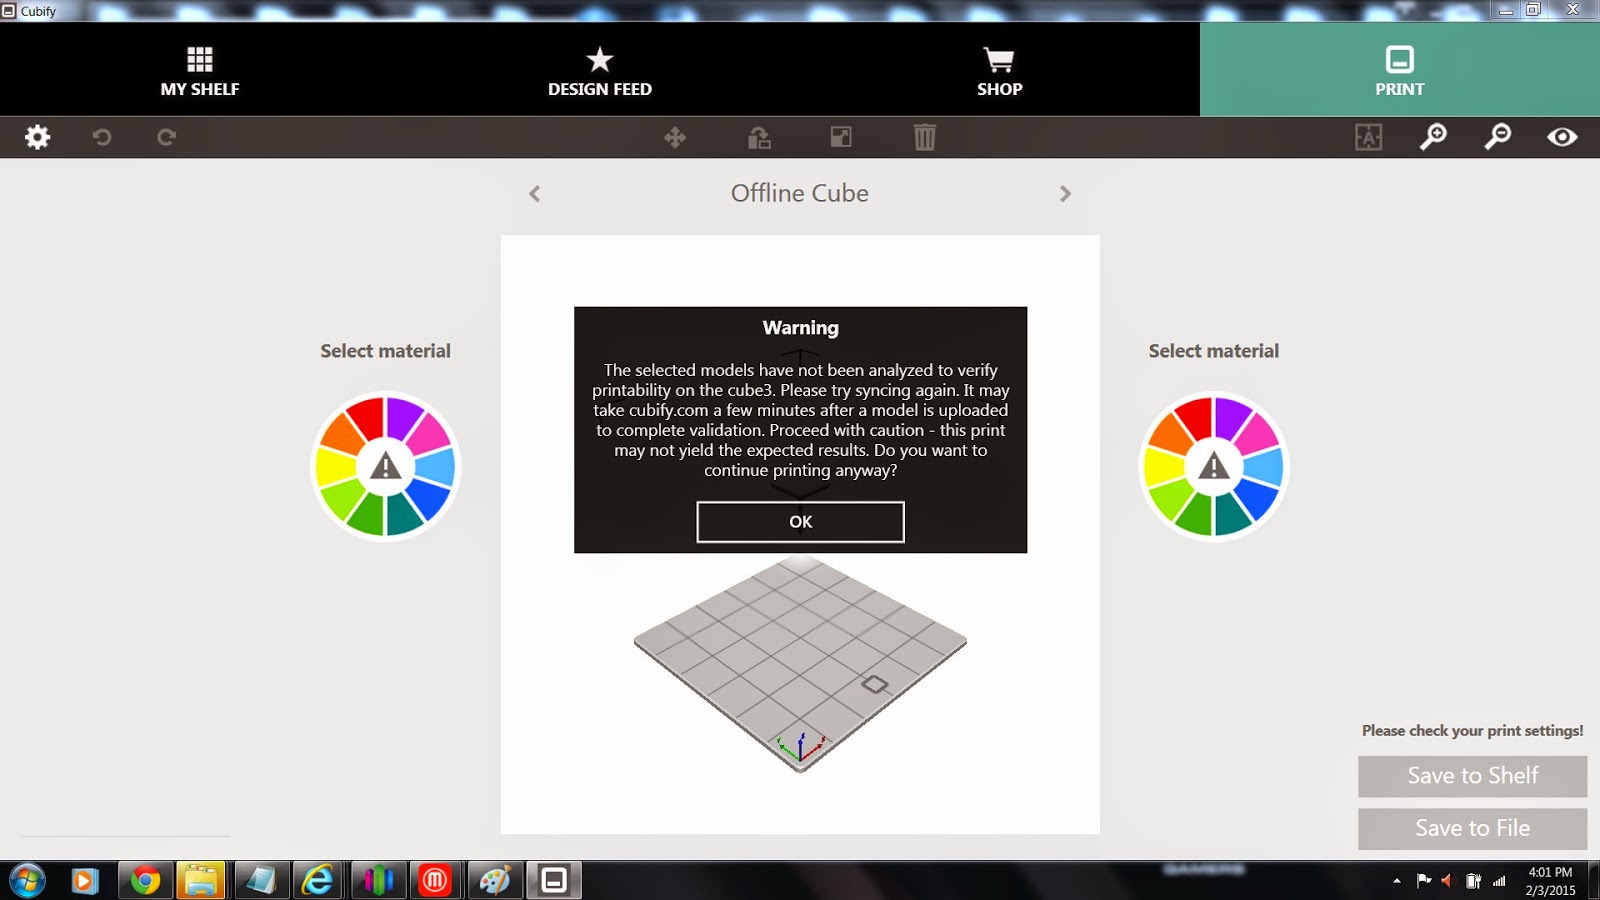
So then you might be asking yourself-OK, so now I have files, how to I print??
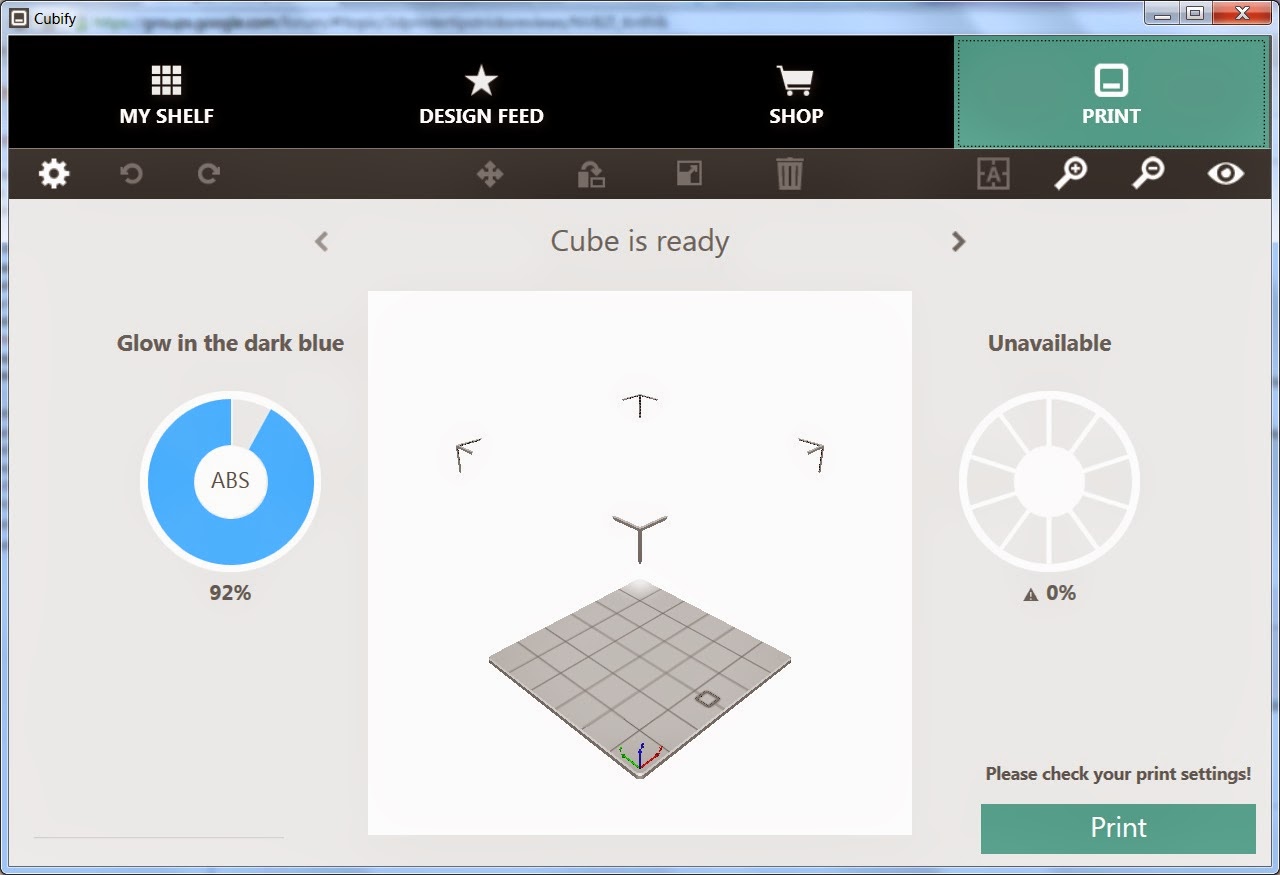
So you might think you click on the big print tab at the top---- WRONG!!!
If you do that, you get this if your printer was ever connected over Wifi, it connects now as long as it's on.
Nowhere on this screen can you import or open an STL or other print file. You can see status, you see the cartridges and my favorite the constant warning of "Please check your print settings!"
Remember, we are doing ANYTHING right now. We simply clicked on this screen and it's sceeming at me please check my print settings.
Worse, let's say it's the first time and your printer isn't connected yet.

Well, based on other factors, believe it or not, you want to be at this screen??? Why? because otherwise, if it's connected over Wifi even one time and the printer is on, you are going to not have these advanced offline save options.
Back to workflow complete opposite of any sense I can figure out, you go back to "My Shelf " tab..
Here, if you click on a file, then and ONLY then does the Print Now button appear. Like i said before, that misleading too- that doesn't YET start the print, it simply adds the STL to the print window.

So you click Print Now and you are teleported back to the print tab.
You then get this massive warning that the STL file hasn't been checked and validated. Also notice the ever present "Please check your print settings!"
So you click past that and can pick you materials and colors. Now keep inn mind, You can pick colors and if you don't have that color loaded in the printer, it gives you this BIG warning error but you can still maybe print it.
However, if you have the wrong material, ABS VS PLA, or somehow you have the Ekocycle printer selected and choose PET, then it will not print that file unless that plastic is loaded on that side of the printer.
Jetguy
Jacob Russo
Jetguy
Jacob Russo

lassi_kinnunen
lassi_kinnunen
Jetguy
Jetguy
Jacob Russo
Jetguy
Jacob Russo

Richard Beck
1. CubePro single, dual, or trio? Which do each of you have?
2. I am dealing with two dead rep 2s right now and an original rep dual that runs into cracking on blocky prints but ironically has been more reliable Than the rep 2s. I am thinking of selling two of these or possibly all three and getting a cube pro trio. Yes or no?
3. I sat with someone as they used the software today, seems pretty straightforward, but does not give you as much freedom to set shells and fill % as stock Makerware. Is that right?
4. I saw mentions of complaints about loading things to the CubifySupport cloud and the "shelf" and the negatives of that. However, in watching cover this persons shoulder, it looked like they could have their files organized how they wanted to, or is this only before you prepare the build file? It also looked like their files sliced in the cube software could be kept where they wanted them, in their case I saw them on a network drive.
Last question between usability and output, is the CubePro, better, same, or worse than stock replicator with Makerware?
Sorry for the basics, but if some real users like you could answer, it would be greatly appreciated.