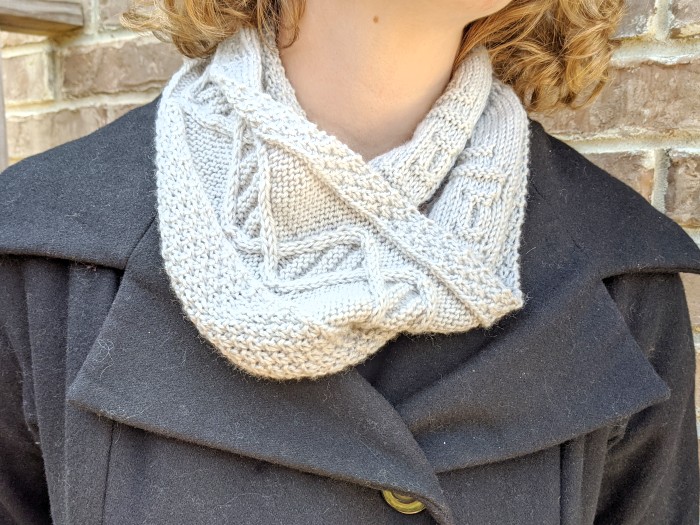
Circular DNA Genetics Scarf
What can I say? I’m still a scientist at heart, and I love DNA cable-knitting.
This is definitely not the first DNA cable-knitting I’ve done, but it is the first time I’ve made my own pattern with it, as well as the first time I’ve ever attempted a provisional cast-on or such an interesting graft. I am ecstatic with how it turned out.
For a clean, ad free, fluff free, printable PDF version of the pattern, it is available in my Etsy Shop for a small fee, I greatly appreciate your support!

Supplies:
- 4mm knitting needles
- Yarn needle
- Stitch markers (at least two)
- (Optional) row counter ring
(it was a lifesaver for me with this project)
Yarn:
- Baby Bee – Sweet Delight – Light weight (3)
- Colorway: Flannel
- ~330 meters
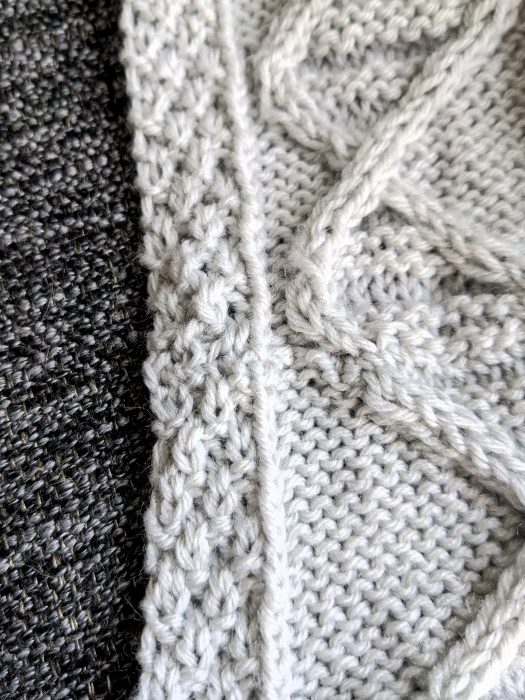
The cable pattern is a modification of this DNA Scarf Pattern, with changes to the borders as well as the casting on and grafting for the circular nature. As well as minor changes to the start and finish of the cable.
Design elements:
This pattern consists of an edging stitch, a large section of moss stitch, a border edging stitch, a cable section, a border edging stitch, a small section of moss stitch, and a final edging stitch. I’ve found that this assists in keeping the edges from curling or flaring, as well as giving nice, asymmetrical regions of cleanly separated texture.
Directions:
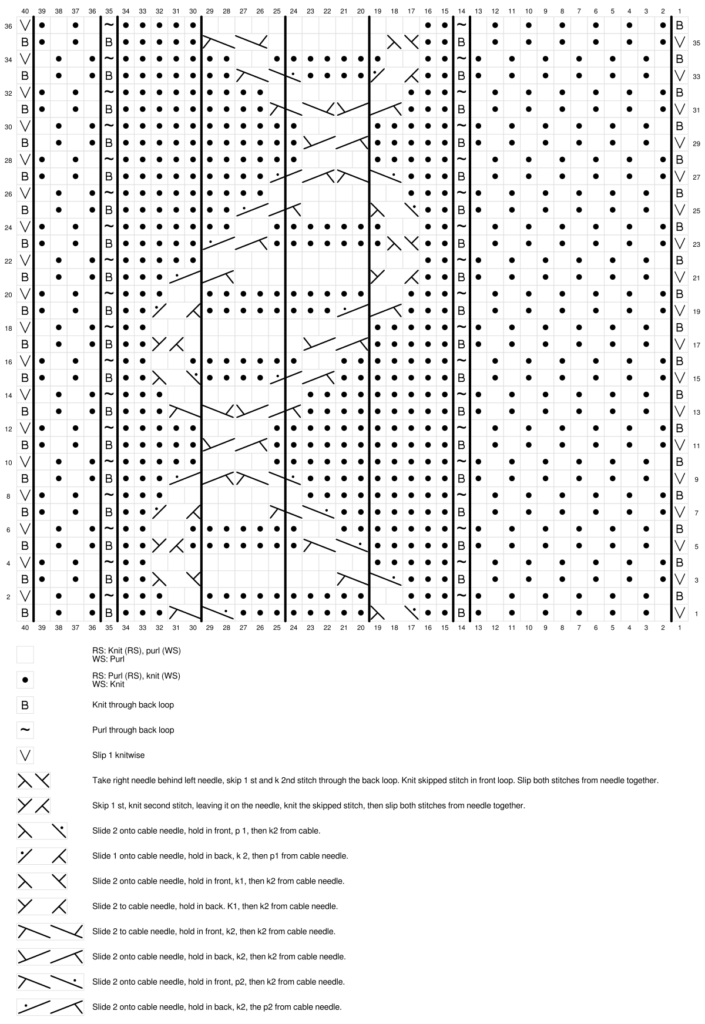
Cast on 40 stitches using a provisional cast on. Place stitch markers after stitch 14, and stitch 34.
Follow the cable chart below for 9 repeats (or enough to comfortably and loosely wrap the scarf around your neck twice), worked flat, be sure to finish a full repeat of the pattern for the graft to mesh nicely.
Once you are satisfied with the length, carefully transfer the provisional cast on to a knitting needle, orienting so that the WS sides of the piece are facing each other. Use the kitchener stitch to graft the pieces together.
(NOTE: I used a traditional, knitwise kitchener stitch for the moss stitch sections as well as the cables and space in between them. By inverting the work (switching the piece without dropping any stitches, so that the RS sides of the work are facing each other) you can continue the kitchener stitch purlwise for the brief sections in between the cables and edging, switching back for the other sections of the piece.)


Oven Baked Hot Wings

4 Comments
Carol erickson
I am trying to decipher the instructions in row 5 of the circular dna scarf knitting pattern: (skip1 st, knit second stitch, leaving it on the needle, knit the skipped stitch, then slip both stitches from needle together). I cannot figure out how to do this. Please send me a video or better instructions. Thank you.
Angela
Hello Carol,
Great question, it is kind of an odd knitting pattern and the stitches get a little on top of one another. In response to this question I’ve uploaded my first ever YouTube video with a quick tutorial on how to stitch it. Please forgive the quality, I’m new to shooting knitting videos, but I hope that it helps!
https://www.youtube.com/watch?v=vim1rc1VwBg
-Angela
Rachel Sharratt
Hi,
Thanks so much for this, I’m really enjoying the pattern so far. Quick question about the fifth instruction from the bottom:
Slide 1 to cable needle, hold on back K2,then K2 from cable needle.
How does that work, do I need to slide 2 to start rather than 1?
Thanks
Rachel
Angela
Oh my gosh, great catch!
That *should* read “Slide 2 to cable needle, hold in back. K1, then k2 from cable needle.”
I’ve updated the pattern to show this in the key.