A Step-by-Step Guide to Integrating Sarufi with AzamPay


In this article, you're going to learn how to add payment integration to your chatbot using AzamPay which enables businesses to accept payments through popular Mobile Money services like TigoPesa, AirtelMoney, and Halopesa, as well as banks such as NMB and CRDB. Get ready to learn how to seamlessly incorporate these payment options into your chatbot. Let's begin!
What do you need to follow through this article?
- Sarufi Account and its API Keys
- AzamPay Developer Account and API Keys
- Sarufi Python package and AzamPay Python Package
- A Replit Account
The Article assumes previous experience with the sarufi platform If you're new you can take a look at the documentation or this video tutorial.
Let's get started
We are going to use an available example in the official sarufi documentation of a pizza-ordering chatbot, If you've tinkered with Sarufi before, you know there are two ways to develop your chatbots: the SDK route or the laid-back No Code Sarufi Builder option. Whichever path you prefer, we've got you covered. So grab a slice of pizza and let's embark on this journey of chatbot integration with AzamPay payment gateway.
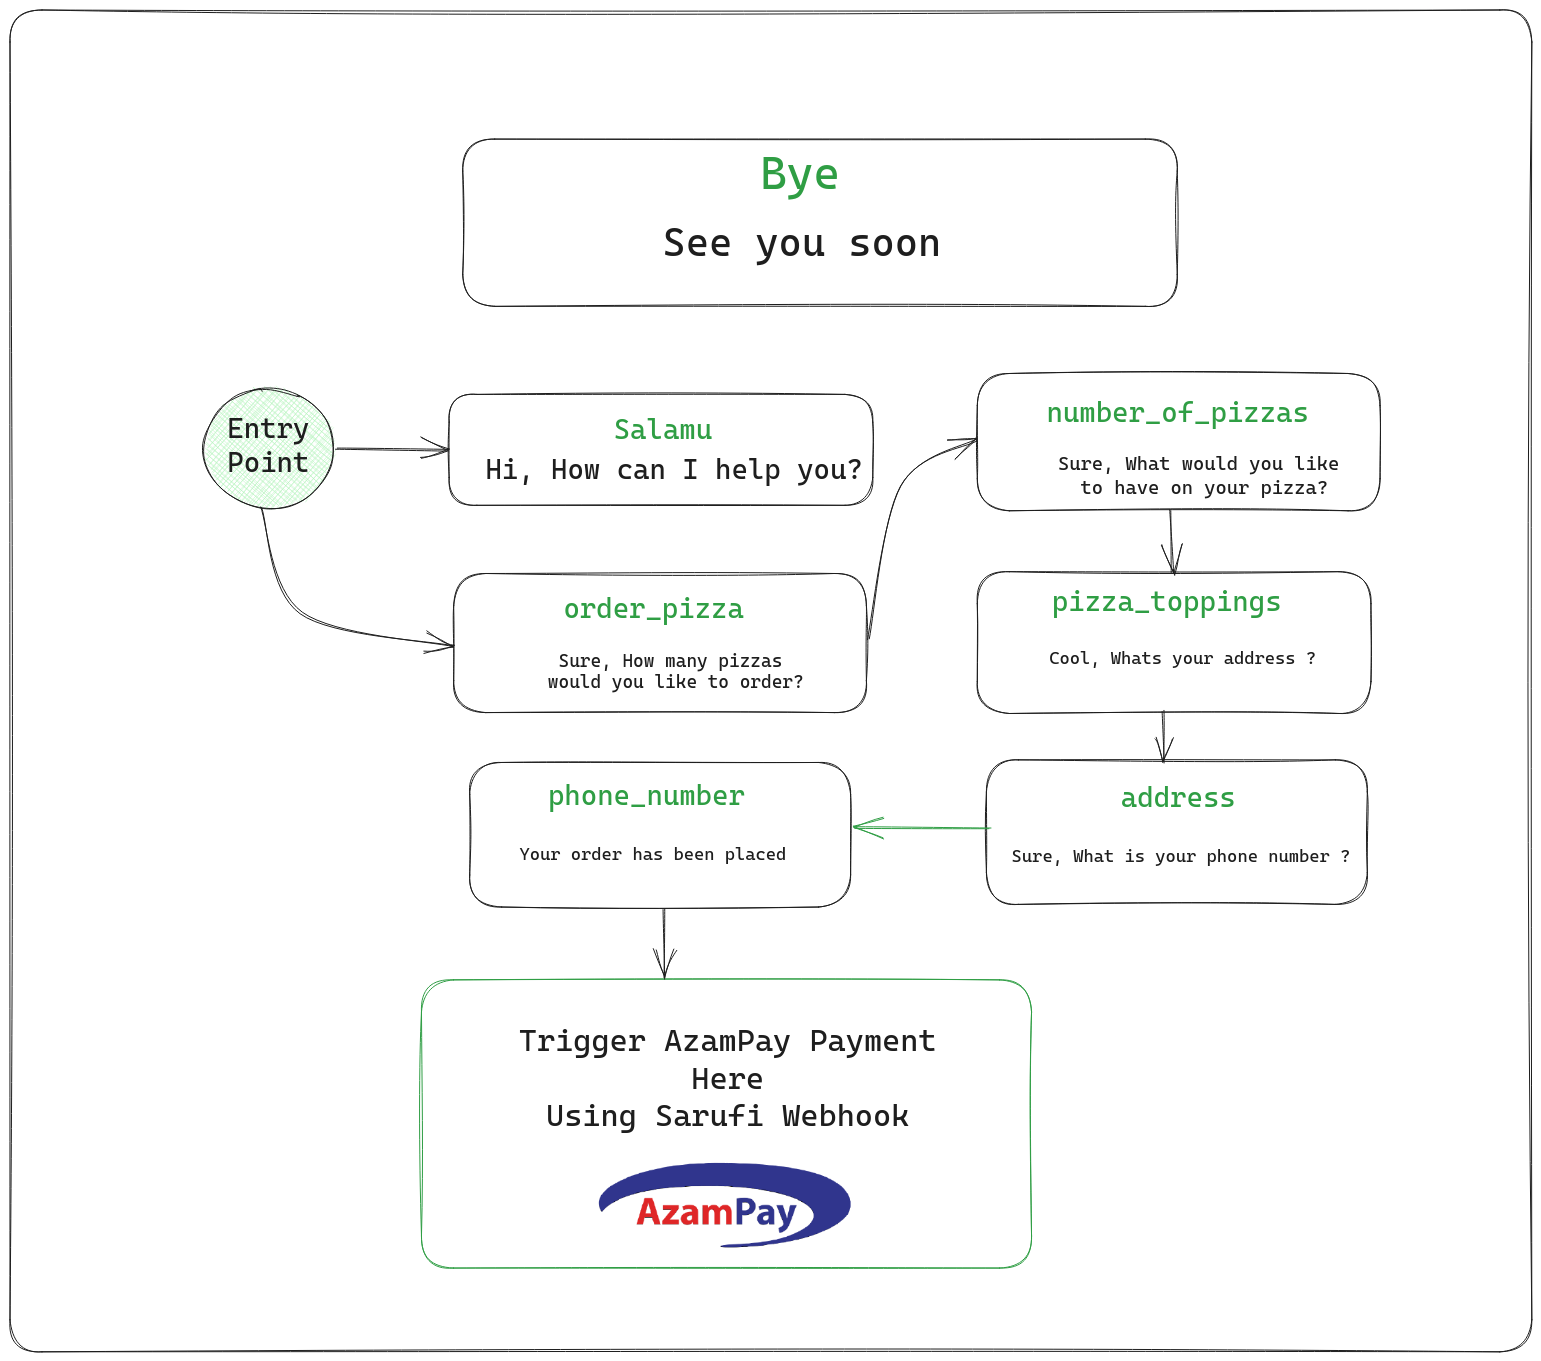
Here is an architecture of what you're going to learn how to build throughout the article;
Hardcore SDK geeks
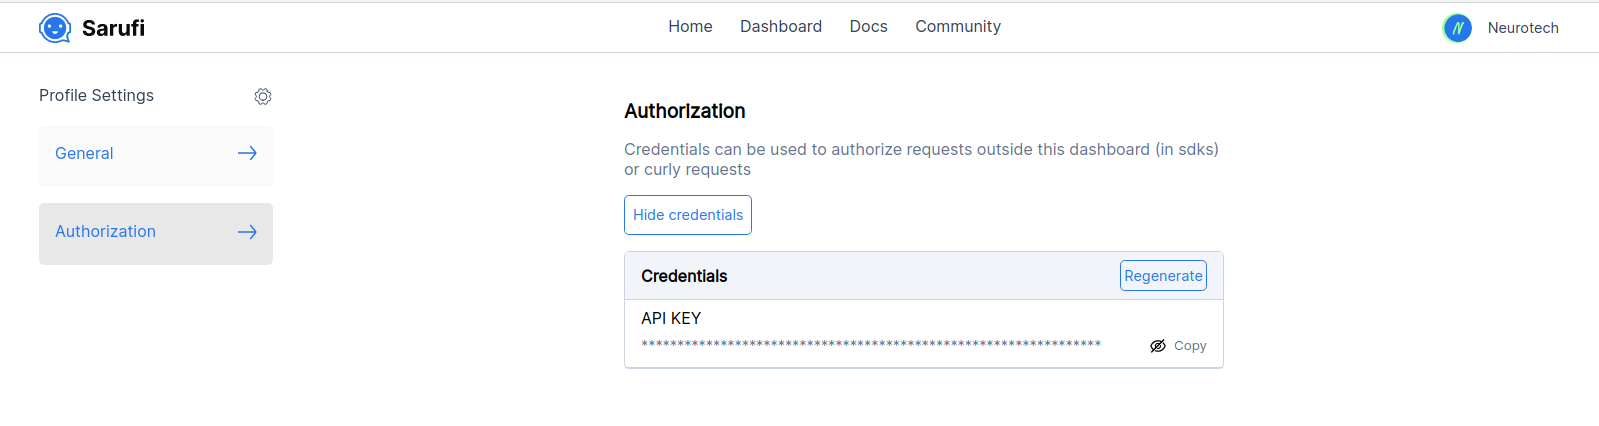
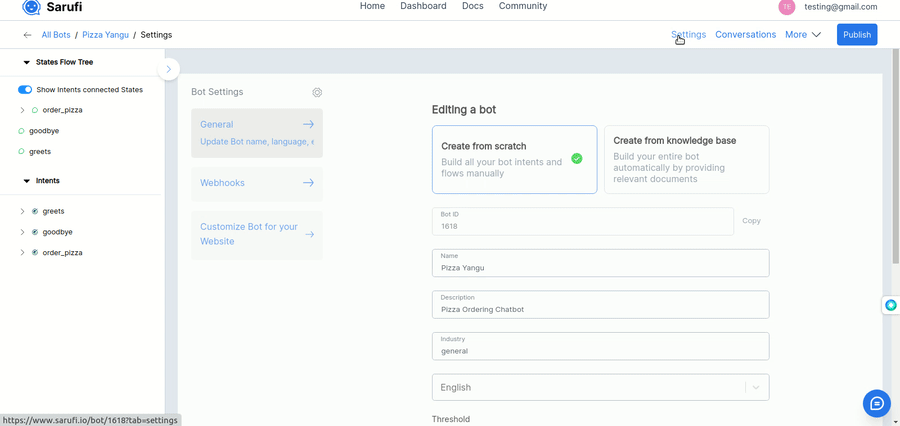
For the hardcore SDK geeks who prefer YAML/JSON over No-code builder, you will need to have Sarufi API Key which you can find on your dashboard ==> Profile ==> Authorization.
And then have the Sarufi SDK installed on your machine, you can easily through a pip command;
$ pip install --upgrade sarufiNow you can just copy-paste the following code to create your chatbot with the necessary flow
from sarufi import Sarufi

sarufi = Sarufi(api_key='your API KEY')
chatbot = sarufi.create_bot(name="Pizza Yangu", description="Pizza Ordering Chatbot")

# We assign intents attribute a dict with intent name and intents dict {<intent name>: [list of all related keywords to trigger the intent]}
chatbot.intents = {
    'greets': ['hey', 'hello', 'hi', 'howdy', 'hola', 'greetings', 'good morning', 'good afternoon', 'good evening'],
    'goodbye': ['bye', 'goodbye', 'see you later', 'see you soon', 'see you', 'talk to you later', 'talk to you soon', 'talk to you'],
    'order_pizza': ['I need a pizza', 'I want a pizza', 'order a pizza', 'I want to order a pizza']
}

chatbot.flow = {
    'greets': {
        'message': ['Hi, How can I help you?'],
        'next_state': 'end'
    },
    'order_pizza': {
        'message': ['Sure, How many pizzas would you like to order?'],
        'next_state': 'number_of_pizzas'
    },
    'number_of_pizzas': {
        'message': ['Sure, What would you like to have on your pizza?'],
        'next_state': 'pizza_toppings'
    },
    'pizza_toppings': {
        'message': ['Cool, What\'s your address?'],
        'next_state': 'address'
    },
    'address': {
        'message': ['Sure, What is your phone number?'],
        'next_state': 'phone_number'
    },
    'phone_number': {
        'message': ['Your order has been placed.', 'Thank you for ordering with us.'],
        'next_state': 'end'
    },
    'goodbye': {
        'message': ['Bye', 'See you soon'],
        'next_state': 'end'
    }
}
You can fork this code on Replit and run it in just one click.
Using Sarufi No-Code Builder
For those preferring a no-code interface, You can easily do this through Dashboard as shown in the video below;
How does Webhook work with Sarufi?
Webhook is simply an API endpoint that will be triggered by Sarufi when a certain event occurs, in our case the main event that will be triggering webhook is at the end of the execution of the intent-based conversation, The end of the conversation will be determined if the next state is equal to end.
Intent-based conversation? If you used Dashabord before you might have noticed that in Sarufi we have two kinds of state components; those which can be triggered directly by intents (intent-connected states) and dependant states; these are states which cannot be triggered directly by intent but they're triggered by a parent intent connected state or another dependant state.
It's not rocket science so don't overthink it, to break it further down, Let's use a simple chatbot we have just created to solidify our understanding, In the case of the pizza bot here will be the breakdown of the states;
| State Name | State Type |
|---|---|
| greets | Intent-Connected |
| order_pizza | Intent-Connected |
| number_of_pizzas | Dependent-State |
| pizza_toppings | Dependent-State |
| address | Dependent-State |
| phone_number | Dependent-State |
| goodbye | Intent-Connected |
Now that we know what Intent-Connected states are, Intent-based based conversations are conversations based on those states, for instance, in the case of our pizza but we have 3 complete conversations as shown below;
Complete Conversations:
-
greets -> end
- Bot: Hi, How can I help you?
-
order_pizza -> number_of_pizzas -> pizza_toppings -> address -> phone_number -> end
- Bot: Sure, How many pizzas would you like to order?
- User: [User input]
- Bot: Sure, What would you like to have on your pizza?
- User: [User input]
- Bot: Cool, What's your address?
- User: [User input]
- Bot: Sure, What is your phone number?
- User: [User input]
- Bot: Your order has been placed. Thank you for ordering with us.
-
goodbye -> end
- Bot: Bye
-
...
Almost done, Now you can trigger webhook action at the end of any of these intent-based conversations, all you have to do is add the parent intent-connected state as a trigger, you can easily do this through the dashboard.
Bot Settings==>Webhooks.
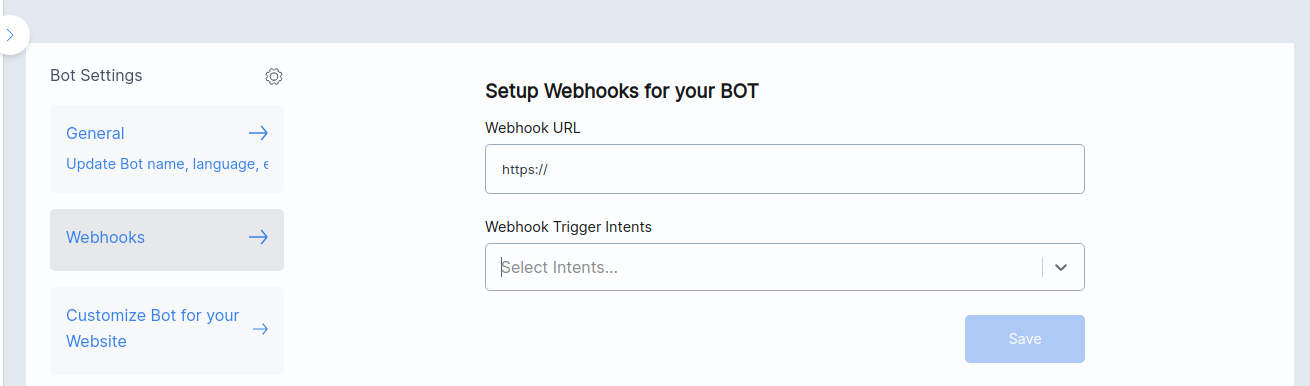
But before you do it you first need to add your Webhook URL and add tags of trigger intent connected states.
What does Webhook actually do?
The main purpose of webhook is to allow you to share your bot data with external third-party applications for a variety of reasons, in our case we will need to share pizza order data from the user to our webhook and then the webhook can use the data to initiate payment action through AzamPay.
The data will be sent to webhook as a POST request with JSON data which is actually the real data from the conversation, using state names as keys and conversation data as values
Let's make a very simple webhook using Flask on Replit
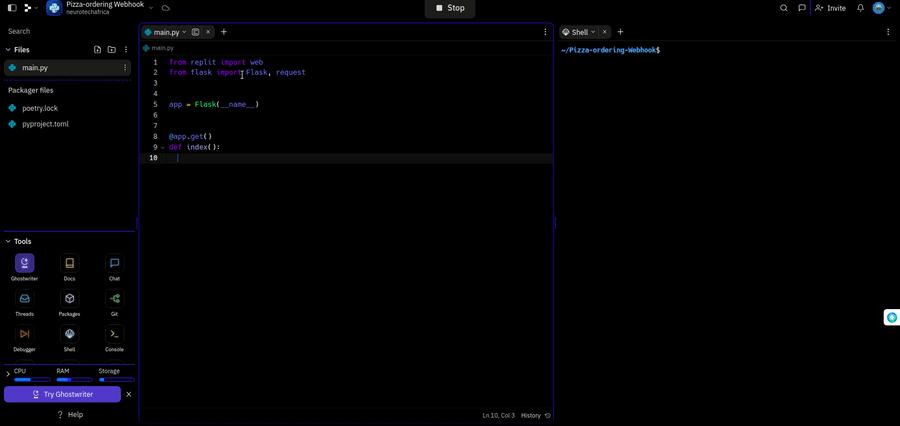
Here is the source code;
from replit import web
from flask import Flask, request


app = Flask(__name__)


@app.get('/')
def index():
  return {'response': "Am alive"}

@app.post('/')
def webhook():
  data = request.get_json()
  print(data)
  return {"response": "Yet alive"}


web.run(app)
Now Let's finalize the webhook to see if everything is working properly before we link it with AzamPay, Here is a short overview of my interaction with my webhook;
Integrating with AzamPay
Now that we are sure that the webhook is working properly as expected we can finalize the last part which is doing the actual payment through the AzamPay Python package, If you noticed on the received JSON object from Sarufi looks like this, As we can see we have a customer phone number as part of the response which we now use to initiate a payment, Let's assume every pizza cost 5000Tsh therefore total prize for the order will be a number of pizza times that amount.
{
   "order_pizza":"order pizza",
   "number_of_pizzas":"2",
   "pizza_toppings":"tomato",
   "address":"Binary",
   "phone_number":"0738394394",
   "chat_id":"1686216396534",
   "bot_id":1618
}
How does AzamPay package work?
You will need to have an AzamPay developer account and when you log in to your dashboard ==> Register an App. You will be able to see your app name, client_id, client_secret, and X-API key. These are what we really need to initiate a payment to the customer's mobile.

Here is how you initiate a payment using the Azampay package, we can adopt the same approach to our webhook.
>>> from azampay import Azampay
>>> azampay = Azampay(app_name='<app_name>', client_id='<client_id>', client_secret='<client_secret>', x_api_key='<x_api_key>', sandbox=True)
>>> checkout_response = azampay.mobile_checkout(amount=100, mobile='<mobile>', external_id='<external_id>', provider='<provider>')Referring to the above on how integration is done, Let's now upgrade our webhook code, please note we will have to run on the sandbox environment which we can test if the code would work on the real environment but you won't any USSD push. Here is the updated webhook code.
import os
import uuid
from replit import web
from azampay import Azampay
from flask import Flask, request

# Create Flask application
app = Flask(__name__)

# Initializing AzamPay
azampay = Azampay(
    app_name=os.environ["app_name"],
    client_id=os.environ["client_id"],
    client_secret=os.environ["client_secret"],
    x_api_key=os.environ["x_api_key"],
    sandbox=True,
)

@app.get('/')
def index():
    # Return a response indicating the application is alive
    return {'response': "Am alive"}

@app.post('/')
def webhook():
    # Retrieve JSON data from the request
    data = request.get_json()
    print(data)

    # Extract relevant data from the JSON payload
    no_pizza = data.get('number_of_pizzas')
    mobile = data.get('phone_number')
    total_price = 5000 * int(no_pizza)

    # Initiating a Payment with AzamPay
    checkout_response = azampay.mobile_checkout(
        amount=total_price,
        mobile=mobile,
        external_id=str(uuid.uuid4()),
    )
    print(checkout_response)

    # Return a response indicating the application is alive
    return {"response": "Yet alive"}

# Run the Flask application
web.run(app)
You can fork the entire implementation on Replit through this link Pizza Ordering Chatbot Webhook.
👴🏻 Let's now test the final implementation
If you managed to follow through the article to this part, you should congratulate yourself, It's like the steep hiking but the view is worth it, let's see now everything we have built so far in action and work as done. User chat with Chatbot ==> Sarufi Triggers Webhook ==> Webhook Initiate Payment.
Here everything is in action.

We have reached the end of the article, Thank you for reading through to the end, You can catch up with me on Twitter, I will be writing consistently on this blog whenever I have a chance so Keep an eye. Cheers