An axillary temperature is taken with an oral thermometer, not a rectal thermometer.
Normally, axillary temperature is taken with a glass thermometer rather than an electric thermometer. Use the following procedures to take a patient’s axillary temperature with a glass thermometer.
a. Wash Hands.
Perform a patient care hand wash.
b. Gather Materials.
You will need the following:
(1) Thermometer tray with oral glass thermometers. (Use pear-shaped tip or stubby tip thermometers only since the long tip bulb could injure the patient’s skin.)
(2) Gauze pads.
(3) Watch or clock (preferably with a second hand).
(4) Pencil or pen.
(5) Form, note pad, or other writing material.
c. Verify That the Axillary Route Should Be Used.
You should take the patient’s temperature using the axillary (under arm) route if either of the following situations applies.
(1) The physician or nurse orders that the temperature be taken using the axillary route.
(2) Both the oral and rectal routes are contraindicated (paragraphs 2-17b and 2-20b).
d. Verify the Patient’s Identity.
Make sure that you are taking the temperature of the proper patient.
e. Position Patient.
Tell the patient that you are going to take his temperature. Help the patient arrange his clothing so that his axillary area is fully exposed (remove one arm from pajama tops or from gown, and so forth). When practical, have the patient lie on his back. (Having the patient lie on his back will greatly reduce the danger of the thermometer dropping onto the floor.)
f. Examine Thermometer.
Pick up one of the thermometers from the “clean” container on the thermometer tray. Make sure that it is a pear-shaped or stubby-tipped oral thermometer. Read the thermometer. Shake down the thermometer before using, if the reading on the thermometer is 94.0º F or above,
g. Position Thermometer.
(1) Have the patient raise his arm so that the underarm area is fully exposed. You may need to assist the patient by supporting his arm.
(2) Pat the patient’s underarm with gauze pads in order to dry the area. Excessive moisture will cool the skin and could result in an inaccurate temperature reading. Be sure to pat the area dry rather than rubbing the area. Rubbing the axillary area could cause an inaccurate reading due to the heat caused by friction (rubbing).
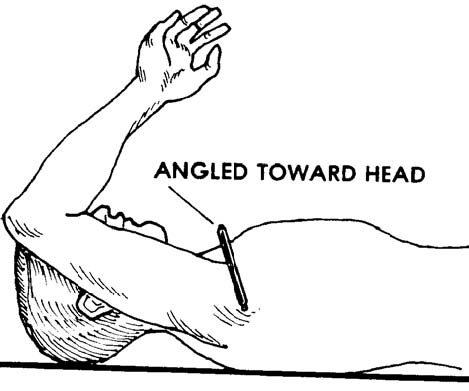
(3) Place the bulb of the thermometer in the center of the axilla. Angle the thermometer so that the stem is pointed up and in the direction of the patient’s head (figure 2-14).
(4) Have the patient bring his arm down so that his upper arm is against the side of his chest and his forearm and hand lie across the top of his chest (figure 2-15). Having the upper arm against the side of the chest forces the air out of the axillary area. Air in the axillary area can cool the area and result in a lower temperature reading. The arm position also secures the thermometer and keeps the bulb in the center of the axilla.


h. Wait Ten Minutes.
Leave the thermometer in place for at least ten minutes in order to obtain an accurate temperature reading. If the patient is capable of keeping the thermometer in place without your assistance, you may use this time to do other tasks such as taking his pulse and breathing rates.
i. Remove Thermometer.
(1) Tell the patient that you are going to remove the thermometer. As you talk to the patient, grasp the stem end of the thermometer with thumb and fingers of one hand. (Grasping the thermometer keeps the thermometer from falling if he moves his arm before you are ready.)
(2) Use your free hand to lift the patient’s elbow so that his upper arm is no longer resting against his chest.
(3) Remove the thermometer from the axillary.
j. Wipe Thermometer.
Wipe the thermometer with a gauze pad. Begin near the stem end and wipe toward the bulb with one downward motion.
k. Read and Record Temperature.
Read the thermometer to the nearest 0.2º F (or nearest 0.1º C). Then record the temperature on the form or paper. Write a circled “A” above the temperature reading to indicate that it is axillary temperature rather than an oral temperature.
l. Place Thermometer in “Used” Container.
Place the thermometer into the “used” container on the thermometer tray. The thermometer must be decontaminated before it can be used again.
m. Wash Hands.
Perform another patient care hand wash.
