
IC 63 - “The Ghost of Cassiopeia” in LHaRGB, ~10 hours
Date: November 30, 2021
Cosgrove’s Cosmos Catalog ➤ #0089
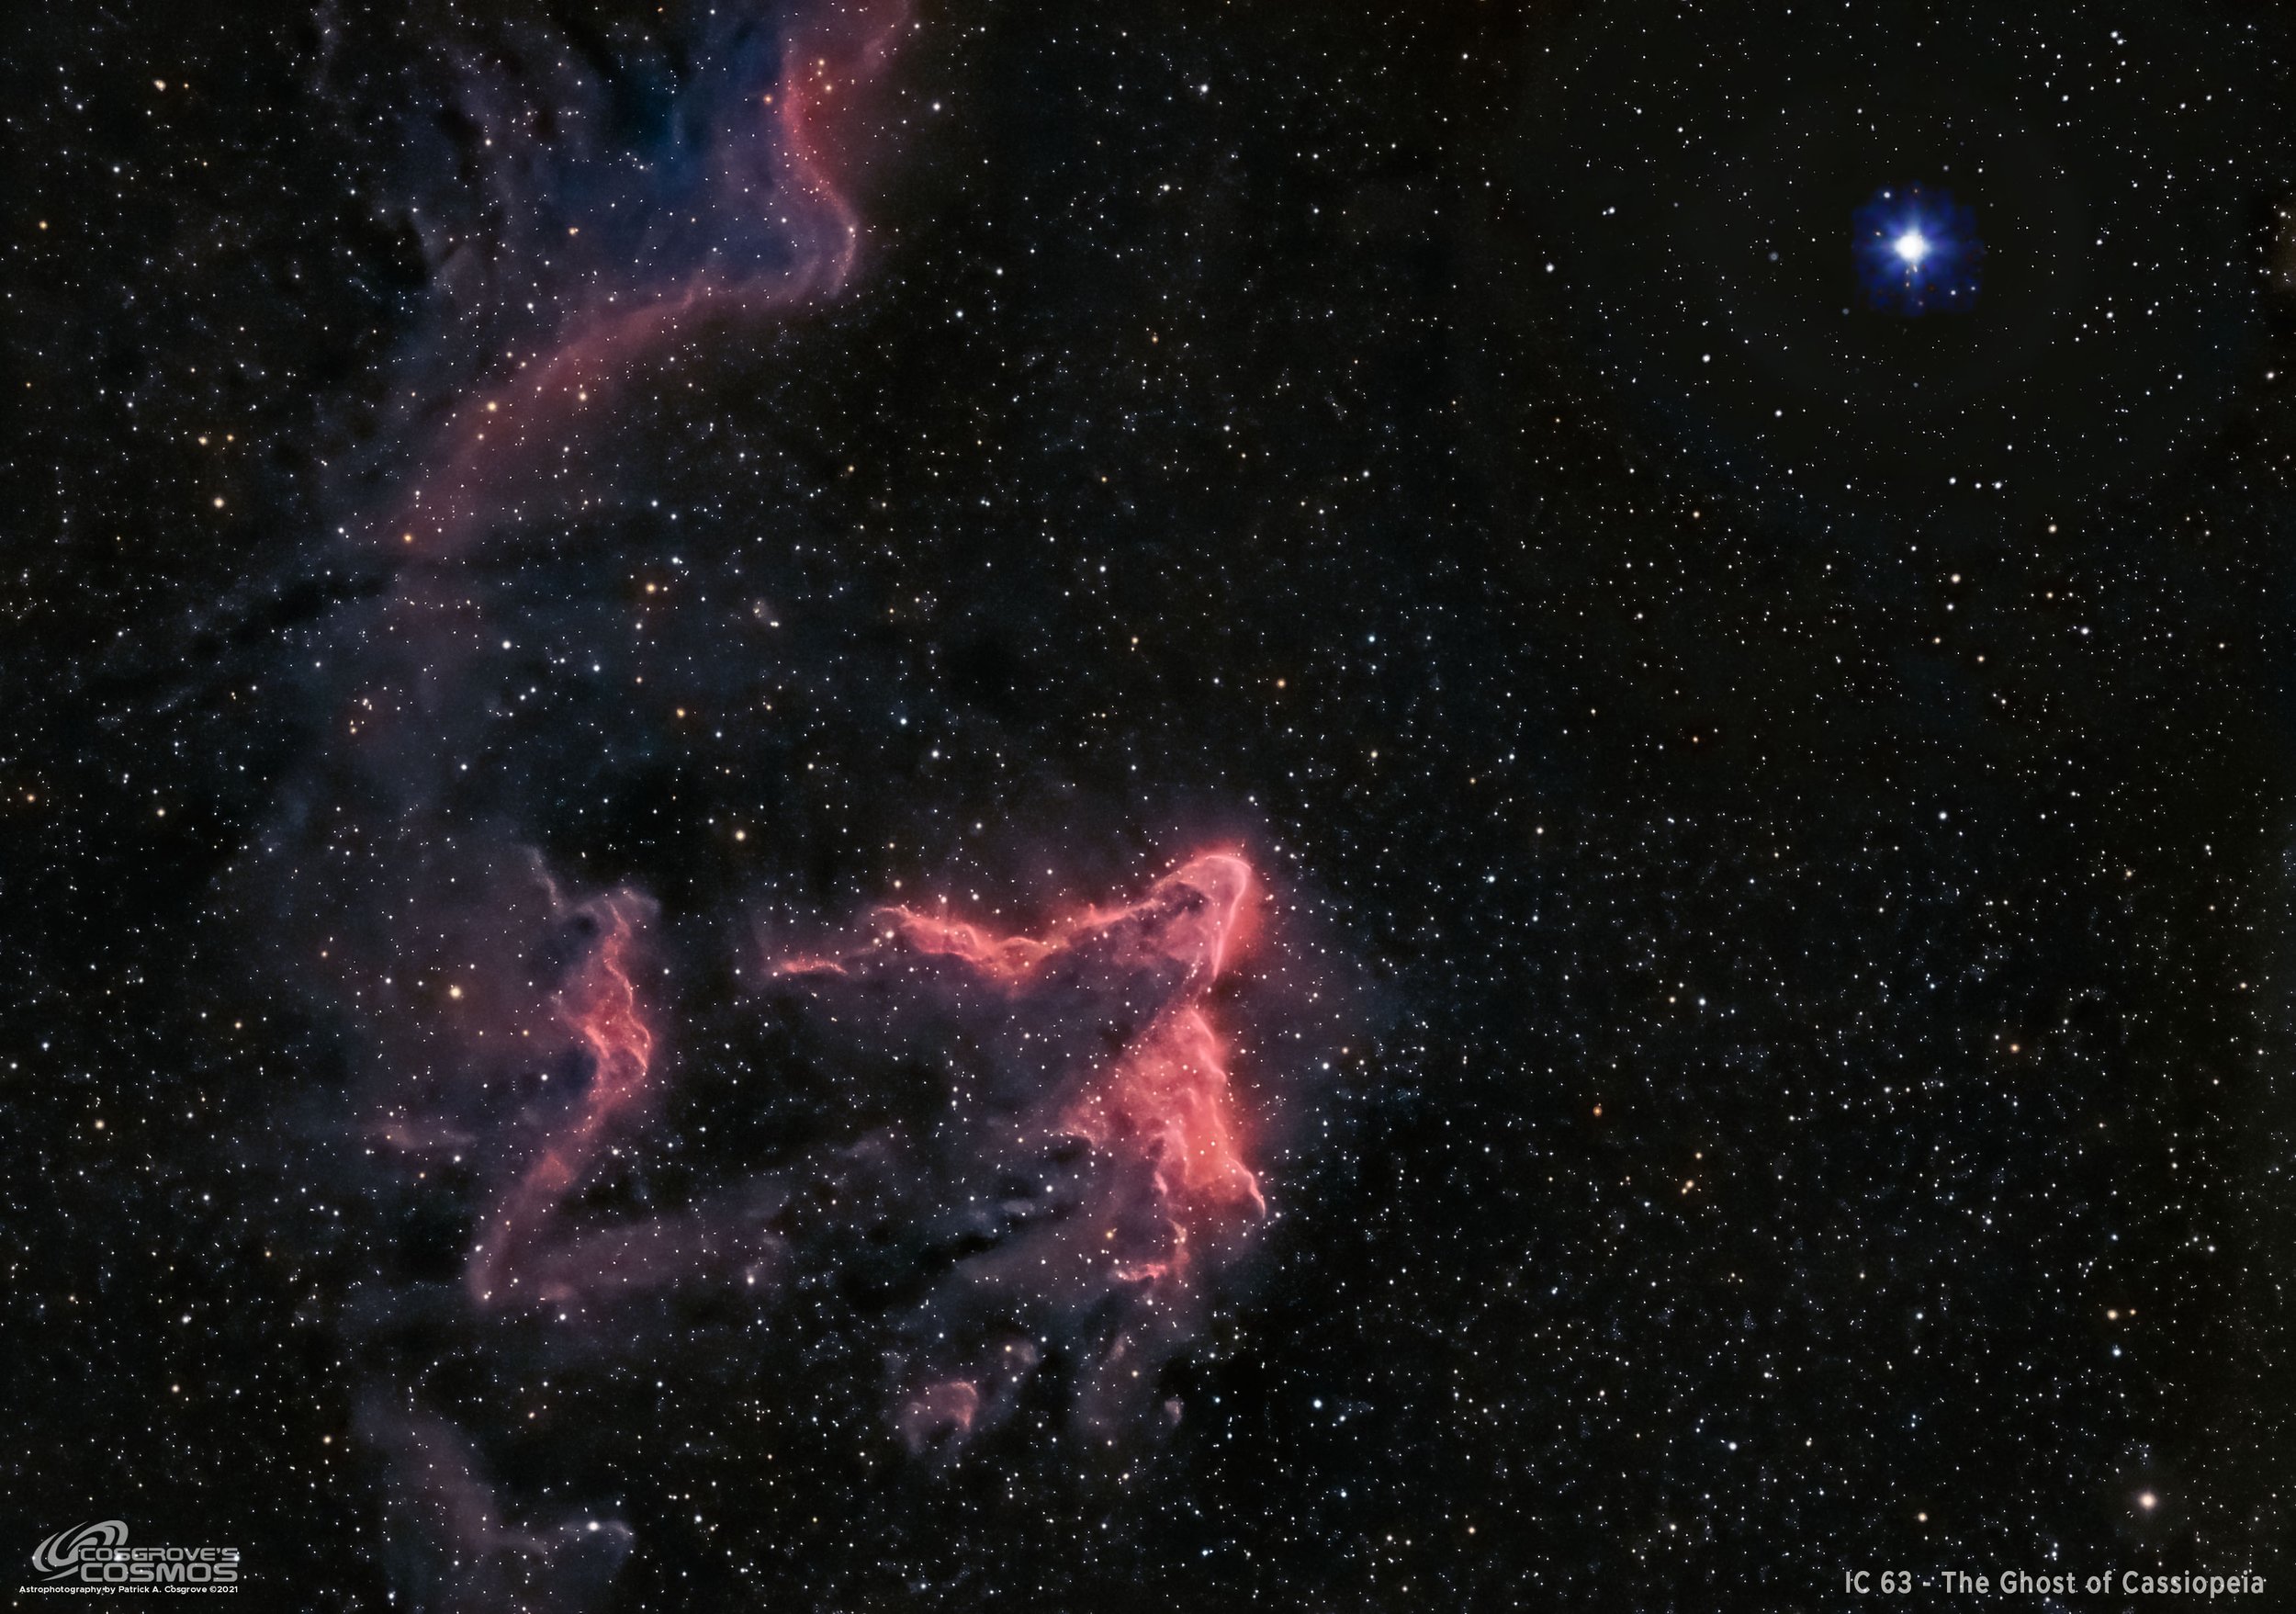
IC 63 - The Ghost of Cassiopeia - along with IC 59 which can be seen to the left. (click for full resolution image via Astrobin.com)
Table of Contents Show (Click on lines to navigate)
About the Target
IC 63, also known as "The Ghost of Cassiopeia", is an area of molecular hydrogen clouds and dust located 550 light-years away in the constellation, appropriately enough, of Cassiopeia.
This region is both an emission nebula and a reflection nebula. The gas and dust in this region are bombarded with radiation from the bright star Gamma Cassiopeia. This Blue-White Giant star forms the middle star in the "W" form made by the constellation. It has a radius that is 14 times larger than our own Sun, while also being 55,000 times more luminous and 19 times more massive. Added to this is the fact that it is only 3 or light-years away from the nebula. and baths it in ultraviolet light, which causes the hydrogen gas to glow in the red part of the spectrum. Areas of blue can also be seen, which is due to light reflected from the gas dust in the nebula.
Located to the left in the image above, is also IC 59 - another region of gas that is also excited by the same star.
The Annotated Image
This annotated version of the IC 63 was created using Pixinsight’s ImageSolver and AnnotateImage scripts. (click to enlarge)
Location in the Sky

About the Project
This is the fourth target to be processed from data that was collected over the nights of November 5th through the 8th.
This shot was taken with the Willian Optics 132mm Platform using the ASI1600mm-pro camera. LRGB data was collected with 90-second subs, while 300-second Ha subs were also collected.
I could tell right off that the image processing for this project would be very demanding.
When I reviewed the images using Blink, I saw a lot of thin clouds passing over the target region for portions of 3rd and last evening. In the past, I would have deleted frames thus impacted by thin clouds, but it is now my practice use to leave them in and use Pixinsight's NormalizedScaleGradient tool to manage the integration of the image. This allows variable gradients on each subframe to be normalized to a selected reference image. This “flattens” out the gradients and puts the full set of frames on a more even footing. This then allows the high and low rejection logic to do a better job and allows portions of a subframe that have viable data to make their contribution to the integrated whole. It does, however, take a bit more time and fussing around to do this.
I also saw that I had some bloated stars and a horrible case of microlens reflections on the bright star Gamma Cassiopeia. I knew this was going to be tough to deal with. After the first night of capture, I noticed some issues with star bloat and halos and artifacts on bright stars - so I checked the telescope objective and saw that it had a lot of dust that had accumulated there over the summer. So I blew the objective off and brushed it and this cleaned it up nicely - but a big chunk of my data would still have the problem.

Here is the Master Ha frame before any processing. The bizarre structure of the micro-lens relections was going to be a challenge to deal with!
So - yeah - this was going to be fun!
The level of fun increased when I ran the WBPP script to calibrate all of the data and then ran the NormalizedScaleGardient script to drive integration and get to the master images. I inspected the high and low rejection images and found some really weird patterns. It was looking like there was a major misalignment of the frames captured. I pulled up some individual subs to investigate further:
Blue Subframe from Night 1 (click to enlarge)

Blue Subframe from Night 2 (click to enlarge)
The previous two subframes registered - note the black areas where the data do not overlap. (click to enlarge)
I discovered that the rotation of the camera ended up being different between night 1 and the other nights! How did this happen? When Sequence Generator Pro "centers" an image before starting exposures, it uses plate solving to verify both the position in the sky that the scope is pointed to and the rotation of the camera. It automatically moves the scope and rotates the camera to get to the specified position.
Or at least it does if I have the sequence set up to actually do rotation. I did have this setup when I shot the first night's subs, but I must have turned this off at the end of the night when I was setting to shoot flats and flat dark calibration frames ( I don’t need centering or rotation when shooting darks or flats). I must never have turned it back on.
Classic operator error! 0bviously, I need to get a smarter operator!
The result of this is that my Master images have some areas of sharp nonuniformity. There is no easy way to fix this. I was going to have to do a deep crop to eliminate the areas that were not common to all subframes. Arrrrrgh!
As you can see in the processing details below - I also had to jump through some hoops to deal with the problems around the bright star Gamma Cas. In the end, I had gotten rid of most of the artifacts and ended up with an image that looked "better", but I had to admit that Gamma Cas did not look very natural. But it was a LOT better.
Here is the first version of the image I shared with my local support team. Despite all of my work to correct the problems with this star, they felt the star did not look natural enough and suggested I just replace it with the image of another star. (click to enlarge).
As I often do, I shared an early version of my image with some of my local astrophotography colleagues for their reaction and feedback. The consensus was that the star was no longer natural-looking and detracted from the image. Dan Kuchta suggested when a star had such bad artifacts, maybe it would be best to just paste another star image over it as a more reasonable solution.
So - taking their advice to heart - I created the following version that did just that. Gary Opitz thought that this would win Awards…. ;-)

My first attempt at just pasting in a better star image. :-). (Yes - sometimes I am just a wiseass!).
What I did do was try to create a replacement star that would be true to the scope and camera used. I found another image (M20) that had a bright blue star that was captured with LRGB with the same scope and camera. This bright star was blue in color and still showed some microlens artifacts - but seemed much more natural. I selected it in photoshop and pasted it right over the top of the bad star that was currently in my image. Some tweaks to feather in the paste and I was good to go. Not perfect, but I think it helped the image.

This was close to my final image - complete with the replacement star. It does look better….
So - is such a correction simply dishonest or cheating?
Perhaps. I would think most purists would think so.
But I had done a lot of work to capture this data and with the weather being what it is in Upstate New York in November, I was not likely to get another chance this year to collect replacement data. If I wanted to get value from the data I did have, something had to be done.
I had already jumped through hoops trying to correct the problem and the result - though arguably better - just did not look natural. After all - the main subject in this image is the nebula. There really is very little info that can be seen for the star except perhaps its brightness and color and I tried to match that here.
In the end, I was reasonably happy with the final image. As I told my colleagues, I think my processing ended up turning a sow's ear into a silk purse!
Image Processing Notes
A special note. A while back I began to share extensive details from my processing notes for each imaging project I posted on this website.
Everything up until this point has been pretty much written for a fairly broad audience.
This section, however, is targeted at those who are learning image processing or just want to see the approach I took. There is a much smaller audience that would appreciate the technical details I am sharing here.
In fact, the target audience isn't even really just those who are interested in the image processing side of things - it is really for those that do their processing with Pixinsight.
So if you are not familiar with Pixinsight, the terminology and tools may be hard to follow. Proceed at your own risk. There be dragons here….
Now on the processing!
1. Assess all captures with Blink
Light images
Lum images
4 images were removed for heavier cloud cover.
Some cloud gradients seen on the remaining images
Red images
5 images were removed due to heavy cloud cover.
Some very light gradients were seen
Significant sensor microlensing reflections on the bright star Gamma Cas
Green Images
Star halos seen
6 frames removed for heavy cloud cover
some very gradients seen
Blue Images
Star halos seen
5 frames removed for heavy cloud cover
some very gradients seen
Ha Images
Star haloes - but less bright than some other filters
2 Images were removed due to heavy cloud cover
Gradients seen
Bright star has microlens relfections
Flat Frames - look great!
Flat Darks
Taken from the B33 project. All look good.
Darks
taken from B33 project - all look good.
2. WBPP Script
All images loaded into WBPP
Cosmetic correction enabled
No Pedastal image was used on Ha channel ( I forgot!)
Integration was NOT enabled.

WBPP Setup.

WBPP Post Process view.
4. Image Integration
All filers were processed with NormalizedScaleGradient, followed by ImageIntegration
All parameters were at defaults
Problem was seen - weird reject maps!
Investigation - night 1 subs have different rotations than the other nights!
Forgot to turn the rotation on for the centering step?
NormalizedScaleGradient Panel Setup for Lum
NormalizedScaleGradient Panel Setup for Ha
NormalizedScaleGradient Panel Setup for Red
NormalizedScaleGradient Panel Setup for Green
NormalizedScaleGradient Panel Setup for Blue
ImageIntegration for Red
ImageIntegration for Green
ImageIntegration for Blue
ImageIntegration for Lum
ImageIntegration for Ha
5. Image Crop
All filter master images were cropped to eliminate areas that did not have data for all subframes due to rotation issues. Other factors that drove the crop were related to image composition.

This shows the extensive crop that was necessary because to avoid background non-uniformities caused by rotational problems. Another factor that drove the selected crop area was composition.
5. Dynamic Background Extraction
A custom sampling pattern was created using the Lum image - avoiding brighter stars and nebulocity
DBE with subtraction was used to remove gradients for all images.
Ha still showed some residual gradients so the sampling pattern was adjusted and DBE run a second time.
Images below show before and after treatment with DBE.
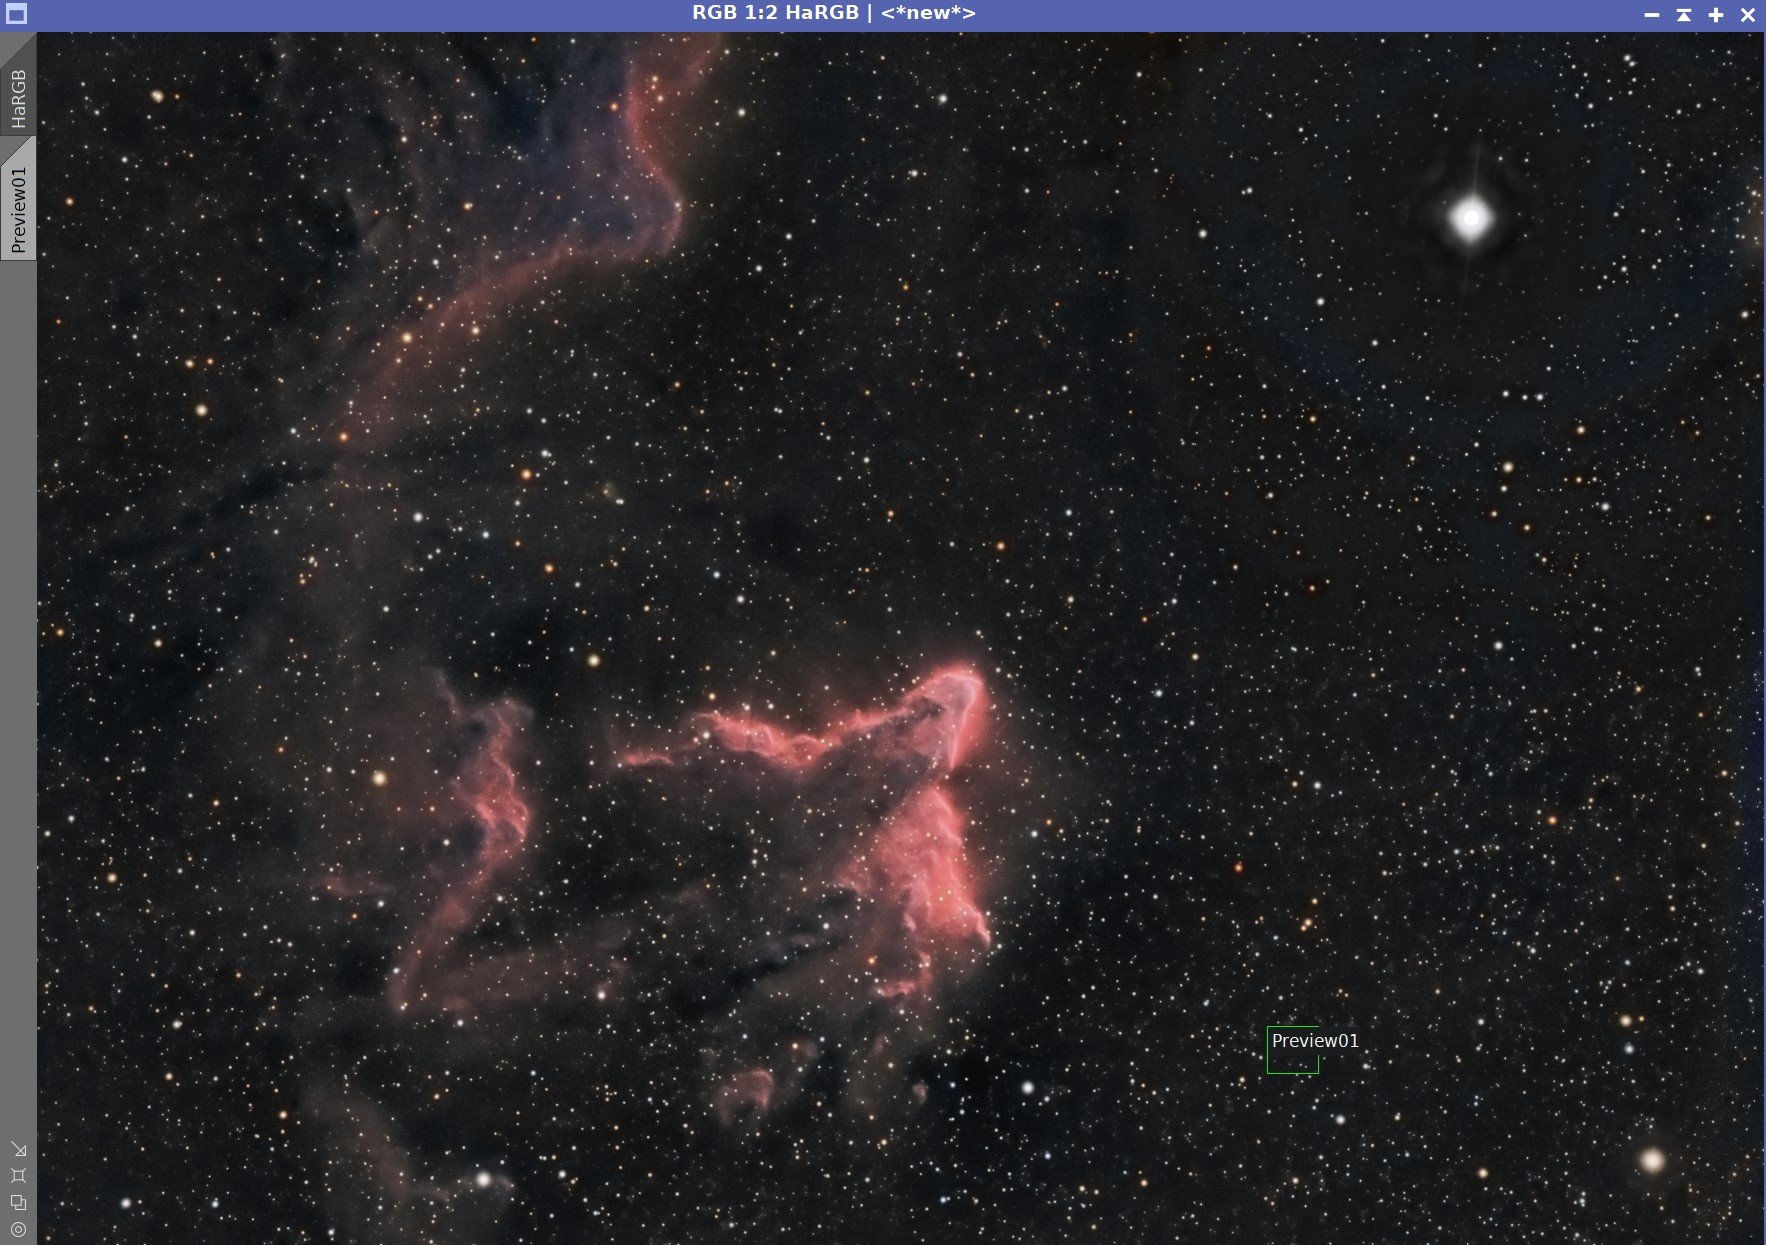
6. Create Linear Color Image
Create Hargb image with SHO-AIP script
Use SHO-AIPO scrip
Experiment with blends
Final blend:
Red = 25% Red + 75% Ha
Green = 70% Gree +25% Ha
Blue = 70% Blue +25% Ha

This is the SHO-AIP Control panel set up with the final blend used to create the HaRGB color image.
Ha Linear Image
Linear Red image
Linear Green Image
Linear Blue image

The initial Color image created from the HaRGB blend.
7. Color Calibration
Run PCC
grab ic63 coordinates
Use preview for background
Run

PCC panel set up to calibrate the HaRGB image

The PCC Color regression lines calculated

The color corrected HaRGB image.
8. Do Linear Noise Reduction on the Color image
Run EZ-denoise on Color Image
Use defaults
HaRGB image before EZ-Denoise

HaRGB image after EZ-Denoise was run.
9. Go Nonlinear with the HaRGB Color Image
Select preview of a background area
Run MaskedStretch with the preview selected and default parameters.
Run ArcsinhStretch with a factor of 1.38 black threshold of 0.012 This finalizes the stretch and protects the color highlights.

HaRGB Nonlinear image after MaskedStretch

Setting use for the ArcSinhStretch run

The final image after ArcSinhStretch
10. Adjust HaRGB Image
Run SCNR - to get the green out
Adjust halo area around Gamma Cas
GAME- create a mask that covers the star halo
Apply mask
Reduce sat and halo intensity
11. Choose what to use for the Lum image
Options are the Lum, the Ha, or a combination.
Looking at them both I decided that the Ha image was dramatically better and that I would use it exclusively for the L. injected image.
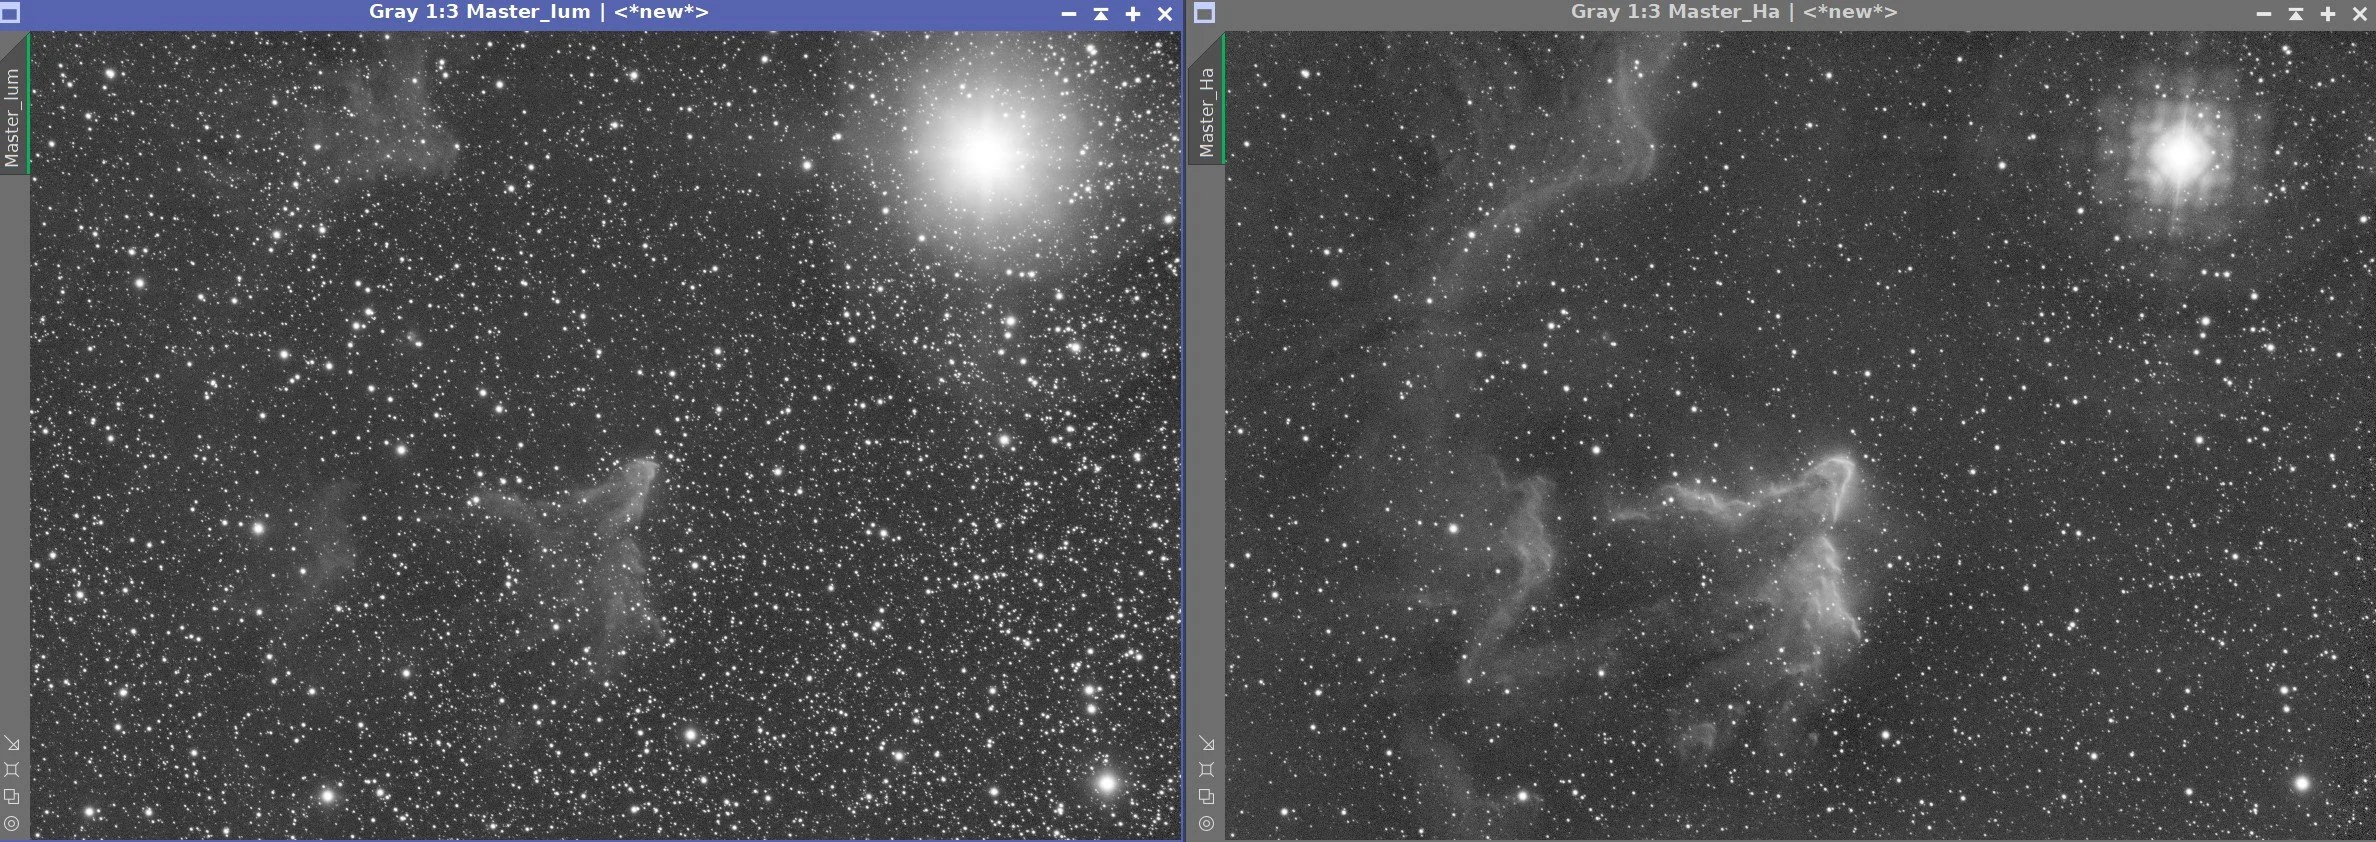
The Lum image is on the left and the Ha image is on the right. The Detail is the Ha impressive!
11. Prepare to Run Deconvolution on the Ha image
Create the Object Mask
create a copy of the Lum image, rename it.
Go nonlinear using the STF->HT method
Use HT to emphasize nebula and stars and suppress background
Adjust the object mask to eliminate the Gamma Cas region - I don’t want decon to sharpen this. The adjustment was made with the DynamicPaintBrush tool.
Create psf with PSFImage script
Create Local Support image
run Starmask
Scale: 6
Smoothness: 10
Check Aggregate
Check Binarize
Use DynamicPaintBrush to whiten out he region around Gamma Cas

The initial Ha Object Mask

The Adjusted Object Mask -note the artifact region around Gamma Cas has ben blacked out so that deon does not sharpen it.

The Ha PSF image

THe Adjusted LDSI Map with the Gamma Cas region adjusted to prevent deconvolution operations around it.
11. Apply Deconvolution to the Lum Image
Apply Object mask to Lum Image
Setup Deconvolution tool to use the psf and local protection images
Select 3 previews
Test and Optimize the Global Dark Parameter with previews
Final - global dark 0.004 with 20 interactions
The Ha image before Deconvolution.

The Ha image after Deconvolution - note the reduction in star sizes and the sharpness in the nebula
12. Apply Noise Reduction to the Lum (Ha) Image
We wish to preserve details since the Lum layer will provide most of that high-frequency information
EZ-Denoise was seen as the better of the two results.
The Lum (Ha) Image before EZ-Denoise being applied (click to enlarge)
The Lum (Ha) Image after EZ-Denoise has been applied (click to enlarge)
13. Go nonlinear with the Lum Image
Select a preview area with a good background sample
Select this with the MaskedStretch process and apply it to the Lum image (see panel below)
Use CT to boost tone scale with a slight “S” curve

Parameters used for the MaskedStretch Run.

The L (Ha) image after stretches are done
14. FInish Processing the L image
Sharpen the L image with Standard MLT config
Work to correct problems in the Gamma Cas image.
Create a mask that covers the area with the GAME Script. Apply.
Use CT to darken the masked area.
Use RangeSelect to create a mask for remaining artifacts, Use DynamicPaintBrush to eliminate all areas other than the region around Gamma Cas.
Use CT to reduce contrast and darken
Use RangeSelect to create a mask of residual pattern on Gamma Cas.
Use CT to darken

First Gamma Cas Correction mask made with RageSelection and DynamicPaintBrush.
The L image before any star fix (click to enlarge)
After the first stage star fix using the custom mask (click to enlarge)
Secondary RageSelection Mask (adjusted) for the residual pattern around Gamma Cas. (click to enlarge)
Using the final mask with CT, we end up with this final result. Not perfect but muchly improved (click to enlarge)
14. Add Lum image to the HaRGB Image
Use LRCGCCombination with the final L image, and apply it to the HaRGB online image
The HaRGB image before L data insertion (click to enlarge)
The initial verion of the LHaRGB image. Note how the L image dominated the Gamma Cas region! (click to enlarge)
15. Process the LHaRGB image further
Run PCC again - only minor changes seen
Use CT tweak tone scale and sats
Run LHE with radius 64, contrast max of 2.0, Amount of 0.27, and an 8-bit histogram
Run HT to clip black a bit
Run ACDNR - at default levels to roll back noise a bit
EZ-Star reduction with default parameters
16. Move to PhotoShop
Export as 16-bit tiff
Open in Photoshop
Use Camera Raw filter to tweak color, tone, and Clarity
Use Starshrink to reduce small stars
Use Starshrink to reduce large stars
Use Starshrink to reduce medium stars
lasso select Gamma Cas and do curves to tweak region
Add watermarks
Share final image with local Colleagues
Feedback is that the star is not looking natural.
Selected a similarly bright star from the same scope and camera from my M20 image.
Used select to grab the star and paste it.
Feathered edges
Boost blue color in the reflection nebula
Export various versions of the image

Additional Info
HubbeSite.org: Hubble Images of IC 63
EASHubble.org: More Hubble Images of IC63
The Live Sky: IC 63
Anne;s Astronomy News: Great article about IC 63
Capture Details
Lights
Images were taken on the nights of Nov 5-8, 2021
47 x 90 seconds, bin 1x1 @ -15C, ZWO L filter, Gen II
59 x 90 seconds, bin 1x1 @ -15C, ZWO R filter, Gen II
45 x 90 seconds, bin 1x1 @ -15C, ZWO G filter, Gen II
59 x 90 seconds, bin 1x1 @ -15C, ZWO B filter, Gen II
57 x 300 seconds, bin 1x1 @ -15C, Astrodon 5nm Ha filter
The total integration time is 9 hours 51 minutes
Cal Frames
25 Darks
12 Flats Ha , L, R, G, & B
25 Flat Darks
Capture Hardware
Scope: William Optics 132mm f/7 FLT
APO Refractor
Focus Motor: Pegasus Astro Focus Cube 2
Cam Rotator: Pegasus Astro Falcon
Guide Scope: Sharpstar 61EDPHII
Guide Focus Motor: ZWO EAF
Mount: Ioptron CEM 60
Tripod: Ioptron Tri-Pier
Camera: ZWO ASI1600MM-Pro
Filter Wheel: ZWO EFW 1.25” 8 slot
Filters: ZWO Gen II 1.25” LRGB,
Astrodon 5nm Ha & O3 filters,
Astronomiks 6nm S2 filer
Guide Camera: ZWO ASI290MM-Mini
Dew Strips: Dew-Not Heater strips for Main and Guide Scopes
Power Dist: Pegasus Astro Pocket Powerbox
USB Dist: Startech 8 slot USB 3.0 Hub
Polar Align Cam: Polemaster
Software
Capture Software: Control: PHD2 Guider, Sequence Generator Pro controller
Image Processing: Deepsky Stacker, Pixinsight, Photoshop, Coffee, extensive processing indecision and second-guessing, and much swearing…..
I was very excited to get the ZWO ASI2600MM-Pro camera a while back. I ordered it when it was announced and then prepared to wait a long time to get it. When I did get it - I decided to put it onto the AP130 platform. That meant that I could move the ZWO ASI1600MM-Pro, along with its filter wheel over to my William Optics Platform. This now means that all of the platforms have been moved over to a mono camera and my ZWOASI924MC-Pro is now not in use.