
One of my favourite desserts in the whole wide world is Cinnamon Apple Pie à la Mode. Freshly made and warm homemade apple pie with a large scoop of vanilla ice cream on top… It doesn’t get much better than that! This recipe is really delicious, with a flaky crust and the perfect flavour from that cinnamon apple pie filling.
What is an Apple Pie à la Mode?
When you read an “à la Mode” at the end of a dessert’s name, it means it’s served with ice cream. The most classic way would be to serve the dessert with vanilla ice cream but it can certainly be other flavours, too! In this case, with this Cinnamon Apple Pie à la Mode recipe, we get a slice of classic apple pie and serve it with a large scoop of ice cream on top. This is one of those easy recipes that everyone loves, it’s such a classic dessert! Certainly, the best way to eat a freshly baked apple pie.

The Perfect Flaky Crust
Here on the blog, we have previously discussed in great detail my recipe for All-Butter Pie Crust. You can go and read that post if you need further guidance on that topic. That recipe makes the most perfect Apple Pie à la Mode. The contrast of a crispy and flaky dough with the sweet and gooey apple filling and that scoop of ice cream makes for the most perfect dessert ever. That slice of apple pie will be the best you have ever had! I’m really sad that, as I’m writing this, there’s no more left at home. I’m really craving a slice of pie now!

Apple Pie Filling Ingredients
The Apple filling for this Apple Pie à la Mode is really tasty. It has the perfect amount of sweetness, tanginess, gooeyness and cinnamon-ess. I guess that’s a word now! It comes together in very little time and the resulting apple mixture makes for the most delicious Cinnamon Apple Pie. Here are the apple filling ingredients:
- Apples: Of course, you will need the most delicious apples you can get. I like to use semi-sweet apples, those with a good tanginess-sweetness balance. We’ll talk about apple varieties later on.
- Unsalted butter: The butter works for this apple filling giving it shine, and a velvety texture. It helps to cook the apples as well.
- Brown sugar: Brown sugar has that caramel taste that we love for blondies, cookies and of course all things apple-related.
- Ground cinnamon: For me, there’s no apple pie without cinnamon. The flavour combination of cinnamon, apples and brown sugar is one of my favourite!
- Cornstarch: Cornstarch will help us to thicken the apple filling, while also giving it shine :).
- Salt: Salt is always needed in recipes, even if it’s a sweet one! It balances out the flavours and makes the most delicious apple pie filling.
- Water: We only add a bit of water at the beginning of the cooking process as we give time for the apples to release their juices, preventing the other ingredients from burning.

Apple filling instructions
It’s imperative to cook the apples along with the other ingredients before filling the Cinnamon Apple Pie. If you don’t, the liquid in the apples will seep into our crust and make it soggy. This filling is very easy to prepare and you can refrigerate it for up to 5 days or even freeze it for up to 3 months.
- Peel the apples, core them and cut them into 5mm thick slices. As you peel and cut them you can place them in a large bowl.
- Place the apple slices in a large saucepan over medium heat along with all the other apple pie filling ingredients. At first, the apples will release their juices and it will look very soupy. As it boils, the apples will soften and the liquid will begin to evaporate and thicken. We’re looking to have a texture similar to honey. You should be able to see the base of the saucepan as you stir when it’s done.
- Remove the warm apples from the saucepan and let them cool down completely before assembling the pie.
Varieties of apples
One of the most common doubts when making a Cinnamon Apple Pie à la Mode is what varieties of apples should be used. My absolute favourite is Pink Lady, closely followed by Fuji and Royal Gala. We want to use apples that aren’t too acidic like a Granny Smith or too sweet like a Red Delicious. Everything that’s in the middle works fine: Golden Delicious, Honeycrisp, Golden Delicious. Now, of course, this all comes down to what you like. If you prefer a tarter filling, go for Granny Smith.
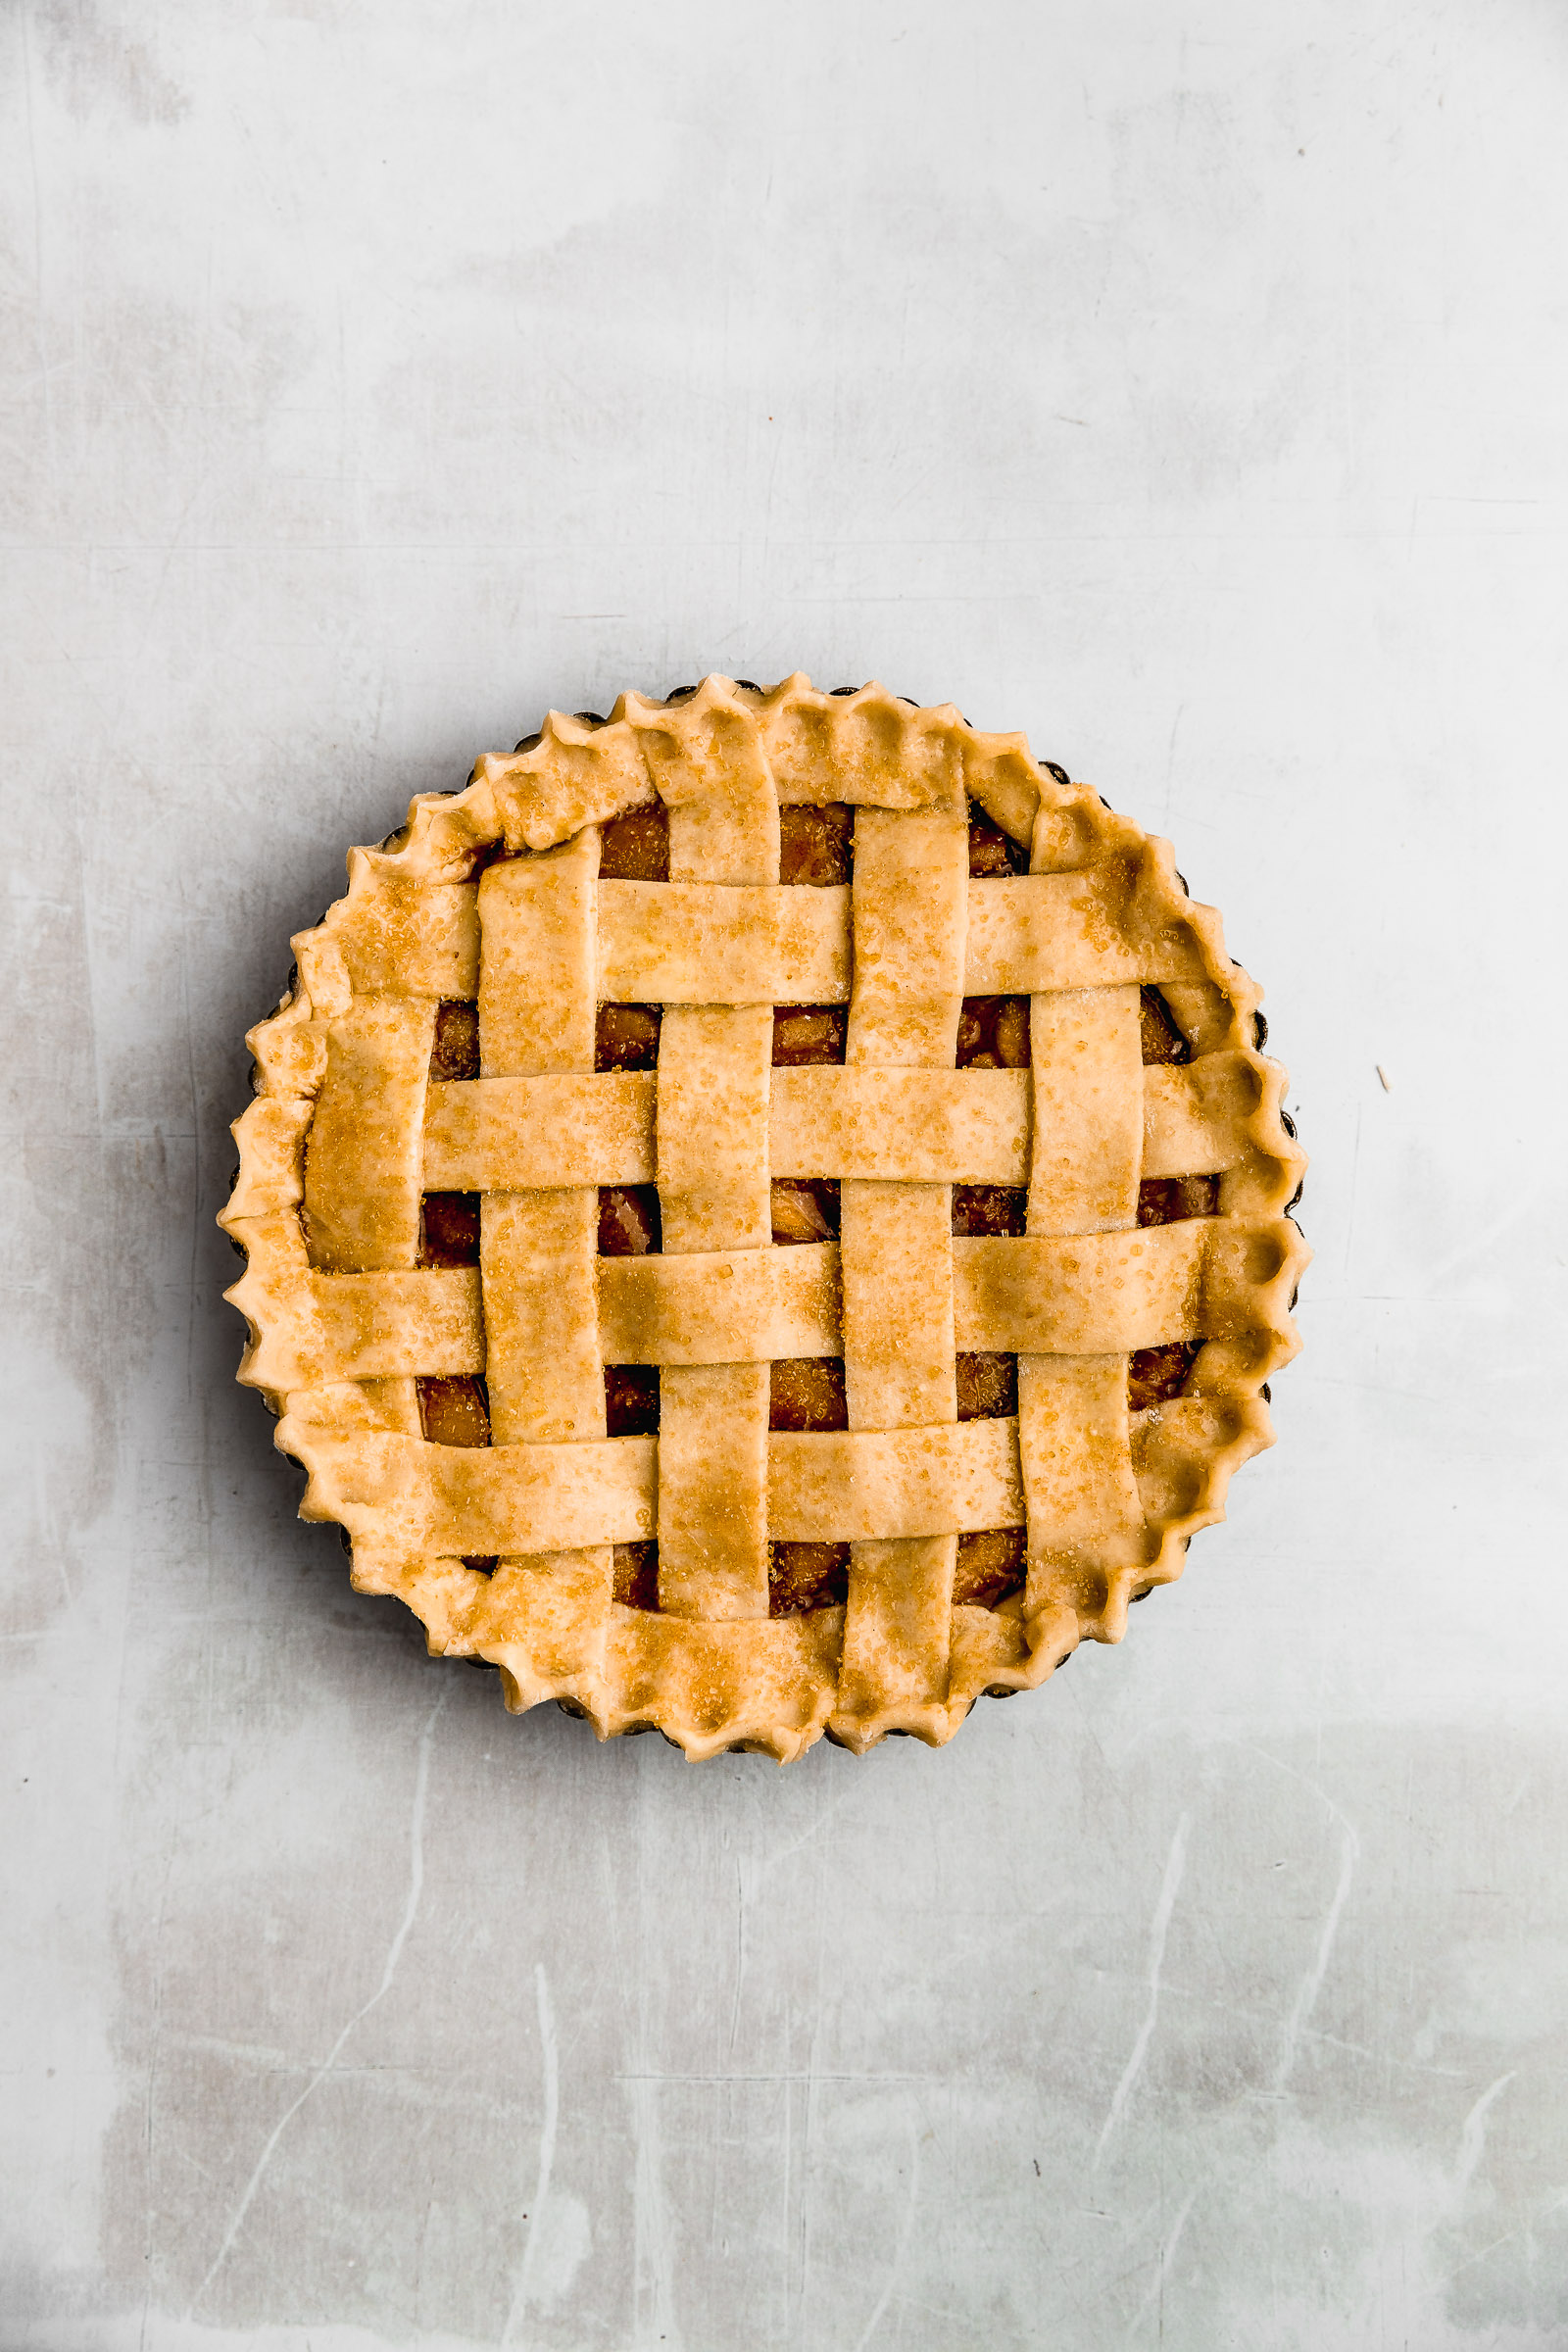

Assembling an Apple Pie
Now that you have made my All-Butter Pie Crust and the apple pie filling, we can assemble our Cinnamon Apple Pie. We’re just a step closer to having a delicious slice of Apple Pie à la Mode! Here are the instructions:
- Separate 1/3 of the dough for the lattice and refrigerate it again. Roll out the rest of the dough on a lightly floured surface using a rolling pin until it’s 3mm thick. If it’s too cold, wait for it to come a bit more to room temperature so that it’s easier to manipulate.
- Lift the dough carefully using the rolling pin and place it over the pie plate, pie pan or tart pan. Lift the sides of the dough and insert them into the corners of the pan, pressing down slightly. Don’t cut the excess dough yet.
- Sprinkle the base of the pie with almond flour and pour the apple pie filling on top.
- Roll out the other third of the dough that we reserved until it’s 2mm thick. Cut 2cm or 2/3in strips for the lattice.
- Place all the strips looking towards the same direction first, leaving 1cm or 1/2in. in between them.
- Lift one of the strips, folding it over itself in half. Repeat this not with the one next to it but the next, and repeat this with all of them. That’s when you will cross it with another strip. Then, bring back those strips you had folded.
- Repeat this with the rest of the lattice, lifting the strips you didn’t lift before. You will do it for one half of the pie first, then rotate it 180 degrees and repeat on the other half.
- Cut the excess of the dough leaving an extra 1cm or 1/3in. I use scissors for this purpose.
- Fold the excess dough underneath the edge, making a thicker edge. If you’re using a pie dish or pan that has an edge, this will be folded over that edge. If you have a tart pan like me, it will be inside the pan.
- To crimp the edges, you will press the edge with one finger from the inside of the pan and surround that finger with your index and thumb of the other hand from the outside of the pan. This will form a tip. Repeat this all around the edge.

Baking a Cinnamon Apple Pie
Once the Cinnamon Apple Pie is completely assembled and you’re in awe of how beautiful it looks, it’s time to bake it. This is the last step before slicing it and having the best ever Apple Pie à la Mode! I’m sure you can already taste it.
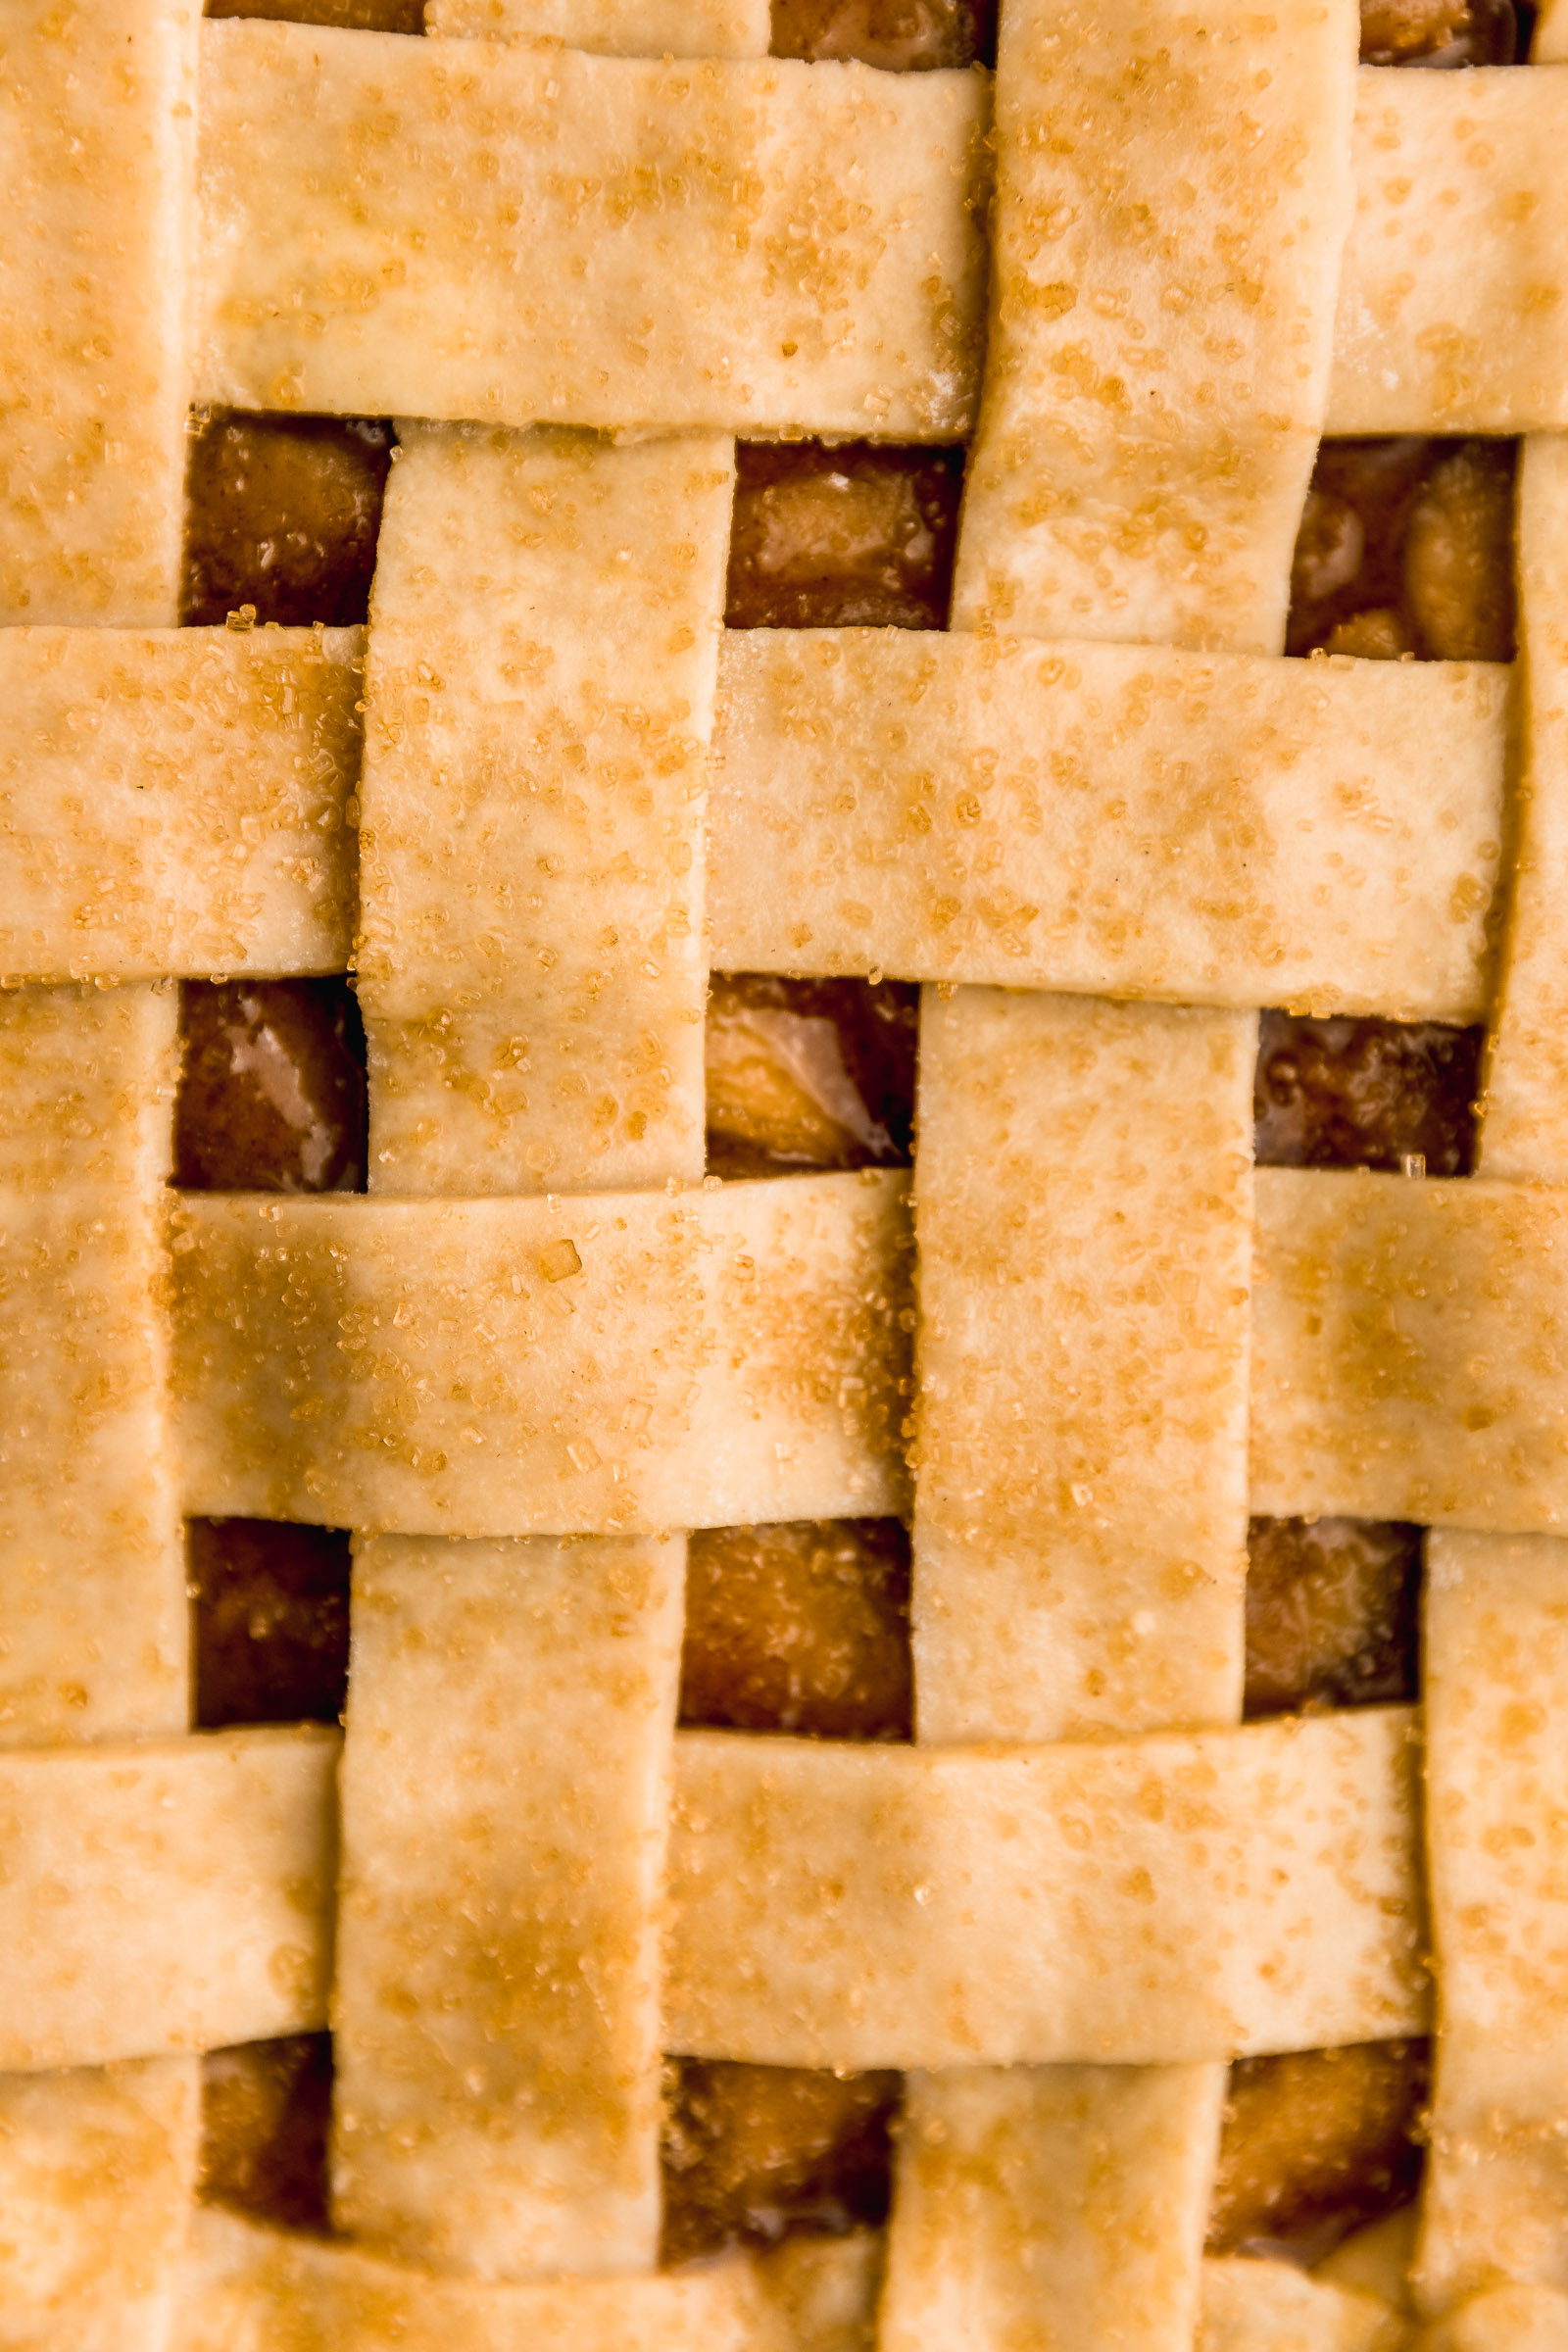
- Paint the lattice and edges carefully with an egg beaten with water. Try to avoid getting the egg wash on the filling.
- Dust everything with brown sugar.
- Bake in a preheated oven at 180C/350F for 50-60 minutes or until the top crust is evenly golden. Also, the filling should be bubbling.
- Place the freshly baked apple pie on a wire rack and let it cool down until it’s just warm before serving.
- If you’re using a pan with a removable bottom like me, you can place it on an upside-down bowl that’s taller than the edge and gently let the sides of the pan drop. After that, you can slide the apple pie off the base and onto your serving dish.

Tips for the greatest Apple Pie à la Mode
I know that making apple pie can be a scary pursuit, especially if you’ve never made it before. Don’t worry though, I will make it easier with these tips for the perfect Apple Pie à la Mode.
- The pan: The pan or dish that you use for baking will help in making it perfect. Some materials such as glass and ceramic are not ideal for this Cinnamon Apple Pie. Even though you can achieve great results with them, it will make it harder for you. These materials don’t have much capability of heat conduction, meaning that to get that golden bottom crust you will have to bake it for longer. The advantage of the glass dish is that you can see through it and check that it’s golden, but it will still take longer. The ideal is metal, whether you are using a pie pan or a tart pan with a removable bottom. For the pictures you see here, I used a tart pan.
- Prevent a soggy bottom: Even though the apple filling is cooked and thickened, it will still release some moisture to the bottom pie crust. To help prevent the base from becoming soggy, sprinkle it with almond flour, ground nuts or even breadcrumbs before adding the filling. The almond flour will soak up some of that excess moisture and you won’t notice it in the final result.
- Aluminum Foil / Tin Foil is your best friend: When baking a Cinnamon Apple Pie, you will notice that the edges tend to get golden a lot faster than the centre because there’s less moisture there. To control this, I like to cover the edges of the pie with aluminum foil/tin foil for the first half of the cooking process. Then, you can remove it and continue with the cooking process. This little tip is great!

Ice Cream for your Apple Pie à la Mode
Now that you have baked the most amazing Cinnamon Apple Pie, we have to turn it into the best Apple Pie à la Mode. The classic way of serving this dessert would be to use a large scoop of vanilla ice cream. However, there are other options of ice cream flavour that are worth considering. These include cinnamon ice cream, dulce de leche ice cream, pecan ice cream and rhum ice cream. Whatever flavour you use, make sure that you get a scoop of ice cream on top of your Apple Pie slice. Also, make sure that you’re using really cold ice cream so that it doesn’t just melt away immediately on top of the warm dessert.


Apple Pie à la Mode (Apple Pie with Ice Cream Recipe)
Ingredients
For the crust
- 300 g all-purpose flour
- 60 g granulated sugar
- 1 tsp salt
- 220 g unsalted butter cold cut into cubes
- 110 g water
For the filling
- 1 kg apples Pink Lady, Royal Gala or Fuji
- 75 g unsalted butter
- 190 g brown sugar
- 1¼ tsp ground cinnamon
- 1¼ tbsp cornstarch
- ¼ tsp salt
- 2½ tbsp water
For assembling
- 5 tbsp almond flour or other type of finely ground nuts or breadcrumbs
For painting
- 1 egg
- 1 tbsp cda agua
- 3 tbsp brown sugar
For serving
- Vanilla Ice Cream or other flavour you prefer
Instructions
For the crust
- Place the all-purpose flour, sugar and salt in a large bowl and mix them together.
- Add the cold butter cut into cubes and mix them in with the flour mixture.
- Pinch the flour along with the dry ingredients to break it up. We don’t want to completely turn it into tiny pieces like we would in other recipes. You should stop when you see about half tiny pieces and half medium pieces of butter. This is what makes this all-butter pie crust extra flaky.
- Add the water and knead slightly with your hands to incorporate the dough. Only knead until it comes together completely. Don’t knead more than you have to or it will turn tough. You will notice spots of butter in the dough and that’s perfect.
- Refrigerate the ball of dough covered in plastic wrap for 30 minutes or up to 2 days. You can also freeze it for up to 2 months.
For the filling
- Peel the apples, core them and cut them into 5mm thick slices. As you peel and cut them you can place them in a large bowl.
- Place the apple slices in a large saucepan over medium heat along with all the other apple pie filling ingredients. At first, the apples will release their juices and it will look very soupy. As it boils, the apples will soften and the liquid will begin to evaporate and thicken. We’re looking to have a texture similar to honey. You should be able to see the base of the saucepan as you stir when it’s done.
- Remove the warm apples from the saucepan and let them cool down completely before assembling the pie.
For assembling
- Separate 1/3 of the dough for the lattice and refrigerate it again. Roll out the rest of the dough on a lightly floured surface using a rolling pin until it’s 3mm thick. If it’s too cold, wait for it to come a bit more to room temperature so that it’s easier to manipulate.
- Lift the dough carefully using the rolling pin and place it over the pie plate, pie pan or tart pan. Lift the sides of the dough and insert them into the corners of the pan, pressing down slightly. Don’t cut the excess dough yet.
- Sprinkle the base of the pie with almond flour and pour the apple pie filling on top.
- Roll out the other third of the dough that we reserved until it’s 2mm thick. Cut 2cm or 2/3in strips for the lattice.
- Place all the strips looking towards the same direction first, leaving 1cm or 1/2in. in between them.
- Lift one of the strips, folding it over itself in half. Repeat this not with the one next to it but the next, and repeat this with all of them. That’s when you will cross it with another strip. Then, bring back those strips you had folded.
- Repeat this with the rest of the lattice, lifting the strips you didn’t lift before. You will do it for one half of the pie first, then rotate it 180 degrees and repeat on the other half.
- Cut the excess of the dough leaving an extra 1cm or 1/3in. I use scissors for this purpose.
- Fold the excess dough underneath the edge, making a thicker edge. If you’re using a pie dish or pan that has an edge, this will be folded over that edge. If you have a tart pan like me, it will be inside the pan.
- To crimp the edges, you will press the edge with one finger from the inside of the pan and surround that finger with your index and thumb of the other hand from the outside of the pan. This will form a tip. Repeat this all around the edge.
For baking
- Paint the lattice and edges carefully with an egg beaten with water. Try to avoid getting the egg wash on the filling.
- Dust everything with brown sugar.
- Cover the edges of the pie with aluminum foil/tin foil and bake in a preheated oven at 180C/350F for 30 minutes. Remove the aluminum and bake for another 30 minutes or until the top crust is evenly golden. Also, the filling should be bubbling.
- Place the freshly baked apple pie on a wire rack and let it cool down until it’s just warm before serving.
- If you’re using a pan with a removable bottom like me, you can place it on an upside-down bowl that’s taller than the edge and gently let the sides of the pan drop. After that, you can slide the apple pie off the base and onto your serving dish.
- Serve a slice of apple pie with a large scoop of vanilla ice cream.
