I’ve been working on connecting my virtual arm board which is running on QEMU to LAN for days. Shame on me L
There is a myriad of documents telling you how to connect QEMU to a real network. However most of them lack detailed explanation and steps. I failed in various attempts trying to connect.
I’m going to explain every single step connecting your QEMU machine to a real network. You’d better read some documents on “Network bridges” and “TUN/TAP” devices” in adcance although you don’t need to.
Prerequisite packages
Before starting out we need to install the following packages
$ sudo apt-get install bridge-utils
$ sudo apt-get install uml-utilities
$ sudo apt-get install openvpn
$ sudo apt-get install firestarter
We are going to make use of bridges and TUN/TAP devices. “TUN/TAP” devices help programs working on user space to send and transmit packets. IP packets are transceived by TUN devices and ethernet packets by TAP devices. In a way they are somewhat similar to “eth0” interface on your host machine except the fact they are pure logical ethernet devices.
Try to insert a TUN device as a module if our kernel supports it.
$ sudo modprobe tun
The node “tun” must have been automatically created in /dev/net folder. If not try to create it manually by typing the following commands
$ sudo mkdir /dev/net
$ sudo mknod /dev/net/tun c 10 200
$ sudo chmod 660 /dev/net/tun
The network interface on our host is called ethernet device and it is named “eth0”. Likewise our virtual machine has a network interface as well. This interface is named “tap0”. Now we have two interfaces namely “eth0” on our host and virtual interface “tap0” which belongs to the guest virtual machine. We are going connect these two interfaces through a virtual bridge.
Let’s write a script which will implement all the things explained above.
$ cd /etc
Get a copy of qemu-ifup and qemu-ifdown for backup if they exist.
$ sudo cp qemu-ifup qemu-ifup-backup
$ sudo cp qemu-ifdown qemu-ifdown-backup
$ sudo gedit qemu-ifup
Change the content of qemu-ifup with the following script: (IMPORTANT NOTICE: Be careful with the quotation marks ” ” ” and apostrophes ‘ ‘ ‘ while writing the scripts and commands. They can change while copying. So try to type them yourself!!!!!)
#!/bin/sh

#
# script to bring up the tun device in QEMU in bridged mode
# first parameter is name of tap device (e.g. tap0)
#
# some constants specific to the local host – change to suit your host
#

ETH0IP=1.10.5.55
GATEWAY=1.10.0.1
BROADCAST=1.10.0.255

#
# First take eth0 down, then bring it up with IP 0.0.0.0
#
ifconfig eth0 down
ifconfig eth0 0.0.0.0 promisc up

#
# Bring up the tap device (name specified as first argument, by QEMU)
#
openvpn --mktun --dev $1 -user 'id -un'
ifconfig $1 0.0.0.0 promisc up

#
# create the bridge between eth0 and the tap device
#
brctl addbr br0
brctl addif br0 eth0
brctl addif br0 $1

#
# only a single bridge so loops are not possible, turn off spanning tree protocol
#
brctl stp br0 off

#
# Bring up the bridge with ETH0IP and add the default route
#
ifconfig br0 $ETH0IP netmask 255.255.0.0 broadcast $BROADCAST
route add default gw $GATEWAY

#
# stop firewall – comment this out if you don’t use Firestarter
#
service firestarter stop
You can change the ETH0IP, GATEWAY, BROADCAST variables according to your network configuration. My Network Mask was 255.255.0.0. Change it as well according to your network.
Save the file and close. Make it executable.
$ sudo chmod +x /etc/qemu-ifup
Now we are going to modify the qemu-ifdown file
$ sudo gedit /etc/qemu-ifdown
Edit its content as the following script
#!/bin/sh
#
# Script to bring down and delete bridge br0 when QEMU exits
#
# Bring down eth0 and br0
#
ifconfig eth0 down
ifconfig br0 down
ifconfig br0 down

#
# Delete the bridge
#
brctl delbr br0

#
# bring up eth0 in “normal” mode
#
ifconfig eth0 -promisc
ifconfig eth0 up

#
# delete the tap device
#
openvpn --rmtun --dev $1

#
# start firewall again
#
service firestarter start
Close and save the file. Change its mode as executable.
$ sudo chmod +x /etc/qemu-ifdown
We are going to use qemu-ifup to establish our bridged network and qemu-ifdown to bring our network configuration back to its original state.
My original configuration is:
$ ifconfig
eth0 Link encap:Ethernet HWaddr 00:0c:29:0c:0a:32
inet addr:1.10.5.55 Bcast:1.10.255.255 Mask:255.255.0.0
inet6 addr: fe80::20c:29ff:fe0c:a32/64 Scope:Link
UP BROADCAST RUNNING MULTICAST MTU:1500 Metric:1
RX packets:8065 errors:0 dropped:0 overruns:0 frame:0
TX packets:1787 errors:0 dropped:0 overruns:0 carrier:0
collisions:0 txqueuelen:1000
RX bytes:5309352 (5.3 MB) TX bytes:146860 (146.8 KB)
Interrupt:19 Base address:0x2024
lo Link encap:Local Loopback
inet addr:127.0.0.1 Mask:255.0.0.0
inet6 addr: ::1/128 Scope:Host
UP LOOPBACK RUNNING MTU:16436 Metric:1
RX packets:11 errors:0 dropped:0 overruns:0 frame:0
TX packets:11 errors:0 dropped:0 overruns:0 carrier:0
collisions:0 txqueuelen:0
RX bytes:744 (744.0 B) TX bytes:744 (744.0 B)
My original routing table is as follows:
$ route -n
Kernel IP routing table
Destination Gateway Genmask Flags Metric Ref Use Iface
1.10.0.0 0.0.0.0 255.255.0.0 U 1 0 0 eth0
169.254.0.0 0.0.0.0 255.255.0.0 U 1000 0 0 eth0
0.0.0.0 1.10.0.1 0.0.0.0 UG 0 0 0 eth0
I’m going to try it on the kernel and root file system we created in my earlier posts.
Now execute the qemu-ifup script with tap0 as the argument.
$ sudo /etc/qemu-ifup tap0
If it executes successfully it must give an output like:
Mon Dec 24 02:05:20 2012 TUN/TAP device tap0 opened
Mon Dec 24 02:05:20 2012 Persist state set to: ON
Now check your network configuration and routing table. Mine is:
$ ifconfig
br0 Link encap:Ethernet HWaddr 00:0c:29:0c:0a:32
inet addr:1.10.5.55 Bcast:1.10.0.255 Mask:255.255.0.0
inet6 addr: fe80::20c:29ff:fe0c:a32/64 Scope:Link
UP BROADCAST RUNNING MULTICAST MTU:1500 Metric:1
RX packets:129 errors:0 dropped:0 overruns:0 frame:0
TX packets:35 errors:0 dropped:0 overruns:0 carrier:0
collisions:0 txqueuelen:0
RX bytes:10442 (10.4 KB) TX bytes:6284 (6.2 KB)
eth0 Link encap:Ethernet HWaddr 00:0c:29:0c:0a:32
inet6 addr: fe80::20c:29ff:fe0c:a32/64 Scope:Link
UP BROADCAST RUNNING PROMISC MULTICAST MTU:1500 Metric:1
RX packets:16557 errors:0 dropped:0 overruns:0 frame:0
TX packets:3805 errors:0 dropped:0 overruns:0 carrier:0
collisions:0 txqueuelen:1000
RX bytes:14839012 (14.8 MB) TX bytes:283190 (283.1 KB)
Interrupt:19 Base address:0x2024
lo Link encap:Local Loopback
inet addr:127.0.0.1 Mask:255.0.0.0
inet6 addr: ::1/128 Scope:Host
UP LOOPBACK RUNNING MTU:16436 Metric:1
RX packets:15 errors:0 dropped:0 overruns:0 frame:0
TX packets:15 errors:0 dropped:0 overruns:0 carrier:0
collisions:0 txqueuelen:0
RX bytes:944 (944.0 B) TX bytes:944 (944.0 B)
tap0 Link encap:Ethernet HWaddr 0a:62:2d:51:a2:ac
inet6 addr: fe80::862:2dff:fe51:a2ac/64 Scope:Link
UP BROADCAST RUNNING PROMISC MULTICAST MTU:1500 Metric:1
RX packets:0 errors:0 dropped:0 overruns:0 frame:0
TX packets:0 errors:0 dropped:149 overruns:0 carrier:0
collisions:0 txqueuelen:100
RX bytes:0 (0.0 B) TX bytes:0 (0.0 B)
$ sudo route -n
Kernel IP routing table
Destination Gateway Genmask Flags Metric Ref Use Iface
1.10.0.0 0.0.0.0 255.255.0.0 U 0 0 0 br0
0.0.0.0 1.10.0.1 0.0.0.0 UG 0 0 0 br0
Now execute QEMU as the root user with the kernel image and root file system we created earlier. If you execute it as a normal user you probably won’t be able to access TAP device. . It’s going to be hell of a long command. You’d better create a script for it later.
$ sudo qemu-system-arm -M versatilepb -m 128M -kernel zImage -initrd rootfs.img.gz -append "root=/dev/ram, rdinit=/sbin/init" -net nic -net tap,ifname=tap0,script=no,downscript=no
When the kernel is loaded and root file system is mounted with success login as root user. We are going to assign an IP address to our guest on QEMU which is available on the network.
(On QEMU)
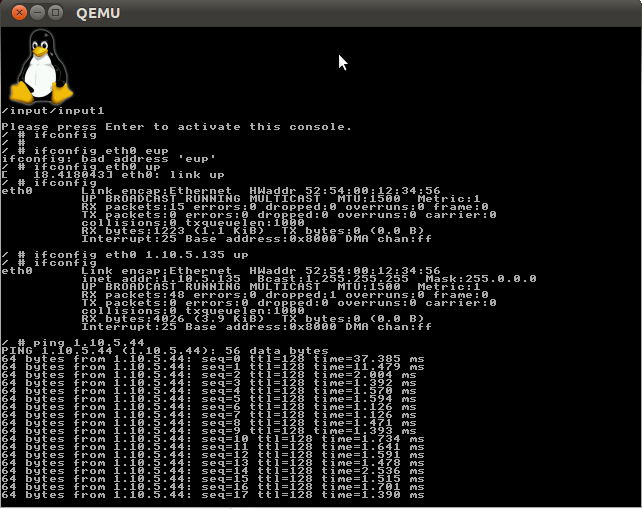
# ifconfig eth0 1.10.5.135 up
Now try to ping a machine on the same network.
# ping 1.10.5.44
There we go! It worked fine with me. Here’s the proof J
You can check the network status on QEMU. Press “CTRL-ALT-2” and type “info network”
When you quit QEMU don’t forget to execute qemu-ifdown script
$ sudo /etc/qemu-ifdown tap0
Now we have our original network configuration.
Up to now I hope everything worked well. How about taking things one step further. Why assign a static IP rather than using DHCP?
Let’s try to get a dynamic IP from our DHCP server.
We need to add a few files to our root file system.
Create a script named “udhcpc.script” under /etc directory in the root file system of the guest operating system with the following content.
#!/bin/sh +x
#
#busybox default script: /usr/share/udhcpc/default.script
#
RESOLV_CONF="/etc/resolv.conf"

[ -n "$broadcast" ] && BROADCAST="broadcast $broadcast"
[ -n "$subnet" ] && NETMASK="netmask $subnet"
/sbin/ifconfig $interface $ip $BROADCAST $NETMASK 2>/dev/null
if [ -n "$router" ]
then
        echo "deleting routers"
        while /sbin/route del default gw 0.0.0.0 dev $interface
        do :
        done 2>/dev/null

        metric=0
        for i in $router
        do
                /sbin/route add default gw $i dev $interface metric $((metric++))
        done

fi
[ -n "$domain" ] && echo domain $domain >> $RESOLV_CONF
for i in $dns
do
        echo adding dns $i
        echo nameserver $i && $RESOLV_CONF
done
Now create under the same directory an empty file named “resolv.config”. The address of the nameserver will be written into this file once a DHCP request is sent.
Create an image of the root file system and compress it with gzip as I explained in previous posts “Building a Root File System using BusyBox”.
With our new file system run QEMU with the following command.
$ sudo qemu-system-arm -M versatilepb -m 128M -kernel zImage -initrd rootfs.img.gz -append "root=/dev/ram, rdinit=/sbin/init" -net nic -net tap,ifname=tap0,script=no,downscript=no
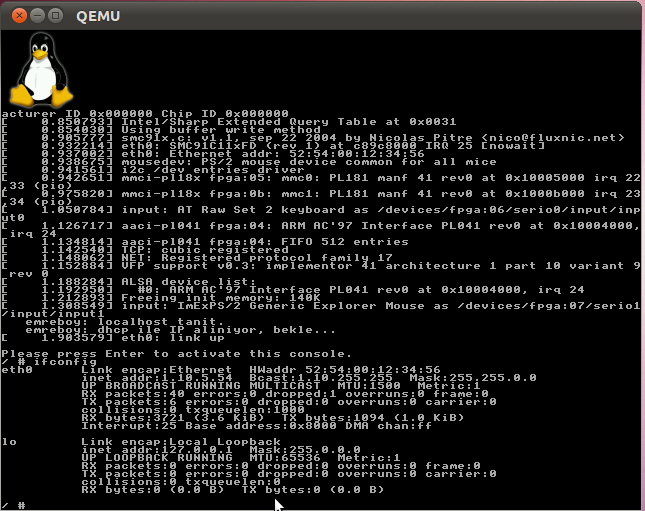
When command prompt of our guest OS running on QEMU appears type:
# ifconfig
If there’s an eth0 interface let’s bring it down.
# ifconfig eth0 down
Then run the script.
# ifconfig eth0 0.0.0.0 up
# udhcpc -n -q -R -s /etc/udhcpc.script
And check your brand new IP address.
# ifconfig
But it’s still too much manual work here. Let’s make the OS get an IP address at boot time.
Go to root file system again. Under /etc/init.d we had created a file named “rcS”. Open the file and add the following lines.
echo "   emreboy: assign localhost."
ifconfig lo 127.0.0.1 up
route add -net 127.0.0.0 netmask 255.255.0.0 gw 127.0.0.1 lo
echo "   emreboy: Getting IP via DHCP, wait…"
ifconfig eth0 0.0.0.0 up                      | logger -t rcS
udhcpc -n -q -R -s /etc/udhcpc.script         | logger -t rcS
Save and close the file. (Make sure that it’s an executable file)
Create an image of the new file system and compress it using gzip. Now with our groundbreaking new file system execute QEMU. 🙂
That’s it we have our new IP address automatically assigned. 🙂 Now we can also ping machines outside our network thanks to the new routing table.
If you cannot ping your windows host but can ping your guest from windows that’s because of the firewall settings. Lately windows firewall settings disable incoming ICMP echo requests. You need to enable it from advanced firewall settings. Control Panel –> System and security –> Windows Firewall –> Advanced settings –> Inbound rules –> New rule –> custom rule
in Protocol and ports: Protocol: ICMPv4
on the same panel go to customize, choose “Specific ICMP types”, check the box “echo request”
Click next for a few times and save the new rule. There you are. Just give it a try this time.
If something goes wrong please do not hesitate to ask.

3 responses to “Connecting QEMU to a Real Network”