This post may contain affiliate links. Please read our disclosure policy.
These French bread rolls have the subtle sweetness of a good dinner roll recipe, but the delightfully crusty exterior of French bread. Best of both worlds! You’ll love them served alongside a bowl of your favorite soup or piled high in a bread basket for a holiday dinner—and you’ll especially love how easy it is to make them!
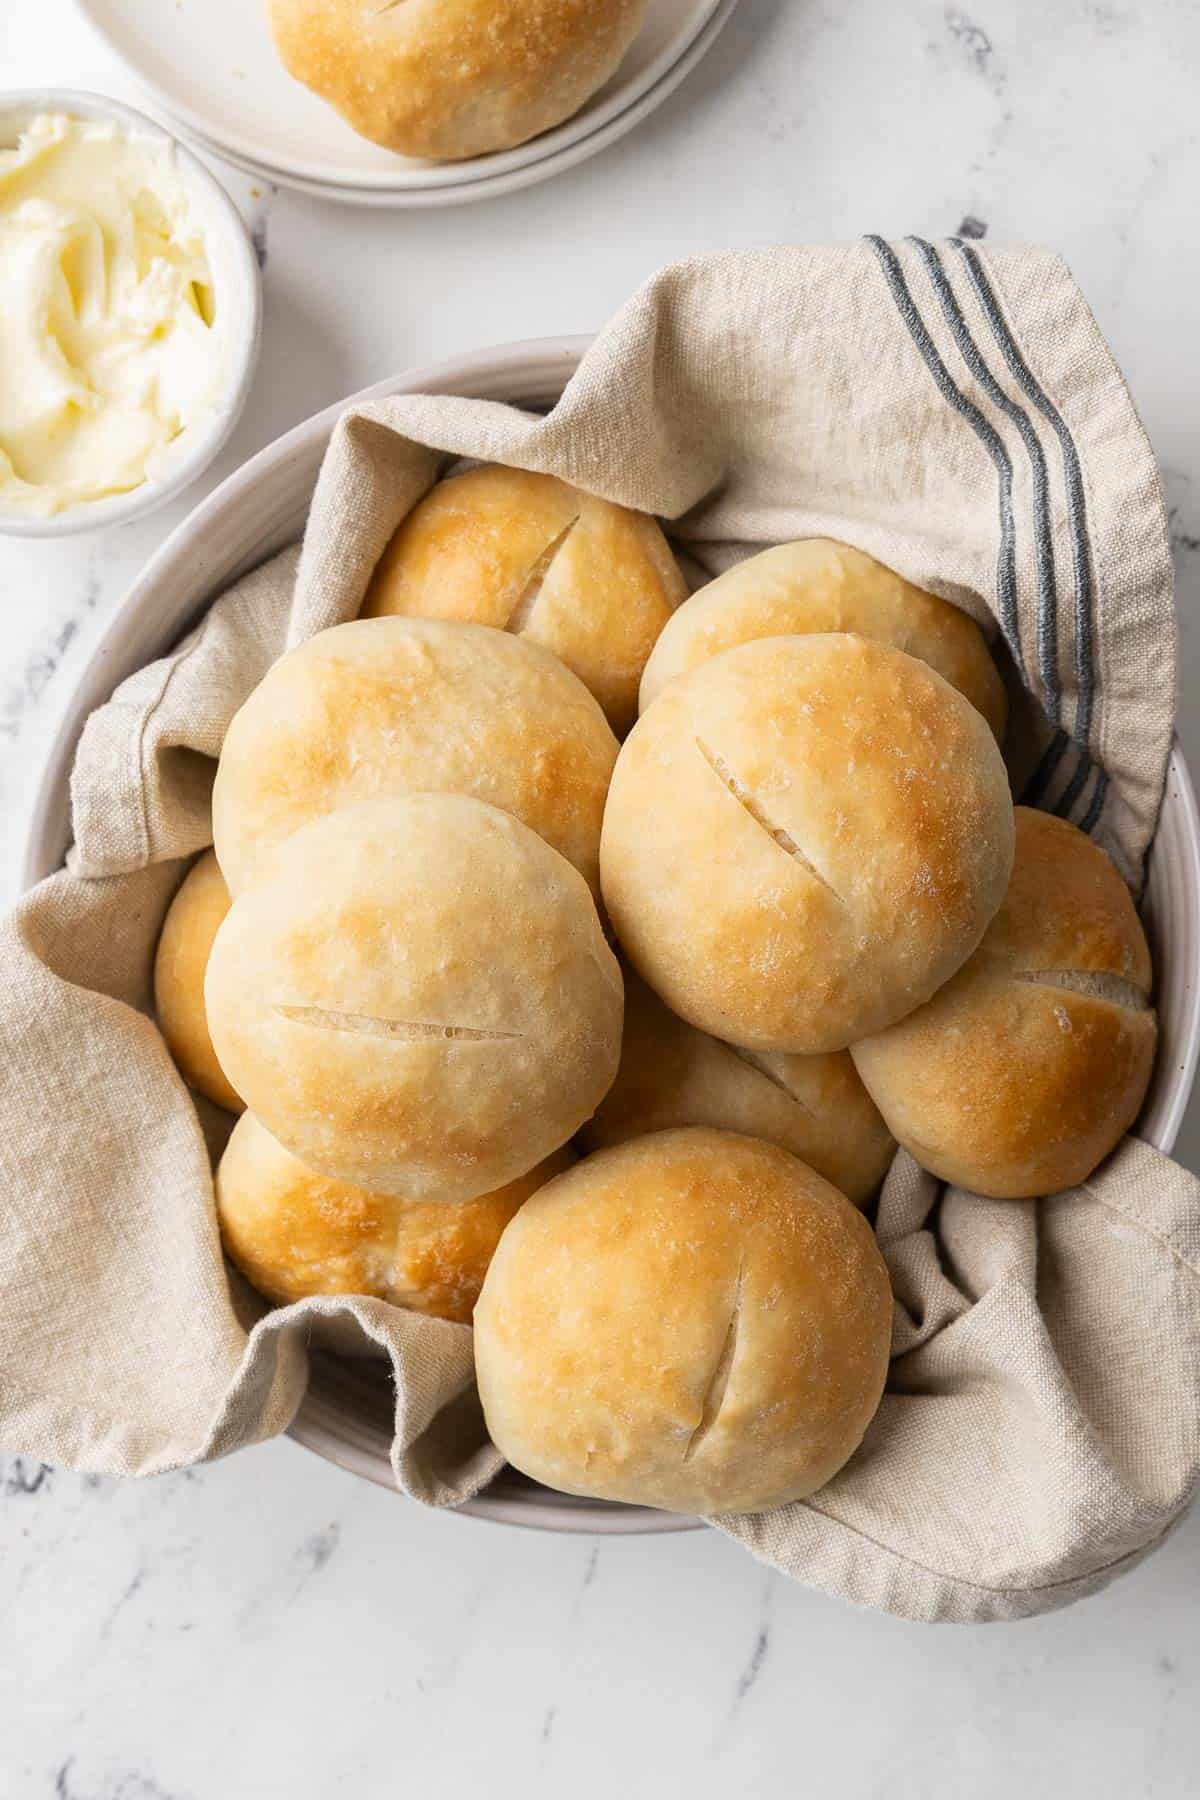
Table of Contents
- Recipe at a Glance
- Ingredients to make French Bread Rolls
- Popular substitutions & additions
- How to make French Bread Rolls
- Tips for making the best French Dinner Rolls
- What to serve with Crusty French Bread Rolls
- How to store & reheat French Bread Rolls
- Frequently asked questions
- More bread recipes:
- French Bread Rolls Recipe
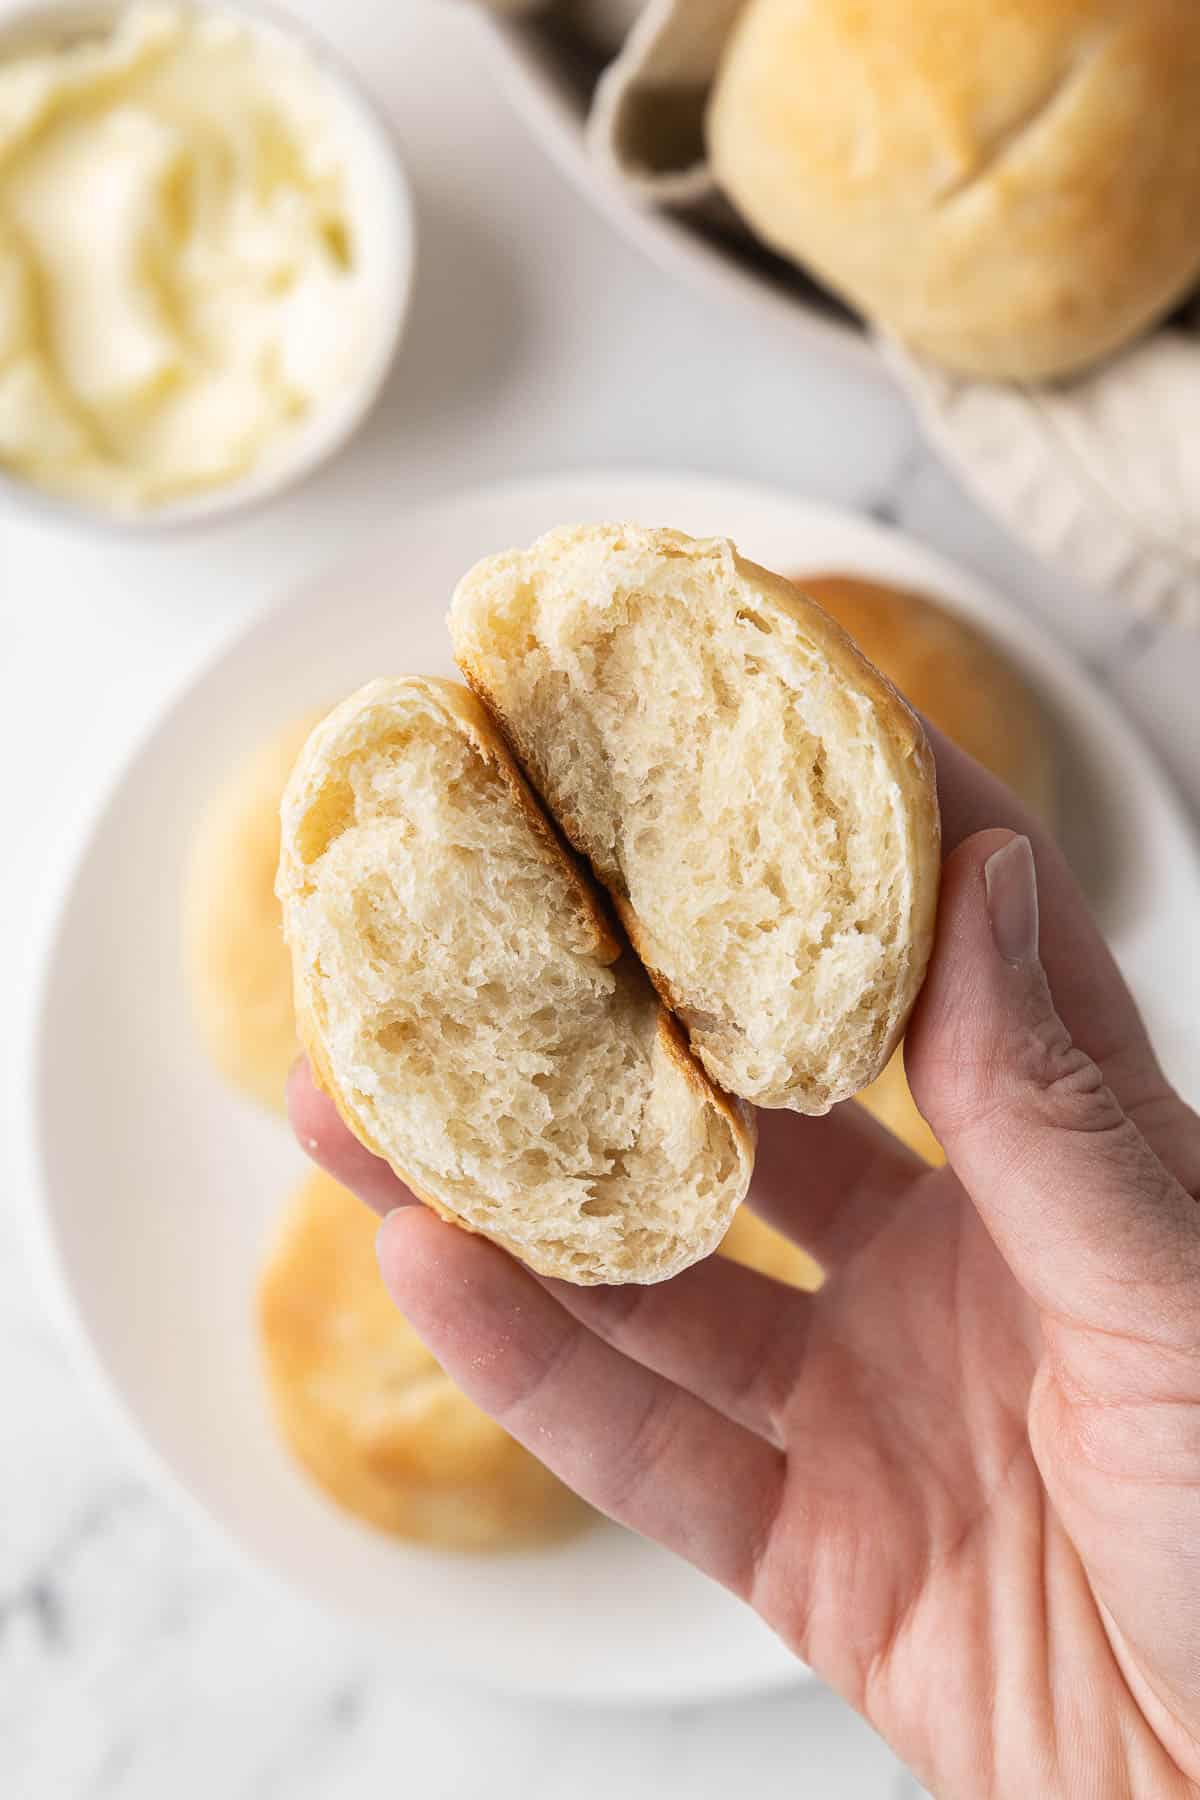
I always get excited for homemade dinner rolls, but these French bread rolls are extra special. While most dinner rolls are soft and pillowy all the way through, French dinner rolls have a chewy, crusty exterior similar to French bread. If the crust is your favorite part of bread, then this is the recipe for you! Don’t worry, though—tucked inside of the crust is a tender, sweet, fluffy center. Basically, this is a recipe that will please everyone!
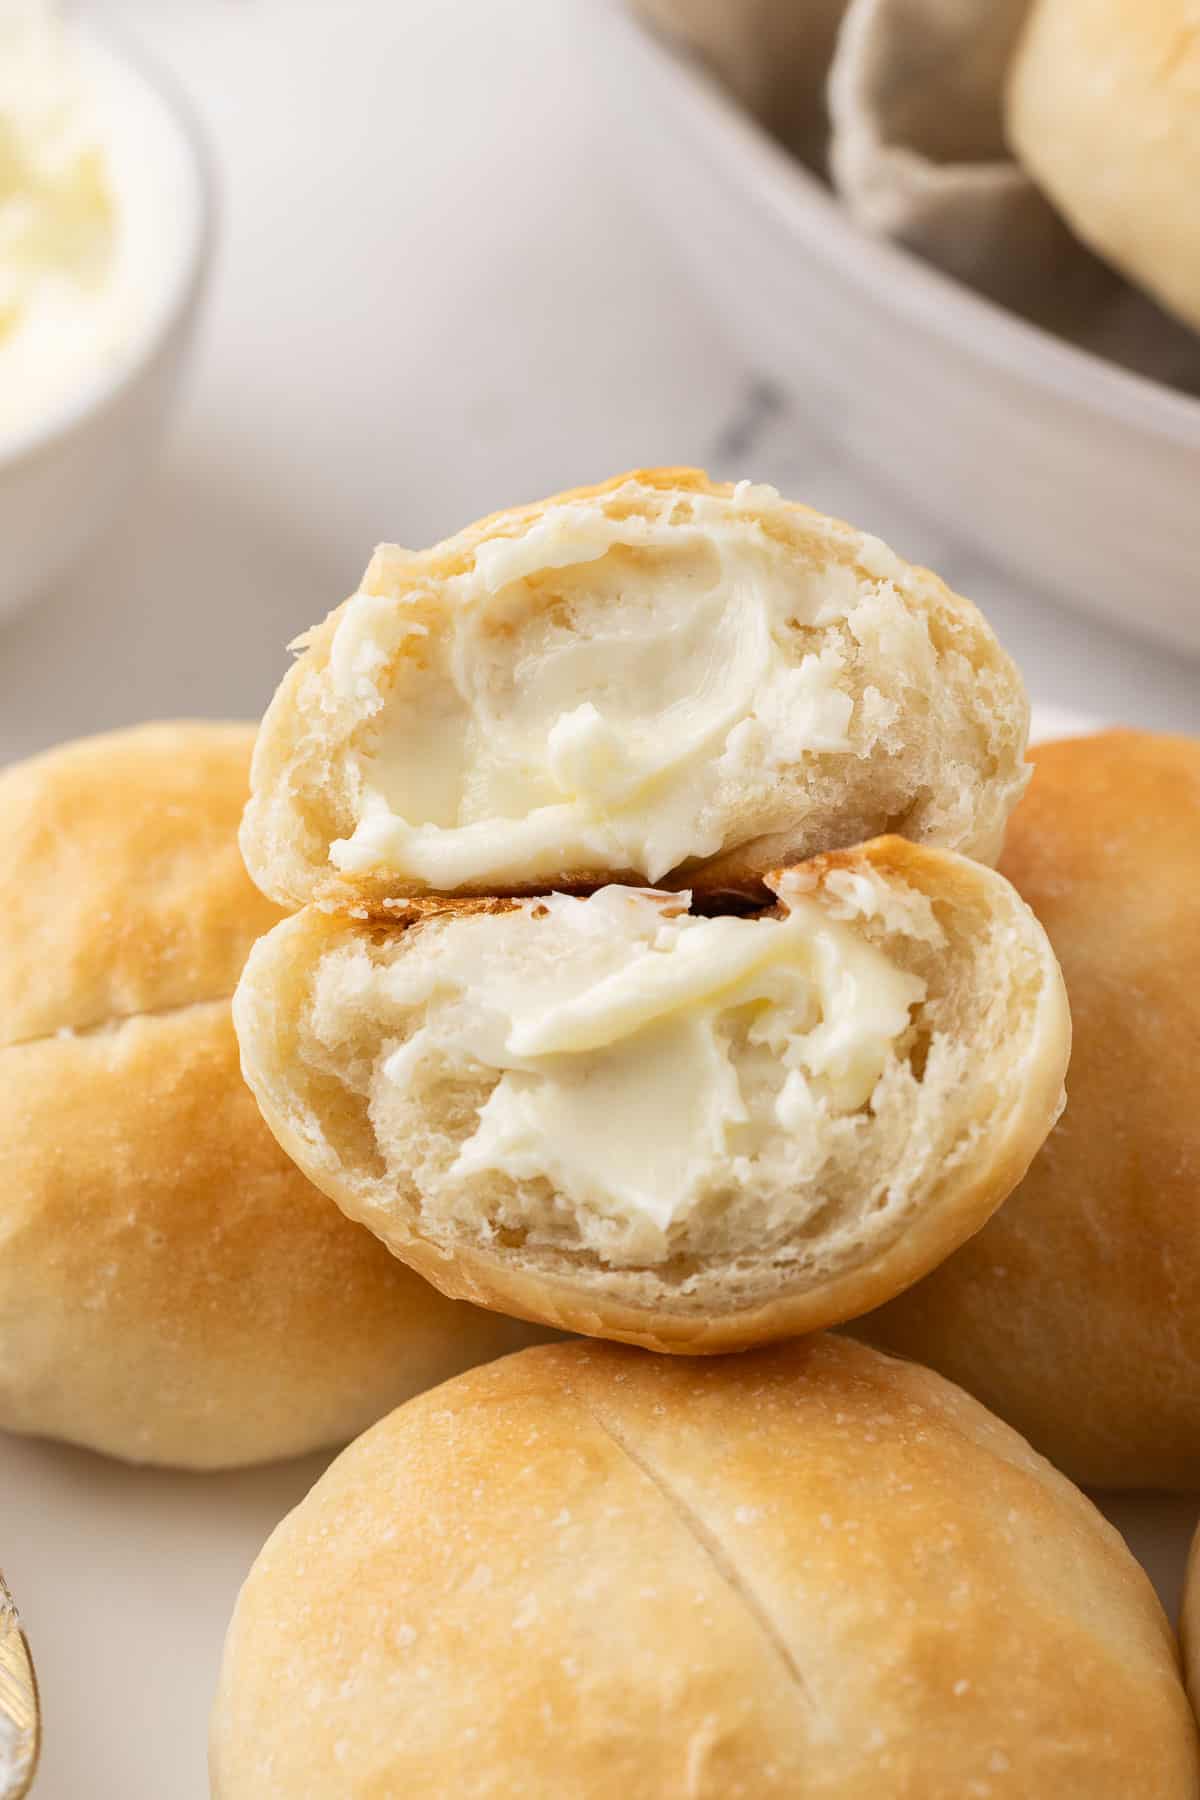
Making fresh bread from scratch can be intimidating, but these easy French bread rolls are the perfect recipe for a first-time bread baker. Your (minimal!) effort will be rewarded with a batch of fresh, warm French dinner rolls to slather with butter or dunk into Roasted Tomato Soup.
Recipe at a Glance
Cuisine Inspiration: American, with French inspiration
Primary Cooking Method: Oven
Dietary Info: Vegetarian
Key Flavor: Slightly sweet
Skill Level: Intermediate
Summary
- A dinner roll recipe for beginners: This is a fuss-free recipe perfect for novice bakers, but even seasoned pros will love the results!
- Unique texture: The combination of pillowy soft dinner rolls with a French bread crust is a total crowd-pleaser. These French bread rolls are impossible to resist!
- Classic dinner roll flavor: Despite the unique texture, the flavor here is traditional—most dinner rolls are lightly sweetened and this recipe gets its subtle sweetness from honey.
- Freezer-friendly: Keep a batch of these crusty French bread rolls in the freezer so you’ll have them on hand for future meals!
Ingredients to make French Bread Rolls
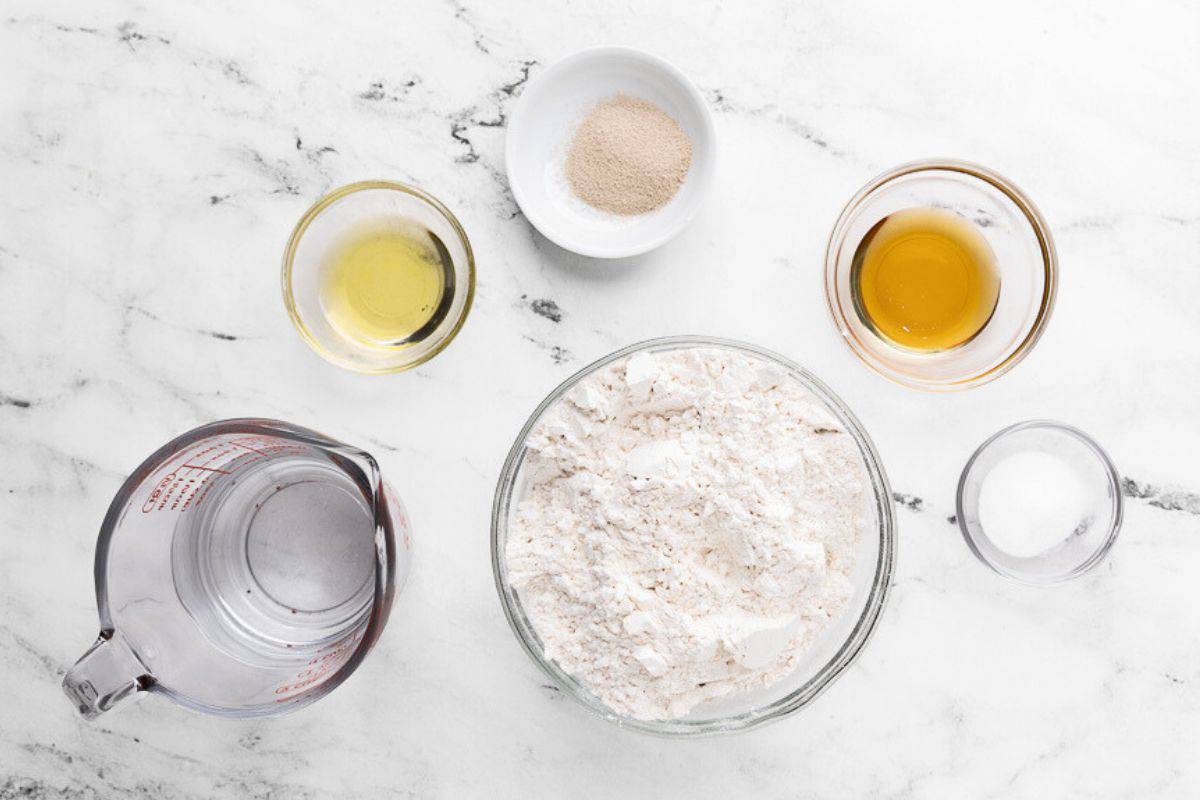
- All-purpose flour: No need for anything fancy here. Everyday all-purpose flour is perfect!
- Water: Warm it up until the temperature reaches 110-120°F.
- Honey: Dinner rolls typically have a lightly sweet flavor. Honey is perfect for this!
- Olive oil: Dinner rolls are also rich! Some recipes call for butter, but I like to use olive oil.
- Instant yeast: Not to be confused with active dry yeast! Be sure to buy instant, since that’s what I used when developing this recipe.
- Salt: Always essential in a homemade bread recipe.
- Cornmeal: This adds some texture and flavor to the bottoms of the rolls, but it’s optional.
Popular substitutions & additions
- Add some whole grain goodness. Swap half of the all-purpose flour for white whole wheat flour. White whole wheat flour (as opposed to regular whole wheat flour) adds whole grains to the rolls without creating a dense texture.
- Fold in some herbs. Fresh minced chives, rosemary, or thyme add flavor to French dinner rolls. Fold these in before you begin kneading the dough.
- Make them buttery. Once the rolls are finished baking, you can brush them with melted butter (or melted garlic butter) to infuse them with flavor—just note that this will soften the crust a bit.
- Add seeds. Brush the tops of the rolls with egg wash and sprinkle on sesame or poppy seeds.
How to make French Bread Rolls
There’s no lengthy rise time for these French dinner rolls, but you should plan for about 2 hours for the entire process, including cleanup.
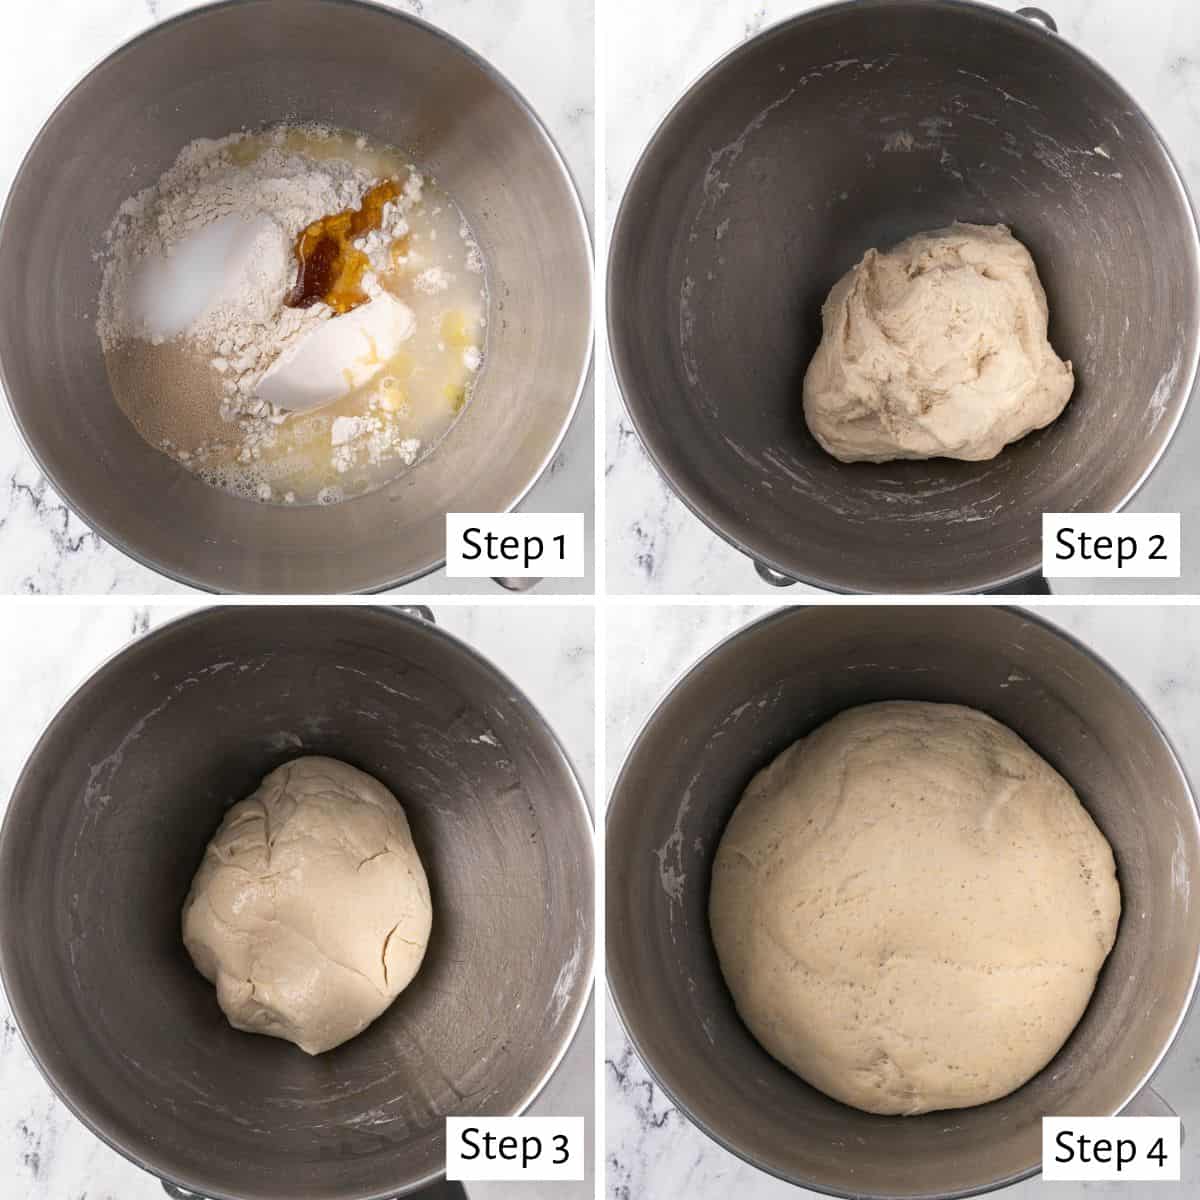
Prepare bread dough
- Combine 2 cups of flour with the rest of the ingredients in the bowl of a stand mixer.
- Use the dough hook to mix everything together, adding more flour ¼ cup at a time.
- Knead until the dough pulls away from the sides of the bowl and forms a ball.
- Set the ball of dough in an oiled bowl, flip it a few times to coat it in oil, cover the bowl, and let it sit until the dough doubles in size.
Make french bread dough balls
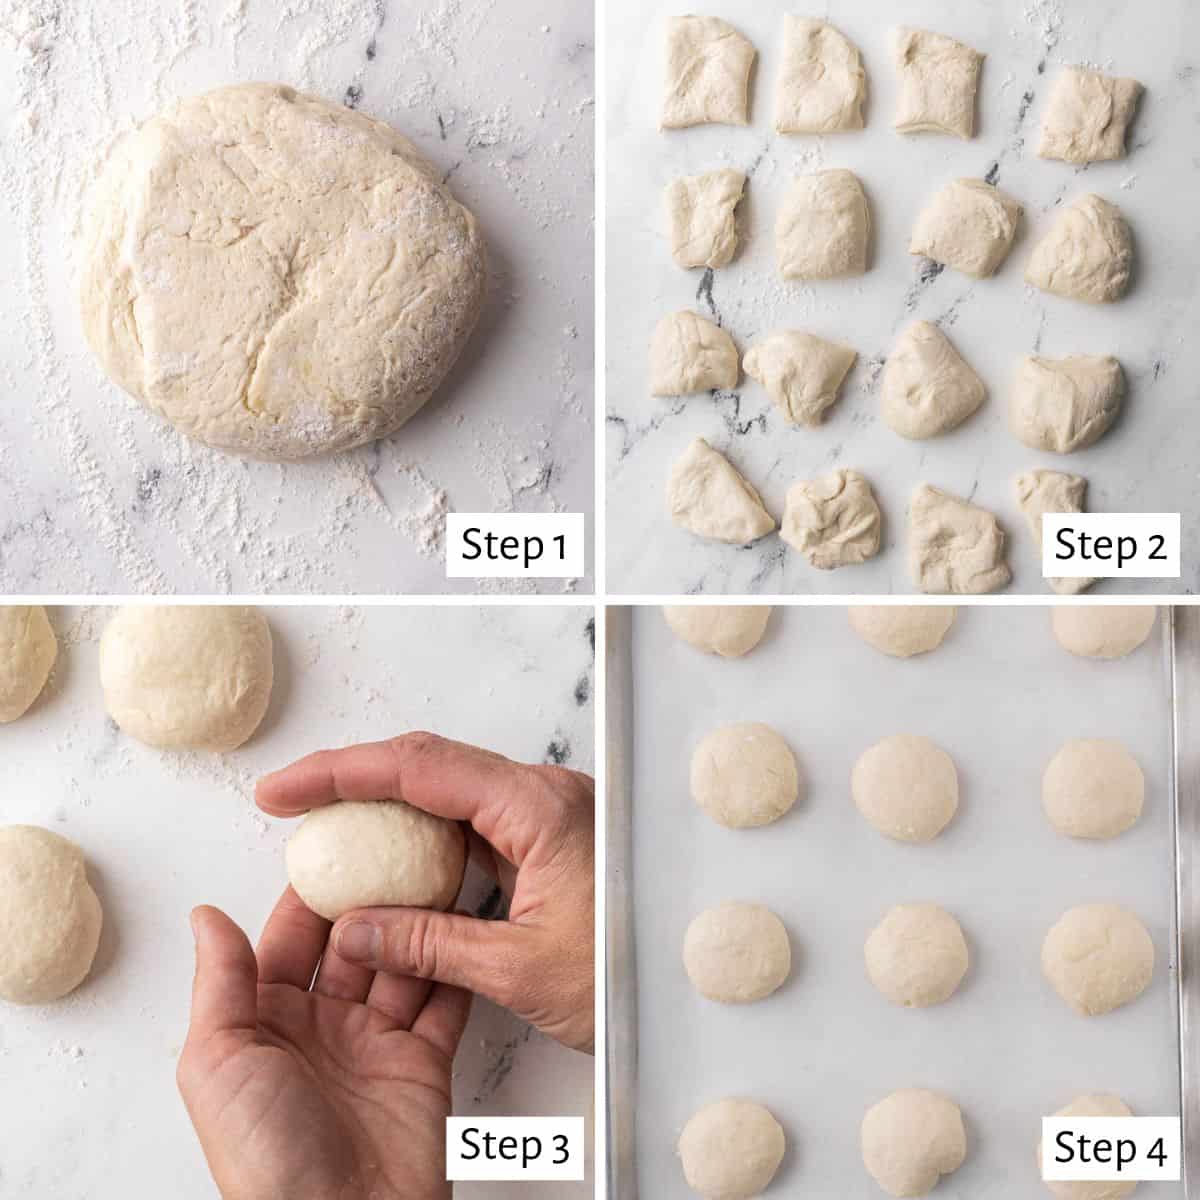
- Gently deflate the dough, then turn it out onto a clean work surface.
- Cut the dough into 16 equal pieces.
- Form each piece of dough into a tight, smooth ball.
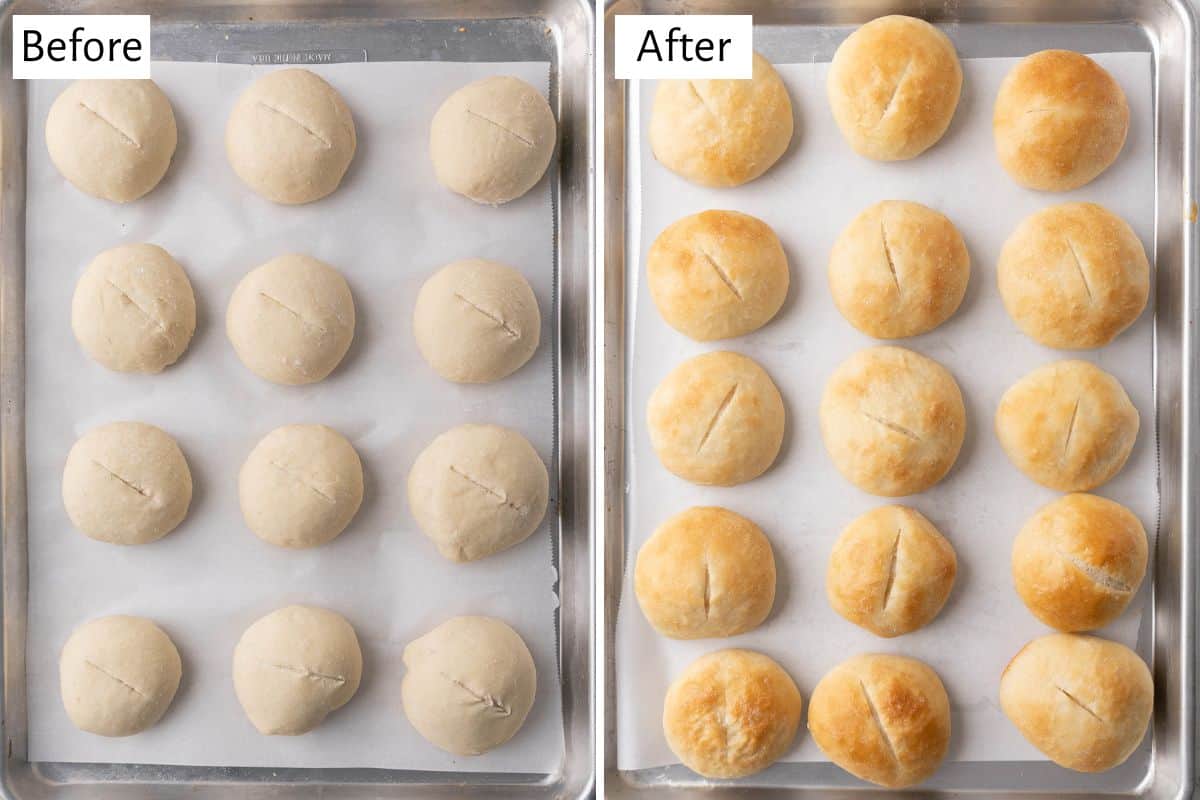
- Set the balls of dough on a parchment-lined baking sheet; cover with a kitchen towel and proof until the rolls are doubled in size.
Bake French Bread rolls in oven
- Score each roll with a sharp knife.
- Bake until the French dinner rolls are golden brown.
Tips for making the best French Dinner Rolls
- Don’t scoop the flour. Because we’re measuring by volume instead of weight, it’s really important that you measure accurately! Instead of scooping the flour out of the jar or bag with your measuring cup, lightly spoon it into the cup, then use a butter knife to scrape off any excess.
- Use your hands if you don’t have a mixer. No stand mixer? No problem! Stir together the dough with a wooden spoon until it all comes together, then switch to using your hands for kneading.
- Don’t over-knead the dough. Kneading activates the gluten in the flour, which gives bread its structure. But too much kneading can result in tough, dense rolls. Only knead until the dough is smooth and elastic.
- Shape the rolls tightly. When shaping the dough into rolls, it’s not enough to simply roll them into balls. Fold the sides under each roll, stretching them a bit to create some tension. Then roll the dough between your hands. Creating taut, tight balls of dough will help them rise tall, rather than simply expanding outward.
- Score the tops. This isn’t just for looks—it serves an important purpose. The steam needs to escape somewhere as the rolls bake. If you don’t score the tops, your dough will decide where to let the steam escape—which will result in rolls that are misshapen and blown out. Scoring gives you control over where the vent is. Use a sharp knife or bread lame to do this; if it’s sticking to the dough, you can coat the blade with olive oil.
- Don’t forget to create steam. The pan of water at the bottom of the oven is key to getting the perfect French bread crust on these rolls. Without it, your dinner rolls will still be delicious, but you won’t have the crusty exterior.
What to serve with Crusty French Bread Rolls
How to store & reheat French Bread Rolls
Let the rolls cool completely, then store them in an airtight container at room temperature for up to 3 days. To reheat, wrap them in foil and place in a preheated oven at 350ºF for 5 to 10 minutes.
Can i freeze French Dinner Rolls?
You can freeze these rolls either before and after baking. To freeze before baking, shape the rolls and place them on a baking sheet lined with parchment paper. Freeze until solid, then transfer the balls of dough to a freezer bag or airtight container for up to 3 months. When you’re ready to bake, let them thaw for about an hour before following the recipe’s instructions.
To freeze after baking, let the rolls cool completely, then place them in a freezer bag or container. They will keep for up to 3 months. You can let them thaw at room temperature and enjoy them that way, or warm them up in the oven.
Frequently asked questions
How do I know my yeast is active?
Using warm water between 110-120°F should activate your instant yeast. However, if you’re unsure about the viability of your yeast, you can test it by mixing it with a bit of warm water and a pinch of sugar. If it froths up within a few minutes, it’s good to go.
What makes homemade rolls tough?
Over-kneading and under-proofing the dough can result in tough, dense rolls. If your house is chilly, you may want to let the rolls proof in the microwave, your pantry, or even in the oven with the pilot light on to protect the dough from drafts of cold air. This will help ensure that they proof in a reasonable amount of time.
Do you let rolls rise before baking?
Yes, this allows the dough to rest and expand, resulting in lighter and fluffier rolls. It also develops the flavor of the bread.
There are several possible reasons why your dough may not rise. It could be that the water temperature was too hot or too cold, affecting yeast activation. Or, you might be using expired yeast. Also, make sure your dough is in a warm, draft-free environment for effective proofing.
Warm, homemade French bread rolls make any dinner special! You’ll love the soft, pillowy centers and irresistibly chewy golden-brown crust. Keep a batch in the freezer and enjoy them anytime!
More bread recipes:
- 2-Ingredient Bagels
- Focaccia Charcuterie Board
- Garlic & Herb Skillet Dinner Rolls
- Homemade Dinner Rolls
- Garlic Knots
- Rosemary Focaccia
- How to Make Flatbread
- Cheese Manakeesh
- Yogurt Flatbread
- Homemade Pita Bread
If you try this feel good French Bread Rolls recipe or any other recipe on Feel Good Foodie, then don’t forget to rate the recipe and leave a comment below! It helps others who are thinking of making the recipe. We would love to hear about your experience making it. And if you snapped some shots, share it on Instagram so we can repost on Stories!
preorder MY book
The Feel Good Foodie Cookbook is now available everywhere books are sold!
Amazon Barnes & Noble Books A Million Hudson Booksellers BookshopSCHULER Books (SIGNED)

French Bread Rolls
Ingredients
- 3 ½ cups all-purpose flour divided
- 1 ¼ cups water warm (between 110-120°)
- 2 tablespoons honey
- 2 tablespoons olive oil plus more for bowl
- 2 ¼ teaspoon instant yeast 1 packet
- 2 teaspoons salt
- cornmeal optional
Instructions
- In the bowl of a stand mixer with the dough hook, combine 2 cups of flour, warm water, honey, olive oil, yeast and salt.
- Mix for a few seconds and add the remaining flour, ¼ cup at a time. Knead for 5 minutes at medium-low speed until the dough pulls away from the sides of the bowl and forms a dough ball.
- While the dough is kneading, lightly oil a bowl. Transfer the dough to the oiled bowl and flip to lightly coat. Cover with a kitchen towel or plastic wrap (lightly) and proof the dough has doubled in size, about 45 minutes. Prepare a baking sheet by lining it with parchment paper and sprinkling with cornmeal (optional).
- Once risen, deflate the dough and transfer to a clean work surface. Gently form a ball and cut into 16 equal pieces. Fold the sides of each piece underneath and gently roll on the surface with the palm of your hand and fingers to form a smooth ball. Transfer to the prepared baking sheet and cover with a kitchen towel and allow to rise until doubled in size, about 30-45 minutes. After the final proofing, use a sharp knife to score the top of each roll.
- Preheat the oven to 400°F and place a shallow baking dish with a small amount of water on the bottom rack of the oven. Once preheated, bake rolls for 16-18 minutes, or until golden brown.
Nutrition
Nutrition information provided is an estimate. It will vary based on cooking method and specific ingredients used.
Hey Yumna!
Do you NEED to use the dough hook attachment for this recipe? Thank you for your time! I love your recipes!
Can you freeze these?
Yes! To freeze after baking, let the rolls cool completely, then place them in a freezer bag or container. They will keep for up to 3 months. You can let them thaw at room temperature and enjoy them that way, or warm them up in the oven.