 Crayfish
Dissection
Crayfish
DissectionCrayfish
Dissection
If you missed the crayfish dissection lab use the links below to view a dissection that utilizes the same techniques we used during our dissection lab:
Click HERE for Crayfish Dissection Lab Video Part 1
Click HERE for Crayfish Dissection Lab Video Part 2
OBJECTIVES:
Identify the external anatomical features of a typical crustacean.
Describe the appearance of the various organs found in a crayfish.
Name the organs that make up the systems of the crayfish
Describe how the crayfish is able to move and obtain food.
Click HERE for the Crayfish Lab Companion (will give you some information about what to look for when you take your lab quiz)
MATERIALS NEEDED:
preserved crayfish
dissecting tray
scissors
tweezers
probe
magnifying glass
Crayfish Phylogeny:
| Kingdom | Animalia |
| Phylum | Arthropoda |
| Class | Malacostraca |
| Order | Decapoda |
| Family | Cambaridae |
| Genus | Procambarus |
| Species | Procambarus clarkii |
CRAYFISH BACKGROUND INFORMATION:
Like all crustaceans, a crayfish has a fairly hard exoskeleton that covers its body. This exoskeleton is composed of a nitrogen-based carbohydrate polymer known as chitin. This polymer can be found in many different organisms of the natural world, from the exoskeletons of arthropods to the composition of fungi cell walls. It is a very versatile substance.
|
|
 |
As shown in the diagram below, the crayfish body is divided into two main parts:
cephalothorax
abdomen

The cephalothorax consists of the cephalic (or head region) and the thoracic region. The rostrum is the most anterior part of the cephalic region of the cephalothorax and will form what is commonly known as the "brow ridge". The part of the exoskeleton that covers the cephalothorax is called the carapace. The cephalothorax is divided into 13 segments. The abdomen is located behind the cephalothrorax and consists of six clearly divided segments. Each segment of the cephalothorax and abdomen will contain a pair of appendages. The cephalic region contains 5 pairs of appendages. If you total these together you get "ten" appendages. This is where the order name originated from. "Deca-" refers to the number 10 and "-poda" refers to appendages. So..... "Decapoda" means "10 appendages".
one pair of antennules (organs of balance, touch, and taste)
one pair of longer antennae (organs of touch, taste, and smell)
one pair of mandibles (crush the food by moving from side to side)
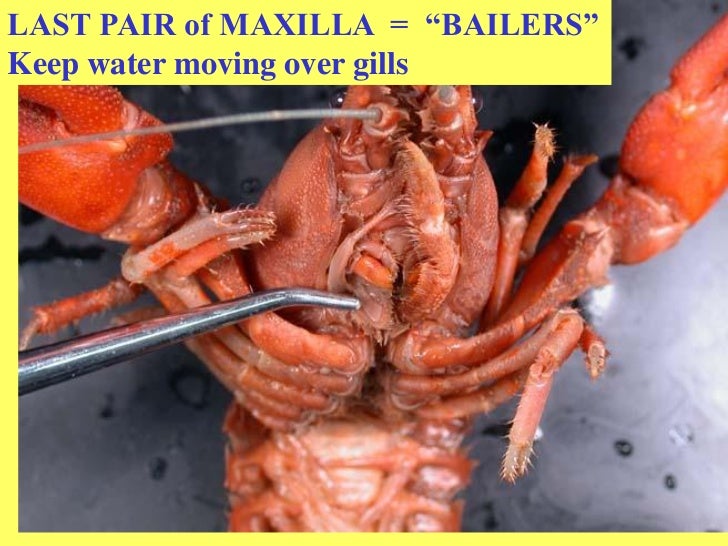
two pair of maxillae (hold solid food, tear it, and pass it to the mouth, the 2nd pair helps draw water over the gills)

The cephalothorax is divided into 8 pairs of appendages:
3 pair of maxillipeds
first two maxillipeds are used for holding the food while eating
last pair of maxillepeds are called "bailers"; these are used to keep water water moving over the gills
1 pair of chelipeds (large "claws" used for defense and capturing food)
4 pair of walking legs (locomotion)
The diagram below shows all of these appendages:
 |
1. antennules
2. antennae 3. mandibles 4. maxillae 5. 6. 7. maxillipeds 8. chelipeds |
The segments of the abdomen are known as abdominal somites include the following appendages:
5 pairs of swimmerets (create water currents and function in reproduction)
2 pair of uropods (two on each side of the telson)
1 telson (contains the anus)
The uropods and telson together make up the tail fan. The crayfish is able to move backwards by forcing water with its tail fan.
 |
 |
Crayfish, common in streams and lakes, often conceal themselves under rocks or logs. They are most active at night, when they feed largely on snails, algae, insect larvae, worms, and tadpoles; some eat vegetation (various water plants). A dead fish worms, corn, and salmon eggs are also favourites of the crayfish. Studies show that adults (one year old) become most active at dusk and continue heavy feeding activity until daybreak. Young crayfish are more likely to be the ones out during bright sunny days, while the older crayfish are more active on cloudy days and during the night. General movement is always a slow walk, but if startled, crayfish use rapid flips of their tail to swim backwards and escape danger.
Most crayfish live short lives, usually less than two years. Therefore, rapid, high-volume reproduction is important for the continuation of the species. Many crayfish become sexually mature and mate in the October or November after they're born, but fertilization and egg laying usually occur the following spring. The fertilized eggs are attached to the female' swimmerets on the underside of her jointed abdomen. There the 10 to 800 eggs change from dark to translucent as they develop. The egg-carrying female is said to be "in berry," because the egg mass looks something like a berry. Females are often seen "in berry" during May or June. The eggs hatch in 2 to 20 weeks, depending on water temperature. The newly-hatched crayfish stay attached to their mother until shortly after their second molt.
Click HERE for and Illustrated Guide to the Dissection of the Crayfish
PROCEDURE PART 1: External Anatomy of a Crayfish
1. Place the crayfish on its side in the dissection tray. Use the diagrams above to locate the cephalothorax and the abdomen. The carapace, a shield of chitin, covers the dorsal surface of the cephalothorax. On the carapace, locate the indentation known as the cervical groove. This indentation extends across the midregion and separates the head and thoracic regions of the cephalothorax.

2. Place the crayfish so that the dorsal side is facing upward. Use the diagrams above to locate the rostrum. Beneath the rostrum are the two eyes, each of which is located on the end of a stalk. Having stalked eyes helps the crayfish to see in all directions. This will help them locate predators and allow them to swim to safety. The indentation along the dorsal surface is known as the dorsal suture. This separates the two sides of the carapace.
3. Locate the five pairs of appendages on the head region. First locate the antennules in the most anterior segment, behind them observe the much longer pair of antennae.

4. Locate the mouth on the ventral side of the crayfish. Observe the mandibles, and the two pairs of maxillae which are the last appendages of the cephalic region of the crayfish.


5. On the thoracic portion of the cephalothorax, observe the 3 pointed maxillipeds.
6. Next observe the largest, most prominent pair of appendages, the chelipeds or claws. Occasionally you might see one larger than the other. Crayfish have the ability to regenerate lost appendages. The smaller one represents the one that is still regenerating. The cheliped is divided into three distinct parts: the "claw" is formed from the propodite and the dactylopodite. The dactylopodite is the moveable part of the claw and the propodite is the stable part of the claw that does not move. The lower claw is attached to the carpodite which is segmented and attaches directly to the cephalothorax.

7. Behind the chelipeds are the four pairs of walking legs. You can use the walking legs as one way to determine the sex of your crayfish. Locate the base segment of each pair of walking legs. The base segment is where the leg attaches to the body. Use a magnifying glass to study the inside surface of the base segment of the THIRD PAIR of walking legs. If you observe a crescent-shaped slit, you have located the genital pore of a female. In a male, the sperm duct openings are on the base segment of the FOURTH PAIR of walking legs. These may be difficult to find, so if you cannot find them, you can still determine the sex of your crayfish by looking at the next group of appendages.
8. On the underside of the abdomen you will find the appendages known as the swimmerets. As stated before, these are used for creating water currents for feeding as well as functioning in reproduction. The FIRST TWO pair of swimmerets in the male are longer and are tucked up underneath and forward facing. The male uses these swimmerets to transfer sperm to the female. The female swimmerets are all rather small and dainty. She will use these swimmerets to hold the eggs underneath her abdomen until they hatch. When a female crayfish is holding her eggs, it somewhat resembles a bunch of "berries", so the term in berry refers to a female that is clutching her eggs under her abdomen. See the pictures below for assistance in determining the sex of your crayfish.
 |
 |
|
Crayfish Anatomy Differences Between Males & Females
|
Female Crayfish "In Berry"
|
PROCEDURE PART 2: Internal Anatomy of a Crayfish
1. Using one hand to hold the crayfish dorsal side up in the dissecting tray, use the scissors to carefully cut through the back of the carapace along the dissection cut line #1 (as seen below on the diagram). Cut along the indentations that separate the thoracic portion of the carapace into three distinct regions. Make small and shallow cuts so as not to disturb any of the structures underneath the carapace. Start the cut at the posterior edges of the carapace, and extend it along both sides in the cephalic region.

2. Use the tweezers to carefully lift away the carapace. Try not to damage any of the underlying structures while doing this. Be careful not to pull away the carapace too quickly, such action would disturb the underlying structures.
3. Place the crayfish on its side with the head facing left on your tray, as shown in the diagram below. Using the scissors, start cutting at the base of cut line #1. Cut along the side of the crayfish, as illustrated by cut line #2 shown below. Extend the cut toward the rostrum at the top of the head.

4. Use the tweezers to carefully lift away the remaining parts of the carapace, exposing the underlying gills and other organs. Use the diagram below to help you locate these organs.

5. The muscles (anterior gastric, mandibular, and pyloric) are muscles that are used in the process of feeding and grinding up the food. Locate the digestive gland. This gland produces digestive enzymes to help break down the food. The digestive gland is also involved in the absorption of nutrients.
6. Use the diagram below to help you locate the gills. They are feather-like structures found under the carapace and are attached to the chelipeds and walking legs. A constant flow of blood to the gills releases carbon dioxide and picks up the oxygen that is available in the water. The feathery like structure is designed to increase the surface area for more areas of absorption.

7. Use the diagram below to help you locate the organs of the circulatory system. Locate the dorsal tubular heart. It is a "shield-like" structure that is connected to a few small arteries. The crayfish has an open circulatory system in which the blood flows from the arteries into small spaces in the tissues called sinuses. Gas exchange takes place as the blood flows over the gills before it returns to the heart.


8. To expose the intestine, carefully cut along the abdomen down towards the tail. Do not cut too deeply or you will cut into the intestine. Carefully peel the chitinous exoskeleton away from the abdomen as seen in the diagram below.
 |
1. flexor muscles
2. extensor muscles 3. intestine 4. walking leg 5. uropods 6. telson 7. carapace
|
9. Carefully peel the lower portion of the exoskeleton from the abdomen (the area that contains the swimmerets) to expose the underside of the abdomen.
10. Use the diagram below to help you locate the lobed cardiac stomach. The cardiac stomach contains some teeth-like growths. These growths compose the gastric mill which is used to help grind up the food for easier digestion.

11. The journey of digesting begins as the mandibles crush the food into smaller bits that can be taken into the mouth. The food then goes on to the stomach where mechanical digestion occurs as the gastric mill grinds up the food into even smaller bits. The digestive glands then secrete the enzymes which will chemically break down the food and absorb the food into the blood which will carry the nutrients to the tissues. The undigested food will then travel to the intestine which will expel the undigested waste through the anus. Use the diagram below to locate the intestine.

12. Use the diagram below to help you locate the ventral nerve cord. The nerve cord lies in a groove on the underside of the abdomen (exactly opposite of the intestine). The ventral nerve cord will run the entire length of the crayfish. It is connected to the primitive brain that is located in the head region. Notice the enlargements of the nerve cord on the lateral sides. These are called ganglia (singular = ganglion). These will extend to the individual nerves to relay information to the various muscles and organs.

You have now come to the conclusion of the crayfish dissection. Please dispose of the crayfish in the garbage and clean up your dissection tools and area.
Finish the Crayfish Dissection Review in JupiterEd to complete your dissection experience.
Click HERE for the Crayfish Dissection Lab Companion (this will give you information about what will be on the dissection quiz)


