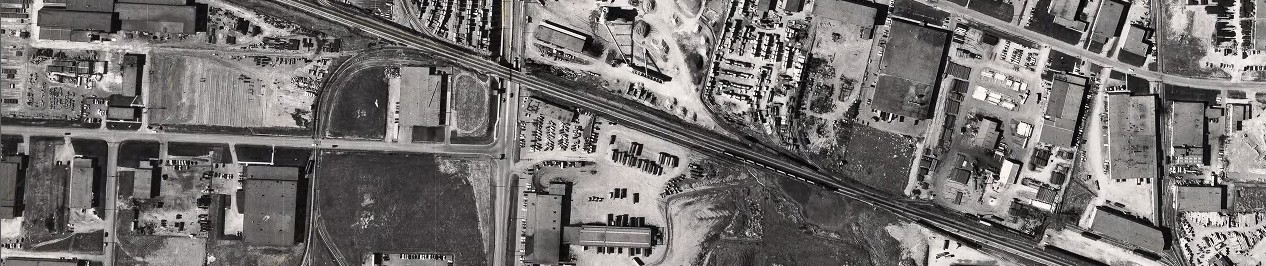
Above: some TLT CN 40′ ice reefer shells that were given a second life, with the addition of some custom underframes!
I recently acquired a few surplus HO-scale True Line Trains 40′ CN refrigerator car shells from a contact that had a few sitting around. The story behind this was years ago TLT originally produced CN reefers in the noodle livery in grey instead of silver, so they had the factory run replacement shells and shipped them out to hobby shops and dealers for replacement. Not all found their way to new owners however, and one can still find some spare shells (either the replacement silver ones, or the original grey ones that were replaced) floating around. Adding underframes to these is an easy way to expand your CN reefer fleet, and put those surplus or replacement shells to good use. This method can also be used to build underframes for other oddball cars and shells you might have sitting around.
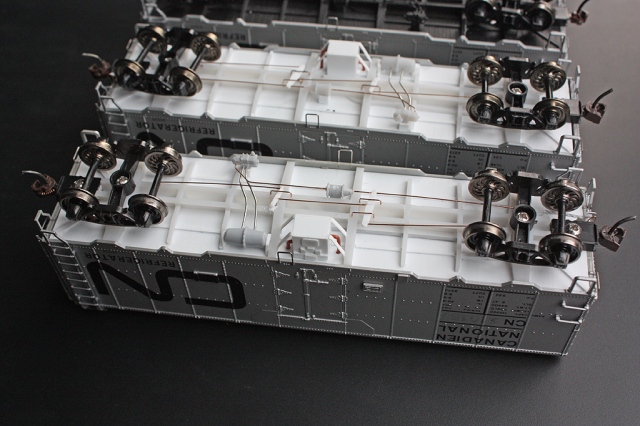
Above: There’s a lame reefer madness joke in here somewhere.
One can put the shells on a different 40′ underframe to put them back into use (like with the modified plug-door TLT car here that used an Athearn “blue box” 40′ boxcar underframe), or one can build their own. Companies like Accurail sell separate plastic underframes that can be utilized, but often bolster spacing and underframe details might not be correct, or need modificatons. As well, many basic underframes aren’t very detailed. The previous TLT reefer build that used a modified Athearn blue-box 40′ boxcar underframe had its drawbacks (the Athearn underframe is not very well detailed, the weight is between the floor and underframe causing a higher ride-height, the cars have poor clip-on coupler pockets, etc).
Prototype Info
The True Line Trains model represents a steel ice reefer unique to CN (originally designed and built at their own Transcona Shops in Winnipeg MB), of which they owned many that served for decades. Even after ice cooling fell out of favour because of newer mechanically cooled cars, the ice reefers continued in “heater service” use due to their underframe-mounted charcoal-fired heaters. The Canadian Freight Railcar Gallery has photos of the prototypes in the 210000-series, although many were renumbered over time into different groups (e.g. 250000-series cars), and similar cars existed in different groups, with plug doors, or rebuilt with larger doors or door-mounted refrigeration units. The TLT shell as-is represents a common ice-cooled hinged-door variant, but could be modified to represent other cars. Funaro and Camerlengo have released a few different flat resin kits of CN reefers in the past.
Of note: the official colour of the CN noodle cars was silver (the older maple leaf logo cars were grey), but many of the silver ones faded into a dull grey colour with age and dirt buildup, so the incorrect grey bodies could be used to simulate an older weathered car. They often could be found mixed together with fresh silver repaints in service, as is the case here: http://www.railpictures.ca/?attachment_id=33806
The Build
The main parts you’ll need (aside from trucks and couplers) are the underframe components, more specifically the underframe itself and some underframe brake rigging/appliances. I typically use Intermountain 40′ boxcar parts for this, often using either of the following for my projects:
Underframe:
-Intermountain part #P40400-16B (PS1 40′ boxcar underframe) or their #P40700-16A (1937 AAR 40′ boxcar underframe)
Underframe Details:
-Intermountain part #P40400-18A (PS-1 underbody details), or #P40700-18A (1937 AAR boxcar underbody detail set), or Tichy #3013 (AB Brake set)
It’s important to note that we’ll be cutting the frame shorter and replacing the plastic rigging with brass wire, so it doesn’t matter which combination of parts you buy. For this project, I used modified PS-1 underframes and cut out all the brake parts from the PS-1 detail set. But, you can easily use them as-is and together depending on the car you’re building an underframe for (note, the PS1 details are designed to fit the PS1 underframe so buy both together if you’re using the frame as-is, ditto for the 1937 AAR boxcar parts).
Now for a little shout-out: I typically get my boxcar parts, couplers, trucks, etc from online model RR retailer TMR Distributing when I can, as Terry always gets them packaged and mailed out promptly, and his pricing is quite competitive – especially when it comes finding and buying parts from US manufacturers in Canada.
The Underframe:
The floor was made from a piece of flat 0.040″ sheet styrene, cut about 14.1cm x 3.3cm (41′ by 9′ 1/2″ scale feet). It was given scribes with an X-acto knife blade to simulate the visible floor slats from below. A modified Intermountain 40′ PS1 boxcar underframe was then glued on. To get the correct truck/bolster spacing, the Intermountain PS1 underframe was shortened about 4mm to bring the bolster spacing to about 10.7cm (31 scale feet). Some of the support ribs underneath had bits of styrene glued to their ends to extend them to the edge of the floor. A few thin strips of 0.020″ styrene were cut to run between the bolsters and glued into place.
 Above: a bare frame and floor (modified and shortened Intermountain frame on a styrene floor), next to a completely detailed frame.
On top of the floor (inside the body) some 0.010″ styrene bits were glued around the edges to get the body to sit right. To re-enforce the ends of the floor where the couplers and coupler boxes would be mounted, some extra 0.040″ styrene sheet was glued to increase the thickness over the bolster and coupler pocket area, and two thick 0.040″ styrene strips were glued upright along the length of the floor to offer extra rigidity to the underframe, and braced with smaller bits. Once dry, holes were marked, drilled and tapped for 2-56 screws to mount Kadee coupler boxes (your preference for draft gear may differ, but a Kadee #232, #242 box or some #175 semi-scale draft gear does the trick nicely). This was all tested at various times to make sure the custom underframes would fit the TLT reefer bodies.
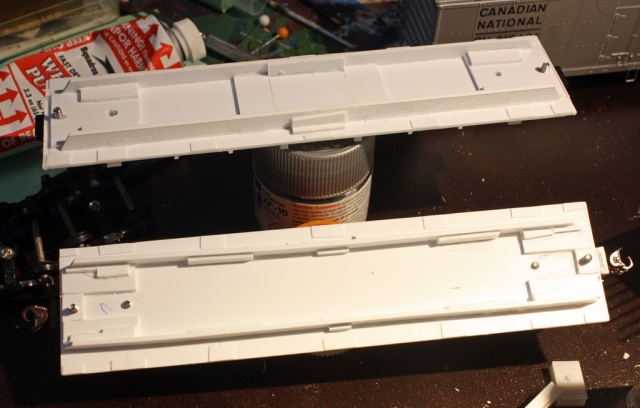
Above: some quickie re-enforcement on top of the underframe floor, using 0.040″ styrene above the coupler areas and along the length of the floor. Most of the extra bits and pieces to brace them came from the styrene scraps box. Also note the 0.010″ shims added to the edges to adjust the body height.
Once the underframe was glued to the floor, some spare round sprue bits were glued into the Intermountain bolster holes (one could use styrene rod too), drilled and tapped for 2-56 screws.
For the underframe brake rigging, one could use either an Intermountain 1937 AAR boxcar brake rigging set and shorten it to fit the underframe, or just salvage the brake rigging components (triple valve, air reservoir, brake cylinder, etc) from that or a PS-1 set, and replace all the rigging with 0.0125 or 0.015″ wire (which is what I ended up doing). As an alternative, components from Tichy’s #3013 AB brake set can also be used.
After plugging and filling all the holes on the Intermountain underframe, it was time to add parts. First I drilled some holes into the sides of the triple valve and air reservoir and ran two short lengths of wire between them. Then, they were glued to the underframe by mounting them on some 0.040″ styrene blocks to get them the right height. Two thin 0.010″ strips of styrene were wrapped around the ends of the reservoir tank to represent the mounting brackets. The brake cylinder was then drilled through so a wire from the rigging could be run through it (one could add a small length of chain here between the cylinder’s pointed end and rigging bars if they desire, but for simplicity it was left off), and another styrene block built up to mount it on at the correct height. Then I drilled out the two rigging bars/arms underneath and cut and glued the appropriate lengths of wire into them. Some U brackets were bent from wire to hold the rigging up and glued into holes drilled into the frame. Holes were also drilled in the underframe near the trucks for the ends of the brake rigging to mount into. The brake wheel chain rigging from the Intermountain set was then mounted at the B-end alongside the coupler box.
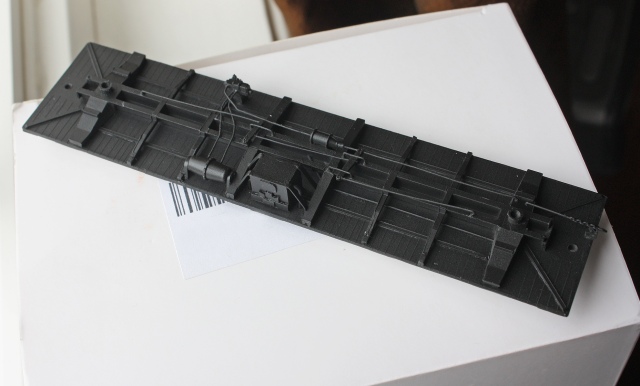
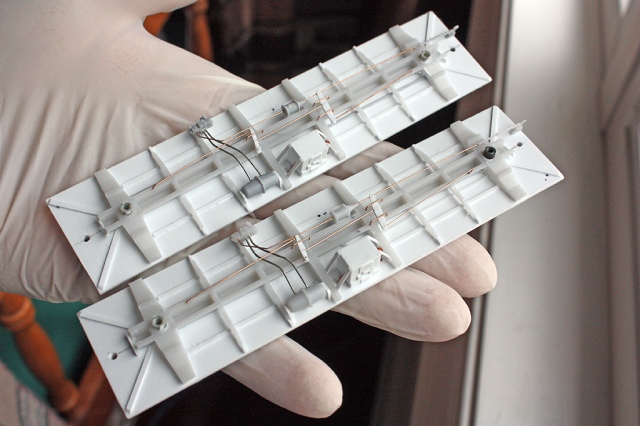 Above: Detailed underframes, showing the custom brake rigging fabricated from wire, styrene, and bits of the Intermountain brake detail sets.
The charcoal-fired heater unit box mounted underneath was scratchbuilt from styrene (it’s a simple box measuring 9 x 9 x 7 mm) and detailed with styrene bits. Some wires were bent and glued into holes on the sides of the box to represent piping running from it to the car. Once the heater unit was glued on, strips of 0.010″ styrene were added and gently bent to represent the bracing. This was all mounted in the middle of the underframe, on the “right” side of the car (assuming the A-end is the front, and the B-end with brake wheel is the rear).
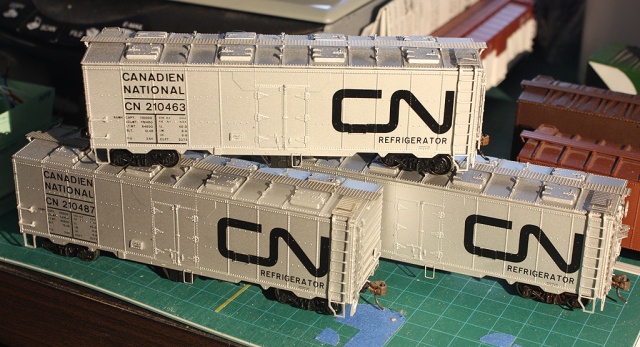
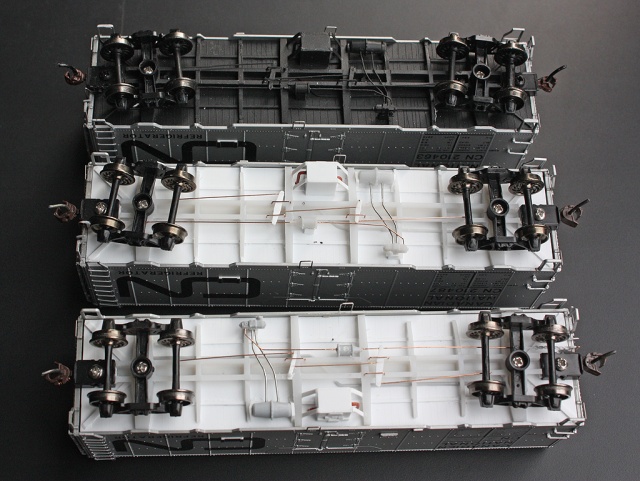 Above: one completed and painted underframe (top), with two uncompleted ones (center & bottom) and most of the parts test-fit.
For painting, all the trucks, couplers and coupler boxes were removed and the underframes cleaned, then the bottom given a coat of Tamiya Fine Surface Primer grey or TLT primer grey (depending on when I finished and painted them). After drying a day or two, the underframes were then given a few coats of Badger Engine Black, and sealed with some clear (Model Master semi-gloss clear acrylic is ideal, although one can add weathering followed by a coat of clear flat). The trucks (some spare Proto 2000 Bettendorf-style solid/friction bearing trucks with 33″ wheelsets) and Kadee couplers were painted (flat black for the wheel faces, and Rapido Old Rust for the couplers) and reinstalled. Weight was then added to the top to get the cars up to around 4 ounces, and the completed underframes were set aside for now.
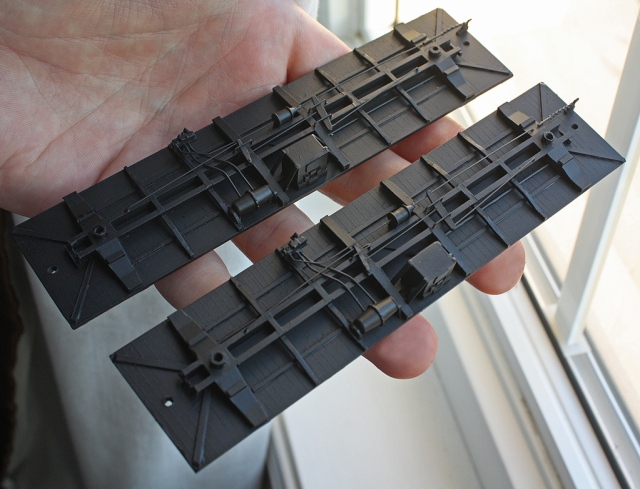 Above: two completed underframes, all painted and ready for couplers, trucks, etc to be re-installed.
 Above: Yet another underframe. I think I built about four of these, with one held in reserve for another shell waiting on a future project.
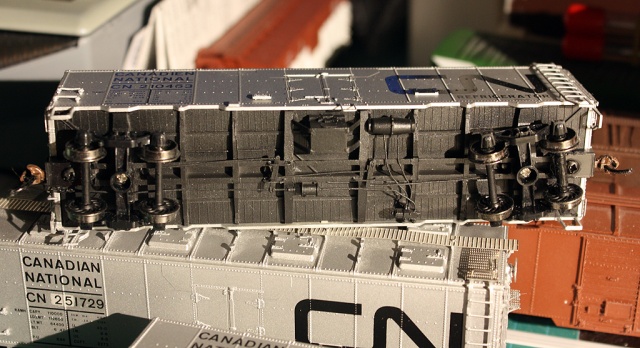
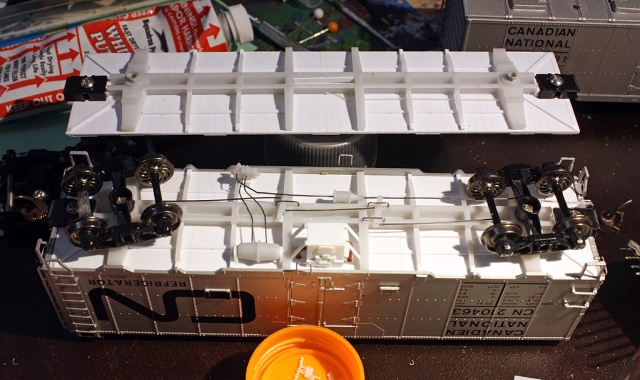
Above: Underside view of a completed underframe installed in a TLT reefer shell.
Body Modifications
For the reefer’s B-end brake rigging, this needed to be replicated (on the TLT models, the rigging linkage that went to the brakewheel housing was glued to the underframe, and not included with the bodies). The linkage was made with a length of 0.0125″ brass wire, looped around a short length of Details West chain (40 links per inch), with a wire eyebolt at the end of that. A hole was drilled at the bottom of the brakewheel housing, the new rigging fed into the end brake walkeay, and the eyebolt end of the rigging glued in. The bottom end of the wire was bent up and glued into a hole drilled into the bottom of the end of the body, so that the bottom of the rigging would meet up with the underframe’s rigging linkage. It was then painted Tamiya Flat Aluminum, except the bent up part at the bottom that was painted black to disguise it.
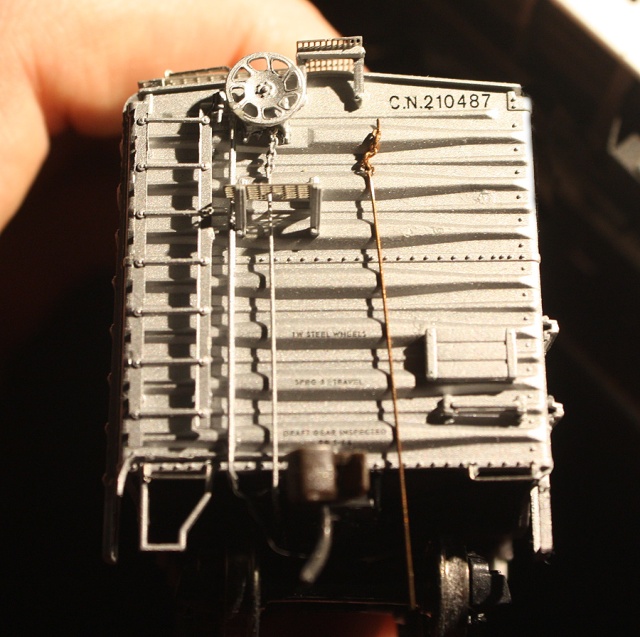 Above: a new brake rigging rod from brakewheel to underframe is already painted and installed on this car, shown with an unpainted example made from a small length of 0.0125″ wire and short length of chain (on right). Tack boards also lowered, and old mounting holes patched and touched up with silver paint.
At this time, I also re-located the end tack boards on the shell from upper to lower positions, by carefully cutting them off the body and gluing them lower on the ends, based on prototype photos. The old holes were then filled with putty, sanded smooth, and touching up with a special mix of aluminum paint (see below). CN did relocate the side tack boards from the right to the left side of the doors to avoid interfering with the large noodle logos applied, but since the side tack boards on the model were cast-on to the body, this step was skipped for simplicity’s sake.
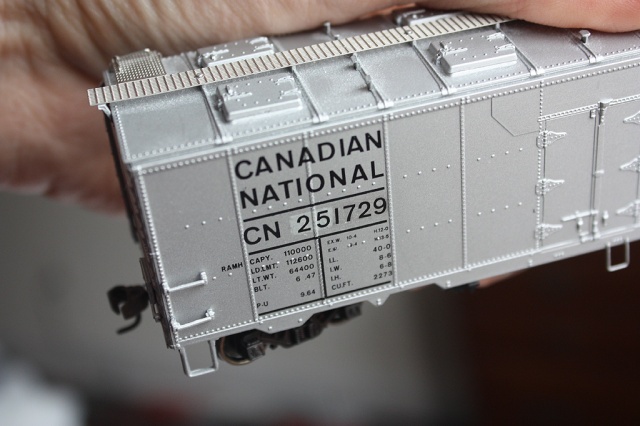 Above: this car was carefully renumbered using both of the methods described below. The old number was painted over with a custom silver mix to match the body colour, and “1729” decalled over as if it was part of the original roadnumber. Then, a “patch mix” of silver with a bit of white/grey was added to give it a noticeable patch, and the “25” was added to represent the car being renumbered to a different series.
Two of the reefer models were also renumbered at this time to represent different groups of cars, however, the TLT factory lettering was difficult to remove without damaging the paint underneath. To get around this issue, a custom batch of paint was carefully mixed to match the TLT paint and hand-painted on. Tamiya’s “Flat Aluminum” silver was used, with a touch of black to darken the colour slightly until it was a satisfactory match to the shade of the silver factory paint. One can either carefully scrape off the old numbers with a sharp X-acto blade and touch up the area with paint, or paint over the old numbers and renumber the car with Black Cat decals.
Now, this method was to just renumber a car without visible patching. CN did patch its reefers to renumber them into different groups (e.g. a 21xxxx car to a 25xxxx car) and the paint didn’t always match. For a car with a visible patch, some silver was mixed with a bit of grey or white to get more noticeable number patch, and then decalled over with new numbers.

Love the scratch built heaters. May have to try that myself. Cars look great!
LikeLike
Thanks Calvin. I forgot to mention, I patterned the side heater details off a car I had, with various pieces of 0.010″ and 0.020″ styrene bits.
LikeLiked by 1 person
HiMrDan:
Love your blog articles. I am the Superintendent for the NMRA Western Ontario Division. Would you give us opermission to reprint in our digital magazine your article: “CP 298008 Double Door 40′ Boxcar” which was posted online in 2017? We would give you full credit, of course. Paul Hurly
LikeLike
Sure Paul!
LikeLike
Thank you sir! Our next issue the Spring 2023. I’ll let you know when it is published and I can send you a link to download it.
Paul
LikeLike