

Monolight is a fancy name for a common type of studio flash unit. If you're interested in taking your lighting work to the next level, monolights are where you'll want to start. In this guide, you'll learn all the basics of monolights from how they compare to speedlights to how use them with modifiers.
The Difference Between Studio Strobes and Speedlights
As photographers, our first adventure into lighting is usually with speedlights, also known as hot shoe flashes. They're portable, can be used on and off camera, and some versions are very affordable.
There are many reasons why you might want to upgrade to monolights. The most common ones are a need for more flash power, a faster recycle time, a modeling light to speed up positioning and great flexibility for the use of access and modifiers.
Watt Seconds vs Guide Number
Almost all monolights are more powerful than almost all speedlights, the question is how much more power do you need. Speedlights are given a power rating in the form of a guide number, the is the exposure reading at certain number of feet away from the flash. It's important to remember that speedlights have a built-in reflector and diffuser.
Monolights come unmodified. They are just a light. The type of reflector and other modifiers you use will drastically affect what the guide number would be. Therefore, the power of a monolight is measured watt-seconds (WS), which is basically of measure of how much energy the unit can push through a bulb.

The monolights that come in the Impact Two Monolight Kit are 100 WS. I mentioned that there is no easy way to compared speedlight power and monolight power, but in my experience and research, a 100 WS monolight with a normal reflector is about twice as powerful as a typical dedicated flash from one of the major camera manufacturers.
When shopping for a monolight, the watt-second rating will typically be in the name of the product. Typical ratings start at 100 WS on the low end with 500 WS units and above being extremely powerful.
Recycle Time and Plug-In Operation
Another big advantage of using monolights is a very short recycle time. Recycle time is the time it takes in between full power bursts of a flash. I've used Vivitar 285 flashes for a long time. With brand new batteries, these flashes take 6 to 8 seconds to recycle. When you're 30 minutes into a shoot with hot, run down batteries, it's much worse.
That's a long time when a model is staring at you holding a pose. Monolights have a much faster recycle time. The Impact lights we're using, for example, have a recycle time of 3 seconds. Higher end lights are even faster. This is possible in part because monolights draw power from an electrical outlet, not batteries.
Plug-in operation works great for consistent power, but it's not the most convenient thing. You either have to plug into an actual outlet, or plug into an expensive battery pack.
Modeling Light
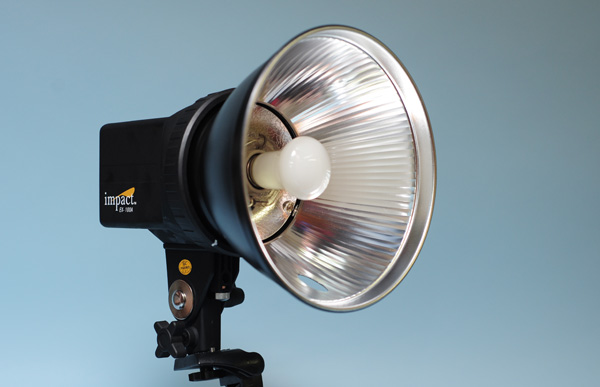
Monolights also have a modeling light built in. A modeling light is a second bulb on your unit that sits in the middle of the circular flash tube. This means it's in essentially the same position as the flash. The modeling light, however, is a continuous light. It's on whenever the flash isn't being fired.

This allows you to position the light and see exactly how it's going to fall on your subject. It's a big time saver when you're doing tricky light setup.
Some high end speedlights have a modeling functions, but they're cumbersome to use because a button usually has to be held down to use it.
More on using the modeling light later.
Built for Accessories
There are now lots of accessories for speedlight flashes, but this is a relatively new development. Studio lights were made for accessories. They have relatively standard mounting systems that reflectors and softboxes that go over the light. There's also a built-in umbrella slot.
We'll go over specific modifiers later.

Optical Slave
This isn't exactly unique to studio flashes, but it's nice to know that almost all of them have optical slaves. Fire one and the others will fire so long as it isn't too bright and the individual units aren't too far apart.
Getting Kitted Out
A downside to using monolights is that, unlike a speedlight, they are not ready to use out of the box. You'll some accessories to get the most out of them.
Luckily, manufacturer's like Impact have solved this problem by packaging up kits. The Impact Two Monolight Kit with Bag comes with everything you need and a case to carry it all in.
Let's take a look at what you need to get started.
Stands
I'd say that light stands are essential for doing serious work with flashes. While you could just set a light somewhere or build something yourself, I've never seen a suitable replacement for a regular, old stand.

Light stands are telescopic to adjust for height, and the legs are collapsible. The top part of every light stand I've ever seen has a standard size fixture for things to attach to. So, a light stand will work with just about every monolight and can be adapted to work with speedlights very easily.
Speedrings
Speedrings are used to attach a variety of accessories to your monolight. They can sometimes be specific to your lights or your accessory, so don't think that any speedring can fit any softbox, but you'll usually find things cross over within the same brand.

Primarily, you'll find them used for softboxes. They have holes on the corners of them for the poles of the softbox to slide into. Most softboxes work like tents with flexible poles providing the shape.
Reflectors
Reflectors are the most important accessory for your monolight. Generally, we want our light to go in some direction. Without a reflector, the light produced by the monolight would go everywhere.

Reflectors come in different angles. Think of this as the zoom on your flash. A 120 degree reflector is a wide angle reflector and might be the shape of a dinner plate.
A 25 degree reflector would be a telephoto reflector. It would be the shape of a big milk glass and focus the light. All other factors being equal, a telephoto reflector will cover a smaller area and produce a brighter light.
You have heard the term "beauty dish" use before. This describes a specific type of reflector designed to be used for portraits. They are very cool. I only point this out because some people use the terms "beauty dish" and "reflector" interchangeably, which is incorrect.
Cords
With IR and new radio transmitters built into our speedlights, it might seem a little antiquated to use cords to connect to your flashes. While there are radio transmitters available, cords are the cheapest way to get going.
There are several standard types of cords, and many monolights have sockets for more than one type. You might be surprised by the existing technology lightmakers decided to utilize. The Impact Monolights have 3.5mm mini jack sockets and come packaged with matching cords. The end that goes into the light is just like the end of your headphone cord.

With the cords, the end that attaches to your camera will always be a standard PC plug. If your camera doesn't have a PC socket, you'll have to get a hotshoe-to-PC adapter. Luckily, they're relatively cheap.
On other lights, you'll might find larger 1/4 inch headphone-style sockets, household outlet sockets, or landline telephone cord sockets. The reason for these common plugs and sockets are so photographers can make their own cords. Telephone, lamp and headphone cord are all cheap. Long cords were also a way to overcome the limitations of optical slaves.
Modifiers
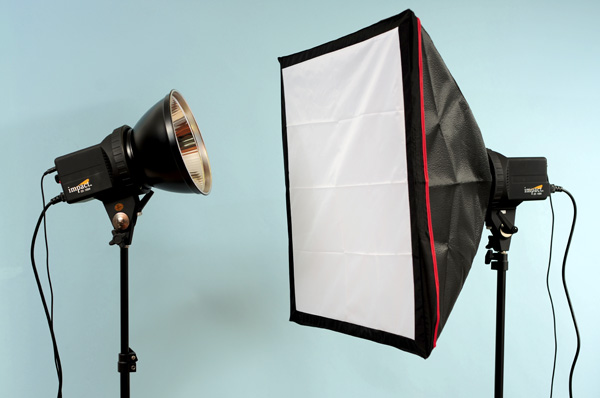
There are literally thousands of modifiers that can be used with monolights. The Impact Two Monolight Kit comes with two 24 inch softboxes, one for each light.

Here's a quick list of the most common modifiers, and what they do, including softboxes.
- Barn doors: A type of restrictor. They surround the light with four flaps, which can moved to block light from hitting certain things in your scene.
- Grids: Another type of restrictor. Grids come in different degrees. The smaller the degree number the more focused the pool of the light the monolight will create.
- Snoots: Another type of restrictor. Snoots work like a funnel for light. They are used for creating very small, focused pools of light.
- Gels: a type of colored filter. Gels change the color of the light leaving the monolight.
- Umbrellas: The traditional way to soften light. By bouncing the off of an umbrella, you're effectively creating a larger and therefore softer light source. They come in many different sizes.
- Softboxes: A newer way to soften light. Softboxes diffuse the light by bouncing it around and passing it through a large white piece of synthetic fabric. They are more controllable than umbrellas and come in many different shapes and sizes.
Power Adjustments
The vast majority of monolights operate in manual mode. Flash power is expressed in fractions. Full power or 1/1 power is what the watt seconds rating refers to. You can then "stop down" the light, lowering the power.
Monolights will have full, 1/2, 1/4, 1/8 and possibly even smaller ratings. Remember, as the power halves, you're moving down one stop, just like a stop on your lens or with your ISO. All other settings being equal, an exposure at f/8 at 1/2 flash power is the same as an exposure at f/5.6 at 1/4 power.

The range of power is something to consider when purchasing a flash. Compare it in relation to the overall power of the flash. If you have a 500 watt second light that only stops down to 1/4 power, you'll have problems with your flash being too bright even at the lowest power in some situations. That's why most 500 watt second stop down to 1/128 power.
If your monolight is 100 watt seconds, like the Impact, stopping down to 1/8 power is probably sufficient. However, I wish the Impact marked out the steps in between full and 1/8.
Dumping
Dumping your flash is not something you have to worry about with speedlights, but it is something you need to worry about with monolights. The problem comes when you change flash power.
If you're at full power taking photos, then you decide to change to 1/2 power. The first frame you shoot after that change will still be full power. It's like the flash has a memory.

The solution is to press the Test button after you make any changes to your flash power. You should note that some monolights have an auto-dump function. If you buy flashes that have this function, don't worry about dumping.
Modeling Light
Using a modeling light can really take your lighting skills to the next level. You get a realtime look at what the light will look like before ever shooting frame. It's important to note that the modeling light turns off for a fraction of second when the flash fires.
Power Adjustment
The modeling light intensity also changes when you adjust the flash power. The modeling light is much dimmer than the actual flash, but still gives off plenty of light to see. So you can't predict exposure.
The power adjustment on the modeling light comes in handy when you're using two or more flashes. It allows you correctly set your lighting ratio. You'll know before taking a shot whether your second flash needs to be 1/2 power or 1/4 power.
White Balance

It's important to remember to set your white balance to the flash setting or set it manually using your kelvin temperature settings. Otherwise, your cameras auto white balance will get a reading off the modeling light.
Your modeling light is essentially a normal household light bulb. The white balance is much, much warmer than the flash will be.
Controls
This is the control panel for the Impact Two Monolight Kit with Bag (120VAC). It is similar to what you'll find on most monolights.

- Optical Slave Cell: This is the sensor for the optical slave. If the light is malfunctioning while being used as a slave, make sure this cell isn't covered.
- Recycle Ready Indicator: This is a light which will illuminate when the flash is ready to fire. It will turn off while the flash is recycling.
- Fuse Box: This is where the fuse is located. You pull this out to replace the fuse.
- Power Socket: The power cord plugs into this socket.
- Flash Power Adjustment Knob: This knob turns to adjust the flash power.
- Sync Port: The 3.5mm mini jack end of the sync cord plugs into this port.
- Test Button: This is the button to press to test the flash and dump the flash between power adjustments.
- Modeling Light Switch: This switch controls the modeling light. The center position turns the modeling light off. The upper "full" position sets the modeling light to full power regardless of the power adjustment setting. The lower "prop" position is the proportional setting, which allows the modeling light to change brightness based on the power adjustment setting.
- Main Power Switch: This switch turns the whole monolight unit on and off.
Using Your Monolights
In practice, using monolights is quite simple. You'll need a way to transport them unless you plan on them never leave the studio. In my case, the Impact kit comes with a bag, otherwise you'll need to purchase one.
Setup is straight forward once you have all the stands and modifiers you need. Adjusting the lights is as easy as turning a knob or possibly moving a lever.
I carry a small bundle of extension cords with me including on that has several female outlets on one end. That allow me to just take up one wall outlet when I'm on location.
Back-Up Parts
The flash tubes will eventually burn out. Unless you have a really good photo shop in your town, you'll need to order a replacement online. That could leave you without lights for several. So, it's not a bad idea to buy a couple back-up tubes. They're usually between $50 and $70 depending on your brand.

Modeling lights can also burn out, but you can use a monolight without one, so it's not as critical. However, they are much cheaper than flash tubes. Most cost just a little more than a regular household light bulb.
Some monolights also have fuses. You'll be able to find replacements for those at your local auto parts store. Just make sure it matches up exactly.
Start Shooting!
If you already have monolights, I hope this tutorial has given you a better idea of how they work and what options are out there for accessories. They seem like simple pieces of equipment, but there's a lot to learn so you can take full advantage of them.
If you're trying to decide if you should purchase monolights, I hope this article gave you a better idea how they compare to speedlights. If you're ready to make your first purchase, the Impact Two Monolight Kit with Bag is a great starter option. It costs less than $250 and provides you with two lights, two stands, two softboxes and all the other kit you need to get started.
When you are making choice, deciding what watt-second rating you need is a good place to start.
Thanks for reading. If you have any thoughts or questions, leave them in the comments below!


