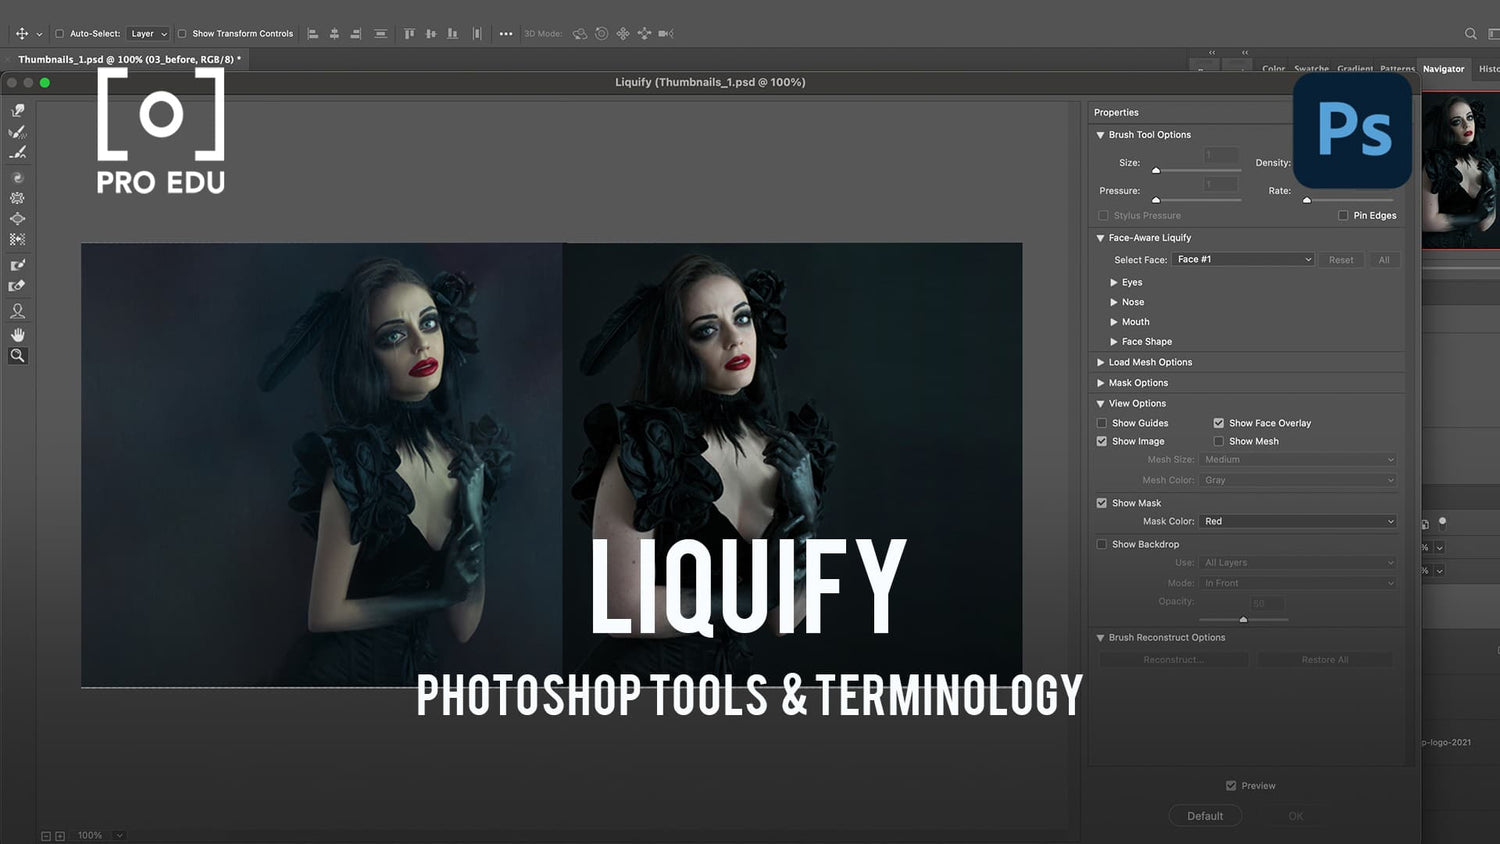
What Is Liquify in Photoshop: An Essential Guide for Creatives
Liquify is a powerful tool in Adobe Photoshop that allows users to manipulate and transform images in various ways. With this feature, you can push, pull, rotate, reflect, pucker, and bloat any area of an image to create subtle or drastic changes. The tool is particularly useful for retouching images, smoothing out wrinkles, and creating artistic effects.
The Liquify filter works by placing an invisible mesh over your image, which enables you to track and control the distortions you make using different warp tools. By understanding how to use Liquify in Photoshop, you can elevate your image editing skills and produce stunning results.
Key Takeaways
- Liquify in Photoshop enables various image manipulations such as pushing, pulling, and rotating
- The tool is essential for retouching images and creating artistic effects
- Using Liquify involves working with an invisible mesh and different warp tools
Understanding Liquify in Photoshop
We know that Photoshop offers a wide range of features and tools for editing and enhancing images. One such powerful tool is the Liquify filter, which enables us to push, pull, rotate, reflect, pucker, and bloat any area of an image.
The Liquify tool works by placing an invisible mesh over an image. This mesh tracks the distortions we make using various warp tools, allowing for both subtle and drastic changes to the image's appearance.
Given the versatility of this tool, it can be used for various purposes. For instance, the Liquify filter is commonly used for retouching tasks, such as smoothing out wrinkles or rough edges, making it essential for photographers and graphic designers.
When using the Liquify filter in Photoshop, it's important to approach it with a confident and knowledgeable mindset. This will help you create more accurate and visually appealing results, while maintaining a clear, neutral tone in your edits. With practice and experience, you will become more proficient in using this powerful feature to enhance your images effectively.
Remember, the key to mastering the Liquify filter is understanding its capabilities and limitations, and using it judiciously to create the desired effect on your images. By doing so, you'll be able to unlock the full potential of this versatile tool and elevate your image editing skills in Photoshop.
Unpacking the Liquify Tools
In Photoshop, the Liquify filter provides a variety of tools for distorting and manipulating images, such as the Warp Tool, Pucker Tool, and Bloat Tool. Each of these tools play a unique role in reshaping different areas of your image, allowing for creative adjustments and retouching.
One of the most commonly used tools within this filter is the Forward Warp Tool. This versatile option lets us push and pull pixels in any direction, allowing for smooth and precise adjustments. On the other hand, tools like the Pucker Tool and Bloat Tool focus on contracting or expanding pixels to create more subtle or drastic changes in specific areas of your image.
To help you accurately modify the image, the Liquify filter offers a variety of brushes with different sizes and settings. These brushes allow for more nuanced manipulations and fine-tuning, so it is crucial to configure them to suit your specific needs.
In addition to brushes, the Liquify toolbox has supporting tools like Smooth and Reconstruct functions. While the Smooth tool helps blend the effect of your modifications, the Reconstruct tool, on the other hand, can be used to revert any changes made gradually or completely, giving you an extra level of flexibility when working with complex adjustments.
Furthermore, the Face Tool in Liquify is an intelligent feature designed to work with facial features specifically, making it more convenient to edit portraits and apply effects like face-reshaping and facial-feature enhancements.
Lastly, the Hand Tool lets us navigate around the image as we modify it. This tool is particularly helpful when working with high-resolution photos or when focusing on intricate details.
By understanding and exploring these powerful Liquify tools in Photoshop, we can create stunning effects and transform our images in various imaginative ways. Our possibilities with this feature are limited only by our creativity and experimentation skills.
Liquify and Image Adjustments
Liquify in Photoshop is an outstanding tool that allows us to make various adjustments to images by manipulating their pixels. By using an invisible mesh that covers the entire image, we can push, pull, and distort the pixels in any direction. This gives us the ability to create both subtle and dramatic effects on images, and it is especially helpful in retouching and modifying photos.
The Liquify tool contains several features that we can use to manipulate the pixels in an image. Some of these features include pushing and pulling pixels, blocking or puckering regions, and rotating or reflecting certain areas. When utilizing these features, we can achieve various adjustments to our images and enhance their overall composition.
In addition to standard pixel adjustments, we can also create masks within the Liquify tool. By creating a mask, we can ensure that specific areas of our image remain unaffected and protected from any changes in the mesh. This ability is particularly useful when we want to focus on a certain area while leaving the remainder of the photo intact.
Another unique feature we can utilize is the twirl function under the Liquify tool in Photoshop. This feature enables us to rotate pixels around a central point, creating a swirling effect that can enhance certain elements within an image. The twirl function is an excellent choice when attempting to create unique, artistic effects in our photos.
To summarize, Photoshop's Liquify tool offers a wide range of pixel manipulation options and adjustments, making it an invaluable tool for our creative projects. With the various features available, we can transform our photos into stunning images that truly capture our desired vision.
Advanced Liquify Techniques
In Photoshop, advanced users can take advantage of powerful Liquify techniques to achieve stunning results. First, let us explore the different brush tools available within the Liquify filter. The key tools include the Forward Warp Tool with which you can push and pull pixels, and the Twirl Clockwise Tool for spinning pixels in a clockwise direction. You can also use the Pucker and Bloat tools to shrink or expand areas, while the Push Left Tool moves pixels to the left.
When working on faces, the Face Tool can be incredibly helpful as it automatically detects facial features, such as the eyes, nose, and mouth. This tool is especially useful for subtle retouching of portraits or enhancing expressions. Additionally, hair can be adjusted using a combination of the Forward Warp Tool and the Twirl Clockwise Tool to create realistic swirls and waves.
One of the most important aspects of utilizing Liquify is managing the mask options. Using the Freeze Mask Tool allows you to protect specific areas of your image from being distorted. This can be particularly useful when you want to avoid affecting the subject's hair or clothes. Conversely, the Thaw Mask Tool can be employed to remove a portion of the mask and selectively reapply the Liquify effect to the previously protected areas.
Moreover, the view options available in the Liquify tool can be incredibly time-saving—they facilitate precise editing by displaying a grid, guides, or a backdrop that helps keep track of the changes being made. Don't forget to use the Reconstruct Tool and the Smooth Tool to ensure seamless transitions and refine the overall appearance.
Remember, mastering these advanced techniques takes practice, so don't be afraid to experiment and explore the full potential of the Liquify tool in Photoshop.
Practical Applications of Liquify
Liquify in Photoshop is a versatile tool that allows users to manipulate images in various ways. We can use it to make subtle adjustments to portraits or create eye-catching artistic effects. Here, we'll explore some practical applications of the Liquify tool, focusing on adjustments such as noses, eyes, and face distortion.
When working with portraits, we might need to make subtle adjustments to facial features, such as the nose or eyes. By selecting a proper brush size and brush pressure, we can easily push or pull pixels to achieve the desired outcome. The Liquify tool allows us to perform these adjustments without affecting the overall image quality.
Face-Aware Liquify, a feature within the Liquify filter, specializes in detecting facial features and allows for precise modifications. This functionality is particularly helpful for enhancing or correcting portraits. For example, we can enlarge or shrink the eyes, adjust their distance, or alter a smile's width and height.
In addition to portraits, the Liquify tool can also be used to distort an image creatively. With its variety of options like pucker, bloat, and twist, we can manipulate specific areas of an image, giving it a unique, artistic appearance. As we experiment with the tool, we'll find that there is a world of possibilities when it comes to adding interesting effects to our designs.
In summary, Photoshop's Liquify tool offers a wide range of applications, from subtle adjustments in portraits to more drastic image distortion. By mastering its features, we can elevate our photo editing skills and improve our overall creative output.
Working with Smart Objects and Liquify
In Adobe Photoshop, utilizing the Liquify filter allows us to distort images in a controlled and creative manner. One of the best practices when working with the Liquify tool is to use it in conjunction with Smart Objects. By converting a layer into a Smart Object, we ensure a non-destructive work process, preserving the image's original quality while applying various filters and transformations.
As we apply the Liquify filter to a Smart Object, it acts as a smart filter, helping us maintain flexibility during editing. To access the Liquify workspace, go to Filter > Liquify. Inside the workspace, we have various tools at our disposal for distorting images. Some tools include the Forward Warp tool, Pucker tool, Bloat tool, and more.
Moreover, working with a stylus or tablet allows us to take advantage of Stylus Pressure. With this feature, we can control the intensity of the distortion simply by adjusting the pressure applied by the stylus. To enable this option, select the Stylus Pressure checkbox located in the Tool Options section of the Liquify workspace.
In summary, combining the use of Smart Objects with the Liquify filter improves our workflow by creating a non-destructive and flexible editing process. With various tools, a well-organized workspace, and the implementation of stylus pressure, we can confidently achieve the desired results in our Photoshop projects.
Frequently Asked Questions
How to use the Forward Warp tool in Photoshop?
We recommend using the Forward Warp tool within the Liquify filter by selecting it from the toolbar on the left. Click and drag on your image to push the pixels in the direction of your brush stroke. This tool is especially useful for creating subtle distortions or modifications to your image.
Can you use the Liquify tool on an iPad?
Yes, you can use the Liquify tool on an iPad with the help of Photoshop on the iPad app. The app offers a similar Liquify experience as the desktop version, allowing you to push, pull, and distort your images on a touch device seamlessly.
Are there any online alternatives to Photoshop's Liquify tool?
There are several online alternatives to Photoshop's Liquify tool, such as Photopea and Pixlr. These web-based photo editing applications offer similar liquify functions, allowing you to modify your images without needing to install any software.
What is the purpose of the Liquify brush in Photoshop?
The Liquify brush in Photoshop allows you to manipulate and distort specific areas of an image. It is particularly useful for making adjustments to facial features, body shapes, and removing unwanted imperfections in your photos. You can use the brush to push, pull, rotate, pucker, and bloat areas of your image as needed.
How to download and install Liquify in Photoshop?
Liquify is an integrated filter that comes pre-installed in Photoshop. Simply open Photoshop, navigate to the Filter menu at the top, and click on "Liquify." This will open the Liquify workspace where you can access all the various tools and adjustments to start modifying your image.
How to use the Bloat tool in Photoshop?
To use the Bloat tool in the Liquify filter, select it from the toolbar on the left. Click and hold the tool over the area you want to enlarge. The Bloat tool will expand the pixels outward from the center of the brush, making it useful for creating artistic effects or enhancing portions of an image.


