How the Phototube vacuum tube works - with DIY example
Now that I'm on a slightly concerning roll with vacuum tube posts, let's move onto a more simple tube that throws away one of the more fundamental components of the vacuum tubes I've previously discussed: The Phototube.
As always, to start you should understand the vacuum tube rectifier, but it's not necessary to understand the phototube.
The Photoelectric Effect
The last three vacuum tubes I've written about (rectifier, triode, and Hull magnetron) all requires a filament to produce free electrons. The filament is heated up with a low-voltage battery until it glows red-hot. Eventually the average thermal energy in the metal approaches the work function (minimum energy to eject electrons) of the metal, and free electrons "boil" off of the metal into the vacuum. This is known as thermionic emission.
The exact same process can be achieved using light photons as well. This is known as the Photoelectric Effect. Every color of light has a different frequency and therefore photon energy. If this photon energy exceeds the work function of a metal, then free electrons will be ejected from the metal if that color light hits the metal.
The work function is typically several eV for most metals. This means that visible light may or may not be able to eject electrons from a given metal, XRays will certainly be able to eject electrons (or interact in others ways), and microwaves will have no chance to eject anything as their photon energy is very low compared to visible light. Thousands of watts of microwaves won't eject a single electron from a block of metal via the Photoelectric effect, but a single photon of UV light can.
Now it should be clear that we can replace the heated thermionic emission filament in a vacuum tube rectifier with a piece of metal exposed to light. If the light photon energy exceeds the metal's work function, shining said color of light on the vacuum tube will cause it to emit electrons that can be accelerated across the vacuum gap, causing the tube to function exactly like its heated filament counterpart.

Photoelectric Effect Example
Image credit
Of course, the type of metal used on the cathode will determine what kind of light will "turn on" the tube, since different metals will have different work functions.
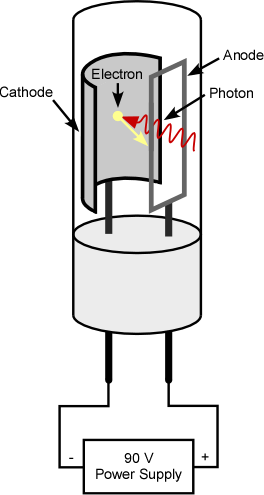
So we have the basic phototube: A low work function cathode and a conductive anode separated by vacuum, serving as a rectifier when light is incident on the cathode.
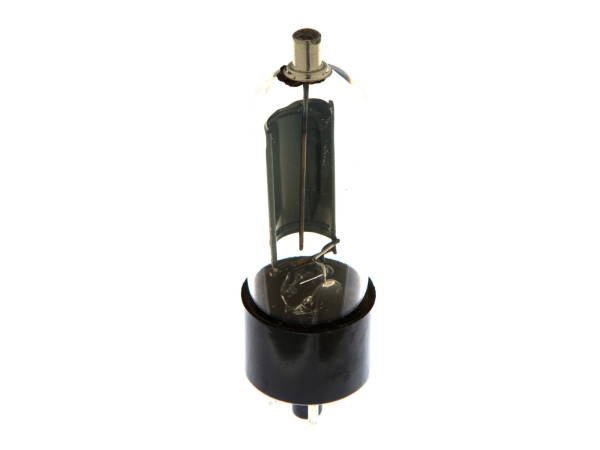
RCA 935 Phototube - notice the large cathode for better light collection
Image credit
In general, phototubes will have less free electrons (current) across the gap than similar thermionic tubes.
The Phototube and its uses
While you could technically just use a phototube as a normal rectifier assuming that it would be placed in sunlight, phototubes are much more useful as light detectors. For example, a phototube could be used to determine if the sun was up: If current flows across the tube, then we know that light is bombarding the cathode and ejecting electrons into the vacuum gap.
For essentially any application that requires detecting light, you can use a phototube.
Depending on what color/frequency light you want to detect, you change the cathode material. Certain materials are more sensitive to lower frequency EM radiation like red or infrared while others will work better for higher energy photons like blue or UV. A lot of this has to do with the fact that different materials have different work functions.
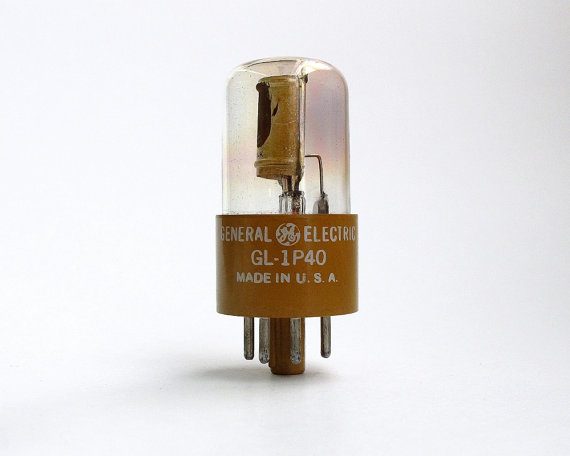
Infrared-sensitive Phototube from the 1940s
Image credit
Most phototubes have been replaced by things like photovoltaic cells, photodiodes, and photoresistors, all of which are solid-state devices far cheaper than phototubes and with less complexity. So why learn about them if they aren't used much? Because they are cool, and that's all the reason I need. Plus the concepts are useful in other areas.
DIY Phototube Demonstration
You can demonstrate the photoelectric effect on your own by making your own phototube (sort of). I did this for fun using an old rectifier tube because it takes about ten seconds if you have the equipment.
You'll need a vacuum tube rectifier (I used the 2X2A, which is also a great XRay emitter tube), a cheap multimeter, and any cheap UV light source. Total cost: Around $10, or zero for me as I already had all of this stuff for other projects. I used a UV secret message pen as the UV source. Hook up a battery across the anode and cathode of the vacuum tube. Then, shine the UV light on the cathode while measuring the current through the tube. If you did everything right, the current should rise from 0 amps to around 1 microamp in my case. This is a tiny change and not really useful for much, but it does demonstrate the photoelectric effect: The change in current while the UV light is on conclusively shows that the light is ejecting electrons from the cathode, which then carry current across the tube.

I used one of these dirt cheap toy UV LED pens to test the 2X2A as a phototube.
Image credit
You should be able to replicate this using most rectifier tubes. Regular light probably won't work because most cathodes weren't optimized for low work function. I guess this makes any rectifier tube a crappy ultraviolet light detector if you turn off the filament.
If you've ever tried this out with another tube and had some success, let me know.
Hopefully you learned something from this post. Feel free to let me know if you have any questions or if anything I said is wrong.
Thanks for reading!
awesome! the world of physics has influenced the human existence and it will continue to. now i know what a phototube is
interresting post, xrays are also used to identify new substances so this phototube is very useful for human and science since a long time, thanks for the inforlmations