The Sewing Pattern Tutorials 9: Measuring yourself


A BEGINNER’S GUIDE: MEASURING YOURSELF
The Sewing Pattern Tutorials is a year-long FREE sewing course where we will demystify dressmaking patterns. We’ll begin with the basics so that if you are new to sewing you can join in from the start. We also know that lots of you want to learn new sewing skills so as we progress we’ll begin to cover more complex topics so that you will finish with the skills needed to deal with fitting problems too. In each post we will also have a sewing jargon busting section explaining any terms used that might be confusing. We’ve already covered the pattern envelope, now we are moving onto using and fitting your sewing patterns. This week we talk through how to measure yourself accurately. Catch up on previous posts in the series here.
Hi, it’s Rachel here on the blog today with the next instalment of our popular Pattern Tutorial series. This week we are talking about accurately measuring yourself to get a better fit for your sewing projects. Plus don’t forget to download our FREE body illustration to record all your numbers.
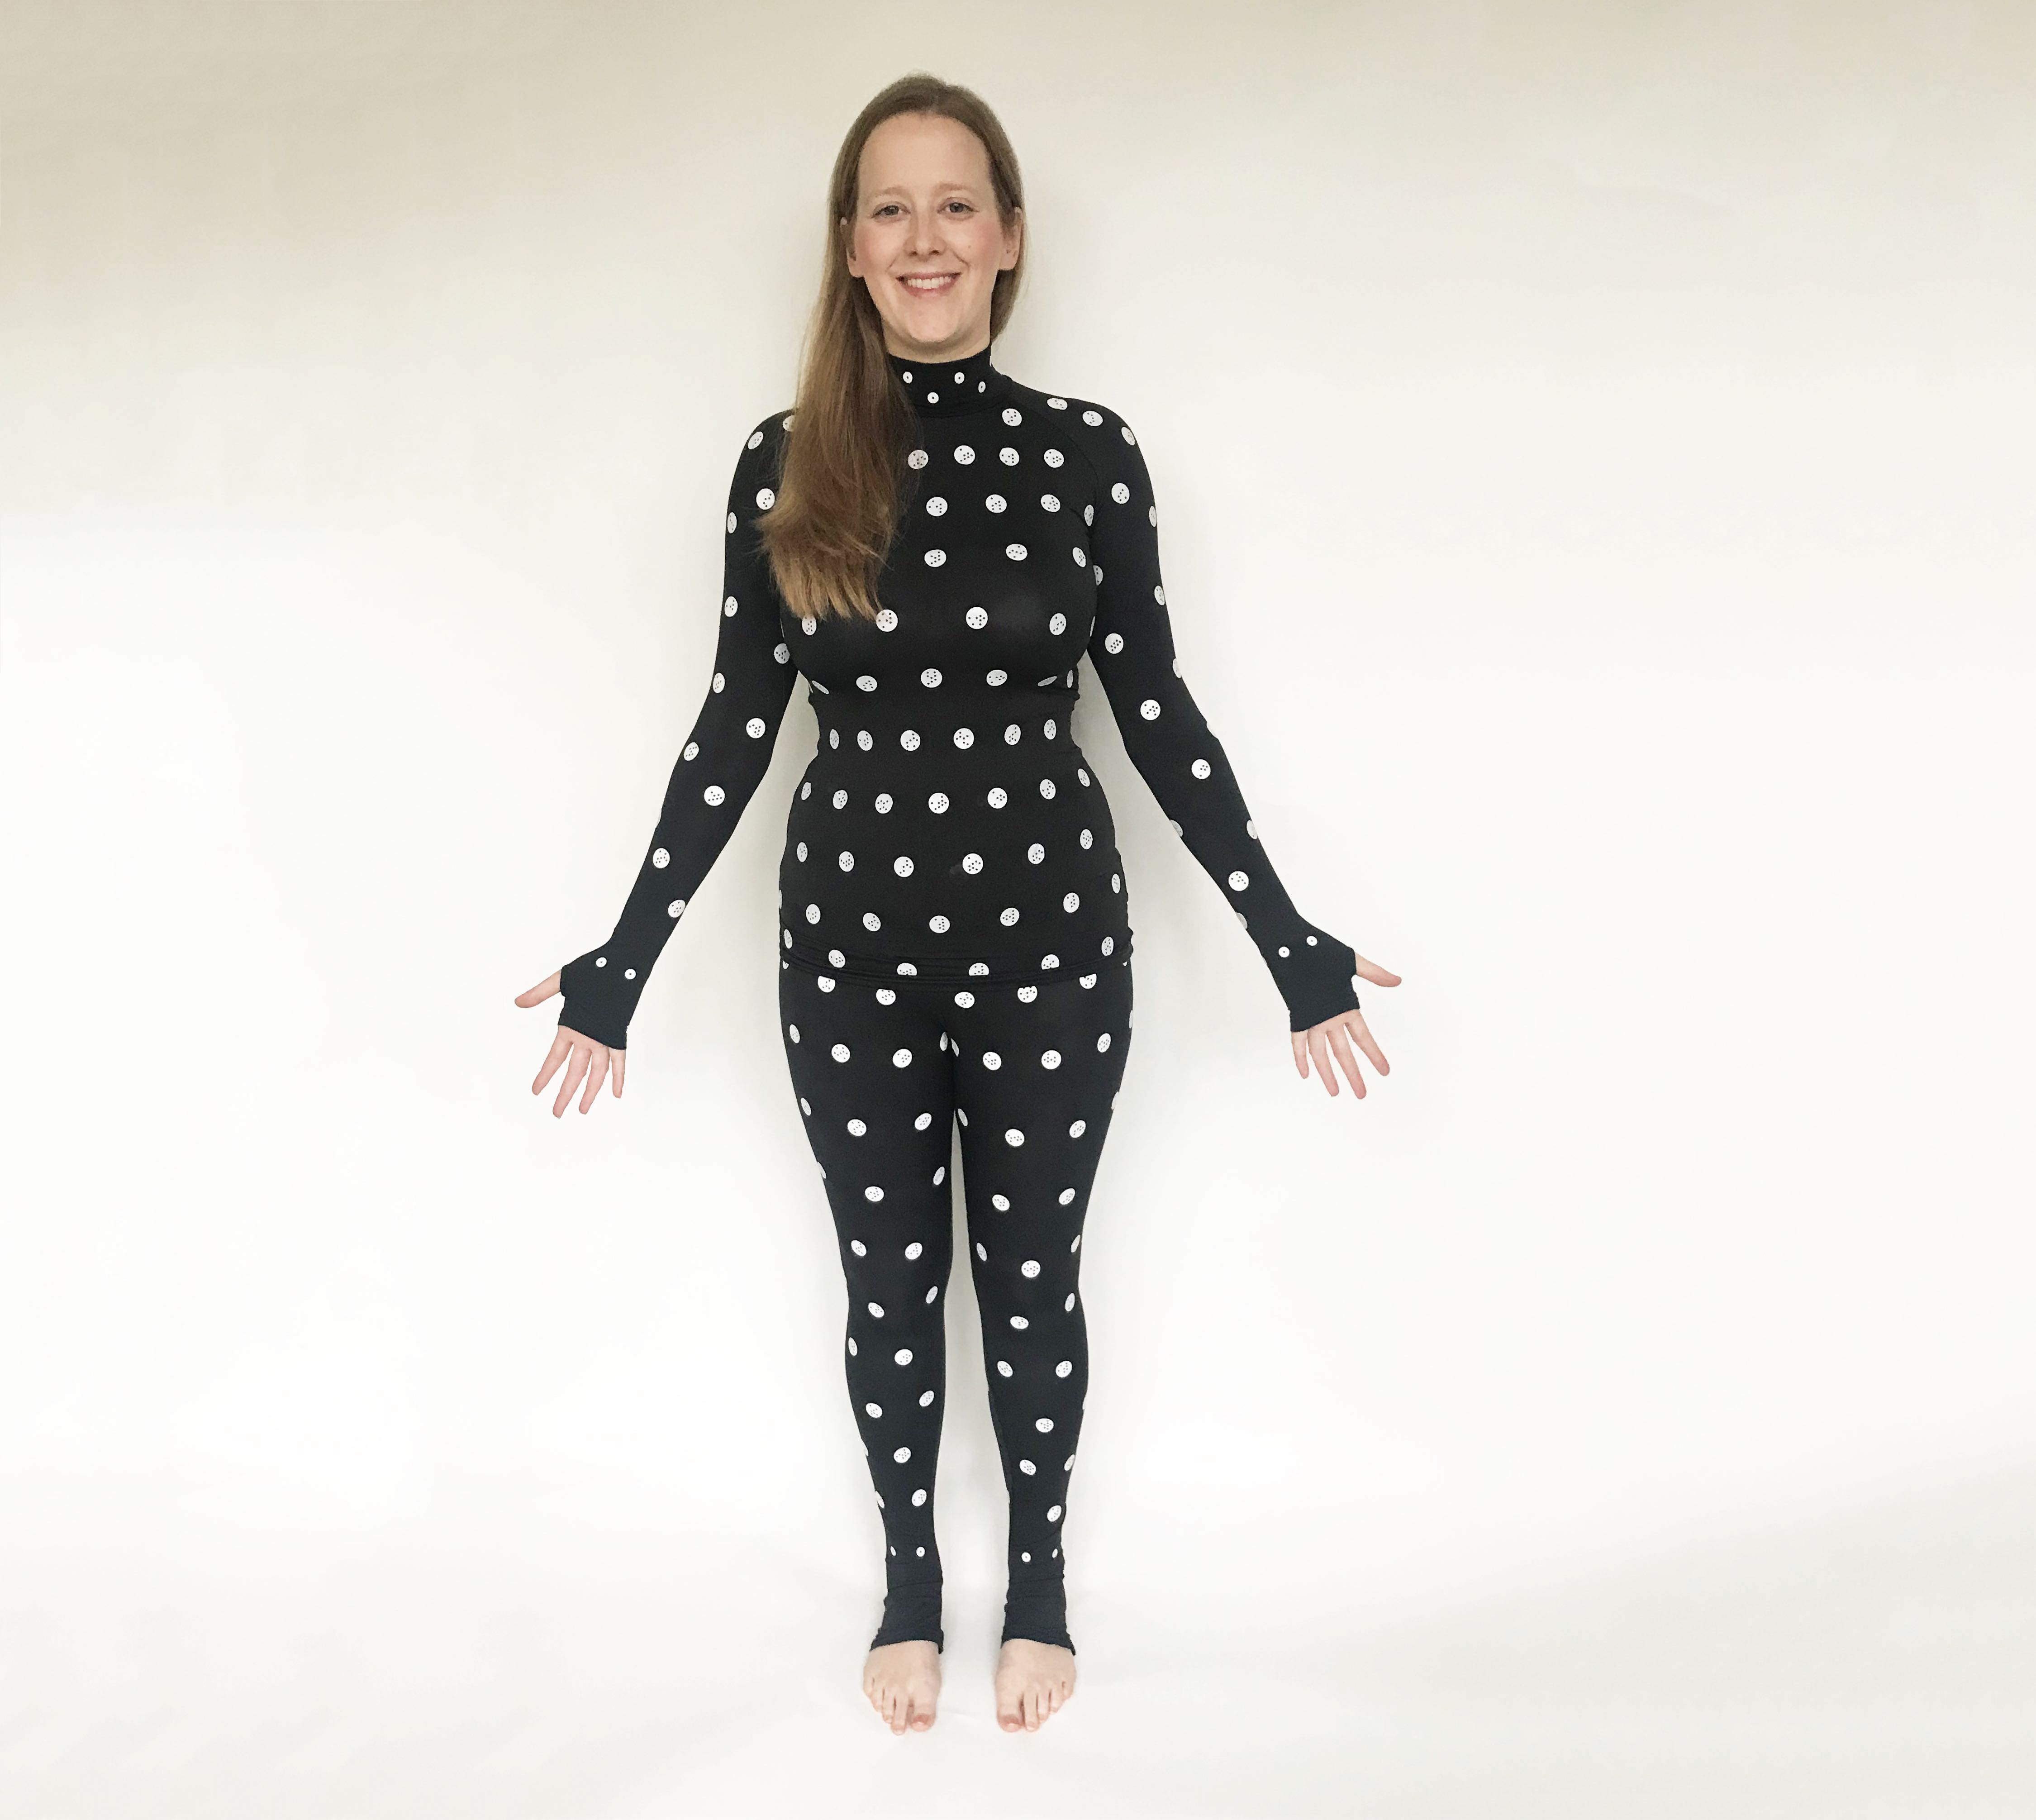
Measuring yourself is not the most exciting of subjects so I have forgone my dignity in the name of sewing to show you an amazing new measuring suit that can take all your measurements for you. Scroll down to see how I got on in my Lycra spotty two-piece! I am never going to live this down …
What equipment do you need?
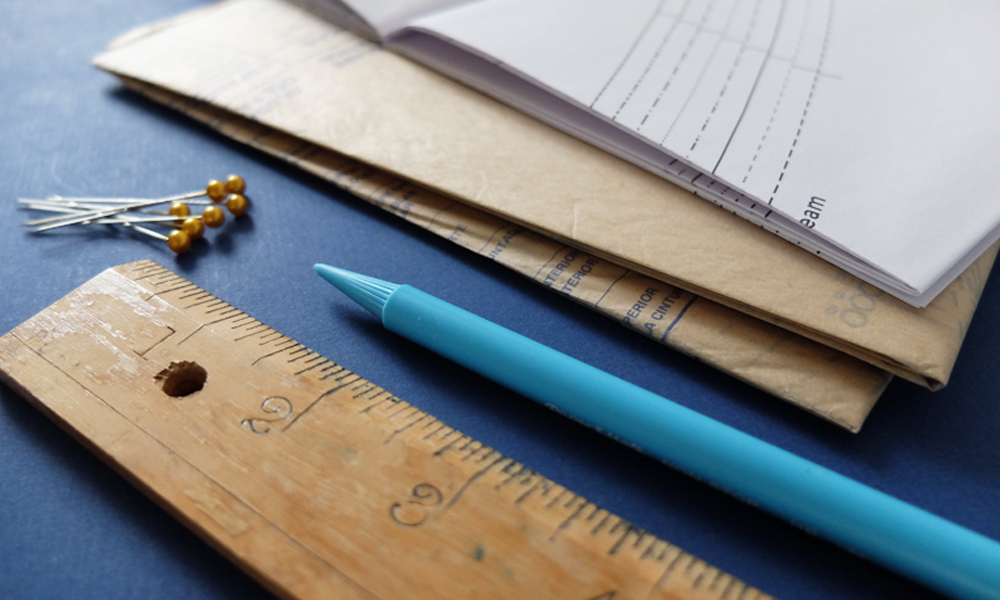
The essential things to measure yourself accurately are a measuring tape, full length mirror and a pen and paper. Optional: string.
Where do I start with body measurements?
First remove any bulky clothing, otherwise your measurements won’t be accurate. Ideally just wear your underwear and whichever is your day-to-day bra so your bust measurements will reflect your typical body shape.
Standing in front of a full length mirror, remember to wiggle around a bit first to relax your body. Hold the measuring tape snug against your body but not too tight and don’t forget to breathe normally!
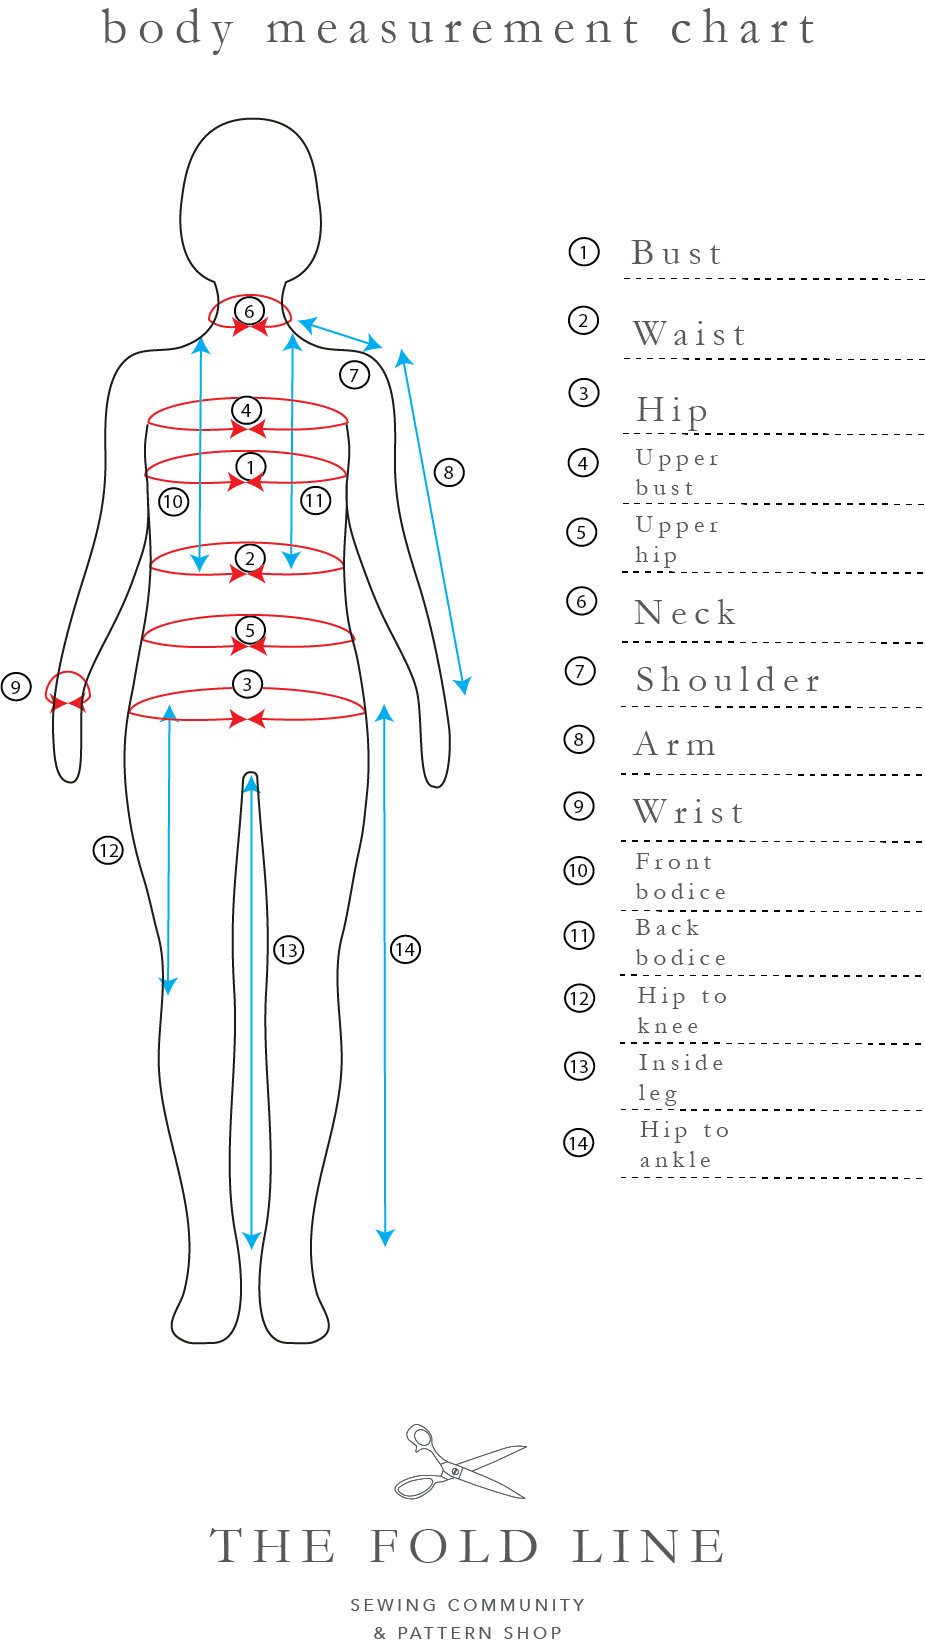
What measurements should I take?
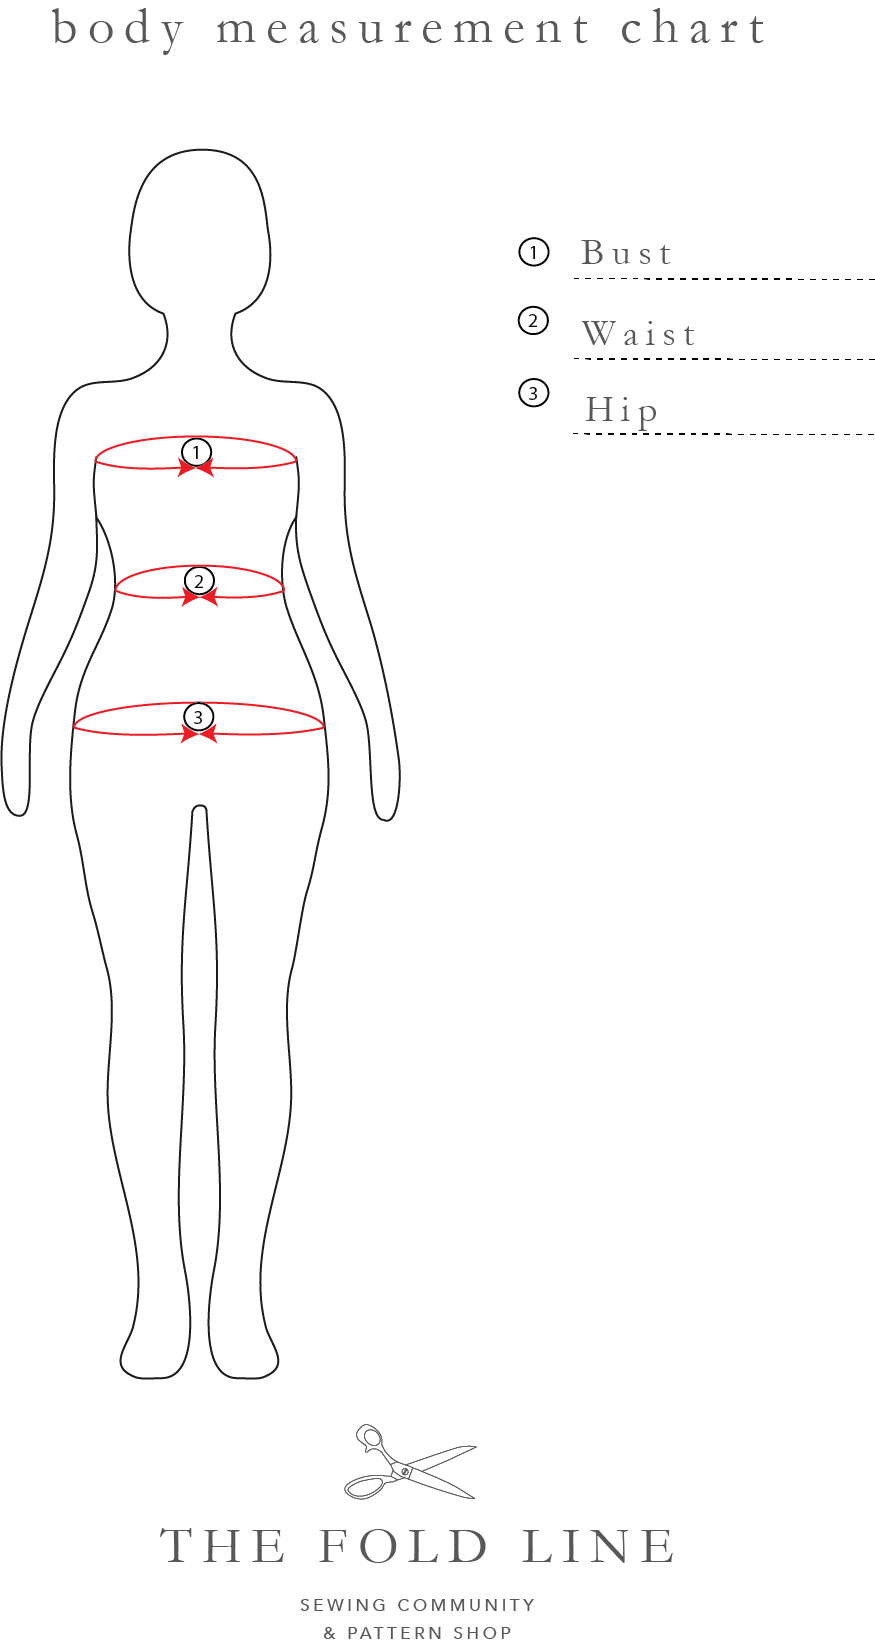
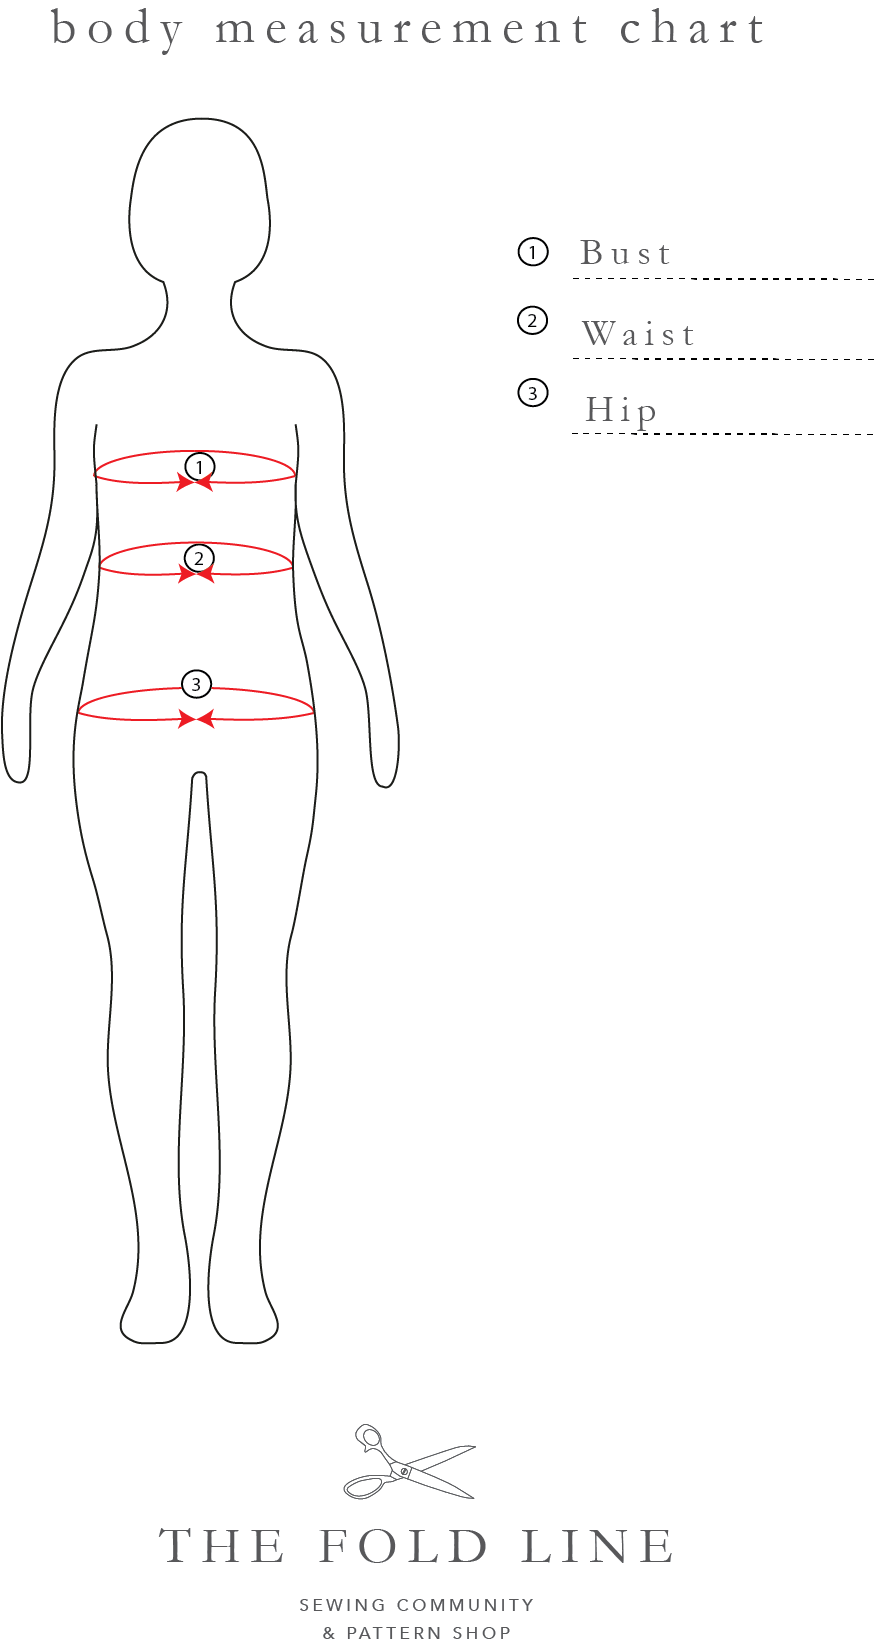
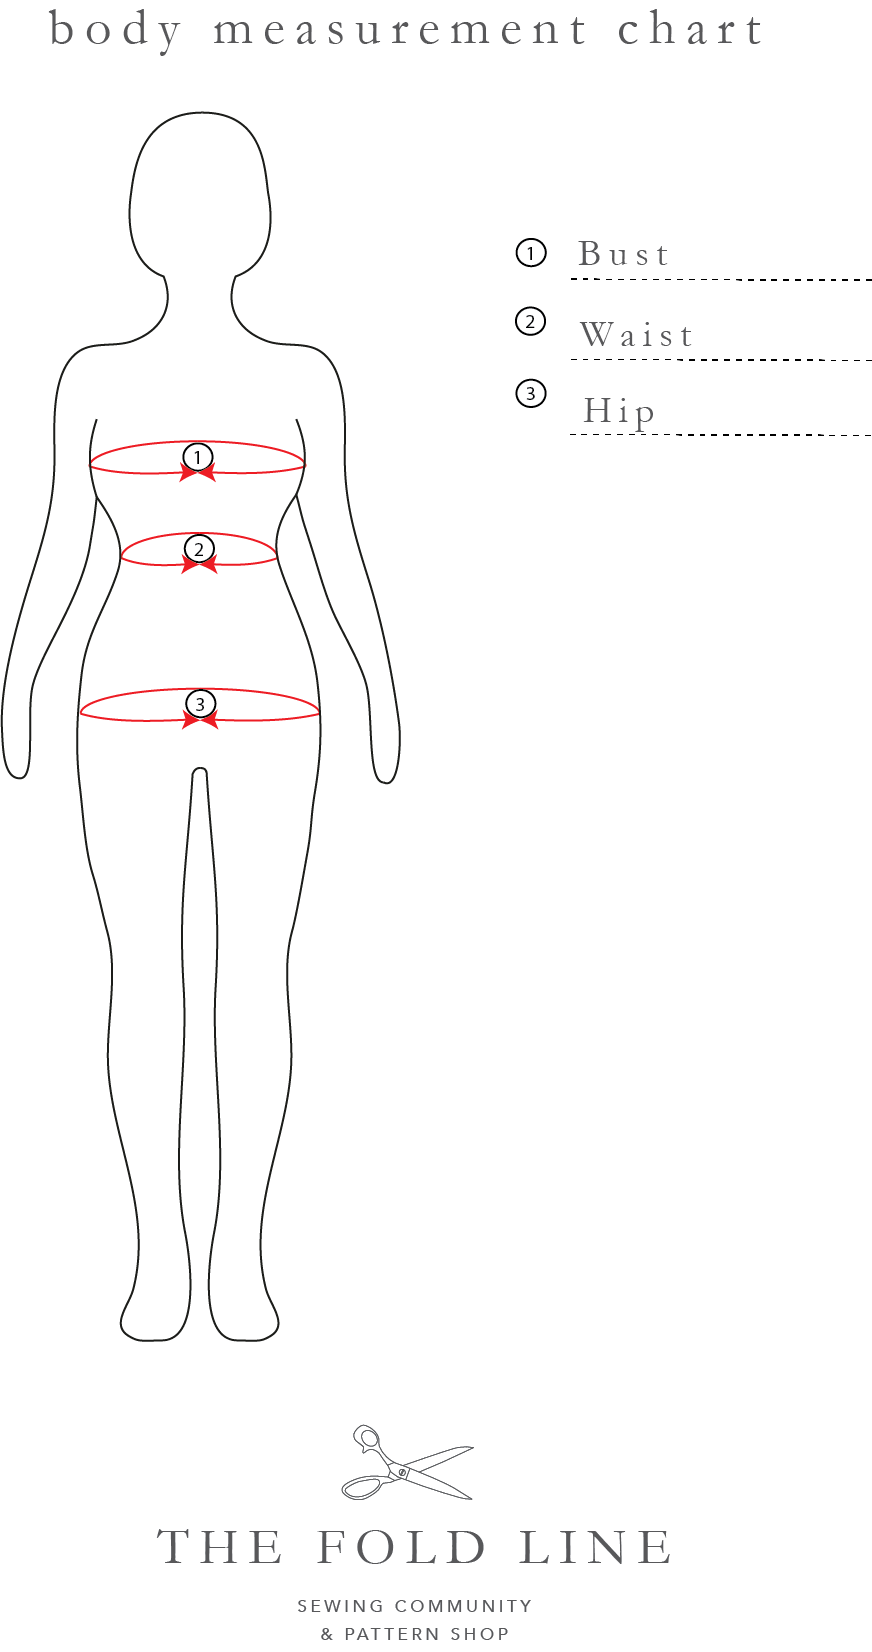
If you are new to sewing or have been sewing for a while, you’ll have noticed that most sewing patterns list three basic measurements to help you choose the size to sew. These are bust, waist and hip. In addition to this you might want to record some extra measurements to help with fitting.
Bust – this is the measurement around your body across the fullest part of your bust, often your nipples. Make sure you keep the measuring tape straight as you record the number so that it doesn’t dip at the back. Check this in a full length mirror.
Waist – this is the measurement around your body at the narrowest part of your torso. If you are having difficulty finding your waist, stand tall and lean over to one side – the point where your body bends is your waist. Sometimes it can help to tie a piece of string or ribbon around your waist to find the right position.
Hip – your hip measurement is taken around your body at the fullest point of your hips/bottom. It’s probably lower down than you think and not around the top of your hip bone.
How should I record my measurements?
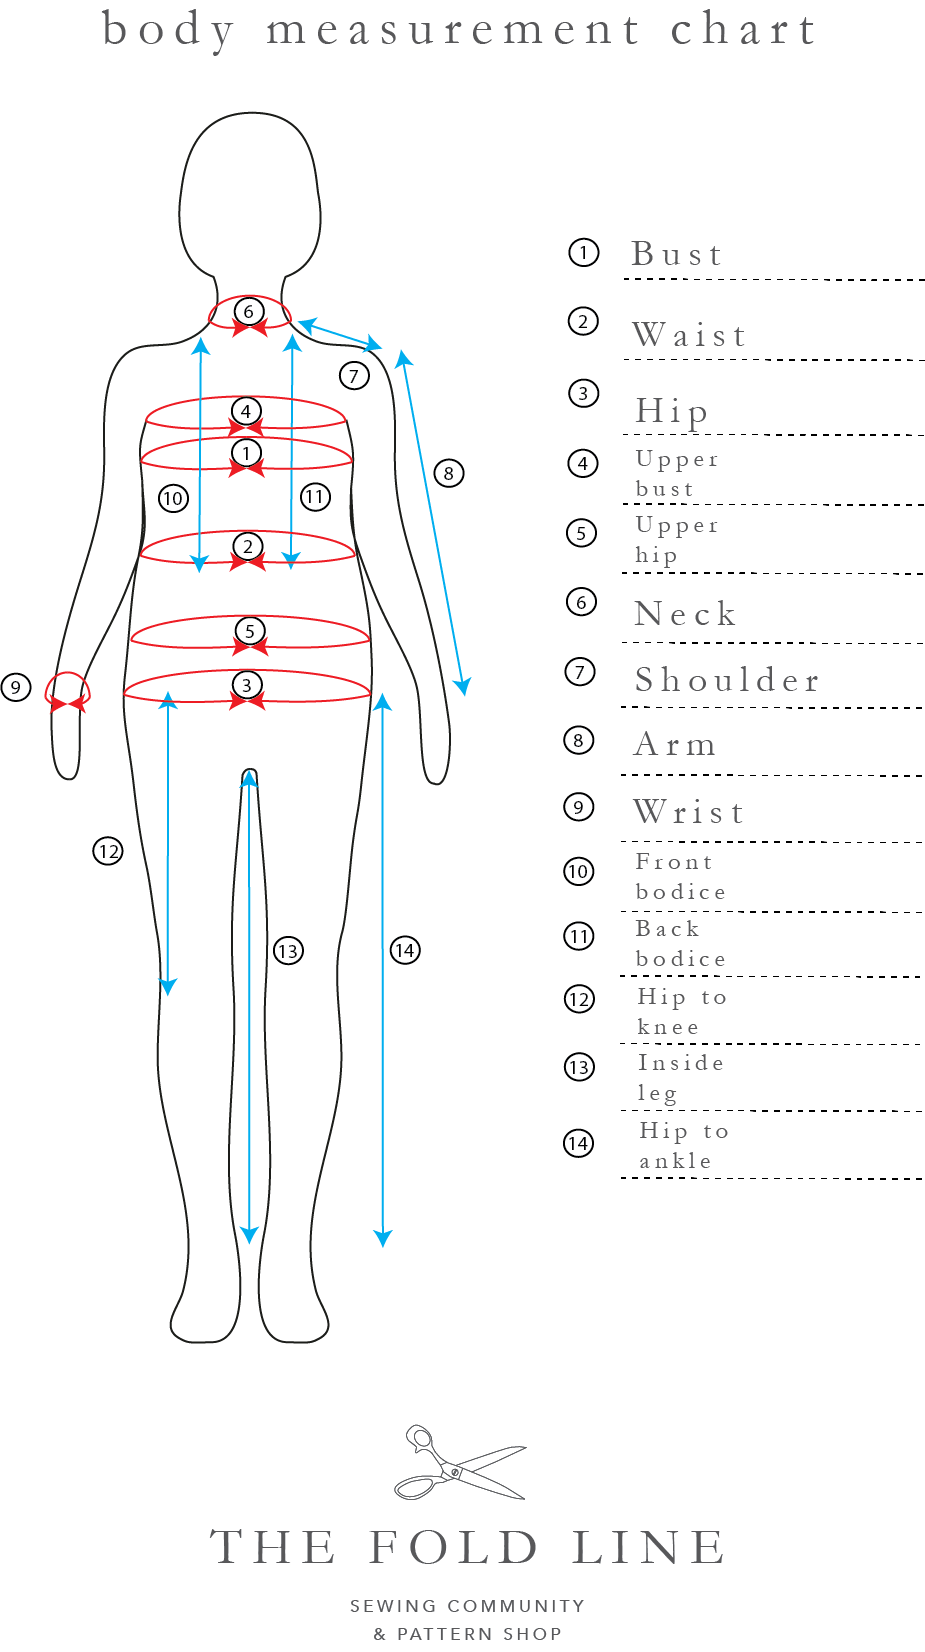
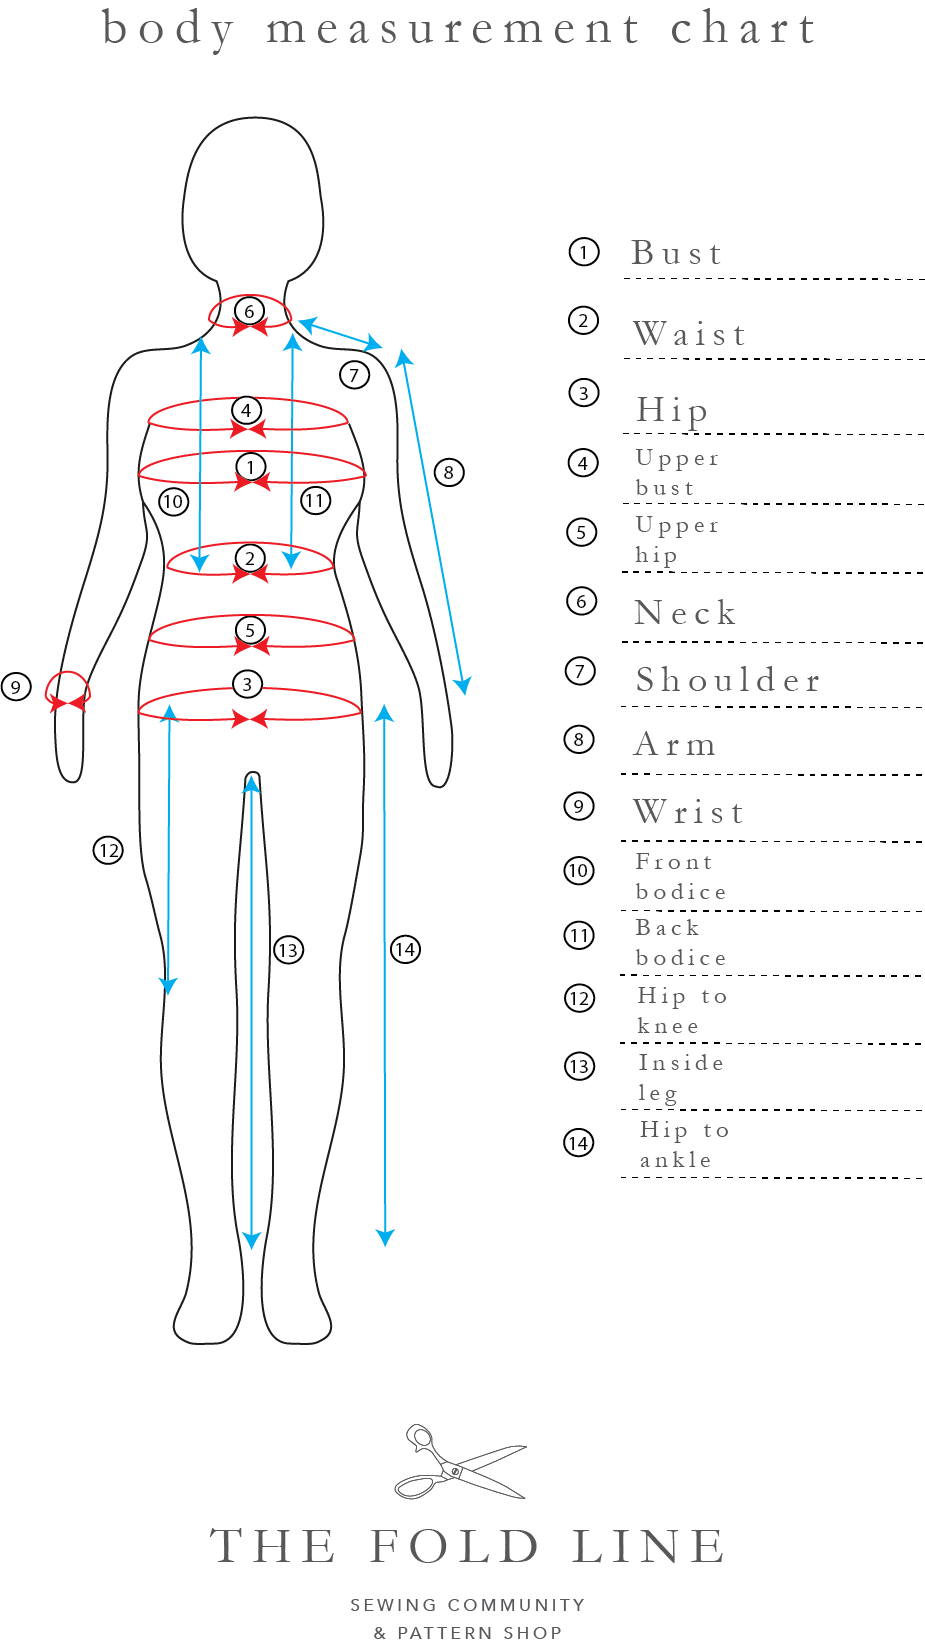
Download your FREE beginner body illustration to mark on your body measurements here. Choose the body shape that you identify with most and print out a copy. Alternatively if you are a more experienced maker, scroll down to download a chart with 14 measurement.

What other body measurements would be useful to know?
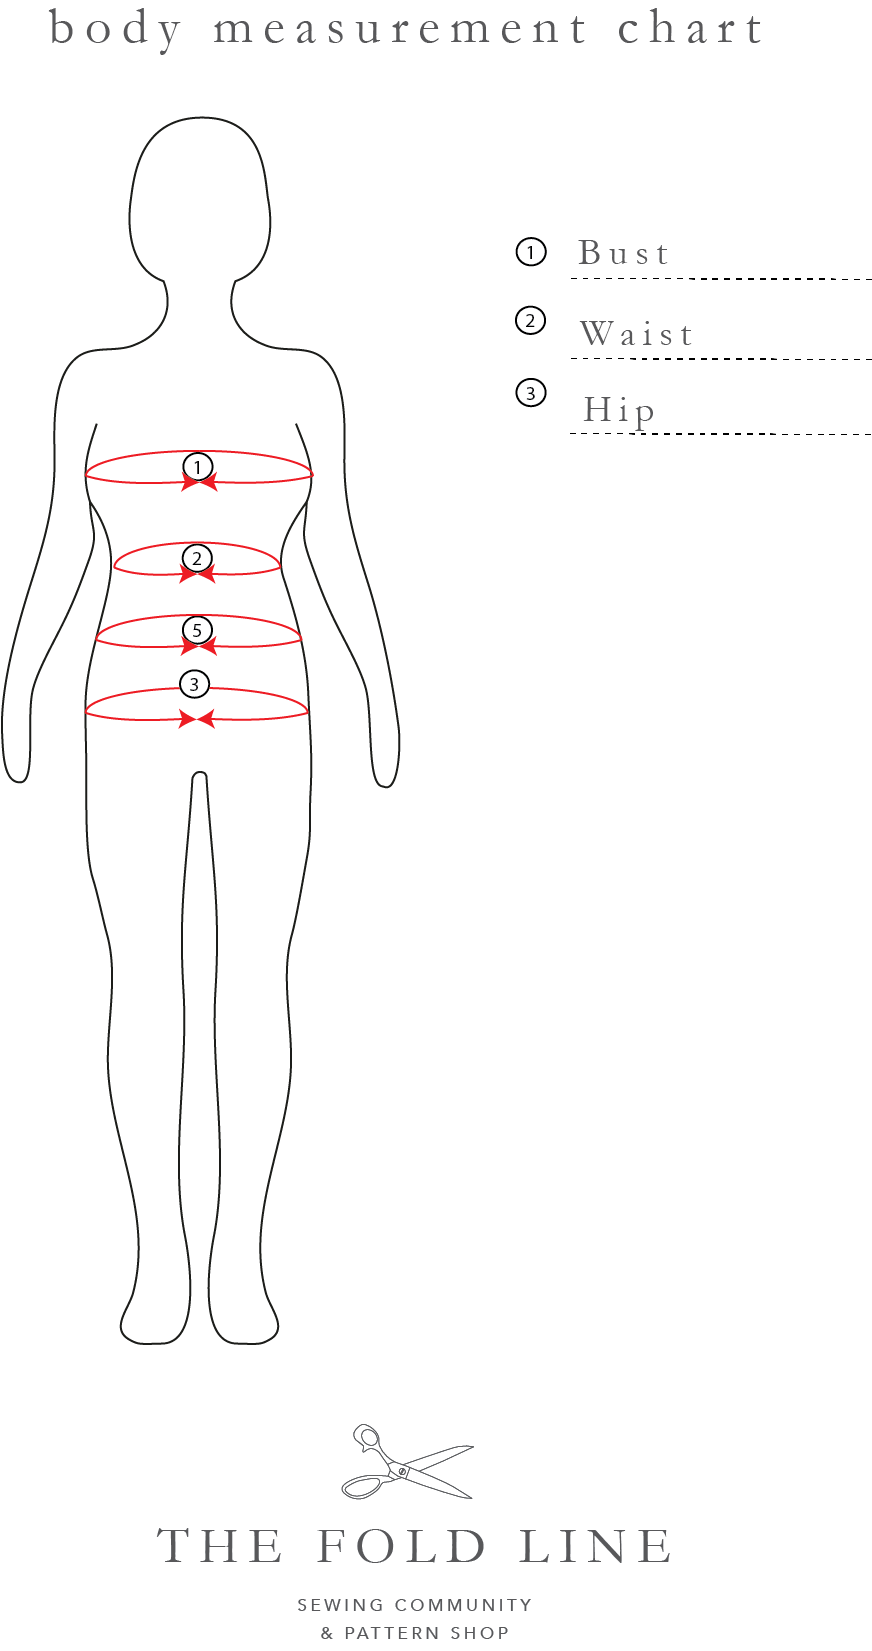
Once you feel comfortable measuring your bust, waist and hips there are other useful measurements you could take. Some of these are specific to particularly garments, such s trousers so you won’t necessarily use them all just yet.
Upper bust – this is the measurement around your body that is taken above your bust. Keep the measuring tape straight and measure just under your armpits. If you have a larger or smaller bust this might be useful for doing full or small bust adjustments to bodices.
Upper hip – this is measured around 2-3″ below your waist and is useful when making trousers and skirts that finish above the hip. Again make sure you keep your tape measure straight as you go around your body.
Neck – If you make any garments with a polo neck or collar knowing your neck measurement is really useful. Measure all the way around your neck above your collar bone.
Shoulder – the shoulder measurement is good to know in case you have wider or narrower shoulders than the pattern. This is an adjustment I always have to make as I have narrow shoulders. Measure from the point your shoulder meets your neck to the top edge of your shoulder.
Arm – measuring the full length of your arm from the top edge of your shoulder to your wrist is useful for sleeve and cuff adjustments.
Wrist – measure around your wrist just above your hand, it is useful to know this measurement to make changes to sleeve hems and cuffs.
Front bodice – measure from your clavicle (where the two bones meet at your neck) to your waist down the centre front of your body (avoiding the bust). This is really useful for making changes to the length of bodices.
Back bodice – measure from your nape (back of the neck where the skull meets your neck) to your waist down the centre back of your body. This is really useful for making changes to the length of bodices.
Waist to knee – this measurements is useful for making changes to the length of skirts and shorts. Measure from your natural waist to just above your knee, remember to add on seam allowance for a hem.
Inside leg – this is useful for sewing trousers. Measure from your crotch to your ankle, remember to add on seam allowance for the hem.
Waist to ankle – this is a useful measurement to have for sewing trousers and maxi dresses. Measure from your natural waist to your ankle, remember to add on a seam allowance for the hem.
How should I record my additional body measurements?
Download your FREE body illustration to mark on your body measurements here. Choose the body shape that you identify with most and print out a copy.


Beyond the measuring tape…
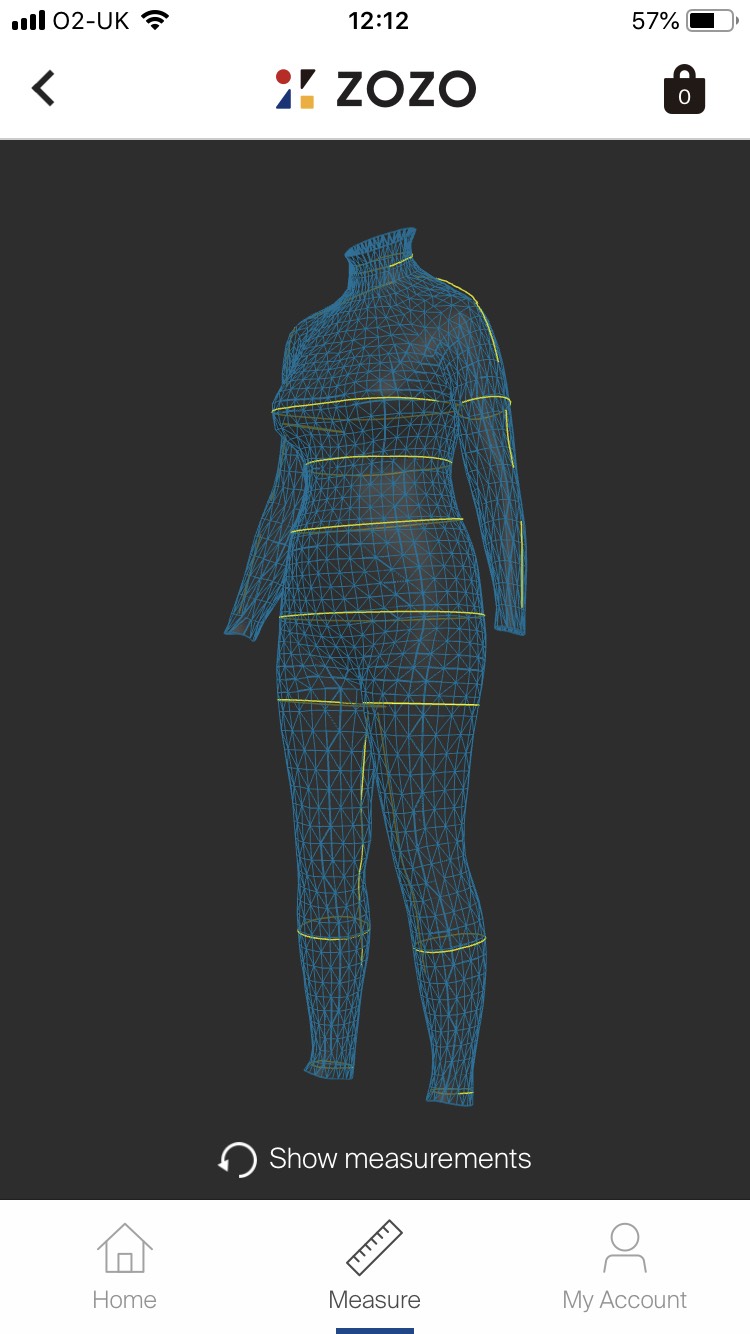
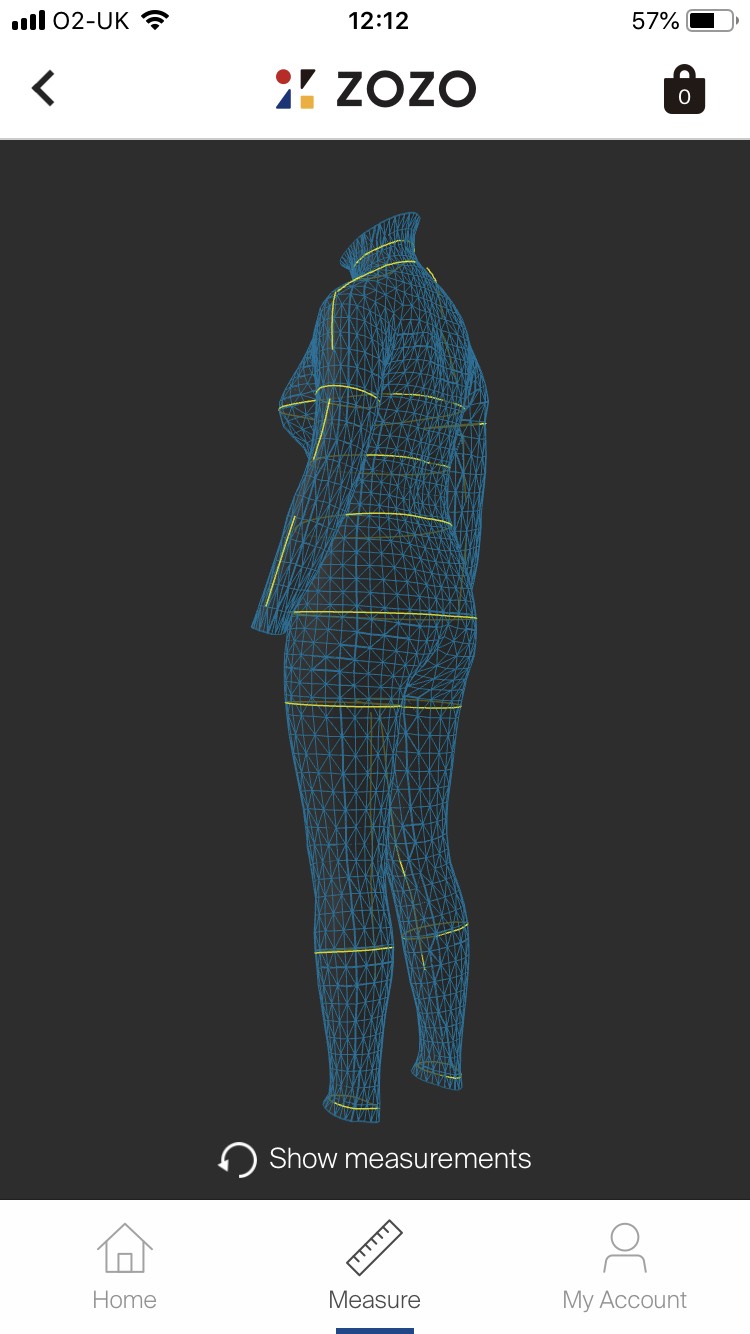
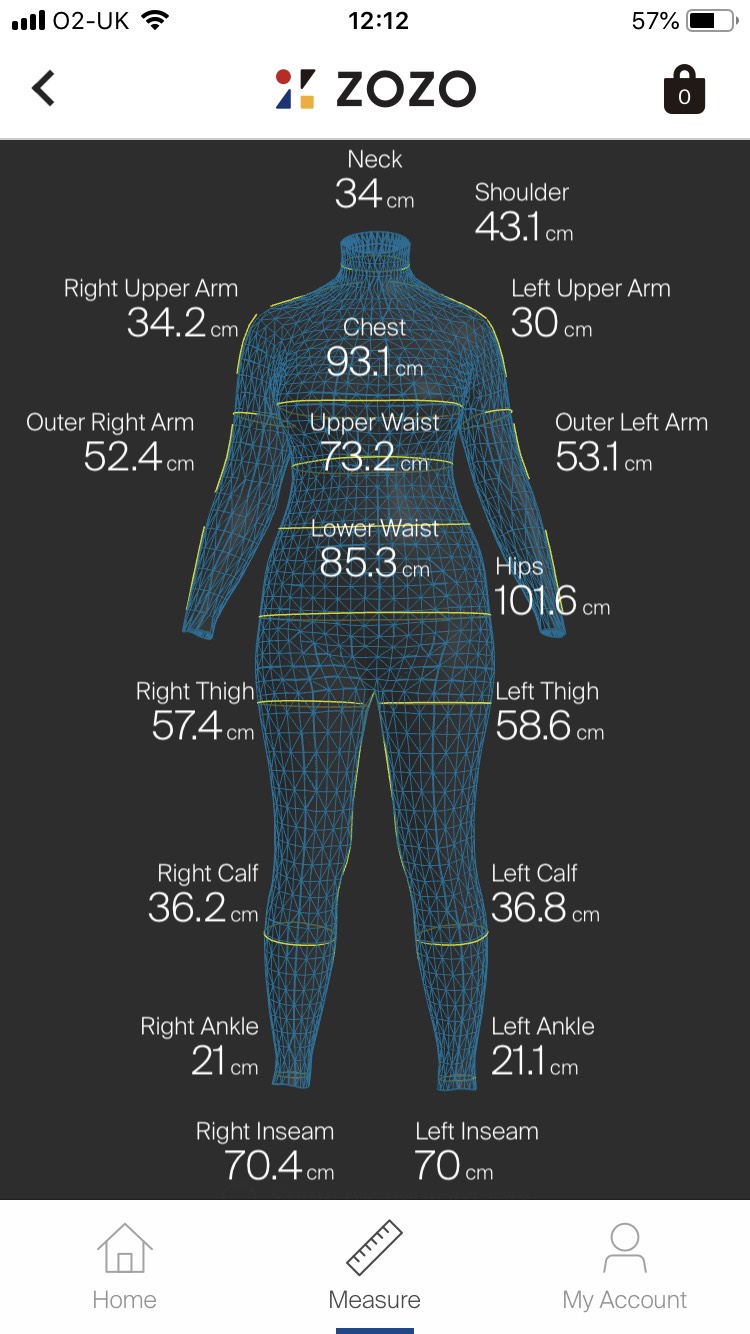
Thanks to the joy of Instagram and Charlotte from English Girl at Home I recently discovered this amazing body measuring suit by a custom-fit clothing company called ZoZo.com (this isn’t a sponsored post, we just thought it would be fun to share!). Currently you can order a suit for around $4 and if you download their free app to your mobile phone it will take photos of you in the suit and give you an accurate 3D image of your body with key measurements. They really should be marketing this to sewing people!
The scientist in me loves how this technology has been developed. Although as makers we sewing some or all of our clothes, I think the high street moving towards more custom made clothes that fit you properly is a really positive step towards reducing the amount of clothes that end up in land fill.
Have a look below to see how I got on! Here i’m wearing the measuring suit, there are lots of do’s and don’t with this that the app takes you through so they can take a good range of measurements from the photos.
Here are my results, which i’ve screen shot from my phone. The first couple of images are of the 3D image of my body that the app generates and then one screen shot of the measurements. I’ve double checked the bust and hip measurements and they are completely accurate, amazing! Although not it’s intended use, I think this could be really helpful for makers to get their measurements nailed!
FAQs
What’s next, how do I choose the right size from the back cover of the pattern?
We have a tutorial with lots of information on size charts and fitted measurements as part of our Pattern Tutorials guide here. You can find out the difference between size charts and fitted garment measurements plus how to choose a size and what ease and negative ease are.
High street clothing sizes vs. sewing pattern sizes, why am I not the same size for both?
Dressmaking patterns have different sizes to those of clothes you find in high street shops. Often this can be as much as 2 or 3 differences in size. Also pattern sizes can vary between independent designers and also between countries. The best thing to do is look at the chart and using your body measurements select the size that is closest to you. We have a tutorial with lots of information on size charts and fitted measurements as part of our Pattern Tutorials guide here.
How often should I measure myself?
You shouldn’t need to check your body measurements often but it is useful to repeat this exercise if you think your body might have changed due to weight fluctuation or a life event such as pregnancy or the menopause.
Related posts
5 thoughts on “The Sewing Pattern Tutorials 9: Measuring yourself”
You must be logged in to post a comment.

[…] suggest watching a video tutorial on how to take body measurements created by Seamwork and reading a short text tutorial by The Fold Line which includes downloadable body diagrams with marked measure….Note: your waist measurement is not where you wear your pants, it is the smallest measurement of […]
[…] to take measurements?The Foldline has a great tutorial. There they have instructions on how to take the most important measurements […]
The ZoZo suit sounds fantastic! Unfortunately the link provided here does not lead me to any site that lets me order it. The site is a pre-release marketing site. I’ve tried navigating and googling with no luck. Can you share how you ordered yours? Companies are able to get them it seems, but not regular consumers.
I know I am a year late, but I just discovered this site. The zozosuit has been updated and is now $98 (usa only) and you have to have the new suit in order to use the app as the old suit is no longer supported.
found that info here https://zozofit.com/
I tried to measure myself and using the additional body measurements page my #3 is bigger than my #5, and my #13 & my #14 are the same size. this makes no sense to me, I am very confused. Because the pictures and knowledge of my body #3 should be smaller than #5 and #13 should be shorter than #14, but they aren’t.