How to create your free blog using Blogspot
Looking for starting your first blogspot blog?
That is very obvious as you are reading this post.
Don’t worry if you are newbie as you will learn blogging overtime.
Actually blogging is a journey and I have written guide to start the journey in the most easiest way.

Back in years, When I started to blog, there were no such fancy and easy to follow guides. But, you are lucky you get to one like this.
I will show exactly how you can create your first blogspot blog with this easy step by step guide. I will also show you how to buy and integrate your custom domain with blogger blog.
What is Blogger
Blogger.com is a free platform provided by Google in which one can create your a blog It can be used to share ideas, interests, feeling and opinions on the blog. I have seen starting with this free Blogger service and making millions with just blogging.
As it is totally free as everything is done by google i.e. blogger provides a subdomain for your blog from where it can be access on internet such as yourblog.blogspot.com.
Hosting for your blog is also done by google for free. You don’t have to worry if your traffic increases in future as google is capable of handling it.
Let’s move on creating your blog!
I will walk you through the following things for creating a complete blog with Domain
Step 1. Create your account at Blogger.com
Step 2. Create your blog at Blogger.com
Step 3. Link your blog with custom domain
Step 1. Create your account with Blogger.com
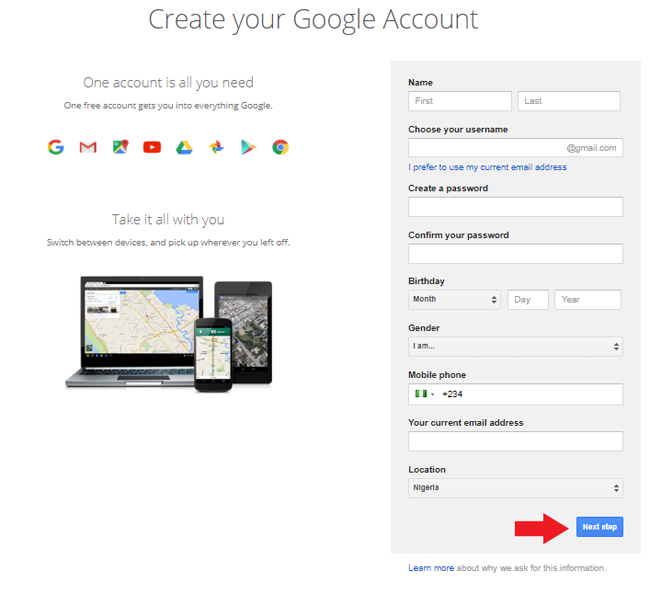
To create your blog, you will need to have a blogger/gmail account with google. Visit Google Accounts and you will have to fill your detail to create your gmail account.
After filling your details, you can click on Next Step at the bottom.
Once you have created your gmail account for your blogger blog then you can move ahead to create your blogger blog.
Step 2. Create your Blog with Blogger.com
1. Visit Blogger.com
To start creating you will have to visit no other than blogger.com. So, click on Blogger.com to open blogger website on new tab.
Once you are on blogger homepage, you will get an overview of blogger and what you will get and what you can do with your blog. You can take a look on the detail and then click on Create a Blog button.

2. Login to Gmail Account:
On the next page, login to your Gmail ID under which you want to create your blog.

3. Choose URL of your Blog:
Once you are logged in with your Gmail ID then on next page, you will need to choose a URL for your blog. It will something like yourblog.blogspot.com. That is you will get a subdomain on which you blog will live on internet.
You can choose anything related to your blog. if you are creating a personal blog, then you can use your name. Don’t think more on this as you will be able to change this in future.

Moreover, I will show in 3rd step how to get a custom domain for your blog such as johnsblog.com. That looks more classy than a subdomain.
4. Choose name of your Blog:
You will also have to choose a name for your blog on this page. I recommend you to keep the name of your blog related to your niche. Suppose if you are writing about food then you can use Fresh Food tips or if you are going to write about football, then you can go for “football freaks”.
I hope you get the point of choosing a relevant name so as to convey message to visitors about things they will get on your blog.
Moreover, if you are creating a personal blog, then you can simply use your name as most of the blogger do such as Lindaikejisblog.com and nielpatel.com
4. Choose Theme for your Blog:
You will also be able to select theme of your blog. You can start with any theme and later on change according to your choice.
To show you, I am selecting the default theme that is already selected “Contempo”
Once you have filled all the details, click on Create Blog!
Hurrah! You have just created your First Blogspot blog.
Your Blogger dashboard and google will ask for if you need a custom domain, Just skip it. I will show you later how to do that.
5. Write your First Post
Click on New Post. It will take you to new page where you will be able to write your first post.

You will see that there are 2 options, that is you can either compose message and google will format it on its own or you can use HTML to give formatting on your own.
If you are familiar with HTML codes then you can use it or other you can simply use formatting given by way you write on Visual Editor.
So, write your post and then click on Publish button on the right. There is also a preview button that is very helpful to see the actual post format without publishing it.

Once you have published your post, to see your post, you can hover over the post in Blogger dashboard and then click on view.
Your post will look something like this. You can also visit your blog directly from its url to view your post, My blogs url is ikejisfootballblog.blogspot.com.

Now, you have successfully create your blogspot blog, let’s move on next steps to link your blog with a custom domain.
Step 3. Link your blog with custom domain
One thing that I love most about blogger is that it allows you to link a custom domain with your blog.
That means, you can personalize the URl of your blog and use any domain such as Lindaikejisblig is using.
1. Register a domain for your Blog.
Step 1. Register a domain for your Blog.
To link a domain, first of all you will have to register the domain. Before registering your domain.
You may need to choose a domain for your blog. Following things may help you to choosing a right domain.
Choosing a right domain for your blog:
Making a blog for yourself, no need to think on this, just use your name as blog name.
Keep it Short: That makes it easy to remember for your readers.
Keep It related to your Niche: If you are writing about football, you shall choose a domain name related to fotball or sport. That will look more friendly for your readers
Avoid Numbers and hyphens: Don’t use hyphens and number in your domain name as they are difficult to remember and your traffic may go some other website owner with similar name
Choose the right extension: If you are targeting a local audience then you can go for a country code doamin such as .com.ng that is very cheap. But if you are targeting a global audience then you should definitely go for a .com domain as they are very prevalent from early days of internet till today.
Cost of a domain.
Registering a domain in 2017 in not any science and price is also very low as compared to past.
These days, you can register a domain for as low as N999 for .com.ng domain and you can register .com for as low as N4100 with us.
Search your domain here:
Search your domain here and it will take you to domain registration cart.
You can take help of this guide to place order for domain registration:
Step 2. Link your domain with your Blog.
1. Login to your Blogger Blog.
Once you are logged in to your blogger dashboard then you can see all your blogs in there. You need to click on
blog name with which you want to link your custom domain.
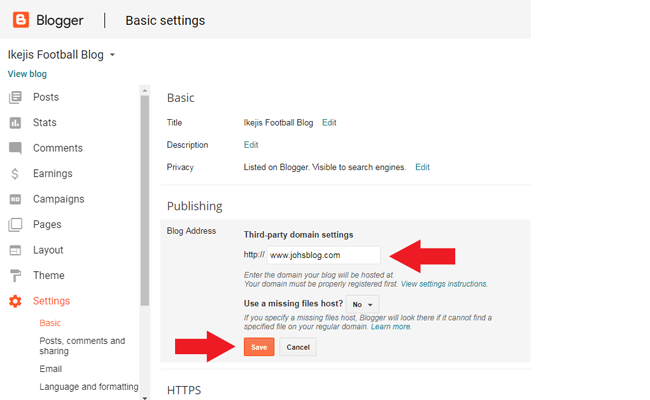
2. Navigate to Basic settings:
Click on”Settings” link in the left side navigation bar. Then, Click on “Basic” once settings are expanded. You will enter basic settings for your blog.
3. Setup 3rd Part URL:
On the same page, you will see a publishing section and box. You will see “Set up a third-party URL for your blog”
Written below the box. Click on it.

As soon as you click that, you will see a box to enter your domain, Enter your domain with “www” i.e if your domain is johnsblog.com then you should write www.johnsblog.com
After entering your domain, “click on Save”.
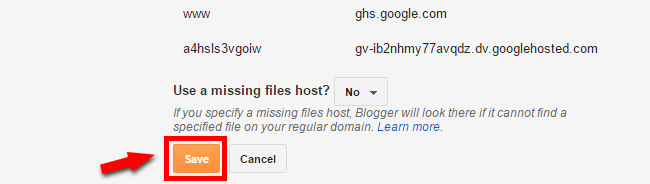
4. Get Cnames to enter them in your Domain’s DNS records.
Once you have clicked on the save after entering your domain. Then you will see 2 CNAMEs as error.

The first CNAME is the same for everyone, Name being “www” and Destination “ghs.google.com”.
The second CNAME is particular to your blog and your Google Account, and is therefore different for each person.
You need to send us these CNAMEs record to our support team. They will add the CNAMES in your domain’s DNS panel.
Final Step of Blogger Integration:
1. Once you have sent the CNAMEs in your DNS panel, then you will have to wait for few hrs for DNS propagation to complete. Once DNS propagation is completed then you will be able to save settings in your blogger dashboard.
On the same page, under basic settings, where you have got the CNAMES, click on save once again. The settings will be saved this time as google will now be able to verify your ownership of the domain.
Click “Save” button as given in the below screenshot.
2. After that, you need to redirect non www traffic to www.yourdomain.com
Once again, Go to Settings & then basic settings of your blogger blog.
Under Publishing section you need to click on Edit next to your custom domain name

Now you need to check the option “Redirect www.yourdomain.com to yourdomain.com”.

Voila! You have successfully linked your custom domain with blogger blog, now you can check your blog. It will work with both with and without www.