Many decades ago, when I fell helplessly in love with Italian-American food, dinners at Angelo's on Flatbush Avenue in Brooklyn, and at thousands of other red-sauce temples across America, used to begin -- de rigueur (or however you say that in Italian) -- with anchovies and pimientos, almost always served on slices of good Italian bread or good garlic bread. Over the last 40 years there have been lots of changes in Italian restaurants in the U.S., and anchovy-pimiento is no longer the go-to, force-of-nature app it once was. Now, you're more likely to get some kind of tri-colore radicchio salad with balsamic vinegar. Sheesh. All the more reason to bring this stellar starter back... in your own home... using the best of the wonderful things available to us in 2013. Old-timers will be brought to new heights, and anchovy neophytes will fall in piscine love.
Recently, I made the best version of anchovies and pimientos I've ever had. Follow me through the three main ingredients, as I look at how they were used over the years... and how they should be used today.
INGREDIENT #1: The Anchovies
I grew up with the very modest anchovies in small, oval tins, packed in oil (preferably olive oil), available at every supermarket. Frankly, there is wide variation today in quality among these tins. In recent years many connoisseurs have moved past them, now opting for much more expensive glass jars of anchovies, wherein the fishy filets stand up straight. There does seem to be an upgrade in texture in anchovies packed this way, but I'm not sure the flavor always justifies the additional expense. For me, there have been too many disappointments.
So now, seeking anchovy nirvana, I've taken to the much-more-labor-intensive, but much-higher-odds path: my go-tos today are whole, salted anchovies, which I soak briefly, then filet myself. Le differenzia! There is no longer an excuse for being lazy!
You can find these at any good, old-fashioned Italian grocery (I buy mine on Arthur Avenue in the Bronx). They are shipped from Italy in very large tins (there may be a few hundred anchovies per tin), the individual fish totally surrounded by salt. You buy by the piece ("gimme a dozen anchovies!").
When you're ready to start working on them, cover them with water. Soaking time is up to you: I like them to remain pretty salty, so I soak for only five minutes. But 10 or more is not impossible -- just don't go too far, because then they'll get insipid.
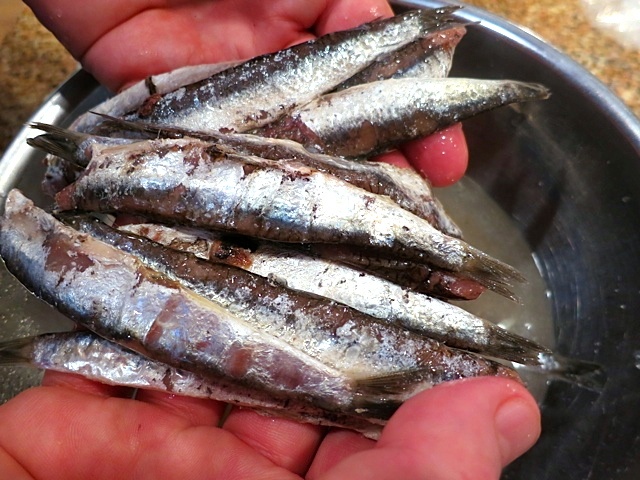
Whole salted anchovies after five minutes of soaking in water
Cut out two filets from each soaked anchovy -- working with a small, very sharp knife and moving it from the tail to the head, above the central bone. After you remove the first filet, simply remove the bone and you've got your second filet. Both filets should retain their silvery skin.
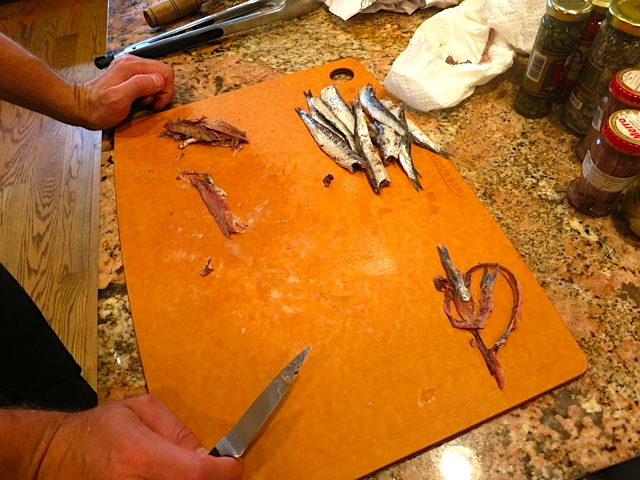
Fileting in process
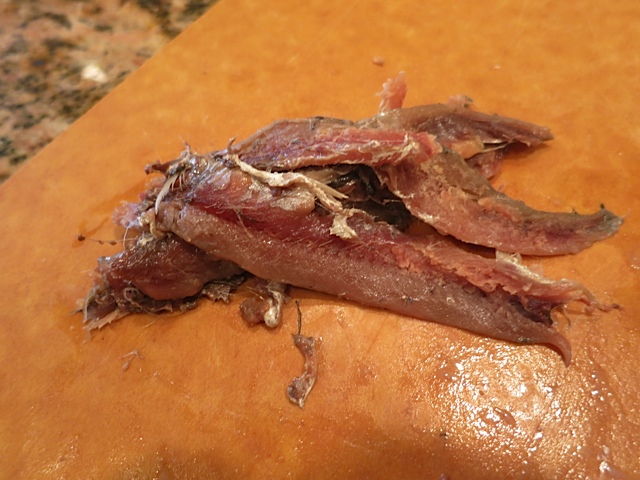
A pile of anchovy filets, skin side down
Place the filets in a small bowl, and just cover with good olive oil. They can sit for a long time -- certainly until dinner, and probably for weeks after that.
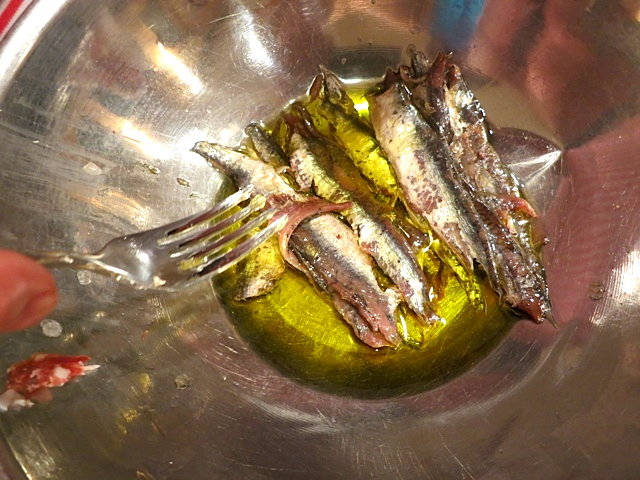
Anchovy filets, skin side up, in olive oil
If you haven't done this before, you will be amazed at the taste. If you're an avowed anchovy-hater... you may even discover you love anchovies! Most people are not aware that their anchovy disaffection, if they have it, comes from anchovies that are not salty enough! The filets in the little tins can be offensively fishy when they're not full-blast sodium chloride; put some of those on a pizza, and of course you don't like anchovies!
But salted anchovies out of the large tin impress almost everyone with their amazing, briny, sea-bright flavor. And... anchovies like this have a more resilient texture than the melt-away ones you may be used to.
INGREDIENT #2: The Pimientos
Things have changed radically in the hunt for this ingredient.
"Pimiento" (with the second i) is the Spanish name for a red bell pepper (technically referring to a heart-shaped pepper that's a little sweeter). Once upon a time, the supermarket was loaded with small jars of "pimientos" -- peppers that have been boiled to remove their skins, then packed in brine with something a little sour (citric acid or vinegar). Dromedary was the big brand (they're still out there), and you could buy whole pimientos, sliced pimientos, diced pimientos, or "pimiento pieces."
I always purchased whole pimientos, cutting each one to fit a piece of bread under the anchovies.
A few years ago, I noticed -- at least in my local markets, and in Italian neighborhoods like Arthur Avenue -- it is now very difficult to find these classic "pimientos."
They have been replaced by a variety of products that are trying to tell you they're more upscale than pimientos. The label may say "roasted red peppers," or "smoked red peppers." The pieces of pepper are likely still packed with some type of acid, but not as much. And, these peppers often have skins on them, showing the charred parts. They are often a little sweeter, a little more resilient, and, of course, smokier, than the old-fashioned "pimientos."
They are not bad for use in an anchovy-pimiento appetizer. I, however, am a creature of habit -- and I've been pining for my old-fashioned pimientos in the jar. After one frustrated hunt, I decided that if I'm going to have to settle for "roasted" red peppers, I'm going to go all the way and roast them myself. I've already done this hundreds of times for other dishes -- but had never thought about doing it for anchovies and pimientos, never associating home-roasted peppers with "pimientos."

A red bell pepper "roasting" on top of an open flame
Wow! Am I glad I broke that wall down! The home-roasted peppers yielded the best anchovy-pimiento dish ever!
One key is "roasting" the peppers on top of an open flame, like on your cooktop; roasting them in the oven will not do, because the flesh gets too cooked by the time it takes for the peppers to char.
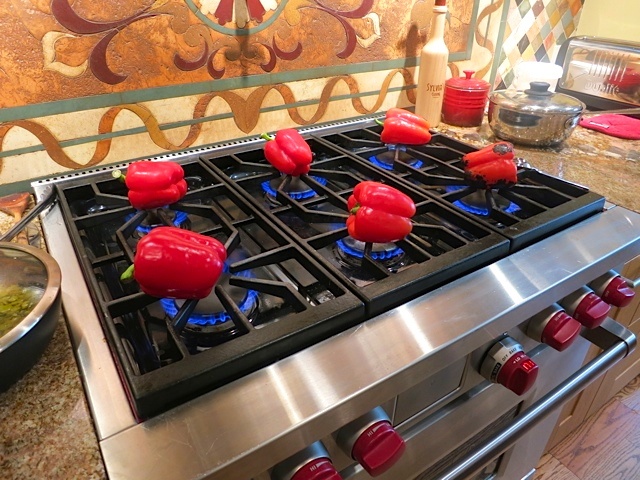
Six peppers "roasting" simultaneously on a cooktop
Turn the peppers every two minutes or so, until each pepper is charred almost everywhere.
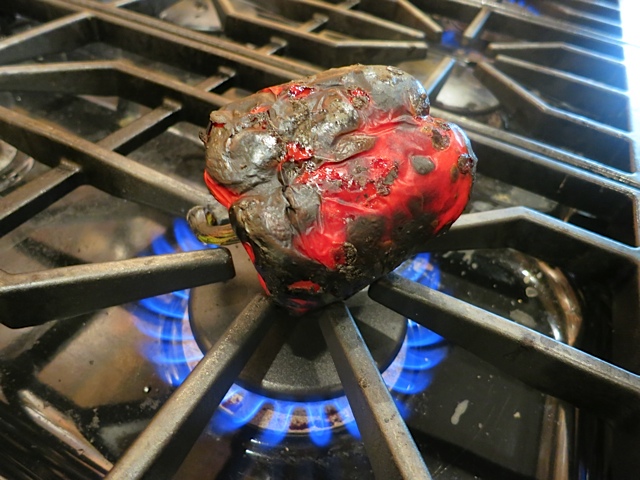
A pepper just about ready for removal
Remove the peppers, and place them in a large paper bag. Roll it up at the top to seal the peppers. Let sit for about 20 minutes; the steam will help the blackened skins separate from the flesh. After twenty minutes, scrape away the blackened skin of each pepper with your hand or a knife. Cut open each pepper, and remove the seeds. NEVER run these peppers under water, in attempts to remove black skin or seeds! When you do this, the peppers lose their lovely, sticky, natural oil. It is better to have some black spots and seeds than to wash away that sweet oil!
Lastly, the coup de grâce: cut each pepper in thirds, toss heavily in very finely minced garlic, then toss the peppers in a bowl with lots of very good extra-virgin olive oil. Just like the anchovies, they will keep until dinner -- and a lot longer, too.
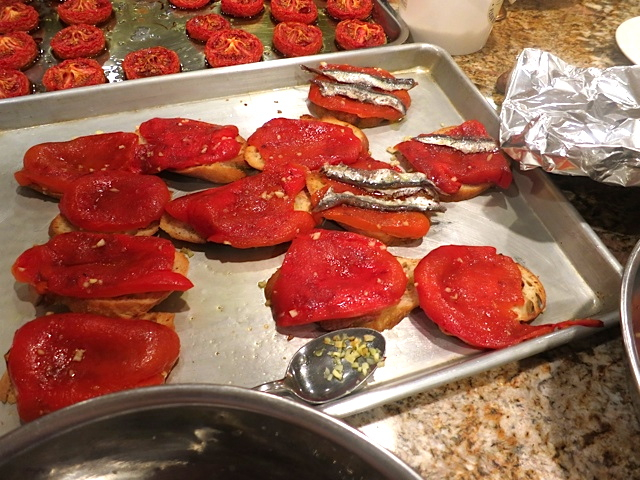
Starting to build the "pimientos" and anchovies on bread
INGREDIENT #3: The Bread
Sure, you could do the whole she-bang on a nice piece of unheated crusty Italian bread, cut about 3/8" thick. But since you're so close to the ultimate...
There's nothin' like the anchovy/pimiento topper on a crisp piece of lightly oiled, very garlicky garlic bread!
Find a good, crusty French or Italian loaf. The golden mean applies here: a loaf that's too light and cottony will fall apart, a loaf that's too dense will be too heavy for the dish. Find a bread that has nice air holes, but some resilient chew as well.
Hours before serving the bread, preheat the oven to 375 degrees.
Cut the bread on a diagonal (you don't want little rounds) into slices that are approximately 3/8" thick. Lay them out in one layer on a baking sheet. Sprinkle about a half-teaspoon of good olive oil on each slice, spreading it around. Top each slice with two teaspoons of minced garlic (not too fine), spreading it around. Finish each slice by sprinkling another half-teaspoon of olive oil over the garlic.
Cook in the oven until the slices are browning at the edges, still tender in the center (approximately ten minutes). Remove from the oven, and hold until dinner.

Garlic bread ready for duty
(NOTE: If you want to serve garlic bread just by itself, serve it hot out of the oven. Each guest decides whether to leave the garlic on top of the slice, or to knock it off).
THE CLIMAX
You know what to do.
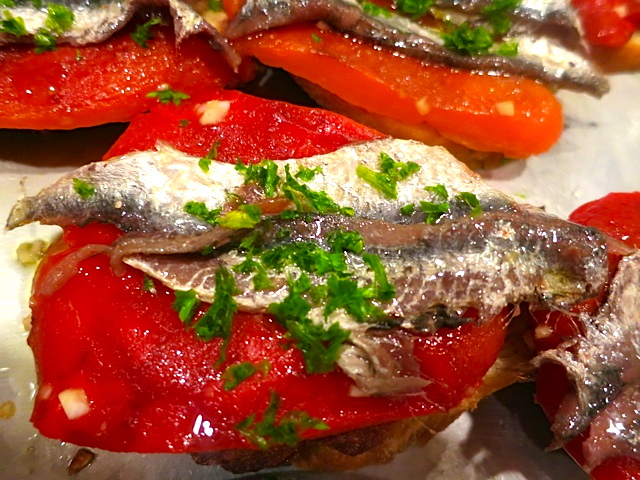
When ready to serve, brush most of the garlic off of each slice of garlic bread. Top each slice with a piece of "pimiento" that fits pretty well. Top each pimiento with two filets of oil-marinated anchovy. Top the whole with finely minced parsley.
The finished anchovy and pimiento
Prepare for moans.
By the way, I've struggled long and hard with the perfect anchovy-and-pimiento wine... and have finally decided that a young, very dry, sparkling Lambrusco (which is red!) from Emilia-Romagna is the ultimate wash.
For more stories like these, sign-up for weekly emails at dRosengarten.com