Table of Contents
Advertisement
Advertisement
Table of Contents

Related Manuals for Baumatic BR27B


Summary of Contents for Baumatic BR27B
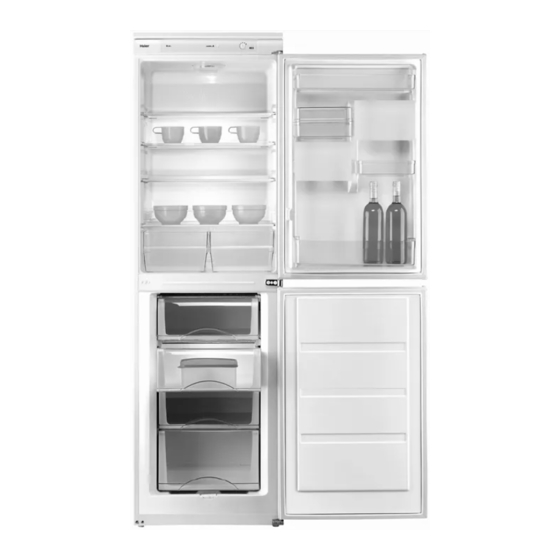
- Page 1 BR27B Built-in Combi Fridge-Freezer...
- Page 2 User Manual for your BR27B BUILT-IN COMBI FRIDGE- FREEZER NOTE : This User Instruction Manual contains important information, including safety & installation points, which will enable you to get the most out of your appliance. Please keep it in a safe place so that it is easily available for future reference.
-
Page 3: Table Of Contents
CONTENTS HT mod 140306 YOUR APPLIANCE’S SPECIFICATIONS …….…….3 SAFETY INFORMATION / ENVIRONMENTAL NOTE .. 4 USING YOUR FRIDGE……………….……………..………5-18 YOUR BR27B FRIDGE …………………….………………….5 BEFORE USING YOUR FRIDGE…………….……………….…6 UNDERSTANDING YOUR FRIDGE-FREEZER…………7-11 ARRANGING FOOD IN YOUR FRIDGE-FREEZER …12-14 NOTES ON USE …………………………………………………15 STORAGE GUIDE FOR YOUR FRIDGE-FREEZER …16-18 CLEANING AND MAINTENANCE ……………………19-21... -
Page 4: Bottle Rack
Specifications of your BR27B Built-In Fridge-Freezer HT mod 02/03/06 Congratulations on purchasing a Baumatic BR27B Built-in Combi Fridge-Freezer! Your Fridge has: Gross capacity: 262 litres Net capacity (fridge/freezer) 163/88 litres Energy efficiency class: B Frost free Freezer Star rating: ****... -
Page 5: Electrical Safety
Manufacturer declines all responsibility for any damage due to non- grounding of appliance. DURING THE GUARANTEE PERIOD ONLY BAUMATIC SERVICE ENGINEERS OR AN AUTHORISED AGENT OF • BAUMATIC SHOULD CARRY OUT REPAIRS ON THIS UNIT. DO NOT USE IF THE SUPPLY CORD IS DAMAGED. NEVER TAKE RISKS WITH FIRE! •... - Page 6 Your BR27 Built-in Combi Fridge - Freezer:...
- Page 7 UNDERSTANDING your BR27B FRIDGE-FREEZER: UPON DELIVERY: When your Fridge-Freezer has been delivered, you will need to wait approximately 3 hours before turning it on. The fluid of the compressor installed in the appliance will need time to settle. PLEASE DO NOT PLUG IN ANY EARLIER THAN THIS!
- Page 8 UNDERSTANDING your Baumatic BR27B FRIDGE-FREEZER YOU SWITCH ON YOUR APPLIANCE by PLUGGING IT IN & SETTING THE THERMOSTAT. This can be found on the control panel, inside the Fridge, at the top. It looks like this: NOTE: When the control panel is connected to a power source, the green Power Indicator lamp (3) and the red Over-temperature warning lamp (4) illuminate.
-
Page 9: Your Br27B Fridge
UNDERSTANDING your Baumatic BR27B FRIDGE-FREEZER NOTE ON LONGER TERM STORAGE OF ITEMS IN YOUR FRIDGE: o In general, you should use the o Turning the dial to a mid-settings (middle sized smaller dot setting will dots) for longer storage of give a milder coldness food in the fridge. - Page 10 UNDERSTANDING your Baumatic BR27B FRIDGE-FREEZER ’ ’ **************************************************************************************************************************************************************************************************************************************************************************************************************************************************************** REMINDER 2: Allow the REMINDER 1: Your Fridge- unit time to settle after Freezer’s thermostat delivery. If your plug and automatically regulates the power socket are now behind inside temperature of the the fridge and you still need compartments.
-
Page 11: Refrigeration Compartment
You switch your fridge-freezer OFF by TURNING UNDERSTANDING your Baumatic BR27B FRIDGE-FREEZER THE THERMOSTAT KNOB TO POSITION ‘0’. REFRIGERATION COMPARTMENT As cold air circulates inside the refrigerator, it produces temperature differences from place to place. Area 6 (see the figure above) is the coldest. - Page 12 SHELVES TO CUSTOMISE THE INTERIOR OF YOUR FRIDGE TO YOUR INDIVIDUAL STORAGE NEEDS. UNDERSTANDING your Baumatic BR27B FRIDGE-FREEZER NOTE: When you first switch on the appliance, allow 24 hours for it to cool down to the desired temperature. During this time, DO NOT open the door often or place a lot of food inside the unit.
-
Page 13: Arranging Food In Your Fridge-Freezer
Ice can easily be removed by hand after the tray has been placed in warm water for a short time. ARRANGING FOOD IN YOUR FRIDGE-FREEZER • To reduce humidity inside your fridge- freezer, NEVER place liquids in unsealed containers in the refrigerator. - Page 14 • ARRANGE meat and cleaned fish (wrapped in packages or sheets of plastic) which you will then use within 1-2 days. • You can put fruits and vegetables into the crisper without leaving them in their packaging. • Unpleasant odours within may mean your fridge needs ARRANGING FOOD IN YOUR FRIDGE-FREEZER cleaning or that food has spoiled.
- Page 15 Always store food with a view to how often it will be used. Food consumed daily should be placed in the most convenient area so that you don’t end up leaving the door open for long periods while you search for food. •...
-
Page 16: Using Your Fridge
Onions, garlic, ginger and other root vegetables should not be stored in the refrigerator as these types of food can be stored appropriately at room temperature. • Ripe squashes, melon, pawpaw, bananas and pineapples should not be stored in the refrigerator. -
Page 17: Storage Guide For Your Fridge-Freezer
REMINDER: You should regulate the temperature of your Fridge bearing the following in mind o Ambient temperature o How often the doors are opened and closed o Quantity of food stored in the compartments o Moisture content of what you place in your fridge o The location of your appliance IN CASE OF A BLACKOUT LONG ABSENCES... -
Page 18: Storing Food In Your Freezer
Remember to store food properly, observing advice on the packaging. STORING FOOD IN YOUR FREEZER suitable for freezing BEFORE they NOTE: When buying commercially are put into the freezer. available frozen food, make sure that Fresh foods – Foods to be the packaging is neither sodden nor stored in the freezer should be in covered with frost (snow) before you... - Page 19 Use correct packaging and wrap items It is very important that the correctly. food is frozen as quickly as possible. We therefore The packaging recommend that the size of should be airtight and the package not be too large. shouldn’t leak since this It should also be sufficiently could cause substantial cooled (at least to room...
-
Page 20: Cleaning And Maintenance
NOTE: For fast, intensive cooling, turn the thermostat (i.e., close to maximum or knob to a very high CLEANING / MAINTENANCE maximum itself) position for some 24 hours. NOTE: Before attempting to clean your appliance, UNPLUG IT and make sure you do the following:... - Page 21 WE RECOMMEND THAT YOU CLEAN THE INSIDE OF YOUR REFRIGERATOR ONCE A MONTH. Pay particular attention Remove In order to collect any to the sealing rubber detachable liquid caused by spillages bars of the doors. accessories and or from exposure to These need to be kept wash them with excessive humidity, take...
-
Page 22: Tips For Energy Savings
THE APPLIANCE FROM ITS POSITION IN THE UNIT IN ORDER TO ACCESS THE CONDENSER. DO SO WITH CAUTION! Upon hearing this alarm, you should: • Check the air circulation through • If necessary, clean or the bottom rail openings. Your vacuum the dust from the fridge-freezer needs good condenser. - Page 23 Try not to open the door too often, especially when the weather is wet and hot. Once you open the door, be sure to close it as soon as possible. ALWAYS MAKE SURE THAT YOUR APPLIANCE HAS THE VENTILATION IT NEEDS. BE ESPECIALLY MINDFUL OF THE NEEDED AIRFLOW BETWEEN ITS PLINTH AND THE FLOOR (SEE INSTALLATION SECTION).
-
Page 24: Installing Your Fridge-Freezer
INSTALLING YOUR BR27B FRIDGE-FREEZER NOTE – YOU -- 200 cm² -- NEED THE SPACES SHOWN HERE TO INSTALL YOUR APPLIANCE. 1776 1782 575cm NOTE: Ensure that you are going to be placing your fridge away from heat sources and in a well-ventilated position. This should be at least 3 cm away from electric or gas stoves and 30 cm from oil or coal stoves. - Page 25 INSTALLING YOUR BR27B FRIDGE-FREEZER 1) After ensuring that the doors open the same way and in the direction you want, fix the joint sockets to the freezer and fridge doors using the provided screws See Figure 1, left Move the...
- Page 26 INSTALLING YOUR BR27B FRIDGE-FREEZER 3) Insert the connecting pad into the joint socket and then fix the connecting pad to the door of the kitchen unit with a margin of 20- 22mm. See Figure 3, at right 4) Properly place the appliance with a 3-4mm space between the left side and the wall of the cabinet.
- Page 27 INSTALLING YOUR BR27B FRIDGE-FREEZER 6) Fill the left gap of the kitchen unit with the gasket. See Figure 5, left 7) Remove the screws and the hole stoppers on the left of the middle connection. 8) Fix the connecting pivot to the...
- Page 28 INSTALLING YOUR APPLIANCE- CONTINUED Fitting Bar Install the Fitting Bar (shown in the picture below), so that it attaches to the top of the appliance and underneath the top of the cabinetry, indicated by the arrow: *Please be aware that the Fitting Bar is not attached to the appliance and needs to be secured during installation.
- Page 29 INSTALLATION-AMBIENT TEMPERATURE GUIDELINES YOU MUST install this appliance in well ventilated, dry room. Energy use is affected by the ambient temperature. You are therefore advised to: Not expose the appliance to direct sunlight; Not install the appliance next to radiators, cookers or other sources of heat;...
- Page 30 Adjusting the feet to level your Appliance Adjust the feet (see picture at right) until your Fridge sits levelly on your floor. You level your unit using these adjustable feet to compensate for dips and rises in your floor surface. NOTE: The height MUST be adjusted before the appliance is built into the unit space designated for it.
- Page 31 Reversing the Doors on your BR27B FRIDGE-FREEZER 1) Firmly hold the door of the refrigerator and remove the screws from the right lower hinge. See Figure at left. 2) Remove the door and keep it in a safe place nearby.
- Page 32 Reversing the Doors on your BR27B FRIDGE-FREEZER 6) Fix the left upper hinge to the left side and then the left upper hinge cover. See above Figure. 7) Mount the refrigerator door to the left of the housing with the middle hinge connected.
- Page 33 9) After installation, open and close the door several times and fix then tighten the hinge screws when the door operates normally. Remove the top hinge cover of the refrigerator door. Remove the door by unscrewing the hinge (the door is supported only by the bottom hinge) and remove the hinge washer.
-
Page 34: Troubleshooting
Troubleshooting PROBLEM WHAT TO DO CHECK THAT THE PLUG IS WELL-INSERTED INTO THE POWER SOCKET. PLUG IN IF NECESSARY. CHECK THAT THERE IS POWER FROM THE MAINS – THERE MAY BE A BLACKOUT OR YOUR FUSES MAY HAVE BLOWN. YOUR FRIDGE CHECK THAT THE ELECTRONIC THERMOSTAT HASN’T BEEN TURNED ALL THE DOES NOT... - Page 35 Troubleshooting YOUR UNIT IS WELL LEVELLED / NOTHING IS TOUCHING THE REAR OF THE UNIT / NO MATERIAL ON THE APPLIANCE IS VIBRATING. PROBLEM WHAT TO DO THE WATER OUTLET IS BLOCKED – CLEAN THE CLOGGED OPENING WITH A STRAW. WATER LEAKS FROM MY THERE HAS BEEN SPILLAGE INSIDE THE APPLIANCE.
- Page 36 REMINDER: THINGS TO KEEP IN MIND WHILE USING YOUR APPLIANCE: A SLIGHT, CONTINUOUS SOUND WILL BE HEARD WHILE THE LIQUID REFRIGERANT CIRCULATES – THIS IS NORMAL. EXCESSIVE VIBRATION IS AN INDICATION OF: A. THE FRIDGE IS NOT WELL POISITIONED AND ADJUSTED. B.
-
Page 37: Conditions Of Guarantee
*In addition, your appliance is covered by a 5 year parts warranty. Baumatic Ltd will provide free of charge the parts required to repair the appliance, only if they are fitted by a Baumatic engineer, for any defect that arises due to faulty materials or workmanship within a period of 5 years from the original purchase date. - Page 38 Baumatic Ltd Make-up for your kitchen Headquarters Baumatic Ltd. Baumatic Buildings, 6 Bennet Road, Reading, Berkshire RG2 0QX, United Kingdom Sales Telephone +44 118 933 6900 Sales Fax +44 118 931 0035 Service Telephone +44 118 933 6911 Service Fax...