Panasonic KX-NT551 Quick Reference Manual
Ip photography telephone
Hide thumbs
Also See for KX-NT551:
- Quick reference manual (25 pages) ,
- Manual (57 pages) ,
- User manual (8 pages)
Table of Contents
Advertisement
Quick Reference Guide
IP Proprietary Telephone
KX-NT551/KX-NT553
Model No.
KX-NT556
Thank you for purchasing this Panasonic product. Please read this manual carefully
before using this product and save this manual for future use. For more details,
please refer to the manuals of the PBX.
This product supports the following PBX versions and CODEC
types:
R KX-NS300/KX-NS500: PFMPR Software File Version 1.0000 or later
R KX-NS1000: PCMPR Software File Version 3.0000 or later
R KX-NCP500/KX-NCP1000: PBMPR Software File Version 8.0000 or later
R KX-TDE100/KX-TDE200: PMMPR Software File Version 8.0000 or later
R KX-TDE600: PGMPR Software File Version 8.0000 or later
R CODEC: G.722, G.711, G.729A
Note
R In this manual, the suffix of each model number is omitted unless necessary.
R The illustrations may differ from the appearance of the actual product.
Trademarks
R Plantronics is a trademark or registered trademark of Plantronics, Inc.
R All other trademarks identified herein are the property of their respective owners.
Advertisement
Table of Contents

Related Manuals for Panasonic KX-NT551


Summary of Contents for Panasonic KX-NT551
-
Page 1: Quick Reference Guide
KX-NT551/KX-NT553 Model No. KX-NT556 Thank you for purchasing this Panasonic product. Please read this manual carefully before using this product and save this manual for future use. For more details, please refer to the manuals of the PBX. This product supports the following PBX versions and CODEC types: R KX-NS300/KX-NS500: PFMPR Software File Version 1.0000 or later... -
Page 2: Information For Users On Collection And Disposal Of Old Equipment And Used Batteries
Important Information Important Information Information for Users on Collection and Disposal of Old Equipment and used Batteries These symbols on the products, packaging, and/or accompanying documents mean that used electrical and electronic products and batteries should not be mixed with general household waste. For proper treatment, recovery and recycling of old products and used batteries, please take them to applicable collection points, in accordance with your national legislation and the Directives 2002/96/EC and 2006/66/EC. - Page 3 Important Information For Users in the European Union For information of Compliance with EU relevant Regulatory Directives, Contact to Authorized Representative: Panasonic Testing Center Panasonic Marketing Europe GmbH Winsbergring 15, 22525 Hamburg, Germany...
-
Page 4: Accessory Information
Accessory Information Accessory Information Included Accessories Handset (1) Handset Cord (1) Stand (1) KX-NT551 KX-NT553/ KX-NT556 Optional Accessories KX-NT551 KX-NT553 KX-NT556 KX-A239CE (PQLV206CE) AC adaptor Wall mount kit KX-A432X KX-A433X — Add-on 48 key module KX-NT505X To order an optional AC adaptor, please order using the"KX-A239xx" model number (not "PQLV206xx"). -
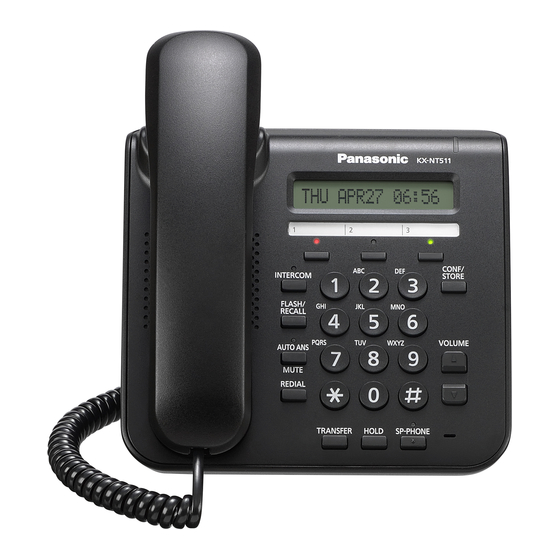
Page 5: Location Of Controls
Location of Controls Location of Controls KX-NT551 KX-NT553 KX-NT556... - Page 6 Location of Controls A Main LCD (Liquid Crystal Display): KX-NT551: 1 line, KX-NT553: 3 lines, KX-NT556: 6 lines B Message/Ringer Lamp: When you receive an intercom call, the lamp flashes green, and on an outside call, the lamp flashes red. When someone has left you a message, the lamp stays on red.
- Page 7 Location of Controls Q Microphone: Used for hands free conversations. R Navigator Key: Used to adjust the volume and the display contrast or select desired items. S ENTER : Used to assign the selected item. T Soft Buttons (S1-S4) : S1-S4 (located from left to right) are used to select the item displayed on the bottom line of the display.
-
Page 8: Before Operating The Telephone
5. Press [ENTER]. 6. Press [CANCEL]. If you hear your own voice through the handset or headset, decrease the volume. To change the sub LCD contrast of the KX-NT553/KX-NT556, enter Step 2. For KX-NT551, press V/S[PAUSE/PROGRAM]. For KX-NT551, press [AUTO DIAL/STORE]. - Page 9 PROG 2. Enter 3. Press [ENTER]. 4. Press a dial key to select the LCD backlight mode. : Automatic : Always ON : Always OFF 5. Press [ENTER]. 6. Press [CANCEL]. For KX-NT551, press V/S[PAUSE/PROGRAM]. For KX-NT551, press [AUTO DIAL/STORE].
-
Page 10: Feature Operations
Feature Operations Feature Operations Making Calls Calling MTo an extensionN 1. Go off-hook. 2. Dial an extension number. MTo an outside partyN 1. Go off-hook. 2. Press a flexible CO button. 3. Dial the outside party’s phone number. Redial 1. Go off-hook. 2. - Page 11 8. Press [CANCEL]. MTo dialN 1. Go off-hook. 2. Press the flexible CO button assigned as a One-touch Dialing button. Enter the outside line access number before an outside phone number. For KX-NT551, press V/S[PAUSE/PROGRAM]. For KX-NT551, press [AUTO DIAL/STORE]. KX-NT553/KX-NT556 only...
-
Page 12: During A Conversation
Feature Operations During a Conversation Call Hold MTo holdN 1. Press [HOLD]. 2. After the confirmation tone, go on-hook. MTo retrieve a call at the holding extensionN 1. Go off-hook. 2. Press a flexible CO button or [INTERCOM]. MTo retrieve an outside call from another extensionN 1. -
Page 13: Setting The Telephone According To Your Needs
Feature Operations Setting the Telephone According to Your Needs Do Not Disturb 1. Go off-hook. 2. Enter 3. Press a dial key to select the setting. : Both outside and intercom calls : Outside calls only : Intercom calls only 4. -
Page 14: Useful Features
Feature Operations Useful Features Multiple Party Conversation MTo add other parties during a conversationN 1. Press [CONF]. 2. After the confirmation tone, dial the phone number of the party to add. 3. Talk to the new party. 4. Press [CONF]. 5. - Page 15 Feature Operations Self Labeling (KX-NT553/KX-NT556 only) The KX-NT553/KX-NT556 features 12 flexible buttons, with an LCD screen next to the buttons. Each item can be named on the LCD screen through personal or system programming to reflect the function of its corresponding flexible button. Additionally, the KX-NT553 (KX-NT556) flexible buttons can be organized into 2 (3) “pages”, allowing you to assign a total of 24 (36) items to the 12 flexible buttons.
-
Page 16: Installation And Setup
Installation and Setup Installation and Setup Note R Panasonic assumes no responsibility for injuries or property damage resulting from failures arising out of improper installation or operation inconsistent with this documentation. Attaching a KX-NT505 to the KX-NT553/KX-NT556 The KX-NT505 allows 48 additional flexible CO buttons to be added to this unit. -
Page 17: Attaching The Stand
AC adaptor must be connected to the second key module. If only 1 key module is connected, an AC adaptor is not required. R Use only the Panasonic AC adaptor. See “Optional Accessories”, Page 4. Attaching the Stand KX-NT551 Insert the catches of the stand into the hooks located in the unit. -
Page 18: Removing The Stand
Installation and Setup Removing the Stand KX-NT551 Remove the stand in the direction indicated while pushing the catches of the stand with both hands as shown. KX-NT553/KX-NT556/KX-NT505 Hold the stand with both hands. Gently rotate the stand in the direction indicated until it is released. - Page 19 Installation and Setup Connections KX-NT551 Optional AC adaptor To a Switching Hub To a PC Ethernet cables To a handset jack (handset) Clamp AC adaptor Handset Headset jack Optional AC adaptor To a switching hub To a PC Ethernet cables...
- Page 20 When connecting to a switching hub R If PoE is available, an AC adaptor is not needed. R KX-NT551/KX-NT553/KX-NT556 comply with the PoE Class 3 standard. When connecting a PC R The PC port does not support PoE for connected devices.
-
Page 21: Wall Mounting
R When mounting the KX-NT553/KX-NT556 with a KX-NT505 on a wall, only ONE KX-NT505 can be attached. Insert the tabs of the wall mounting adaptor into the designated openings in the base, and then slide the wall mounting adaptor in the direction of the arrow until it clicks. KX-NT551 KX-NT553/KX-NT556 with KX-NT505... - Page 22 Wall Mounting Fasten the wall mounting adaptor(s) to the base with the screw(s). (Recommended torque: 0.4 N·m [4.08 kgf·cm] to 0.6 N·m [6.12 kgf·cm]) Connect the cables to the unit, and run the cables through the wall mounting adaptor, as shown in the illustration below. Drive the screws into the wall either 83 mm or 100 mm apart, and mount the unit on the wall.
- Page 23 Notes...
- Page 24 IP-PT and the 2 screws for the KX-NT505, as indicated above. This space is abbreviated in this template and must be measured. One screw at either point One screw at either point © Panasonic System Networks Co., Ltd. 2013 PNQX6260ZA PP0913MK0...