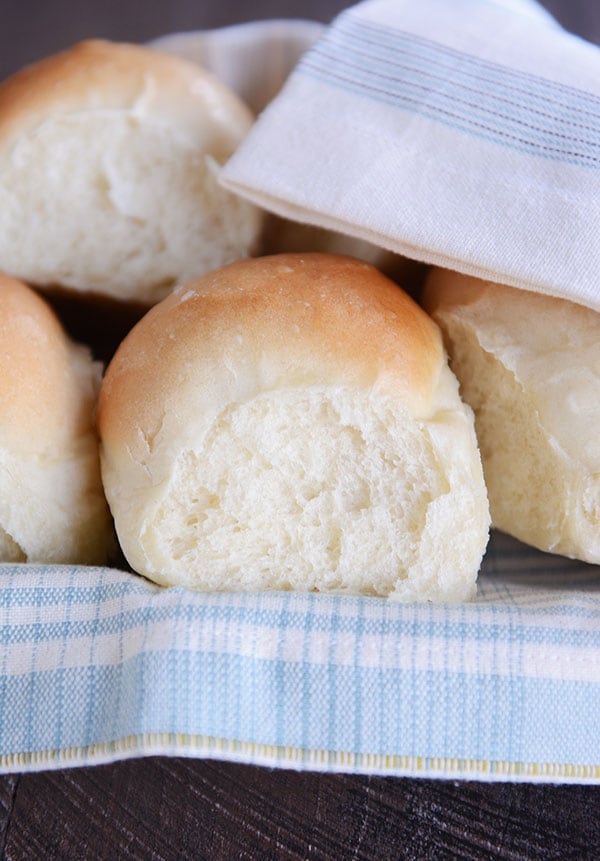
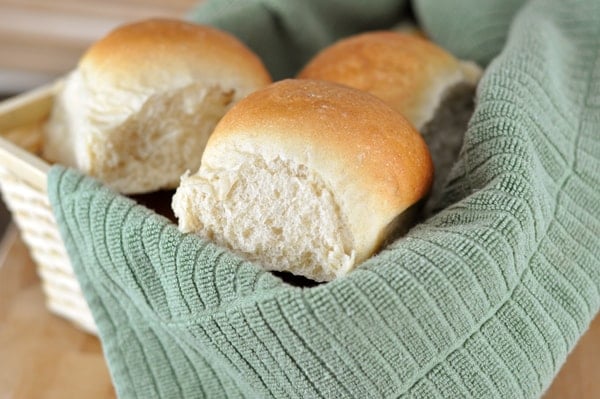
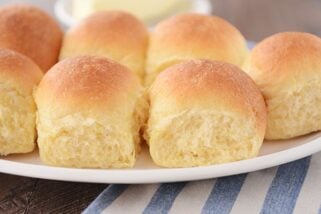
French Bread Rolls {Step-by-Step}
These popular, no-fail French bread rolls are light, fluffy and delicious! They are so easy to make; perfect for bread-making beginners and experts alike!
If you want one of the easiest, foolproof, most delicious roll recipes around, this is it.
This French bread roll recipe has been around a loooooong time, and after 10+ years, it is still the roll recipe I probably make the most (that’s saying a lot, because I have a lot of favorite roll recipes).
A Very Forgiving Dough
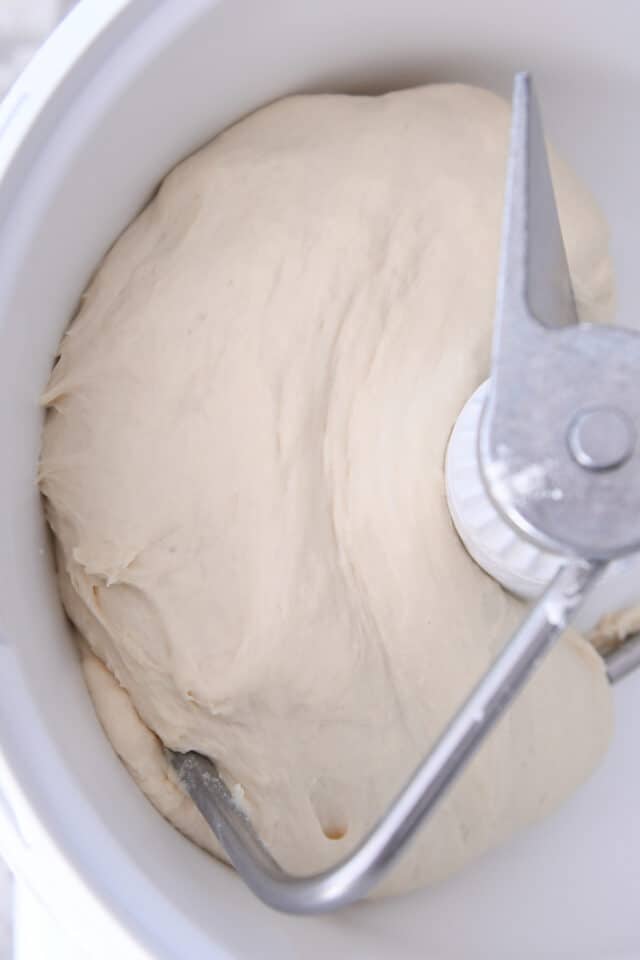
The dough for these French bread rolls is straightforward and very forgiving. I usually use my Bosch stand mixer, but many of you make this dough in a KitchenAid mixer and others make it by hand.
Dough ingredients:
- warm water
- yeast (instant or active dry yeast)
- sugar
- oil
- salt
- flour (all-purpose or bread flour)
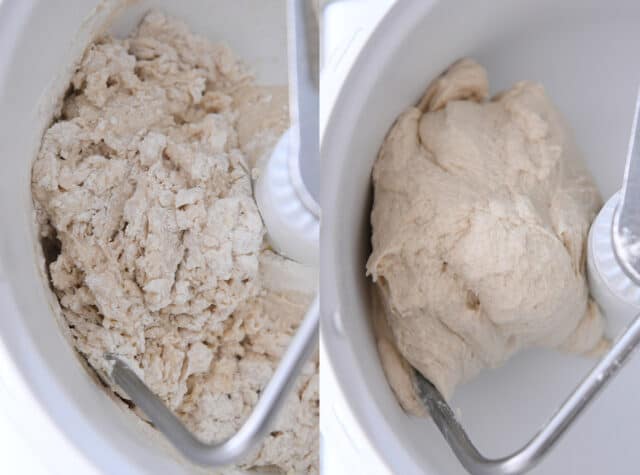
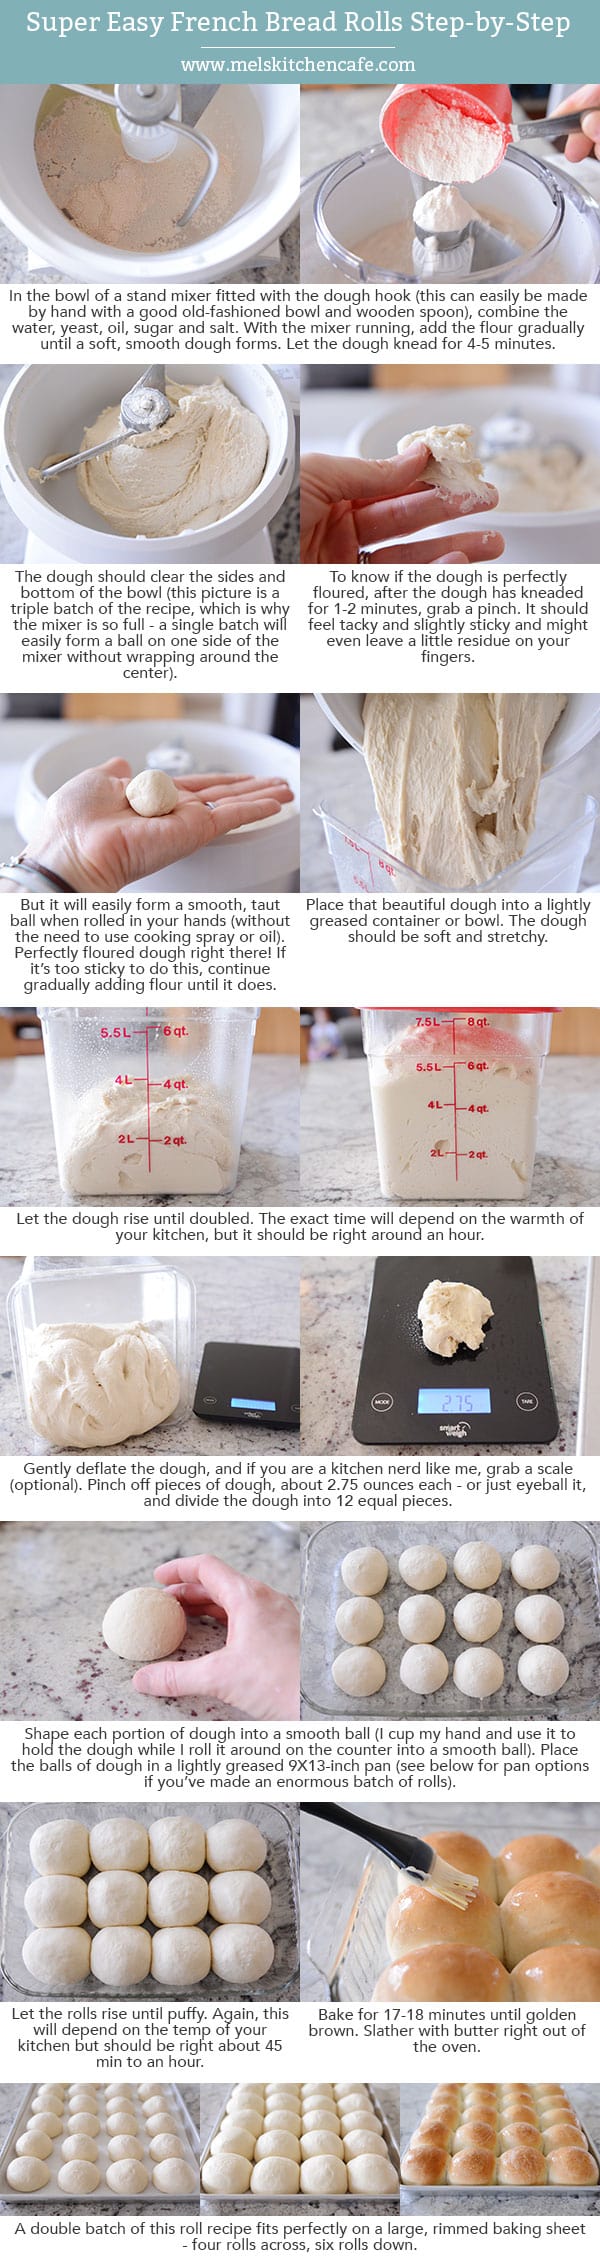
Mix all the ingredients together until the dough forms a soft, slightly sticky ball of dough that clears the sides of the bowl and doesn’t leave a lot of sticky residue on your fingers.
How to Make Yeast Dough at Home
Stop stressing about adding the exact amount of flour called for in a recipe! Many, many factors determine how much flour is needed (elevation, humidity, how we each measure flour, etc.)
Judge the dough based on how it feels and how it looks. If you need to add a bit more flour, that’s ok!
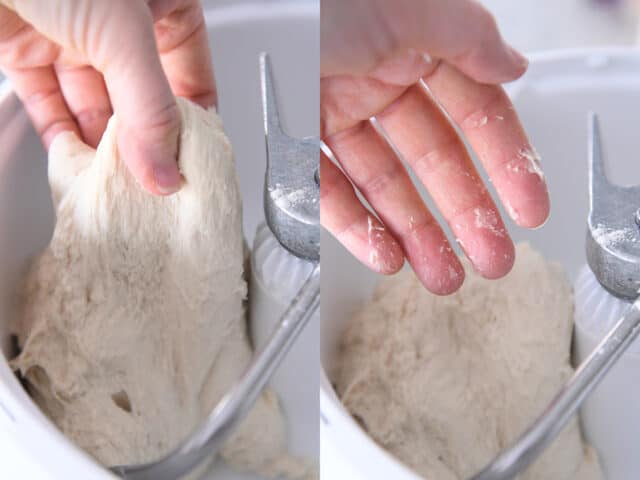
For this recipe, grab a piece of dough after the flour has been added. Initially, it might leave a little sticky residue on your fingers.
Try rolling it into a ball without any oil or cooking spray on your hands. If it can form a ball shape without sticking to your hands in a shaggy, horror-movie mess, you are good to go. If not, add a bit more flour (a couple tablespoons), mix and try again.
Adding too much flour can spell death to light and fluffy homemade bread or rolls.

Let it Rise
I’m lazy and let the dough rise right in the mixing bowl. It is a pretty quick-rising dough.
Once it has doubled in size, it’s ready to get shaped into rolls.
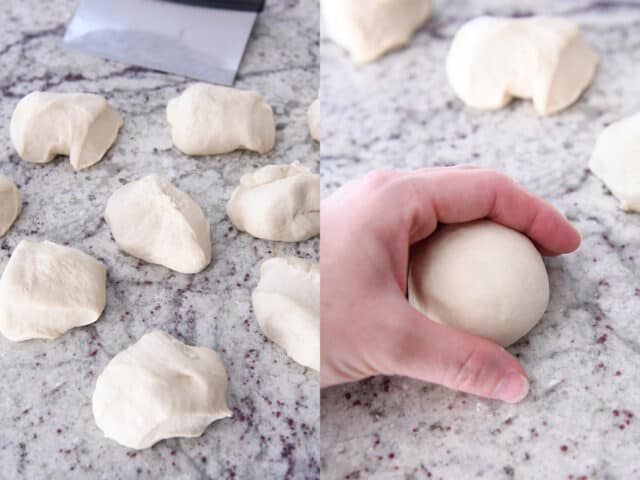
Shape the Rolls
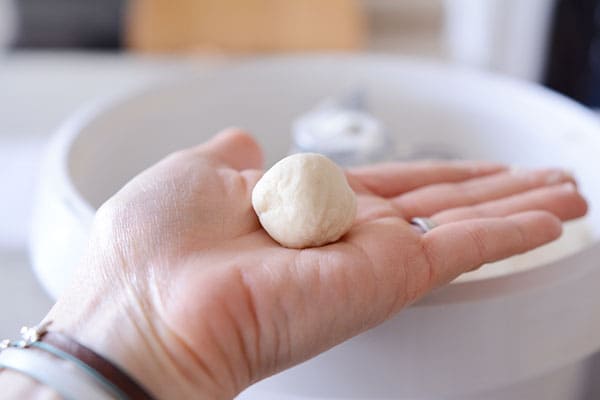
Cut the dough into 12 equal pieces. I usually weigh each piece to make sure they are uniform. Each dough piece usually weighs right around 2.6 to 2.7 ounces.
Cup your hand and roll the dough into a smooth ball (keep the pinky side of your hand against the counter while you roll). Pinch the bottom to seal, if needed.
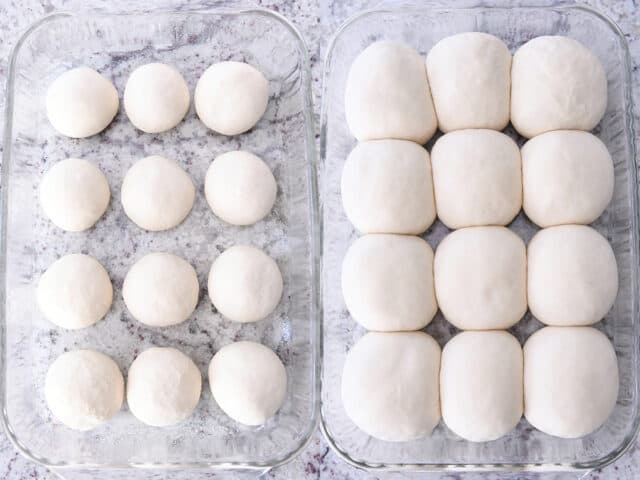
Place the rolls in a greased 9X13-inch pan.
For a double batch (I almost always double the batch), I like to place and bake the rolls on a half sheet pan (24 rolls fit perfectly).
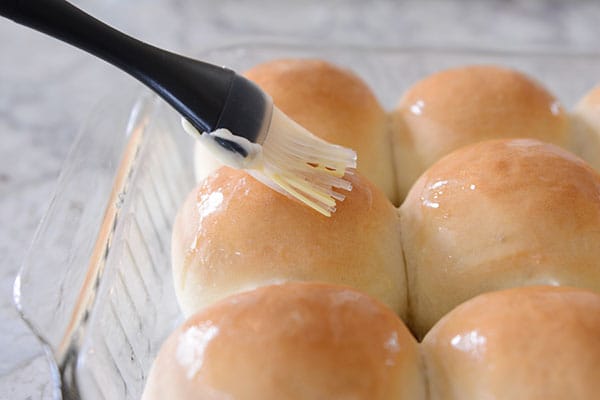
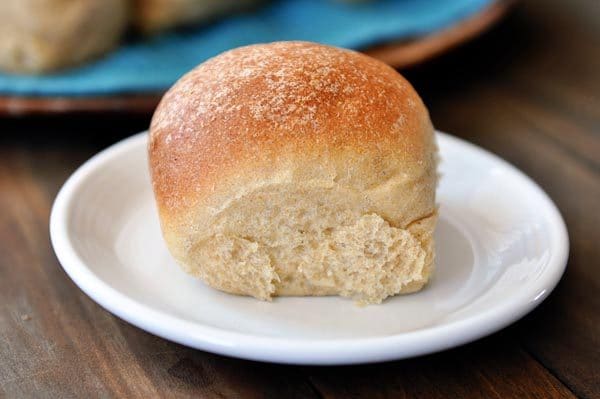
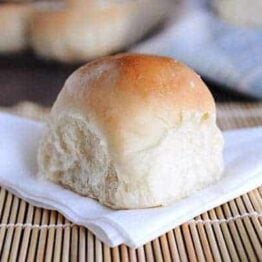
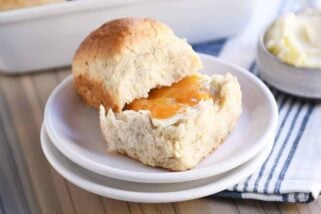
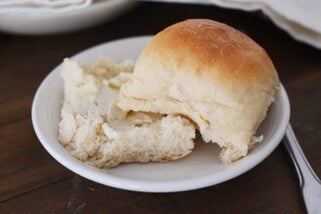
Bake the rolls until golden and then brush the tops with butter.
The Perfect Roll for Sandwiches or Subs
Over the years, these French bread rolls have become more than a dinner roll.
These French bread rolls have become my go-to for any recipe that needs a wonderful all-purpose roll or bun.
Here are a few examples:

Whole Wheat Version
I also posted a 100% whole wheat version of these French bread rolls with a few small but important notes/changes, so if whole wheat is more your jam, check that out (although you can definitely add whole wheat flour to the recipe below as I’ve done many a time throughout the years).
Freezer Friendly
There is not an easier, more perfect roll recipe out there!
These French bread rolls come together fast, and honestly, I haven’t met a single person who wouldn’t fight to the death for one of these fluffy, heavenly rolls.
I always, always at least double (most often triple) the French bread rolls batch, because the baked and cooled rolls freeze amazingly well!
Step by Step French Bread Rolls
Tools for Making French Bread Rolls at Home:
*Affiliate links included below for products I’ve purchased from Amazon; feel free to shop around for the best price!*
- -I like to weigh out the dough for this recipe and others; this is the beloved kitchen scale that I have
- -Here is the large 8-quart container I use for letting the dough rise (comes in many different sizes; also carried in stores like Standard Restaurant Supply, if you have one local); smaller 4-quart version here (keep in mind you have to purchase the lids separately)
- –Silicone pastry brush for slathering on the butter
- -My favorite OXO bench knife for portioning out the dough
A quick note about mixers: I have a Bosch Universal and use it for 99% of the bread recipes I make. Here is a side-by-side (unsponsored) review I did between a Bosch stand mixer and a KitchenAid stand mixer.
French Bread Rolls
Ingredients
- 1 ½ cups warm water
- 1 tablespoon instant or active dry yeast (see note)
- 2 tablespoons granulated sugar or honey
- 2 tablespoons canola oil, vegetable oil or other neutral-flavored oil (olive oil will work, too)
- 1 teaspoon salt
- 3 ½ to 4 cups (497 to 569 g) all-purpose or bread flour, more or less (see note)
Instructions
- In the bowl of a stand mixer fitted with the dough hook or in a large bowl by hand, combine the warm water, instant yeast, sugar, oil, salt and 2 cups of the flour.
- Begin mixing, and continue to add the rest of the flour gradually until the dough has pulled away from the sides of the bowl. Begin kneading the dough for 4-5 minutes in a stand mixer (7-9 minutes by hand).
- The dough should be soft and smooth but still slightly tacky to the touch. After a few minutes of kneading, stop the mixer and grab a small piece of dough to test if it needs more flour or not. It might leave a little bit of sticky residue on your fingers, but if you can roll it into a small ball without it sticking all over to your hands, it is good to go. If not, gradually add a bit more flour as needed.
- Place the dough in a lightly greased bowl and cover. Let the dough rise until doubled, 1-2 hours.
- Lightly punch down the dough and turn it out onto a lightly greased countertop.
- Divide the dough into 12 equal pieces (about 2.75 ounces each, more or less), and form the dough into round balls (video tutorial here right at minute marker 2:20).
- Place the rolls in a lightly greased 9X13-inch pan or on a large, rimmed baking sheet lined with parchment or lightly greased. Space the rolls about 1/2- to 1-inch apart.
- Cover the rolls with lightly greased plastic wrap taking care not to pin the plastic wrap under the baking sheet or else the rolls will flatten while rising. Let the plastic wrap gently hang over the sides of the pan to fully cover the rolls but not press them down.
- Let the rolls rise until very puffy and doubled, about 45 minutes to 1 hour.
- Preheat the oven to 400 degrees. Bake for 15-17 minutes until lightly browned and cooked through.
- Immediately out of the oven, brush with butter.
Notes
Recommended Products

Recipe Source: Mel’s Kitchen Cafe
Recipe originally published 12/2007; updated with new pictures, step-by-step tutorial, and recipe notes.
Will bread flour work as well in this recipe versus all purpose flour?
Yes! The rolls will be chewier and even softer!
Hey Mel,
I love your recipes! These rolls didn’t turn out for me tonight and I know it was something I did and maybe you can help me figure it out. The rolls were lumpy and didn’t rise much. I did 3 1/2 cups flour. Did I not do enough flour? I don’t think I killed the yeast because they did rise. Did they rise too much? This has happened to my bread before and I don’t know what I am doing wrong. When they rise the second time they go more out than up. Thanks for your help!
Hey Bailee – if the rolls are rising out instead of up, I think you probably need about 1/2 cup more flour. How long are you kneading the dough for? You might try kneading for longer, too, so the dough isn’t lumpy.
Made as directed…super fluffy, yummy rolls, and the perfect amount!
I. FINALLY Did. It!!!!! I made the rolls tonight and they came out big, tender, fluffy and delicious !l I guess the third time was the charm ( For me) The problem was underflouring. I used a full 4 cups of flour this time and that was what I needed. They still had a little stickiness to them but were much much easier to handle. I also used the “light batter” proof setting on my oven which is 110 degrees, rather than 125 degrees for the “dense batter” setting and I think that worked in my favor too.
THANK YOU Mel, Lynn and Terry
Linda T.
Yay!! I’m so excited to read the update, Linda. Way to go!
Just made these and they were so easy and delicious! Will definitely be keeping this recipe for my go-to roll recipe.
I have a question. Every time I roll out dough for rolls or buns, I get a crater in the bottom. I leave my pinky on the mat, and simply roll as instructions always say, however I always end up with the crater on the bottom. I also always use whole wheat flour or white whole wheat, mixed with bread flour, sometimes AP. Is this the reason? Or am I doing something wrong? Please help. Thanks much ~
Hi Terry – is the crater or hole right where the dough swirls on the bottom of the roll? Do you feel like the dough is over floured at all?
I can’t believe I’m going to be the only person in the whole wide world to try these roles twice, and have a total fail both times ! Seriously,, I can’t do it and I’m the only one !
I think maybe I underflour them because I’m afraid to overflour them, but I don’t know what the problem is. I put them on a flat cookie sheet so they weren’t up against each other,, but they came out flat and not fluffy and soft. Nothing like your rolls. Anyway, I know it’s my fault and has nothing to do with your fantastic. recipe but for some reason, it doesn’t like me
And for the record, I made your best ever “Cheryl’s cinnamon rolls and they came out amazing.
You may be killing yeast. Make sure you use the appropriate one. Let it really foam out to the pkg directions. Killed yeast makes horrible rolls. Done it and know exactly the results you got matched discription. Never rush yeast. Do not make mistake of putting salt in to fast or it will kill yeast as well.
Oh and water, make sure it is not to hot. We are talking warm to touch , not hot. That too will kill it. Good luck
Thank you Lynn for the suggestions ! I don’t think I kill the yeast because I get a good rise out of them . I might try these ONE more time and use a full 4 cups of flour. I think I might be underflouring them because the dough is really sticky, What happened this time was the dough rose but when I took them out of the oven ( I proof dough in my oven on the “proof setting”), they completely fell.
I baked them anyway hoping they would rise again but they didn’t
It sounds like the dough was over proofed. If your ovens bread proofing drawer is too warm, it can rise too fast. Once it fell, you can successfully deflate it properly, and let it rise again, this time watching it, so it doesn’t over proof. You may want to invest in an oven thermometer to see what the temp is in there. I have a recipe that is supposed to rise the second time for an additional hour after I’ve shaped the loaf. It’s deflated after an hour. After 20 minutes though, it’s exactly where it needs to be go in the oven to bake. Try this, hopefully it helps. Don’t be afraid to deflate properly and rise again 😉
Hey Linda! I have no doubt we can get these rolls to turn out spectacular for you! First of all, I think if you are worried about over flouring them and have a tendency to under flour, place the rolls closer together. As they rise, they’ll use each other’s sides to rise up instead of flatten. If they are rising and then falling, it might be that they are rising for too long (and under flouring can make the structure of the rolls more fragile causing them to fall). So I think with a bit more flour, placing them a little closer together and not letting them over rise – all of that might help.
Hi Mel,
Thank you for the tips, Mel! Lynn and Terry were also so sweet to lend me some tips too. You have a great following !
A good friend of mine makes these ALL THE TIME and they come out perfectly every time !,!! They look exactly like the picture on your blog!
I will try them again using 4 cups of flour and using a 9x 13 pan to allow them to rise and support each other.
I will report back
Thanks again! And I hope all is well with you and your family.
Hi there.
My dough didn’t rise 🙁 I used instant yeast and followed the recipe perfectly. I must have messed up somewhere, but they came out surprisingly good for my first time making these 😀
Thank you for the recipe!
Hi Mel,
Any chance you have the nutrition facts for the rolls?
Thanks!
I don’t, sorry!
Well…. Your french bread rolls are now famous in Zakynthos , have tried many recipes,but these are simply the best!!!!! & Easy to make!!! Lucky I found you on Google Thanks for the recipe. Lynne xx
First time ever that my bread buns have turned out edible. They were so easy to make, and look and taste amazing. Thanks for sharing your recipe.
This recipe is fantastic! I have never been able to bake bread. I have tried maybe a dozen times but have never managed to end up with the fluffy golden goodness……. UNTIL NOW! This recipe is a fail safe. The picture tutorials are an amazing tool and the recipe is so easy to follow. If I can do it, believe me, anyone can. Thank you, thank you Mel!
WOW. They turned out BEAUTIFUL and incredibly soft! The softer parts tasted more like bread from a bread machine and the parts closer to the crust had a more traditionally bready flavor. Success on the first try!
Wow! 4” high fluff rolls!
Just took a batch of these to a dinner party, and my friends were blown away!
“Best bread I ever had”, said one. “How do you do that?”, said another. Wifey declared them winners, and she can be depended upon for clear judgement.
A powerful and simple recipe. Easy to adjust batch size. Soaks up a ton of butter and remains incredibly light.
I never remember to come back and comment on a recipe but I just had to for this one. I feel so accomplished now that I can make buns with this recipe. My family LOVES them! Thank you so much. Your rolling technique is the best, sooo easy! I found that 3.5 cups flour turns out the best for me. All of your recipes that I’ve tried are amazing!
I made this dough for calzones yesterday and am thrilled how fast and easy it was! Oh and delicious. I used honey for the sweetener.
I got the idea from your Philly Cheese steak calzone recipe but modified the filling so much I didn’t want to post a comment there. I used ground beef, onion, garlic and roasted Poblano pepper if anyone’s interested. We had salsa for a dipping sauce and it was great!
I’m already making plans to make these (probably with pizza fillings) next time the grandkids visit. They’ll be very happy! Thanks Mel, your recipes rock
What a great recipe Mel! Since I tried this recipe a couple of months ago, I no longer buy rolls. My ‘buns’ are now a must have at every family gathering. My nephew says the buns even “smell soft”! For his 20th birthday this year, he has asked me for a dozen!
Making this recipe was my first attempt at baking bread rolls and they turned out perfectly (thanks to Mel’s tutorials!). I was so impressed at having make something that looked store bought!! Since then, Mel’s website has become my “go to” online recipie cookbook when I want to impress. Having said this, I was really hoping to find a gluten-free version of these beautiful fluffy French rolls as my mum is on a gluten-free diet for acid reflux. I have attempted a recipie (which I would prefer not to mention – since I think I discovered how to make concrete in my KitchenAid) and am hopeful that Mel might have some experience in this area?? Many thanks for the gorgeous recipes, keep them coming as you are touching the lives of people who live all the way in Australia.
Hi Emma! Thanks for your sweet comment. Unfortunately, I don’t have a lot of experience baking gluten free yeast breads. I know the formula has to be significantly different because gluten free flour doesn’t behave the same way as gluten flour in bread recipes. Have you googled fluffy gluten-free dinner rolls to see if any promising recipes come up?
Hi Mel, thanks for your reply. I’ve had a bit more of a look at online recipes and I think I have found a recipe that may work. Also, as u mentioned and from what I have read, G-F flour does behave quite differently to wheat flour and that the bread roll dough itself will be a lot more wet than regular wheat dough so to not expect it to pull away from the mixing bowl when enough flour has been added. Well, with arms, legs, toes, eyes and fingers crossed I shall experiment and try. Wish me luck!! Take care, Emma.
Have you seen he I can’t Believe it’s Gluten free cookbook from america’s Test kitchen? It has a good recipie.
This has become my go-to recipe for just about everything bread-wise. It’s easily formed into any shape, and bakes up perfectly every time. I use it about once a week now — for dinner rolls, burger and hot dog buns, sub rolls, large ‘Italian’ loaves that become garlic bread, pizza dough, and much more. Easy and foolproof. Thanks.
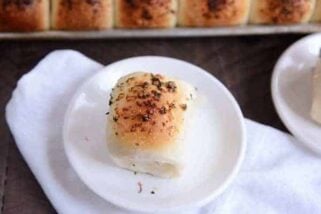
Hi! I’m making these rolls now, and I was wondering if you had advice on adding sesame seeds and when I would add those to the rolls? Cheers in advance! No worries if you’re unsure 🙂
Hi Morgan, if you want to add sesame seeds inside the dough, I’d add them during the kneading process. If you want them on top, I’d brush the rolls with an egg wash prior to rising (after they’ve been shaped) and sprinkle on the seeds then.
These are definitely my new favourite, go to roll recipe. I have made them several times, and they always turn out great. Thanks Mel.
I love this recipe!!! I’m currently soy & dairy free due to breastfeeding my daughter who has allergies and can’t eat much bread that’s in store. This recipe is super easy & cheap to make & most importantly extremely delicious!
After seeing all the positive comments, I was so excited to try these, unfortunately they didn’t rise much at the second go and then look a bit disappointing (compared to yours). Any suggestions for next time please? Thanks
Not rising enough could be 3 things. Temperature (was it too cold?) time (might have needed to wait longer for a fuller proof?) or yeast (is your yeast fresh? Stored in cool dry place? Activated or instant?)
If your yeast is fresh, then time and and temperature are the factors to change for better results.
For time, you can try the same method but wait longer on the rise and proof.
For temp you can make sure your ingredients all start at room temp, use slightly warmer water, and make sure your dough is in a warmer draft free spot during rising and proofing.
* I like to place my proofing rolls on top of my refrigerator because it puts off just a little heat.
Hope that helps!
Best recipe ever! Made several times and always turn out great
Thank so much for the recipe
This Christmas everyone had to help with dinner. In the middle of the day my grandson jumped up and scurried to the kitchen where he made a double batch of these rolls. They were a big success. It’s his job from now on. He is 18 but has done very little cooking. (Mac and Cheese and Nugget)
Wow, way to go! That’s amazing!
Hi, could you please tell me if these rolls would be good for mini sausage with peppers and onions. I would like to make them for Christmas! Thank you!!
I haven’t tried that but sounds delicious.
Ty for the info. I looked online and I should have doubled the diamond kosher salt for table salt. Also a lot of bakers prefer table salt because of the fine grain. I think I’ll get some table salt for baking.Great roll recipe
Wow such a great recipe and I feel like a pro roll maker. I’m curious what kind of salt you use? I use Diamond kosher and I think it’s less salty than other kinds per measure. I think I’ll add a bit more salt next time.
I usually use table salt, so yes, if you are using Diamond coarse kosher salt, you’ll want to add a bit more.
Mel,
I printed well copied and pasted your recipe then converted the measurements of the ingredients to grams and weighed them. The rolls turned out fantastic. This is definitely a keeper. I hope you dont mind the cups and tablespoons conversion to grams. and the 2.75 ounce is 77-78 grams.
Thanks, Frank!
I love your trick of using a measured container for rising the dough. I’m never quite sure when the dough has doubled. I have 2 4qt containers. Maybe I’ll split the dough and put half in each container.
Could you please provide additional instructions for how to make/proof the dough the night before baking?
I make the dough, let it rise (in bulk), punch it down and shape into rolls and put them on the sheet pan. Then I cover the pan and pop in the refrigerator. The next day I take them out and let them come to room temp and rise before baking. Does that help?
Another winner! These are AMAZING! Thanks!
I’m wanting to make these for thanksgiving tomorrow. I’m wondering if I can make the dough today and then put them in the fridge after the first rise, before forming into rolls? If so, how long would they need to rise tomorrow?
Thanks!
Sorry for the late response! I hope they worked out for you! If making ahead, I would suggest shaping into rolls and then refrigerating.
These are brilliant! They’ve now become a staple in our house as our 3 boys just devour them. Haha! I’ve also referred a couple friends to this page and they love the recipe too. Quick, easy and delicious. Thank you very much, Mel!
Thank you so much!
Did a test run for Thanksgiving. Thanks for the recipe, tips and tutorial on rolling the rolls!
Can I put them in the freezer without baking them?
Yes, these freeze pretty well unbaked (don’t let them rise before freezing).
Since they have to rise twice, do I let them rise the first time?
Yes, let them rise as one big lump of dough, then shape them, put them on the pan and freeze them. They’ll rise the 2nd time when you take them out of the freezer to thaw. Does that help?
It sure does! Thanks so much!
My husband does not like his bread sweet. If I leave out the sugar (or reduce it) will they still turn out ok?
I’d recommend keeping it in – the rolls are not sweet but the sugar helps balance the flavors. You could cut the amount in half.
Thank you so much for this wonderful recipe. Trust me you are completely sane. I just picked the wrong time to lose 10-15 lbs. Happy baking! Sincerely will
Haha…thanks Will!
I made these, but it only took the 2 cups of flour. It’s my first attempt at making rolls, so I’m not sure if that is normal.
As for the prep process, I loved watching these proof. I don’t think I’ve ever been so fascinated by waiting for something to be ready as much as I was while making these rolls.
I tried making these tonight. They came out AMAZING!! My son, who doesn’t eat white bread, ate 5! It was a major hit in my house!
I have a couple of complaints though..
1. I’m gonna gain SO much weight bc of this recipe.
2. I’ll have to start doubling the recipe, otherwise I won’t get any.
3. I’ll be buying a ton of flour and yeast bc this will be made SEVERAL times a week.
😉
This will be my go to recipe from now on!
Haha. Thanks, Missy! Glad you loved them (and your son, too!)
Hi Mel! Just wanted to try and make these.. but i have a perhaps silly question.. how can i double the recipe? Just double everything? or do i have to use less yeast? Please let me know!! im so excited to try this recipe!!! and i will also try your lemon brownies those look devine.. but again i want to double that recipe.. how do i do it? Thanks ever so much!
Hi Jordana – for both of those recipes you can double everything. Hope that helps!
OMG – great rolls
It is raining here in Sydney today and I had decided I wasn’t venturing out. I needed bread rolls for dinner and came across this recipe on google, had the ingredients so gave it a try.
Fantastic recipe, easy to follow and great result.
Going to tonight
These were absolutely delicious! I’ve always been afraid of making any kind of bread/rolls due to a few flops. But your level of detail in your posts, photos and videos really gave me the confidence to try again. Knowing exactly what it was supposed to look and feel like at each step made all the difference. Thank you so much. I’m looking forward to trying some of your other recipes. ☺️
Dear Mel, I would like to ask how many grams of flour you use. I am from Greece, where we use grams, and I found many cup-to-grams converters but amounts vary from 120 to 150 grams for 1 cup. I know now I did not use the right converter because I kept adding and adding flour. I assume it must be around 500-520 grams of flour
Thank you
Hi Denise, I’m not sure how many grams it would be because I usually add flour until the “feel” of the dough is soft and smooth without being overly sticky. If you had to add more flour, that’s ok as long as the dough didn’t end up stiff.
Hi Mel,
Like Denise (although I am in Canada not Greece) I would like to know how many grams one cup of flour (as you measure it weighs). As she pointed out the conversion charts say anywhere from 120 – 150 grams for a cup of flour. This range is far to large, as it would be anywhere from 420 grams up to 600 grams of flour. If we knew your typical cup of flour weighs in at say 135 grams we could easily do the math & know that we would need from 472 grams up to 540 grams. We all measure our flour differently, and over time I have found that my cup of all purpose flour typically weighs in at around 150 grams. Thanks for posting all your great recipes.
Hi Jackie – the reason I don’t give a specific weight amount for bread/roll recipes is because there are so many factors that dictate exactly how much flour will be used (humidity, elevation, temperature of water, etc) as compared to a cake or cookie recipe that uses an exact amount of flour. I recommend adding flour until the texture and feel of the dough is perfect. The exact flour amount will vary person to person. Having said that, I usually count on 5 ounces for each cup of flour (I don’t use grams as a measure but google tells me that 5 ounces is about 141.74 grams).
Thanks so much Mel. Knowing that you average 5 oz to a cup makes it so much easier to convert your recipes. I always used to just use cup measurements & rarely weighed any ingredients in baking recipes. With time I have found that the results are much better when I weigh my ingredients. The exact amount of flour I use even in my own bread recipe does vary with the seasons & humidity, but I start with the lower amount & add as needed to get the right texture & feel.
Thanks again.
OK, first time bread roll maker here too. I love these – and they really work! Well, half of them did, perfectly. One piece of advice for the novice though – DON’T touch or move them once you’ve rolled them and placed on the tray to rise (especially towards the end). They deflate 🙁 Although I left them longer to see if they would rise some more, the puffiest ones were the ones I left alone. I sprinkled mine with sesame seeds for a tasty touch. Very nice, thank you Mel.
Such an easy, no fail recipe! I make these often. In fact they are in the oven now for Philly Cheesesteak Sloppy Joe’s! Thank you!
These were the easiest rolls I have ever made. Absolutely no fail if you follow the directions. So we’re so good! This will be my new go to recipe. Thank you 🙂
I have been baking bread with the oldest mixers known to man kind My Hands, I love to bake bread any kind of bread, I tried these a couple of times now and they are really good. I only use flour to knead bread if it is NOT an enriched dough otherwise I use olive oil so as not to alter the texture, even those with a wet sloppy ones you have to work forever. I have a Kitchen Aid but I never use it to make bread for some reason. I guess I like to be able to feel the bread and if I did it in a machine I would be afraid of over working it. The Joys of being old…LOL Just so those of you who don’t have a Mixer Bosh or otherwise You Can Still Make Fantastic Bread including this recipe
These are off the charts good!! First time making bread. I have made them into rolls and hamburger buns. Thank you!!!
These are good. Used 3.5 cups all purpose flour.
Live in a dry area. Came out extra fluffy.
Mel, thank you thank you!! Your recipes have given me the confidence I’ve been desiring in the kitchen. They are simple and hearty and have saved me money while filling my brood’s bellies! Your video tutorial on shaping the rolls was a HUGE help to me. I’ve failed so many times at making rolls (croquettes more like) but these were so easy and I feel like a rock star baker!
Thank you so much, Christine!