
Backpacking food is often uninspiring. Because vegetables and meat are heavy and inconvenient, they often get left behind. And many easy-to-make, lightweight, dehydrated meals are bland or textureless. It’s a shame when you consider the wealth of free and delicious wild foods we’re surrounded by on so many backpacking trips. Plus, if you gather your meal at camp, it won’t weigh you down on the trail.
If you want to go this route, your options are: get a Ph.D.’s worth of knowledge and experience in order to find and eat wild mushrooms, berries, and plants with confidence, or, depending on the water near your camp and the local laws, pack a lightweight fishing rod (like the small-water ones we recommend here) and just a few other supplies, like a knife and spices. With even a little bit of practice and planning, odds are decent you’ll be able to pull a meal out of a nearby lake or stream, and often that dinner will be a delicious trout.
Trout are one of the better fish to catch and eat in the backcountry, not only because they’re plentiful in mountain waters all across the U.S., but they’re also a cinch to clean and prep no matter their size. That said, if you’re imagining a big fillet of pure meat like you pick up at the store, you’re going to be disappointed. In the backcountry, you’re almost always going to end up with a mess of meat, bones, and skin on your plate. But picking tidbits of freshly caught trout off the bones is only as hard as scavenging every delicious morsel off a chicken wing—and much more satisfying. Plus, it tastes way better than a bag of freeze-dried slop.
Cleaning
Once you’ve caught and killed your fish, you’ll want to clean it as quickly as possible—ideally immediately. Warm temperatures can cause trout to deteriorate and spoil fast, but removing the entrails will slow that process. Waiting until you get back to camp or when it’s time for dinner can result in a wasted fish.
A dedicated filleting utensil, like Morakniv’s rubber-handled Fishing Comfort Fillet 155 ($20) or Opinel’s folding No.08 Slim Stainless Steel Folding Fillet knife ($20), will deliver clean and easy cuts and prove much more effective than knives not built for this purpose. Trust us on this one. Begin by holding the fish by its lower jaw and making a cut up the belly from the anus (the small hole toward the tail) to between the gills. Use the tip of the knife to slice just through the skin. Avoid piercing the entrails or spine and spilling blood.
Cut two slits in the thin layer of skin just behind and under the bottom jaw of the fish, creating a V that points forward. (You can see this area better by sticking a finger in the fish’s mouth and pressing down on its tongue.) Slip your thumb into the V you just cut, and pull down toward the tail—this should remove the gills and guts in one clean stroke. Inspect the cavity for any remaining entrails, and remove anything that isn’t meat or bones. Check local regulations for how to dispose of the entrails: in most places, you can drop them into deep or moving water (not at the shoreline) or bury them in a cathole far away from camp and the water. When in doubt, pack them out in a sealed container.
Once the guts are gone, you should see a line of red along the spine at the back of the cavity. Run your thumbnail along this line from head to tail, squeezing out all the blood. This is the fish’s kidney, it doesn’t come out with the rest of the guts, and leaving it in can spoil the taste. If you want to remove the head, bend it back until you break the spine, then cut it away. (This is optional: if you do, you’ll be missing out on some secret stashes of meat later on.)
Clean the fish thoroughly inside and out with fresh water to wash off any blood or other guts, then dry it well with a clean towel. At this point, the fish is ready to cook. Seal it in a disposable zip-top bag or Stasher Silicone Reusable bag ($12), and keep it as cool as possible until you’re ready to eat. You can usually keep the bag in the water on the shoreline.
Cooking
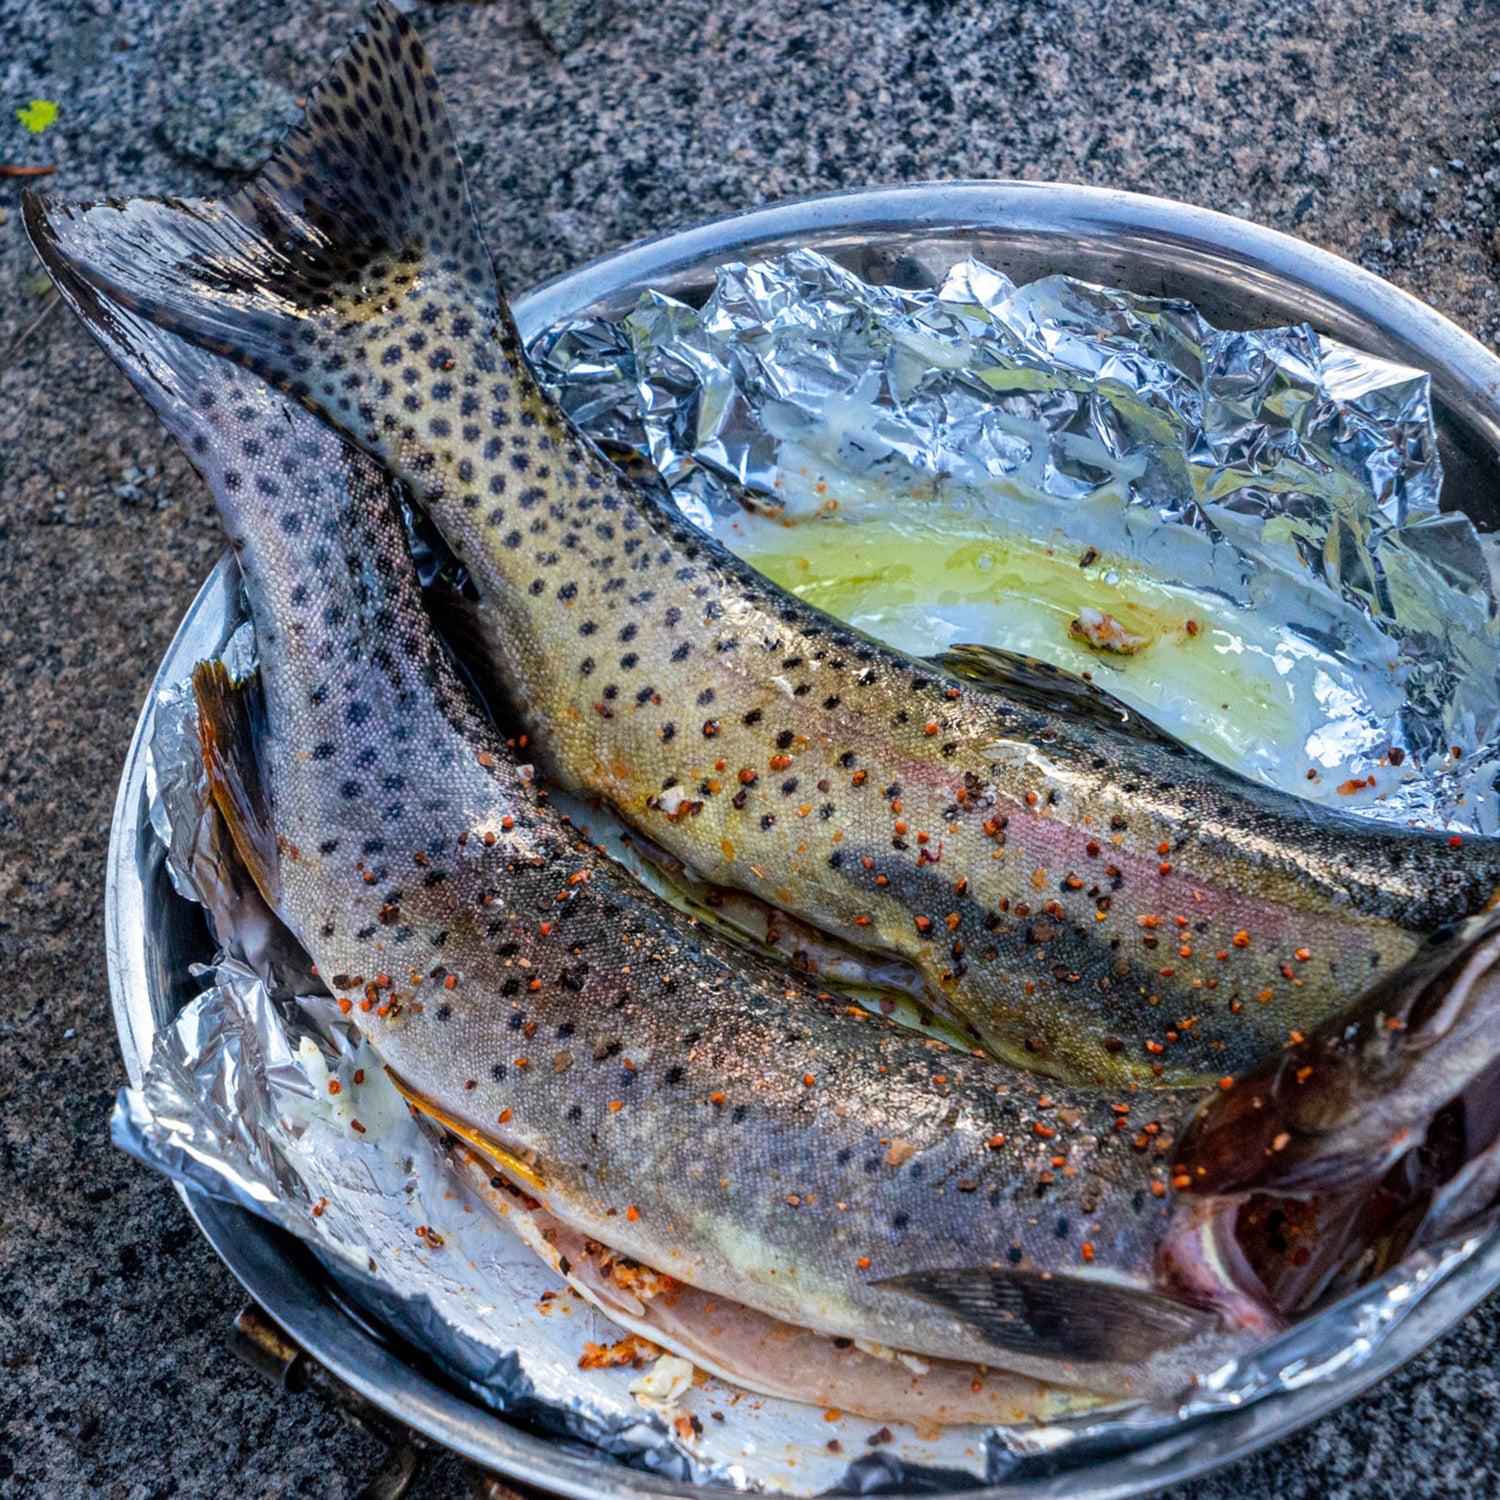
One of the easiest and most delicious ways to cook your trout is by seasoning it inside and out with olive oil, salt, and lemon pepper. I carry my oil in a reusable squeeze bottle like HumanGear’s GoToob+ ($25 for three). Pocket-size Stasher Reusable storage bags ($14 for two) or one-ounce Nalgene containers ($6) are good for packing spices. For those willing to haul in more fixings, a real lemon (save some for seasoning as you eat) intensifies the flavor, and butter (it should keep a day or two at moderate temperatures without refrigeration) is richer than oil. Dedicated backcountry chefs can pack the fish’s cavity with garlic, dried herbs like thyme and oregano, onions, and spices like cayenne. Keep in mind that adding veggies or other things to the fish will lengthen the cooking time.
Once you’ve seasoned the fish, wrap it in aluminum foil. If your fish are smaller than eight to ten inches, you might be able to combine a few into one sheet; otherwise, wrap them up individually. If you’re lucky enough to be able to cook your trout over a campfire, wait until you have a good bed of coals, then lay the foil-wrapped fish over them. If you have a grate—or an easy-packing grill and pit combo, like the UCO Flatpack ($34)—you can also raise them above the fire to better control the cooking temperature. Cook the fish for five to ten minutes (a general rule is eight minutes per inch of thickness, but exact numbers depend on the fish and your fire), flipping it halfway through.
If fires are a no-go due to local restrictions or fire danger, cut the fish into manageable lengths for your pot or pan, then fry them over your camp stove. While using foil isn’t necessary in this case, wrapping the fish can make cleanup easier.
You’ll know your fish is ready to eat when the meat is opaque and flakes easily.
Eating
If cooked properly, the meat should slide right off the bones, giving you a lot more than you’d get by filleting the fish prior to cooking (which is often tricky with smaller trout anyway). Pull the meat off carefully to limit the number of bones that end up in your mouth, but be prepared to spit a couple of small ones out.
The skin and fins are all OK to eat, as are the eyes and the cheeks—the latter are tiny scallop-like morsels that have long been prized for their rich, almost sweet flavor.
From hook to plate, you can be chowing down on a fresh, all-time backcountry meal in just 20 minutes, having carried little more than a rod, a few sheets of aluminum foil, a squeeze bottle of oil, and a few of your favorite spices.