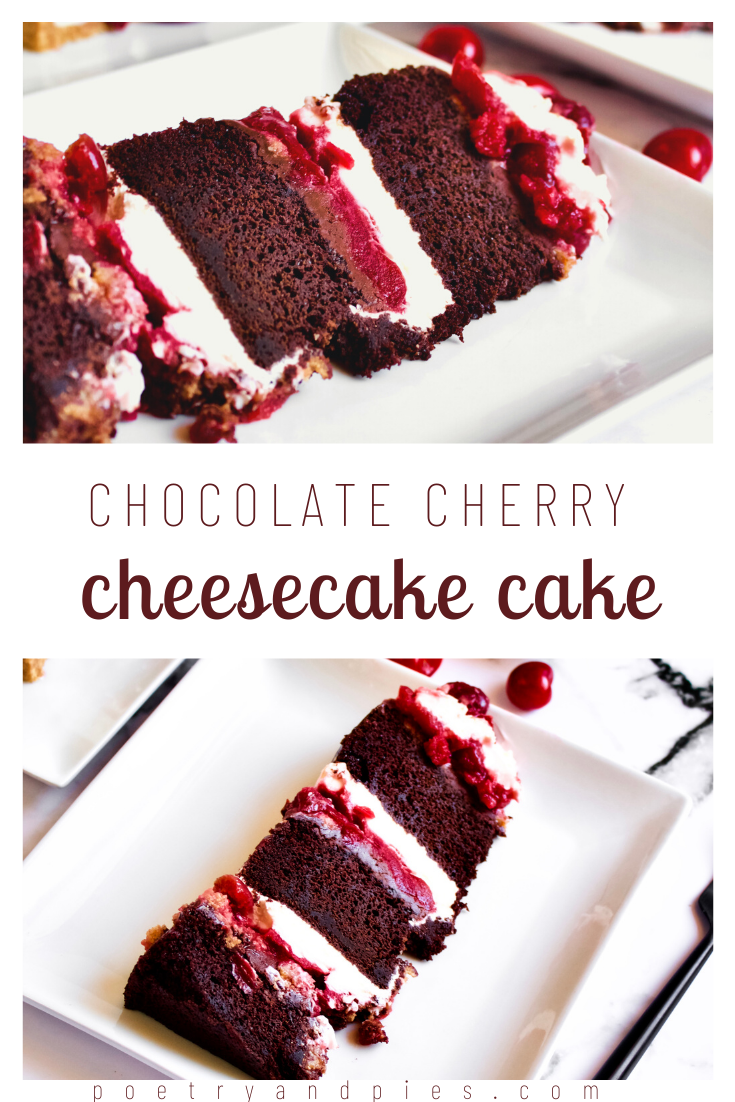
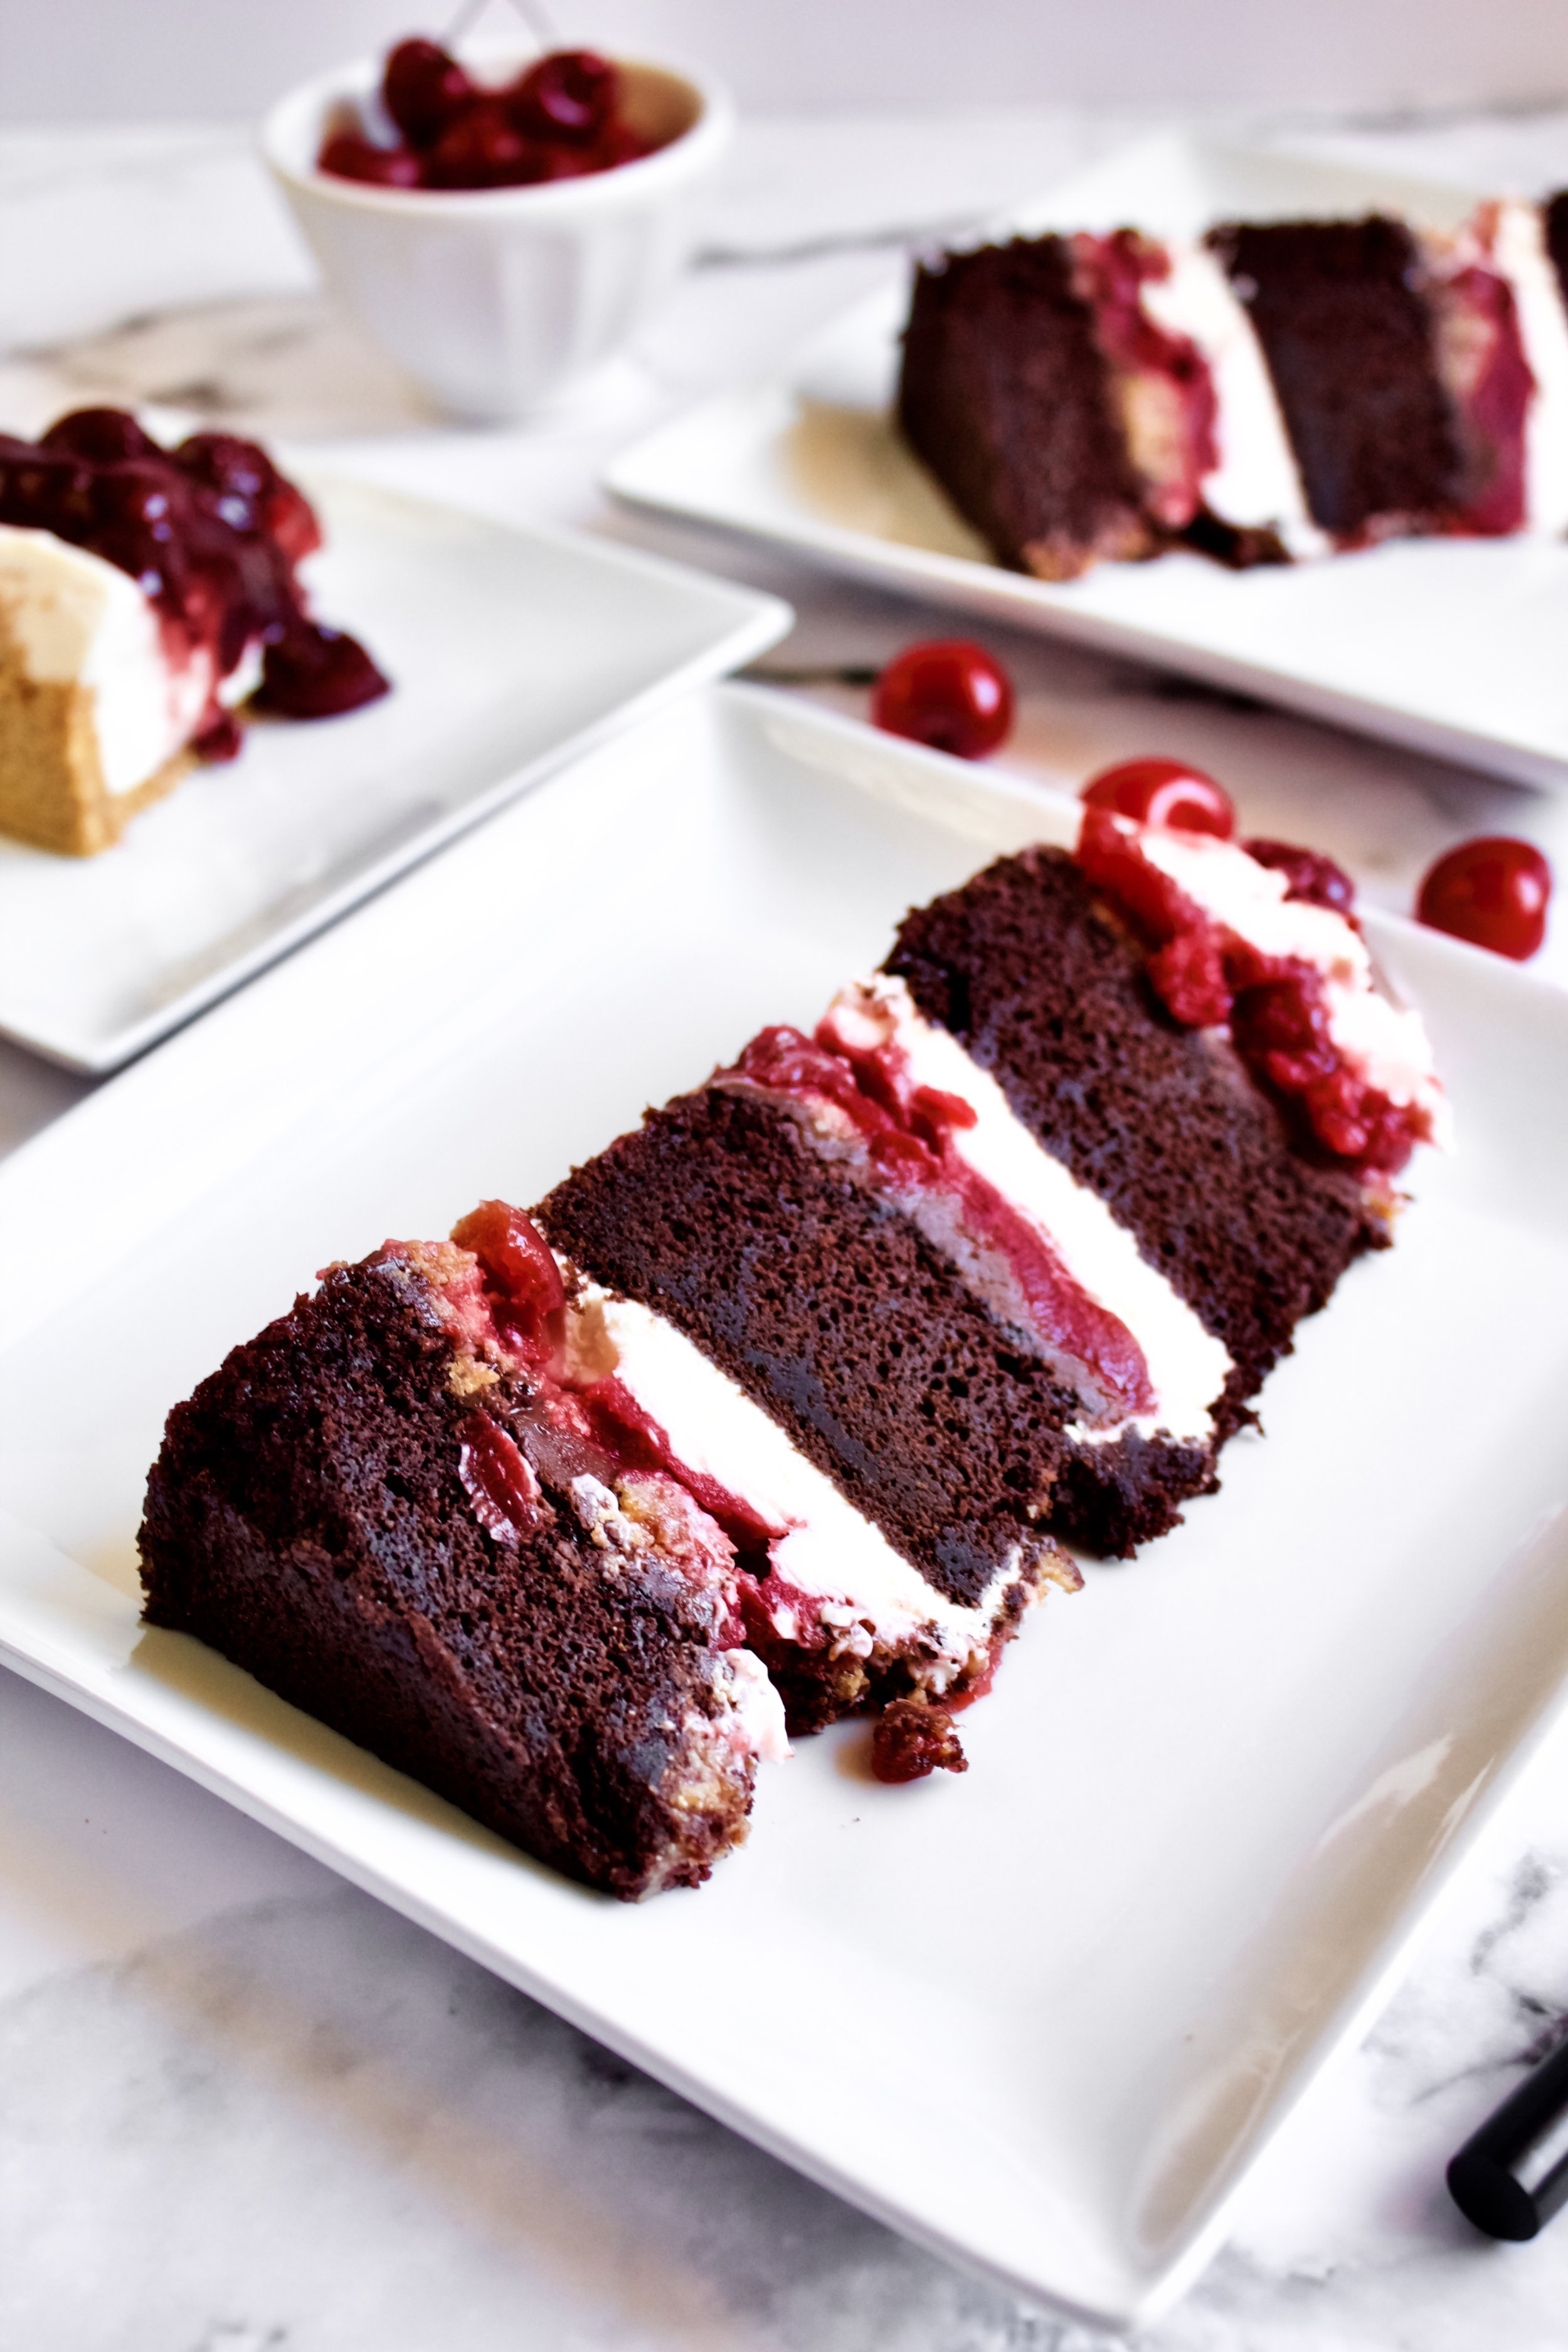
Chocolate Cherry Cheesecake Cake
Moist chocolate cake layered with cheesecake and cherry pie fillings, graham cracker crumbles, and rich chocolate ganache. This cake is a bit like a Black Forest Cake meets cherry cheesecake. It can easily be made ahead of time so you can enjoy this decadent (yet fairly simple) cake for any big event—or just because!
This post may contain affiliate links from which, at no additional cost to you, I may earn a small commission to keep this site running. Only products I myself would or do use are recommended.

This cake. Oh my goodness. I was a little skeptical that it would turn out, especially because I don’t do Milk Bar style cakes that often and am always tentative of a cake that has to be frozen.
This cake changed my mind on that forever.
Last summer, my husband saw a cake online (I forget where, now) that he requested for Father’s Day. But he usually gives me free reign to “make something like that.” So, I switched out this and changed that, also using all of my own recipes for each layer in the inspiration cake.
One significant change I made was using regular cake pans instead of the traditional 9x13 method of cutting out 6” circles with a cake ring. I don’t particularly like that method. The bottom layer is always pieced together from scraps. And the edges are cut, meaning the cake will dry out faster, especially after the acetate is removed. Using 6” cake pans ensures you have sealed edges that retain moisture until you are ready to serve the cake.
Plus, it’s just less work. Win!
The best part though is how this cake tastes. The combination of fluffy chocolate cake, creamy cheesecake filling, smooth ganache, ripe cherries, and crunch graham crumbles makes for not only a delicious combination but also an amazing array of textures.
If you like chocolate or cherries or cheesecake or Black Forest cake, you will like this cake. In fact, some of our non-cake eating family loved this cake. Not just ate it, loved it. That’s a huge deal!

Why this recipe works
Using cake pans may be unorthodox for a “Milk Bar” style cake, but I prefer it. A normal Milk Bar cake has you bake a 9x13 cake, cut out two 6” rounds, then use the remaining bits to piece together a third (bottom) layer. It works okay, but I've found that the cake dries out much faster. Using cake pans creates a “sealed” edge to each layer, preventing it drying out. With all of the chilling and freezing this cake requires, that’s an ideal solution.
I also used my super moist chocolate cake recipe here. It’s the perfect cake to stand up to copious freezing.
Each of the fillings are actually pretty simple to make and most can be made ahead. The cheesecake is silky and very light, which is a perfect contrast to the thick and rich ganache and the meaty (for lack of a better term) cherry pie filling. And those graham cracker crumbles. Yuuuuum. I like to bake mine for a few minutes to make them crunchier, but you can just freeze them. You end up with a bite that’s part cherry cheesecake, part Black Forest cake, and all deliciousness.

Key ingredients
Flour. Be sure to spoon then level your flour to ensure you don’t pack it in.
Cocoa powder. Unsweetened is best.
Sugar. If your sugar has clumped up, you can sift it.
Baking soda/powder. Be sure these are fresh (they tend to lose their oomph about 6 months after opening).
Salt. I prefer sea salt for its health benefits and overall taste.
Buttermilk. I always make my own by adding 1 tablespoon white vinegar to my (slightly less than 1 cup) room temperature milk. Only do this 5-10 minutes before baking—ideally when the milk and eggs are room temperature and you’re now ready to get started.
Eggs. Use fresh, room temperature eggs.
Oil. I prefer avocado or grape seed oil, as they’re “health” fats with no taste (avoid extra virgin avocado oil, as it’s sometimes stronger in taste). Canola or vegetable oil work, too.
Vanilla. Use pure vanilla extract, not imitation.
Hot coffee. I prefer blonde roast for this cake, but you can use whatever you’d like. You won’t taste the coffee in the cake unless you make it VERY strong, about the level of a straight shot of espresso. Hot water does work but doesn’t make as fluffy a cake (in my experience) and the chocolate flavor is milder.


Chocolate chips. For the ganache filling. You can also use chopped baking chocolate, and you can use whatever darkness you prefer. I like semi-sweet in this cake.
Heavy cream. Also for the ganache. Avoid using half and half or milk.
Cream cheese. I like to use full fat so it’s creamier, but you can use lowfat if you’d like. Be sure it’s room temperature so it blends easily.
Powdered sugar. This is key to making a smooth cheesecake—there’s no need to whip the cream cheese and sugar for forever to dissolve the sugar.
Vanilla. Use pure vanilla, not imitation.
Heavy whipping cream. Cold, fresh, heavy whipping cream is what gives a soft, light texture to this cake.
Graham crackers. You can use any kind, but I prefer plain or cinnamon.
Sugar. Don’t forget to pulse this with the graham crackers to make it nice and fine. Otherwise, the large crystals will cause the crust to crumble.
Butter. Be sure to measure this carefully so your crust isn’t soggy.
Cherry pie filling. You can use any recipe or store bought filling you want, but I prefer homemade because it’s less goopy and more cherry-y.

How to make a chocolate cherry cheesecake cake
1. Ideally, make the cherry pie filling ahead of time. You can make it while the cake cools, too, but I get overwhelmed by that many things to do in one day.
Bake the cake
2. Sift and whisk dry ingredients. Don’t skip the sifting here!
3. Whisk oil, eggs, buttermilk, and vanilla. Whisk until very well blended.
4. Slowly pour in hot coffee while whisking quickly. It’s helpful to have a bowl that stays put as you do this so it doesn’t spin around while both of your hands are busy.
5. Slowly stir into dry ingredients. Do this on low in a stand mixer. Stop and scrape the bowl after it’s all combined.
6. Beat on medium for exactly 2 minutes. Set a timer—you really do want to beat it for that exact amount of time!
7. Bake. Bake until a toothpick comes out with some moist crumbs—not fully clean (that can mean it’s over baked). Let cool in the pans for 5-10 minutes then remove to a cooling rack until fully cooled.


Make the graham cracker crumbles
8. Grind graham crackers and sugar. Grinding both together ensures you have finely ground sugar as well.
9. Stir in melted butter. You could also pulse this in the processor.
10. Squeeze into crumbles. You want pea-ish sized pieces, but there’s no exact science here. The only thing to bear in mind is that too big of pieces can make the cake harder to cut.
11. Bake until golden and puffy. This only takes 5-10 minutes. Let them cool completely on the pan before removing. You can make these ahead and freeze them up to 1-2 months.


Make the ganache
12. Melt chocolate and heavy cream in a double boiler. Plain and simple. Place the cream and chocolate in a heatproof bowl set over a saucepan with 1-2” simmering water, over low heat. Stir until 75% melted, remove from heat, and keep stirring until fully melted.
Make the cheesecake filling
13. Beat cream cheese, sugar, and vanilla. Make sure it’s very, very smooth.
14. Whip the heavy cream. You only need soft peaks for this, so it should still be a little shiny in appearance.
15. Fold into cream cheese. Do this 1/3 at a time. Keep refrigerated until ready to use, and avoid making more than 30 minutes in advance as it will set in the fridge into the shape of the bowl and not be spreadable.

Assemble the cake
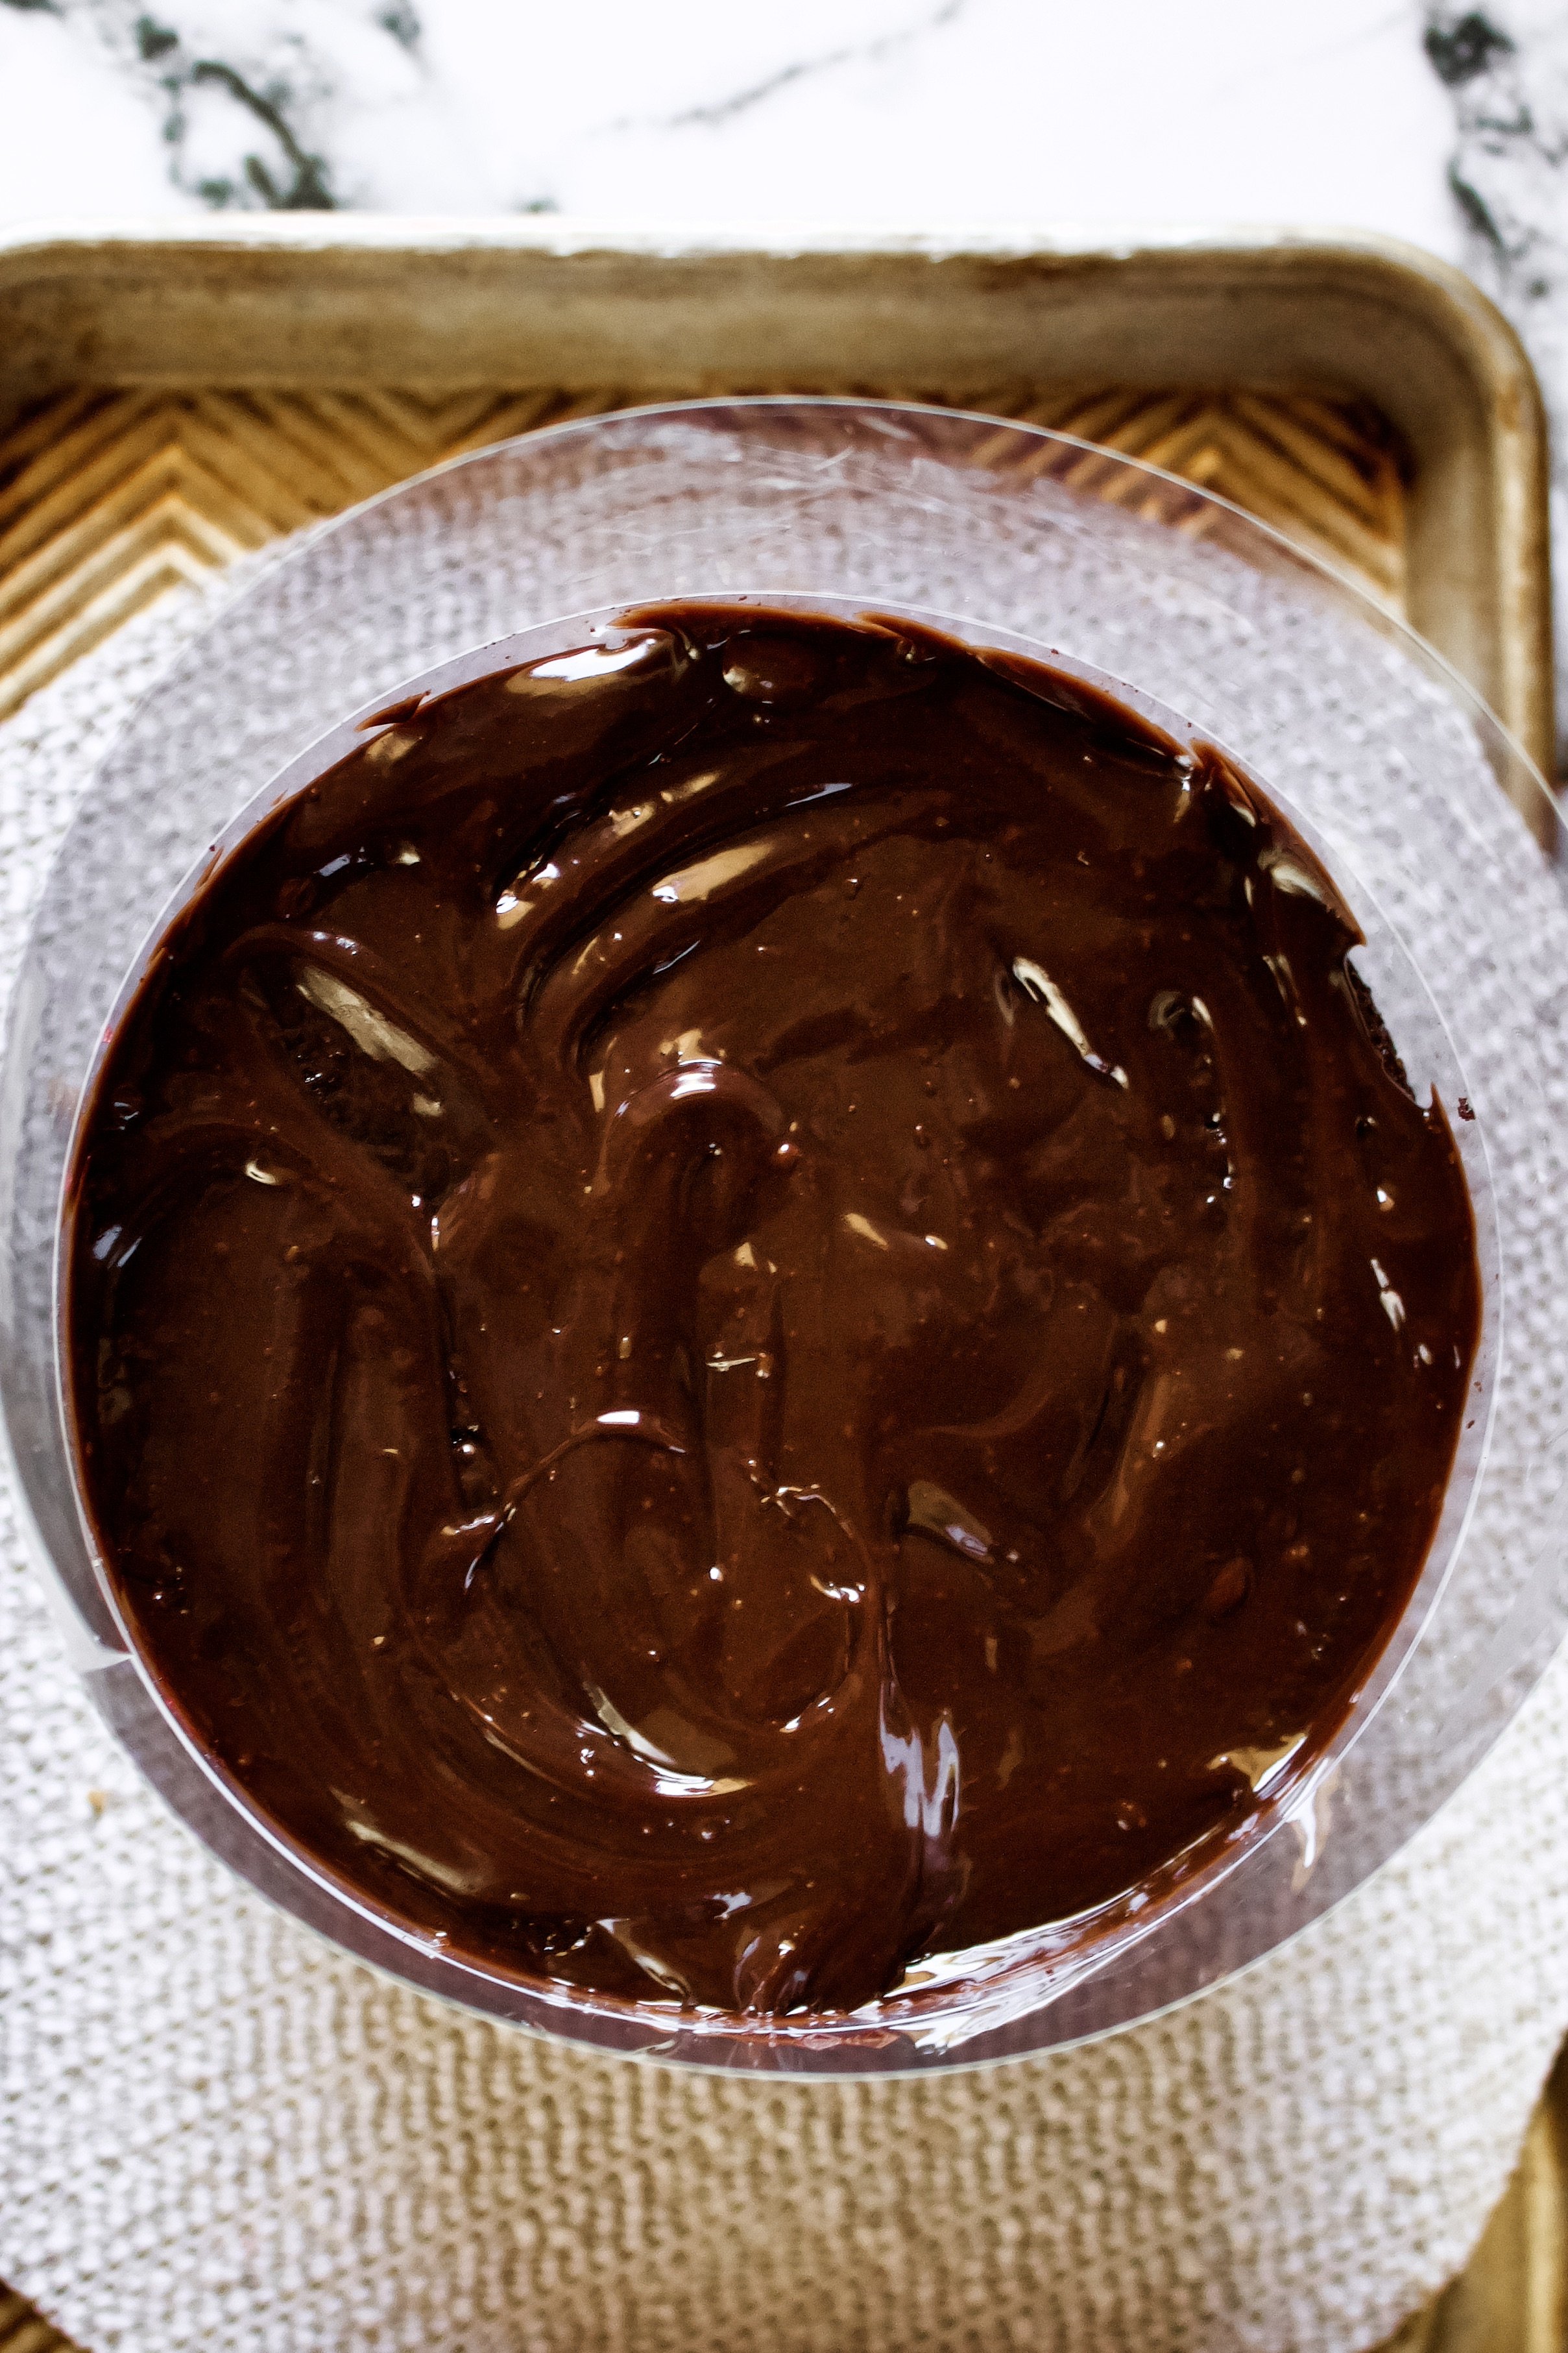
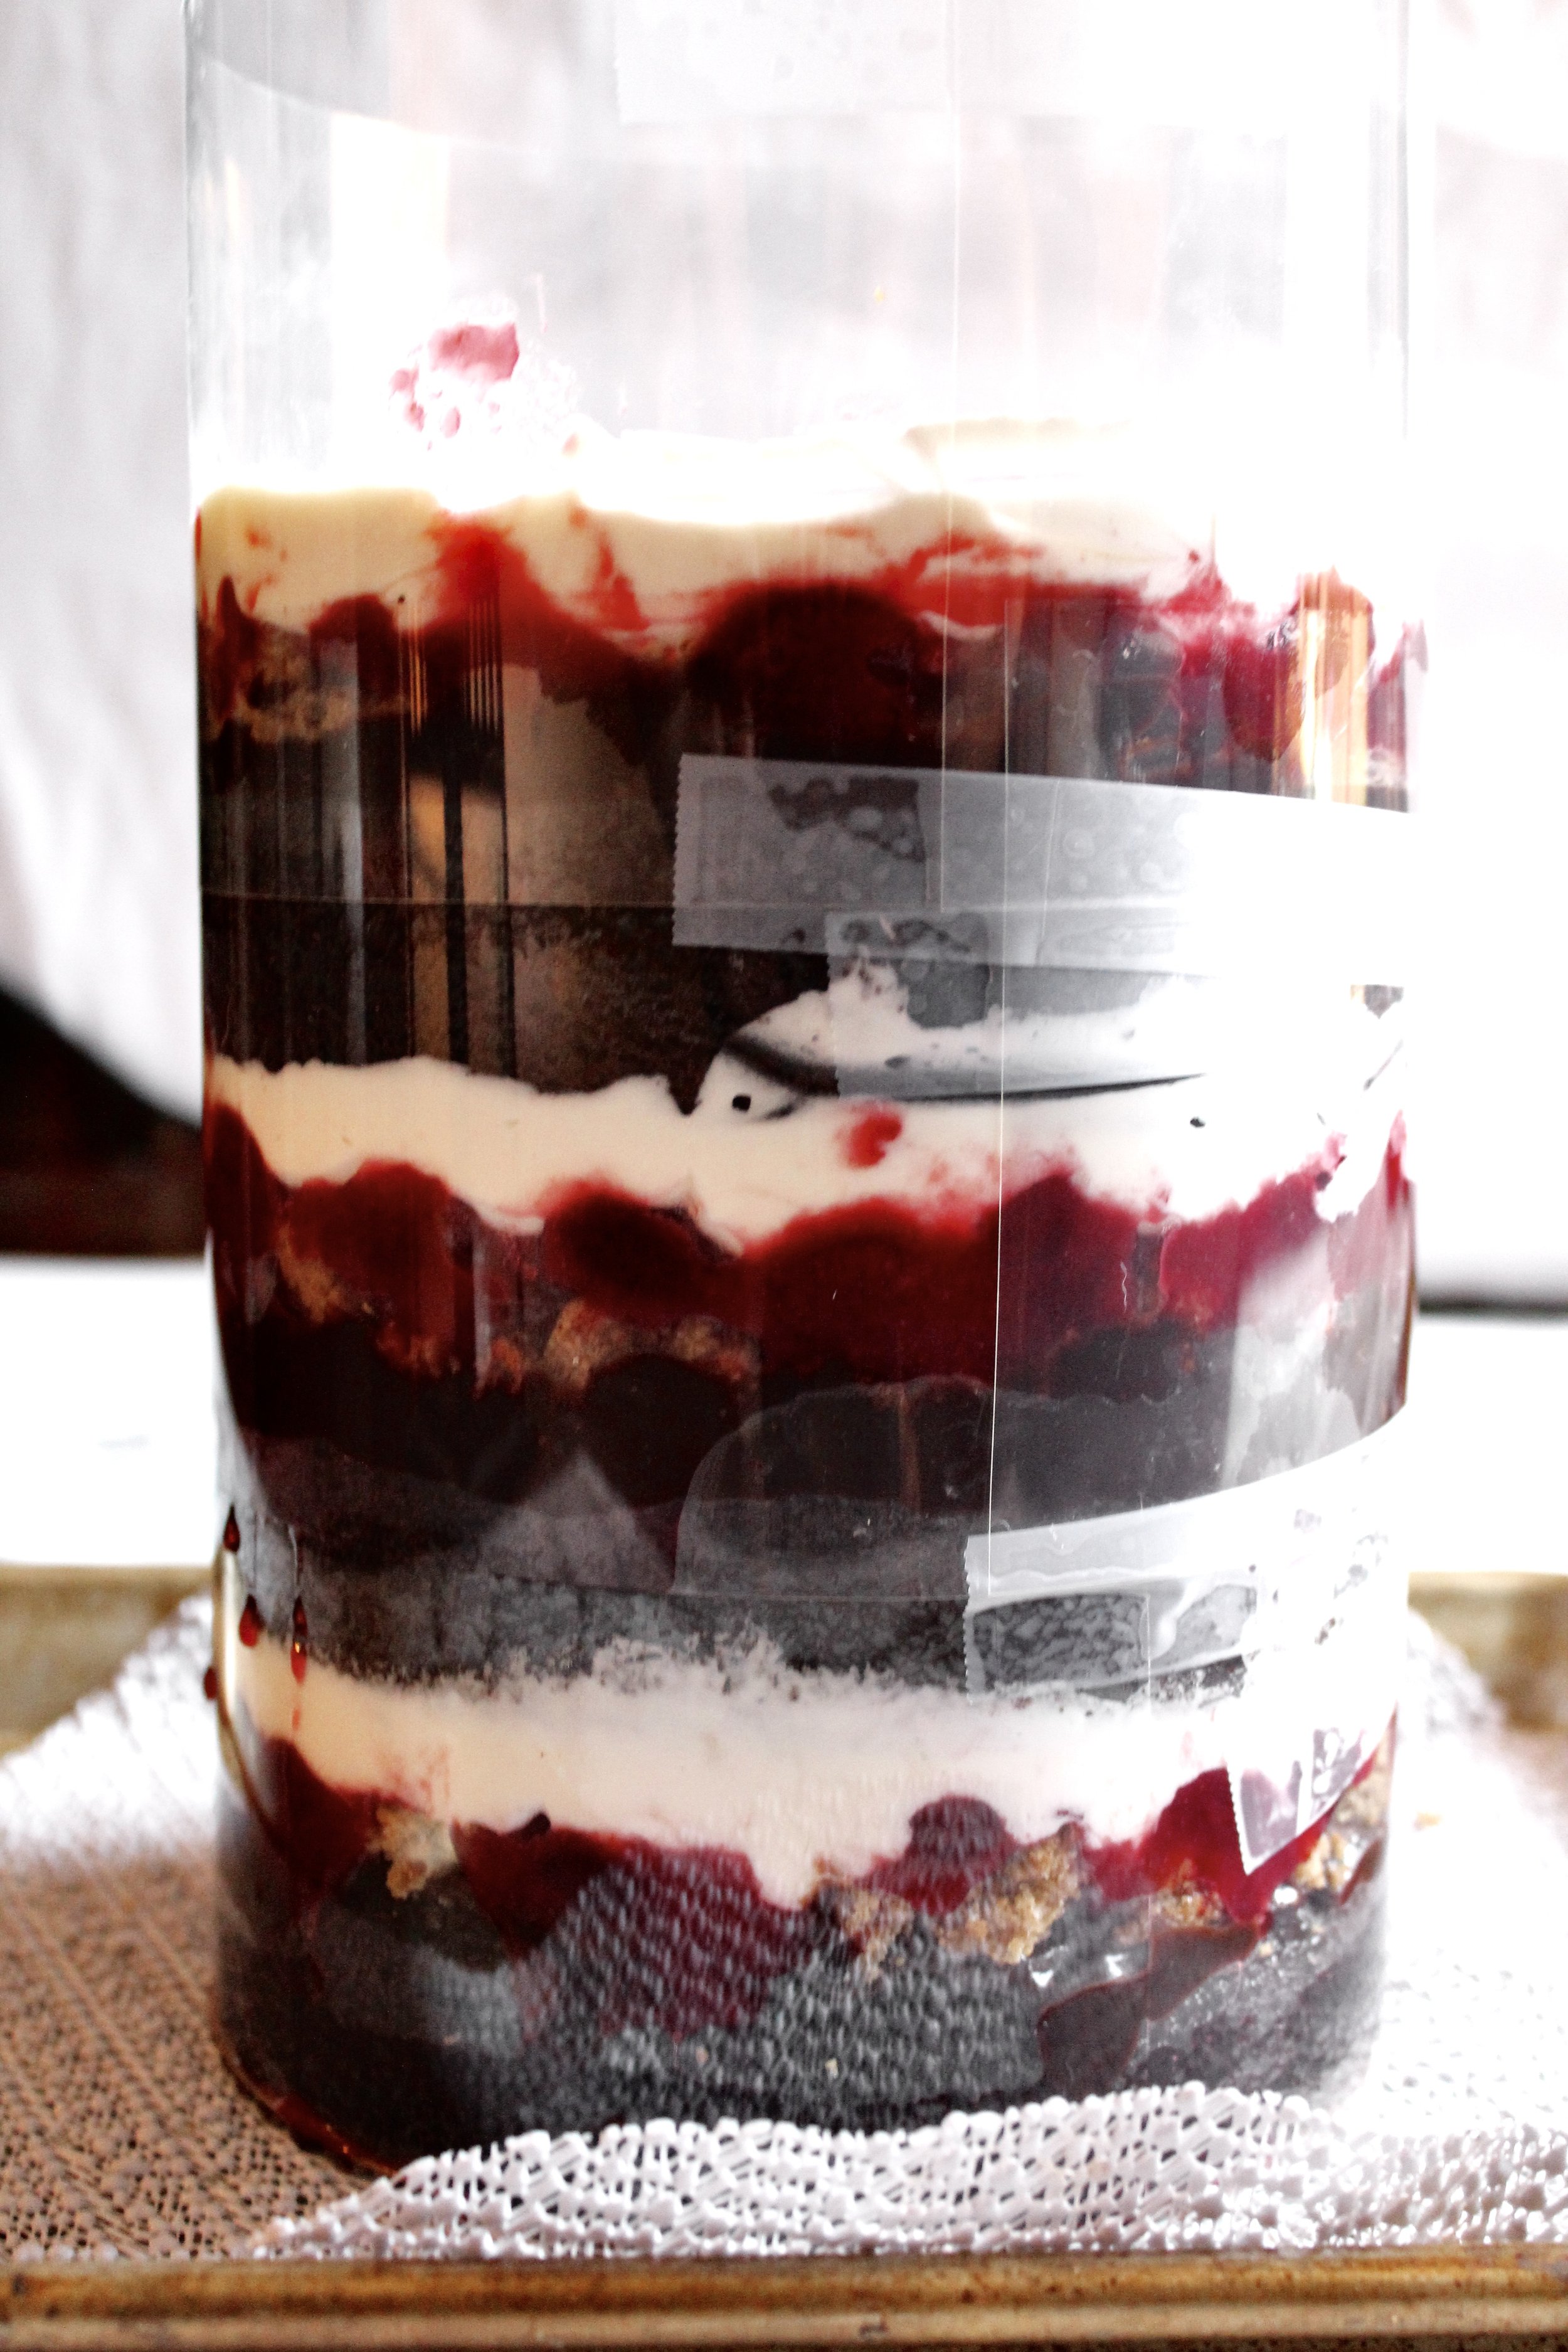
16. Wrap bottom cake layer with acetate. Be sure it’s as straight as you can get it and snug against the cake\. If you have a 6” cake ring, you can use that to help guide your acetate wrapping.
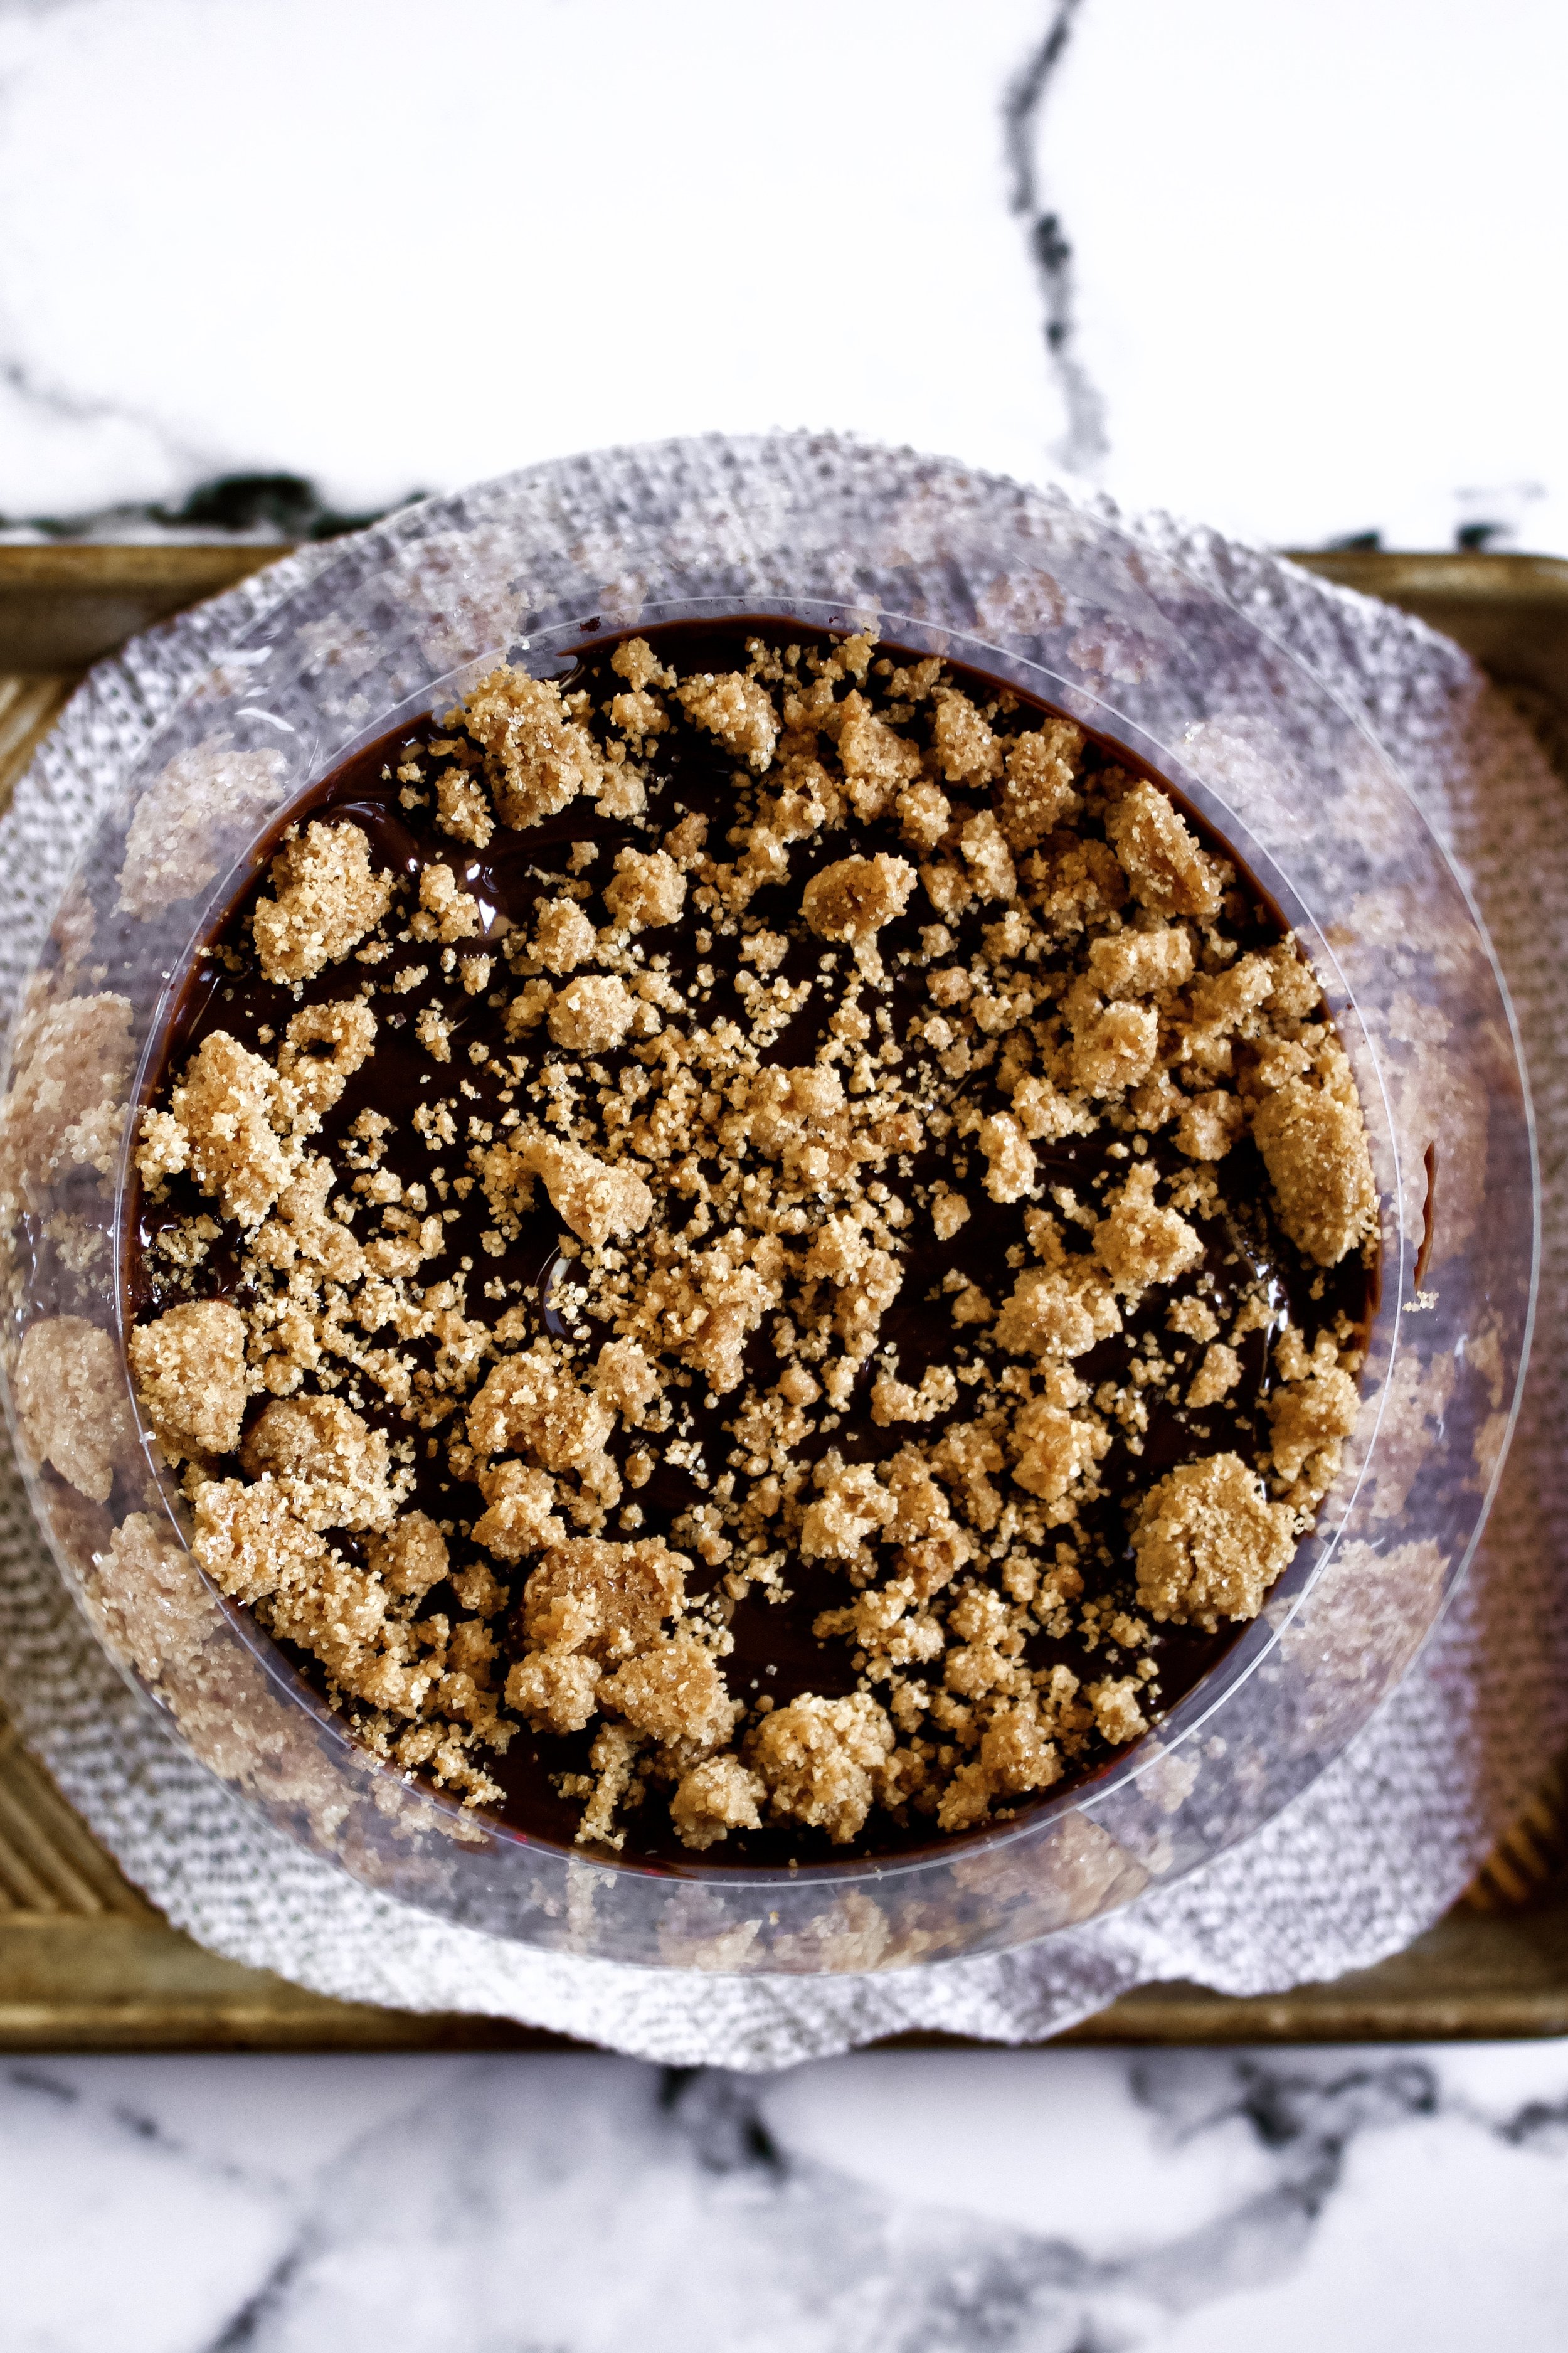
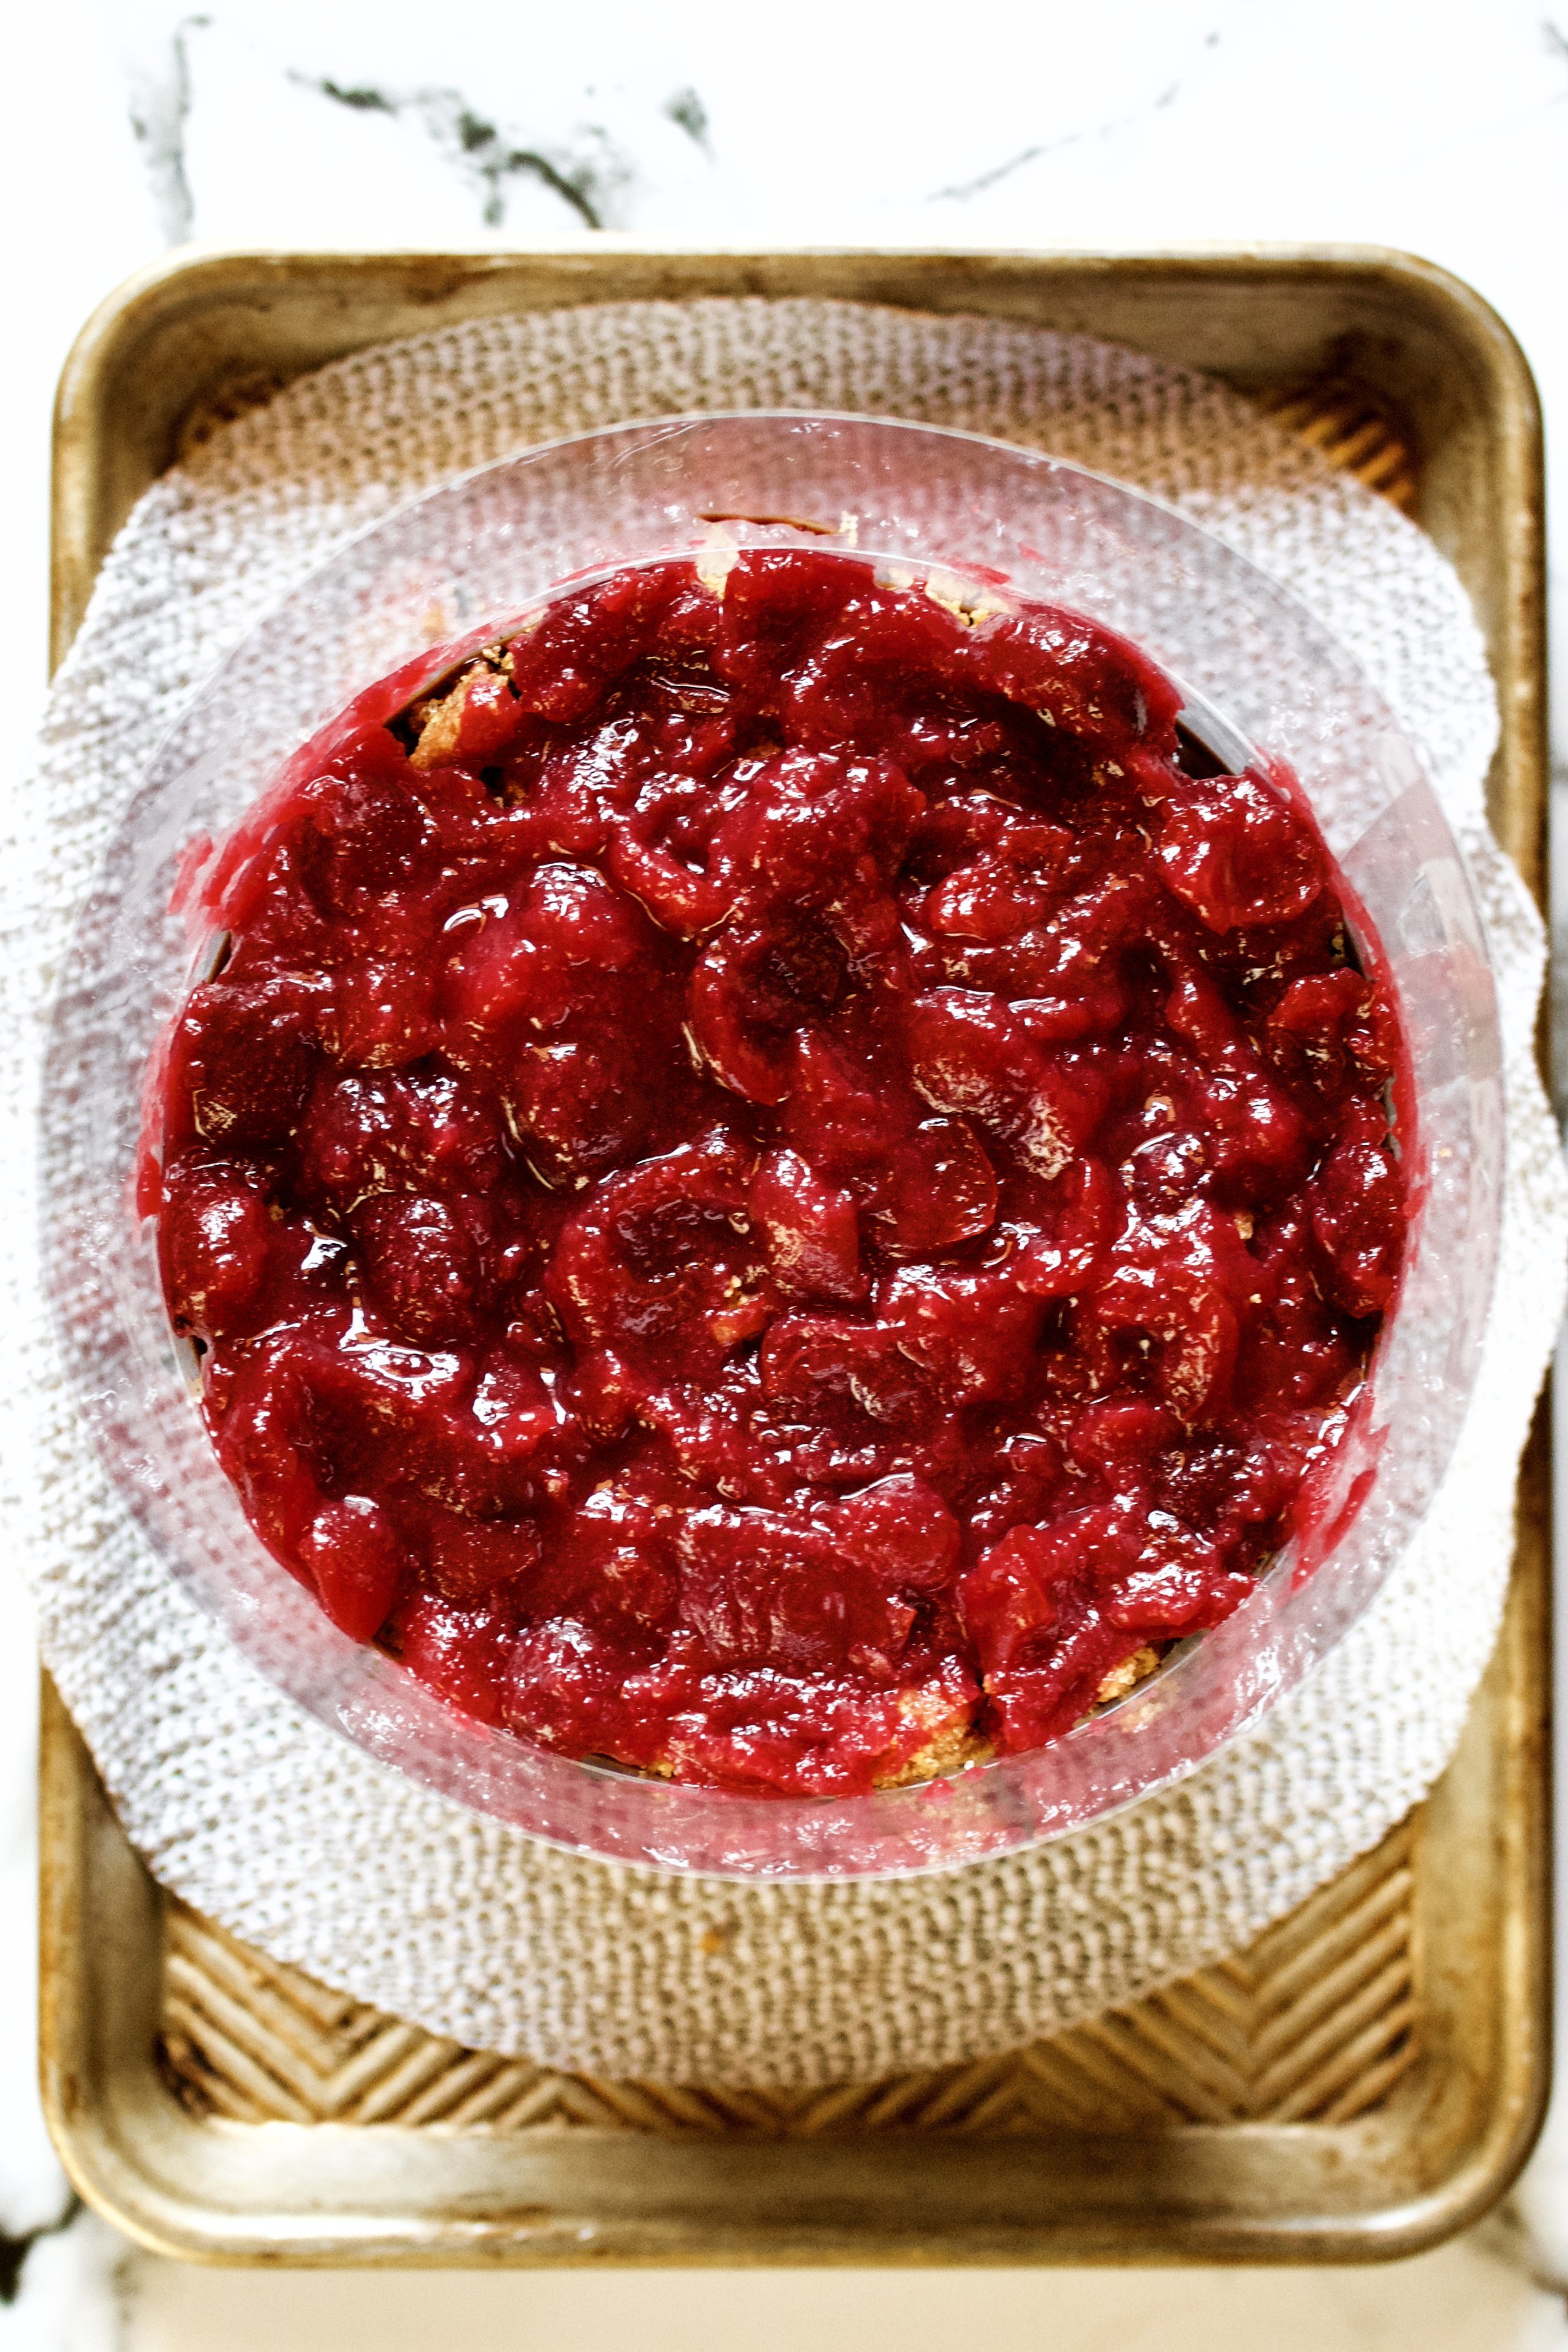
17. Fill with ganache, graham cracker crumbles, cherry pie filling, then cheesecake filling. Spread each thing all the way to the edge so you have those visible layers.
18. Repeat, adding more acetate as needed. Be sure each new strip is taped well and straight.
19. Freeze overnight. This cake needs at minimum 3-4 hours in the freezer, but really it needs to be frozen overnight, for about 8-12 hours.
20. Defrost in the fridge before serving. This does take a few hours, so plan ahead!
Enjoy!

Tips and FAQ’s for this recipe
Can I use any cherry filling?
Yes! If you have a recipe you love or a store bought kind you like, go for it! I just really like using halved cherries and a less gelatinous filling. It holds its shape but isn’t goopy or overly thick or sickly sweet. But it’s all about personal preference!
Split up your work
The beauty of this cake is that it HAS to be made in advance. So feel free to make it over the course of a few days. The graham crumbles and cake can be made ahead, well-sealed, and frozen for up to 2 months. The cherry pie filling can be made up to 2 weeks ahead and refrigerated (well-sealed). The ganache and cheesecake filling are best made when you assemble, as ganache will harden in the fridge and the cheesecake filling must be fresh and un-set to spread properly. However, both of those are quick to make when you’re assembling.

Can I assemble the whole cake in advance?
Yes! I made each piece over a couple of days then assembled the cake the day before Father’s Day. That way, it just sat in the freezer until I had to cart it across the Bay then went into the fridge until I was ready to serve it. It can last in the freezer up to 2 weeks, so make it when it’s least stressful then defrost and serve! You do want to let this cake defrost in the fridge for a few hours, so plan ahead with that.
When do I take it out of the freezer?
This one is up to interpretation. In a true Milk Bar style cake, you’d leave it in the freezer until a few hours before serving, defrosting it in the fridge. However, I’ve defrosted some of these cakes on the counter (only with non-perishable fillings). I’ve also defrosted for several hours because I had no room in the freezer. There seems to be a sweet spot with a cake like this—with perishable, softer fillings—where the cake is still fairly firm but not so firm you can’t cut it. So, give it at least a few hours in the fridge before cutting, but avoid keeping it in the fridge for a whole day.

Can I skip the freezing step?
I wouldn’t. You could probably get away with it if you don’t mind it falling apart a bit, but the freezing is important to help set all of the filling ingredients. That’s why you want to make this cake the day before you’ll need it. And trust me—it will be even more delicious because of that and less stressful for all your party planning!
Spread the fillings all the way against the acetate
You want to create visible layers from the outside, so make sure each layer of filling is touching the acetate when you spread it onto the cake. Use the outside as a visual cue for knowing if you’ve added enough and spread it as far as needed.

My tools
Here are my must-have tools I use for making this cake. Affiliate links provided.
Mesh sieve (because sifting is KEY for a fluffy cake)
All-rubber spatula (this makes scraping the bowl easier as the batter and frosting doesn’t get all over a wooden handle!)
6” aluminum cake pans (I’ve found nonstick doesn’t bake as evenly)
Offset spatula for smoothing out the fillings (a spoon would work, too)
Cherry pitter, citrus juicer, and microplane zester for the pie filling
Mini food processor for the graham cracker crust

Chocolate Cherry Cheesecake Cake
- prep time: 65-75 minutes
- bake time: 35-45 minutes
- freeze time: 3-8 hours (overnight is ideal)
- defrost time: 2-3 hours
- total time: about 13 hours (includes 2 hours to prep, bake, and assemble)
servings: 12-16
Ingredients:
- one batch of tart cherry pie filling (or 28 ounces store bought)
for the chocolate cake layers
- 1 ⅔ cups (335g) granulated sugar
- 1 ⅔ cups (226g) flour, sifted
- ¾ cup (75g) unsweetened cocoa powder, sifted
- 2 teaspoons (8g) baking powder
- 1 teaspoon (5g) baking soda
- ½ teaspoon (3g) sea salt
- 2 large eggs, room temperature
- 1 cup (236g) buttermilk, room temperature*
- ½ cup (108g) avocado oil (can sub vegetable or canola oil)
- 1 tablespoon (13g) pure vanilla extract
- 1 cup (240g) very hot, light roast coffee (or very hot water)
for the graham cracker crust crumbles
- 4 full graham crackers
- 2 tablespoons (25g) sugar
- 2 tablespoons (28g) butter, melted
for the chocolate ganache drizzle (this makes a little extra)
- 4 ounces (113g) semi-sweet or dark chocolate chips (or baking chocolate, chopped)
- 3 ounces (85g) heavy whipping cream
for the cheesecake filling
- 8 ounces (227g) cream cheese, room temperature
- ½ cup (65g) powdered sugar
- 1 teaspoon (4g) pure vanilla extract
- ⅓ cup (77g) heavy whipping cream
Instructions:
- Ideally, make the cherry pie filling ahead of time so it can cool and set. It will keep for 2-4 weeks in the fridge, if well-sealed.
make the chocolate cake layers
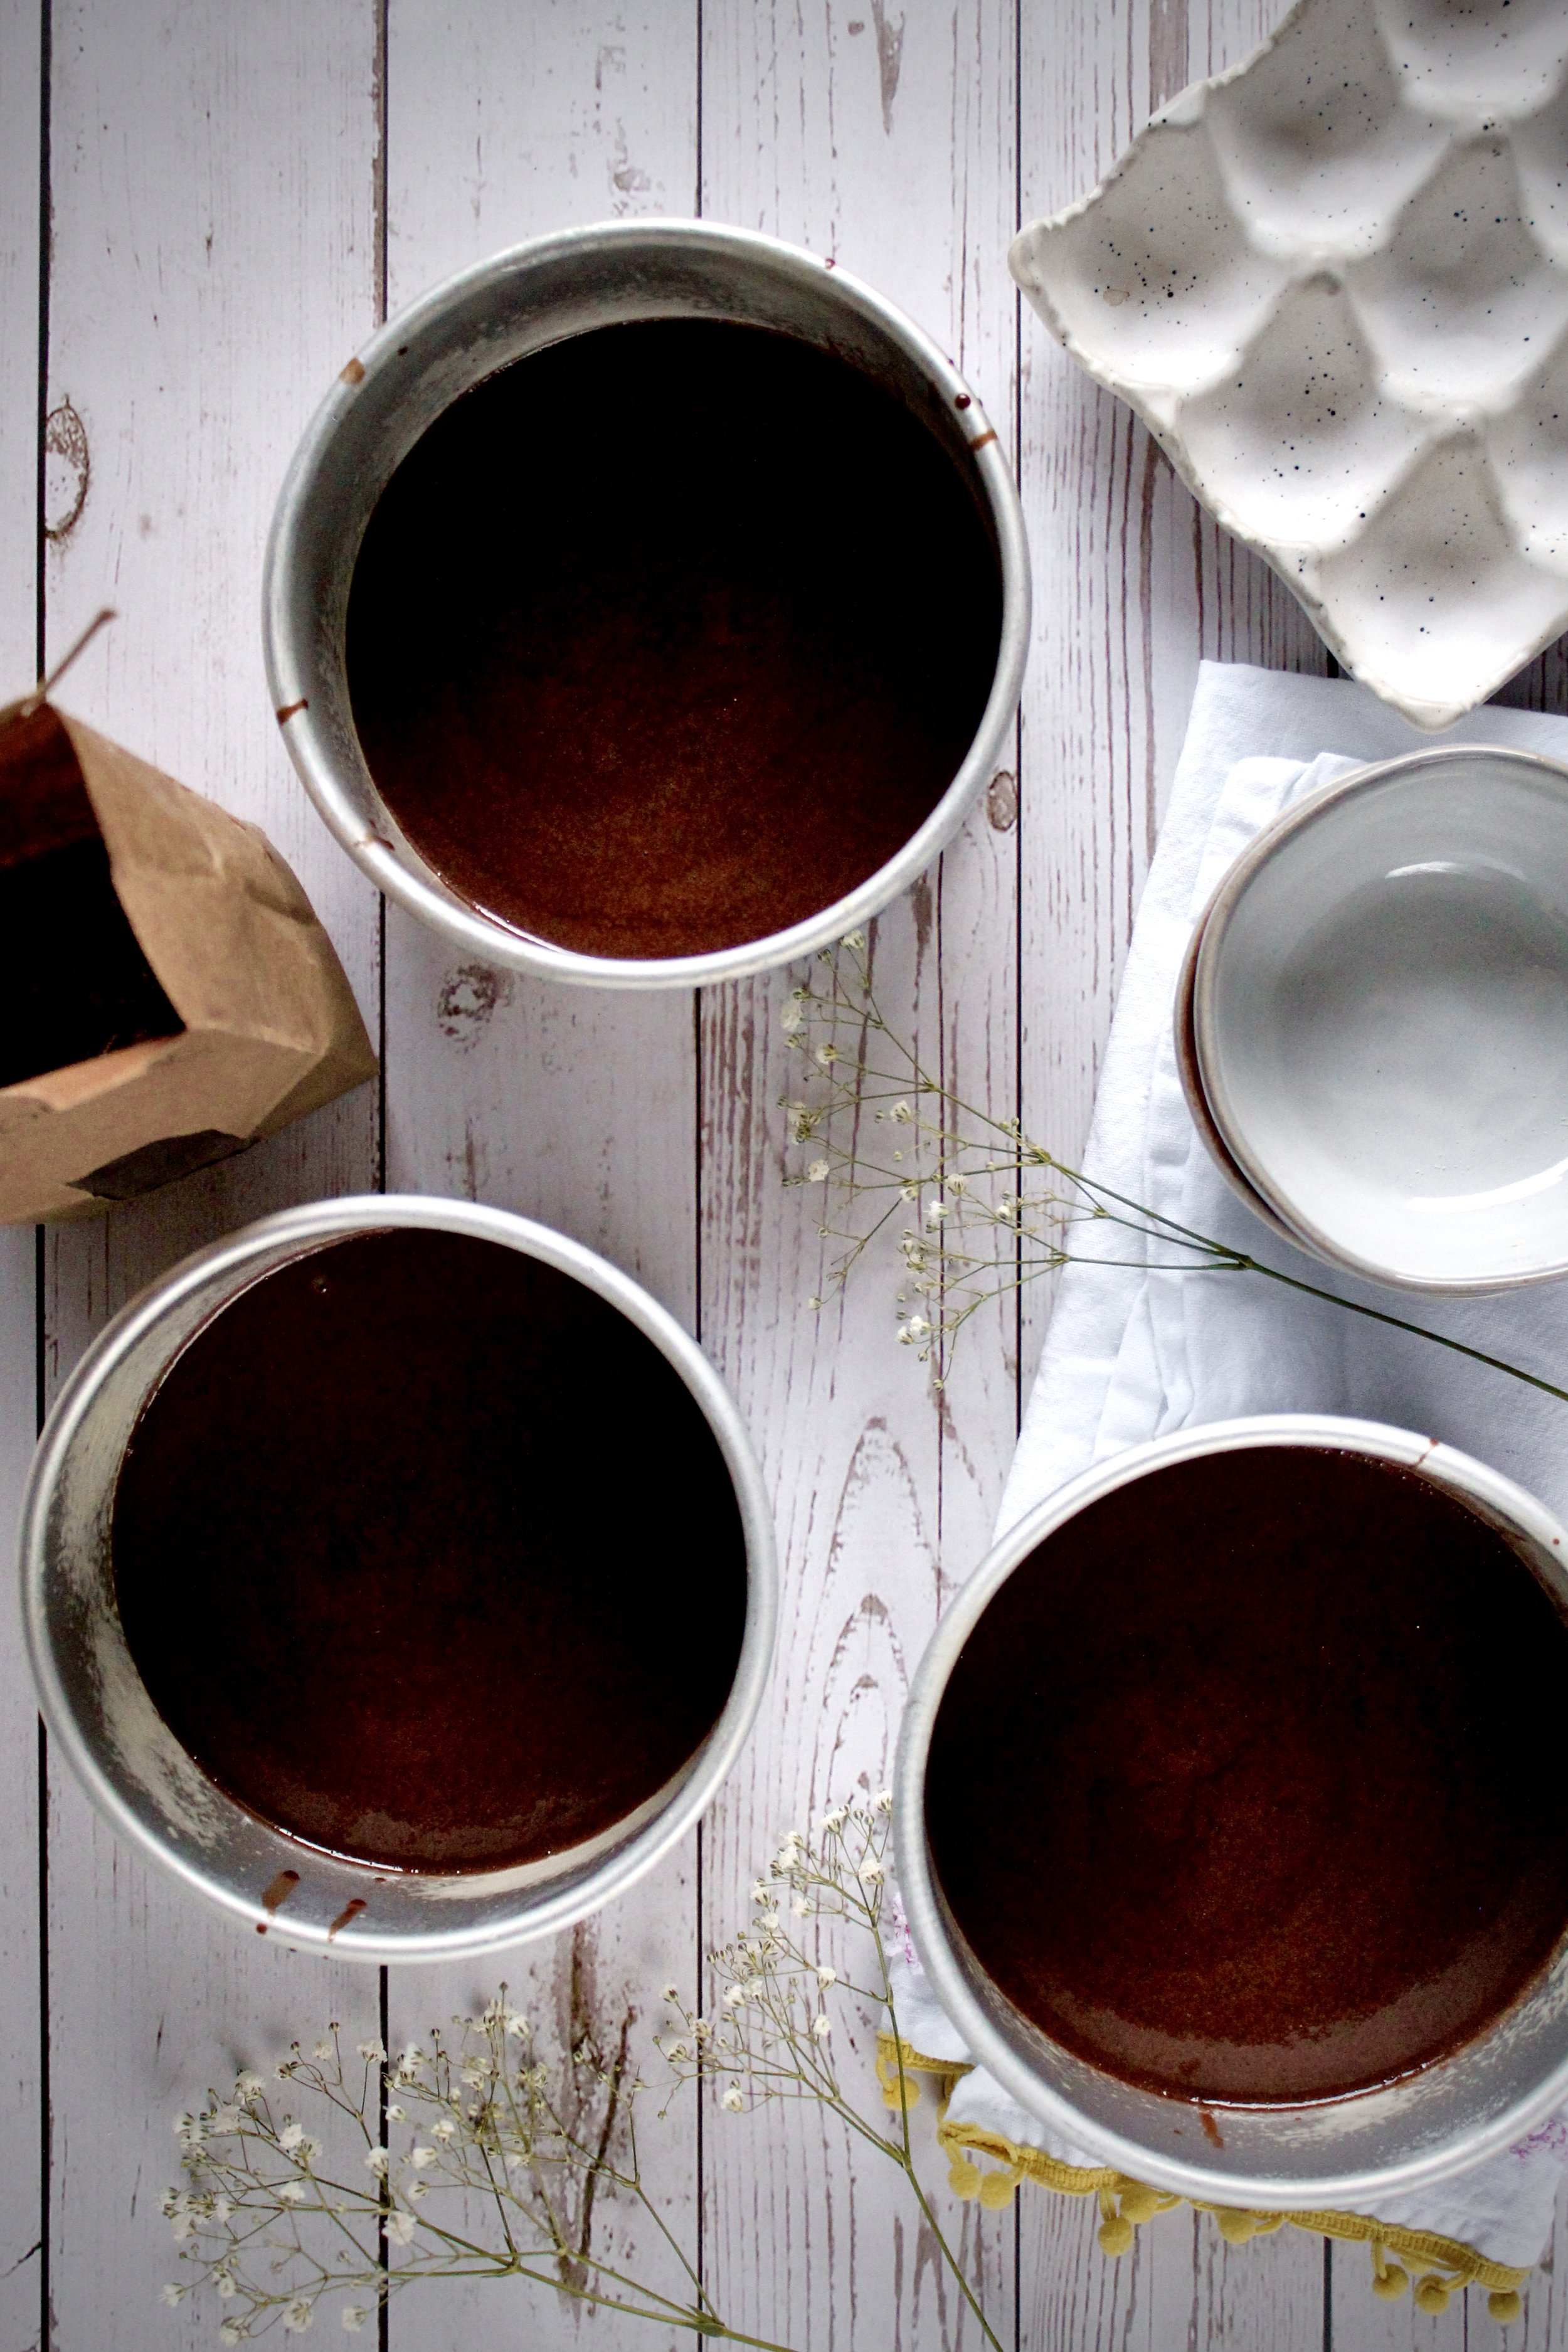
- Preheat your oven to 325F/165C. Lightly grease and flour three 6” cake pans* (or use baking spray) and line the bottom with parchment paper or silicone baking mats. This is also a great time to set your coffee to percolate (unless using hot water or espresso and hot water, which is what I do).
- Whisk together the sugar, flour, cocoa powder, baking powder, baking soda, and salt in the bowl of your stand mixer or a large mixing bowl, sifting everything but the sugar (unless yours is fine enough to sift--go for it!). Set aside.
- In a separate medium mixing bowl, whisk the eggs, buttermilk, oil, and vanilla together until well-blended and fully emulsified, about 1 minute.
- Very, very slowly stream the hot coffee or water into the wet ingredients, whisking vigorously and constantly as you pour to avoid scrambling the eggs. Feel free to do this in segments if it’s easier. If you do scramble some of the eggs, you can run the mixture through your fine mesh sieve to remove the cooked egg bits.
- Using the paddle attachment, turn your stand mixer to low (or use a hand mixer) and slowly pour the wet ingredients into the dry. This should take about 30 seconds or so. The batter will clump up then thin out. Once you’ve poured all the wet ingredients, immediately turn off the mixer. Scrape down the bottom and sides. Beat on medium for exactly 2 minutes (set a timer).
- Evenly divide batter between prepared pans. Bake for 25-30 minutes, until a toothpick inserted in the middle of each cake comes out with just a few moist crumbs (ideally not fully clean, as this could mean they’re over baked). Check early and rotate halfway if not using convection.
- Let cool 5-10 minutes in the pans then remove to a cooling rack to cool completely. Cake layers can be made in advance, cooled completely, double wrapped in plastic and frozen for up to 1 month.
make the graham cracker crust crumble
- While the cakes bake, make the graham cracker crumble. In a small food processor or blender, grind the graham crackers and sugar until a sandy texture. Add melted butter and pulse a few times until blended.
- Pour out mixture onto a parchment lined baking sheet or small baking pan. Use clean hands to squeeze the crumbs into roughly pea-sized pieces. Some will be larger and some smaller.
- For the no-bake option, freeze the crumbs in the pan until ready to use. If making ahead, cover with plastic wrap or place in a well-sealed freezer safe bag so the grahams don’t become stale or absorb the smells of your freezer (doesn’t matter how clean your freezer is--this is just a reality of freezers). It will last 1-2 months in the freezer.
- For the crunchier baked option, bake the crumbs at 350F/175C for 5-10 minutes. They’ll puff up but not really change color much–you’ll see just a bit of darkening on some tops. Let cool completely in the pan then transfer to a well-sealed container until ready to use. These will last 3-5 days on the counter or 1-2 months in the freezer.
make the chocolate ganache drizzle
- Combine the chocolate and heavy cream in a heatproof bowl. Bring 1-2” water to a boil in a small to medium saucepan that can hold the bowl on top in such a way that all or almost all of the ingredients are over the water and not over the stove.
- Once the water boils, turn down the heat to medium low or low and place the bowl over it. You want it to stay simmering without getting too hot. Stir constantly with a rubber spatula until the chocolate is mostly melted. Remove from heat and stir or whisk vigorously until it is all melted and smooth. Return to heat if some chunks remain, but don’t worry if the color looks a little streaky (usually only noticeable in a glass bowl). It’s best not to overheat the chocolate because it will become grainy and separated. Note: some brands of chocolate will look like they’re seizing up (i.e. a clumpy mess) right before they smooth out and melt completely. Just keep stirring and keep the heat low and the ganache should come together. 15.Set aside or place in a drip bottle to cool slightly, about 20 minutes. You can also make this up to 2 weeks ahead of time and keep refrigerated. About 10 minutes before you’re ready to assemble the cake, place the drip bottle in a glass of hot (just below boiling) water or microwave in 10 second intervals until smooth and drizzle-able.
make the cheesecake filling
- Place the heavy whipping cream in a large mixing bowl. Beat with a handheld mixer (or use the whisk attachment and bowl of a stand mixer) on medium until frothy. Increase speed to high and beat until soft peaks form. It should hold its shape slightly if you turn the beaters upside down but should still be a bit floppy and shiny. Place in the fridge.
- In a medium bowl, combine the softened cream cheese, powdered sugar, and vanilla. Beat with a handheld mixer (or use the whisk attachment of a stand mixer–for either option you don’t need to wash the beaters/whisk) on medium until combined. Turn up the mixer to high and beat for about 1-2 minutes, until very soft and fluffy and smooth, similar to frosting that is easily spread on a cake.
- Fold in the whipped cream ⅓ at a time, using a rubber spatula and mixing until fully blended each time. It will deflate after the first addition but should be very smooth and fluffy by the third addition. Refrigerate until ready to use. This can be made ahead and will last 2-3 days in the fridge.
assemble cake
- When the cake is cooled, cut off any domed tops from the cake. If you previously froze the cake, let it sit on the counter for 30-60 minutes so it’s just thawed enough to cut the domed tops off. You can technically cut these before you freeze it, but I’ve found that it dries out even with plastic wrap if frozen longer than a few days.
- Prepare your work station by placing the bottom layer of cake on a clean work surface. Wrap a strip of acetate around it, making sure it is both snug against the side of the cake and perfectly upright/perpendicular to the work surface. Secure it with tape at the bottom and top, leaving about 1 inch of overlap. Take your time doing this–it’s very helpful to have it perfectly straight.
- Spread about ⅓ of the ganache on top of the cake, smoothing it out evenly and getting all the way to the edge.
- Sprinkle ⅓ of the graham cracker crumbs on top of that, making sure they are spread evenly and getting it all the way to the edge so it’s visible through the acetate.
- Spread about ⅓ of the cherry pie filling on top of the crumbs, dropping it on top to avoid moving the crumbs around too much. Spread the top evenly, all the way to the edge.
- Finally, spread about ⅓ of the cheesecake mixture on top, again dropping small spoonfuls all around on top of the cherry pie filling to make it easier to spread. Smooth out evenly, all the way to the edge so it is visible through the acetate.
- Repeat this process, adding the next layer of cake (cut side up) and layering all of the filling on top. As you go, once you are about 1” from reaching the top of the acetate, apply another strip inside the bottom piece and overlapping them by about 1”. It’s important to place it inside to avoid any filling leaking down the sides. In total, I used 3 strips of acetate.
- Once the final layer is complete, smooth out the top of the cream cheese filling then cover the entire thing in plastic wrap or foil (with the acetate still on). Freeze for at least 3 hours, but ideally overnight
- Transfer the cake to the fridge to defrost for at least a few hours before serving. Remove the acetate right before cutting. Cake can be made up to 1-2 days ahead and kept in the freezer, well covered, until ready to defrost and serve.
Enjoy!
Cake should be stored in a truly airtight container and kept frozen until ready to defrost and serve. If you have any leftovers, place a piece of plastic wrap right against the cut sides to seal it. Leftovers can be refrigerated for 3-5 days (they may fall over after a few days) or frozen up to 2 months.
*This is a Milk Bar style cake made with cake pans instead of the traditional method of making a 9x13” cake and cutting it with a cake ring. I don’t own cake rings, so I like this method much, much better. Plus, I like that the edges of my cake layers aren’t cut (by the cake rings) and thus stay fresh longer through all of this freezing and refrigeration.