Key Concepts
Physics
Engineering
Simple Machines
Force
Pressure
Introduction
Not even the strongest human could lift a truck into the air. Our brains, however, are smart enough to create a tool that can lift heavy objects for us: hydraulic lifts! You can find them at car repair shops, in wheelchair lifts, and even on skyscraper construction sites. They use water (or other liquids) to increase the force available to lift things. And you will get to build one in this activity! Try it out, and discover how much easier it is to lift with the power of water.
Background
If you have ever used a wheelbarrow, you know it can help to lift heavy objects: lifting the handles of the wheelbarrow is easier than lifting the object itself. A hydraulic lift accomplishes the same task. It allows you to move a heavy object with much less effort.
On supporting science journalism
If you're enjoying this article, consider supporting our award-winning journalism by subscribing. By purchasing a subscription you are helping to ensure the future of impactful stories about the discoveries and ideas shaping our world today.
"Hydraulic" refers to tools that operate by moving liquids, such as water or oil. You cannot compress liquids (unless you have special equipment). This means that no matter how hard you press on a liquid you cannot noticeably change its volume. Try it out! Fill an oral medicine syringe with water, close its open tip with a finger, and try to press the plunger in. You will see that you cannot. Even if you could place an elephant on the plunger, it would not compress the fluid in the syringe. So what will you be able to do with this water power?
In the effort to move something, it is not only important to exert force but also to consider the full area over which the force is spread. Think of a time when you played with Play-Doh. Pushing a finger into the dough is easy, but pushing the palm of your hand into the dough is harder—you probably felt more resistance. Because your hand has a larger surface area, your effort is spread out over a larger area, and the dough does not receive as much force for each square inch as it does with a single-finger push. Now think about this problem in reverse: sometimes you want less force per square inch, such as when you are trying to lift something. Is there a way to place an object on a larger surface so it creates less pressure when you're trying to lift it? Try the activity to find out!
Materials
Two stainless steel wall plates, at least 4.5 by 2.75 inches in size. (These are available in hardware stores.)
Two small oral medicine syringes (these are usually given in metric measurements—25 milliliters or 25CC works well.) (Available at pharmacies.)
Large oral medicine or irrigation syringe (one that is approximately 60 milliliters or 60CC works well; one with a catheter tip attached will be easiest to work with). (Available at pharmacies.)
Extra-strong wall-mount double-sided tape
Four feet of silicone fuel tubing with a 5/32-inch inner diameter. (This is available in hobby shops, hardware stores and online.)
Scissors
Hardware vise
Sturdy surface to which the vise can be attached
Jar full of water (with lid closed tightly) and/or other heavy object that will fit on the wall plate
Large bowl of water
Ruler
Paper and pen or pencil
Adult helper
Workspace that can get messy
Plumber's putty (optional) (available at hardware stores)
Scale (optional)
Other sizes of syringes with catheter tip (optional)
Preparation
Put one small syringe away to the side. This syringe will be the "leading" syringe; you will use it to make the lift move. The other two syringes (one small one and the large one) will hold the weight that needs to be lifted. These will be the "helping" syringes.
Use the extra-strong double-sided tape to adhere the center of one wall plate to the flat top of each of the plungers on the two helping syringes.
Carefully cut the tubing in two pieces, each about 2-feet long.
For each helping syringe (the syringes with plates attached) connect a plastic tube to its tip.
Push the plunger in each helping syringe all the way down so that it is fully depressed into the cylinder.
One at a time, put the free end of each tube into the water, and pull the plungers smoothly up as far as they will go without falling out of the syringes. The syringes will suck up water.
Hold each syringe (one at a time) with its tip pointing up. Remove the air bubble near the tip of the syringe by pushing the plunger in slowly until all the air is pushed out of the tube.
Place the end of the small syringe's tube back in the water, and suck in some more water.
Very little air should be left in either of the tubes or helping syringes. The small syringe should be full, and the larger one can be half-full.
Attach the vice to a sturdy surface.
Procedure
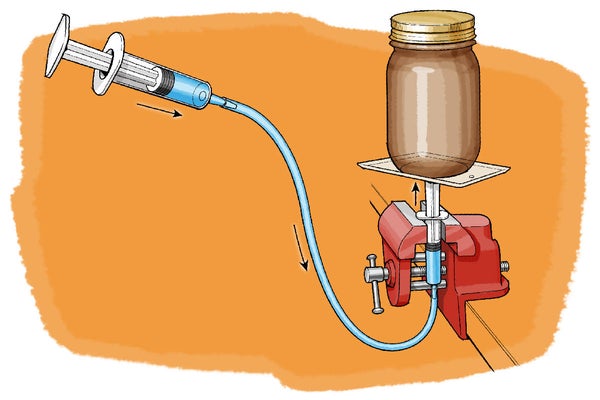
Insert the tip of the leading syringe into the free end of the tube connected to the small helping syringe. Push the plunger of this helping syringe in. What happens to the leading syringe?Why would this happen?Do you need to push hard to get the water to transfer from one syringe to the other? (If the tubing pops off, refill the tubing and helping syringe with water, and reattach the tubing to the leading syringe. If needed, seal the connection with plumber's putty.)
The leading syringe should now be full of liquid.
Use the vise to carefully hold the helping syringe vertically with the plate horizontal and facing up. Be careful to not squish the cylinder of the syringe as this will obstruct the movement of the plunger.
Fill the jar with water, and place it in the precise center of the platform attached to the helping syringe in the vice. Do you think you can easily lift this weight by pushing on the leading syringe?
Try it out. Push gently so the jar does not tumble off. You might need a helper to gently keep the construction upright. Was your prediction correct?
Take the jar off the platform, push the plunger of the helping syringe down until the leading syringe is filled with liquid, and then place the jar (or another heavy object) on the platform and lift it again. Use a ruler to measure how high your load (the jar with water) is moving. (You might need a helper for this step.) Write this distance down.
You just tested a design in which the helping and leading syringes are equal in size. Switch the helping syringe (the syringe that holds the weights) to one that is larger than the leading syringe. Do you think lifting the jar will be easier or harder with this design? Do you think the jar will move up more, less or about the same? Why do you think this?
Repeat the procedure with the larger helping syringe to find out! (Notice you will not have to press the helping syringe completely to fill the leading syringe.)
Use the ruler to measure how high the plate is being moved, and write down that distance.
Compare the measurements you made for each design. Why do you think they are different?
Did one design make it easier to move the jar? Why do you think this is so? Which design would you choose to lift a heavy truck—and why?
Extra: Try to lift heavier and heavier objects until you barely can lift them. Remember to place the objects centered on the plate (if a heavy weight is placed off center, the tape might give and your object might fall). Try this for each configuration and, if you have a scale available, weigh the different weights you were able to lift with each syringe combination. Which combination was able to lift more weight? Why do you think that is?
Extra: Measure the radius of the small and large helping syringe cylinders. Can you use these numbers to find the factor by which the weight you can lift gets multiplied when you move from a small to a large syringe?
Extra: Try other combinations of syringe sizes. Can you see a pattern in your findings?
Extra: Make a hydraulically operated wheelchair lift, dental office chair, or car lift for toys.
Observations and Results
You probably found it easier to lift the jar with the large helping syringe. In that combination the jar probably also moved a much shorter distance.
When you press one plunger the liquid inside the closed system presses with an equal amount of pressure against the other plunger. Because pressure is created by applying force over an area, a small push on a small area creates the same pressure as a much larger push on a much larger area. That is why a hydraulic lift can multiply a force: you push on a small plunger, the pressure that is created moves through the liquid to a much larger plunger, and the load on the larger plunger feels a much greater push than the one you first made. For that reason it was easier and, if you tried, you could move more weight with a large helping syringe compared to a small one.
Did you see how liquid was transferred from one column to the other in the process? Because the volume of liquid does not change, the larger plunger will not move as much as the smaller plunger. But that is the tradeoff for being able to lift a heavy object!
More to Explore
Jack it Up! Lift a Load Using Hydraulics, from Science Buddies
The Multiplication of Force by a Hydraulic System, by Wisc Online
Heavy Lifting with a Lever, from Scientific American
STEM Activities for Kids, from Science Buddies
This activity brought to you in partnership with Science Buddies
