Backing Up and Archiving Data with Linux

Share This Post:

Share on facebook
Facebook
Share on twitter
Twitter
Share on linkedin
LinkedIn
backing-up-data-linux-850 (1)

As a hacker penetration tester understanding how system administrators go about backing up and archiving data with Linux is going to be key to your success as back ups keep all the good information.

Soon to be system administrators will quickly find out that backing up and archiving data with Linux is going to be a key part of their skill sets and hopefully protect their career security in the event of a hack or system failure.

The Basics of Backing Up and Archiving Data with Linux

Understanding the importance of creating and managing backups is what will keep you calm in the midst of a crisis (and hopefully prevents someone from writing a story like this about you).  Just so there is no misunderstanding here, let’s be clear here, developing a comprehensive back up plan is critical and this includes: 

  • Choosing backup types.
  • Using the right compression methods.
  • Securely transferring your backup files over networks. 
  • Validating backup integrity.  
backup Rule of Three
Businesses need to have several archives in order to properly protect their data. The Backup Rule of Three is typically good for most organizations, and it dictates that you should have three archives of all your data. One archive is stored remotely to prevent natural disasters or other catastrophic occurrences from destroying all your backups.
The other two archives are stored locally, but each is on a different media type. You hear about the various statistics concerning companies that go out of business after a signifi- cant data loss. A scarier statistic would be the number of system administrators who lose their jobs after such a data loss because they did not have proper archival and restoration procedures in place.

So read on my dear geeks as Secur walks you through the essentials.

Different Types of Linux Backups

Backups, referred to as archives by those preferring to sound sophisticated, are restorable copies of your system’s data.  Backups represent two sources of anxiety for Linux system administrators:

  • You need to make sure they are actually being done.  Many people set and forget back up systems only to find out the back up system “forgot” to work.
  • Hackers will target back up archives when hunting for data.   Backups are often like the “junk” room of your system, stuff gets thrown in there and no one ever really checks what is going on in room, until you have a water leak or rodent infestation. 

One of your career goals is avoiding backup anxiety.  Now with that said, let’s get into it.

Understanding the various categories of backups is the foundation of your  backup planning;  there are a range of backup types, with each providing a different level of comprehensiveness in terms of the type of data captured and resource requirements.  Your particular operating environment and data protection requirements determine which backup methodology you employ but most likely it is a combination the ones below, which are ranked in descending order of resource intensity.

  • System Image/Clone:  A copy of the operating system binaries, configuration files, and everything needed to quickly restore a system to a bootable state; not normally used to recover individual files or directories, and in the case of some backup utilities, you cannot do so.
  • Full:  A copy of all the data, without modification date.
    • Primary advantage: takes less time than other types to restore a system’s data.
    • Take longer to create a full backup compared to the other types,
    • Requires more storage.
    • Needs no other backup types to restore a system fully.
  • Incremental:  Copy of data modified since the last backup operation (any backup operation type).
    • File’s modified timestamp is compared to the last backup type’s timestamp.
    • Takes less time to create this backup type than the other types.
    • Requires a lot less storage space.
    • Often requires a long restoration time; you need restore data using the incremental backups created after a full backup, so you should do a complete back up periodically.
  • Differential: Copies all data that has changed since the last full backup.
    • Balance between full and incremental back- ups.
    • Less time than a full backup but potentially more time than an incremental backup.
    • Requires less storage space than a full backup but more space than a plain incremental backup.
    • Takes  less time restoring from differential backups than incremental backups; only the full backup and the latest differential backup are needed. 
    • Requires a full backup to be completed periodically.
  • Copy-on-Write Snapshot:  A hybrid approach that saves space ; only modified files/updated pointer reference table are stored for each additional backup.  Allows you can go back to any point in time and do a full system restore from that point.  Simulate multiple full backups per day with less space and processing than a full backup.  The “rsync” utility uses snapshots.
    • A full, read-only copy of the data is made.
    • Then pointers/hard links create a reference table linking backup data and original data.
    • Next backup is incremental as only modified/new files are copied and updates/copies the pointer reference table.
    • Uses much less space than the other backup types. 
  • Split-mirror Snapshot:  Keeps a copy of all the data, not just new or modified data, on a mirrored storage device.
  • Snapshot Clone:  Once a snapshot is created, such as an LVM snapshot, it is copied, or cloned.
    • Useful in high data IO environments.
      • minimizes any adverse performance impacts to production data IO because the clone backup takes place on the snapshot and not on the original data.
    • Typically modifiable; if using LVM, you can mount these snapshot clones on a different system.  Useful in disaster recovery scenarios.

Linux Compression Methods

With the amount of data growing each and everyday, you can imagine that backing up data consumes large amounts of media space, so there are a number of compression utilities designed to minimize this space:

  • gzip:  Developed as a replacement for old compress utilities
    • Using the Lempel-Ziv (LZ77) algorithm
    • Achieve text-based file compression rates of 60–70%, gzip has long been a popular data compression utility.
    • Compress a file by typing “gzip” followed by the file’s name.
      • Original file is replaced by a compressed version with a .gz file extension.
      • To reverse the operation, use “gunzip” followed by the compressed file’s name.
  • bzip2: Uses the Huffman coding algorithm to offer higher compression and rates than gzip but takes slightly longer to perform the data compression.
    • Employs multiple layers of compression techniques and algorithms. 
    • Compress a file by typing “bzip2” followed by the file’s name. The original file is replaced by a compressed version with a .bz2 file extension.
    • Reverse the operation with “bunzip2” followed by the com- pressed file’s name, which decompresses (deflates) the data.
  • xz: Uses the LZMA2 compression algorithm and provides higher default compression rate than bzip2/gzip .
    • Used for compressing the Linux kernel for distribution.
    • To compress a file,  type “xz” followed by the file’s name.
    • Original file is replaced by a compressed version with an .xz extension.
    • Reverse with the “unxz” utility.
  • zip:  Packs multiple files together in a single file, as a folder or an archive file, and then compresses it.
    • Does not replace the original files;  instead it places a copy of the file(s) into the archive file.
  • Archive/compress files with zip by typing “zip” followed by the final archive file’s name, ending in a .zip extension, and one or more files you want in the compressed archive.
    • Original files remain intact, but a copy of them is placed into the compressed zip archive file.
    • Reverse the operation with unzip followed by the compressed archive file’s name.

To demonstrate the differences in compression, we are going to a site by side comparison of the different utilities, we are going to use all of them to compress the same file and then compare the size of the file output.  

We started by making a copy of the /var/auth.log as logcopy and making 4 copies of it in the “compressiontest” folder (as seen in the first screenshot below).  All the files are the same size.

Linux compression
Screen shot of files to be compressed with different Linux utilities.
Linux compression utilities
Comparing the output files of different compression utilities.

You can see in the screenshot above the files are compressed with the compression utilities.  Some things to be aware of:

  • The various file extension names and compressed sizes.
    • xz” produces the highest compression so the file is the smallest in size. 
  • Specify the level of compression and control the speed via the “-#” option. 
    • # is a number from 1 to 9,
      • 1 is the fastest/lowest compression 
      • 9 is the slowest/highest compression. 
      • Utilities use “-6” as the default compression level.
  • When using compression utility with an archive/restore program for data backups,  you must use a lossless compression method.
    • gzip, bzip2, xz, and zip utilities provide lossless compression. 

Linux Data Archiving And Restoration Utilities

Command-line utilities for archiving and restoring data include:

  • cpio 
  • dd 
  • rsync 
  • tar

Archiving Data with cipo

As almost a blinding flash of the obvious, “cpio” is an acronym for  “copy in and out.”; it gathers file copies and stores them in an archive file.  The “cpio” utility maintains each file’s absolute directory reference, so it is used to create system image and full backups.  The program has several useful options displayed in the table below.

ShortLongDescription
-I (Capital “i”)Designates an archive file to use.
i–extractCalled copy-in mode and copies files from an archive
or displays the files within the archive, depending
upon the other options employed.
N/A–no-absolute- filenamesDesignates that only relative path names are to
be used. (The default is to use absolute path
names.)
-o–createCreates an archive by copying files into it. Called
copy-out mode.
-t–listDisplays a list of files within the archive. This list is
called a table of contents.
-v–verboseDisplays each file’s name as each file is processed.
cpio compression
Using the "cpio" utility to compression files and view the contents of an archive.

In the screenshot above:

  • We set up a directory, “learningcpio
    • Using the “?” wildcard character with “ls” to list the 5 logcopy files in the folder and pipe the STDOUT as STDIN to the “cpio” command
      •  The  “-ov” options display the file’s name as they are copied into the archive.
      • The archive file used is named “logcopyx.cpio“.  For the sake of record keeping, use the cpio extension for cpio archive files.
  • View the files stored within a cpio archive with the “cpio” command and  “-itv” options and the “-I” option to designated the archive file


Additionally you can use “cipo” to back up data based upon metadata,  in addition to its file location.  For example, to create an archive for all the files owned by the JamesBond user account,  use the “find / -user JamesBond” command and pipe it into the “cpio” utility in order to create the archive file. 

As “cpio” maintains the files’ absolute paths, files get restored, with the “-ivI ” command, to their original locations.   To restore the files to another directory location,  use the “–no-absolute-filenames” option.  As seen below, the “logcopyx.cpio” archive file is moved into the “restorecpio” directory. Restore the files to a new directory location by removing absolute path names from the archive  with the “–no-absolute-filenames” option;  to restore the files to their original location, do not use this opion.

cpio file restore linux
Using the restore functionality of the "cpio" command

Archiving Linux Files with tar

The name of the “tar” utility is derived from “tape archiver”:

  • The archived file is called a tar archive file. 
  • If this archive file is then compressed, the compressed archive file is called a tarball.
  • If you own a time machine (joke!), you can store your tarballs/archives files on tape as the “tar” utility is the “tape archiver“.
    • Substitute the SCSI tape device file name, such as /dev/st0 or /dev/nst0, in place of the archive/tarball file name within the “tar” command

The “tar” command options can be seen in the table below.

ShortLongDescription
-c–createCreates tar archive file. Provides a full or incremental
backup, depending upon the other selected options.
-u–updateAppends files to an existing tar archive file. Copies
those files that were modified since the original
archive file was created.
-g–listed-incrementalCreates an incremental or full archive based upon
metadata stored in the provided file.
-z–gzipCompresses tar archive file into a tarball using gzip.
-j–bzip2Compresses tar archive file into a tarball using bzip2.
-J–xzCompresses tar archive file into a tarball using xz.
-v–verboseDisplays each file’s name as each file is processed.

When creating an archive using the tar utility, you have to add a few arguments to the options and the command.   Though not required, it is good file management practice form to use the .tar extension on tar archive files. In the screenshot below, you will see it in use with the following options: 

  • -c“: creates the tar archive. 
  • -v“:  displays the file names being placed into the archive file. 
  • -f“: indicates the archive file name; 
  • The command’s last argument designates the files to copy into this archive.
  • You can also use the old-style tar command options and remove the single dash from the beginning of the tar option.
linux tar

If  backing up large amounts of data, use one of the compression utilities discussed earlier by adding an additional switch to the “tar” command options. The creation of tarball is seen below.

tarball creation
Creation of a tarball with gzip utility

In the screenshot above, the tarball file name has a “.tar.gz” file extension to show the compression method that was used.   The “tar” command creates both full and incremental backups; the screenshot below walks through the process of creating an incremental back up.

snapshot tar incremental
Use of the "tar" command to create an incremental compressed archive with the "xz" compression utility.

The “tar” utility views full and incremental backups in levels.

  • Full backup is one that includes all of the files indicated, and it is considered a level 0 backup.
    • The first tar incremental backup after a full backup is a level 1 backup.
    • The second tar incremental backup is considered a level 2 backup, and so on.

To start, we created a compressed full backup archive named “LearningArchives.txz” and used the “-g” option to create a snapshot file, FullBackUpArchive.snar.   The snapshot file:

  • Has the “.snar” file extension, indicating the file is a tarball snapshot file. 
  • Contains metadata used by “tar” commands for creating full and incremental backups.
    • This metadata includes file timestamps, so the “tar” application can determine if a file has been modified since it was last backed up. 
  • Identifies any files that:
    • Are new, or, 
    • Were deleted since the last backup.

Our next step is showing how to make an incremental back up using the snapshot file, “FullBackUpArchive.snar” that determines if any of the archived files have been modified, are new, or have been deleted.

  • First, we inserted some new copy into the “logcopy1” file in order tot modify it.
  • Then we used the “tar” command with the “-g” option and points to the “FullBackUpArchive.snar” snapshot file
  • Metadata within “FullBackUpArchive.snar” shows the tar command that the “logcopy1” file has been modified since the previous backup.
  • The new tarball only contains the “logcopy1“, and it is effectively an incremental backup.
    • Continue to create additional incremental backups using the same snapshot file as needed.

Whenever you create data backups, it is a good practice to verify them and the “tar” command options will help you with that.

ShortLongDescription
-d–compare/–diffCompares a tar archive file’s members with external files;
lists the differences.
-t–listDisplays a tar archive file’s contents.
-W–verifyVerifies each file as the file is processed.
Not usable with compression options.

Backup verification can be done either: 

  • During the building of the archive:  Use the “-v” option with the “tar” command in order to watch the files being listed as they are included in the archive file. 
  • After archive creation: Verify that desired files are in the backup with the “-t” option to list tarball contents. 
The screenshot below shows:
  • Using tar -tf to list a tarball’s contents
  • Using “tar -df” to verify files within an archive by comparing them against the current files. 
  • Verifying a backup automatically immediately after the creation of the  tar archive with the “-W” option.  The “-W” option cannot be used if compression created the tarball. 
    • In this situation,  create/verify the archive and then compress it in  separate steps.
    • You can use the “-W” option when you extract files from a tar archive to instantly verify files restored from archives.
tar archive verification

The “tar” command also restores data from archives; the table below lists some of the options for use with the tar utility to restore data from a tar archive or tarball.

ShortLongDescription
-j–bunzip2Decompresses tarball using bunzip2.
-J–unxzDecompresses tarball using unxz.
-x–extract
–get
Extracts files from tarball/archive file.
Places them in working directory.
-z–gunzipDecompresses files in a tarball using gunzip

Extracting files from an archive/tarball is also done with the “tar” utility. 

In the screenshot below, we walk through the process:

  • Create a new directory, “restoringfiles” with the “mkdir” command
  • Move the “LearningArchives.tar.gz” file to the new directory
  • Use the “tar -zxvf ” command/option combination.
  • Run the “ls” command and you will see:
    • The restored files.
    • The tarball is not removed after a file extraction.


Extracting tar files
Extracting compressed archive files with the "tar" utility.

Duplicating Files with dd

The “dd” command allows you to back up nearly everything on a disk, including Master Boot Record (MBR) partitions.  When copying disks via “dd“, make sure the drives are not mounted anywhere in the virtual direc- tory structure.It creates low-level copies of an entire hard drive or partition and used for: 

  • Creating system images in digital forensics,
  • Copying damaged disks,
  • Wiping partitions.

The utilities basic syntax structure is:

dd if=input-device of=output-device [OPERANDS]

The arguments/ operands for the “dd” command include:

  • The input-device and output-device are either a drive or a partition; be sure that you get the right device for out and the right one for in, otherwise you may unintentionally wipe data.
  • bs=BYTES: Sets the maximum block size (number of BYTES) to read and write at a time. The default is 512 bytes.
  • count=NSets the number (N) of input blocks to copy.
  • status=LEVEL: Sets the amount (LEVEL) of information to display to STDERR.
    • LEVEL can be set to one of the following:
      • none: only displays error messages.
      • noxfer: does not display final transfer statistics.
      • progress: displays periodic transfer statistics. 
dd utility linux
Using the "dd" utility to copy a Linux partition.

n the screenshot above, the dd command, 

  • The “if” operand is used to indicate the disk to copy, /dev/sda1 drive. 
  • The “of” operand indicates that  /dev/sdb1 disk will hold the copied data. 
  • The status=progress displays period transfer statistics. 

You can  create a system image backup using a “dd” command by doing the following:  

  1. Shut the system down .
  2. Attach the necessary spare drives. 
  3. Boot the system using a live CD, DVD, or USB so you can unmount them prior to the backup operation.
  4. For each system drive, issue a dd command, specifying the drive to back up with the “if” operand and the spare drive with the “of” operand.
  5. Shut down the system, and remove the spare drives containing the system image.
  6. Reboot your Linux system.
 

If you have a disk you are getting rid of, you can also use the dd command to zero out the disk with the following command:

dd if=/dev/zero of=/dev/sdc status=progress

  • The “if=/dev/zero” allows the zero device to write zeros to the “sdc” disk. 
  • You can also employ the /dev/random and/or the /dev/urandom device files to put random data onto the disk.
  • Perform this operation at least 10 times or more to thoroughly wipe the disk.  
  • This particular task can take a long time to run for large disks.

File Replication with rsync

When determining which utilities to employ for your various archival and retrieval plans, keep in mind that one utility will not work effectively in every backup case.  While the “rsync“, “scp” and “sftp” utilities all securely copy files, consider:

  • rsync” is better for backups than “scp” as it provides more options. 
  • scp” works well for a small number of files
  • sftp” utility works well for any interactive copying, 
    • scp” is faster because sftp is designed to acknowledge every packet sent across the network.
  • You will employ all of these utilities in some way when building your company’s backup plans.

The “rsync” utility is known for its performance speed and lets you copy files locally or remotely, so it can be used for creating backups with the options displayed in the table below:

ShortLongDescription
-a–archiveUse archive mode. Is the equivalent to using
the “-rlptgoD” options which is the rsync
command option for creating directory tree
backups.
-DRetain device and special files.
-e–rshModifies the program used to communicate between
a local and remote connection. OpenSSH is the default.
-g–groupRetain file’s group.
-h–human-readableDisplay any numeric output in
a human-readable format.
-l–linksCopy symbolic links as symbolic links.
-o–ownerRetain file’s owner.
-p–permsRetain file’s permissions.
–progressDisplay progression of file copy process.
-r–recursiveCopy a directory’s contents, and for any
subdirectory within the original directory
tree, consecutively copy its contents as
well (recursive).
–statsDisplay detailed file transfer statistics.
-t–timesRetain file’s modification time.
-v–verboseProvide detailed command action
information as command executes.
-z–compressCompresses the file data during the transfer.

rsync‘s archive option, -a or –archive, generates a backup copy and is equivalent to  the “-rlptgoD” options and accomplishes the following:

  • Copies files from the directory’s contents and for any subdirectory within the original directory tree, recursively copying their contents .
  • Preserves the:
    • Device files, if run with super user privileges
    • File group
    • File modification time
    • File ownership, if run with super user privileges
    • File permissions
    • Special files
    • Symbolic links

The screenshot below shows how to create a local back up with “rsync“. The most popular options, “-ahv“, allow you to back up files to a local location. 

rsync backup utility

As seen in the screenshot above, we did the following:

  • Make a new directory “learntousesync“.
  • Move the file to “learningrsync.tar” to the “learntousesync” directory.
  • Make a new directory “StorageFile” in the “learntousesync” directory.
  • Run the rsync command with the “-avh” options against any *.tar file in the “learntousesync” fold, transferring it to the “StorageFile” directory.

The “rsync” utility is helpful in backing up large files over a network;  for a secure remote copy process to work, “rsync” and “OpenSSH” must be installed and running on both the local and remote machines.  To transfer a file to a remote user, run a command like the one below:

rsync -avP -e ssh *.tar user_remote@192.168.0.314:~

This command does the following:

  • The “-avP” options set the copy mode to archive  provide detailed information as the file transfers take place.
  • The “-e” option determines that OpenSSH is used for the transfer and  creates an encrypted tunnel so that anyone sniffing the network cannot see the data flowing by. 
  • The “*.tar” in the command selects the files are to be copied to the remote machine. 
  • The last argument in the rsync command specifies the following:
    • The remote user account (user_remote)to use for the transfer.
    • The remote system’s IPv4 address.
      • A hostname can be used instead.
    • Directory location on the remote machine where the files are to be placed.
      • It is the home directory, indicated by the ~ symbol.
      • In the last argument there is a colon (:) between the IPv4 address and the directory symbol.
        • If you do not include this colon, you will copy the files to a new file named user_remote@192.168.0.314~ in the local directory.
  • If you have a fast CPU but a slow network connection, speed things up with the “-z” option to compress the data via the zlib compression library.

Securing Offsite/Off-System Backups with Linux

There are a few additional ways to secure your backups when they are being transferred to remote locations.  Besides rsync, you can use one of the following to securely transferring archives:

  • The “scp” utility:  based on the Secure Copy Protocol (SCP).
  • The “sftp” program: based on the SSH File Transfer Protocol (SFTP)

Secure Copying with scp

The “scp” utility employs OpenSSH and is

  • Geared for quickly transferring files in a non-interactive manner between two systems on a network.
  • Good for copying from either:
  • A local to remote system.
  • One remote system to another.
  • Best used for small files that you need to securely copy on the fly.
  • Unable to restore the transfer if it gets interrupted during its operation.
  • Not well suited larger files and you are better off using either the rsync or sftp utility.
  • Commonly used copy options:
    • -C: Compresses the file data during transfer
    • -p: Preserves file access and modification times as well as file permissions.
    • -r: Copies files from the directory’s contents (recursively), and for any subdirectory within the original directory tree, consecutively copies their contents as well 
    • -v: Displays verbose information concerning the command’s execution.
  • Performing a secure copy of files from a local system to a remote system by:
    • Making sure OpenSSH is running on the remote system.  
    • Running the following command:

 scp File_to_transfer.txt Remote_user1@192.168.0.314:~ 

  • The scp utility overwrites remote files with the same name as the one being transferred without any messaging stating that. 
  • Performing a secure copy of files from one remote system to a another with the following command:
  • scp Remote_user1@192.168.0.314:File_to_transfer.txt Remote_user2@192.168.0.223:~  

Transferring Files Securely with sftp

Employing OpenSSH, the “sftp” utility interactively transfer files securely across a network as it allows for the:

  • Creation of directories as needed,
  • Immediate checking on transferred files,
  • Determination of the remote system’s present working directory

The “sftp” utility is used with a username and a remote host’s IPv4 address.

sftp UserName@192.168.0.242 

Once the correct user account’s password is entered, the sftp utility’s prompt is shown. At this point:

  • You are connected to the remote system.
  • You can enter any commands, including:
    • help” to see a display of all the possible commands and,
    • bye” to exit the utility.
  • Once the utility has been exited, you are no longer connected to the remote system.
CommandDescription
bye/exitExits the remote system and quits the utility.
getGets a files from the remote system
and stores them on the local system.
Called downloading.
regetResumes an interrupted get operation.
putSends files from the local system
and stores them on the remote system.
Called uploading.
reputResumes an interrupted put operation.
lsDisplays contents of the remote system’s
present working directory.
llsDisplays contents of local system’s present
working directory.
mkdirCreates a remote directory
lmkdirCreates a local directory.
progressToggles on/off the progress display. (Default is on.)

Checking Backup File Integrity

Archives files can be corrupted during transfer, but there are a number of utilities that you can use to ensure file integrity

Digesting an MD5 Algorithm

The “md5sum” utility is based on the MD5 message-digest algorithm and produces a 128-bit hash value of file.  You check file integrity by running two files through “md5sum” and if the hash value result is the same, the files are the same and indicates no file corruption occurred during its transfer. 

In the screenshot below, we compare two local files with different names but identical contents and you can see the md5sum output is identical.

md5sum linux
Using the "md5sum" utility to check the integrity of two files.

Securing Hash Algorithms

The Secure Hash Algorithms (SHA) is a family of various hash functions that can be used to verify an archive file’s integrity.

The screenshot below show the different SHA’s on your computer, in this case:

  • sha224sum
  • sha256sum
  • sha384sum
  • sha512sum

Each utility has the SHA message digest it employs within its name and are used in a similar manner to the “md5sum” command.  The screenshot below demonstrates that different hash value lengths are produced by the different commands, so that when we check the integrity of “logcopy2” with both the “sha224sum” and “sha512sum“, you get different results.  When you are checking file integrity, make sure that you use the same function.


shasum hash linux
Using the SHA function to check file integrity.

Summary: Backing Up and Archiving Data with Linux

Providing appropriate archival and retrieval of files is critical. Understanding your business and data needs is part of the backup planning process. As you develop your plans, look at integrity issues, archive space availability, privacy needs, and so on. Once rigorous plans are in place, you can rest assured your data is protected.

Share This Post:

Share on facebook
Facebook
Share on twitter
Twitter
Share on linkedin
LinkedIn

Leave a Reply

Your email address will not be published. Required fields are marked *

Table of Contents

You May Like

Related Posts

Linux logging
Linux Basics
Linux Administrator

Linux System Logs: How Do They Work

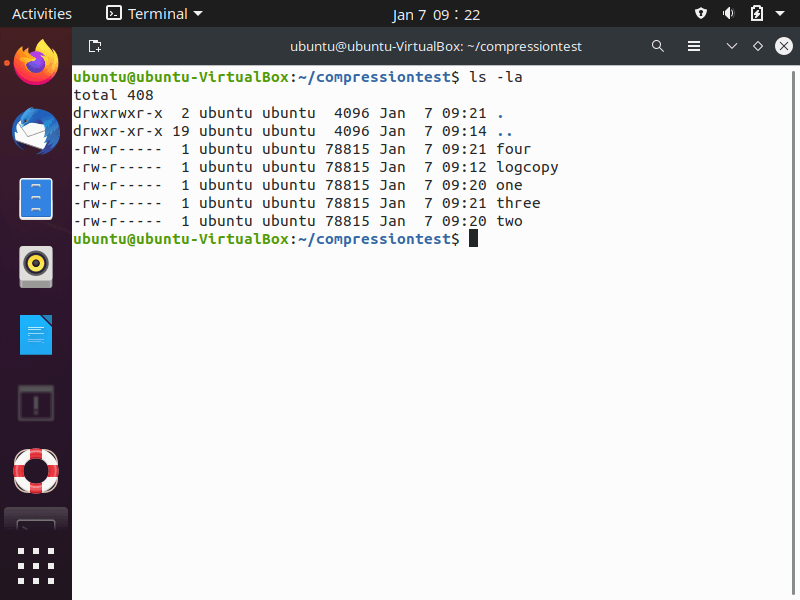
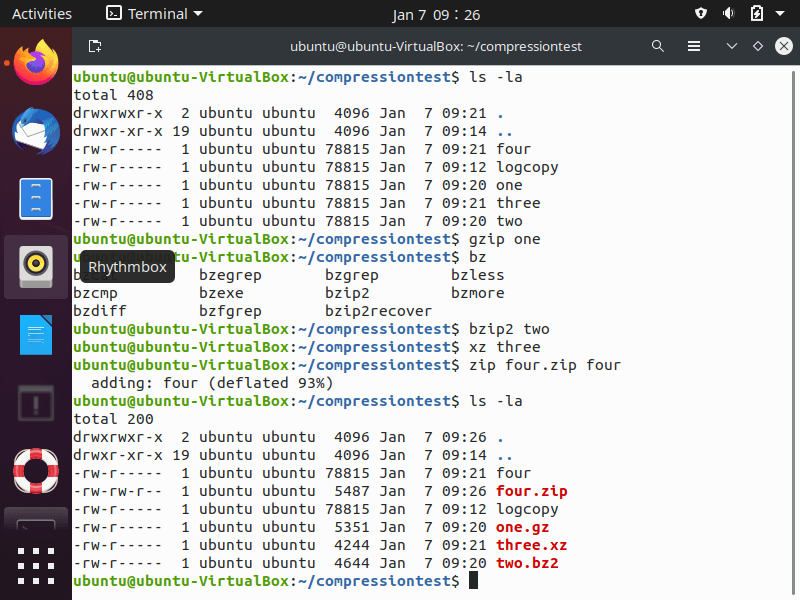
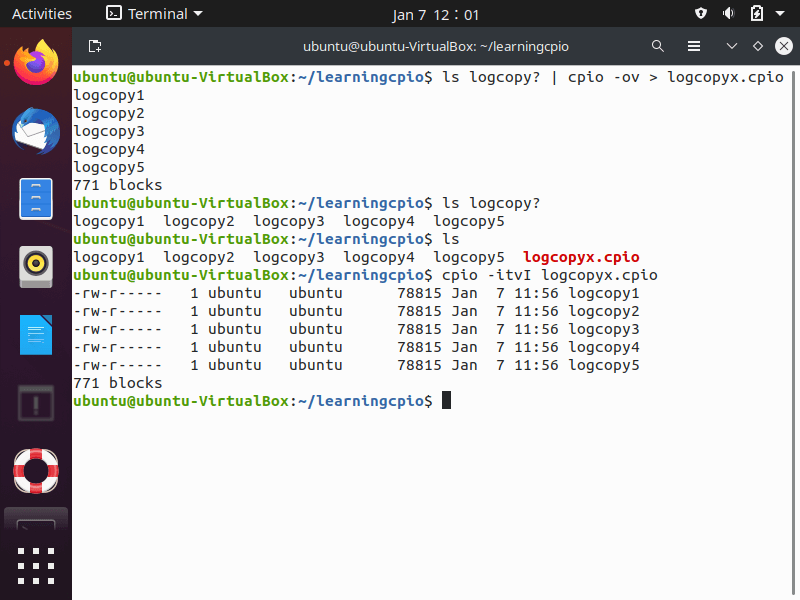
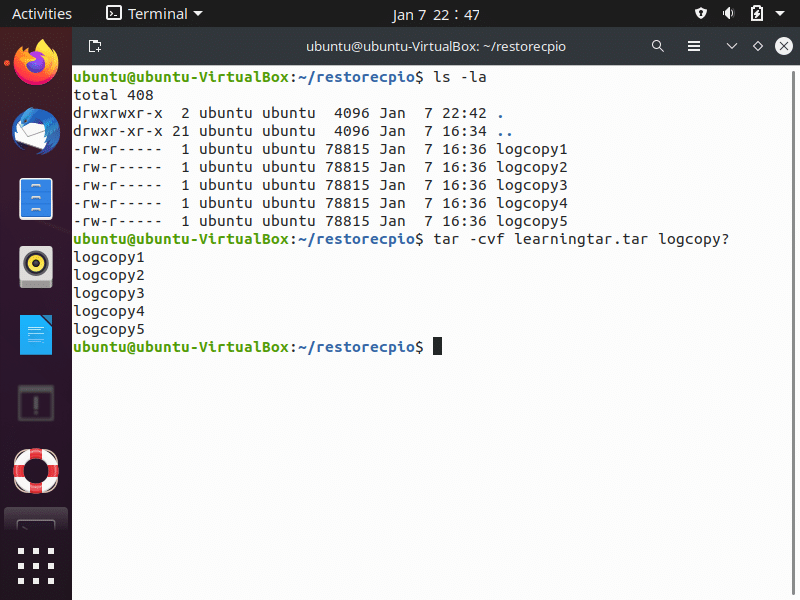
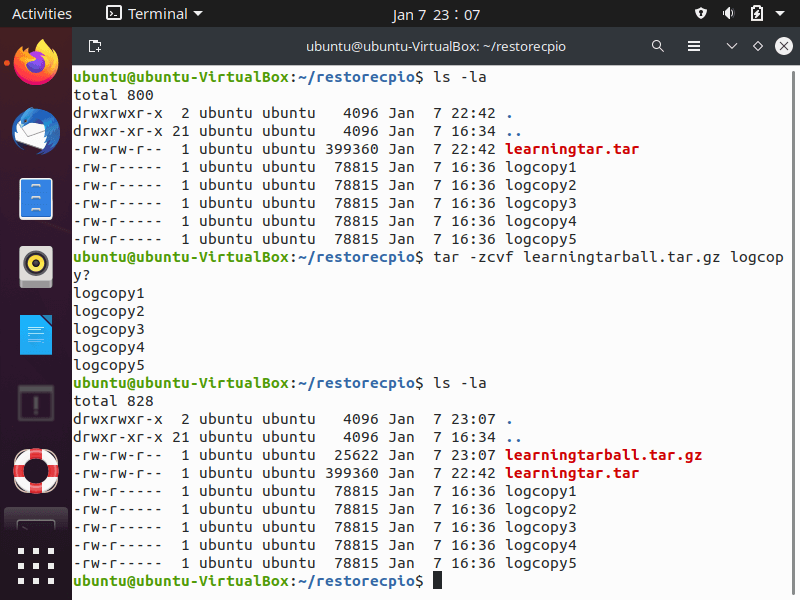
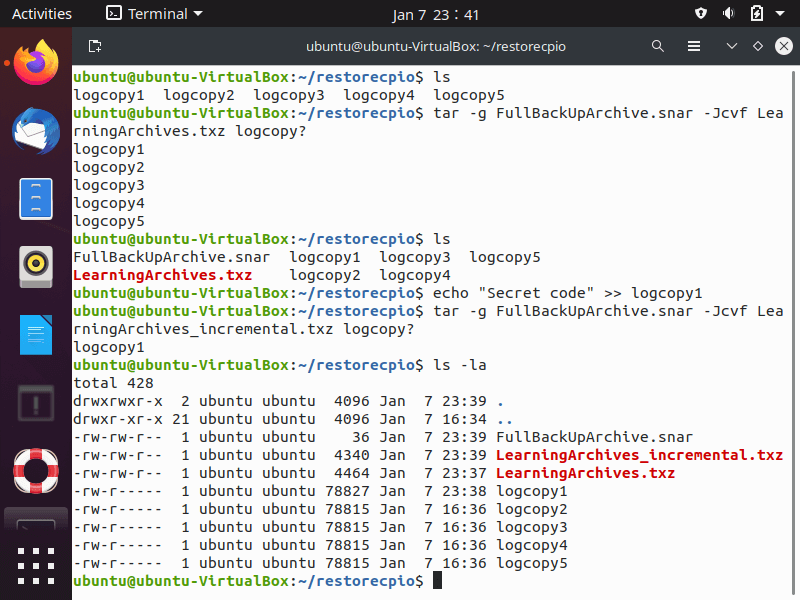
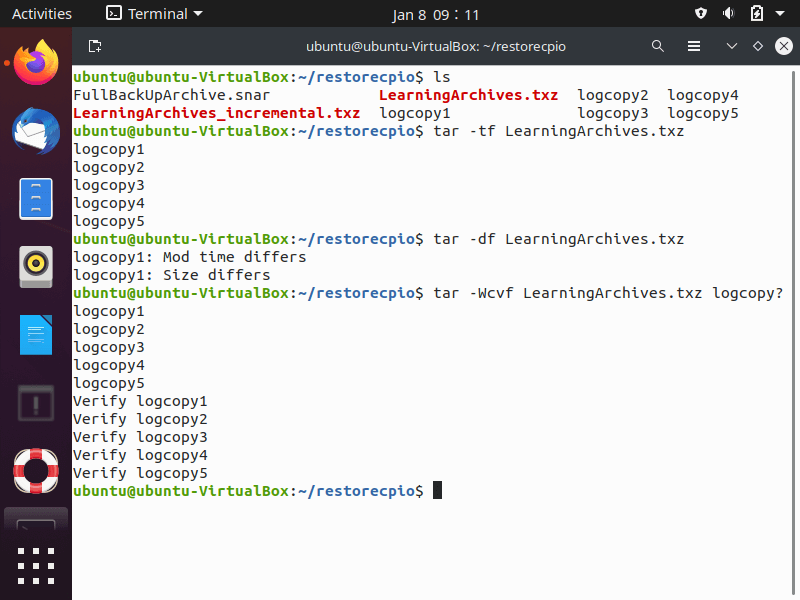
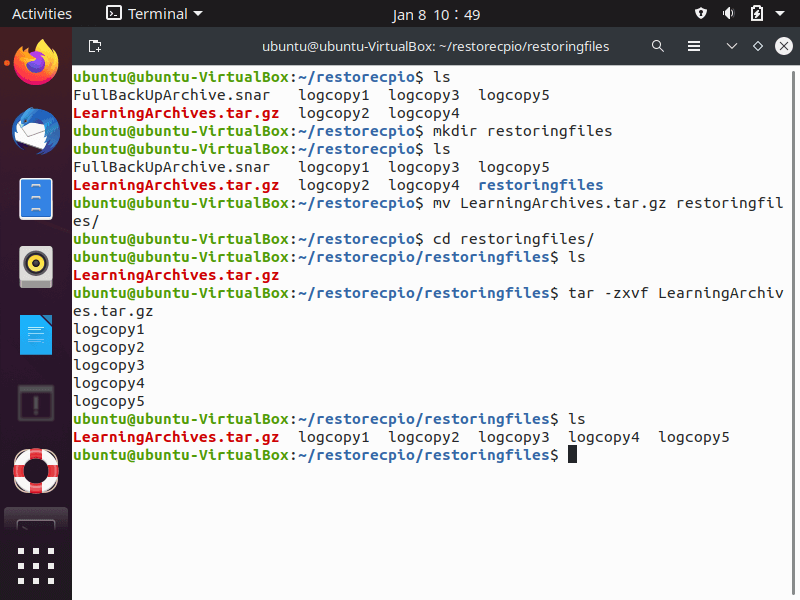
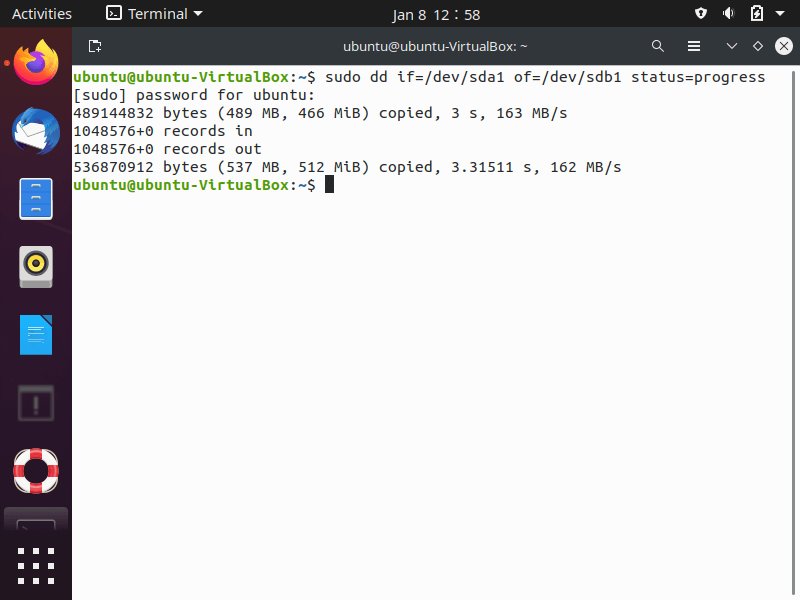
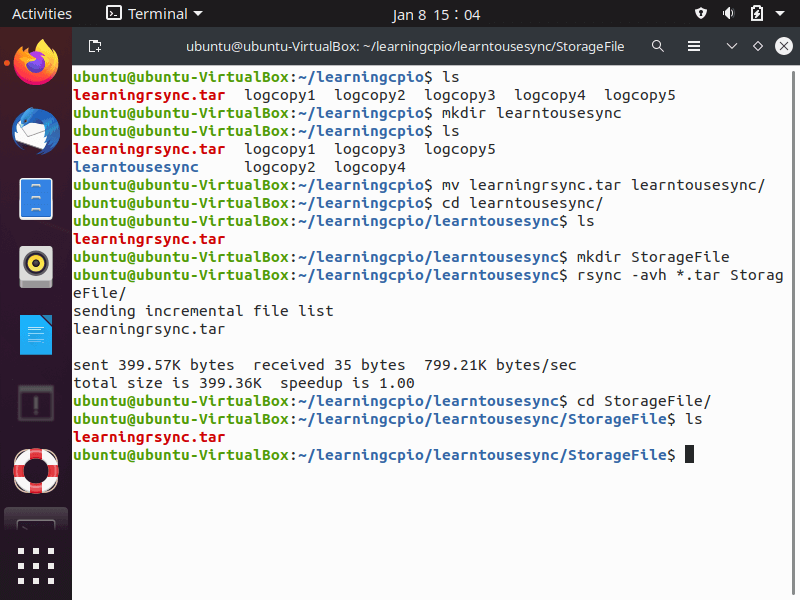
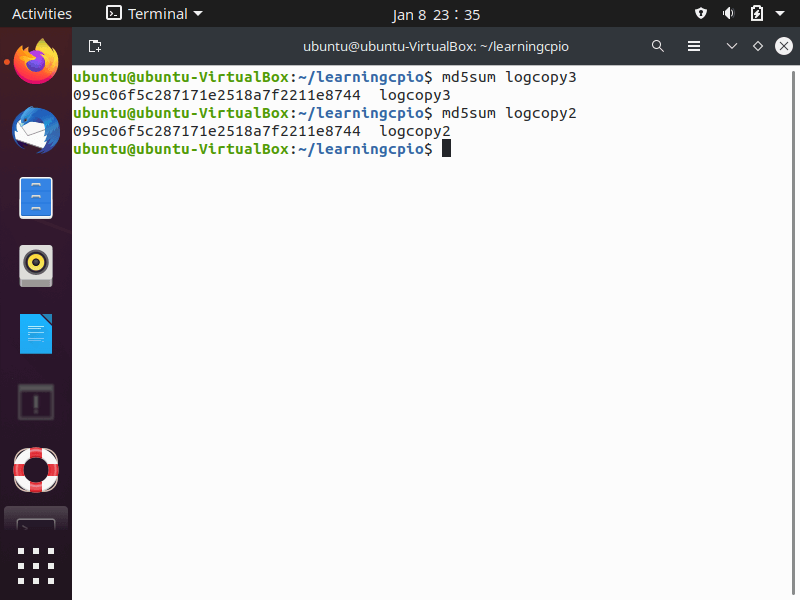
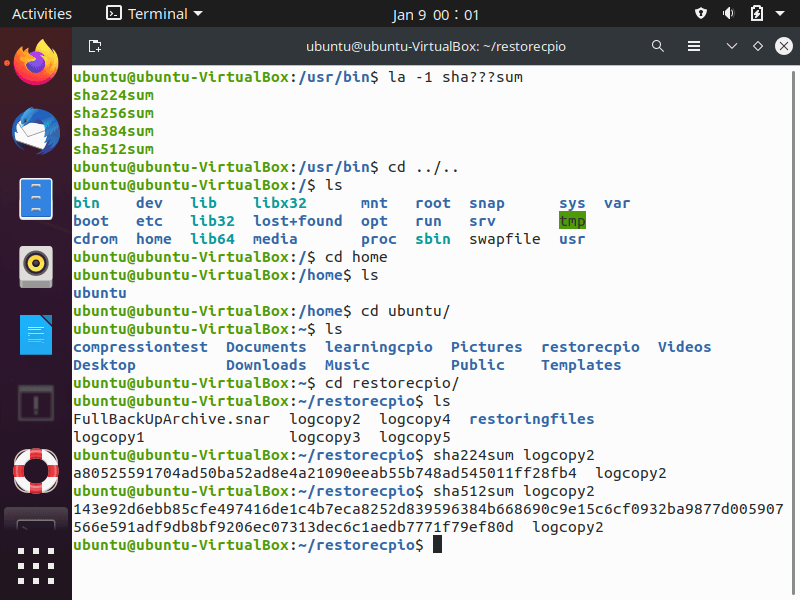
The various parts of the built in Linux logging system records almost all actions (especially errors and security alerts) that take place on your system and provides administrators with a great resource in analyzing system activities. Log files provide evidence of all system activity, including unauthorized access, so these files can provide evidence of hacker intrusions so you need to understand how to these files can be manipulated in order to obfuscate intrusions.

Read More »
Secure Coding Best Practices
Security
ComputerGeek

Secure Coding Best Practices

hile you won’t be writing applications as Linux administrator, understanding secure coding best practices as application security bugs are often used to attack networks, so

Read More »