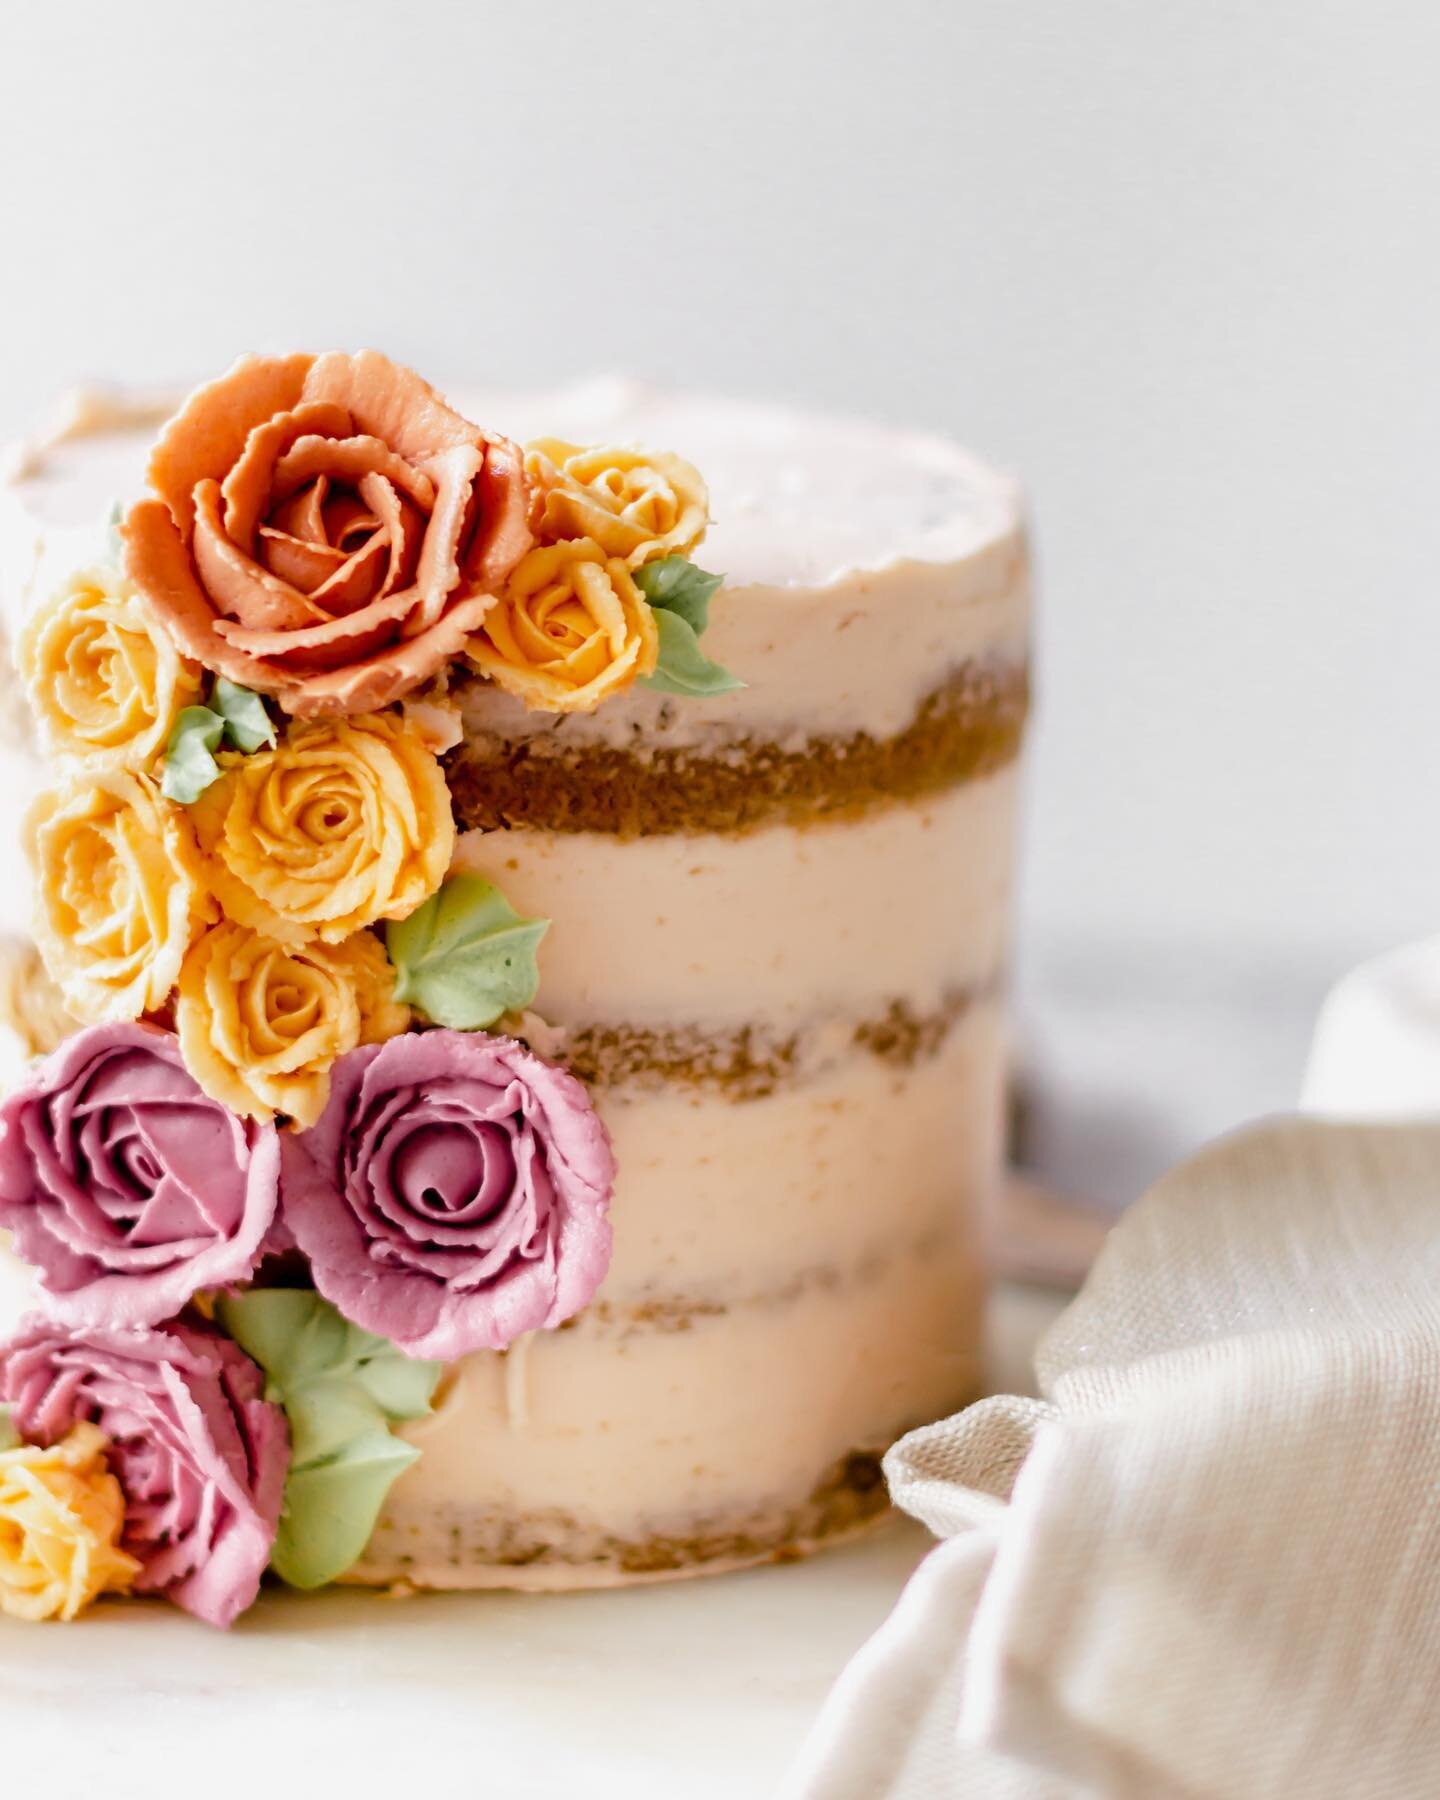
Neapolitan Cake
Like the classic ice cream flavor, this showstopper three layer cake boasts vanilla, strawberry and chocolate, all surrounded by the silkiest cream cheese icing.
I am certainly not the first to tackle a Neapolitan Cake, but I have been dreaming for quite some time about creating a version that I could call my own. Based on the classic ice cream flavor, Neapolitan cake has a different flavor for each layer: strawberry, chocolate and vanilla. This cake is both delicious and beautiful, so let’s dive into what makes this version particularly special.
What Makes This Neapolitan Cake Special?
There are two ways to approach this cake: make three separate batters, one for each cake flavor, or create the three Neapolitan flavors from a base batter. I chose the second approach, creating the chocolate and strawberry flavors from my base vanilla cake. The butter and sugar are creamed together, eggs are added, but then batter is separated into three separate bowls, transformed into vanilla, strawberry and chocolate. The chocolate flavor is created with cocoa powder, and the strawberry flavor is created with ground freeze dried strawberries, and a bit of strawberry extract. This cake is made with Lifeway Kefir, which makes for such a soft and flavorful crumb. I have started using kefir in substitution for buttermilk in most of my cakes, but buttermilk can certainly be used instead, if desired. The cake is finished with a tangy cream cheese icing, making this treat, dare I say, even better than the ice cream?

What You Need To Make Neapolitan Cake
Due to the nature of my work, I have about six KitchenAid bowls that I can attach to my stand mixer at any given time, and a bunch of paddle attachments, and while this does make baking faster, it isn’t necessary. The first half of this recipe is made with a single bowl attached to a stand mixer or a hand-held mixer, and then the batter is distributed evenly into three bowls. The flour and kefir are then mixed by hand, or by using the lowest setting on a handheld mixer. If, like me, you have a lot of KitchenAid equipment, the batters can be completed using the stand mixer, but I didn’t want to make this the expectation. A few clean spatulas are handy for this recipe, but if only one is available, it can be washed and used for each separate batter. I mention this only to say, don’t let equipment hold you back; this recipe can be made with standard equipment.
As far as ingredients, most items listed are pantry staples including butter, sugar, oil, eggs and flour, but there are a few ingredients that will likely require a trip to the grocery store, so plan accordingly. These ingredients include, freeze dried strawberries, cocoa powder, kefir, cake flour and vanilla paste or a vanilla bean. Pure vanilla extract can certainly be used, but having those beautiful speckles of vanilla throughout the batter is such a gorgeous touch, taking this cake to the next level. It’s no secret that many of my cake recipes use a combination of all-purpose flour and cake flour—this is a trusted method in my kitchen because I find it yields the best possible cake texture. Don’t just take my word for it, try it! Cake flour can be found in the baking isle of most mainstream grocery stores, and for those who want to get better at cake making, get familiar with cake flour.
Tips For Making Neapolitan Cake
1.) Read through the entire recipe before starting, making sure all the ingredients are accounted for and gathered. If questions arise, message me on Instagram or email me, as I am here to help.
2.) Measure the ingredients carefully. Because three different flavors are being created on a small scale, measuring correctly is important. Too much flour will yield a dry and dense cake, so be sure to spoon and level the flours for an accurate measurement. More on spoon and leveling can be found here.
3.) The freeze-dried strawberries should be ground to a fine powder. I prefer using a small food processor, but the old-fashioned method of using a rolling pin and a zip log bag is perfectly acceptable, just make sure to pound and roll the strawberries into powder, so they fold seamlessly into the batter.
4.) Invest in quality cake pans. The pans I use aren’t fancy or particularly expensive, but equipment does matter. These are the pans I use, in case one is looking to purchase or they aren’t happy with their existing pans.
5.) Be sure to properly grease and flour the cake pans or the cake WILL stick. More on properly greasing and flouring pans can be found here.

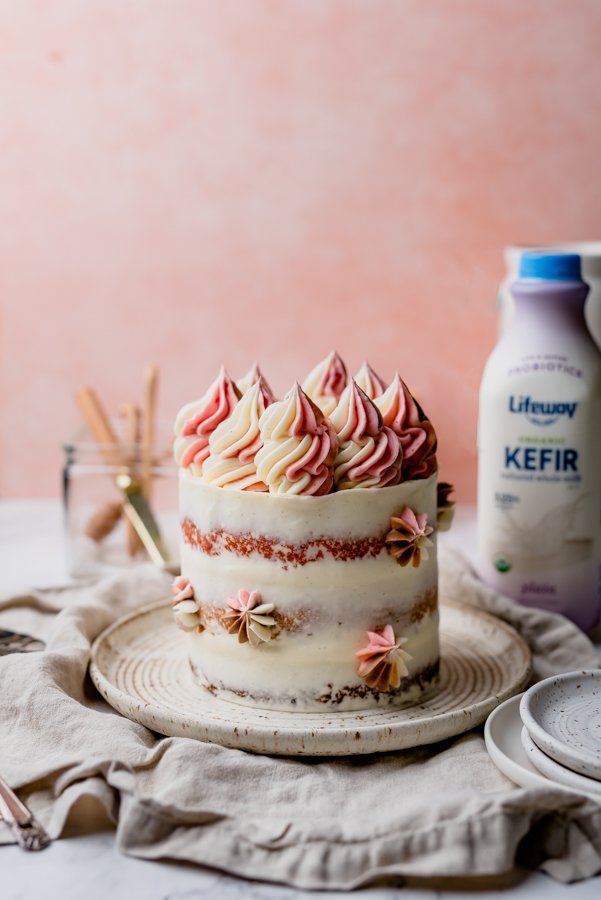
Piping Buttercream Swirls
In food photography, a lot goes into creating images and styling food. I often get asked how to make those perfect buttercream swirls on top of my cakes. When I do this, I am NOT using cream cheese icing. Cream cheese icing is absolutely delicious, but not stable, especially for piping. I prefer my cream cheese icing tangy rather than overly sweet, so my cream cheese icing recipe is looser than many that call for additional powdered sugar.
To make an icing for buttercream swirls, I use any leftover cream cheese icing (if none is left, no problem), and into the same bowl as the cream cheese icing, I add two sticks of butter and four cups of powdered sugar. I essentially make an American Buttercream, but use any leftover cream cheese icing to minimalize waste. Cream the butter and sugar until smooth and then add a bit of milk, half and half or cream—whatever is on hand—into the bowl until the desired consistency is achieved. I go for a thicker icing since it’s being used for piping swirls, and I want it stable.
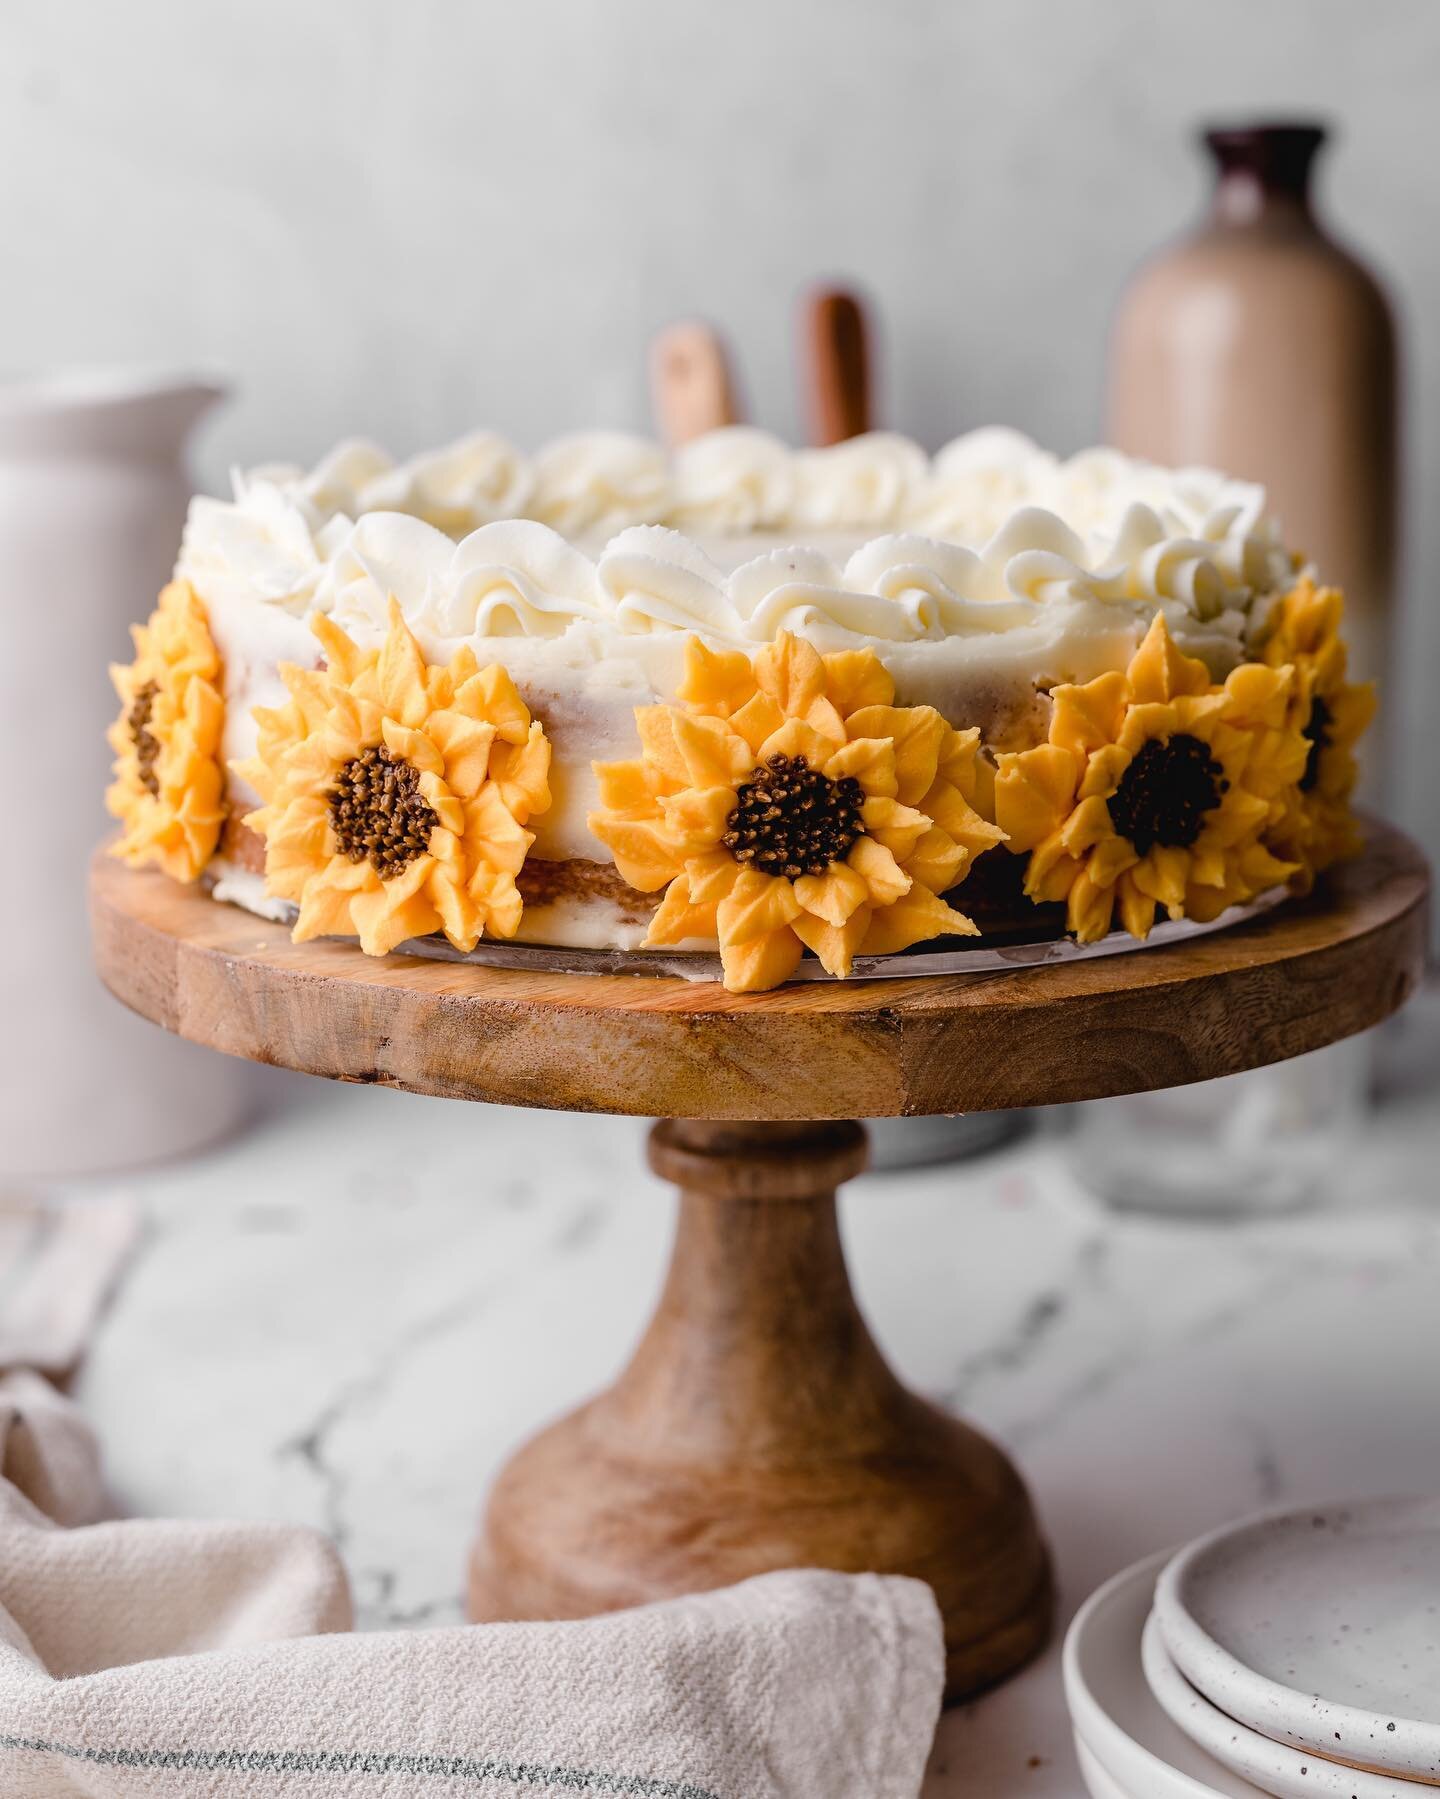
When piping swirls, I use a pastry bag with a large star tip—my favorite tip for swirls is the Wilton 1M. For the base of this Neapolitan cake, I went with a plain cream cheese icing, but for the swirls I went a step further and flavored the buttercream. I used one-part vanilla bean buttercream, one-part strawberry buttercream and one-part chocolate buttercream to not only provide flavor, but to make beautiful three toned swirls. To achieve this look, I use the technique that can be found here, which makes the process seamless and easy. In short, using a long piece of saran wrap, layer the flavors horizontally parallel to each other, leaving a couple of inches of plastic on either side. Once the icing is lined up, 1,2, 3, I carefully wrap the saran wrap onto itself making a cylinder of icing with all the colors contained, and now touching each other in a circle. After twisting the long ends of the plastic wrap, I snip one side, putting that side into the piping bag, towards the piping tip. The bag is then ready to be used and will make beautiful multi-color swirls.
Final Tip
Make sure the cake is fully cooled before decorating. Once the layers have been baked and cooled to room temperature, wrap the layers in saran wrap and place in the fridge one to two hours before stacking and decorating. Alternatively, wrap the cake in saran wrap and then tin foil to be stored in the freezer until ready to decorate. Once the cake is decorated it should be stored in the fridge until two to three hours before enjoying. Any leftovers should be stored in the fridge because of the cream cheese icing.
Neapolitan Cake

Ingredients
- 1/2 cup butter, softened
- 1 1/2 cup granulated sugar
- 1/4 cup canola oil
- 3 eggs, room temperature
- 1 tablespoon vanilla bean paste*
- 1 cup all-purpose flour
- 3/4 cup cake flour
- 1 teaspoon baking powder
- 1/2 teaspoon baking soda
- 1/2 teaspoon salt
- 1 cup Lifeway Kefir, room temperature
- 3 tablespoons unsweetened cocoa powder
- 1 1/2 tablespoons hottest tap water
- 2 tablespoons freeze dried strawberries, ground
- 1/4 teaspoon strawberry extract
- red food coloring (optional)
- 8 ounce block cream cheese, softened
- 1 stick butter, softened
- 3-4 cups powdered sugar
- 1 teaspoon vanilla bean paste
Instructions
- Preheat oven 350 degrees F. Generously butter and flour three 6" cake pans. To guarantee the cake won't stick, line the bottom of the greased cake pans with parchment paper rounds. Set aside.
- In a mixer, fitted with the paddle attachment, cream the butter and sugar on medium speed for 3 minutes. Drizzle the oil into the bowl on medium-low speed. Once incorporated, turn the mixer back to medium speed for another 2 minutes.
- Add eggs one at a time, briefly mixing batter on medium speed until smooth, scraping the bowl after each egg addition. Add vanilla and mix until incorporated.
- Next, distribute the batter evenly into three medium bowls.
- In another three bowls, put 1/3 cup all-purpose flour, 1/4 cup cake flour, 1/4 heaping teaspoon baking powder, 1/8 heaping teaspoon baking soda, and a pinch of salt into each bowl. Into only *one* of the bowls, add 2 tablespoons ground freeze dried strawberries. Whisk to combine each bowl and set aside.
- First, complete the vanilla cake. Fill a glass measuring cup with 1/3 cup kefir. Using one of the pre-measured bowls of dry ingredients (not the one with strawberry powder), add 1/3 of the flour into one of the bowls of batter and gently fold to incorporate. While folding the dry ingredients, drizzle in half of the kefir. Continue with the next 1/3 of flour followed by the rest of the kefir. Finish with the last 1/3 of flour and continue folding the batter until no large flour clumps remain. Set batter aside.
- Next make the chocolate cake. Into a glass measuring cup add 1/3 cup kefir, 3 tablespoons cocoa powder and 1 1/2 tablespoons hottest tap water. Whisk to combine. Using the next pre-measured bowl of dry ingredients (the one with strawberry powder should still be set aside), add 1/3 of the flour into the second bowl of batter and gently fold to incorporate. While folding the dry ingredients, drizzle in half of the chocolate kefir. Continue with the next 1/3 of flour followed by the rest of the chocolate kefir. Finish with the last 1/3 of flour and continue folding the batter until no large flour clumps remain. Set batter aside.
- Last, make the strawberry cake batter. Add 1/4 teaspoon strawberry extract into the remaining bowl of batter and mix briefly. Fill a glass measuring cup with 1/3 cup kefir. Using the last pre-measured bowl of dry ingredients that has strawberry powder, add 1/3 of the flour into the batter and gently fold to incorporate. While folding the dry ingredients, drizzle in half of the kefir. Continue with the next 1/3 of flour followed by the rest of the kefir. Finish with the last 1/3 of flour and continue folding the batter until no large flour clumps remain. At this time, add a touch of red food coloring, if desired. If using gel, the color goes far, so use a tiny amount.
- Pour batter into prepared pans, one flavor per pan. Place pans into oven. Start assessing your cakes at 25 minutes, but they could take up to 30 minutes or longer to bake, depending on the oven temperature. When a toothpick inserted comes out clean, the cake is done. Cool pans for 10 minutes, before running a knife around the edge of the pan, and turning out the cake. Place cake on wire rack to finish cooling. Once cake is cooled, cover with saran wrap and refrigerate for at least 1 hour. This step is optional, but makes icing the cake easier.
- With an electric mixer fitted with the paddle attachment, mix the cream cheese and butter on medium speed until there are no lumps, and the consistency is smooth.
- Add sifted powdered sugar to the bowl, 1 cup at a time, mixing first on low speed to prevent splashing, then turning the mixer to medium-low until it's incorporated. Repeat process with remaining 2 cups of powdered sugar. Add vanilla. Briefly mix one more time to complete the icing. For a fluffier icing, the whisk attachment can be used.
- Place one layer of cake on a clean turn table or cake board with a small dollop of icing underneath. This works as a glue, helping prevent the cake layers from sliding around while icing. Place a dollop of icing on top of the first cake layer, and spread evenly with a small offset spatula or knife. Place the second cake layer on top of icing and repeat process. Once the third and final layer has been set, place another dollop of icing onto the top of the cake, smoothing evenly, letting excess icing drop to the side of the cake.
- With the rest of the icing, using an offset spatula, put a even layer of icing around the entire cake, with a back and forth motion.
- Using a bench scraper (also known as cake smoother) with your dominant hand, hold it steady against the cake, but slightly angled toward the cake, to aid in smoothing, and slowly move the turn table with the other hand, while not moving the scraper, and keeping it as straight and steady as possible. As excess icing builds on the scraper, place it back into the mixing bowl, and continue smoothing the cake with a clean scraper. This cake is intended to be semi-naked, so as you scrape the excess icing off the cake, bits of the cake underneath will be exposed. See blog pictures for reference.
- While smoothing the sides, a lip of icing will form around the top of the cake. Using an offset spatula, gently sweep away the lip with a motion toward the center of the cake. Rotate the cake, and sweep until the lip has been removed, and top of the cake is smooth. Any leftover icing can be used to make an American Buttercream to make buttercream swirls for the top of the cake. See blog post for more details.
Notes
Pure vanilla extract can be used instead of Vanilla Bean Paste, if desired.
You May Like These…