BSP Developer's Guide
BSP Developer's Guide
BSP Developer's Guide

Create successful ePaper yourself
Turn your PDF publications into a flip-book with our unique Google optimized e-Paper software.
VxWorks®<br />
5.5<br />
<strong>BSP</strong> DEVELOPER’S GUIDE
Copyright © 2002 Wind River Systems, Inc.<br />
ALL RIGHTS RESERVED. No part of this publication may be copied in any form, by photocopy,<br />
microfilm, retrieval system, or by any other means now known or hereafter invented without the prior<br />
written permission of Wind River Systems, Inc.<br />
AutoCode, Embedded Internet, Epilogue, ESp, FastJ, IxWorks, MATRIX X , pRISM, pRISM+, pSOS,<br />
RouterWare, Tornado, VxWorks, wind, WindNavigator, Wind River Systems, WinRouter, and Xmath are<br />
registered trademarks or service marks of Wind River Systems, Inc. or its subsidiaries.<br />
Attaché Plus, BetterState, Doctor Design, Embedded Desktop, Emissary, Envoy, How Smart Things Think,<br />
HTMLWorks, MotorWorks, OSEKWorks, Personal JWorks, pSOS+, pSOSim, pSOSystem, SingleStep,<br />
SNiFF+, VSPWorks, VxDCOM, VxFusion, VxMP, VxSim, VxVMI, Wind Foundation Classes, WindC++,<br />
WindManage, WindNet, Wind River, WindSurf, and WindView are trademarks or service marks of Wind<br />
River Systems, Inc. or its subsidiaries. This is a partial list. For a complete list of Wind River trademarks<br />
and service marks, see the following URL:<br />
http://www.windriver.com/corporate/html/trademark.html<br />
Use of the above marks without the express written permission of Wind River Systems, Inc. is prohibited.<br />
All other trademarks, registered trademarks, or service marks mentioned herein are the property of their<br />
respective owners.<br />
Corporate Headquarters<br />
Wind River Systems, Inc.<br />
500 Wind River Way<br />
Alameda, CA 94501-1153<br />
U.S.A.<br />
toll free (U.S.): 800/545-WIND<br />
telephone: 510/748-4100<br />
facsimile: 510/749-2010<br />
For additional contact information, please visit the Wind River URL:<br />
http://www.windriver.com<br />
For information on how to contact Customer Support, please visit the following URL:<br />
http://www.windriver.com/support<br />
VxWorks <strong>BSP</strong> Developer’s <strong>Guide</strong>, 5.5<br />
9 Aug 02<br />
Part #: DOC-14695-ND-00
1 Overview .................................................................................................................. 1<br />
2 <strong>BSP</strong> Organization ................................................................................................. 11<br />
3 Creating a New <strong>BSP</strong> ............................................................................................. 41<br />
4 Hardware <strong>Guide</strong>lines ............................................................................................ 63<br />
5 Driver <strong>Guide</strong>lines .................................................................................................. 89<br />
6 Components ........................................................................................................ 111<br />
7 Validation Testing ............................................................................................... 139<br />
8 Writing Portable C Code .................................................................................... 159<br />
9 Documentation <strong>Guide</strong>lines ................................................................................ 173<br />
10 Product Packaging ............................................................................................. 195<br />
A Upgrading a <strong>BSP</strong> for Tornado 2.0 ..................................................................... 203<br />
B Upgrading a <strong>BSP</strong> for Tornado 2.2 ..................................................................... 211<br />
C Upgrading a <strong>BSP</strong> for the VxWorks Network Stack .......................................... 221<br />
D VxWorks Boot Sequence ................................................................................... 223<br />
E Component Language ........................................................................................ 231<br />
F Generic Drivers ................................................................................................... 247<br />
G Upgrading 4.3 BSD Network Drivers ................................................................. 257<br />
H Implementing a MUX-Based Network Interface Driver .................................... 267<br />
I Writing a SCSI-2 Device Driver .......................................................................... 317<br />
iii
VxWorks 5.5<br />
<strong>BSP</strong> Developer’s <strong>Guide</strong><br />
J <strong>BSP</strong> Validation Test Suite Reference Entries ......................................................... 365<br />
K <strong>BSP</strong> Validation Checklists ....................................................................................... 401<br />
L Refgen ....................................................................................................................... 415<br />
M <strong>BSP</strong> Product Contents ............................................................................................. 423<br />
Index .......................................................................................................................... 427<br />
iv
Contents<br />
1 Overview ................................................................................................................... 1<br />
1.1 Introduction ...................................................................................................... 1<br />
New Features for Tornado 2.x .......................................................... 2<br />
Prerequisites ........................................................................................ 4<br />
<strong>BSP</strong> Kit Components ......................................................................... 4<br />
Documentation ................................................................................... 5<br />
Documentation Conventions ........................................................... 7<br />
2 <strong>BSP</strong> Organization ..................................................................................................... 11<br />
2.1 Introduction ...................................................................................................... 11<br />
2.2 <strong>BSP</strong> Components .............................................................................................. 11<br />
2.2.1 <strong>BSP</strong> Source and Include Files ........................................................... 12<br />
Files in the target/config/all Directory .......................................... 13<br />
Files in the target/config/comps/vxWorks Directory ................. 14<br />
Files in the target/config/comps/src Directory ........................... 14<br />
Files in the target/config/bspname Directory .............................. 15<br />
2.2.2 Derived Files ....................................................................................... 28<br />
2.2.3 Required Routines ............................................................................. 30<br />
2.2.4 Optional Routines .............................................................................. 31<br />
v
VxWorks 5.5<br />
<strong>BSP</strong> Developer’s <strong>Guide</strong><br />
2.3 VxWorks Boot Sequence ................................................................................. 32<br />
2.3.1 Processor Variances ........................................................................... 32<br />
2.3.2 Sequence Overview ........................................................................... 33<br />
2.3.3 Files and Routines ............................................................................. 33<br />
2.4 Mistakes To Be Avoided .................................................................................. 38<br />
3 Creating a New <strong>BSP</strong> ................................................................................................. 41<br />
3.1 Introduction ...................................................................................................... 41<br />
3.2 Setting Up Your Development Environment ............................................... 43<br />
3.3 Writing the <strong>BSP</strong> Pre-Kernel Initialization Code .......................................... 44<br />
3.3.1 Writing the <strong>BSP</strong> Files ......................................................................... 44<br />
3.3.2 Building and Downloading VxWorks ............................................ 49<br />
3.3.3 Debugging the Initialization Code .................................................. 50<br />
ROM Initialization ............................................................................. 50<br />
RAM Initialization ............................................................................. 51<br />
Generic Initialization ......................................................................... 52<br />
3.3.4 Starting the WDB Agent Before the Kernel ................................... 53<br />
3.4 Using a Minimal Kernel .................................................................................. 55<br />
3.4.1 ISR <strong>Guide</strong>lines .................................................................................... 55<br />
3.4.2 Required Drivers ............................................................................... 56<br />
3.4.3 Serial Drivers ...................................................................................... 56<br />
3.5 The Target Agent and Tornado ...................................................................... 57<br />
3.6 Finishing the Port ............................................................................................. 57<br />
3.6.1 Cleanup ............................................................................................... 58<br />
3.6.2 NVRAM .............................................................................................. 58<br />
3.6.3 Adding Other Timers ........................................................................ 58<br />
3.6.4 Network .............................................................................................. 58<br />
vi
Contents<br />
3.6.5 Cache, MMU, and DMA Devices .................................................... 60<br />
3.6.6 Boot ROMs .......................................................................................... 60<br />
3.6.7 SCSI ...................................................................................................... 61<br />
3.6.8 Projects ................................................................................................. 61<br />
4 Hardware <strong>Guide</strong>lines ................................................................................................ 63<br />
4.1 Introduction ...................................................................................................... 63<br />
4.2 Architectural Considerations .......................................................................... 64<br />
4.2.1 Interrupt Handling ............................................................................ 64<br />
4.2.2 Cache Issues ........................................................................................ 65<br />
4.2.3 MMU Support .................................................................................... 66<br />
4.2.4 Floating-Point Support ...................................................................... 66<br />
4.2.5 Other Issues ........................................................................................ 67<br />
4.3 Memory .............................................................................................................. 67<br />
4.3.1 RAM ..................................................................................................... 68<br />
4.3.2 ROM ..................................................................................................... 68<br />
4.3.3 Ethernet RAM ..................................................................................... 68<br />
4.3.4 NVRAM ............................................................................................... 69<br />
4.3.5 Parity Checking .................................................................................. 69<br />
4.3.6 Addressing .......................................................................................... 69<br />
4.3.7 Bus ........................................................................................................ 70<br />
VMEbus ............................................................................................... 70<br />
Multibus II ........................................................................................... 74<br />
PCI, cPCI, and PMC ........................................................................... 76<br />
Busless ................................................................................................. 76<br />
4.4 Devices ............................................................................................................... 76<br />
4.4.1 Interrupts ............................................................................................. 77<br />
4.4.2 System Clock ...................................................................................... 79<br />
vii
VxWorks 5.5<br />
<strong>BSP</strong> Developer’s <strong>Guide</strong><br />
4.4.3 Auxiliary Clock .................................................................................. 79<br />
4.4.4 Timestamp Clocks ............................................................................. 79<br />
4.4.5 Serial Ports .......................................................................................... 79<br />
4.4.6 Ethernet Controllers .......................................................................... 80<br />
4.4.7 SCSI Controllers ................................................................................. 81<br />
4.4.8 DMA Controllers ............................................................................... 82<br />
4.4.9 Reset Button ........................................................................................ 82<br />
4.4.10 Abort Button ....................................................................................... 82<br />
4.4.11 DIP Switches ....................................................................................... 82<br />
4.4.12 User LEDs ........................................................................................... 82<br />
4.4.13 Parallel Ports ...................................................................................... 83<br />
4.5 Enabling the Virtual Memory Library .......................................................... 83<br />
4.5.1 Changes to sysLib.c ........................................................................... 83<br />
4.5.2 Changes to config.h ........................................................................... 85<br />
4.5.3 Additional Requirements for SPARC Targets ................................ 85<br />
Sun-4 MMU ........................................................................................ 85<br />
SPARC Reference MMU ................................................................... 86<br />
5 Driver <strong>Guide</strong>lines ...................................................................................................... 89<br />
5.1 Introduction ...................................................................................................... 89<br />
5.2 Design Goals ..................................................................................................... 90<br />
Designing for Performance .............................................................. 90<br />
Code Flexibility/Portability ............................................................. 90<br />
Maintenance and Readability .......................................................... 91<br />
Ease of Configuration ....................................................................... 91<br />
Performance Testing .......................................................................... 91<br />
Code Size ............................................................................................ 91<br />
Reentrancy .......................................................................................... 91<br />
5.3 Design Problems .............................................................................................. 92<br />
Hardware Designs of All Types ....................................................... 92<br />
viii
Contents<br />
Memory-Mapped Chips ................................................................... 92<br />
I/O-Mapped Chips ............................................................................ 93<br />
Multi-Function Chips ........................................................................ 93<br />
Multiple Buses .................................................................................... 94<br />
Interrupt Controllers ......................................................................... 94<br />
5.4 Design <strong>Guide</strong>lines ............................................................................................ 95<br />
Names and Locations ........................................................................ 95<br />
Documentation and Standards ........................................................ 96<br />
Per-Device Data Structure ................................................................ 97<br />
Per-Driver Data Structure ................................................................. 97<br />
Driver Interrupt Service Routines ................................................... 97<br />
Access Macros .................................................................................... 98<br />
5.5 Step by Step ....................................................................................................... 100<br />
5.6 Cache Considerations ...................................................................................... 101<br />
5.7 Helpful Hints .................................................................................................... 102<br />
5.8 Driver Use of the Cache Library .................................................................... 103<br />
5.8.1 Review of cacheLib Facilities ........................................................... 103<br />
5.8.2 Conducting Driver Analysis ............................................................ 103<br />
Shared Memory Types ....................................................................... 104<br />
Driver Attributes ................................................................................ 105<br />
5.8.3 Developing the cacheLib Strategy ................................................... 106<br />
Flush and Invalidate Macros ............................................................ 107<br />
WRITE_PIPING Attribute ................................................................ 107<br />
SNOOPED Attribute ......................................................................... 108<br />
MMU_TAGGING Attribute ............................................................. 108<br />
USER_DATA_UNKNOWN Attribute ............................................ 108<br />
DEVICE_WRITES_ASYNCHRONOUSLY Attribute ................... 109<br />
SHARED_CACHE_LINES Attribute .............................................. 109<br />
DEVICE_WRITES_ASYNCHRONOUSLY and<br />
SHARED_CACHE_LINES Attributes .............................. 109<br />
SHARED_POINTERS Attribute ...................................................... 110<br />
5.8.4 Additional Cache Library Hints ...................................................... 110<br />
ix
VxWorks 5.5<br />
<strong>BSP</strong> Developer’s <strong>Guide</strong><br />
6 Components .............................................................................................................. 111<br />
6.1 Introduction ...................................................................................................... 111<br />
6.2 Component Description Language ............................................................... 113<br />
6.2.1 Components ....................................................................................... 113<br />
6.2.2 CDL Object Types .............................................................................. 115<br />
Folders ................................................................................................. 116<br />
Selections ............................................................................................ 118<br />
Components ....................................................................................... 120<br />
Parameters .......................................................................................... 123<br />
Initialization Groups ......................................................................... 124<br />
6.3 Creating Components ..................................................................................... 125<br />
6.3.1 CDF Conventions .............................................................................. 126<br />
6.3.2 CDF Precedence and Paths .............................................................. 126<br />
6.3.3 Defining a Component ...................................................................... 127<br />
6.3.4 Modifying a Component .................................................................. 134<br />
6.4 Releasing Components .................................................................................... 135<br />
6.4.1 Testing New Components ................................................................ 136<br />
6.4.2 Packaging a Component ................................................................... 137<br />
7 Validation Testing ..................................................................................................... 139<br />
7.1 Introduction ...................................................................................................... 139<br />
7.2 Background ....................................................................................................... 140<br />
7.2.1 Design Goals ....................................................................................... 140<br />
7.2.2 Validation Test Suite Software Architecture .................................. 141<br />
7.3 Configuring the <strong>BSP</strong> VTS ................................................................................ 143<br />
7.3.1 Hardware Setup ................................................................................. 143<br />
7.3.2 Installing the <strong>BSP</strong> VTS ...................................................................... 145<br />
x
Contents<br />
7.3.3 System Configuration ........................................................................ 147<br />
Configuring the Host System ........................................................... 147<br />
Configuring the Target Hardware ................................................... 147<br />
Configuring VxWorks ....................................................................... 148<br />
Configuring the <strong>BSP</strong> VTS .................................................................. 149<br />
7.4 Running the <strong>BSP</strong> VTS ...................................................................................... 153<br />
7.4.1 Starting the <strong>BSP</strong> VTS ......................................................................... 153<br />
7.4.2 Monitoring a <strong>BSP</strong> Test ....................................................................... 155<br />
8 Writing Portable C Code .......................................................................................... 159<br />
Background ......................................................................................... 159<br />
8.1 Portable C Code ................................................................................................ 160<br />
8.1.1 Data Structures ................................................................................... 160<br />
Specify Field Widths .......................................................................... 161<br />
Avoid Bit Fields .................................................................................. 161<br />
8.1.2 In-Line Assembly ............................................................................... 162<br />
8.1.3 Static Data Alignment ....................................................................... 163<br />
8.1.4 Runtime Alignment Checking ......................................................... 163<br />
Checking the Alignment of a Data Item ......................................... 163<br />
Verifying Pointer Alignment ............................................................ 163<br />
Unaligned Accesses and Copying ................................................... 164<br />
8.1.5 Other Issues ........................................................................................ 165<br />
Follow Strict ANSI Compilation ...................................................... 165<br />
Remove Compiler Warnings ............................................................ 165<br />
Avoid Use of Casts ............................................................................. 165<br />
Avoid inline Keyword ....................................................................... 165<br />
Avoid alloca( ) Function .................................................................... 166<br />
Take Care with void Pointer Arithmetic ......................................... 166<br />
Use volatile and const Attributes .................................................... 167<br />
Misuse of the register Attribute ....................................................... 167<br />
Avoid vector Name ............................................................................ 167<br />
Statement Labels ................................................................................ 168<br />
Summary of Compiler Macros ......................................................... 168<br />
xi
VxWorks 5.5<br />
<strong>BSP</strong> Developer’s <strong>Guide</strong><br />
8.2 Tool Implementation ....................................................................................... 171<br />
8.2.1 New Tool Macros File ....................................................................... 171<br />
8.2.2 New Tool Directories ......................................................................... 171<br />
8.2.3 <strong>BSP</strong> Makefile Changes ...................................................................... 171<br />
8.2.4 Macro Definitions for GNU and Diab ............................................ 172<br />
9 Documentation <strong>Guide</strong>lines ...................................................................................... 173<br />
9.1 Introduction ...................................................................................................... 173<br />
9.2 Written Style ..................................................................................................... 173<br />
Sentences ............................................................................................. 174<br />
Punctuation ........................................................................................ 174<br />
Word Usage ........................................................................................ 174<br />
Spelling ................................................................................................ 175<br />
Acronyms ............................................................................................ 178<br />
Board Names ...................................................................................... 179<br />
9.3 Format ................................................................................................................ 180<br />
Layout ................................................................................................. 180<br />
Special Elements ................................................................................ 180<br />
Displays ............................................................................................... 182<br />
9.4 Subsections ........................................................................................................ 183<br />
Library and Subroutine Reference Pages ....................................... 183<br />
Target Information Reference Page: target.nr ................................ 186<br />
9.5 Generating Reference Pages ........................................................................... 189<br />
9.5.1 Files ...................................................................................................... 189<br />
Source Directory ................................................................................ 189<br />
Documentation Directories .............................................................. 190<br />
9.5.2 Tools ..................................................................................................... 190<br />
9.5.3 Text Formatting .................................................................................. 190<br />
Markup Commands .......................................................................... 190<br />
Tables ................................................................................................. 192<br />
xii
Contents<br />
9.5.4 Processing ........................................................................................... 193<br />
10 Product Packaging ................................................................................................... 195<br />
10.1 SETUP Developer’s Kit ................................................................................... 195<br />
10.2 <strong>BSP</strong> Packaging .................................................................................................. 195<br />
<strong>BSP</strong> Contents ....................................................................................... 196<br />
Default Configuration ....................................................................... 196<br />
Included Files ..................................................................................... 197<br />
Excluded Files ..................................................................................... 197<br />
Source of the Files .............................................................................. 198<br />
Vendor-Supplied Shared Files .......................................................... 199<br />
10.2.1 <strong>BSP</strong> Media ........................................................................................... 200<br />
10.3 Component Packaging .................................................................................... 200<br />
10.4 Project Packaging ............................................................................................. 201<br />
A Upgrading a <strong>BSP</strong> for Tornado 2.0 ........................................................................... 203<br />
A.1 Porting Issues .................................................................................................... 203<br />
A.2 Code Interface Changes ................................................................................... 204<br />
A.3 Project Issues ..................................................................................................... 205<br />
A.4 Product Contents .............................................................................................. 205<br />
A.4.1 Product Restrictions ........................................................................... 206<br />
A.4.2 Product Requirements ....................................................................... 207<br />
A.5 Summary ........................................................................................................... 208<br />
B Upgrading a <strong>BSP</strong> for Tornado 2.2 ........................................................................... 211<br />
B.1 Architecture-Independent Changes to <strong>BSP</strong>s ................................................ 211<br />
B.2 Architecture-Dependent <strong>BSP</strong> Issues .............................................................. 214<br />
B.2.1 Migration Changes Common to All Architectures ....................... 214<br />
xiii
VxWorks 5.5<br />
<strong>BSP</strong> Developer’s <strong>Guide</strong><br />
B.2.2 68K/CPU32 ........................................................................................ 215<br />
B.2.3 ARM .................................................................................................... 215<br />
B.2.4 ColdFire ............................................................................................... 216<br />
B.2.5 MIPS .................................................................................................... 216<br />
B.2.6 Pentium ............................................................................................... 217<br />
B.2.7 PowerPC ............................................................................................. 218<br />
B.2.8 XScale/StrongARM ........................................................................... 219<br />
B.2.9 SuperH ................................................................................................ 220<br />
C Upgrading a <strong>BSP</strong> for the VxWorks Network Stack ................................................ 221<br />
D VxWorks Boot Sequence ......................................................................................... 223<br />
E Component Language .............................................................................................. 231<br />
E.1 Component Description Language (CDL) ................................................... 231<br />
E.1.1 Component Properties ...................................................................... 232<br />
E.1.2 Parameter Properties ......................................................................... 234<br />
E.1.3 Folder Properties ............................................................................... 235<br />
E.1.4 Selection Properties ........................................................................... 235<br />
E.1.5 InitGroup Properties ......................................................................... 236<br />
E.2 Folder Hierarchy .............................................................................................. 236<br />
E.3 Project Initialization Order ............................................................................. 238<br />
E.3.1 romInit.s .............................................................................................. 239<br />
E.3.2 romStart.c ............................................................................................ 239<br />
E.3.3 usrEntry.c ............................................................................................ 239<br />
E.3.4 sysALib.s ............................................................................................. 240<br />
E.3.5 prjConfig.c .......................................................................................... 240<br />
xiv
Contents<br />
F Generic Drivers ......................................................................................................... 247<br />
F.1 Introduction ...................................................................................................... 247<br />
F.2 Serial Drivers ..................................................................................................... 248<br />
F.3 Multi-Mode Serial (SIO) Drivers .................................................................... 249<br />
F.4 Timer .................................................................................................................. 251<br />
F.5 Non-Volatile Memory ...................................................................................... 252<br />
F.6 VMEbus ............................................................................................................. 253<br />
F.7 DMA ................................................................................................................... 254<br />
F.8 Interrupt Controllers ........................................................................................ 254<br />
F.9 Multi-Function .................................................................................................. 254<br />
F.10 PCI Bus ............................................................................................................... 255<br />
G Upgrading 4.3 BSD Network Drivers ...................................................................... 257<br />
G.1 Introduction ...................................................................................................... 257<br />
G.1.1 Structure of a 4.3 BSD Network Driver .......................................... 258<br />
G.1.2 Etherhook Routines Provide Access to Raw Packets .................... 259<br />
G.2 Upgrading to 4.4 BSD ...................................................................................... 260<br />
G.2.1 Removing the xxOutput( ) Routine ................................................. 261<br />
G.2.2 Changing the Transmit Startup Routine ......................................... 262<br />
G.2.3 Changes in Receiving Packets .......................................................... 262<br />
G.2.4 Creating a Transmit Startup Routine .............................................. 263<br />
G.3 Porting a Network Interface Driver to the END Model ............................. 264<br />
Rewrite xxattach( ) to Use an endLoad( ) Interface ....................... 265<br />
xxReceive( ) Still Handles Task-Level Packet Reception .............. 265<br />
Rewrite xxOutput( ) to Use an endSend( ) Interface ..................... 265<br />
xv
VxWorks 5.5<br />
<strong>BSP</strong> Developer’s <strong>Guide</strong><br />
xxIoctl( ) is the Basis of endIoctl( ) .................................................. 266<br />
H Implementing a MUX-Based Network Interface Driver .......................................... 267<br />
H.1 Introduction ...................................................................................................... 267<br />
H.2 How VxWorks Launches and Uses Your Driver ......................................... 270<br />
H.2.1 Launching Your Driver ..................................................................... 271<br />
H.2.2 Your ISR Puts Work on the Network Job Queue ........................... 272<br />
H.2.3 Executing Calls Waiting in the Network Job Queue .................... 273<br />
H.2.4 Adding Your Network Interface Driver to VxWorks ................... 273<br />
H.3 <strong>Guide</strong>lines for Handling Packet Reception in Your Driver ....................... 275<br />
H.3.1 Setting Up and Using a Memory Pool for Receive and<br />
Transmit Buffers 276<br />
H.3.2 Swapping Buffers Between Protocol and Driver .......................... 280<br />
H.3.3 Using Private Memory Management Routines ............................. 280<br />
H.3.4 Supporting Scatter-Gather in Your Driver ..................................... 280<br />
H.4 Indicating Error Conditions ........................................................................... 280<br />
H.5 Required Driver Entry Points and Structures .............................................. 282<br />
H.5.1 Required Structures for a Driver ..................................................... 283<br />
Tracking Your Device’s Control Structure: DEV_OBJ .................. 285<br />
Identifying the Entry Points into Your Network<br />
Driver: NET_FUNCS .......................................................... 286<br />
Tracking Link-Level Information: LL_HDR_INFO ...................... 287<br />
Tracking Data That Passes Between the Driver and the<br />
Protocol: mBlk ...................................................................... 288<br />
H.5.2 Required Driver Entry Points .......................................................... 289<br />
Loading the Device: endLoad( ) ...................................................... 290<br />
Unloading the Device: endUnload( ) .............................................. 291<br />
Providing an Opaque Control Interface to Your<br />
Driver: endIoctl( ) ................................................................ 292<br />
Sending Data Out on the Device: endSend( ) ................................ 293<br />
Starting a Stopped but Loaded Driver: endStart( ) ....................... 294<br />
xvi
Contents<br />
Stopping the Driver Without Unloading It: endStop( ) ................ 294<br />
Handling a Polling Send: endPollSend( ) ....................................... 295<br />
Handling a Polling Receive: endPollReceive( ) ............................. 296<br />
Adding a Multicast Address: endMCastAddrAdd( ) ................... 296<br />
Deleting a Multicast Address: endMCastAddrDel( ) ................... 297<br />
Getting the Multicast Address Table: endMCastAddrGet( ) ....... 298<br />
Forming an Address into a Packet for Transmission:<br />
endAddressForm( ) ............................................................. 299<br />
Getting a Data-Only mBlk: endPacketDataGet( ) ......................... 299<br />
Return Addressing Information: endPacketAddrGet( ) ............... 300<br />
H.6 Writing Protocols That Use the MUX API .................................................... 301<br />
Protocol Startup .................................................................................. 302<br />
Sending Data ...................................................................................... 303<br />
Receiving Data .................................................................................... 303<br />
Supporting Scatter/Gather Devices ................................................ 304<br />
Protocol Transmission Restart .......................................................... 304<br />
Protocol Shutdown ............................................................................ 305<br />
H.6.1 Protocol to MUX API ......................................................................... 305<br />
The Protocol Data Structure NET_PROTOCOL ............................ 306<br />
Passing a Packet Up to the Protocol: stackRcvRtn( ) .................... 307<br />
Passing Error Messages Up to the Protocol: stackError( ) ........... 308<br />
Shutting Down a Protocol: stackShutdownRtn( ) ......................... 309<br />
Restarting Protocols: stackTxRestartRtn( ) ..................................... 310<br />
H.6.2 Network Layer to Data Link Layer Address Resolution ............. 310<br />
H.7 Converting an END Driver from RFC 1213 to RFC 2233 ........................... 311<br />
I Writing a SCSI-2 Device Driver ............................................................................... 317<br />
I.1 Introduction ...................................................................................................... 317<br />
I.2 Overview of SCSI ............................................................................................. 318<br />
I.3 The SCSI Libraries ............................................................................................ 321<br />
I.3.1 SCSI Manager (scsiMgrLib) .............................................................. 322<br />
I.3.2 SCSI Controller Library (scsiCtrlLib) .............................................. 324<br />
I.3.3 SCSI Direct Access Library (scsiDirectLib) .................................... 324<br />
xvii
VxWorks 5.5<br />
<strong>BSP</strong> Developer’s <strong>Guide</strong><br />
I.3.4 SCSI Sequential Access Library (scsiSeqLib) ................................. 324<br />
I.3.5 SCSI Common Access Library (scsiCommonLib) ........................ 324<br />
I.3.6 An Execution Example ..................................................................... 325<br />
I.4 The SCSI Driver Programming Interface ...................................................... 325<br />
I.4.1 Basic SCSI Controller Driver ............................................................ 325<br />
I.4.2 Advanced SCSI Controller Driver ................................................... 334<br />
I.5 The <strong>BSP</strong> Interface ............................................................................................. 357<br />
I.6 <strong>Guide</strong>lines for Developing a SCSI Driver .................................................... 359<br />
I.7 Test Suites .......................................................................................................... 360<br />
scsciDiskThruputTest( ) .................................................................... 360<br />
scsiDiskTest( ) ..................................................................................... 361<br />
scsiSpeedTest( ) .................................................................................. 362<br />
tapeFsTest( ) ........................................................................................ 363<br />
I.8 Troubleshooting and Debugging ................................................................... 364<br />
J <strong>BSP</strong> Validation Test Suite Reference Entries ......................................................... 365<br />
K <strong>BSP</strong> Validation Checklists ....................................................................................... 401<br />
L Refgen ....................................................................................................................... 415<br />
M <strong>BSP</strong> Product Contents ............................................................................................. 423<br />
Index .......................................................................................................................... 427<br />
xviii
1<br />
Overview<br />
1.1 Introduction<br />
One strength of VxWorks is that it provides a high degree of architectural and<br />
hardware independence for application code. This portability is due to VxWorks’s<br />
modular design, which isolates all hardware-specific functionality into a set of<br />
libraries called the Board Support Package (<strong>BSP</strong>). The <strong>BSP</strong> libraries provide an<br />
identical software interface to the hardware functions of all boards. They include<br />
facilities for hardware initialization, interrupt handling and generation, hardware<br />
clock and timer management, mapping of local and bus memory spaces, memory<br />
sizing, and so on.<br />
Broadly speaking, there are several types of VxWorks porting activity:<br />
■<br />
Host Porting: Porting Tornado and VxWorks development capability to a<br />
previously unsupported host.<br />
■<br />
■<br />
■<br />
■<br />
Architecture Porting: Porting VxWorks and the Tornado debugger to a<br />
previously unsupported target processor type or architecture.<br />
Board Porting: Porting VxWorks to a new target board, for which there is<br />
already an architecture port and a host port available.<br />
Upgrading pre-Tornado <strong>BSP</strong>s to work with Tornado.<br />
Porting an optional Component to a Tornado release.<br />
Host ports and architecture ports require access to the entire VxWorks source code<br />
and are outside the scope of this manual. Board porting, the focus of this manual,<br />
requires access to just the hardware-dependent source within VxWorks and the<br />
debugger. This source code is the <strong>BSP</strong>.<br />
1
VxWorks 5.5<br />
<strong>BSP</strong> Developer’s <strong>Guide</strong><br />
Over the years, Wind River has been able to offer a wide range of <strong>BSP</strong>s to<br />
customers. However, with the proliferation of many new CPU boards (many of<br />
which are custom designs) Wind River alone has not been able to keep up with the<br />
demand for new <strong>BSP</strong>s.<br />
The Tornado <strong>BSP</strong> Developer’s Kit for VxWorks (<strong>BSP</strong> Kit) is intended to help you<br />
create, document, and test new <strong>BSP</strong>s, components, and projects. The process of<br />
porting VxWorks to a new board can be challenging, primarily because the<br />
VxWorks development tools are unavailable until after the porting is finished.<br />
Wind River has developed strategies that make porting easier. This <strong>BSP</strong> Kit<br />
provides these strategies and a detailed look at how the system elements interact.<br />
It also includes the technical information that a third party needs in order to create<br />
and distribute components and projects based upon Tornado 2.x.<br />
This release of the <strong>BSP</strong> Kit is compatible with Tornado 2.0 or later. Upgrading<br />
earlier <strong>BSP</strong>s to work with the Tornado 2.x product is a relatively simple task. For<br />
more information, see A. Upgrading a <strong>BSP</strong> for Tornado 2.0 or B. Upgrading a <strong>BSP</strong> for<br />
Tornado 2.2.<br />
New Features for Tornado 2.x<br />
■<br />
SCSI 1 Dropped Support for SCSI-1 drivers and libraries has been dropped. These<br />
libraries are still included in Tornado 2.0, but they are classified as obsolete and<br />
will not be included in future releases.<br />
■<br />
Macro TYCO5_2 Deleted The TYCO5_2 macro is no longer supported. Customers<br />
should be using SIO drivers for Tornado 2.x.<br />
■<br />
<strong>BSP</strong> Packaging Changes Refer to 10.2 <strong>BSP</strong> Packaging, p.195 for details on<br />
packaging requirements. See M. <strong>BSP</strong> Product Contents for a quick summary of a<br />
typical product contents.<br />
■<br />
Documentation All on-line documentation is now provided as HTML pages. A<br />
utility called refgen that generates HTML from existing nroff input is included in<br />
the system.<br />
■<br />
VxWorks Network Stack The network stack, which was an option for Tornado 1.0.1<br />
users, is now the only stack supported. It is referred to as the VxWorks network<br />
stack. All <strong>BSP</strong>s have been converted to use drivers modified for the VxWorks<br />
network stack (BSD 44 stack). In <strong>BSP</strong>s where both BSD44 and END drivers are<br />
available, the END driver has been selected as the default driver for the <strong>BSP</strong>.<br />
2
1<br />
Overview<br />
■<br />
New Drivers Many new END network drivers have been added to the driver<br />
product in order to provide as many <strong>BSP</strong>s as possible with at least one available<br />
END driver.<br />
1<br />
■<br />
Integrated Simulators Tornado 2.x includes an integrated simulator with the base<br />
product. This allows developers to begin application development before the<br />
hardware environment is ready.<br />
■<br />
Integrated WindView The Tornado 2.x product contains an integrated WindView<br />
tool for examining run-time behavior. Refer to the WindView User’s <strong>Guide</strong> for<br />
information on how to use all the features of WindView.<br />
■<br />
VTS Test Updates The Validation Test Suite has received only minor updates that<br />
allow it to work correctly with the new virtual I/O features of the target shell.<br />
■<br />
SCSI Test Suites The SCSI performance test suites, which were omitted from the<br />
previous release of the porting kit, are now included on the CD-ROM.<br />
■<br />
ROM_WARM_ADRS This new macro has been introduced into the template <strong>BSP</strong>s<br />
and some existing <strong>BSP</strong>s. It represents the warm entry point into the boot ROM<br />
code, and is needed to remove the artificial computation of the entry point based<br />
on CPU family. Normally, ROM_WARM_ADRS is based on an offset from<br />
ROM_TEXT_ADRS, for example:<br />
#define ROM_WARM_ADRS (ROM_TEXT_ADRS + 8)<br />
■<br />
New SIO IOCTLs New SIO IOCTL codes have been created to support modem<br />
control lines. The IOCTLs SIO_OPEN and SIO_HUP notify the driver when the<br />
device is opened and closed. The new IOCTLs SIO_HW_OPTS_SET and<br />
SIO_HW_OPTS_GET allow the user to manage character length, parity, stop bits,<br />
and modem control lines. The options bit CLOCAL disables modem control lines<br />
from being used in the driver. For backward compatibility, the CLOCAL option is<br />
selected by default in Wind River-supplied <strong>BSP</strong>s.<br />
■<br />
Target.txt File Removed. The text version of the target.nr file (generated for<br />
Windows host users) has been eliminated. Both UNIX and Windows hosts now use<br />
a browser for reading documentation in HTML format. The host utility refgen<br />
takes nroff input and generates HTML output.<br />
3
VxWorks 5.5<br />
<strong>BSP</strong> Developer’s <strong>Guide</strong><br />
Prerequisites<br />
Users of the <strong>BSP</strong> Kit should have a working knowledge of low-level C<br />
programming and assembly languages, familiarity with device drivers, familiarity<br />
with interrupts, and general experience interfacing software with hardware. In<br />
addition, you should be familiar with the Tornado development tools (at least to<br />
the point of having read through the Tornado User’s <strong>Guide</strong>). Finally, you should<br />
have a reference <strong>BSP</strong> that is a released Tornado <strong>BSP</strong> based on the same CPU used<br />
by your target.<br />
You should also have the template <strong>BSP</strong> for your architecture and the template<br />
drivers. Most customers also purchase one or more of the driver source code<br />
products as well.<br />
<strong>BSP</strong> Kit Components<br />
The <strong>BSP</strong> Kit consists of a documentation set and a CD-ROM with software. The<br />
documentation set consists of an installation guide and this manual, which is<br />
summarized in Documentation, p.5. The software consists of the following:<br />
■<br />
■<br />
■<br />
■<br />
<strong>BSP</strong> Validation Test Suite (VTS). The purpose of these programs is to exercise<br />
the basic functionality of a <strong>BSP</strong>, and, in the process, note and report any<br />
defects. These programs run on both the target machine and the supported<br />
hosts. Feel free to enhance existing tests or create new ones. However, the basic<br />
set of tests provided by the VTS is the standard by which <strong>BSP</strong>s are judged.<br />
The test suite is highly automated. Once started, a <strong>BSP</strong> test requires no user<br />
intervention, ensuring repeatability of the tests and also reducing the tedium<br />
of running the tests by hand.<br />
The VTS is distributed in source form to facilitate maintenance and extension.<br />
When performing official validation testing, the tests should not be modified<br />
from their original code.<br />
Template <strong>BSP</strong>s. These templates are provided for all architecture types. These<br />
templates provide a starting point for <strong>BSP</strong> development. Each template<br />
compiles, but nearly every optional feature has been disabled. This allows<br />
quick-starting from a copy of the template directory, without having to make<br />
major changes.<br />
Template Drivers. Template drivers are provided for all device types.<br />
SCSI Test suite. A suite of SCSI test programs is included. Please refer to the<br />
test programs in the target/src/test/scsi directory.<br />
4
1<br />
Overview<br />
Included with Tornado (not the <strong>BSP</strong> Kit) is a reference <strong>BSP</strong> appropriate to the<br />
architecture you specified when you ordered Tornado. This is a full working <strong>BSP</strong>.<br />
Use this reference <strong>BSP</strong> as the source for many of the header files and object<br />
modules in the <strong>BSP</strong> you create.<br />
For instructions on how to install the <strong>BSP</strong> Kit, the reference <strong>BSP</strong>, or any other Wind<br />
River software product, see the Tornado Getting Started <strong>Guide</strong>.<br />
1<br />
Documentation<br />
This Manual<br />
The <strong>BSP</strong> Kit documentation includes the Tornado Getting Started <strong>Guide</strong> and this<br />
manual.<br />
This user’s guide contains information on all aspects of writing, documenting, and<br />
testing a <strong>BSP</strong>. This manual also details the standards that should be used for both<br />
C source code and documentation, and provides information on how to write<br />
network interface drivers, SCSI device drivers, and other drivers. The chapters of<br />
this manual are summarized below:<br />
■<br />
■<br />
■<br />
■<br />
■<br />
■<br />
1. Overview (this chapter)<br />
2. <strong>BSP</strong> Organization is an overview of <strong>BSP</strong> construction and requirements. It<br />
discusses required and optional files and routines. This is the basic overview<br />
of what constitutes a <strong>BSP</strong> and how it interacts with VxWorks.<br />
3. Creating a New <strong>BSP</strong> presents strategies for beginning a <strong>BSP</strong> port. Several<br />
methods for getting started using different hardware configurations are<br />
discussed. Getting started without having a working VxWorks boot ROM is<br />
the most difficult part of porting to a new board.<br />
4. Hardware <strong>Guide</strong>lines discusses CPU architectural considerations and how<br />
different hardware elements can influence the <strong>BSP</strong> porting effort.<br />
5. Driver <strong>Guide</strong>lines provides guidelines for device drivers in general. Specific<br />
details of drivers are found elsewhere in various appendices describing<br />
particular device types.<br />
6. Components describes how a <strong>BSP</strong> interacts with components. This chapter<br />
provides the basis for component creation and usage.<br />
5
VxWorks 5.5<br />
<strong>BSP</strong> Developer’s <strong>Guide</strong><br />
■<br />
■<br />
■<br />
■<br />
■<br />
■<br />
■<br />
■<br />
■<br />
■<br />
7. Validation Testing describes the operation and use of the <strong>BSP</strong> Validation Test<br />
Suite (VTS), a collection of programs that run on the host and target machines<br />
to exercise the basic functionality of <strong>BSP</strong>s and to detect and report defects<br />
found in them. Documentation for the test suite programs and the individual<br />
tests can be found in J. <strong>BSP</strong> Validation Test Suite Reference Entries. A checklist to<br />
be followed for <strong>BSP</strong> testing is found in K. <strong>BSP</strong> Validation Checklists.<br />
8. Writing Portable C Code describes how to write compiler-independent<br />
portable C code. The goal is to write code that does not require changes in<br />
order to work correctly with different compilers.<br />
9. Documentation <strong>Guide</strong>lines covers Wind River conventions for style and<br />
format, and the procedures for generating <strong>BSP</strong> documentation from source<br />
modules. The template <strong>BSP</strong>s supplied with the <strong>BSP</strong> Kit provide examples of<br />
the writing style, text format, module layout, and text commands discussed<br />
throughout this section.<br />
10. Product Packaging discusses the content and format of the <strong>BSP</strong> product that<br />
is delivered to the end user.<br />
A. Upgrading a <strong>BSP</strong> for Tornado 2.0 describes how to convert an existing<br />
Tornado 1.0.1./SENS <strong>BSP</strong> to a Tornado 2.0 <strong>BSP</strong>.<br />
B. Upgrading a <strong>BSP</strong> for Tornado 2.2 discusses the migration of a <strong>BSP</strong> from<br />
Tornado 2.0 to 2.2. It includes information on both architecture-independent<br />
and architecture-dependent issues.<br />
C. Upgrading a <strong>BSP</strong> for the VxWorks Network Stack describes the <strong>BSP</strong> update<br />
procedure for the network stack. This is only for <strong>BSP</strong>s that were not previously<br />
updated for the Tornado 1.0.1 SENS stack product.<br />
D. VxWorks Boot Sequence provides a detailed look at the full VxWorks boot<br />
sequence. It identifies each step by its function, its name, and its source<br />
location.<br />
E. Component Language provides a technical summary of the Component<br />
Description Language (CDL) used in component description files (CDFs). It<br />
also presents a hierarchical view of the default component folders and their<br />
initialization groups and sequencing.<br />
F. Generic Drivers provides details on how to write other drivers used in the<br />
VxWorks system.<br />
■<br />
G. Upgrading 4.3 BSD Network Drivers is an application note on converting a 4.3<br />
BSD style driver to the 4.4 BSD interface required by the new network stack.<br />
6
1<br />
Overview<br />
■<br />
■<br />
■<br />
■<br />
■<br />
■<br />
H. Implementing a MUX-Based Network Interface Driver describes the<br />
requirements for a new Enhanced Network Driver (an END) that uses the<br />
MUX to access all the features of the new network stack. Enhanced drivers<br />
include polling and multicast support not available in the basic NETIF drivers.<br />
I. Writing a SCSI-2 Device Driver describes how a VxWorks SCSI-2 device<br />
driver fits into the VxWorks I/O system hierarchy, and how to write a SCSI-2<br />
driver that interfaces with the VxWorks SCSI-2 library (scsi2Lib), which<br />
provides the high-level SCSI-2 interface routines that are device independent.<br />
J. <strong>BSP</strong> Validation Test Suite Reference Entries provides the detailed<br />
documentation for using the <strong>BSP</strong> Validation Test Suite (<strong>BSP</strong>-VTS).<br />
K. <strong>BSP</strong> Validation Checklists provides copies of the <strong>BSP</strong> validation checklists<br />
used at Wind River. PostScript copies of the forms are included on the<br />
CD-ROM.<br />
L. Refgen documents use of the refgen tool for generating HTML reference<br />
pages from traditional <strong>BSP</strong> source code.<br />
M. <strong>BSP</strong> Product Contents lists the typical contents of a <strong>BSP</strong> product.<br />
1<br />
Other Documentation<br />
The following documents provide important background information on<br />
VxWorks and Tornado.<br />
■<br />
Tornado Getting Started <strong>Guide</strong>, 2.2<br />
■<br />
Tornado Release Notes, 2.2<br />
■<br />
Tornado User’s <strong>Guide</strong>, 2.2<br />
■<br />
VxWorks Programmer’s <strong>Guide</strong>, 5.5<br />
■<br />
VxWorks API Reference: Drivers, 5.5<br />
■<br />
VxWorks API Reference: OS Libraries, 5.5<br />
■<br />
Wind River Technical Notes (available from the WindSurf Web site)<br />
Documentation Conventions<br />
The remainder of this chapter describes this document’s conventions for cross<br />
references, path names, and type.<br />
Cross-References<br />
Cross-references in this guide to a reference entry for a tool or module refer to an<br />
entry in the VxWorks API Reference (for target libraries or subroutines) or to the<br />
reference appendix in the Tornado User’s <strong>Guide</strong> (for host tools) or the <strong>BSP</strong>-specific<br />
7
VxWorks 5.5<br />
<strong>BSP</strong> Developer’s <strong>Guide</strong><br />
Path Names<br />
entries in the Tornado man directories. These references are also provided in the<br />
Tornado Online Manuals. For more information about how to access online<br />
documentation, see the Tornado User’s <strong>Guide</strong>: Documentation <strong>Guide</strong>.<br />
Other references from one book to another are always at the chapter level, and take<br />
the form Book Title: Chapter Name.<br />
The top-level Tornado directory structure includes three major directories (see the<br />
Tornado User’s <strong>Guide</strong>: Directories and Files). Because all VxWorks files reside in the<br />
target directory, this manual uses relative path names starting below that directory.<br />
For example, if you install Tornado in /usr/wind, the full path name for the file<br />
shown as config/all/configAll.h is /usr/wind/target/config/all/configAll.h.<br />
NOTE: In this manual, forward slashes are used as path name delimiters for both<br />
UNIX and Windows filenames.<br />
Typographical Conventions<br />
This manual uses the conventions shown in Table 1-1 to differentiate various<br />
elements. Parentheses are always included to indicate a subroutine name, as in<br />
printf( ).<br />
Table 1-1<br />
Font Usage for Special Terms<br />
Term<br />
files, path names<br />
libraries, drivers<br />
host tools<br />
Example<br />
/etc/hosts<br />
memLib, nfsDrv<br />
more, chkdsk<br />
subroutines semTake( )<br />
boot commands<br />
p<br />
code display main ();<br />
keyboard input make CPU=MC68040 ...<br />
display output value = 0<br />
user-supplied parameters<br />
constants<br />
name<br />
INCLUDE_NFS<br />
8
1<br />
Overview<br />
Table 1-1<br />
Font Usage for Special Terms (Continued)<br />
Term<br />
Example<br />
1<br />
C keywords, cpp directives<br />
named key on keyboard<br />
control characters<br />
lower-case acronyms<br />
#define<br />
RETURN<br />
CTRL+C<br />
fd<br />
9
VxWorks 5.5<br />
<strong>BSP</strong> Developer’s <strong>Guide</strong><br />
10
2<br />
<strong>BSP</strong> Organization<br />
2.1 Introduction<br />
This chapter describes the components of a <strong>BSP</strong>. It lists and describes the contents<br />
of all the <strong>BSP</strong>-associated source and include files. For the .h files, this chapter<br />
describes the consequences of defining or undefining the standard symbolic<br />
constants. For the .c files, it describes all the required and optional functions<br />
associated with the file. This chapter describes the derived files, such as sysLib.o<br />
(the interface between board-dependent and board-independent code) and<br />
bootrom.<br />
There is a section enumerating the principal <strong>BSP</strong>-associated routines and their<br />
order of invocation (for a tabular summary of the boot sequence, see D. VxWorks<br />
Boot Sequence). This information is provided to give you the system awareness<br />
needed to debug the VxWorks boot phase.<br />
At the end of this chapter is a discussion of mistakes commonly made by the<br />
novice <strong>BSP</strong> developer.<br />
2.2 <strong>BSP</strong> Components<br />
A <strong>BSP</strong> consists of the routines that provide VxWorks with its main interface to the<br />
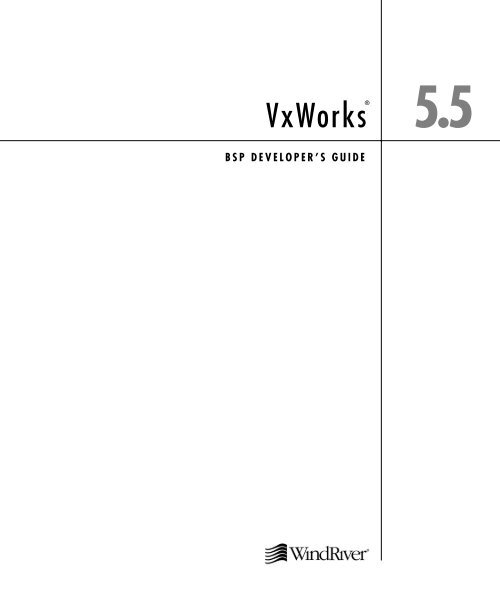
hardware environment. Figure 2-1 illustrates the various components of VxWorks,<br />
indicating the hardware-dependent and -independent elements.<br />
11
VxWorks 5.5<br />
<strong>BSP</strong> Developer’s <strong>Guide</strong><br />
Figure 2-1<br />
VxWorks Components<br />
Hardware-Independent Software<br />
Tools - Applications<br />
I/O System<br />
VxWorks Libraries<br />
TCP/IP<br />
File<br />
System<br />
Hardware-Dependent Software<br />
wind Kernel<br />
SCSI<br />
Driver<br />
<strong>BSP</strong><br />
Network<br />
Driver<br />
Hardware<br />
SCSI<br />
Controller<br />
Serial<br />
Controller<br />
Clock<br />
Timer<br />
Ethernet<br />
Controller<br />
The <strong>BSP</strong> routines are contained in a number of C and assembly files that you must<br />
create (or modify, if starting with a template <strong>BSP</strong>). The rest of this section<br />
summarizes <strong>BSP</strong> files and directories.<br />
2.2.1 <strong>BSP</strong> Source and Include Files<br />
This section describes the directories target/config/all and target/config/bspname.<br />
Strictly speaking, the files in target/config/all are not part of the <strong>BSP</strong>, but the<br />
modules defined there are shared by all <strong>BSP</strong>s. Familiarity with these modules is<br />
essential if you want to understand your particular <strong>BSP</strong>. When building project<br />
images, the component configlettes in target/config/comps/src replace the files in<br />
target/config/all.Aconfiglette is any C source code compiled by the project facility<br />
as a part of the project build step. Such files provide only some limited part of the<br />
final project configuration.<br />
12
2<br />
<strong>BSP</strong> Organization<br />
Files in the target/config/all Directory<br />
The files in target/config/all are delivered as part of the VxWorks architecture<br />
product. Do not alter these files unless absolutely necessary. Of special concern is<br />
configAll.h. This file sets the default configuration for all VxWorks images. The<br />
values you define here should be generic and therefore true for most if not all<br />
VxWorks developers at your site. If you need a VxWorks image that differs from<br />
the default configuration, use your <strong>BSP</strong>’s config.h to override (#define or #undef)<br />
the default values in configAll.h.<br />
Files in config/all are not directly used when building a project. They are scanned<br />
only once when a new project is made from a <strong>BSP</strong>. Any changes to the files in<br />
target/config/all after a project has been created do not affect the project. If a<br />
change is desired, the user must make the change directly in the project area.<br />
2<br />
! CAUTION: Changing configAll.h from the command line can have unpleasant<br />
side effects for other VxWorks users at your site. This note only applies to building<br />
from the command line. One benefit of the Tornado project facility is that changes<br />
do not affect existing projects. Only new projects created from a <strong>BSP</strong> after the<br />
change to configAll.h inherit that change.<br />
bootConfig.c – Main Initialization for Boot ROM Images<br />
The bootConfig.c file is the main initialization and control file for all boot ROM<br />
images. It includes the complete boot ROM shell task. It contains a table (NETIF)<br />
for network device initialization. This module is a subset of usrConfig.c. Boot<br />
ROM images do not provide all of the optional features available in the full<br />
VxWorks images. Of particular note is that boot images do not use MMU libraries<br />
(except for SPARC).<br />
The Tornado project facility does not have the ability to create and manipulate a<br />
boot ROM project. For projects created from a <strong>BSP</strong>, there is a button that performs<br />
the traditional command-line creation of a boot ROM image from the Build menu.<br />
Please take note that project-specific configuration information has no effect at all<br />
when the boot ROM image gets built. Only the traditional config.h, configAll.h,<br />
bootConfig.c, and bootInit.c files affect the building of a boot ROM image.<br />
bootInit.c – Second-Stage ROM Initialization<br />
The bootInit.c file is the second stage of boot ROM initialization, after romInit.o.<br />
The romInit( ) routine in romInit.s terminates by jumping to romStart( ), defined<br />
in this file. The routine romStart( ) performs the necessary code uncompression<br />
and relocation for ROM images. First it copies the text and data segments from<br />
13
VxWorks 5.5<br />
<strong>BSP</strong> Developer’s <strong>Guide</strong><br />
ROM to RAM. Then it clears those parts of main RAM not otherwise used. Finally<br />
it uncompresses the compressed portion of the image. Different configuration<br />
options can modify how these operations are performed.<br />
In a project being built for Tornado 2.x, the configlette romStart.c replaces the<br />
functionality of bootInit.c. (For a ROMed VxWorks image only. Not for a boot<br />
ROM image).<br />
dataSegPad.s – VxVMI Text Segment Protection<br />
The dataSegPad.s file is used only for VxVMI text segment protection. It insures<br />
that text and data segments do not share an MMU page.<br />
usrConfig.c – Initialization Code for VxWorks Image<br />
The userConfig.c file contains the main initialization code for traditional VxWorks<br />
images. Unlike bootConfig.c, which is fully self-contained, usrConfig.c includes<br />
target/src/config/usrExtra.c, which includes other files that provide subsystem<br />
initialization and configuration.<br />
This file is used only when building from the command line, as was done in<br />
Tornado 1.0. When building projects using the project facility, project initialization<br />
groups determine the order of component initialization. Each component has a set<br />
of properties that specify which initialization group it belongs to and where in that<br />
group it belongs.<br />
Files in the target/config/comps/vxWorks Directory<br />
Files under this directory are the basic component descriptor files (CDF files) for<br />
the VxWorks real-time kernel. Refer to 6. Components for more information on how<br />
components are created, used, and delivered. Refer to E.1 Component Description<br />
Language (CDL), p.231 for details on the syntax for CDF files.<br />
Files in the target/config/comps/src Directory<br />
The files in this directory represent the configlettes associated with the kernel<br />
components. They represent code fragments formerly found in<br />
target/config/all/usrConfig.c and in target/src/config.<br />
14
2<br />
<strong>BSP</strong> Organization<br />
Files in the target/config/bspname Directory<br />
The target/config/bspname subdirectory contains the system or<br />
hardware-dependent files for the <strong>BSP</strong>.<br />
2<br />
README<br />
The README file contains the <strong>BSP</strong> release record. It records each release version<br />
and revision and documents work done on the <strong>BSP</strong> as a whole. This file was first<br />
introduced with Tornado 1.0.<br />
Makefile and depend.bspname<br />
The makefile controls the building of images from the command line. Beginning<br />
with VxWorks 5.2, the standard make utility was GNU make, and the current<br />
make technology continues to use many of the advanced features available in<br />
GNU make. The <strong>BSP</strong> make system includes make subfiles located in the<br />
target/h/make directory. If a dependencies file does not already exist, make<br />
automatically generates a depend.bspname file that it uses to track all module<br />
dependencies. The depend.bspname dependency file is not shipped with the <strong>BSP</strong>, it<br />
is a generated file. For more information on customizing the makefile, see the<br />
Tornado User’s <strong>Guide</strong>, 2.2.<br />
Within the makefile, you must define the following macros:<br />
CPU<br />
The target CPU architecture (for example, MC68040).<br />
TOOL<br />
The host tool chain (for example, gnu).<br />
TARGET_DIR<br />
The target directory (<strong>BSP</strong>) name.<br />
VENDOR<br />
The target manufacturer’s name.<br />
BOARD<br />
The target name.<br />
ROM_TEXT_ADRS<br />
Specifies the boot ROM entry address in hexadecimal. For most boards, this is<br />
set to the beginning of the ROM address area. However, if your hardware<br />
configuration uses an area at the start of ROM for the reset vector, you should<br />
offset accordingly.<br />
15
VxWorks 5.5<br />
<strong>BSP</strong> Developer’s <strong>Guide</strong><br />
config.h<br />
ROM_WARM_ADRS<br />
The warm entry point to the boot ROM code.<br />
ROM_SIZE<br />
The ROM area’s size in hexadecimal.<br />
RAM_LOW_ADRS<br />
The address at which to load VxWorks.<br />
RAM_HIGH_ADRS<br />
The destination address used when copying the boot ROM image to RAM.<br />
The config.h file contains all includes and definitions specific to the CPU board.<br />
The standard organization of config.h contents is roughly as follows:<br />
(1) <strong>BSP</strong> version and revision ID numbers<br />
(2) configAll.h (#included)<br />
(3) memory caching and MMU configuration<br />
(4) shared memory network definitions<br />
(5) on-board memory addresses and size<br />
(6) ROM addresses and size<br />
(7) non-volatile memory (NVRAM) parameters<br />
(8) the default bootline parameters<br />
(9) timestamp driver support<br />
(10) external bus address mapping<br />
(11) network device and interrupt vectors<br />
(12) bspname.h file (#included)<br />
NOTE: A config.h file should include both configAll.h and bspname.h.<br />
<strong>BSP</strong> Release Numbers. The release number for a <strong>BSP</strong> consists of its version<br />
number and revision number. A <strong>BSP</strong>’s version number identifies a <strong>BSP</strong>’s<br />
generation. A <strong>BSP</strong>’s revision number is an incrementing number that identifies a<br />
particular release of a <strong>BSP</strong> within its generation.<br />
16
2<br />
<strong>BSP</strong> Organization<br />
Version 1.0 <strong>BSP</strong>s are written for all standard VxWorks releases up to and including<br />
VxWorks 5.2. Version 1.1 <strong>BSP</strong>s are written for Tornado 1.0 and Tornado 1.0.1.<br />
Version 1.2 identifies a <strong>BSP</strong> designed for use with Tornado 2.x. The main interface<br />
differences between 1.1 and 1.2 <strong>BSP</strong>s is support for the networking stack and<br />
different packaging. With each new version sequence, the revision number begins<br />
with 0 and is incremented each time the <strong>BSP</strong> is released for production.<br />
To specify a <strong>BSP</strong> version number, you can define <strong>BSP</strong>_VERSION to be the string<br />
“1.2” or “1.1”. Otherwise, you can define either of the macros <strong>BSP</strong>_VER_1_1 or<br />
<strong>BSP</strong>_VER_1_2, whichever is appropriate. To set the revision number, use <strong>BSP</strong>_REV,<br />
which you should set to a string value such as “/0”. The revision number includes<br />
the slash character. The full <strong>BSP</strong> release number is the concatenation of the two<br />
string macros <strong>BSP</strong>_VER and <strong>BSP</strong>_REV: for example, “1.2/0”.<br />
Thus, to set a <strong>BSP</strong>’s release number to “1.2/0”, define the following:<br />
2<br />
#define <strong>BSP</strong>_VER_1_1<br />
#define <strong>BSP</strong>_VER_1_2<br />
#define <strong>BSP</strong>_VERSION "1.2"<br />
#define <strong>BSP</strong>_REV "/0" /* Increment for each new release */<br />
configAll.h. Include configAll.h (located in the target/config/all directory) in your<br />
config.h so the reasonable configuration defaults for a <strong>BSP</strong> are adopted. Use<br />
config.h as the main user-editable configuration file for your <strong>BSP</strong>.<br />
Use config.h as the main user-editable configuration file for your <strong>BSP</strong>. To pick up<br />
the reasonable configuration defaults for a <strong>BSP</strong> at your site, your config.h should<br />
include configAll.h (located in the target/config/all directory). 1<br />
Within your config.h you can override these site defaults, with values more<br />
appropriate to this particular <strong>BSP</strong>. You should also present your config.h to<br />
subsequent users of your <strong>BSP</strong> as the configuration file that they should edit either<br />
to override configAll.h or to configure whatever optional features you have built<br />
into your <strong>BSP</strong>.<br />
When building project images, components and parameters selected using the<br />
project override any values assigned in either configAll.h, config.h, or even<br />
bspname.h. Any macro known to the project facility is assigned the project value,<br />
overriding any other assignment.<br />
1. Here, the term “user” refers to developers who use your <strong>BSP</strong> to build their VxWorks applications.<br />
In addition, if a value is not optional but always required and must not be edited,<br />
set it in bspname.h, not config.h.<br />
17
VxWorks 5.5<br />
<strong>BSP</strong> Developer’s <strong>Guide</strong><br />
! CAUTION: A config.h file should not include configAll.h until after<br />
<strong>BSP</strong>_VERSION and <strong>BSP</strong>_REV have been defined. If they are not defined,<br />
configAll.h, assigns default values.<br />
If you include <strong>BSP</strong>-specific configuration options in config.h, try to make those<br />
options as user-friendly as possible. Ideally, users should immediately understand<br />
the use of an option from its name alone. In addition, do not expect users to<br />
perform calculations to set a configuration option. For example, you should make<br />
the code (or the compiler) figure out register values based on whether a<br />
meaningfully named constant is defined.<br />
Cache and MMU Configuration. The default cache and MMU configuration are<br />
architecture dependent. They are usually configured to maximize board<br />
performance. Depending on the architecture, cache and the MMU can be<br />
completely independent or highly integrated. Usually, when the MMU is enabled,<br />
it assumes control of caching on a page-by-page basis. This means that the macros<br />
USER_I_CACHE_MODE and USER_D_CACHE_MODE do not usually affect caching<br />
when the MMU is enabled. For detailed information on cache and MMU<br />
interactions, refer to the relevant VxWorks Architecture Supplement document.<br />
Most <strong>BSP</strong>s undefine the configAll.h default settings for cache and MMU, and<br />
redefine them in config.h just to allow users to make their own selections more<br />
easily. Doing so brings the settings to the direct attention of users when they make<br />
configuration changes. Of course, if cache mode is not a user-changeable option,<br />
these macros should be defined in bspname.h instead of config.h.<br />
Shared Memory Network Definitions. This section describes the parameters needed<br />
to configure the shared memory network driver (for additional information, refer<br />
to the VxWorks Network Programmer’s <strong>Guide</strong>: Data Link Layer Network Components).<br />
The shared memory network allows a number of CPU boards in a system to<br />
communicate via shared memory. The following constants are important when the<br />
shared memory network is initialized:<br />
SM_ANCHOR_ADRS<br />
The backplane anchor address. The anchor contains a pointer to the actual<br />
shared memory pool. If the on-board memory is being dual-ported, then the<br />
allocated memory’s low address + 0x600 is the default used by Wind River. If<br />
a memory board is used, then the base address of this memory is used.<br />
SM_MEM_ADRS<br />
The location of the shared memory. Specifying NONE means that the memory<br />
is to be dynamically located from the master’s on-board dual-ported memory<br />
using malloc( ).<br />
18
2<br />
<strong>BSP</strong> Organization<br />
SM_MEM_SIZE<br />
The size of the shared memory pool.<br />
SM_INT_TYPE<br />
The method of communication with other CPU boards on the backplane.<br />
Define SM_INT_TYPE to equal one of the macros listed in Table 2-1.<br />
2<br />
Table 2-1<br />
Shared Memory Interrupt Types<br />
SM_INT_TYPE SM_INT_ARG1 SM_INT_ARG2 SM_INT_ARG3 Meaning<br />
SM_INT_NONE - - - Polling<br />
SM_INT_BUS level vector - Bus interrupt<br />
SM_INT_MAILBOX_1 address space address value 1-byte write<br />
mailbox<br />
SM_INT_MAILBOX_2 address space address value 2-byte write<br />
mailbox<br />
SM_INT_MAILBOX_4 address space address value 4-byte write<br />
mailbox<br />
SM_INT_MAILBOX_R1 address space address - 1-byte read<br />
mailbox<br />
SM_INT_MAILBOX_R2 address space address - 2-byte read<br />
mailbox<br />
SM_INT_MAILBOX_R4 address space address - 4-byte read<br />
mailbox<br />
For information on changes made to the shared memory subsystem for Tornado<br />
2.2, see the Tornado Migration <strong>Guide</strong>.<br />
RAM Addresses and Size.<br />
LOCAL_MEM_LOCAL_ADRS<br />
The start of the on-board memory area.<br />
LOCAL_MEM_SIZE<br />
The fixed (static) memory size.<br />
19
VxWorks 5.5<br />
<strong>BSP</strong> Developer’s <strong>Guide</strong><br />
LOCAL_MEM_AUTOSIZE<br />
Run-time (dynamic) memory sizing. For more information, see Wind River<br />
Technical Note #42.<br />
USER_RESERVED_MEM<br />
Reserved memory size (bytes). For more information, see Wind River Technical<br />
Note #41.<br />
RAM_HIGH_ADRS<br />
The destination address used for copying the boot ROM image. It is usually<br />
the on-board memory start address plus 0x00100000. This must be the same<br />
value as defined in the makefile (see Makefile and depend.bspname, p.15).<br />
ROM Addresses and Size.<br />
ROM_BASE_ADRS<br />
The ROM start address in hexadecimal.<br />
ROM_TEXT_ADRS<br />
The boot ROM entry address in hexadecimal. For most boards, this is set to the<br />
beginning of the ROM address area. However, there are boards that use some<br />
area at the start of the ROM address area for the reset vector. This must be the<br />
same value as defined in the makefile (see Makefile and depend.bspname, p.15).<br />
ROM_LINK_ADRS<br />
If used, this macro specifies the boot ROM link address in hexidecimal form.<br />
For most boards, this is set to the beginning of the ROM address area. If this<br />
address is present, the linker uses it to link the boot ROM image. Otherwise,<br />
ROM_TEXT_ADRS is used as the link address.<br />
ROM_WARM_ADRS<br />
The warm boot entry address. This is usually defined as an offset from<br />
ROM_TEXT_ADRS.<br />
ROM_SIZE<br />
The size of the ROM area in hexadecimal. This must be the same value as<br />
defined in the makefile (see Makefile and depend.bspname, p.15).<br />
Non-Volatile Memory. The routines sysNvRamSet( ) and sysNvRamGet( ) have an<br />
offset parameter. If NV_BOOT_OFFSET is greater than zero, you can access the bytes<br />
before the boot line by specifying a negative offset. To override the default value of<br />
NV_BOOT_OFFSET, first undefine the macro in config.h, then define it.<br />
20
2<br />
<strong>BSP</strong> Organization<br />
For boards without NVRAM, include the file mem/nullNvRam.c so that calls to<br />
NVRAM routines return ERROR. This file is provided on the <strong>BSP</strong> Kit CD-ROM in<br />
the target/src/drv/mem directory.<br />
There is a generic NVRAM driver called templateNvRam.c. See comments in this<br />
file for a description of the requirements and macros needed to use this driver. The<br />
templateNvRam.c file is appropriate for all boards where NVRAM is byte<br />
accessible, as opposed to block accessible.<br />
NV_RAM_SIZE<br />
The total bytes of NVRAM available. Define NV_RAM_SIZE in config.h. For<br />
boards without NVRAM, define NV_RAM_SIZE as NONE.<br />
BOOT_LINE_SIZE<br />
The number of bytes of NVRAM that are reserved for the VxWorks boot line.<br />
The default value is 255 and is defined in configAll.h. BOOT_LINE_SIZE must<br />
be less than or equal to NV_RAM_SIZE. To override the default value of<br />
BOOT_LINE_SIZE, first undefine the macro in config.h, then define it.<br />
2<br />
NV_BOOT_OFFSET<br />
The byte offset to the beginning of the VxWorks boot line in NVRAM. The<br />
default value is 0 and is defined in configAll.h.<br />
Default Bootline Parameters. The DEFAULT_BOOT_LINE macro provides an<br />
example bootline, which end users can alter to reflect their target environment.<br />
This is particularly useful for targets without NVRAM, because it means the end<br />
user does not have to re-enter the boot parameters on each power cycle.<br />
Timestamp Support. Each <strong>BSP</strong> should have timestamp support for the WindView<br />
product. The user configures timestamp support by defining or undefining the<br />
macro INCLUDE_TIMESTAMP. See the comments in the timer driver source file for<br />
a description of the additional support required by that specific driver.<br />
External Bus Address Mapping. VMEbus mapping is controlled by a series of nine<br />
macros for master window mapping and another set of nine standard macros for<br />
slave window mapping. The user configures VME by defining INCLUDE_VME in<br />
config.h. The VME mappings for A16, A24, and A32 space master access are<br />
controlled by a sequence of three macros each.<br />
It is assumed that the <strong>BSP</strong> honors all of these macros. If the hardware is fixed and<br />
one or more sets of these macros must have fixed values, then those macros should<br />
be moved from config.h to bspname.h. Only macros that the user can reasonably<br />
change should be in config.h.<br />
21
VxWorks 5.5<br />
<strong>BSP</strong> Developer’s <strong>Guide</strong><br />
Use the following macros to define the windows onto the VMEbus from the local<br />
CPU (bus master accesses):<br />
VME_A16_MSTR_SIZE<br />
VME_A16_MSTR_BUS<br />
VME_A16_MSTR_LOCAL<br />
VME_A24_MSTR_SIZE<br />
VME_A24_MSTR_BUS<br />
VME_A24_MSTR_LOCAL<br />
VME_A32_MSTR_SIZE<br />
VME_A32_MSTR_BUS<br />
VME_A32_MSTR_LOCAL<br />
Size of the window into A16 space.<br />
First bus address of A16 window.<br />
Local address of A16 window.<br />
Size of the window into A24 space.<br />
First bus address in A24 window.<br />
Local address of A24 window.<br />
Size of the window into A32space.<br />
First bus address in A32 window.<br />
Local address of A32 window.<br />
Use the following macros to define the windows from the VMEbus into local<br />
memory. By default, only CPU 0 exports its memory to an external bus. These<br />
macros control bus slave windows that make local memory visible to the VMEbus.<br />
Because of its small size, main memory is rarely mapped into an A16 slave<br />
window. Setting the size of any window to 0 should disable that window.<br />
VME_A16_SLV_SIZE<br />
VME_A16_SLV_BUS<br />
VME_A16_SLV_LOCAL<br />
VME_A24_SLV_SIZE<br />
VME_A24_SLV_BUS<br />
VME_A24_SLV_LOCAL<br />
VME_A32_SLV_SIZE<br />
VME_A32_SLV_BUS<br />
VME_A32_SLV_LOCAL<br />
Size of the window onto A16 space.<br />
Bus address of A16 window.<br />
Local address mapped into A16 window.<br />
Size of the window onto A24 space.<br />
Bus address of A24 window.<br />
Local address mapped into A24 window.<br />
Size of the window onto A32space.<br />
Bus address of A32 window.<br />
Local address mapped into A32 window.<br />
A standard set of macros to describe PCI address mapping has not yet been<br />
formalized. Contact Wind River for the latest PCI interface standards. For<br />
additional information, see Wind River Technical Note #44 and<br />
target/src/drv/vme/templateVme.c.<br />
PCI Address Macros. For PCI, you should describe at least 1 and sometimes 4<br />
windows reaching from local bus space to PCI spaces. These are called the master<br />
windows because the local CPU is the bus master for these transactions.<br />
PCI_MSTR_MEM_SIZE<br />
PCI_MSTR_MEM_BUS<br />
PCI_MSTR_MEM_LOCAL<br />
PCI_MSTR_IO_SIZE<br />
PCI_MSTR_IO_BUS<br />
Size of the window onto PCI memory space.<br />
Bus address of PCI memory window.<br />
Local address mapped into PCI memory<br />
window.<br />
Size of the window onto PCI I/O space.<br />
Bus address of PCI I/O window.<br />
22
2<br />
<strong>BSP</strong> Organization<br />
PCI_MSTR_IO_LOCAL Local address mapped into PCI I/O window.<br />
PCI_MSTR_MEMIO__SIZE Size of the window onto PCI memory<br />
(non-prefetched).<br />
PCI_MSTR_MEMIO_BUS Bus address of PCI non-prefetched memory<br />
window.<br />
PCI_MSTR_MEMIO_LOCAL Local address mapped into non-prefetched<br />
window.<br />
Not all PCI spaces are implemented in every situation. Note that there are different<br />
windows mapping main memory. The default window is for prefetchable memory<br />
operations. The second window, PCI_MSTR_MEMIO, is for performing<br />
non-prefetchable operations. One or both of these windows to main memory is<br />
always mapped. Our standard signal to disable a window is to set the size value<br />
to zero, which should disable access from local memory to that space.<br />
For more information on PCI macros, please refer to Wind River Technical Note #49.<br />
2<br />
romInit.s<br />
Network Device and Interrupt Vector. If this <strong>BSP</strong> uses external boards for network<br />
devices, then the bus addresses and interrupt vector assignments are user options<br />
presented in config.h.<br />
bspname.h. This file is normally included after all option selections. This allows<br />
tests to be inserted into bspname.h to check for proper selection combinations. An<br />
example would be a board that has two different Ethernet options, only one of<br />
which can be selected at a time. In this case, the bspname.h file would check to see<br />
if both were defined and generate an error message, if necessary.<br />
Another example would be to add additional features required to support a<br />
user-selected feature. For example, the user might select NFS support, and the<br />
bspname.h file would add RPC and network support as being required to support<br />
NFS. This is precisely what usrExtra.c does for usrConfig.c. Of course, this is just<br />
a hypothetical illustration of the concept, not an actual example.<br />
This file contains the assembly language source for initialization code that is the<br />
entry point for the VxWorks boot ROMs and ROM-based versions of VxWorks.<br />
The entry point, romInit( ), is the first code executed on power-up. It sets the<br />
BOOT_COLD parameter to be passed to the generic romStart( ) routine. If the<br />
hardware requires immediate memory mapping or setting special registers,<br />
handle it here. Most hardware initialization occurs using the sysHwInit( ) routine<br />
in sysLib.c.<br />
23
VxWorks 5.5<br />
<strong>BSP</strong> Developer’s <strong>Guide</strong><br />
sysALib.s<br />
There are three main functions that must be performed by romInit( ):<br />
■<br />
Disable interrupts and set up the CPU.<br />
■<br />
Set up the memory system. This usually involves turning off caches and<br />
setting up memory controllers as needed. For the SPARC architecture, the<br />
MMU must be enabled.<br />
■<br />
Set up the stack pointer and other registers to begin executing C code. The<br />
address of the romStart( ) routine is calculated and the routine is called. There<br />
is no return from romStart( ).<br />
It is important to note that romInit( ) must be coded as position-independent code<br />
(PIC). This is needed to support the complex boot strategies of VxWorks. If an<br />
address cannot be made PC-relative, then it must be recomputed by subtracting<br />
the symbol romInit and adding the value ROM_TEXT_ADRS. This is usually done<br />
by a macro ROM_ADRS.<br />
#define ROM_ADRS(x) ((x) - _romInit + ROM_TEXT_ADRS)<br />
It is a common mistake for <strong>BSP</strong> writers to attempt too much initialization in<br />
romInit.s. Most other initialization functions are quite easily deferred to the<br />
sysHwInit( ) function. Additionally, code in romInit.s should not call out to other<br />
modules or routines. This causes linking problems for the compressed boot ROM<br />
image and negates any benefits of compression.<br />
Calling out from romInit.s to C level routines is possible but discouraged. Certain<br />
C code uses absolute addressing rather than PC relative code and is therefore not<br />
PIC. If a C routine is needed, then it should not be part of sysLib.c. Such a routine<br />
should be placed in a separate module and included into the system by adding the<br />
module to the makefile variable BOOT_EXTRA.<br />
Another common mistake made by <strong>BSP</strong> writers is to assume that devices<br />
initialized by romInit.s do not need to be reinitialized by sysALib.s or sysLib.c.A<br />
VxWorks image does not assume that it was booted by the VxWorks bootrom<br />
program. It must reset and reinitialize all devices and features for itself. Failure to<br />
do this makes proper operation of a VxWorks image dependent on code executed<br />
by a bootrom image. Linking of bootrom and VxWorks images in this way is not<br />
desirable.<br />
This file contains the assembler source of target-specific, system-dependent<br />
routines. All <strong>BSP</strong> routines should be coded in C. However, if there are compelling<br />
technical reasons for resorting to assembler, you can place the routines in<br />
sysALib.s.<br />
24
2<br />
<strong>BSP</strong> Organization<br />
The entry point of the VxWorks image, _sysInit, is located in sysALib.s. It is the<br />
first code executed after booting (see sysALib.s: sysInit( ), p.34). It is usual here to<br />
perform all the functions performed by romInit.s, except for system memory<br />
setup. The memory system should be initialized at this stage of the startup<br />
procedure.<br />
Unlike romInit.s, code in sysALib.s does not need to be written as PIC or to use<br />
the ROM_ADRS macro to remap absolute addresses. It can call out to other<br />
modules and routines.<br />
2<br />
sysLib.c<br />
sysSerial.c<br />
sysScsi.c<br />
This file contains the C source of target-specific, system-dependent sysLib<br />
routines. These routines provide the board-level interface on which VxWorks and<br />
application code can be built in a system-independent way. Note that sysLib.c can<br />
include drivers from the src/drv directory and that these drivers can include some<br />
of the routines listed below. For more information, see 5. Driver <strong>Guide</strong>lines and<br />
F. Generic Drivers.<br />
Driver setup and initialization is usually done in a subfile, which is included in<br />
sysLib.c. Common subfiles are named: sysSerial.c, sysScsi.c, sysNet.c, and so on.<br />
The purpose of using subfiles is keeping the setup and initialization of a particular<br />
device constant across all architectures. The setup file for one board using a<br />
particular device should be the same for any other board using that same device.<br />
Not every feature of a particular board is necessarily supported by this <strong>BSP</strong><br />
abstraction. Some boards provide functions with jumpers or PALs instead of<br />
software controllable/readable registers. Other hardware configurations might<br />
not support some normally expected basic features.<br />
When features are missing, it is usually safe to code an empty stub that returns<br />
ERROR or NULL (whichever is appropriate), if any return value is required.<br />
This optional file contains all the serial I/O setup and initialization for the SIO<br />
device drivers. It is not separately compiled, but is included from sysLib.c. The<br />
purpose of separating serial initialization from sysLib.o is to modularize the code<br />
and allow reuse of code between <strong>BSP</strong>s.<br />
This optional file contains the SCSI-2 setup and initialization for the <strong>BSP</strong>. Like<br />
sysSerial.c, it is included in sysLib.c.<br />
25
VxWorks 5.5<br />
<strong>BSP</strong> Developer’s <strong>Guide</strong><br />
sysNet.c<br />
bspname.h<br />
Optional setup and initialization for network interface devices.<br />
Use bspname.h to set all non-optional, board-specific information as defined in this<br />
file, including definitions for the serial interface, timer, and I/O devices. The<br />
directory target/h/drv is where much of the information is located. The header files<br />
of the drivers needed to port VxWorks to your board should be included at the<br />
beginning of bspname.h.<br />
This file is intended for constant information that is not subject to user<br />
configuration. If any macros or values defined in bspname.h can be changed to<br />
customize the system, then define those macros or values in config.h instead.<br />
It is helpful to use a sample header file, because most constant names, basic device<br />
addresses, and so on are already defined and just require refinement. The<br />
following should be defined in bspname.h:<br />
■<br />
interrupt vectors/levels<br />
■<br />
I/O device addresses<br />
■<br />
the meaning of the device register bits<br />
■<br />
system and auxiliary clock parameters (maximum and minimum rates)<br />
Also, use a board description macro prefix (for example, Heurikon is defined as<br />
HK_) to indicate values that are board-specific.<br />
Interrupt Vectors and Levels. Define all interrupt vectors and levels dictated by<br />
hardware and not user changeable in bspname.h.<br />
I/O Device Addresses. Define all I/O addresses fixed by hardware or otherwise<br />
not user-changeable in bspname.h.<br />
Meaning of Device Register Bits. For on-board control registers, define a macro<br />
value for each bit or group of bits in each registers. Typically, such macro<br />
definitions are placed in bspname.h if there is no better location for them.<br />
System and Auxiliary Clocks. When given a new clock rate, the timer drivers use<br />
these macros to determine if the new rate is valid:<br />
SYS_CLK_RATE_MIN<br />
SYS_CLK_RATE_MAX<br />
AUX_CLK_RATE_MIN<br />
AUX_CLK_RATE_MAX<br />
Sets the minimum system clock rate.<br />
Sets the maximum system clock rate.<br />
Sets the minimum auxiliary clock rate.<br />
Sets the maximum auxiliary clock rate.<br />
26
2<br />
<strong>BSP</strong> Organization<br />
target.nr<br />
The file target.nr, located in the target/config/bspname directory, contains<br />
board-specific information necessary to run VxWorks. To provide a convenient<br />
starting point for a new <strong>BSP</strong>, the <strong>BSP</strong> Porting Kit CD-ROM includes several<br />
architecture-specific templates, such as target/config/template68k/target.nr.<br />
For Tornado 2.x, the target.nr file is not processed as a UNIX-style reference page<br />
or Windows-compatible text page. It is delivered to the customer as an HTML file.<br />
Refer to L. Refgen for details on the refgen documentation utility.<br />
This reference entry is divided into the following sections:<br />
NAME<br />
The name of the board.<br />
INTRODUCTION<br />
Summary of scope and assumptions. Instructions concerning boot ROMs and<br />
necessary jumper settings.<br />
FEATURES<br />
Summary of all supported and unsupported features of the board.<br />
HARDWARE DETAILS<br />
Summary of available devices, for example, serial, Ethernet, and SCSI.<br />
SPECIAL CONSIDERATIONS<br />
Special features or restrictions.<br />
BOARD LAYOUT<br />
An ASCII representation of the board, useful for illustrating boot ROMs and<br />
jumpers. Jumpers and jumper states are represented by the characters shown<br />
in Table 2-2.<br />
SEE ALSO<br />
References to other relevant VxWorks manuals.<br />
BIBLIOGRAPHY<br />
Summary of data sheets and other sources of technical information pertinent<br />
to the board and devices.<br />
2<br />
27
VxWorks 5.5<br />
<strong>BSP</strong> Developer’s <strong>Guide</strong><br />
Table 2-2<br />
ASCII Representation of Board Layout<br />
Jumper Type State Character<br />
Vertical jumper Installed x<br />
Vertical jumper Open : (colon)<br />
Vertical jumper (three-pin) Up U<br />
Vertical jumper (three-pin) Down D<br />
Horizontal jumper Installed - (dash)<br />
Horizontal jumper Open " (quote)<br />
Horizontal jumper (three-pin) Left L<br />
Horizontal jumper (three-pin) Right R<br />
2.2.2 Derived Files<br />
The following files are derived from the source files, the system header files, driver<br />
source files, and modules in the VxWorks archive libraries. These files are only<br />
delivered for demonstration purposes. The user recreates some or all of these files<br />
when configuring a system.<br />
When you are working with a Tornado 2.x project, these derived files are found in<br />
the project directory. Their counterparts in the <strong>BSP</strong> directory are used only when<br />
building from the traditional command-line method.<br />
NOTE: As of this release, boot ROMs cannot be built from the Tornado project<br />
facility. Enhancement of the project facility to configure and build boot ROM<br />
images is planned.<br />
bootInit.o, bootInit_res.o, and bootInit_uncmp.o<br />
There are three boot strategies available: compressed ROMs, uncompressed<br />
ROMs, and ROM-resident ROMs. All three strategies can be used for boot ROMs<br />
or VxWorks ROMs. The name of the module indicates the strategy it is used with.<br />
28
2<br />
<strong>BSP</strong> Organization<br />
bootrom<br />
This file is an object module containing the binary VxWorks boot ROM.<br />
2<br />
bootrom.hex<br />
This is an ASCII file containing the VxWorks boot ROM code, suitable for<br />
downloading over a serial connection to a PROM programmer. The default<br />
encoding uses Motorola S-Records.<br />
bootrom.Z.s and bootrom.Z.o<br />
ctdt.o<br />
dataSegPad.o<br />
This is the source and object output that is the compressed image of the bootrom.o<br />
module.<br />
This module handles C++ constructor/destructor functionality.<br />
The module insuring that the text and data segments do not share a common<br />
memory page. For the VxVMI option, this module forces alignment of the data<br />
segment in a different MMU page from the text segment.<br />
symTbl.c and sysALib.o<br />
These are the source and object files for the built-in symbol table.<br />
sysLib.o and sysALib.o<br />
romInit.o<br />
These modules always go together as a pair. They are the output of the sysALib.s<br />
and sysLib.c modules.<br />
This module is the startup code for any ROM image, boot or VxWorks. For<br />
Tornado, it works in conjunction with the romStart.o module instead of bootInit.o.<br />
vxWorks and vxWorks.sym<br />
The vxWorks file is the complete, linked VxWorks binary to be run on the target.<br />
The vxWorks.sym file is the symbol table for the VxWorks binary. Both files are<br />
created with the supplied configuration files.<br />
29
VxWorks 5.5<br />
<strong>BSP</strong> Developer’s <strong>Guide</strong><br />
vxWorks.st<br />
This file is the complete, linked, standalone VxWorks binary with the symbol table<br />
linked in.<br />
target/proj/bspname_gnu/* and target/proj/bspname_diab/*<br />
These directories contain the <strong>BSP</strong> project files and default build outputs. There are<br />
two ways to create a new project: the preferred method uses the project facility; the<br />
alternative uses the command make prj_gnu or make prj_diab from the command<br />
line.<br />
doc/vxworks/bsp/bspname/*.*<br />
This directory contains the HTML documentation files that are incorporated into<br />
the user’s help system when the product is installed. This documentation is<br />
generated from the command line with the command make man.<br />
2.2.3 Required Routines<br />
The following routines are expected to be found in the sysLib.o module. If any<br />
routine is missing, then an unresolved global error is encountered during linking.<br />
sysBspRev( ) - return the <strong>BSP</strong> version and revision number<br />
sysClkConnect( ) - connect a routine to the system clock interrupt<br />
sysClkDisable( ) - turn off system clock interrupts<br />
sysClkEnable( ) - turn on system clock interrupts<br />
sysClkInt( ) - handle system clock interrupts (internal)<br />
sysClkRateGet( ) - get the system clock rate<br />
sysClkRateSet( ) - set the system clock rate<br />
sysHwInit( ) - initialize the system hardware<br />
sysHwInit2( ) - initialize additional system hardware<br />
sysMemTop( ) - get the address of the top of logical memory<br />
sysModel( ) - return the model name of the CPU board<br />
sysNvRamGet( ) - get the contents of non-volatile RAM<br />
sysNvRamSet( ) - write to non-volatile RAM<br />
30
2<br />
<strong>BSP</strong> Organization<br />
sysSerialHwInit( ) - initialize the <strong>BSP</strong> serial devices to a quiescent state<br />
sysSerialHwInit2( ) - connect <strong>BSP</strong> serial device interrupts<br />
sysSerialChanGet( ) - get the SIO_CHAN device associated with a serial<br />
channel<br />
sysToMonitor( ) - transfer control to the ROM monitor<br />
2<br />
2.2.4 Optional Routines<br />
The following routines are usually present on all targets. Those marked as<br />
“internal” are internal to the <strong>BSP</strong> and are not called by the application.<br />
sysAbortInt( ) - handle the ABORT button interrupt<br />
sysAuxClkConnect( ) - connect a routine to the auxiliary clock interrupt<br />
sysAuxClkDisable( ) - turn off auxiliary clock interrupts<br />
sysAuxClkEnable( ) - turn on auxiliary clock interrupts<br />
sysAuxClkInt( ) - handle auxiliary clock interrupts<br />
sysAuxClkRateGet( ) - get the auxiliary clock rate<br />
sysAuxClkRateSet( ) - set the auxiliary clock rate<br />
sysPhysMemTop( ) - get the address of the top of physical memory<br />
The following routines are normally present only on targets that have a bus<br />
interface:<br />
sysProcNumGet( ) - get the processor number<br />
sysProcNumSet( ) - set the processor number<br />
sysBusIntAck( ) - acknowledge a bus interrupt<br />
sysBusIntGen( ) - generate a bus interrupt<br />
sysBusTas( ) - test and set a location across the bus<br />
sysBusTasClear( ) - clear a location set by sysBusTas( )<br />
sysBusToLocalAdrs( ) - convert a bus address to a local address<br />
sysIntDisable( ) - disable a bus interrupt level<br />
sysIntEnable( ) - enable a bus interrupt level<br />
sysLocalToBusAdrs( ) - convert a local address to a bus address<br />
31
VxWorks 5.5<br />
<strong>BSP</strong> Developer’s <strong>Guide</strong><br />
sysMailboxConnect( ) - connect a routine to the mailbox interrupt<br />
sysMailboxEnable( ) - enable the mailbox interrupt<br />
sysMailboxInt( ) - handle the mailbox interrupt (internal)<br />
sysNanoDelay( ) - set a calibrated delay (spin loop)<br />
2.3 VxWorks Boot Sequence<br />
This section describes a typical VxWorks boot scenario. Fundamentally, all<br />
processors execute the same logical steps when initializing and loading VxWorks,<br />
although some may require an extra step or two, and others may skip certain steps.<br />
Minimally, initializing a processor consists of providing a portion of code and<br />
possibly some tables located at a specific location in memory that the processor<br />
always jumps to on reset or power-up. This code sets the processor in a specific<br />
state, initializes memory and memory addressing, disables interrupts, and then<br />
passes control to additional bootstrapping code.<br />
This section covers the boot sequence step-by-step for various configurations and<br />
architectures. In some cases, this description can only provide an approximate<br />
guide to the processor boot sequence because there may be unique variations for<br />
specialized chips, such as the M68302 embedded controller.<br />
To see the boot sequence for an image built from the traditional command line,<br />
refer to D. VxWorks Boot Sequence. To see the boot sequence for an image built using<br />
the project tool, refer to E.3 Project Initialization Order, p.238.<br />
2.3.1 Processor Variances<br />
The VxWorks Motorola 680x0 heritage is evident in the VxWorks boot sequence;<br />
fortunately, most processors accommodate this scenario.<br />
The Intel i960 is unique in requiring an Initial Boot Record (IBR) that contains an<br />
exhaustive processor configuration table defining memory regions, interrupt table<br />
information, exception handling, and so on. In a way, this is the first code executed<br />
on the processor and must be in a fixed location, such as the Stack Pointer and<br />
Program Counter on many other processors.<br />
32
2<br />
<strong>BSP</strong> Organization<br />
The Motorola M68040 must be put in a transparent memory-mapping mode.<br />
The Motorola M683xx family is a special case. These processors run on busless<br />
boards that communicate with the outside world via serial lines; for this reason,<br />
the boot ROMs contain an embedded standalone VxWorks shell<br />
(vxWorks.st_rom.hex). This type of configuration may become more prevalent in<br />
future busless systems.<br />
2<br />
2.3.2 Sequence Overview<br />
The processor is first “jumped” to the entry point in ROM, which sets the status<br />
word and creates a dummy stack; then it jumps toaCroutine. A parameter on the<br />
dummy stack determines whether to clear memory (cold start), and then copies the<br />
rest of ROM into RAM (if the remainder of the ROM is compressed, then it is<br />
uncompressed during the copy). Next, the processor jumps to the entry point in<br />
RAM. 2<br />
The RAM entry point in bootConfig.c disables the cache, clears the bss segment to<br />
zero, initializes the vector table, performs board specific initialization, and then<br />
starts the multitasking kernel with a user booting task as its only activity.<br />
The VxWorks boot ROM image is a standalone application in its own right. The<br />
developer uses it to boot a new VxWorks image over the network and link in<br />
application code. The boot ROM’s kernel is discarded; there is no trap mechanism<br />
or reuse of this code. The application is linked with a new image built on the host.<br />
2.3.3 Files and Routines<br />
This section contains a more detailed explanation of how booting takes place,<br />
organized by file and routine name. For clarity, the sequence has been broken<br />
down into a number of main steps or function calls. The key functions are listed as<br />
headings and shown in invocation order.<br />
romInit.s: romInit( )<br />
At power-up (cold start) the processor begins execution at romInit( ), always the<br />
first routine in romInit.s. For warm starts, the processor begins execution at<br />
2. The reason for executing the text segment from RAM is partly for speed (although it is not<br />
faster in all situations), and to allow a uniform model for uncompression, which may be<br />
insufficient reason for an application to retain this model, especially at the cost of wasted<br />
RAM. Either way, the data segment and bss (uninitialized data) must be in RAM.<br />
33
VxWorks 5.5<br />
<strong>BSP</strong> Developer’s <strong>Guide</strong><br />
romInit( ) plus a small offset (see sysToMonitor( ) in sysLib.c). The romInit( )<br />
routine disables interrupts, puts the boot type (cold/warm) on the stack, clears<br />
caches, and branches to romStart( ) in bootInit.c. The stack is placed to begin<br />
before the text section and grows in the opposite direction. The routine romInit( )<br />
must do as little device setup as possible to start executing C code. Hardware<br />
initialization is the function of the sysHwInit( ) routine in sysLib.c.<br />
bootInit.c: romStart( )<br />
The text and data segments are copied from ROM to RAM in these ways:<br />
■<br />
■<br />
■<br />
If the text segment is not ROM-resident, the text and data segments are copied.<br />
If the text segment is ROM-resident, only the data segment is copied.<br />
Unused memory is cleared to initialize it.<br />
■<br />
If necessary, decompression is done.<br />
Atypically, the i960 invokes sysInit(bootType), which eventually invokes<br />
usrInit(bootType), as on all other architectures.<br />
sysALib.s: sysInit( )<br />
VxWorks calls sysInit( ) in normal rebooting to avoid code redundancy, the i960<br />
calls the routine during ROM initialization as well. The sysInit( ) routine, which<br />
must always be the first routine defined in sysALib.s, invalidates caches if<br />
applicable, initializes the system interrupt tables with default stubs, initializes the<br />
system fault tables with default stubs, and initializes all the processor registers to<br />
known default values. It enables tracing, clears all pending interrupts and finally<br />
invokes usrInit(bootType).<br />
This routine must duplicate the hardware initialization done by romInit( ). If not,<br />
then features set up in the boot ROM code could transfer to the VxWorks image.<br />
This is very undesirable as the configuration and initialization actions of the boot<br />
ROM would have influence over the run-time VxWorks images. It would likely<br />
result in the user rebuilding boot ROMs for configuration changes. It might also<br />
result in the user having to use paired sets of boot ROMs and VxWorks images.<br />
usrConfig.c and bootConfig.c: usrInit( )<br />
The usrInit( ) routine (in usrConfig.c) saves information about the boot type,<br />
handles all the initialization that must be performed before the kernel is actually<br />
started, and then starts the kernel execution. It is the first C code to run in VxWorks.<br />
It is invoked in supervisor mode with all hardware interrupts locked out.<br />
34
2<br />
<strong>BSP</strong> Organization<br />
Many VxWorks facilities cannot be invoked from this routine. Because there is no<br />
task context as yet (no TCB and no task stack), facilities that require a task context<br />
cannot be invoked. This includes any facility that can cause the caller to be<br />
preempted, such as semaphores, or any facility that uses such facilities, such as<br />
printf( ). Instead, the usrInit( ) routine does only what is necessary to create an<br />
initial task, usrRoot( ). This task then completes the startup.<br />
The initialization in usrInit( ) includes the following:<br />
■<br />
■<br />
■<br />
Cache Initialization. The code at the beginning of usrInit( ) initializes the<br />
caches, sets the mode of the caches and puts the caches in a safe state. At the<br />
end of usrInit( ), the instruction and data caches are enabled by default.<br />
Zeroing Out the System bss Segment. The C and C++ languages specify that<br />
all uninitialized variables must have initial values of 0. These uninitialized<br />
variables are put together in a segment called the bss. This segment is not<br />
actually loaded during the bootstrap, because it is known to be zeroed out.<br />
Because usrInit( ) is the first C code to execute, it clears the section of memory<br />
containing bss as its very first action. While the VxWorks boot ROMs clear all<br />
memory, VxWorks does not assume that the boot ROMs are used.<br />
Initializing Interrupt Vectors. The exception vectors must be set up before<br />
enabling interrupts and starting the kernel. First, intVecBaseSet( ) is called to<br />
establish the vector table base address.<br />
2<br />
! CAUTION: For some architectures, there are exceptions to the rule that<br />
intVecBaseSet( ) must be called before enabling interrupts and starting the kernel.<br />
See the appropriate VxWorks Architecture Supplement document.<br />
After intVecBaseSet( ) is called, the routine excVecInit( ) initializes all exception<br />
vectors to default handlers that safely trap and report exceptions caused by<br />
program errors or unexpected hardware interrupts.<br />
Initializing System Hardware to a Quiescent State. System hardware is initialized<br />
by calling the system-dependent routine sysHwInit( ). This mainly consists of<br />
resetting and disabling hardware devices that can cause interrupts after interrupts<br />
are enabled (when the kernel is started). This is important because VxWorks ISRs<br />
(for I/O devices, system clocks, and so on) are not connected to their interrupt<br />
vectors until the system initialization is completed in the usrRoot( ) task. However,<br />
because the memory pool is not yet initialized, you must not try to connect an<br />
interrupt handler to an interrupt during the sysHwInit( ) call.<br />
35
VxWorks 5.5<br />
<strong>BSP</strong> Developer’s <strong>Guide</strong><br />
lib/*.a: kernelInit( )<br />
The kernelInit( ) routine initiates the multitasking environment and never returns.<br />
It takes the following parameters:<br />
– The application to be spawned as the “root” task, typically usrRoot( ).<br />
– The stack size.<br />
– The start of usable memory; that is, the memory after the main text, data, and<br />
bss of the VxWorks image. All memory after this area is added to the system<br />
memory pool, which is managed by memPartLib. Allocation for dynamic<br />
module loading, task control blocks, stacks, etc., all come out of this region.<br />
– The top of memory as indicated by sysMemTop( ). If a contiguous block of<br />
memory is to be preserved from normal memory allocation, set the macro<br />
USER_RESERVED_MEM in config.h to the amount of reserved memory<br />
desired.<br />
– The interrupt stack size. The interrupt stack corresponds to the largest amount<br />
of stack space that could be used by any interrupt-level routine that might be<br />
called (plus a safe margin for the nesting of interrupts).<br />
– The interrupt lock-out level. For architectures that have a level concept, it is the<br />
maximum level. For architectures that do not have a level concept, it is the<br />
mask to disable interrupts. See the appropriate VxWorks Architecture<br />
Supplement.<br />
The kernelInit( ) routine calls intLockLevelSet( ), disables round-robin mode, and<br />
creates an interrupt stack if supported by the architecture. It then creates a root<br />
stack and TCB from the top of the memory pool, spawns the root task, usrRoot( ),<br />
and terminates the usrInit( ) thread of execution. At this time, interrupts are<br />
enabled; it is critical that all interrupt sources are disabled and pending interrupts<br />
cleared.<br />
usrConfig.c and bootConfig.c: usrRoot( )<br />
For the generic VxWorks development environment, usrRoot( ) initializes the I/O<br />
system, installs drivers, creates devices, and then sets up the network as<br />
configured in configAll.h and config.h.<br />
The usrRoot( ) routine calls memInit( ). Optionally, it calls memShowInit( ) and<br />
usrMmuInit( ).<br />
The routine sysClkConnect( ) is the first routine called in the <strong>BSP</strong> after the system<br />
is multitasking. It immediately calls sysHwInit2( ). This is an opportune time for<br />
36
2<br />
<strong>BSP</strong> Organization<br />
further board initialization that could not be completed in sysHwInit( ); for<br />
example, an intConnect( ) of additional devices may be done in sysHwInit2( ).<br />
The 60 Hz system clock is set up by calling sysClkRateSet( ) and sysClkEnable( ).<br />
VxWorks can be booted without the system clock running. However, network<br />
drivers, when they attach, usually execute a taskDelay( ) to allow hardware reset<br />
to complete. If the system clock is not running, the delay does not expire, causing<br />
the system to hang.<br />
The system clock can be dynamically changed from the shell or application<br />
programs. However, facilities that take a “snapshot” of the clock rate (for example,<br />
spyLib) can be broken by such an unexpected rate change.<br />
If INCLUDE_IO_SYSTEM is defined in configAll.h, the VxWorks I/O system is<br />
initialized by calling the routine iosInit( ). The arguments specify the maximum<br />
number of drivers that can be subsequently installed, the maximum number of<br />
files that can be open in the system simultaneously, and the desired name of the<br />
“null” device that is included in the VxWorks I/O system. This null device is a<br />
“bit-bucket” on output and always returns end-of-file for input.<br />
The inclusion or exclusion of INCLUDE_IO_SYSTEM also affects whether the<br />
console devices are created, and whether standard in, standard out, and standard<br />
error are set; see the next two sections for more information.<br />
If the driver for the on-board serial ports is included (INCLUDE_TTY_DEV), it is<br />
installed in the I/O system by calling the driver’s initialization routine, typically<br />
ttyDrv( ). The actual devices are then created and named by calling the driver’s<br />
device-creation routine, typically ttyDevCreate( ). The arguments to this routine<br />
include the device name, a serial I/O channel descriptor (from the <strong>BSP</strong>), and input<br />
and output buffer sizes.<br />
The macro NUM_TTY specifies the number of tty ports (default is 2);<br />
CONSOLE_TTY specifies which port is the console (default is 0); and<br />
CONSOLE_BAUD_RATE specifies the bps rate (default is 9600). These macros are<br />
specified in configAll.h, but can be overridden in config.h for boards with a<br />
nonstandard number of ports.<br />
PCs can use an alternative console with keyboard input and VGA output; see your<br />
PC workstation documentation for details.<br />
The excInit( ) routine is called to initialize exception handling. Other facilities are<br />
optionally initialized at this point, as specified by macros in configAll.h. (See also<br />
VxWorks Programmer’s <strong>Guide</strong>: Configuration.)<br />
If INCLUDE_WDB is defined, wdbConfig( ) in src/config/usrWdb.c is called. This<br />
routine initializes the agent’s communication interface, then starts the agent. For<br />
2<br />
37
VxWorks 5.5<br />
<strong>BSP</strong> Developer’s <strong>Guide</strong><br />
information on configuring the agent and the agent’s initialization sequence, see<br />
the Tornado User’s <strong>Guide</strong>: Setup and Startup.<br />
If the INCLUDE_USR_APPL is defined, the code executes the USER_APPL_INIT<br />
macro. However, you must make sure the USER_APPL_INIT macro is a valid C<br />
statement.<br />
2.4 Mistakes To Be Avoided<br />
Most of the mistakes listed below could be summarized as doing the right thing in<br />
the wrong place or at the wrong time. Context matters.<br />
Forgetting About LOCAL_MEM_LOCAL_ADRS<br />
Many <strong>BSP</strong> writers assume that LOCAL_MEM_LOCAL_ADRS is zero and fail to<br />
include it in macros that need to be offset by the start of memory. Most users do not<br />
change the value of LOCAL_MEM_LOCAL_ADRS, but this problem tends to be<br />
copied and replicated throughout development projects.<br />
Doing Too Much in romInit.s<br />
Many <strong>BSP</strong> writers try to put too much device initialization code into romInit.s. Use<br />
the initialization in romInit.s as just a preliminary step. Handle the real device<br />
initialization in sysHwInit( ) in sysLib.c. See romInit.s: romInit( ), p.33.<br />
Doing Too Little in sysALib.s<br />
Many <strong>BSP</strong> writers believe that any initialization done in romInit.s only needs to be<br />
done once. The routine sysInit( ), in sysALib.s, should repeat all initialization<br />
done by romInit.s. It may skip memory controller setup in some situations. Failure<br />
to do this requires users to rebuild boot ROMs for simple configuration changes in<br />
their VxWorks images. See sysALib.s: sysInit( ), p.34.<br />
Modified Drivers Put in the Wrong Directory<br />
<strong>BSP</strong> writers frequently modify Wind River device drivers, as well as provide their<br />
own drivers. These <strong>BSP</strong>-specific drivers must be delivered in <strong>BSP</strong>-specific<br />
directories and not in the Wind River directories target/src/drv and target/h/drv.<br />
<strong>BSP</strong>-specific code belongs in the <strong>BSP</strong>-specific directory target/config/bspname. This<br />
38
2<br />
<strong>BSP</strong> Organization<br />
can have very undesirable effects for customers using multiple <strong>BSP</strong>s from different<br />
sources. Only Wind River original code is allowed in these directories.<br />
Confusing Configuration Options<br />
In the file config.h, the user should be presented with clear choices for configuring<br />
the <strong>BSP</strong>. Material where the user does not have a choice should not be in config.h,<br />
it should be in bspname.h. The user should not have to compute values to be<br />
entered into config.h. If a register needs to be loaded with the high 16 bits of an<br />
address, the user should enter the full address. The code does the computation of<br />
the value to load in the register. The user should not have to do this; see <strong>BSP</strong><br />
Contents, p.196.<br />
2<br />
Using Non-Maskable Interrupts (NMI)<br />
Because the wind kernel uses intLock( ) as the primary method for protecting<br />
kernel data structures, using non-maskable interrupts (NMI) should be avoided. If<br />
an NMI interrupt service routine (ISR) makes a call to VxWorks that results in a<br />
kernel object being changed, then protection is lost and undesirable behavior can<br />
be expected. For more information on ISRs at high interrupt levels, refer to the<br />
VxWorks Programmer’s <strong>Guide</strong>: Basic OS.<br />
Also note that a VxWorks routine marked as interrupt safe does not mean it is NMI<br />
interrupt safe. On the contrary, many routines marked as interrupt safe are actually<br />
unsafe for NMI.<br />
39
VxWorks 5.5<br />
<strong>BSP</strong> Developer’s <strong>Guide</strong><br />
40
3<br />
Creating a New <strong>BSP</strong><br />
3.1 Introduction<br />
Creating a new <strong>BSP</strong> using tools available under Tornado requires that you handle<br />
the development in graduated steps, each building on the previous, as follows:<br />
1. Set up the basis of the development environment.<br />
2. Write the <strong>BSP</strong> pre-kernel initialization code.<br />
3. Start a minimal VxWorks kernel and add the basic drivers for timers, serial<br />
devices, and an interrupt controller.<br />
4. Start the target agent and connect the Tornado development tools.<br />
5. Complete the <strong>BSP</strong>. Topics include networking, boot ROMs, SCSI, caches, MMU<br />
initialization, and DMA.<br />
6. Generate a default project for use with the new project facility.<br />
This chapter provides a detailed description of each of the steps listed above.<br />
The goal of this procedure is not only the creation of a new <strong>BSP</strong> but the<br />
minimization of the time during which you do not have access to the Tornado<br />
development tools—in particular, the Wind Debug target agent (WDB agent).<br />
Because the WDB agent is linked to the kernel, it can share initialization code with<br />
the kernel. Thus, after the initialization code has run, you can start either the WDB<br />
agent, the VxWorks kernel, or both.<br />
Using the WDB agent, you can debug the VxWorks image to which it is linked.<br />
This is in contrast to a traditional ROM-monitor approach which requires that you<br />
first port the monitor to the board and then port the OS.<br />
41
VxWorks 5.5<br />
<strong>BSP</strong> Developer’s <strong>Guide</strong><br />
The target agent’s linked-in approach has several advantages over the traditional<br />
approach:<br />
■<br />
■<br />
There is only one initialization code module to write. In a traditional<br />
ROM-monitor approach, you must write two initialization code modules: one<br />
for the monitor and one for the OS. In addition, the traditional approach<br />
requires non-standard modifications to resolve contention issues over MMU,<br />
vector table, and device initialization. 1<br />
The code size is smaller because VxWorks and the target agent can share<br />
generic library routines such as memcpy( ).<br />
■<br />
Traditional ROM monitors debug only in “system mode.” The whole OS is<br />
debugged as a single thread. The WDB agent provides, in addition to system<br />
mode, a fully VxWorks-aware tasking mode. This mode allows debugging<br />
selected parts of the OS (such as individual tasks), without affecting the rest of<br />
the system.<br />
How you download the WDB agent and VxWorks kernel depends on your phase<br />
of development. When writing and debugging the board initialization code, you<br />
must create your own download path. This is no better or worse than the<br />
traditional ROM-monitor approach in which you had to create the download path<br />
for porting the monitor itself. After you have the board initialization code working,<br />
how you proceed depends on the speed of your download path.<br />
If you have a fast download path, continue to use it for further kernel<br />
development. This is a win over a traditional ROM monitor approach which often<br />
forces you to use a serial-line download path. If you have a slow download path,<br />
you should burn into ROM the kernel, the agent, and as much generic VxWorks<br />
code as fits.<br />
Because the Tornado development tools let you download and execute code<br />
dynamically, you can download extensions (such as application code, new drivers,<br />
extra hardware initialization code, and the like) and use the WDB agent to debug<br />
the extensions. This is a win over a traditional monitor approach, which requires<br />
that you to download the entire kernel every time, even though most of the code<br />
has not changed.<br />
1. The traditional ROM-monitor approach is to modify the OS initialization code temporarily<br />
to ensure that the MMU, certain parts of the vector table, and the device used by the monitor<br />
are not reset. By running only one set of initialization code, these problem go away.<br />
42
3<br />
Creating a New <strong>BSP</strong><br />
3.2 Setting Up Your Development Environment<br />
Setting up your development environment means establishing a mechanism to<br />
download code to the target and then testing the downloaded code. It is usually<br />
best to start with some simple image test code rather than a full blown VxWorks<br />
image. To find out what compiler and linker flags you need, go to your reference<br />
<strong>BSP</strong> and build either vxWorks (a RAM image) or vxWorks_resrom_nosym (a<br />
ROM image).<br />
3<br />
Choosing a Technique for Downloading Code to the Target<br />
The following are some of the more common techniques for downloading code to<br />
the target:<br />
■<br />
■<br />
Using the download protocol supplied in the board vendor’s debug ROMs.<br />
The drawback of this approach is that downloading is often slow. The<br />
advantage is that it is easy to set up.<br />
Using a JTAG debugger such as a visionICE or visionPROBE emulator. The<br />
main drawback of this approach is that support is not available for all<br />
architectures and/or CPUs. However, this method allows for a quick<br />
download and also allows you to single-step through the initialization code.<br />
■<br />
Using a ROM emulator (such as NetROM from AMC). The drawback of this<br />
approach is that it can take time for you to learn how to use it. The advantages<br />
include fast download times, portability to most boards, and a communication<br />
protocol that lets debug messages pass from the target to the host through the<br />
ROM socket.<br />
After you have downloaded code to the target, examine memory and/or ROM to<br />
make sure it is loaded into the right place. The Wind River-supplied GNU tools nm<br />
and objdump can be used on your compiled images to see what should be in the<br />
target memory. Pay special attention to the addresses of the start of the text and<br />
data segments.<br />
Choosing a Method for Testing the Downloaded Code<br />
The next step is to establish a debugging mechanism to track the progress of your<br />
initialization sequence. The following are some of the more common techniques:<br />
■<br />
■<br />
Using a JTAG device such as visionICE or visionPROBE.<br />
Using the board’s native debug ROMs (if it has breakpoint support).<br />
43
VxWorks 5.5<br />
<strong>BSP</strong> Developer’s <strong>Guide</strong><br />
■<br />
Using a logic analyzer to trace the processor’s address lines.<br />
■<br />
Writing a debugging library to do something like the following:<br />
– Flash an LED.<br />
– Write to persistent memory (local, off-board, or battery backed memory).<br />
– Transmit a character over a serial line in polled mode.<br />
– Send data up through the NetROM debug port.<br />
After you have chosen a debugging mechanism, check that you can jump to your<br />
code’s entry point and run it successfully. Your test code should set up the board’s<br />
RAM as needed and prove that it is working by writing to it and reading back the<br />
value. Your test program will probably use the same initialization code as<br />
VxWorks. For details on the files romInit.s and sysALib.s, see 3.3.1 Writing the <strong>BSP</strong><br />
Files, p.44.<br />
NOTE: If you are testing a debugging library on a ROM-based VxWorks image, be<br />
aware that the data and bss segments are not yet set up. In particular, libraries that<br />
depend on the correct initialization of global variables cannot work yet.<br />
3.3 Writing the <strong>BSP</strong> Pre-Kernel Initialization Code<br />
This section describes how to write the <strong>BSP</strong> files, build and download VxWorks,<br />
debug the initialization code, and how and when to start the WDB agent before<br />
you start the kernel.<br />
3.3.1 Writing the <strong>BSP</strong> Files<br />
Create a <strong>BSP</strong> directory by copying the <strong>BSP</strong> template files from<br />
target/config/templateCPU. Below is a file-by-file description of considerations to<br />
keep in mind when modifying the files.<br />
44
3<br />
Creating a New <strong>BSP</strong><br />
Makefile<br />
At a minimum, your makefile must define the following macros:<br />
CPU<br />
The target CPU, which must be the same as the reference <strong>BSP</strong>.<br />
3<br />
TOOL<br />
The host tool chain (such as gnu), which must be the same as the reference <strong>BSP</strong>.<br />
TGT_DIR<br />
The path to the target directory. The default is installDir/target.<br />
TARGET_DIR<br />
The <strong>BSP</strong> directory name.<br />
VENDOR<br />
The board manufacturer’s name.<br />
BOARD<br />
The board name.<br />
ROM_TEXT_ADRS<br />
The boot ROM entry address in hexadecimal. For most boards, this is set to the<br />
beginning of the ROM address area. However, there may be some hardware<br />
configurations that use an area at the start of ROM for the reset vector; thus, it<br />
should be offset accordingly. The offset is typically architecture dependent.<br />
Thus, the low order bytes of this macro can be copied from a reference <strong>BSP</strong>.<br />
ROM_WARM_ADRS<br />
The boot ROM warm entry address in hexadecimal. This is usually a fixed<br />
offset of 8 bytes beyond the cold boot entry point ROM_TEXT_ADRS. The code<br />
in sysToMonitor( ) should do an explicit jump to ROM_WARM_ADRS when a<br />
switch to the hardware ROM code is desired.<br />
ROM_SIZE<br />
The ROM area’s size in hexadecimal.<br />
RAM_LOW_ADRS 2<br />
The address at which to load VxWorks.<br />
RAM_HIGH_ADRS 2<br />
The destination address used when copying the boot ROM image to RAM.<br />
2. RAM_LOW_ADRS and RAM_HIGH_ADRS are absolute addresses, typically chosen to<br />
be at an architecture-specific offset from the start of DRAM. For a quick look at the VxWorks<br />
memory layout, see the memory layout diagram in the appendix of the VxWorks<br />
Programmer’s <strong>Guide</strong>.<br />
45
VxWorks 5.5<br />
<strong>BSP</strong> Developer’s <strong>Guide</strong><br />
HEX_FLAGS<br />
Architecture-specific flags for the objcopy utility that generates S-record files.<br />
MACH_EXTRA<br />
Any extra machine-dependent files. Make it an empty declaration for now.<br />
! CAUTION: The hexadecimal addresses above should not include a leading 0x.<br />
bspname.h<br />
config.h<br />
sysLib.c<br />
Some additional architecture-specific macros might also be required in the<br />
makefile. For example, the i960 needs to know where to link the Initial Boot<br />
Record. For architecture-specific information, see the appropriate VxWorks<br />
Architecture Supplement or 4. Hardware <strong>Guide</strong>lines.<br />
See bspname.h, p.26.<br />
The basic description of config.h, p.16 applies, although some small modifications<br />
are needed. First, make sure the following code stub is present before the line that<br />
includes configAll.h:<br />
/* <strong>BSP</strong> version/revision identification, before configAll.h */<br />
#define <strong>BSP</strong>_VER_1_1 1<br />
#define <strong>BSP</strong>_VER_1_2 1<br />
#define <strong>BSP</strong>_VERSION "1.2"<br />
#define <strong>BSP</strong>_REV "/0" /* 0 for first revision */<br />
To start, add the following lines near the end of the header file:<br />
#undef INCLUDE_MMU_BASIC /* bundled mmu support */<br />
#undef INCLUDE_CACHE_SUPPORT /* cache support */<br />
Make sure the definitions of ROM_TEXT_ADRS, ROM_SIZE, and<br />
RAM_LOW_ADRS match those defined in the makefile.<br />
Make sure LOCAL_MEM_LOCAL_ADRS and LOCAL_MEM_SIZE are correctly<br />
defined.<br />
While sysLib.c is by far the largest <strong>BSP</strong> file, at this phase you should implement<br />
only the basics: sysModel( ), sysBspRev( ), sysHwInit( ), sysHwInit2( ), and<br />
sysMemTop( ). The routine sysBspRev( ) is new as of VxWorks 5.3. Implement this<br />
routine as follows:<br />
46
3<br />
Creating a New <strong>BSP</strong><br />
char * sysBspRev (void)<br />
{<br />
return (<strong>BSP</strong>_VERSION <strong>BSP</strong>_REV);<br />
}<br />
The file sysLib.c should also include the following stub drivers:<br />
3<br />
romInit.s<br />
#include "mem/nullNvram.c"<br />
#include "vme/nullVme.c"<br />
The sysHwInit( ) routine is the heart of sysLib.c, and most of your work is done<br />
here. It is the routine that resets all devices to a quiescent state so that they do not<br />
generate interrupts later on when interrupts are enabled.<br />
At power-up (cold start) the processor begins execution at romInit( ), which must<br />
be the first routine in the text segment of romInit.s. For warm starts, the processor<br />
begins execution at romInit( ) plus a small offset (see sysToMonitor( ) in sysLib.c).<br />
Most hardware and device initialization is performed later in the initialization<br />
sequence by sysHwInit( ) in sysLib.c. The job of romInit( ) is to perform the<br />
minimal setup needed to transfer control to romStart( ) (in config/all/bootInit.c):<br />
■<br />
Initialize the processor (this code is specific to the processor and not the board,<br />
and thus can be copied from a reference <strong>BSP</strong>):<br />
– Mask processor interrupts<br />
– Set the initial stack pointer to STACK_ADRS (defined in configAll.h)<br />
– Disable processor caches<br />
■<br />
Initialize access to target DRAM as needed for the following (this code is<br />
board-specific):<br />
– Wait states<br />
– Refresh rate<br />
– Chip-selects<br />
– Disabling secondary (L2) caches (if needed)<br />
At the end, romInit( ) jumps to romStart( ) in bootInit.c, passing the start type. The<br />
start type should be BOOT_COLD on a cold boot, or the parameter passed from<br />
sysToMonitor( ) on a warm boot.<br />
This file must also contain a data variable called sdata to mark the start of the data<br />
segment. This variable typically stores a string such as “start of data.”<br />
Refer to the template romInit.s file in the template <strong>BSP</strong> that accompanies this<br />
product.<br />
47
VxWorks 5.5<br />
<strong>BSP</strong> Developer’s <strong>Guide</strong><br />
sysALib.s<br />
This file contains the entry point for RAM-based images such as vxWorks. The<br />
entry point, sysInit( ), performs the minimal setup necessary to transfer control to<br />
usrInit( ) (defined in config/all/usrConfig.c). This routine is similar to romInit( ).<br />
The sysInit( ) routine is largely the same for each architecture. As such, copying<br />
the code from a template <strong>BSP</strong> is the best way to start. The sysInit( ) routine<br />
typically just masks processor interrupts and sets the stack pointer. For processors<br />
whose stack grows down, the stack pointer is set to sysInit( ). For processors<br />
whose stack grows up, it is set to a few hundred bytes below sysInit( ). It then calls<br />
usrInit( ), passing it the parameter BOOT_WARM_AUTOBOOT. Most hardware<br />
and device initialization is performed later in the initialization sequence by<br />
sysHwInit( ) in sysLib.c.<br />
<strong>BSP</strong> routines should be coded in C when possible, but if there are compelling<br />
technical reasons for resorting to assembler, then place the routines in sysALib.s.<br />
config/all/usrConfig.c<br />
During development you will want to add debugging code and make other such<br />
modifications to the generic (non-<strong>BSP</strong>) configuration files. Rather than modifying<br />
the generic code directly, instead create local copies in the <strong>BSP</strong> directory as follows:<br />
1. First copy the files config/all/usrConfig.c and config/all/bootInit.c into your<br />
<strong>BSP</strong> directory. Next, add the following lines to your <strong>BSP</strong>’s Makefile, right after<br />
the definition of HEX_FLAGS:<br />
BOOTINIT<br />
USRCONFIG<br />
= bootInit.c<br />
= usrConfig.c<br />
This causes the makefile to use your copy of these generic configuration files<br />
when building VxWorks.<br />
2. Next, modify your copy of usrConfig.c to remove everything except the<br />
pre-kernel initialization code by using #if FALSE/#endif pairs so that<br />
usrExtra.c is not included, and the body of usrRoot( ) is empty:<br />
...<br />
#if FALSE<br />
#include "usrExtra.c"<br />
#endif<br />
...<br />
void usrRoot<br />
...<br />
{<br />
#if FALSE<br />
48
3<br />
Creating a New <strong>BSP</strong><br />
...<br />
#endif<br />
}<br />
The #include of usrExtra.c links in the other configuration files from<br />
src/config. You do not need these now, but you will need them later as you add<br />
features. For example, when you are ready to start working on the kernel and<br />
the target agent, you need to link in the appropriate configuration code as<br />
follows:<br />
3<br />
#if FALSE<br />
#include "usrExtra.c"<br />
#else<br />
#include "usrWdb.c"<br />
#endif<br />
3.3.2 Building and Downloading VxWorks<br />
The VxWorks image you load to the target depends on the download method you<br />
use. The primary images are as follows:<br />
vxWorks<br />
This image starts execution from RAM. It must be loaded into RAM by some<br />
external means such as the board’s native debug ROMs.<br />
vxWorks_rom<br />
This image starts execution from ROM, but its text and data segments are<br />
linked to RAM addresses. Early on it copies itself into RAM and continues<br />
execution from there.<br />
vxWorks_resrom_nosym<br />
This image executes from ROM. Only the data segment is copied into RAM.<br />
If your download path puts the image in RAM (such as when using a vendor<br />
debug ROM), use vxWorks. If your download path puts the image in ROM (such<br />
as when using NetROM), use either vxWorks_rom or vxWorks_resrom_nosym.<br />
The advantage of vxWorks_rom is that it can be more easily debugged because the<br />
software breakpoints can be set only on RAM addresses. The advantage of<br />
vxWorks_resrom_nosym is that it uses less target memory. The makefile for both<br />
ROM images lets you specify an optional .hex suffix (for example,<br />
vxWorks_rom.hex) to produce an S-record, rather than an object file.<br />
There is a file called depend.cputool containing the file dependency rules used by<br />
the makefile. The makefile automatically generates the dependency file if it does<br />
not already exist. If you add new files to the <strong>BSP</strong>, delete the dependency file and let<br />
the makefile regenerate it.<br />
49
VxWorks 5.5<br />
<strong>BSP</strong> Developer’s <strong>Guide</strong><br />
After you have downloaded your code to the target, examine memory and/or<br />
ROM to make sure that the code is loaded into the right place. Use the nm and<br />
objdump utilities on the VxWorks image to see what should be in the target<br />
memory. Pay special attention to the addresses of the start of the text and data<br />
segments.<br />
3.3.3 Debugging the Initialization Code<br />
The beginnings of the ROM and RAM initialization sequences differ, but they are<br />
otherwise the same. Details of what each <strong>BSP</strong> procedure needs to do were<br />
provided in the previous section. This section reviews the steps of the initialization<br />
sequence and supplies tips on what to check if a failure occurs at a particular step.<br />
ROM Initialization<br />
This section describes the initialization sequence for the ROM-based VxWorks<br />
images vxWorks_rom and vxWorks_resrom_nosym.<br />
romInit.s: romInit( )<br />
At power-up (cold start) the processor begins execution at romInit( ), whose job is<br />
to perform the minimal setup necessary to transfer control to romStart( ) (in<br />
config/all/bootInit.c). Most hardware and device initialization is performed later<br />
in the initialization sequence by sysHwInit( ) in sysLib.c.<br />
bootInit.c: romStart( )<br />
The text and data segments are copied from ROM to RAM in one of the following<br />
ways:<br />
■<br />
For vxWorks_rom, both the text and data segments are copied to RAM.<br />
■<br />
For vxWorks_resrom_nosym, only the data segment is copied to RAM.<br />
After the copy, check that the data segment is properly initialized. For example:<br />
int thisVal = 17; /* some data segment variable */<br />
...<br />
if (thisVal != 17)<br />
somethingIsWrong();<br />
If something is wrong, check if RAM access is working properly. For example:<br />
50
3<br />
Creating a New <strong>BSP</strong><br />
int dummy;<br />
...<br />
dummy = 17;<br />
if (dummy != 17)<br />
somethingIsWrong();<br />
If RAM access is working, check that the data segment was copied into memory at<br />
the right offset. This is only a problem for vxWorks_resrom_nosym images. The<br />
romStart( ) routine assumed that the data is located at some architecture-specific<br />
offset from the end of the text segment in ROM, as the following code stub from<br />
bootInit.c shows:<br />
3<br />
#if (CPU_FAMILY == SPARC)<br />
bcopyLongs ((UINT *)(etext + 8), (UINT *) RESIDENT_DATA,<br />
#elif ((CPU_FAMILY == MIPS) || (CPU_FAMILY == PPC))<br />
bcopyLongs ((UINT *)(etext + 0), (UINT *) RESIDENT_DATA,<br />
#else<br />
bcopyLongs ((UINT *)(etext + 4), (UINT *) RESIDENT_DATA,<br />
#endif<br />
However, this offset can be different if you are using alternative tools to create your<br />
ROM image. In this case you may need to adjust the offset accordingly.<br />
The last thing romStart( ) does is call the generic initialization routine usrInit( ) in<br />
usrConfig.c. The one exception is the i960, which first jumps to sysInitAlt( ) (in<br />
sysALib.s) in order to reinstall the processor tables before jumping to usrInit( ).<br />
The rest of the initialization sequence is described in section Generic Initialization,<br />
p.52.<br />
RAM Initialization<br />
This section describes the initialization routine for the RAM-based VxWorks<br />
image.<br />
sysALib.s: sysInit( )<br />
The VxWorks entry point is sysInit( ), whose job is to perform the minimal setup<br />
necessary to transfer control to usrInit( ) (in usrConfig.c). Most hardware and<br />
device initialization is performed later in the initialization sequence by<br />
sysHwInit( ) in sysLib.c.<br />
51
VxWorks 5.5<br />
<strong>BSP</strong> Developer’s <strong>Guide</strong><br />
Generic Initialization<br />
The remainder of the initialization code is common to both ROM and RAM based<br />
images.<br />
usrConfig.c: usrInit( )<br />
From a <strong>BSP</strong> writer’s point of view, the main significance of usrInit( ) is that it clears<br />
the bss segment (so that uninitialized C global variables are now zero), and then<br />
calls sysHwInit( ) (in sysLib.c) to initialize the hardware. If memory has been set<br />
up properly, there is little that can go wrong in this routine.<br />
sysLib.c: sysHwInit( )<br />
This is the heart of the <strong>BSP</strong> initialization code. It must reset all hardware to a<br />
quiescent state so as not to generate uninitialized interrupts later when interrupts<br />
are enabled.<br />
usrConfig.c: usrInit( )<br />
After sysHwInit( ) has completed, control returns to usrInit( ). The last thing<br />
usrInit( ) does is call kernelInit( ) to start the VxWorks kernel. This is the end of<br />
the pre-kernel initialization code. The routine kernelInit( ) does not return. Rather,<br />
it starts the kernel with usrRoot( ) as the first task. It is deep within the<br />
kernelInit( ) routine that interrupts are finally enabled; serious confusion ensues if<br />
not all interrupt sources were disabled and cleared in sysHwInit( ).<br />
You can start the agent as this point if you want to bring up the kernel under<br />
control of the agent. This is an optional step which is not typically done. For more<br />
information, see 3.3.4 Starting the WDB Agent Before the Kernel, p.53.<br />
usrConfig.c: usrRoot( )<br />
The remainder of the VxWorks initialization is done after the kernel has been<br />
started in usrRoot( ). Details are covered in subsequent sections. In this phase, it is<br />
enough if usrRoot( ) can verify that sysHwInit( ) was properly written.<br />
If kernelInit( ) is called but execution fails to reach the start of usrRoot( ), one of<br />
two things are wrong. Either your sysMemTop( ) routine is returning a bogus<br />
address, or, more likely, some device has not been reset and is generating an<br />
interrupt. In the second case, you must modify sysHwInit( ) to reset the<br />
interrupting device.<br />
52
3<br />
Creating a New <strong>BSP</strong><br />
To find the source of the interrupt, start by figuring out the interrupt vector being<br />
generated, applying any of the following techniques:<br />
■<br />
■<br />
■<br />
Use a logic analyzer to look for instruction accesses to the interrupt vector<br />
table.<br />
Use an ICE to set breakpoints in the interrupt vector table.<br />
Modify sysHwInit( ) to mask suspected interrupt vectors via an interrupt<br />
controller.<br />
■<br />
Modify sysHwInit( ) to connect debug routines to the suspected interrupt<br />
vectors using intVecSet( ) (you cannot use intConnect( ) because it calls<br />
malloc( ) and the VxWorks memory allocator has not yet been initialized).<br />
At this point you have a working kernel, but no device drivers. The only drivers<br />
required by VxWorks is a timer and possibly an interrupt controller. Most <strong>BSP</strong>s<br />
also have serial drivers. Adding basic driver support to VxWorks is described in<br />
3.4 Using a Minimal Kernel, p.55.<br />
3<br />
3.3.4 Starting the WDB Agent Before the Kernel<br />
NOTE: This procedure applies only to images built from the command line.<br />
This step is optional and is rarely done at Wind River when creating a new <strong>BSP</strong>. The<br />
disadvantages to starting the agent before the kernel are:<br />
■<br />
■<br />
Once the hardware initialization code is written, bringing up the kernel takes<br />
less time than bringing up the agent. Because most developers consider a<br />
working kernel to be the bigger milestone, start with the kernel.<br />
Starting the agent before the kernel does not really help get the basic kernel<br />
working. This is because the basic kernel adds little to what you have written<br />
already; just a timer driver and possibly an interrupt controller, which are<br />
simple devices.<br />
■<br />
Starting the agent before the kernel limits you to system mode debugging.<br />
The only reason to start the agent early is if you have a very slow download<br />
environment. In that case, you may want to put everything in ROM as early as<br />
possible to save download cycles.<br />
Starting the agent before the kernel is described in Tornado User’s <strong>Guide</strong>: Setup and<br />
Startup. The following two sections provide important additional information.<br />
53
VxWorks 5.5<br />
<strong>BSP</strong> Developer’s <strong>Guide</strong><br />
Caveats<br />
Because the virtual I/O driver requires the kernel, add the following line to<br />
config.h:<br />
#undef INCLUDE_WDB_VIO<br />
There is an important caveat if you are planning to use the target agent’s serial-line<br />
communication path. When the kernel is first started, interrupts are enabled in the<br />
processor, but driver interrupt handlers are not yet connected. You must take care<br />
to ensure that the serial device you use for agent communication does not generate<br />
an interrupt. If your board has an interrupt controller, use it to mask serial<br />
interrupts in sysHwInit( ). Beware that the target agent tries to use all drivers in an<br />
“interrupt on first packet” mode. As a result, you should modify the serial driver<br />
to refuse to go into interrupt mode, even if the agent requests it.<br />
System-Mode Debugging Techniques<br />
After you have the agent working, you will want to use it to debug the VxWorks<br />
image to which it is linked. To save download time, you should link the VxWorks<br />
code you want to test into the ROM image. In particular, you should glance at<br />
section 3.4 Using a Minimal Kernel, p.55 to see what driver code to link with<br />
VxWorks. To avoid remaking ROMs, consider adding hooks to your <strong>BSP</strong> and<br />
driver routines as follows:<br />
void (*myHwInit2Hook)(void); /* declare a hook routine */<br />
...<br />
void sysHwInit2 (void)<br />
{<br />
if (myHwInit2Hook != NULL) /* and conditionally call it */<br />
{<br />
myHwInit2Hook();<br />
return;<br />
}<br />
... /* default code */<br />
}<br />
This allows you to replace the routine from the debugger dynamically. For<br />
example, to override the behavior of sysHwInit2( ) above, just create a new<br />
version of it called myHwInit2( ) in a module called myLib.o, and then type:<br />
(gdb) load myLib.o<br />
(gdb) set myHwInit2Hook = myHwInit2<br />
(gdb) break myHwInit2<br />
(gdb) continue<br />
However, if you start the agent before the kernel, you must start it after the call to<br />
sysHwInit( ). Thus, you cannot override sysHwInit( ). On the other hand, you<br />
54
3<br />
Creating a New <strong>BSP</strong><br />
might want to add additional hardware initialization code that is called before the<br />
kernel is started. In this case, you can add a hook right before the call to<br />
kernelInit( ). As an alternative to hooks, you can call routines from the debugger<br />
by using the GDB’s call procedure. For example:<br />
(gdb) call myHwInit2<br />
3<br />
The advantage of using hooks instead of the call mechanism is that:<br />
■<br />
Hooks let you avoid executing the original code.<br />
■<br />
Hooks are much faster.<br />
If your board has an “abort” button, consider connecting a debug routine to the<br />
abort interrupt. Then you can set a breakpoint on your interrupt handler from the<br />
debugger. This provides a way for you to gain control of the system if it appears to<br />
have died. In this case it is best to have the abort switch tied to a non-maskable<br />
interrupt (NMI).<br />
! WARNING: Only fatal interrupts such as “abort” can be connected to an NMI. If a<br />
device interrupt is connected to an NMI, the kernel will not work properly.<br />
3.4 Using a Minimal Kernel<br />
A minimal kernel involves adding just a few simple device drivers. Because these<br />
drivers involve connecting interrupt service routines, this section starts with some<br />
ISR guidelines.<br />
3.4.1 ISR <strong>Guide</strong>lines<br />
After the kernel is started, you can use the intConnect( ) routine and<br />
INUM_TO_IVEC macro to connect interrupt service routines (ISRs) to the interrupt<br />
vector table. For example:<br />
intConnect (INUM_TO_IVEC (intVec), proc, param);<br />
The intVec parameter is the interrupt vector, proc is the C routine to call in response<br />
to the interrupt, and param is a parameter to pass the proc routine. For more<br />
information, see the reference entry for intConnect( ).<br />
55
VxWorks 5.5<br />
<strong>BSP</strong> Developer’s <strong>Guide</strong><br />
A common mistake made when writing ISRs is to omit the interrupt acknowledge<br />
needed to clear the interrupt source. The unfortunate result is the immediate<br />
generation of another interrupt as soon as the ISR completes.<br />
Non-maskable interrupts (NMIs) cannot be used in conjunction with most<br />
VxWorks library functions. They must be used and implemented with great care.<br />
For more information on ISRs at high interrupt levels, see the VxWorks<br />
Programmer’s <strong>Guide</strong>: Basic OS.<br />
! WARNING: ISRs must not call certain VxWorks routines. For a listing of the<br />
routines callable from interrupt level, see the ISR special limitations discussion<br />
included in the VxWorks Programmer’s <strong>Guide</strong>: Basic OS.<br />
3.4.2 Required Drivers<br />
The only driver required by VxWorks is the system clock, although certain<br />
architectures, such as the 80x86 and PowerPC, also require an interrupt controller<br />
driver. Implementing a system clock driver typically involves using one of the<br />
existing drivers from src/drv/timer (and src/drv/intrCtl if an interrupt controller<br />
driver is needed). If you are reusing an existing driver, all you need to do is<br />
perform board-specific hardware initialization in sysHwInit( ), and connect the<br />
interrupt by calling intConnect( ) in sysHwInit2( ).<br />
The timer drivers are simple devices that you can test by modifying usrRoot( ) to<br />
perform some action periodically, such as blinking an LED. For example:<br />
void myTestCode (void)<br />
{<br />
while (1)<br />
{<br />
taskDelay (5*sysClockRateGet()); /* every 5 seconds */<br />
sysFlashLed(); /* flash an LED */<br />
}<br />
}<br />
3.4.3 Serial Drivers<br />
Although not always required, most <strong>BSP</strong>s include a serial driver. Serial drivers<br />
have changed significantly with the introduction of Tornado (in fact, that was the<br />
major change made to the <strong>BSP</strong>s). For a description of these changes, see<br />
A. Upgrading a <strong>BSP</strong> for Tornado 2.0. The new serial drivers are located in the<br />
src/drv/sio directory. One of these drivers should be appropriate to your needs. If<br />
56
3<br />
Creating a New <strong>BSP</strong><br />
not, use the src/drv/sio/templateSio.c template driver as the basis for your own<br />
custom serial driver.<br />
Earlier, you removed most of the body of usrRoot( ) with #if FALSE/#endif pairs.<br />
Now, you need to move the #if FALSE line further down, below the point at which<br />
the serial devices are initialized.<br />
You should modify usrRoot( ) to spawn some application test code to test your<br />
drivers. For example, you can periodically print a message to the console:<br />
3<br />
void myTestCode (void)<br />
{<br />
extern int vxTicks;<br />
char * message = "still going...\n";<br />
while (1)<br />
{<br />
taskDelay (5*sysClockRateGet()); /* every 5 seconds */<br />
write (1, message, strlen (message)); /* print a message */<br />
}<br />
}<br />
3.5 The Target Agent and Tornado<br />
The debug agent is initialized by a call to wdbConfig( ). By default, this happens<br />
at the very end of usrRoot( ). However, you modified this usrRoot( ) to be empty<br />
(see config/all/usrConfig.c, p.48). To restore the agent, call wdbConfig( ) right after<br />
your serial-line initialization code. The default configuration for the target agent<br />
uses the network as a connection to the host. Unfortunately, networking is not yet<br />
available. Therefore, you must use an alternative method of connection. For<br />
information on how to do this, see the section on Alternative Back Ends in the<br />
Tornado Users <strong>Guide</strong>: Setup and Startup.<br />
3.6 Finishing the Port<br />
This section summarizes the various and diverse tasks essential to completing the<br />
port. Included is a discussion of cleanup, timers, networking, and other issues.<br />
57
VxWorks 5.5<br />
<strong>BSP</strong> Developer’s <strong>Guide</strong><br />
3.6.1 Cleanup<br />
Up to now you have been using private copies of usrConfig.c and bootInit.c. Your<br />
<strong>BSP</strong> should work with the generic versions. To reinstall the generic versions,<br />
remove these lines from your <strong>BSP</strong>’s Makefile:<br />
BOOTINIT<br />
USRCONFIG<br />
= bootInit.c<br />
= usrConfig.c<br />
And then do a make clean.<br />
Previously you masked out unwanted configuration code with #if FALSE/#endif<br />
pairs. Now you need to eliminate the unwanted code in a more standard way. That<br />
is, you must undefine the appropriate macros in config.h. The file<br />
src/config/usrDepend.c lists macro dependencies you must keep in mind.<br />
3.6.2 NVRAM<br />
VxWorks defines an interface for reading and writing to a persistent storage area.<br />
This interface is called a non-volatile memory library. Several generic drivers exist<br />
in the target/src/drv/mem directory.<br />
3.6.3 Adding Other Timers<br />
Your driver should probably include an auxiliary clock driver as well as a<br />
high-resolution timestamp driver.<br />
The auxiliary clock is used by the VxWorks spy utility, and also by the Tornado<br />
host tool called the browser. For more information on the auxiliary clock interface,<br />
see the reference entries for the various sysAuxClk*( )routines, F. Generic Drivers,<br />
and the WindView User’s <strong>Guide</strong>: Creating a VxWorks Timestamp Driver.<br />
The high-resolution timestamp driver is currently used only by WindView, but<br />
writing it can be useful to you for future debugging. The interface can be found in<br />
the header file target/h/drv/timer/timestampDev.h.<br />
3.6.4 Network<br />
This manual describes how to use a “standalone” VxWorks image, vxWorks.st.<br />
This image has two properties:<br />
58
3<br />
Creating a New <strong>BSP</strong><br />
■<br />
It has a VxWorks symbol table linked in. This is no longer needed because<br />
Tornado uses a host-based symbol table for debugging information.<br />
■<br />
It links in the network subsystem, but does not initialize it.<br />
Instead of using a vxWorks.st image, continue to use vxWorks,orvxWorks_rom.<br />
To link in the network without initializing it, add a dummy conditional to<br />
usrConfig.c right before the call to usrNetInit( ):<br />
3<br />
if (FALSE) /* add this line */<br />
usrNetInit (BOOT_LINE_ADRS); /* so that this is not called */<br />
Then you can call usrNetInit( ) later, and use CrossWind to debug your network<br />
driver(s). It is easiest to get your network driver first working with the cache and<br />
MMU disabled.<br />
The following table in src/config/usrNetwork.c is used to configure the BSD 4.4<br />
network devices:<br />
#ifdef NETIF_USR_DECL<br />
NETIF_USR_DECL /* declarations from <strong>BSP</strong> */<br />
#endif<br />
...<br />
LOCAL NETIF netIf [] = /* network interfaces */<br />
{<br />
#ifdef NETIF_USR_ENTRIES /* Additional entries, from <strong>BSP</strong> */<br />
NETIF_USR_ENTRIES<br />
#endif<br />
#ifdef INCLUDE_DC<br />
{"dc", dcattach, (char*)IO_ADRS_DC, INT_VEC_DC, INT_LVL_DC,<br />
DC_POOL_ADRS, DC_POOL_SIZE, DC_DATA_WIDTH, DC_RAM_PCI_ADRS,<br />
DC_MODE },<br />
#endif /* INCLUDE_DC */<br />
#ifdef INCLUDE_EGL<br />
{"egl", eglattach, (char*)IO_ADRS_EGL, INT_VEC_EGL, INT_LVL_EGL},<br />
#endif /* INCLUDE_EGL */<br />
...<br />
}<br />
For END drivers, network devices are initialized by a table in the configNet.h file.<br />
The table name is endDrvTbl.<br />
#define DEC_LOAD_FUNC dec21x40EndLoad<br />
#define DEC_BUFF_LOAN 1<br />
/*<br />
* ::::::: \<br />
* :<br />
*/<br />
# define DEC_LOAD_STRING<br />
59
VxWorks 5.5<br />
<strong>BSP</strong> Developer’s <strong>Guide</strong><br />
"0x81020000:0x80000000:0x12:0x12:-1:-1:-1:0:0x80800<br />
000"<br />
IMPORT END_OBJ* DEC_LOAD_FUNC (char*, void*);<br />
END_TBL_ENTRY endDevTbl [] =<br />
{ 0, DEC_LOAD_FUNC, DEC_LOAD_STRING, DEC_BUFF_LOAN, NULL, FALSE},<br />
{ 0, END_TBL_END, NULL, 0, NULL, FALSE},<br />
};<br />
As you can see, the drivers that are initialized are controlled by a set of macros.<br />
To add <strong>BSP</strong> support for an existing VxWorks network driver, modify config.h to<br />
define the corresponding macro and I/O parameters. To add support for custom<br />
BSD drivers, define the macro NETIF_USR_ENTRIES and NETIF_USR_DECL<br />
appropriately. END customers only need to add an appropriate entry to the<br />
endDrvTbl to include the driver. Refer to the specific driver documentation for the<br />
exact format and syntax of the drivers initialization string.<br />
Support for the VME-based standalone networking cards, Excelan EXOS-202 and<br />
the CMC ENP-10, has been dropped from the standard product as of Tornado 2.0.<br />
3.6.5 Cache, MMU, and DMA Devices<br />
The next step is to get the <strong>BSP</strong> working with caches and MMU enabled. For more<br />
information, see 5.6 Cache Considerations, p.101, and 4.5 Enabling the Virtual Memory<br />
Library, p.83. Cache and MMU configuration can strongly affect the behavior of<br />
DMA devices such as network drivers.<br />
3.6.6 Boot ROMs<br />
The boot ROMs use the VxWorks kernel. The two main differences between the<br />
bootrom image and the vxWorks image are:<br />
■<br />
■<br />
The bootrom image uses target/config/all/bootConfig.c instead of<br />
target/config/all/usrConfig.c. Both files are very similar, so to getting the boot<br />
ROM working involves essentially the same the steps previously described.<br />
The bootrom image is compressed by default. It is uncompressed and copied<br />
into RAM in bootInit.c.<br />
60
3<br />
Creating a New <strong>BSP</strong><br />
3.6.7 SCSI<br />
VxWorks supports SCSI-2 drivers; see I. Writing a SCSI-2 Device Driver. SCSI-1<br />
drivers are no longer supported.<br />
3<br />
3.6.8 Projects<br />
The Tornado documentation set contains the necessary information regarding<br />
creating, configuring, and building projects. These steps can all be handled<br />
through the project facility GUI. For information about working with the project<br />
facility GUI, see 6. Components and E. Component Language.<br />
61
VxWorks 5.5<br />
<strong>BSP</strong> Developer’s <strong>Guide</strong><br />
62
4<br />
Hardware <strong>Guide</strong>lines<br />
4.1 Introduction<br />
VxWorks runs on many architectures and targets from a wide variety of vendors,<br />
including custom and embedded hardware, VMEbus, Multibus, and PCIbus<br />
single-board computers, and workstation and PC mother boards. VxWorks can<br />
also boot from many different UNIX and Windows hosts using a variety of<br />
communication media.<br />
With the number of combinations that have been configured, Wind River has<br />
gathered sufficient experience to make recommendations in board design to best<br />
suit the VxWorks run-time environment. However, this document should not be<br />
used to determine the desirability of potential or existing ports. Many<br />
considerations essential to such determinations, such as cost analysis, time to<br />
market, and power and cooling requirements, are beyond the scope of this<br />
document.<br />
This chapter enumerates run-time functional requirements, distills features of<br />
important run-time components, and warns against potential pitfalls. The primary<br />
objective of this chapter is to assist developers in selecting appropriate boards and<br />
components for VxWorks operation. The following issues are discussed in this<br />
chapter:<br />
■<br />
■<br />
■<br />
■<br />
architectural considerations<br />
memory<br />
bus<br />
devices<br />
The particulars of how an individual architecture implements these considerations<br />
are discussed in the VxWorks Architecture Supplement document for each<br />
63
VxWorks 5.5<br />
<strong>BSP</strong> Developer’s <strong>Guide</strong><br />
architecture. This chapter is a general discussion of the issues and not an<br />
implementation-specific guide.<br />
4.2 Architectural Considerations<br />
At the core of any VxWorks run-time environment is the target architecture. This<br />
section is dedicated to the capabilities and run-time ramifications of architecture<br />
selection. Some general observations follow, but most details are covered in<br />
sections devoted to a particular architecture.<br />
For additional documentation that pertains to VxWorks architecture support, refer<br />
to the following:<br />
■<br />
the appropriate VxWorks Architecture Supplement document<br />
■<br />
VxWorks API Reference: Drivers, 5.5<br />
■<br />
VxWorks API Reference: OS Libraries, 5.5<br />
■<br />
Tornado User’s <strong>Guide</strong>, 2.2<br />
■<br />
<strong>BSP</strong> documentation (for a target similar to yours)<br />
■<br />
Wind River Technical Notes, available online through WindSurf<br />
4.2.1 Interrupt Handling<br />
Interrupts asynchronously connect the external world to the system, and are<br />
typically the most important aspect of real-time systems. VxWorks adopts a<br />
vectored interrupt strategy where applications “connect” ISRs (Interrupt Service<br />
Routines) to a unique vector generated by the interrupting component. VxWorks<br />
provides functions to dynamically program these vectors to contain the address of<br />
an extremely small and fast code stub that calls an application’s C-language ISR,<br />
and then returns control to the kernel.<br />
A frustrating complication to ordinary interrupt servicing is interrupt<br />
acknowledgment (IACK). Most system architectures provide for automatic<br />
interrupt acknowledgment. For the relatively few that do not address this issue,<br />
ISRs must manually acknowledge an interrupt through a register access or by<br />
some other awkward mechanism.<br />
Finally, interrupt latency may vary from architecture to architecture. Interrupt<br />
latency is the maximum amount of time from the initial processor interrupt request<br />
64
4<br />
Hardware <strong>Guide</strong>lines<br />
to the start of interrupt service processing. Both hardware and software contribute<br />
to interrupt latency. The hardware may prioritize external interrupts, thereby<br />
introducing an intrinsic latency to lower-priority interrupts. Architectures often<br />
have indivisible instructions whose execution times are surprisingly long.<br />
Especially problematic are cache push operations, which may take tens of<br />
uninterruptable microseconds. The VxWorks operating system also contributes to<br />
interrupt latency by inhibiting the processor’s ability to receive interrupts. While<br />
each architecture has optimized these interrupt locks to an absolute minimum, be<br />
aware that some variation in performance exists when comparing one architecture<br />
to another.<br />
For information on non-maskable interrupts (NMIs), see the discussion of<br />
interrupt service code in VxWorks Programmer’s <strong>Guide</strong>: Basic OS. Non-maskable<br />
interrupts are usable, but they must not call any VxWorks kernel routines as part<br />
of the service routine. This severely limits the functionality that can be used within<br />
an NMI handler.<br />
4<br />
4.2.2 Cache Issues<br />
Many recent architectures have introduced instruction and data caching to<br />
increase processor performance and reduce CPU bus activity. The most difficult<br />
aspect of memory caching is that the technology has often addressed the cache<br />
coherency problem inadequately.<br />
The cache coherency problem refers to cached information that is redundant with the<br />
information in memory. If another bus master or DMA device updates memory,<br />
the cached data no longer reflects the actual value in memory. Without sufficient<br />
hardware support, solving the coherency problem is left to the software.<br />
Unfortunately, cache management varies greatly from architecture to architecture.<br />
In some cases, the architecture provides cache management instructions; in others,<br />
cache management is bundled together with functions for managing virtual<br />
memory.<br />
VxWorks provides a cache library interface that is unified across disparate CPU<br />
architectures. This permits highly portable, high-performance device drivers to be<br />
implemented with VxWorks. For more information, see the reference entry for<br />
cacheLib and 5.8.1 Review of cacheLib Facilities, p.103.<br />
When considering hardware snooping, only full cache snooping is of benefit. Some<br />
processors implement partial snooping, but partial snooping does not meet our<br />
memory coherency requirements. Only when the snoop hardware makes the<br />
memory fully coherent is it useful for VxWorks.<br />
65
VxWorks 5.5<br />
<strong>BSP</strong> Developer’s <strong>Guide</strong><br />
The combination of copyback cache without snooping is particularly dangerous,<br />
although the risk is reduced if all user buffers are positioned so that they do not<br />
share cache lines with any other buffer. The user can insure that the front end of<br />
any user buffer is aligned on a cache boundary by setting the variable<br />
memDefaultAlignment to the cache line size. This results in all malloc( ) requests<br />
being aligned on the start of a cache line.<br />
The user can protect the rear end of any buffer by increasing the size of the memory<br />
request by one cache line. This guarantees that no other buffer shares a cache line<br />
with this buffer. Having done all this, memory buffers for DMA operations are<br />
relatively safe from the effect of memory coherency in a copyback situation.<br />
Many new processors implement write pipes that can buffer write operations<br />
when the bus controller is busy. This requires device drivers to make use of the<br />
CACHE_PIPE_FLUSH macros for generic drivers. A CACHE_PIPE_FLUSH operation<br />
should be inserted between any I/O write operation and a I/O read operation. If<br />
a routine begins with an I/O read then you should assume that an I/O write<br />
operation precedes it.<br />
4.2.3 MMU Support<br />
VxWorks supports several different MMUs through a virtual memory library.<br />
Because virtual memory is inappropriate for some real-time applications,<br />
VxWorks can be configured to not include virtual memory support.<br />
For more information on VxWorks virtual memory support, see the following:<br />
■<br />
the reference entries for vmBaseLib and vmLib<br />
■<br />
■<br />
VxWorks Programmer’s <strong>Guide</strong>: Virtual Memory Interface<br />
VxWorks Programmer’s <strong>Guide</strong>: Configuration<br />
■<br />
4.5 Enabling the Virtual Memory Library, p.83<br />
4.2.4 Floating-Point Support<br />
Floating point is supported as a tasking extension to avoid costly context switch<br />
times for tasks that do not use floating-point operations. Tasks can be spawned<br />
with a special floating-point option, and context switch callouts provide the<br />
mechanism to initialize, save, and restore a floating-point context. By switching<br />
floating-point data and control registers in and out, each task effectively shares the<br />
single floating-point unit.<br />
66
4<br />
Hardware <strong>Guide</strong>lines<br />
Higher-level transcendental functions are supported in VxWorks in one of these<br />
ways:<br />
■<br />
■<br />
A portable version that avoids using any floating-point instructions is<br />
standard, but can be replaced with an optimized (assembly language) version<br />
for certain architectures with floating-point capabilities. See the discussion of<br />
the selection of optional features in the VxWorks Programmer’s <strong>Guide</strong>:<br />
Configuration.<br />
For floating-point intensive applications, coprocessors offer significant<br />
performance advantages.<br />
4<br />
4.2.5 Other Issues<br />
Other features worth consideration include the following:<br />
■<br />
■<br />
■<br />
The endian byte order selection is transparent to full VxWorks functionality.<br />
An architecture with indivisible read-modify-write operation, such as<br />
test-and-set, is necessary for high-performance backplane network<br />
communication.<br />
Restrict non-maskable interrupts to events that require no operating system<br />
support.<br />
4.3 Memory<br />
This section discusses the following issues:<br />
■<br />
■<br />
■<br />
■<br />
■<br />
■<br />
RAM<br />
ROM<br />
Ethernet RAM<br />
NVRAM<br />
parity checking<br />
addressing<br />
67
VxWorks 5.5<br />
<strong>BSP</strong> Developer’s <strong>Guide</strong><br />
4.3.1 RAM<br />
VxWorks CISC processors require 1 MB of RAM for a development system that<br />
includes all of the standard VxWorks features, such as the shell, network, file<br />
system, loader, and others. RISC processors typically require more RAM space:<br />
2 MB of RAM is the minimum; 4 MB is encouraged. For a scaled-down production<br />
system, the amount of RAM required depends on the application size and the<br />
options selected.<br />
The primary configuration values controlling the usage of memory are<br />
LOCAL_MEM_LOCAL_ADRS, LOCAL_MEM_SIZE, USER_RESERVED_MEM,<br />
ROM_TEXT_ADRS, ROM_WARM_ADRS, and ROM_SIZE. For more information on<br />
these values, see 2.2.1 <strong>BSP</strong> Source and Include Files, p.12.<br />
4.3.2 ROM<br />
VxWorks CISC processors require a minimum of 128 KB of ROM, which is just<br />
sufficient for VxWorks compressed boot ROMs. RISC processors typically require<br />
greater ROM space; 256 KB of ROM should be considered a minimum. These<br />
figures do not include any ROM-resident application code.<br />
Applications running out of ROM are usually slow because of 16-bit or (more<br />
commonly) 8-bit data width, slow access times, and so on. VxWorks avoids this<br />
problem by typically copying the contents of the boot ROMs into RAM.<br />
For information on creating a ROM-resident VxWorks image, see the discussion of<br />
executing VxWorks from ROM in the VxWorks Programmer’s <strong>Guide</strong>: Configuration,<br />
and the Tornado User’s <strong>Guide</strong>: Cross-Development.<br />
The configuration macros ROM_TEXT_ADRS and ROM_SIZE control the actual<br />
usage of ROM memory space. For more information, see 2.2.1 <strong>BSP</strong> Source and<br />
Include Files, p.12.<br />
The macro ROM_WARM_ADRS is the warm boot entry point used by the<br />
sysToMonitor( ) routine. It is normally defined as a constant offset, normally 8<br />
bytes, above the cold boot entry point ROM_TEXT_ADRS.<br />
4.3.3 Ethernet RAM<br />
Some application designers have elected to provide dedicated pools of memory to<br />
DMA-based Ethernet chips. CPU access to its own memory is therefore<br />
unimpeded by incoming Ethernet packets, thus guaranteeing real-time response.<br />
68
4<br />
Hardware <strong>Guide</strong>lines<br />
Such dedicated pools of memory are supported by the associated VxWorks<br />
Ethernet drivers. These pools of memory should fully support 32-bit data width<br />
accesses, or network performance is seriously compromised.<br />
Refer to the man page for the relevant driver code for information about<br />
configuring dedicated DMA memory pools.<br />
4<br />
4.3.4 NVRAM<br />
VxWorks can use 255 bytes of non-volatile RAM (NVRAM) for storing the<br />
boot-line information. Without NVRAM, the correct boot-line must either be<br />
burned into the boot ROMs or typed in after every reset/power-up during<br />
development.<br />
NVRAM can be implemented with battery-backed static RAM, EEPROM, or other<br />
technology. A number of boards use the Mostek MK48T02, which contains a<br />
time-of-day clock (also optional) in addition to 2040 bytes of battery-backed static<br />
RAM.<br />
Refer to the man page for the appropriate memory driver for more information on<br />
configuring a specific driver. Almost all drivers use the configuration macros<br />
NV_RAM_SIZE, NV_BOOT_OFFSET, and NV_RAM_ADRS. These macros are<br />
usually defined in config.h, bspname.h, or configAll.h. For more information, see<br />
2.2.1 <strong>BSP</strong> Source and Include Files, p.12.<br />
4.3.5 Parity Checking<br />
VxWorks makes no direct use of memory parity checking on the RAM. If parity<br />
checking is desired or needed, it is usually left to the <strong>BSP</strong> or the user to enable<br />
parity and to implement a parity error handling routine. Some architectures may<br />
specify an interrupt or exception vector to be used for parity error handling.<br />
4.3.6 Addressing<br />
The address map for VxWorks itself is not important; however, a complex<br />
distribution of code and data within memory might not be supported by the tool<br />
chain.<br />
The critical addresses in the memory map are: RAM_HIGH_ADRS,<br />
RAM_LOW_ADRS, and ROM_TEXT_ADRS. (See configuration macros for RAM,<br />
described above).<br />
69
VxWorks 5.5<br />
<strong>BSP</strong> Developer’s <strong>Guide</strong><br />
4.3.7 Bus<br />
This section describes issues of concern when considering the following bus types:<br />
■<br />
■<br />
■<br />
■<br />
VMEbus<br />
Multibus II<br />
PCI, cPCI, and PMC<br />
busless<br />
VMEbus<br />
This section discusses issues of concern to the <strong>BSP</strong> developer considering the<br />
VMEbus.<br />
VME Specification C.1.<br />
Addressing<br />
VME interoperability is crucial for the success of the standard. Special-purpose<br />
extensions to the bus should be confined to the user pins on rows A and C of the<br />
P2, and they should be clearly documented. Under no circumstance is it acceptable<br />
to deviate from the timings presented in the specification.<br />
The VME-64 Specification is a superset of earlier specifications. At this time Wind<br />
River does not provide support for the plug and play features provided in the<br />
VME-64 specification or any of its extensions.<br />
The choice of address map is not critical in VxWorks. Local addresses can obscure<br />
parts of the VME bus address space. Some boards cannot address low memory on<br />
the bus because their local address starts at 0. This is not a problem for VxWorks,<br />
because all VME device drivers are configurable. However, conflicting devices<br />
may be a system issue.<br />
Dynamic Bus Sizing on VMEbus Accesses<br />
There are three address types defined in the specification:<br />
■<br />
A16 short<br />
■<br />
A24 standard<br />
■<br />
A32 extended<br />
In addition, there are often data width restrictions to off-board devices.<br />
Many implementers offer different windows with different data widths (D16 or<br />
D32) to the same VME address.<br />
70
4<br />
Hardware <strong>Guide</strong>lines<br />
Especially useful are windows that break the wider D32 accesses into two D16<br />
accesses automatically. This can be achieved with the dynamic bus-sizing<br />
capability of some architectures (for example, 68K).<br />
Some boards require that a register be initialized to indicate data “direction”<br />
(read/write) in addition to the AM (Address Modifier). This is inconvenient.<br />
See config.h, p.16, for a standard set of configuration macros to declare master and<br />
slave access windows onto the VMEbus.<br />
Wind River does not provide direct support of 64-bit addressing or data. However,<br />
this does not preclude board specific routines from providing such support to the<br />
user.<br />
4<br />
Dual-Port Memory<br />
RMW<br />
Most CPU boards have local (on-board) RAM. Creating a slave access window on<br />
the VMEbus makes the local memory accessible by other CPUs and DMA devices<br />
on the bus. This is also called dual porting. It is required by systems that want<br />
backplane-shared memory to be on the local processor’s RAM. Such dual-ported<br />
memory should fully support RMW cycles as described below.<br />
Dual porting is also required for off board devices that DMA into target memory,<br />
such as the Excelan EXOS-302.<br />
It is useful if the dual-ported memory can be seen by the local processor at the<br />
memory’s external address, although this is often not provided (and is not used by<br />
VxWorks).<br />
Dual-port memory is also very useful during porting; it facilitates the use of<br />
backplane debugging.<br />
Read-modify-write (RMW) must be provided in an indivisible manner.<br />
The board must adhere to the RMW mechanism defined in the VME specification;<br />
namely, a master must keep the address strobe low between the read and the write<br />
portions of the cycle. A correctly functioning dual-ported slave board keeps the<br />
RMW indivisible across both ports by detecting an address strobe that remains<br />
low.<br />
Unfortunately, keeping the address strobe low is only viable if you are reading and<br />
writing the same single address. A more complicated indivisible instruction, such<br />
as CAS, that involves multiple addresses cannot use this, and thus has no correct<br />
mechanism for dual-ported memory. Because VxWorks uses only TAS, this is not<br />
an issue. Some vendors have added a LOCK pin to the P2 bus for this reason.<br />
71
VxWorks 5.5<br />
<strong>BSP</strong> Developer’s <strong>Guide</strong><br />
Arbitration<br />
However, the pin is not part of the standard and is therefore insufficient support<br />
for this mechanism. For most boards this is not an issue.<br />
Caching and/or snooping can be an issue for VME RMW cycles. The shared<br />
memory master board must not introduce any cache coherency problems. It must<br />
be non-cached, or protected by full snooping capabilities, for proper VME slave<br />
accesses.<br />
For some PowerPC implementations, it has been necessary to use bus arbitration<br />
as a global semaphore for VME RMW operations. When a board cannot generate,<br />
nor respond to RMW cycles, using the bus as a global semaphore works. Any<br />
board that cannot use RMW, arbitrates for and holds the VME bus while a read and<br />
write cycle is completed. In addition, the bus master board, where the shared<br />
objects are stored, must implement the same bus lockup protection, even if the<br />
master board can do RMW cycles correctly. This scheme is implemented in the <strong>BSP</strong><br />
sysBusTas( ) and sysBusTasClear( ) functions.<br />
The board should default to bus request level 3 and provide a jumper mechanism<br />
if alternative arbitration levels are supported.<br />
It is often convenient to be able to select the manner of bus-release that can be RWD<br />
(release when done), ROR (release on request), or RAT (release after timeout).<br />
Multiple bus request/grant levels may be critical for systems with many masters<br />
in the backplane; with round-robin arbitration it can guarantee timely access to the<br />
bus for each bus master.<br />
If masters on the same level are daisy chained, the masters far down the bus may<br />
become “starved.”<br />
Arbitration/System Controller<br />
The system controller functionality should be optional and selected by a jumper.<br />
The system controller should not be enabled through a software settable register.<br />
The ability for software to read the system controller state (on/off) is useful.<br />
The bus system controller should assert the bus RESET signal when a “local” reset<br />
is initiated.<br />
The system controller need not arbitrate all bus levels, but if it only arbitrates one<br />
level, it is usually level 3.<br />
It is the responsibility of the system controller to time out and assert the BERR<br />
signal for slave processors. Better implementations allow this timeout to be<br />
72
4<br />
Hardware <strong>Guide</strong>lines<br />
selected from as fast as 16 microseconds to as slow as forever. A system controller<br />
LED is useful for alerting the user to the state of the arbitration logic.<br />
Mailbox Interrupts<br />
Mailbox interrupts and location monitors are similar mechanisms that may be<br />
used as interprocessor synchronization methods.<br />
A mailbox allows the interrupter to pass some information, usually a short or long<br />
word, to the receiver, while a location monitor only causes an interrupt and has no<br />
capability to pass data.<br />
VxWorks uses these mechanisms for synchronization when transmitting network<br />
packets between nodes in the backplane. Without them, VxWorks must rely on an<br />
inefficient polling mechanism that degrades backplane network throughput. One<br />
mailbox or location monitor is used currently, but two or more would be better.<br />
VxWorks can use VME interrupts to drive the backplane driver; this is preferable<br />
to polling but not as good as mailbox interrupts.<br />
No information is actually passed by VxWorks when using mailbox interrupts;<br />
only their interrupt capability is used.<br />
4<br />
VMEbus Interrupts<br />
Although VxWorks does not require VMEbus interrupts, it is a good idea to<br />
support all VMEbus interrupts, especially if off-board Ethernet capability is<br />
required. It may be possible to jumper the enabling and disabling of these<br />
interrupts, but software control is preferable. Allowing software to read the<br />
interrupt state is valuable.<br />
VMEbus Interrupt Acknowledge<br />
VMEbus interrupt requests must be acknowledged by the receiver. While some<br />
implementers have chosen to force the ISR to acknowledge the interrupt, the more<br />
elegant and preferred solution is to have the hardware automatically acknowledge<br />
the request and present the CPU with the correct vector.<br />
Software interrupt acknowledgment is not recommended because it carries a<br />
significant performance penalty.<br />
VME interrupt generation capability is also desirable. This is especially true if the<br />
board is used in a backplane network with boards that do not have mailbox<br />
interrupts. The most important example of this is on a backplane with a Sun board<br />
running SunOS; if VME interrupt generation capability is not provided by the<br />
slave, the backplane driver on the SunOS side needs to poll.<br />
73
VxWorks 5.5<br />
<strong>BSP</strong> Developer’s <strong>Guide</strong><br />
Power Usage<br />
Extractors<br />
VLSI Chips<br />
The VMEbus standard specifies the maximum power draw per voltage level.<br />
Designers must adhere to these restrictions or clearly document additional power<br />
requirements.<br />
The typical maximum power consumption per board is about 7 watts. Boards that<br />
have requirements in excess of this should emphasize it.<br />
VME boards should have card extractors mounted on the front panel.<br />
A number of VLSI chips exist that offer complete VMEbus interface functionality.<br />
Multibus II<br />
This section discusses issues for the <strong>BSP</strong> developer using Multibus II.<br />
Multibus II Specification<br />
Multibus II is actually a collection of bus standards:<br />
■<br />
■<br />
■<br />
■<br />
IPSB. a message-passing bus for communication between boards, using<br />
geographical addressing<br />
ILBX. a memory expansion bus<br />
ISBX. a definition for modules that can be plugged into Multibus II boards<br />
Multibus II Transport Protocol Specification (Intel)<br />
■<br />
Multibus II Interconnect Interface Specification (Intel)<br />
Configuration<br />
There are four address spaces on the bus: memory, I/O, message, and interconnect.<br />
Multibus II boards do not use DIP switches or jumpers for configuration.<br />
Configuration options are set by accessing the target board’s MB II interconnect<br />
space. Typical options are memory-board start and end addresses.<br />
74
4<br />
Hardware <strong>Guide</strong>lines<br />
Hardware Interrupts<br />
Hardware bus interrupts are not used. Instead, messages are used to convey<br />
information (such as device ready) or the actual I/O data. Message passing<br />
provides a reliable and easily expandable means of sending information between<br />
Multibus II agents. All backplane communications between agents can be handled<br />
with messages. No master/slave memory interfaces are required – in fact, memory<br />
interfaces are discouraged for use in communicating between boards. Because<br />
messages contain data, a block of I/O data can be transferred in the same message<br />
as the status or attention information. No memory addressing conflicts arise on the<br />
bus and there are no bus memory caching problems because messages are sent<br />
between agents, not memory addresses.<br />
4<br />
Processor Number<br />
Initialization<br />
Multibus boards are slot independent. At system initialization, the system<br />
controller (slot 0) sends slot ID numbers to each board. The initialization software<br />
on each board then sets up message IDs.<br />
During initialization, any or all boards can use the interconnect space to locate<br />
specific boards on the bus. For example, each device driver can search the bus for<br />
boards that it “recognizes” and can control. This method allows board types and<br />
locations and the system configuration to be determined at run time. Interconnect<br />
registers and the data contained in interconnect records are defined by Intel.<br />
Vendors who comply with the Intel specification identify themselves (via<br />
interconnect data) as compliant. Non-compliant boards may be used; such boards<br />
identify themselves as non-compliant.<br />
Message Passing Protocol<br />
Device Drivers<br />
Intel has defined a transport protocol for use in sending messages; this protocol is<br />
used by many board vendors. This makes adding new device devices easy because<br />
the basic communication between agents uses existing message passing routines<br />
and conventions. There is usually no hardware-specific code that needs to be<br />
written to add a new device once the initial message-passing driver is in place.<br />
A <strong>BSP</strong> normally includes one hardware device driver for the MPC chip (message<br />
passing coprocessor) and a transport software module. All VxWorks I/O device<br />
drivers send or receive messages by communicating on a software level with the<br />
transport layer (or directly with the MPC driver, if necessary). The transport layer<br />
75
VxWorks 5.5<br />
<strong>BSP</strong> Developer’s <strong>Guide</strong><br />
and MPC driver queue messages and deliver responses back to the appropriate<br />
device driver. Multiple devices can be controlled simultaneously since all<br />
messages contain source and destination addresses, as well as sequence numbers,<br />
etc., that keep track of message traffic.<br />
PCI, cPCI, and PMC<br />
Wind River provides drivers compliant with Rev 2.1 of the PCI Specifications.<br />
These drivers provide support for manual and automatic configuration and<br />
enumeration of devices. Also provided is a interrupt library module that handles<br />
the overloading of PCI interrupt sources. Refer to the reference entries for<br />
pciConfigLib, pciConfigShow, pciAutoCfg, and pciIntLib for more information.<br />
Wind River Technical Note #49 also contains information regarding PCI support.<br />
Busless<br />
When confronted with the task of porting VxWorks to a busless target, Wind River<br />
strongly recommends the use of a NetROM or In-Circuit Emulator. Emulator<br />
object file formats and operations are as varied as the vendors that sell them.<br />
Contact Wind River Systems for information on appropriate combinations.<br />
The initial goal should be to get serial line activity. Start small. Build a simple<br />
polled serial driver and build up from there. Take advantage of any LEDs that can<br />
be blinked as checkpoints in the code are passed. Use an oscilloscope to see that<br />
interrupts are occurring and being acknowledged correctly.<br />
See 3. Creating a New <strong>BSP</strong> for more information on strategies for dealing with the<br />
initial startup of a new <strong>BSP</strong>.<br />
4.4 Devices<br />
Devices should support both read and write access; it is both expensive and error<br />
prone for software to keep copies of registers or other data written to a device.<br />
Devices that have mandatory access timing requirements should not expect<br />
software to delay between accesses (error prone and non-portable), but should<br />
automatically suspend the next access.<br />
76
4<br />
Hardware <strong>Guide</strong>lines<br />
The rest of this section discusses more specific areas of concern for devices that<br />
may be used in your real-time system.<br />
4.4.1 Interrupts<br />
Interrupts are a major consideration in any real-time system. The issue of interrupt<br />
latency can have major influence on system design. The interrupt handler<br />
mechanism in VxWorks is designed to provide minimum interference between the<br />
interrupt event and the execution of the interrupt handler routine. A minimum<br />
response time is published in the benchmarks.<br />
All of this effort could go to waste if the hardware interrupt circuits are designed<br />
in a way that makes interrupt handling cumbersome or inefficient. This is one<br />
reason why certain hardware is not suited to real-time systems design.<br />
Another important fact is that the device drivers are often written to intentionally<br />
disable interrupts for a brief period of time. This is done to guard data variables<br />
that are shared (between task level code and the interrupt handler) from<br />
corruption. Ideally the driver can disable only the interrupt from the device the<br />
driver controls. However, because of some hardware with limiting designs, the<br />
driver must sometimes disable all interrupts on the board. This is not desirable,<br />
because no interrupts can be serviced during this lock-out period.<br />
Some devices are capable of supplying the interrupt vector during the interrupt<br />
acknowledge bus cycle. In addition, some of these devices can provide a modified<br />
vector, where certain bits are changed to indicate the exact cause of the interrupt<br />
within the device. This is a desirable feature because it allows the proper handler<br />
routine within the driver to be executed faster than if only a single shared handler<br />
routine is provided. (A single handler routine needs to poll the device to determine<br />
which of several possible events caused the interrupt).<br />
Many hardware designs include a special class of device: the interrupt controller.<br />
These devices “field” all of the interrupt sources of the board and provide<br />
programmable selection of interrupt parameters for each source. These parameters<br />
may be: the priority level the interrupt generates, the vector the interrupt<br />
generates, and whether the interrupt source is enabled or disabled. Some interrupt<br />
controllers can be programmed to provide round-robin arbitration of interrupt<br />
sources that are set to the same priority level.<br />
The following are guidelines for interrupt circuitry:<br />
(1) Choose devices that can provide the interrupt vector and modify the vector<br />
according to individual events. If not possible, then choose devices that<br />
provide a single vector.<br />
4<br />
77
VxWorks 5.5<br />
<strong>BSP</strong> Developer’s <strong>Guide</strong><br />
(2) Interrupt controller devices are considered good features. They can replace or<br />
augment the requirement in (1) above. There are several on the market for<br />
which Wind River has support routines. If implemented in-house, make sure<br />
the device is well documented.<br />
(3) Each interrupt source on the board should have the capability to individually<br />
enable/disable the interrupt from reaching the processor. This is so the driver<br />
never needs to alter the CPU interrupt level. An interrupt controller device<br />
usually provides this feature. A simple control register can also be used to<br />
block interrupt signals from a device. Most devices contain an interrupt<br />
enable/disable bit in one of the programmable registers. However, this is not<br />
always true: Wind River has seen devices that have no mechanism for<br />
disabling their interrupt pin from being asserted.<br />
(4) All sources of interrupts must be in the de-asserted state after a hardware reset<br />
or power up. This requirement is generally wise practice, but is especially<br />
important in VxWorks. This is because of the way VxWorks is layered into<br />
modules of different functionality. If a device is asserting its interrupt signal<br />
after reset, some programming of the device or other circuits must be done, at<br />
kernel initialization time, to cause the device to de-assert its signal. The sort of<br />
device-specific knowledge needed to do this is usually contained only in the<br />
device’s driver. It is not appropriate to duplicate this sequence within the<br />
kernel initialization routines.<br />
The only other mandatory requirement for interrupt design is to provide a well<br />
diagramed and documented interrupt vector scheme. Even in a flexible<br />
open-ended design, documentation should mention default vectors and priorities<br />
(if selectable) for the devices on the board.<br />
Some people are confused about the terminology used in discussing interrupts.<br />
Interrupt level refers to an interrupt’s input priority. Priority levels are the means by<br />
which devices interrupt the processor. Interrupt vectors are the ID numbers used to<br />
identify the correct interrupt service routine in response to an interrupt. Drivers<br />
attach service routines to interrupt vectors. Drivers enable and disable interrupt<br />
levels. Also note that while it is normal for a driver to enable the interrupt level<br />
when it is initializing a device, it should not disable the interrupt level when<br />
disconnecting from the device. This is because other devices may share the same<br />
interrupt level.<br />
Wind River Technical Note #46 discusses the creation of standard interrupt controller<br />
devices for use in certain architectures. Please refer to this technical note for further<br />
information.<br />
78
4<br />
Hardware <strong>Guide</strong>lines<br />
4.4.2 System Clock<br />
A system clock interrupt is mandatory. The system clock for VxWorks requires an<br />
interrupt between 30 Hz and ~2 KHz.<br />
The default is 60 Hz and it is desirable to generate this frequency exactly. Relying<br />
on baud-rate generators often makes this precision unattainable.<br />
4<br />
4.4.3 Auxiliary Clock<br />
VxWorks uses an auxiliary clock from 30 Hz to ~2 KHz to profile CPU utilization.<br />
This is required by the spy utility. It is useful to have a 24-bit (or greater) counter<br />
driven at a high frequency (~10 MHz) for profiling performance.<br />
4.4.4 Timestamp Clocks<br />
Many of the generic timers in target/src/drv/timer include timestamp<br />
functionality. A timestamp driver provides a high-resolution time measurement<br />
facility, typically used by the WindView product. See the WindView User’s <strong>Guide</strong>:<br />
Creating a VxWorks Timestamp Driver for more information on the API.<br />
4.4.5 Serial Ports<br />
VxWorks currently requires one RS-232 serial port, which is needed during the<br />
development and debug phases. The device should be configurable to operate at a<br />
number of “standard” baud rates; 9600 is preferred. Standard communications<br />
parameters are 8 data bits, 1 stop bit, no parity, and no modem control lines. It is<br />
possible to boot VxWorks without a serial interface, and in production, it is<br />
conceivable that embedded systems will not have a serial interface.<br />
The preference is to consider the target board to be DCE. Therefore, the RS-232<br />
connectors should be one-to-one and not null-modem (pins 2 and 3 crossed). This<br />
allows for a straightforward connection to a standard terminal.<br />
VxWorks supports software flow control; hardware flow control signals are<br />
usually ignored. Therefore, only three lines (transmit, receive, and signal ground)<br />
are required for operation.<br />
The API for SIO type serial drivers has been expanded to include support for<br />
hardware flow control and for changing the operational parameters for each serial<br />
device. The user can alter the hardware options flag for each device in order to<br />
79
VxWorks 5.5<br />
<strong>BSP</strong> Developer’s <strong>Guide</strong><br />
change the number of data bits, data parity, stop bits, and to enable or disable<br />
hardware flow control. The default settings are always to use 8 data bits, 1 stop bit,<br />
no parity, and no hardware flow control. The ioctl code for changing hardware<br />
options is SIO_HW_OPTS_SET (0x1005). The code SIO_HW_OPTS_GET (0x1006)<br />
can be used to read the current hardware options. See target/h/sioLib.h for the<br />
values assigned to the options flag bits. Not all drivers have been updated to<br />
respond to these new ioctl commands yet. Currently only the Zilog 8530 driver, the<br />
Motorola MC68681, and the Intel 8250 drivers have been fully updated with this<br />
feature.<br />
Additional serial ports may be provided by the hardware and required by the<br />
application, they are not required by VxWorks. If multiple serial ports are present,<br />
their baud rates should be independently settable.<br />
4.4.6 Ethernet Controllers<br />
VxWorks is very “network oriented,” at least during the development phase; thus,<br />
it is highly desirable to have a networking interface available. The interface can be<br />
used for booting and downloading application code as well as application-specific<br />
interprocessor communication. VxWorks provides a device-independent interface<br />
to Ethernet controllers via netLib, which permits the use of RPC and NFS and<br />
other Internet protocols.<br />
There are two basic classes of Ethernet devices on the market: those that share<br />
memory with the CPU and other bus devices, and those that maintain a private<br />
packet buffer hidden from the CPU.<br />
The devices that share memory with the CPU do so through DMA bus cycles. This<br />
implies that the device is sharing cycles on the bus while it is transmitting and<br />
receiving data. This can have a non-deterministic effect on the application.<br />
The devices that hide the packet buffer from the CPU typically require CPU<br />
processing to move the packet data in and out of the private buffer. This is<br />
commonly done with byte or word moves to or from a register on the device. This<br />
model may provide better deterministic behavior because the CPU is in complete<br />
control of the movement of packet data.<br />
Within the shared memory class of devices is another classification: those devices<br />
that only deal with contiguous memory, and those devices that deal with<br />
fragmented memory. Devices that can deal with fragmented memory are generally<br />
preferred for VxWorks, because the network interface driver exchanges mbufs with<br />
the protocol modules, and mbufs are basically memory fragments. If a device can<br />
80
4<br />
Hardware <strong>Guide</strong>lines<br />
only deal with contiguous memory, the driver must copy the packet data between<br />
mbufs and this contiguous memory, which can affect performance.<br />
If a device from the shared memory class is used, it is advantageous to select one<br />
that does not have any addressing or memory segment restrictions. This keeps the<br />
driver simpler, more efficient, and more generic.<br />
If data caching is an issue with the selected processor, it is advantageous if the<br />
Ethernet controller/DMA device and the CPU have hardware cache coherency<br />
support such as the snoop lines on the MC68040 and the Intel 82596, or if the<br />
Ethernet device and the memory it uses can be “marked” as non-cacheable. If<br />
hardware support is not available, the driver must take into consideration cache<br />
coherency, performing cache-invalidate or cache-flush operations at appropriate<br />
times. This makes the driver more complex and less generic.<br />
Designing a CPU board to include an Ethernet chip saves the expense of additional<br />
off-board networking hardware (in a “bus-full” environment) and, potentially, has<br />
a higher performance.<br />
A detailed description of writing a VxWorks END network device driver is<br />
included in H. Implementing a MUX-Based Network Interface Driver.<br />
4<br />
4.4.7 SCSI Controllers<br />
SCSI (Small Computer Systems Interface) controllers can be used to control hard<br />
disks, floppy disks, and tape drives. These devices can be used for local booting<br />
and data storage as required by the application. VxWorks provides a<br />
device-independent interface to SCSI controllers through scsiLib, which also<br />
permits the use of the MS-DOS and RT-11 compatible file systems and the<br />
“low-level” raw file system.<br />
The use of a SCSI controller with internal or external DMA capability is not<br />
required, but use of DMA greatly enhances the performance of the driver. The<br />
same cache coherency and addressing issues that apply to Ethernet controllers also<br />
apply to SCSI controllers.<br />
It is important that the SCSI controller selected support the type of SCSI target<br />
required by the application. If advanced SCSI features are important, the SCSI<br />
controller must be able to provide the required features.<br />
Wind River no longer supports its original SCSI-1 product. The SCSI-1 library and<br />
drivers are still present in the delivered product, but will not be included in future<br />
releases. Support in the form of technical questions or modifications is no longer<br />
provided. Full support is limited to the SCSI-2 libraries and drivers.<br />
81
VxWorks 5.5<br />
<strong>BSP</strong> Developer’s <strong>Guide</strong><br />
A detailed description of writing a VxWorks SCSI device driver is included in<br />
I. Writing a SCSI-2 Device Driver.<br />
4.4.8 DMA Controllers<br />
DMA controllers can free the processor of lengthy copies to I/O devices or<br />
off-board memory and may optionally be used by SCSI device drivers.<br />
4.4.9 Reset Button<br />
A reset button should be provided that is functionally equivalent to a power-on<br />
reset. If operating in a bus-full environment, the reset signal may need to be<br />
propagated to the bus.<br />
4.4.10 Abort Button<br />
The ability to generate a non-maskable-interrupt (NMI) allows the user to retake<br />
control from a wayward interrupt-bound processor, without resetting the whole<br />
board.<br />
4.4.11 DIP Switches<br />
Selection of addressing and interrupts is more convenient with DIP or rotary<br />
switches than with jumpers. Software-readable DIP switches (jumpers) are an<br />
advantage during configuration.<br />
In general, it is preferable that all functions except enabling the system controller<br />
be software settable.<br />
4.4.12 User LEDs<br />
LEDs are useful debugging tools, especially on busless targets. They allow for<br />
quick visual inspection of a board to verify its functionality. With a row of LEDs,<br />
information such as error codes can be displayed. (The LEDs should be in an easily<br />
visible place, such as a front panel).<br />
82
4<br />
Hardware <strong>Guide</strong>lines<br />
4.4.13 Parallel Ports<br />
VxWorks provides simple support of parallel ports. Refer to directory<br />
target/src/drv/parallel for supported devices and capabilities.<br />
4<br />
4.5 Enabling the Virtual Memory Library<br />
Before proceeding with this section, review the vmBaseLib and vmLib reference<br />
entries and the VxWorks Programmer’s <strong>Guide</strong>: Virtual Memory Interface.<br />
The vmBaseLib (the base virtual memory support library) and the vmLib (the<br />
VxVMI Option) have similar <strong>BSP</strong> requirements. Because vmBaseLib is bundled<br />
with VxWorks, <strong>BSP</strong>s are written to include it by default. If the VxVMI Option is<br />
installed, the end user need only change INCLUDE_MMU_BASIC to<br />
INCLUDE_MMU_FULL in target/config/bspname/config.h to include the unbundled<br />
library in future builds.<br />
The rest of this section describes the changes you must make in the sysLib.c file<br />
and the config.h file for all supported targets with MMUs, and additional changes<br />
you must make for SPARC targets.<br />
! CAUTION: Due to a limitation in the current implementation of VxWorks, virtual<br />
addresses must equal physical addresses when using 68K MMUs.<br />
4.5.1 Changes to sysLib.c<br />
Virtual memory support has two requirements:<br />
■<br />
Add a physical memory description. This requires the inclusion of one header<br />
file and the definition of two variables. Start with the code example shown in<br />
Example 4-1, and change it as appropriate.<br />
– Local RAM is valid, writable, and cacheable. ROM is valid, read-only, and<br />
often non-cached. I/O devices are valid, writable, and non-cached. If<br />
applicable, VMEbus regions are valid, writable, and usually non-cached.<br />
Flash ROM is usually writable and non-cached if it can be written directly<br />
from the CPU.<br />
83
VxWorks 5.5<br />
<strong>BSP</strong> Developer’s <strong>Guide</strong><br />
– Address and length parameters must be multiples of VM_PAGE_SIZE,<br />
defined as 8192 in configAll.h.<br />
– Because each mapped page requires a page table entry to be stored in<br />
physical memory, there is a physical memory size-dependent upper limit<br />
to the amount of address space that can be mapped. Do not map vast<br />
regions of VMEbus space. To be safe, do not map more than 32 MB per<br />
record.<br />
– When virtual memory support is enabled (see below), CPU accesses<br />
falling outside the physical memory description result in bus errors.<br />
Memory mapped devices (Ethernet, SCSI, serial, and others) are not<br />
accessible unless included in the sysPhysMemDesc[ ] array.<br />
■<br />
Add the following at the beginning of sysToMonitor( ):<br />
VM_ENABLE (FALSE); /* disable MMU */<br />
Example 4-1<br />
Additions to sysLib.c for Virtual Memory Support<br />
/* includes */<br />
#include "private/vmLibP.h"<br />
/* globals */<br />
PHYS_MEM_DESC sysPhysMemDesc [] =<br />
{<br />
/* adrs and length parameters must be page-aligned */<br />
/* RAM */<br />
{<br />
(void *) LOCAL_MEM_LOCAL_ADRS,<br />
(void *) LOCAL_MEM_LOCAL_ADRS,<br />
LOCAL_MEM_SIZE,<br />
VM_STATE_MASK_VALID | VM_STATE_MASK_WRITABLE |<br />
VM_STATE_MASK_CACHEABLE,<br />
VM_STATE_VALID | VM_STATE_WRITABLE | VM_STATE_CACHEABLE<br />
},<br />
/* ROM */<br />
{<br />
(void *) ROM_BASE_ADRS,<br />
(void *) ROM_BASE_ADRS,<br />
ROM_SIZE,<br />
VM_STATE_MASK_VALID | VM_STATE_MASK_WRITABLE |<br />
VM_STATE_MASK_CACHEABLE,<br />
VM_STATE_VALID | VM_STATE_WRITABLE_NOT | VM_STATE_CACHEABLE_NOT<br />
}, /* a16 VME */<br />
{<br />
(void *) SHORT_IO_ADRS,<br />
(void *) SHORT_IO_ADRS,<br />
84
4<br />
Hardware <strong>Guide</strong>lines<br />
0x10000, /* 64 Kbytes */<br />
VM_STATE_MASK_VALID | VM_STATE_MASK_WRITABLE |<br />
VM_STATE_MASK_CACHEABLE,<br />
VM_STATE_VALID | VM_STATE_WRITABLE | VM_STATE_CACHEABLE_NOT<br />
}<br />
};<br />
int sysPhysMemDescNumEnt = NELEMENTS (sysPhysMemDesc);<br />
4<br />
4.5.2 Changes to config.h<br />
Define INCLUDE_MMU_BASIC to enable basic virtual memory support.<br />
4.5.3 Additional Requirements for SPARC Targets<br />
In SPARC <strong>BSP</strong>s, two global variables in sysLib.c, sysCacheLibInit and<br />
sysMmuLibInit, are used to select appropriate cache and MMU libraries. The<br />
following code segment illustrates this mechanism (Sun-4 MMU example):<br />
/* Sun-4 cache library */<br />
IMPORT mmuSun4LibInit();<br />
FUNCPTR sysCacheLibInit = (FUNCPTR) cacheSun4LibInit;<br />
FUNCPTR sysMmuLibInit = (FUNCPTR) mmuSun4LibInit;<br />
Sun-4 MMU<br />
The Sun-4 MMU page size is typically 8 KB, matching the definition of<br />
VM_PAGE_SIZE in target/config/all/configAll.h. Some hardware implementations<br />
use a different page size. For such a target, override the VM_PAGE_SIZE default<br />
value by adding the following #undef/#define sequence to<br />
config/bspname/config.h (this example assumes a 4 KB page size):<br />
#undef VM_PAGE_SIZE<br />
#define VM_PAGE_SIZE 4096<br />
The Sun-4 MMU supports only eight virtual memory contexts. Additionally, only<br />
66 MB of virtual address space may be mapped at any one time (shared among the<br />
various contexts) because of the finite size of the static RAM containing the<br />
translation tables.<br />
85
VxWorks 5.5<br />
<strong>BSP</strong> Developer’s <strong>Guide</strong><br />
When defining the global mappings in sysPhysMemDesc[ ], make sure that the<br />
amount of virtual memory being mapped does not exceed 66 MB. Also keep in<br />
mind that additional virtual memory space may be mapped at run-time for private<br />
virtual memory in each of the eight contexts.<br />
SPARC Reference MMU<br />
The SPARC Reference MMU page size is 4KB. Because this does not agree with the<br />
default definition of VM_PAGE_SIZE in config/all/configAll.h, add the following<br />
#undef/#define sequence to config/bspname/config.h:<br />
#undef VM_PAGE_SIZE<br />
#define VM_PAGE_SIZE 4096<br />
Due to a 32-bit physical address assumption in vmLib, it is impossible to fully<br />
represent the 36-bit physical addresses of the SPARC Reference MMU model.<br />
Thus, for the current version of vmLib, physical addresses must be physical page<br />
numbers (that is, physical address shifted to the right by PAGE_SHIFT, or 12 bits).<br />
This affects calls to vmGlobalMap( ), vmMap( ), and vmTranslate( ), as well as<br />
specifications in the sysPhysMemDesc[ ] array. For each of these calls (and<br />
specifications), do the PAGE_SHIFT of the physical address.<br />
For supporting multiple contexts, the SPARC Reference MMU implements a<br />
fourth layer in an otherwise three-layer page table indexed by the current context<br />
number. This table is variable in size and is defined by the constants exported from<br />
the <strong>BSP</strong> as follows:<br />
mmuInitNumContexts<br />
Initial number of contexts in table (which is rounded up to a power of 2 as well<br />
as what fits on a physical page).<br />
mmuMaxNumContexts<br />
Maximum number of contexts in table (not necessarily different than<br />
mmuInitNumContexts).<br />
mmuContextTableAlign<br />
Alignment required for context table.<br />
Each of these can be determined from documentation of the particular SPARC<br />
Reference MMU chips. <strong>BSP</strong> designers may want to limit mmuMaxNumContexts<br />
to prevent the table from getting overly large (on implementations that allow a<br />
large number of context table entries).<br />
86
4<br />
Hardware <strong>Guide</strong>lines<br />
The following is an example of global variables defined in sysLib.c:<br />
/* export parameters of context table */<br />
int mmuInitNumContexts = TI390_SPARC_CONTEXTS;<br />
int mmuMaxNumContexts = TI390_SPARC_CONTEXTS;<br />
int mmuContextTableAlign = PAGE_SIZE;<br />
4<br />
87
VxWorks 5.5<br />
<strong>BSP</strong> Developer’s <strong>Guide</strong><br />
88
5<br />
Driver <strong>Guide</strong>lines<br />
5.1 Introduction<br />
This chapter describes the general problems associated with writing device<br />
drivers. Additional information on specific device drivers can be found in Wind<br />
River Technical Notes as well as the following appendices:<br />
■<br />
F. Generic Drivers (serial, SIO, memory, timer, and so on)<br />
■<br />
G. Upgrading 4.3 BSD Network Drivers<br />
■<br />
H. Implementing a MUX-Based Network Interface Driver<br />
■<br />
I. Writing a SCSI-2 Device Driver<br />
The software distributed with the <strong>BSP</strong> Kit contains template versions of each<br />
driver type. These template files provide a framework of logic that is shared by<br />
most all drivers of that type. They also explain how that particular driver should<br />
interact with the VxWorks system itself.<br />
This chapter includes a general discussion of cache considerations for DMA driver<br />
design. However, see the appropriate VxWorks Architecture Supplement<br />
document for architecture-specific details of cache implementations.<br />
89
VxWorks 5.5<br />
<strong>BSP</strong> Developer’s <strong>Guide</strong><br />
5.2 Design Goals<br />
Any design document must begin with a statement of objectives and goals. The<br />
first goal is real-time performance. Other goals include flexibility, maintainability,<br />
readability, and configurability.<br />
Designing for Performance<br />
Drivers must perform well enough to match the real-time kernel’s abilities.<br />
Designing for performance means many things. It certainly means using DMA and<br />
interrupts in an efficient manner. In coding, it means keeping the subroutine<br />
nesting at an optimum level. Too many subroutine calls and restore operations can<br />
reduce performance. This must be balanced against good use of subroutines to<br />
keep code size small and make the design easy to follow and understand.<br />
Designing for performance also means keeping interrupt latency to a minimum.<br />
Interrupt handlers must receive the greatest care in any design. Overall system<br />
performance is just as important as the specific drivers performance.<br />
Code Flexibility/Portability<br />
Flexibility in a device driver relates to adapting to new board configurations. Key<br />
elements here are structured design features and use of macros for all hardware<br />
accesses. Flexibility comes in two flavors: run-time flexibility and compile-time<br />
flexibility. Run-time flexibility usually sacrifices some amount of real-time<br />
performance for an object module that uses pointers to access routines to achieve<br />
the desired flexibility. Run-time flexibility is also called portability. Compile-time<br />
flexibility uses preprocessor macros to customize the system at compile-time for<br />
performance.<br />
Wind River recommends using both methods wherever possible. This gives<br />
compiled object modules the desired portability and still allows the same source<br />
code to be compiled with a different set of macros to generate an optimized<br />
module. The preferred method at Wind River is to use compile time macros to<br />
implement run-time vectored routines. This achieves both goals. A normally<br />
compiled object module will be customizable at run-time to achieve flexibility. Yet,<br />
that same source code can be used with redefined compile time macros to create a<br />
module optimized for performance.<br />
90
5<br />
Driver <strong>Guide</strong>lines<br />
Maintenance and Readability<br />
Most code work is maintenance. Thus, any effort that makes maintenance simpler<br />
is valuable. Adherence to coding standards and quality documentation makes<br />
code easy to read, easy to understand, and easy to maintain. The concern should<br />
be on why things happen. Poor quality documentation is just as bad as insufficient<br />
documentation. All new documentation should be reviewed by at least one other<br />
person.<br />
5<br />
Ease of Configuration<br />
Drivers should not limit the end-user’s options or requirements. Do not impose<br />
limits on the number of devices to be supported or other features. You may not be<br />
able to support all features or modes for a device, but the design should not<br />
preclude their support at a later time.<br />
Performance Testing<br />
All drivers must be tested for performance. In addition to writing the driver, the<br />
engineer must also consider test routines. This involves inserting debug<br />
information as well as benchmark tests. If a standard benchmark test is not<br />
available, then the engineer must consider writing one. Performance testing<br />
should be considered for all types of device drivers, ethernet, SCSI, serial, timers,<br />
interrupt controllers, and the like.<br />
Code Size<br />
In the embedded RTOS market, code size is important. Code size should be<br />
minimized through good structured design. Reducing code size can hurt<br />
performance. The engineer must balance the design to provide performance<br />
without excessive code size.<br />
Reentrancy<br />
Drivers should be fully re-entrant in order to support any number of devices.<br />
Drivers that limit the number of supported devices are not desirable. Instead of<br />
fixed arrays of device information, the user should create a structure for each new<br />
device and pass it to the driver for initialization and control. Alternatively, the<br />
91
VxWorks 5.5<br />
<strong>BSP</strong> Developer’s <strong>Guide</strong><br />
driver can malloc( ) the structure for each device as part of the device initialization<br />
call. Access to global data structures must be protected by some form of<br />
synchronization. The usual synchronization methods include intLock( ),<br />
taskLock( ), or a mutex semaphore.<br />
#define NUM_LN 2<br />
LN_CTRL ln_softc[NUM_LN]; /* BAD IDEA */<br />
5.3 Design Problems<br />
This section discusses the design problems associated with the variety of hardware<br />
designs, memory-mapped chips, I/O-mapped chips, multi-function chips,<br />
multiple buses and interrupt controllers.<br />
Hardware Designs of All Types<br />
The variety of hardware designs is nearly unlimited. You cannot assume anything<br />
about the hardware connections designers invent. Designers continue to push the<br />
limits requiring software to play an increasing role in the overall system design.<br />
In an ideal world, your first encounter with a new chip would tell you most of<br />
what you need to know for all subsequently derived chips. Experience differs<br />
sharply from this ideal. The first hardware implementation and thus the first<br />
software driver is sure to require extensive modification by the time the technology<br />
has matured.<br />
Memory-Mapped Chips<br />
In memory-mapped systems, designers make choices about how to map the chip<br />
registers into the memory space. Systems using the same chip can map the device<br />
I/O registers in very different ways.<br />
Consider a simple serial chip with 4 byte wide registers. One designer might map<br />
them to 4 consecutive byte addresses. Another using a 16-bit memory system<br />
might map each register on a half-word boundary, using only the low order 8 bits<br />
of the 16-bit memory bus. In another system, the registers could be mapped to long<br />
92
5<br />
Driver <strong>Guide</strong>lines<br />
word addresses. Thus, there are three different implementations with three<br />
different addressing schemes.<br />
Consider also that the designer who chose the long word implementation might<br />
also have chosen to require the driver to use only long word read/write accesses.<br />
The driver cannot even assume that a byte read operation can be used to read a<br />
byte register.<br />
One solution to this problem is to require that all accesses to the chip be restricted<br />
to as few routines as possible. Further, each access to the chip should be declared<br />
in a preprocessor macro that can be redefined so as to meet the special<br />
requirements of any particular system.<br />
5<br />
I/O-Mapped Chips<br />
Most engineers had their first experiences on Motorola processors that use<br />
memory mapped I/O exclusively. However, there is another world of processors<br />
using a separate address space called I/O space. Unfortunately, the C language<br />
does not provide a means to specify if an address is a memory address or an I/O<br />
address. You have to use assembly language subroutines to access the special<br />
instructions to reach data in I/O space. You cannot write a direct expression in C<br />
to do that.<br />
Fortunately, the solution to the memory-mapped problem above also solves this<br />
problem. By defining the special hardware access macros to use a special I/O<br />
subroutine, you can handle devices mapped into I/O space.<br />
Multi-Function Chips<br />
Designers are fond of combining more and more channels (devices) per chip. Then<br />
they thought up the idea for ASIC chips combining multiple devices of different<br />
types into a single piece of silicon. The designers are only limited by imagination<br />
in the ways they can combine silicon building blocks together.<br />
Rather than write a driver for a complete ASIC, you should strive to write drivers<br />
as though each subsection is a separate device. It might be necessary, if<br />
undesirable, for one driver to require support from another driver. If this is the<br />
case, then this must be clearly documented in the dependent driver<br />
documentation. A single large monolithic driver for an entire ASIC is opposed to<br />
the goal of system scalability. The user should be able to exclude features that are<br />
not needed by the application.<br />
93
VxWorks 5.5<br />
<strong>BSP</strong> Developer’s <strong>Guide</strong><br />
Multiple Buses<br />
CPU Local Bus, VMEbus, VXI, QBus, SBus, PCI Local Bus: will it never end?<br />
Computers are getting more complex and it is reaching the embedded computer<br />
arena. Some buses define their own byte ordering differently from the local CPU<br />
byte ordering. You want your drivers to work on any bus with a minimum of<br />
configuration changes. Fortunately, the hardware access macros that were defined<br />
for flexibility come to the rescue once again. It is simple to define the macros to<br />
perform any byte swapping or other bus related operations.<br />
The most complex board system to date is the Motorola MVME-1600 board. The<br />
local bus is the PowerPC MPC bus. The MPC105 chip connects the MPC bus to a<br />
PCI bus. A PCI chip connects to an ISA Bus. A different PCI chip connects the PCI<br />
bus to a Motorola 68040 bus. From the 68040 Bus, there is a VME chip to interface<br />
to the VMEbus. One board, five different buses. VMEbus supports seven interrupt<br />
request levels and 256 possible vectors. PCI supports four interrupt levels. ISA<br />
supports 16 interrupt levels. PCI is little endian by definition. The 040 bus is big<br />
endian by definition. The MPC bus is ambidextrous (either ended).<br />
Interrupt Controllers<br />
Some hardware designs require special interrupt acknowledge steps. Sometimes<br />
interrupts are processed through cascaded chains of interrupt controllers requiring<br />
multiple steps with each interrupt just to reset or clear the interrupt controller<br />
hardware.<br />
With the rush to PCI bus devices, you must insure that all your interrupt service<br />
routines are compatible with chaining. This means that the driver code must<br />
determine if the device is actually asserting an interrupt request and if not then the<br />
code must exit immediately.<br />
Ideally, the device driver should not be concerned with connecting interrupt<br />
vectors. This is definitely an area of <strong>BSP</strong> responsibility. The driver interrupt service<br />
routine should be a global routine that the <strong>BSP</strong> connects to the vector as part of<br />
sysHwInit2( ). If a driver must be involved in the interrupt connect step, then this<br />
should be through a hardware abstraction macro. This needs to be a flexible<br />
interface so that different boards with different interrupt structures can be<br />
supported from the one driver.<br />
94
5<br />
Driver <strong>Guide</strong>lines<br />
5.4 Design <strong>Guide</strong>lines<br />
This section discusses guidelines you should follow when designing a driver for<br />
use with Wind River products. Included are discussions of function naming<br />
conventions, documentation standards, per-device and per-driver data structures,<br />
interrupt service routines, and access macros for chip registers.<br />
5<br />
Names and Locations<br />
Follow the Wind River driver naming convention. Be very careful about routine<br />
and variable names. Each module should have a distinctive prefix and every<br />
routine and variable declared must start with that prefix. The coding conventions<br />
document suggests the module-noun-verb method of name construction. You can<br />
also consider it as being proceeding from generic to specific going from left to<br />
right. Related routines must have a common root and be distinct from each other<br />
by their suffixes.<br />
A poor example:<br />
STATUS fooStartPoll (void);<br />
STATUS fooStopPoll (Void);<br />
Should be (assuming they both are related to a polling operation):<br />
STATUS fooPollStart (void);<br />
STATUS fooPollStop (void);<br />
Only Wind River generic drivers are stored in target/src/drv/xxx. This implies that<br />
all drivers are used by more than one <strong>BSP</strong>, or are expected to be used by more than<br />
one <strong>BSP</strong>. Third party <strong>BSP</strong> writers frequently assume that these directories are for<br />
all drivers, including theirs. Because the future is unpredictable, Wind River<br />
reserves all rights with respect to these directories. Third parties must place their<br />
drivers in the same directory as the <strong>BSP</strong>.<br />
Even Wind River special drivers are placed in the <strong>BSP</strong> directory. Usually these are<br />
modified versions of a generic driver. Sometimes they are just wrappers that<br />
declare a specialized set of macros and then #include the generic driver.<br />
95
VxWorks 5.5<br />
<strong>BSP</strong> Developer’s <strong>Guide</strong><br />
Documentation and Standards<br />
Describe the entire chip with all of its features and operating modes. Code<br />
maintainers need to determine the basis of the chip without resorting to a complete<br />
library search. Most manufacturers now have their data sheets on the World Wide<br />
Web. This makes finding data sheets easier, but a good one paragraph summary of<br />
the chip can save a lot of time spent searching and reading.<br />
Describe the driver modes and limitations. The module description should be an<br />
introduction to both the chip and the driver.<br />
Follow the Wind River coding standard. This enhances readability and eases<br />
maintenance. Have a technical writer review the documentation for clarity and<br />
grammar.<br />
Do a formal code review to check for adherence to the coding standards. There is<br />
no better way to insure quality and readability than to have someone else look at<br />
your code.<br />
Concentrate on documenting how the device and the driver work together. In<br />
addition to missing documentation, there is the problem of useless documentation.<br />
It is not unusual to see documentation that is trivial and redundant. A typical<br />
example would be:<br />
x = 0; /* clear x */<br />
fooReset (&myFoo); /* reset myFoo */<br />
These are not unusual examples. Assembly level programmers are used to<br />
documenting each line of code. In the C era, programmers tend to write comments<br />
preceding the code. The line by line comment model tends to have more useless<br />
documentation. Programmers are warned to avoid the problems with line by line<br />
running comments.<br />
Another point to consider is that the documentation that goes into the generated<br />
man pages is usually more important than comments in the body of the code. This<br />
is information for the user. It must be accurate and clear. Done right, the reader will<br />
understand what the code intends to accomplish. It becomes much easier to spot<br />
problems in code when you understand its goals clearly.<br />
Documentation should tell the engineer how to integrate the driver into the overall<br />
<strong>BSP</strong> package. All special external routines should be documented. Instructions on<br />
initializing the driver should be included. Actual examples of <strong>BSP</strong> integration code<br />
would be very helpful.<br />
96
5<br />
Driver <strong>Guide</strong>lines<br />
Per-Device Data Structure<br />
As part of an object-oriented design, each device should be represented in the<br />
system by a single structure with all the state information included. The object<br />
methods (subroutines) perform operations on objects using an object handle (a<br />
pointer to the data structure representing the object).<br />
New instances of a device object would be created by calling a device create<br />
function in the driver library (xxxDevCreate). During device creation time the<br />
driver should probe to verify that the device is actually present. If not present, the<br />
device creation operation should fail and return a null pointer.<br />
5<br />
Per-Driver Data Structure<br />
In keeping with an object oriented design methodology, there should be a structure<br />
to represent the driver itself. This structure would include all the driver state<br />
information (class variables). From a practical standpoint, having all the driver<br />
data in a single structure makes it easy to display from the CrossWind debugging<br />
tool.<br />
Driver Interrupt Service Routines<br />
Because there may be bus issues related to interrupts, drivers should not call<br />
intConnect( ) directly. The driver should define a macro that can be changed by the<br />
customer to call the correct interrupt connection routine, which may not be<br />
intConnect( ).<br />
#ifndef FOO_INT_CONNECT<br />
#define FOO_INT_CONNECT(vec, rtn, arg)<br />
#endif<br />
intConnect(vec, rtn, arg)<br />
Device driver ISRs must exit immediately if the device is not asserting interrupt.<br />
Do not assume that there is a one-to-one mapping between interrupt vectors and<br />
interrupt handlers. With PCI systems, it is quite likely that interrupt lines are used<br />
to service more then one device. Interrupt routines must examine the device and<br />
determine if it is actually generating an interrupt condition. If not, the interrupt<br />
handling code should exit as quickly as possible.<br />
97
VxWorks 5.5<br />
<strong>BSP</strong> Developer’s <strong>Guide</strong><br />
Access Macros<br />
Every access to chip registers should be made through macros that can be<br />
redefined to accommodate different access methods. Usually, just a read and a<br />
write macro should suffice. In some cases, a modify macro to change individual<br />
bits in a register is also needed. For example:<br />
M68681_READ(addr, pData)<br />
M68681_WRITE(addr, data)<br />
M68681_CLR_SET(addr, clear_bits, set_bits)<br />
Accesses to a command block in memory or on a bus must also be through a<br />
redefinable macro to accommodate byte swapping and address manipulation.<br />
Note that read macros are passed the address of where to return the value read.<br />
They do not return a value like a subroutine returns a value. This is deliberate.<br />
Macros written this way can be replaced by a simple statements, subroutine calls,<br />
or by a block statement. Macros written to return a value cannot be replaced by a<br />
C block statement. For example:<br />
xxx = M68681_READ (x); /* Limited */<br />
M68681_READ (x, &xxx); /* Better */<br />
Minimize preprocessor conditional expressions within code blocks. They should<br />
add to the readability of the code, not reduce it. If the conditional only changes the<br />
value of an argument to a routine, it should be done at the beginning of the file<br />
using a #define. Only conditional expressions that actually change the flow of logic<br />
should be within a function.<br />
In this example, the only change is to one argument of a subroutine call. Putting<br />
the conditional statements inside the subroutine only confuses the reader. It does<br />
this because it has absolutely no effect on the flow of execution.<br />
#ifdef INCL_FOO<br />
fooReset (&myFoo,<br />
#else<br />
fooReset (&yourFoo,<br />
#endif<br />
arg2, arg3, arg4);<br />
98
5<br />
Driver <strong>Guide</strong>lines<br />
To fix this situation, create a new macro that is the value of the argument. Define it<br />
at the head of the file in its proper place, then refer to it at the proper place in the<br />
code. This results in a subroutine that is much easier to understand at first sight.<br />
For example:<br />
/* A better way */<br />
#ifdef INCL_FOO<br />
# define THE_FOO myFoo<br />
#else<br />
# define THE_FOO yourFoo<br />
#endif<br />
. . .<br />
fooReset (&THE_FOO, arg2, arg3, arg4);<br />
5<br />
The general rule shall be to use conditional compilation if it really changes the flow<br />
of execution within the routine. If only argument values, variable names, or<br />
subroutine names are changed then use the technique above to define an<br />
intermediate macro.<br />
Be careful with macro names, neither too simple nor too complex. Both of the<br />
following examples are unsatisfactory:<br />
SIO_READ<br />
NS16550_CONTROL_REGISTER_BIT_7_CLEAR<br />
Do not use structures to declare hardware registers, or memory control blocks. Use<br />
macros for offset constants or to convert a base address into a register address.<br />
Structures are inherently non-portable. This is the single greatest source of failure<br />
when porting drivers across architectures. Even using the same toolchain, the<br />
default structure creation can vary from architecture to architecture. The C<br />
language specification does not specify a standard for structure element<br />
alignments.<br />
typedef struct { /* I8250_DEV */<br />
char CSR;<br />
char DATA;<br />
char MBR;<br />
} I8250_DEV;<br />
/* A better way */<br />
#define I8250_CSR 0<br />
#define I8250_DATA 1<br />
#define I8250_MBR 2<br />
99
VxWorks 5.5<br />
<strong>BSP</strong> Developer’s <strong>Guide</strong><br />
5.5 Step by Step<br />
The general order shall be to design from the top down, but to implement and test<br />
from the bottom-up.<br />
Top-Down Design<br />
Top-down design means planning and documenting before starting any actual<br />
coding.<br />
■<br />
Template File<br />
Start from a template file or an existing driver. A template file is preferred.<br />
Starting from an existing file usually brings in all the problems of the other<br />
driver code. Wind River provides template files for all classes of drivers.<br />
■<br />
Module Description<br />
Find the chip manual and copy the introductory description of the chip into<br />
the module description body. Then, add paragraphs detailing how this driver<br />
is to work, which parts of the chip will be controlled, and the operating modes<br />
that will be supported.<br />
■<br />
Device Structures<br />
Start by defining a basic per-device data structure and a per-driver data<br />
structure. These structures define the state of the driver and each device. As<br />
structures, the debugger can display the complete state of either with a single<br />
print command.<br />
■<br />
Macro Definitions<br />
Document any macros that can be used to customize the driver for different<br />
applications, such as chip access macros, memory access macros, and the like.<br />
Tell the user what the macros do and how they are defined for the default<br />
situation.<br />
■<br />
Subroutine Declarations<br />
Declare all the subroutines you think the customer and <strong>BSP</strong> writer need to use<br />
this driver. Try to follow the device design with the software design as much<br />
as possible.<br />
■<br />
Block Out Functions<br />
Create the banners and declarations for all the routines you plan to write.<br />
Leave the bodies empty until you are really ready to write code. Write the<br />
subroutine description in the comment block. The comments in the comment<br />
100
5<br />
Driver <strong>Guide</strong>lines<br />
block are more important than those in the code body. They will help others to<br />
study the design without having to read the code bodies.<br />
Bottom-Up Implementation<br />
■<br />
■<br />
■<br />
■<br />
After planning the driver and laying out its skeleton of functions and data<br />
structures, you are ready to implement and test.<br />
Write the Code<br />
Start with device initialization. Write the code to accept a device structure and<br />
initialize it for use. Fill in the bodies to all the other low-level driver functions.<br />
You could do a test compile to check that all the necessary routines are<br />
declared. Examine the symbols in the object module to verify that only the<br />
desired external routines are unresolved.<br />
Test, Debug, Recompile<br />
The usual test, fix, and recompile cycle. Personal preferences guide this phase.<br />
Some code and test one routine at a time.<br />
Work One Layer at a Time<br />
Repeat the write, test, debug, recompile cycle for each layer of code. Thorough<br />
testing of each layer gives confidence in the project. Trying to write all the code<br />
at once can be unmanageable.<br />
Performance Testing<br />
Some set of benchmark tests should be used to verify that the device meets the<br />
usual customers expectations. A wide SCSI device that can only deliver<br />
5 MB/s net throughput is not going to please the customer very much. It might<br />
be necessary for the engineer to write a complete performance benchmark test<br />
as part of the overall project.<br />
5<br />
5.6 Cache Considerations<br />
The VxWorks cache library (cacheLib) was designed to hide architecture and<br />
target details from the rest of the system and to provide mechanisms to maintain<br />
cache coherency. Cache coherency means data in the cache must be in sync (or<br />
coherent) with that in RAM.<br />
101
VxWorks 5.5<br />
<strong>BSP</strong> Developer’s <strong>Guide</strong><br />
Device drivers are one of the module types in a VxWorks system that can have<br />
problems with data cache coherency. (Note that the CPU instruction cache<br />
coherency is maintained elsewhere in the system.) This document describes the<br />
issues of concern to the driver writer and describes how to use the cacheLib to deal<br />
with these issues.<br />
This document also describes how to enable the virtual memory library. This is<br />
necessary if you are using 68K or SPARC architectures. In these architectures, the<br />
VxWorks cache library controls the cache by calling the virtual memory library to<br />
manipulate the memory management unit (MMU).<br />
Only drivers using direct memory access (DMA) need to be concerned with cache<br />
issues. It is only in the area of DMA that caching is a consideration for a device<br />
driver. On architectures that do write-buffering, the driver needs to consider issues<br />
related to WRITE_PIPING.<br />
NOTE: If your target architecture includes an MMU, and you disable virtual<br />
memory support but enable the data cache, then cacheDmaMalloc( ) is unable to<br />
provide buffers safe from cache coherency issues.<br />
NOTE: If you use an MMU, the cache modes are controlled by the cache mode<br />
values in the sysPhysMemDesc[ ] table and not by the configuration macros<br />
USER_I_CACHE_MODE and USER_D_CACHE_MODE. It is a common mistake to<br />
assume these macros always control the cache operating mode.<br />
5.7 Helpful Hints<br />
■<br />
Avoiding printf( ) in drivers<br />
Avoid use of printf( ) in drivers, even for debugging purposes. Use logMsg( )<br />
instead. There may be system interactions between the driver and the I/O<br />
system that would cause printf( ) to crash the system.<br />
■<br />
Calling intConnect( )<br />
Do not call intConnect( )—or any other routine that calls malloc( )—from<br />
within sysHwInit( ). The memory partition library is not initialized and the<br />
system crashes.<br />
102
5<br />
Driver <strong>Guide</strong>lines<br />
5.8 Driver Use of the Cache Library<br />
Before reading this section, review the reference entry for cacheLib. This section<br />
describes how to maintain data cache coherency for device drivers by using the<br />
VxWorks cache library (cacheLib). It also describes the cacheLib mechanism for<br />
controlling the side effects of CPU write piping, and provides additional hints for<br />
handling cache-related issues in your device driver.<br />
5<br />
5.8.1 Review of cacheLib Facilities<br />
The cacheLib reference entries describe the library’s facilities in detail. This section<br />
provides a brief definition of the facilities discussed in this document. Remember<br />
that the cacheLib.h header file contains the function prototypes and macros need<br />
to make use of the cacheLib facilities. Include this file in your driver code.<br />
This document also references the following routine and macros:<br />
■<br />
The cacheDmaMalloc( ) routine allocates memory from the system. It<br />
attempts to use the underlying hardware features to provide a memory region<br />
that is safe from cache coherency issues. This memory region is guaranteed to<br />
start on a cache line boundary, and not to overlap cache lines with adjacent<br />
regions.<br />
■<br />
■<br />
■<br />
The CACHE_DMA_xxxx macros (such as CACHE_DMA_FLUSH) flush,<br />
invalidate, and learn attributes of memory regions provided by the<br />
cacheDmaMalloc( ) routine.<br />
The CACHE_DRV_xxxx macros (such as CACHE_DRV_INVALIDATE) flush,<br />
invalidate, and learn attributes of ordinary memory that the driver controls.<br />
The CACHE_USER_xxxx macros (such as<br />
CACHE_USER_IS_WRITE_COHERENT) flush and invalidate user memory that<br />
is outside the domain of the driver.<br />
5.8.2 Conducting Driver Analysis<br />
Each driver has a set of attributes that define its behavior relative to the cache. This<br />
section provides some guidelines for analyzing your driver for potential cache<br />
coherency problems. When you know the driver’s attributes, you can create a<br />
strategy for use of the cacheLib routines in the driver.<br />
103
VxWorks 5.5<br />
<strong>BSP</strong> Developer’s <strong>Guide</strong><br />
Before proceeding, determine if the device is DMA capable. Is the device capable of<br />
performing read or write accesses directly to memory that is shared with the CPU?<br />
If the answer is no, your driver might not need any of the cache-related facilities of<br />
the cacheLib. Cache issues affect only those devices that can access memory<br />
shared with the CPU.<br />
If the CPU architecture performs buffered writes, then you might need to deal with<br />
WRITE_PIPING even if the device does not include DMA. Device registers that are<br />
memory mapped should not be cached. In most hardware cases, there is a<br />
hardware mechanism provided that keeps I/O addresses from being cached.<br />
However, keep in mind that even a non-DMA type of device can still have issues<br />
related to write pipelining (see Driver Attributes, p.105).<br />
Shared Memory Types<br />
For DMA-type devices, the driver and the device share one or more memory<br />
regions. This shared memory can be of one of the following types:<br />
■<br />
■<br />
Memory that is allocated using the cacheDmaMalloc( ) routine. This memory<br />
is associated with the CACHE_DMA_xxxx macros and is under the control of<br />
the driver and the underlying hardware for cache issues.<br />
Memory that is allocated using the malloc( ) or memalign( ) routine or<br />
declared in the data or bss sections of the module (stack memory must never<br />
be shared with a device). This type of memory is associated with the<br />
CACHE_DRV_xxxx macros and is solely under the control of the driver for<br />
cache issues.<br />
Because you cannot control the positioning of data obtained by these methods,<br />
this type of memory has an inherent problem: the possibility of sharing a cache<br />
line with an adjacent region that does not belong to the driver. This means that<br />
flush and invalidate operations within this region can interfere with the<br />
coherency of the neighbor’s data in the shared cache lines. Therefore, restrict<br />
the use of this type of memory to exclude the first and last cache line in the<br />
region. Because the cache line size varies on different systems, this becomes a<br />
portability issue.<br />
By using memalign( ), it is possible to insure that buffers are cache line aligned<br />
at their starting address. If you need to protect the end of the buffer, you<br />
should increase the size of this request by at least one cache line size. This<br />
insures that the end of the buffer does not share a cache line with any another<br />
buffer.<br />
104
5<br />
Driver <strong>Guide</strong>lines<br />
■<br />
■<br />
Memory that is of unknown origin. This memory is associated with the<br />
CACHE_USER_xxxx macros and is outside the control of the driver. In other<br />
words, the driver does not really know how the memory was allocated, but the<br />
CACHE_USER_xxxx macros assume the memory was allocated using malloc( ).<br />
Memory that is of a fixed or special purpose. This memory is a special region<br />
that is provided by the target hardware and is intended for the exclusive use<br />
of a DMA-type device. This is usually done for performance reasons. This<br />
memory is not part of the system pool, and thus is not associated with the<br />
malloc( ) routine, the cacheDmaMalloc( ) routine, the data section, or the bss<br />
section. There are no cache macros associated with this type of memory. The<br />
hardware usually provides a means to make this entire region non-cacheable.<br />
5<br />
Driver Attributes<br />
This section lists the driver attributes you need to be aware of when planning your<br />
cacheLib strategy. Each attribute is given a name to simplify later discussion.<br />
Other than write pipelining, the attributes are of concern only to a DMA-type of<br />
device.<br />
WRITE_PIPING<br />
The CPU uses write pipelining. Write pipelining means that write operations of<br />
the CPU are held in a pipeline until the optimum state of the external bus<br />
occurs. Write pipelining is used on RISC architectures, such as MIPS. This<br />
technique can seriously affect your driver because it can delay the delivery of<br />
commands or data to the device your driver controls.<br />
This attribute is TRUE if the driver is to be run on a CPU that has a write pipe.<br />
USER_DATA_UNKNOWN<br />
The user data is in an unknown state. This attribute is TRUE if your driver<br />
passes data by address directly between the device and the driver’s user. In<br />
this case, data handed to the driver by the user is of an unknown cache state.<br />
An example of this is a pointer to a data buffer given to a SCSI disk driver for<br />
writing to the disk. In this case, the driver does not know if the buffer has been<br />
flushed to memory, or is still in cache. Conversely, data that is obtained from<br />
the device must be coherent between cache and memory before the pointer to<br />
that data can be given to the user for consumption.<br />
MMU_TAGGING<br />
The hardware provides MMU tagging of cache regions.This attribute is TRUE<br />
if an MMU that allows tagging of memory regions as non-cacheable is<br />
available on the target hardware.<br />
105
VxWorks 5.5<br />
<strong>BSP</strong> Developer’s <strong>Guide</strong><br />
DEVICE_WRITES_ASYNCHRONOUSLY<br />
The hardware provides asynchronous write operations to shared memory.<br />
This attribute is TRUE if the device can perform write operations to shared<br />
memory asynchronously to driver activity.<br />
SHARED_CACHE_LINES<br />
The hardware allows both the driver and the device to write to a single cache<br />
line. If any single cache line can be written by both the driver and the device,<br />
this attribute is TRUE. An example of this is a shared data structure such as this<br />
one:<br />
struct<br />
{<br />
short command;<br />
short status<br />
};<br />
In this case, the driver is responsible for writing the command field and the<br />
device is responsible for writing the status field.<br />
SNOOPED<br />
The hardware provides bus snooping. This attribute is TRUE if the target<br />
hardware supports bus snooping. Bus snooping makes cache issues transparent<br />
to the driver. Only full bus snooping that maintains full coherency is<br />
supported. Some processors provide partial snooping that does not meet the<br />
requirements of full memory coherency. Without full snooping, this attribute<br />
must be FALSE.<br />
SHARED_POINTERS<br />
The device’s control model allows the driver and the device to exchange<br />
memory pointers. This attribute is TRUE if the driver and the device exchange<br />
memory pointers.<br />
5.8.3 Developing the cacheLib Strategy<br />
This section describes how to devise a cacheLib strategy based on your driver’s<br />
attributes.<br />
Before proceeding, establish the target range that the driver is to support—for<br />
example, a single target, multiple differing targets, or broad support. This decision<br />
affects your choice of cache strategy. For example, a driver intended for broad<br />
support can be restricted to certain cacheLib routines because target specifics are<br />
unknown. However, drivers intended to support only a single known target can<br />
be designed to use the cacheLib routines that make best use of the target hardware.<br />
106
5<br />
Driver <strong>Guide</strong>lines<br />
The level of cache library support designed into a driver must be well documented<br />
in the code. This is an important issue that must not be neglected.<br />
Many of the routines and macros in cacheLib are designed to hide the details of<br />
the underlying hardware. The macros might actually call routines within<br />
cacheLib, or they might do nothing at all. Their action depends on how certain<br />
function pointers are initialized at run-time. The run-time initialization of the<br />
cacheLib is determined by the code in the <strong>BSP</strong> modules, which are where the<br />
actual details of the caching hardware are known. This hiding of details allows<br />
drivers to be broadly targeted, which increases portability.<br />
Good driver design includes portability. The following subsections assume<br />
portability is a goal and discuss target-specific applications only minimally.<br />
5<br />
Flush and Invalidate Macros<br />
Generally, you need to add the flush and invalidate macros to your driver. The<br />
macro set you implement depends on the type of memory you need to control (see<br />
Shared Memory Types, p.104). The flush macro is used on memory locations that are<br />
given to the device for subsequent reading by the device. The invalidate macro is<br />
used before the driver reads from memory locations that were written by the<br />
device.<br />
Portable drivers use flush and invalidate macros wherever needed. The macros are<br />
written to perform null operations if they are not needed on the particular target.<br />
WRITE_PIPING Attribute<br />
The cacheLib macro CACHE_PIPE_FLUSH flushes the write pipeline of the CPU.<br />
Typically, you add this macro to appropriate locations throughout your driver.<br />
Appropriate locations are after one or more commands have been written to the<br />
device. Device commands that require immediate delivery are most important.<br />
These commands are commonly found in initialization sequences or in interrupt<br />
handlers (where an interrupt condition requires clearing).<br />
Deciding when this macro needs to be used requires in-depth knowledge of the<br />
device you are programming. Some devices are not affected by the delays caused<br />
by a write pipeline. Such devices do not require the pipeline flush macro in the<br />
driver. Other devices do not function correctly without a tight synchronization<br />
with the driver. Such devices require liberal use of the pipeline flush macro<br />
throughout the driver.<br />
107
VxWorks 5.5<br />
<strong>BSP</strong> Developer’s <strong>Guide</strong><br />
It is recommended that you use CACHE_PIPE_FLUSH between an I/O write<br />
operation and a following I/O read operation. Successive writes or reads should<br />
not require any special protection. It is only when switching from writing to<br />
reading that pipeline flushing becomes essential.<br />
Note that flushing of the write pipeline does not mean the cache is automatically<br />
flushed to memory as well. You must still handle cache issues within the driver.<br />
Conversely, flushing or disabling the cache does not automatically flush or disable<br />
the write pipeline. The write pipeline is first in the hierarchy.<br />
SNOOPED Attribute<br />
This attribute is transparent to all memory types. Portable drivers use the<br />
appropriate flush and invalidate macros. However, if SNOOPED is TRUE, the<br />
macros evaluate to null operations. Target-specific drivers do not need flush or<br />
invalidate macros.<br />
Some systems implement partial snooping. They can read snoop and only<br />
invalidate cache data on a write. This does not meet the requirements for fully<br />
coherent memory. In this case, the SNOOPED attribute is FALSE not TRUE.<br />
MMU_TAGGING Attribute<br />
This attribute is transparent to the memory type obtained using the<br />
cacheDmaMalloc( ) routine. Portable drivers use the CACHE_DMA_FLUSH and<br />
CACHE_DMA_INVALIDATE macros. However, if MMU_TAGGING is TRUE, the<br />
macros evaluate to null operations. Target-specific drivers do not need<br />
CACHE_DMA_FLUSH or CACHE_DMA_INVALIDATE macros.<br />
This attribute does not typically affect memory obtained using the malloc( )<br />
routine, the data section, or the bss section. Therefore, appropriate use of the<br />
CACHE_USER_xxxx and CACHE_DRV_xxxx flush and invalidate macros is<br />
required, as described in Flush and Invalidate Macros, p.107.<br />
USER_DATA_UNKNOWN Attribute<br />
With this attribute, your driver must maintain cache coherency of any data that is<br />
passed directly between the device and the user. For outgoing data, first flush the<br />
user data from the cache with the CACHE_USER_FLUSH macro before<br />
commanding the device to access the data. For incoming data, first invalidate the<br />
108
5<br />
Driver <strong>Guide</strong>lines<br />
cache for the device data using the CACHE_USER_INVALIDATE macro before<br />
passing the data to the user.<br />
DEVICE_WRITES_ASYNCHRONOUSLY Attribute<br />
This attribute is only of concern when combined with the SHARED_CACHE_LINES<br />
attribute; see the next two sections.<br />
5<br />
SHARED_CACHE_LINES Attribute<br />
The driver can easily function with this attribute as long as the driver can<br />
synchronize all operations to the data fields that may share a cache line (if the<br />
driver cannot synchronize the operations, see the next section). If the device cannot<br />
write to the data fields until explicitly commanded by the driver, the driver can<br />
sequence the use of flush macros, invalidate macros, and device commands in a<br />
manner that ensures data integrity.<br />
DEVICE_WRITES_ASYNCHRONOUSLY and SHARED_CACHE_LINES Attributes<br />
The combination of DEVICE_WRITES_ASYNCHRONOUSLY and<br />
SHARED_CACHE_LINES attributes can cause problems. Because the driver cannot<br />
synchronize the write operations of the device, the potential exists for data<br />
corruption. This happens if the device performs a write operation, then the driver<br />
performs a flush operation. In this sequence, the data value written by the device<br />
is wiped out by the cache line flush operation.<br />
For this set of attributes, the driver cannot use the general CACHE_DRV_FLUSH<br />
and CACHE_DRV_INVALIDATE macros because the driver can no longer control<br />
the integrity of the shared memory. The shared memory must be obtained using<br />
the cacheDmaMalloc( ) routine. Furthermore, this routine must provide memory<br />
that is write-coherent because the driver cannot perform any flush operations. The<br />
driver can check the attributes of the memory provided by cacheDmaMalloc( ) by<br />
using the CACHE_DMA_IS_WRITE_COHERENT macro. If this macro evaluates to<br />
FALSE, the driver cannot function reliably and should abort.<br />
109
VxWorks 5.5<br />
<strong>BSP</strong> Developer’s <strong>Guide</strong><br />
SHARED_POINTERS Attribute<br />
This attribute is only a problem if the memory shared between the driver and the<br />
device was obtained using the cacheDmaMalloc( ) routine. Because this routine<br />
can invoke MMU or other special hardware services, the address of the provided<br />
memory can be a virtual address. The device, however, can deal only in physical<br />
addresses.<br />
In this case, use the CACHE_DMA_VIRT_TO_PHYS and<br />
CACHE_DMA_PHYS_TO_VIRT macros to convert between driver-viewed<br />
addresses and device-viewed addresses.<br />
5.8.4 Additional Cache Library Hints<br />
Here are some additional hints for using the cache library:<br />
■<br />
■<br />
Before adding any cacheLib support to your driver, ensure that the driver<br />
works reliably with the data cache turned off. You will not experience cache<br />
coherency problems with the data cache disabled. When you begin to add<br />
cacheLib support, you can enable the data cache. Any changes to the driver’s<br />
reliability can then be attributed to cache issues.<br />
Ensure that the driver works with cacheLib support on a single target first,<br />
using target-specific knowledge to guide the strategy. When this has been<br />
achieved, you can then modify the driver’s cacheLib strategy for broader,<br />
target-independent support.<br />
110
6<br />
Components<br />
6.1 Introduction<br />
Tornado 2.x introduces a new configuration method better suited to handling the<br />
increasing complexity of the VxWorks environment. This method uses Tornado<br />
2.x’s graphical configuration tool, the project facility, to provide users with a view<br />
into the configurable world of VxWorks. The project facility workspace displays a<br />
hierarchically organized list of optional software components that can easily be<br />
configured into VxWorks using point-and-click technology. (For Tornado 2.x,<br />
downloadable applications do not use components.)<br />
For most users, this GUI-level view of the configurable system is enough to satisfy<br />
their development needs. However, the project facility includes an API and a<br />
language, the Component Description Language (CDL), that are used to define<br />
components, their parameters, their dependencies, and their relationships with<br />
other components. This chapter discusses how to use these building blocks, the<br />
API and the CDL, to create or modify the software components that, when<br />
selected, are configured into your VxWorks system image or application.<br />
Components are a high-level means of grouping code and configuration data into<br />
units of functionality, such as “message logging.” Bootable projects are collections<br />
of components, their configuration parameter values, and their build options. In<br />
Tornado 2.x, using the project facility is the only way to manipulate projects; in<br />
other words, projects cannot be configured from the command line. (For more<br />
information about how to use the project facility, see the Tornado User’s <strong>Guide</strong>:<br />
Projects.)<br />
The traditional approach for configuring VxWorks, based on configuration header<br />
files, has become less and less effective coping with the rapidly increasing<br />
complexity of the software. When VxWorks 5.0 was released, there were about<br />
111
VxWorks 5.5<br />
<strong>BSP</strong> Developer’s <strong>Guide</strong><br />
twenty optional components that could be configured into the VxWorks system<br />
image. By the release of VxWorks 5.4, there were nearly 300, a number that does<br />
not include components offered by third party vendors. Using configuration<br />
header files contributed to development issues in three areas:<br />
Usability. As the system grew in complexity, it became increasingly difficult to<br />
visualize what was in the system. Reading through and modifying lines and lines<br />
of configuration source code became a challenge. Moreover, there was no<br />
mechanism to warn you if the system was misconfigured.<br />
Scalability. Looking at the configuration header files offered no visibility into<br />
dependencies among components. If you do not know what the dependencies are,<br />
you cannot know what is needed nor what can be left out.<br />
New releases. Configuration conflicts among system components occurred when<br />
releasing new product versions, third party components, and customer<br />
modifications because all source code changes occurred in the same two files,<br />
usrConfig.c and configAll.h.<br />
The implementation of the project facility as the configuring tool eliminates the<br />
problems above.<br />
The remainder of this chapter discusses how to work with the Component<br />
Description Language (CDL) and how to release and integrate new components<br />
into the system. Some of the examples in this chapter draw comparisons between<br />
the traditional use of configuration header files and the Tornado 2.x project facility<br />
to illustrate differences between the two schemes, as well as show their<br />
complementarity.<br />
This manual assumes you are already familiar with the functioning of Tornado,<br />
including its project facility. For more information, see the Tornado User’s <strong>Guide</strong>:<br />
Projects.<br />
NOTE: This release does not restrict you from using the configuration header files<br />
to configure VxWorks and applications. In some circumstances, using config.h and<br />
configAll.h complements the project facility.<br />
112
6<br />
Components<br />
6.2 Component Description Language<br />
In the past, the only information in the configuration header files describing a<br />
component was its preprocessor macro (for example, INCLUDE_NFS). Tornado 2.x<br />
introduces the Component Description Language (CDL) which allows for the<br />
graphical presentation of more useful information about each component, such as:<br />
■<br />
■<br />
■<br />
any hierarchical grouping with related components<br />
associated dependencies on other components<br />
configurable properties<br />
■<br />
how it is integrated into an existing system (for component releases)<br />
This information is organized by CDL objects. There are five classes:<br />
– the component object<br />
– the parameter object<br />
– the folder object<br />
– the selection object<br />
– the initialization group object<br />
Because components are the central building block of your configuration, they are<br />
discussed first. This section then provides a look at each of the CDL objects and<br />
their respective properties.<br />
6<br />
6.2.1 Components<br />
Components are basic units of configurable software. They are the smallest,<br />
scalable unit in a system. Through the project facility, the user can include or<br />
exclude a component, as well as modify some of its characteristics.<br />
The CDL uses component description files (CDFs) to describe software components<br />
in a standard way. Each CDF carries the suffix .cdf. Writing conventions for<br />
component description files are presented in 6.3.1 CDF Conventions, p.126. One file<br />
can define more than a single component.<br />
113
VxWorks 5.5<br />
<strong>BSP</strong> Developer’s <strong>Guide</strong><br />
In Tornado 2.x, a code generator outputs the system configuration files, basing<br />
them only on those components selected for configuration by the user. The overall<br />
configuration of a project is the list of included components and their properties.<br />
Details of how the project facility and code generator work can be found in the<br />
Tornado User’s <strong>Guide</strong>: Projects.<br />
In the past, you thought of components as the code and parameters included in the<br />
system by making modifications to the configuration files (config.h or<br />
configAll.h), as follows:<br />
#define INCLUDE_FOO<br />
For Tornado 2.x, you describe a component by defining its properties in a CDF, as<br />
follows:<br />
Component INCLUDE_FOO { // Define a component called INCLUDE_FOO.<br />
NAME<br />
Foo example component<br />
SYNOPSIS This is just an example component<br />
... // other properties<br />
}<br />
Component properties fall into one of the following four categories:<br />
■<br />
■<br />
■<br />
Code. This can be a combination or subset of object code (modules) and source<br />
code (configlettes and stubs) used in the build of a project.<br />
Configuration Information. CDL provides a rich set of properties to be used to<br />
describe a component. These can be specified, altered, added, or eliminated.<br />
Parameters are configurable properties expressed as data types. These are<br />
typically preprocessor macros used within a component’s configuration code.<br />
There is a separate CDL object used to define parameters.<br />
Integration Information. These properties control how a component is<br />
integrated into an executable “system image,” for example, an initialization<br />
routine and a description of when in the initialization sequence that routine<br />
should be called.<br />
Integration properties also define dependencies among components, replacing<br />
the #ifdef/#endif statements that proliferated in previous versions of<br />
Tornado.<br />
114
6<br />
Components<br />
■<br />
User Presentation. A number of properties control how a component is<br />
presented to the user, that is, how a component appears in the Tornado GUI.<br />
For example, presentation properties define characteristics as basic as a<br />
component’s name and a brief synopsis of the component’s functionality. They<br />
also affect where in the project facility component hierarchy a component,<br />
folder, or selection is displayed.<br />
You can also specify HTML reference pages as support material for a particular<br />
component.<br />
6.2.2 CDL Object Types, p.115 goes into greater detail about the various properties<br />
and their uses.<br />
For more information about working with component description files, see<br />
6.3 Creating Components, p.125 and 6.4 Releasing Components, p.135.<br />
6<br />
6.2.2 CDL Object Types<br />
The Component Description Language supports a number of object classes.<br />
With the proliferation of components, a means of grouping them into related<br />
subsystems has been developed—called folders and selections, each of which is<br />
described by a CDL object. A means of specifying a component’s initialization<br />
order is provided by initialization groups, another object type. Of course, CDL<br />
provides an object to define a component and its properties. And there is an<br />
additional object type for defining parameters, which are component properties<br />
expressed as data types.<br />
Figure 6-1 shows the project facility component hierarchy. Entries (components,<br />
selections, and folders) appear in boldface in the project facility component<br />
hierarchy when they are included in the configuration, in “plainface” when they<br />
are not included, and in italics when they are not installed (that is, when a CDF<br />
already describes a component, but the component’s modules have not been<br />
installed.)<br />
For the complete syntax of each CDL object type, see E.1 Component Description<br />
Language (CDL), p.231.<br />
115
VxWorks 5.5<br />
<strong>BSP</strong> Developer’s <strong>Guide</strong><br />
Figure 6-1<br />
The Project Facility Component Hierarchy<br />
Folder<br />
Selection<br />
Component<br />
Folders<br />
Folders provide a directory-type hierarchy for grouping components that are<br />
logically related. The WDB agent subsystems, the ANSI components, and the<br />
POSIX subsystems are components grouped in folders. In the project facility,<br />
folders are represented by the file folder icon, as shown in Figure 6-1.<br />
Folders can contain more than one component. Before Tornado 2.x, component<br />
grouping was usually accomplished by nesting include statements, for example:<br />
#ifdef INCLUDE_ANSI_ALL<br />
#define INCLUDE_ANSI_ASSERT /* ANSI-C assert library functionality */<br />
#define INCLUDE_ANSI_CTYPE /* ANSI-C ctype library functionality */<br />
#define INCLUDE_ANSI_LOCALE /* ANSI-C locale library functionality */<br />
...<br />
#endif<br />
For Tornado 2.x, the ANSI functionality is contained in a folder described in CDL,<br />
as follows:<br />
116
6<br />
Components<br />
Folder FOLDER_ANSI {<br />
NAME<br />
ANSI C components (libc)<br />
SYNOPSIS ANSI libraries<br />
CHILDREN INCLUDE_ANSI_ASSERT \<br />
INCLUDE_ANSI_CTYPE \<br />
INCLUDE_ANSI_LOCALE \<br />
INCLUDE_ANSI_MATH \<br />
INCLUDE_ANSI_STDIO \<br />
INCLUDE_ANSI_STDLIB \<br />
INCLUDE_ANSI_STRING \<br />
INCLUDE_ANSI_TIME \<br />
INCLUDE_ANSI_STDIO_EXTRA<br />
DEFAULTS INCLUDE_ANSI_ASSERT INCLUDE_ANSI_CTYPE \<br />
INCLUDE_ANSI_MATH INCLUDE_ANSI_STDIO \<br />
INCLUDE_ANSI_STDLIB INCLUDE_ANSI_STRING \<br />
INCLUDE_ANSI_TIME<br />
}<br />
6<br />
Folders offer greater flexibility in grouping components than the pre-Tornado 2.0<br />
method. Previously, #ifdef statements meant that all of the specified #defines were<br />
included simultaneously. Now, folders allow groups to include more than just a<br />
default set of components that are included together (as defined in Tornado 2.x by<br />
the DEFAULTS property of the folder object); components can be added and<br />
removed from the configuration individually (as defined by the CHILDREN<br />
property of the folder object).<br />
Folder information largely affects user presentation. It is not related to<br />
initialization group hierarchy, and thereby the startup sequence, which depend<br />
solely on a component’s initialization group. Folders can contain one or more<br />
components, selections, and other folders; they do not have parameter or<br />
initialization group objects associated with them.<br />
The following properties describe a folder:<br />
NAME<br />
A readable name, the one that appears next to the folder icon in the project<br />
facility component hierarchy.<br />
SYNOPSIS<br />
A brief description of the folder.<br />
CHILDREN<br />
Components, folders, and selections belonging to this folder are called children.<br />
DEFAULTS<br />
The default component(s) that would be included if the folder were “added”<br />
without any overrides. Folder groupings can affect configuration when a<br />
folder is added, because components specified by a folder’s DEFAULTS<br />
property are added all at once.<br />
117
VxWorks 5.5<br />
<strong>BSP</strong> Developer’s <strong>Guide</strong><br />
Figure 6-2<br />
Include Folder Dialog Box<br />
You can ascertain the default components specified for a folder by looking at<br />
the associated CDF, or by viewing the Include Folder dialog box (Figure 6-2),<br />
which is opened by double-clicking on a particular folder in the project facility<br />
component hierarchy. The Include Folder dialog box displays only those<br />
components that are not already configured. If a component is specified as a<br />
default, it appears checkmarked in a newly opened window. To see a complete<br />
set of default values, you would have to uninclude all components in the<br />
folder.<br />
NOTE: Use folder objects only when creating a new grouping of components (new<br />
or existing). Do not modify existing folders in order to include new components.<br />
CDL accommodates that by prepending an underscore to a property name, for<br />
example, _CHILDREN. See 6.4 Releasing Components, p.135 for more information.<br />
For a hierarchical listing of the folders distributed with Tornado 2.x, see E.2 Folder<br />
Hierarchy, p.236.<br />
Selections<br />
Selections are similar to folders, but they are components that implement a<br />
common interface, for example, serial drivers, the WindView timestamp<br />
mechanism, and the WDB communication interface. These components provide<br />
alternatives for the same service, and one or more can be selected for configuration<br />
118
6<br />
Components<br />
in a single project. In the project facility, they are represented by the checkbox icon,<br />
as shown in Figure 6-1.<br />
Prior to Tornado 2.0, there were #ifdef/#else constructs that implemented the<br />
same feature. In this example from Tornado 1.0.1, the user has a choice of the<br />
timestamp device to use with WindView:<br />
#ifdef INCLUDE_USER_TIMESTAMP<br />
... /* user timestamp driver */<br />
#elif defined(INCLUDE_TIMESTAMP)<br />
... /* system timestamp driver */<br />
#else<br />
... /* DEFAULT: sequential timestamp driver */<br />
#endif<br />
6<br />
Selection information, like that for folders, is for user presentation only. It is not<br />
related to initialization group hierarchy, and thereby the startup sequence.<br />
Selections contain one or more components only.<br />
Selections behave like folders, except they add a count for a range of available<br />
components; for example, a selection containing three components might tell the<br />
user only one can be configured at a time, or perhaps two of three. Because of the<br />
count, selections do not contain folders or other selections; nor do they have<br />
parameter or initialization group objects associated with them.<br />
The following properties describe a selection:<br />
NAME<br />
A readable name, the one that appears next to the selection icon in the project<br />
facility component hierarchy.<br />
SYNOPSIS<br />
A brief description of the selection.<br />
COUNT<br />
Set a minimum and maximum count from available options.<br />
CHILDREN<br />
Components from which to select.<br />
DEFAULTS<br />
The default component(s), depending on the count.<br />
119
VxWorks 5.5<br />
<strong>BSP</strong> Developer’s <strong>Guide</strong><br />
For Tornado 2.x, the same feature captured by the Tornado 1.0.1 code above, would<br />
be written in CDL as follows:<br />
Selection SELECT_TIMESTAMP {<br />
NAME<br />
select timestamping<br />
COUNT 1-1<br />
CHILDREN INCLUDE_SYS_TIMESTAMP \<br />
INCLUDE_USER_TIMESTAMP \<br />
INCLUDE_SEQ_TIMESTAMP<br />
DEFAULTS INCLUDE_SEQ_TIMESTAMP<br />
}<br />
There are three timestamp drivers available, as indicated by the three values for the<br />
CHILDREN property. The COUNT permits a choice of one, that is, a minimum and<br />
a maximum of 1.<br />
Components<br />
The component object class defines the source and object code associated with a<br />
component, much of the integration information, and any associated parameters.<br />
In the project facility, components are represented by the building block icon, as<br />
shown in Figure 6-1.<br />
Previously, this kind of information was included in usrConfig.c or src/config/*<br />
files and surrounded by #ifdef/#endif statements, as follows:<br />
#ifdef INCLUDE_LOGGING<br />
logInit (consoleFd, MAX_LOG_MSGS);<br />
#endif /* INCLUDE_LOGGING */<br />
Tornado 2.x configuration files contain only the information necessary to build the<br />
application or VxWorks, and not all the code related to the hundreds of other<br />
components that could be included. Furthermore, dependencies among<br />
components can be detected and the related components can be automatically<br />
added by the project facility. It does this by analyzing the global symbols in each<br />
associated object module and knowing within which components they are<br />
contained. The same message logging component above could be written in CDL<br />
as follows:<br />
Component INCLUDE_LOGGING {<br />
NAME<br />
message logging<br />
SYNOPSIS Provides logMsg support<br />
MODULES logLib.o<br />
INIT_RTN logInit (consoleFd, MAX_LOG_MSGS);<br />
CFG_PARAMS MAX_LOG_MSGS<br />
HDR_FILES logLib.h<br />
}<br />
120
6<br />
Components<br />
The component object includes the greatest number of properties. The more<br />
commonly used properties are described below; definitions for the rest can be<br />
found in E.1.1 Component Properties, p.232:<br />
NAME<br />
A readable name, the one that appears next to the component icon in the<br />
project facility component hierarchy.<br />
SYNOPSIS<br />
A brief description of the component.<br />
The next four properties are all related to the configuring of code in a project:<br />
MODULES<br />
Object files associated with the component.<br />
CONFIGLETTES<br />
Common configuration source files having source code that typically makes<br />
use of parameters associated with the component.<br />
<strong>BSP</strong>_STUBS<br />
Generic configuration source files that are copied into the <strong>BSP</strong> directory upon<br />
first use. The user can then make <strong>BSP</strong>-specific alterations to the copied files<br />
without affecting other <strong>BSP</strong>s. Note that a modified stub file is shared by all<br />
projects using the same <strong>BSP</strong> as a base.<br />
6<br />
NOTE: Source code can come in the form of a <strong>BSP</strong> stub. <strong>BSP</strong> stubs are supported<br />
in Tornado 2.2; however, stubs are not supported for earlier releases of Tornado 2.x.<br />
HDR_FILES<br />
Header files associated with your configlette code or initialization routine.<br />
These are header files that must be included in order for your configlette or<br />
initialization routine to compile.<br />
ARCHIVE<br />
The archive file in which to find object modules stored other than in the<br />
standard location.<br />
The following property provides configuration information:<br />
CFG_PARAMS<br />
A list of configuration parameters associated with the component, typically a<br />
list of macros. Each must be described separately by its own parameter object.<br />
The next group of properties control integration of the component into the system<br />
image. There is initialization information and dependency information, such as<br />
121
VxWorks 5.5<br />
<strong>BSP</strong> Developer’s <strong>Guide</strong><br />
that conveyed by linked symbols, required #includes and #excludes, and if/then<br />
#includes:<br />
INIT_RTN<br />
A one-line initialization routine.<br />
LINK_SYMS<br />
A list of symbols to look up in order to include components from an archive.<br />
REQUIRES<br />
A list of component(s) that do not otherwise have structural dependencies and<br />
must be included if this component is included. Typically, list only those<br />
components that cannot be detected from MODULES, that is, by their<br />
associated object files, for example, components with configlettes only or those<br />
that reference other components through function pointers. In this latter case,<br />
REQUIRES can specify a selection.<br />
EXCLUDES<br />
A list of components that can not be included if this component is being<br />
included.<br />
INCLUDE_WHEN<br />
Sets a dependency to automatically include the specified component(s) when<br />
this component is included (that is, it handles nested includes).<br />
INIT_BEFORE<br />
Call the initialization routine of this component before the one specified by this<br />
property. This property is effective only in conjunction with _INIT_ORDER.<br />
_INIT_ORDER<br />
The component belongs to the specified initialization group. This property<br />
places the specified component at the end of the INIT_ORDER property list of<br />
the initGroup object.<br />
Like NAME and SYNOPSIS before them, the following properties also affect user<br />
presentation:<br />
HELP<br />
List reference pages associated with the component.<br />
_CHILDREN<br />
This component is a child component of the specified folder.<br />
_DEFAULTS<br />
This component is a default component of the specified folder. This property<br />
must be used in conjunction with _CHILDREN.<br />
122
6<br />
Components<br />
Parameters<br />
Parameters are one of the user’s primary means of configuring a system. Typically,<br />
one or more parameters control a component’s features. As an example, we can<br />
consider the maximum number of log messages in the logging queue. In Tornado<br />
1.0.1, this was in target/config/configAll.h as:<br />
#define MAX_LOG_MSGS 50<br />
For Tornado 2.x, use the parameter object class to describe those parameters listed<br />
by a particular component’s CFG_PARAMS property. The logging example is as<br />
follows:<br />
6<br />
Parameter MAX_LOG_MSGS {<br />
NAME max # queued messages<br />
TYPE uint<br />
DEFAULT 50<br />
}<br />
The following properties describe a parameter:<br />
NAME<br />
A readable name, the one that appears below the list of parameter IDs in the<br />
Params tab of the project facility’s Properties window, as shown in Figure 6-3.<br />
Figure 6-3<br />
The Properties Window<br />
TYPE<br />
The type of parameter, that is, int, uint, bool, string, exists, or untyped.<br />
123
VxWorks 5.5<br />
<strong>BSP</strong> Developer’s <strong>Guide</strong><br />
Exist type parameters are #defined if their value is TRUE and #undefined if<br />
FALSE.<br />
DEFAULT<br />
The default value of the parameter, which appears above the list of parameter<br />
IDs in the Params tab of the project facility Properties window, as shown in<br />
Figure 6-3.<br />
Initialization Groups<br />
A component must include information that controls how it is integrated into an<br />
executable “system image,” for example, an initialization routine and a description<br />
of when in the initialization sequence that routine should be called. Initialization<br />
groups or initGroups assemble related components for initialization and, thus,<br />
define the system startup sequence. Initialization group hierarchy is run-time<br />
related only and has no impact on the GUI.<br />
For Tornado 1.0.1, the initialization order was determined in<br />
target/config/all/usrConfig.c or target/src/config/*.c files and surrounded by<br />
#ifdef/#endif statements, as follows:<br />
#if defined(INCLUDE_EXC_HANDLING) && defined(INCLUDE_EXC_TASK)<br />
excInit (); /* initialize exception handling */<br />
#endif /* defined(INCLUDE_EXC_HANDLING) && defined(INCLUDE_EXC_TASK) */<br />
#ifdef INCLUDE_LOGGING<br />
logInit (consoleFd, MAX_LOG_MSGS); /* initialize logging */<br />
#endif /* INCLUDE_LOGGING */<br />
...<br />
The <strong>BSP</strong> file sysLib.c determined (and still does) the order of most board hardware<br />
initialization.<br />
An initGroup is a routine from which components and other initGroups are called.<br />
The code in the routine is determined by the included components and their<br />
initialization code fragments. For example:<br />
InitGroup usrIosExtraInit {<br />
INIT_RTN usrIosExtraInit ();<br />
SYNOPSIS extended I/O system<br />
INIT_ORDER INCLUDE_EXC_TASK \<br />
INCLUDE_LOGGING \<br />
...<br />
}<br />
124
6<br />
Components<br />
In the example, the components INCLUDE_EXC_TASK, INCLUDE_LOGGING, and<br />
INCLUDE_PIPES are part of the initGroup usrIosExtraInit. If those components are<br />
included, then their initialization routines are called in the order specified as part<br />
of this initialization group.<br />
The code in an initGroup is synthesized by the project facility into the file<br />
prjConfig.c, always part of every <strong>BSP</strong> project. To see a system’s initialization<br />
sequence, build the project and examine the generated code in prjConfig.c.Tosee<br />
the default initialization sequence, see E.3 Project Initialization Order, p.238.<br />
The following properties describe an initialization group:<br />
NAME<br />
SYNOPSIS<br />
The NAME property can be used to provide a short name for the initGroup;<br />
however, it does not appear anywhere in this release of the GUI. The<br />
SYNOPSIS property is used to provide a brief, readable definition of the<br />
initialization group.<br />
INIT_RTN<br />
The initialization routine that initializes an associated component(s).<br />
INIT_ORDER<br />
Components and initGroups belonging to this initialization group listed in the<br />
order in which they are to be initialized.<br />
6<br />
6.3 Creating Components<br />
This section instructs you how to define your own component or modify an<br />
existing one. You must follow certain conventions when using the CDL. After<br />
describing your component in a component description file, you must place the file<br />
in the proper path, ensuring that the project facility reads the information and<br />
properly includes the component in the hierarchy.<br />
125
VxWorks 5.5<br />
<strong>BSP</strong> Developer’s <strong>Guide</strong><br />
6.3.1 CDF Conventions<br />
Follow these conventions when working with component description files:<br />
■<br />
■<br />
■<br />
■<br />
■<br />
■<br />
■<br />
All component names are of the form INCLUDE_FOO.<br />
All folders names are of the form FOLDER_FOO.<br />
All selection names are of the form SELECT_FOO.<br />
Parameter names should not match the format of any other object type, but are<br />
otherwise unrestricted. For example, you can use FOO_XXX, but not<br />
INCLUDE_FOO.<br />
All initGroup names should be of the form initFoo. However, Wind River<br />
initGroups use the form usrFoo (for backwards compatibility.)<br />
All component description files have a .cdf suffix.<br />
All .cdf file names begin with two decimal digits, that is, 00xxxx.cdf. These first<br />
two digits control the order in which .cdf files are read within a directory.<br />
6.3.2 CDF Precedence and Paths<br />
The component description files are read at two points:<br />
■<br />
when a project is created<br />
■<br />
after component description files are changed and the project build occurs<br />
The order in which CDFs are read is important to the user. If two files describe the<br />
same property of the same component, the one read last overrides all earlier ones.<br />
The intent is to allow component description files to have some precedence level.<br />
Files read later have higher precedence than those read earlier.<br />
Precedence is established in two complementary ways:<br />
– CDF files reside in certain directories, and those directories are read in a<br />
specified order.<br />
– Within one of these directories, CDFs are read in alphanumeric order.<br />
The project facility sources all .cdf files in any of the following directories. These<br />
directories are read in the order in which they’re presented:<br />
(1) comps/vxWorks<br />
Contains all generic VxWorks components.<br />
126
6<br />
Components<br />
(2) comps/vxWorks/arch/arch<br />
Contains all architecture-specific VxWorks components (or component<br />
overrides).<br />
(3) config/bsp<br />
Contains all <strong>BSP</strong>-specific components.<br />
(4) the project directory<br />
Contains all other components.<br />
Within a directory, to control alphanumeric order, a two digit number is prepended<br />
to each .cdf file. Wind River reserves the first 50 numbers, that is 00xxxx.cdf<br />
through 49xxxx.cdf. The remaining numbers, 50 through 99, are reserved for third<br />
parties. The xx in the .cdf files above are placeholders for these numbers. (That is,<br />
0n+1 overrides 0n.)<br />
This method of setting precedence allows project, <strong>BSP</strong>, and CPU<br />
architecture-specific overrides of generic components or parameters. If a <strong>BSP</strong><br />
provider wanted to change the maximum number of files that can be open<br />
(NUM_FILES) to 75 from the default value of 50, it could be done in a <strong>BSP</strong>-specific<br />
CDF, as follows:<br />
6<br />
Parameter NUM_FILES {<br />
DEFAULT 75<br />
}<br />
If you are creating a new CDF, you must place it in the appropriate path, based on<br />
the nature of the contents and the desired level of precedence. Your choices of<br />
paths are listed above in the discussion about precedence:<br />
– comps/vxWorks for generic VxWorks component descriptions only<br />
– comps/vxWorks/arch/arch for architecture-specific VxWorks component<br />
descriptions<br />
– config/bsp for board-specific component descriptions<br />
– the project directory for all other files<br />
6.3.3 Defining a Component<br />
This section describes the process of defining your own component. To allow for<br />
the greatest flexibility, there is no convention governing the order in which<br />
properties describe a component or the sequence in which CDL objects are entered<br />
127
VxWorks 5.5<br />
<strong>BSP</strong> Developer’s <strong>Guide</strong><br />
into a component description file. The following steps taken to create the<br />
component INCLUDE_FOO are a suggested order only; the sequence is not<br />
mandatory. Nor is there meant to be any suggestion you use all of the properties<br />
and object classes described.<br />
Step 1:<br />
Name and Provide a Synopsis<br />
To create your new component, first name it and provide a synopsis of its utility.<br />
Component INCLUDE_FOO {<br />
NAME<br />
foo component<br />
SYNOPSIS this is just an example component<br />
...<br />
In the imaginary component INCLUDE_FOO, the NAME property is foo<br />
component. SYNOPSIS informs the user that “this is just an example component.”<br />
NAME and SYNOPSIS affect user presentation only; they have no bearing on<br />
initialization sequence or dependencies.<br />
Step 2:<br />
Describe the Code-Related Elements<br />
Next, describe your component’s code portions by defining any modules and<br />
source configlettes that should be configured in during the build.<br />
NOTE: <strong>BSP</strong> stubs are supported for Tornado 2.2 however, they cannot be defined<br />
for earlier Tornado 2.x releases.<br />
If your imaginary component INCLUDE_FOO has an object module associated<br />
with it, use the MODULES property to specify it. You can specify any number of<br />
modules this way. In the following example, fooLib.o and fooShow.o are listed:<br />
...<br />
MODULES<br />
HDR_FILES<br />
ARCHIVE<br />
CONFIGLETTES<br />
...<br />
fooLib.o fooShow.o<br />
foo.h<br />
fooLib.a<br />
fooConfig.c<br />
Tornado 2.x offers visibility into component dependencies by graphically<br />
presenting component relationships in the Include Components and Exclude<br />
Components windows of the project facility (see Figure 6-4).<br />
128
6<br />
Components<br />
Figure 6-4<br />
Include Components Window<br />
6<br />
The project facility automatically analyzes object module dependencies in order to<br />
calculate component dependencies; for example, if fooLib.o has an unresolved<br />
global for logMsg( ), an automatic dependency upon the component<br />
INCLUDE_LOGGING is detected. For components not shipped in object module<br />
format, CDL supports the explicit listing of component dependencies. If the source<br />
portion contains a call to logMsg( ), the project facility does not detect the<br />
dependency; instead, an explicit dependency upon INCLUDE_LOGGING should<br />
be declared using the REQUIRES property. See Step 6.<br />
If your module is not located in the standard path, use the ARCHIVE property to<br />
specify the archive name, for example, /path/fooLib.a. (For additional instructions<br />
concerning the use of ARCHIVE, see Step 10.)<br />
NOTE: Third parties should create their own archives; do not modify Wind River<br />
archives.<br />
Use the HDR_FILES property to specify any .h files associated with the component,<br />
like foo.h. These files are emitted in prjConfig.c, providing the initialization<br />
routine with a declaration.<br />
If there is source code that should be compiled as part of the component, put it in<br />
a .c file and specify the file name in the CONFIGLETTES property, for example,<br />
fooConfig.c. Component parameters should be referenced in the configlette or in<br />
the initialization routine; otherwise they have no effect.<br />
129
VxWorks 5.5<br />
<strong>BSP</strong> Developer’s <strong>Guide</strong><br />
Step 3:<br />
Set Up Initialization<br />
If your component must be initialized, use the INIT_RTN property of the<br />
component object class to specify the initialization routine and its arguments to be<br />
called, as in fooInit(arg1, arg2). If your component needs more than a single line of<br />
initialization, create or add the initialization code to a .c file and use the<br />
CONFIGLETTES property instead. By associating a configlette with an<br />
initialization routine, you are securing the configlettes place in the initialization<br />
sequence.<br />
...<br />
INIT_RTN<br />
...<br />
fooInit(arg1, arg2);<br />
If you are not using the MODULES property of the component object, use the<br />
LINK_SYMS property to include your object module from a linked archive. The<br />
system generates an unresolved reference to the symbol _fooRtn1, causing the<br />
linker to resolve it by extracting your module from the archive.<br />
...<br />
LINK_SYMS<br />
...<br />
_fooRtn1<br />
Step 4:<br />
Establish the Initialization Sequence<br />
Initialization order is important. You can control when in the initialization<br />
sequence your component is initialized with the _INIT_ORDER property. A<br />
component (or initGroup) that is bound to an existing initGroup using the<br />
_INIT_ORDER property is, by default, initialized last within that group. This is<br />
typically the desired effect; however, you can override this behavior by explicitly<br />
using the INIT_BEFORE property.<br />
...<br />
_INIT_ORDER<br />
INIT_BEFORE<br />
...<br />
usrRoot<br />
INCLUDE_USER_APPL<br />
In the example, INCLUDE_FOO is declared a member of the usrRoot initGroup.<br />
INIT_BEFORE has been used for fine control, and INCLUDE_FOO is initialized<br />
before INCLUDE_USER_APPL.<br />
Alternatively, you can create a new initialization group and declare<br />
INCLUDE_FOO a member; however, you would have to declare the new initGroup<br />
a member of an existing initGroup. For more information on initialization groups,<br />
see E. Component Language.<br />
130
6<br />
Components<br />
NOTE: INIT_BEFORE only affects ordering within the initGroup. Do not reference<br />
a component that is not in the initGroup; this has no effect at all.<br />
Step 5:<br />
NOTE: The INIT_AFTER property has no effect in the Tornado 2.x implementation.<br />
See E.3 Project Initialization Order, p.238 for the default initialization sequence for<br />
Tornado 2.x.<br />
Link Helpful Documentation<br />
Specify related reference entries (in HTML format) with the HELP property.<br />
6<br />
...<br />
HELP<br />
...<br />
fooMan.html<br />
By default, a build automatically includes reference entries related to values<br />
declared by the MODULES and INIT_RTN properties. In the case of<br />
INCLUDE_FOO, in addition to fooMan.html, which is specified by HELP, the build<br />
associates the fooLib and fooShow libraries and the fooInit( ) routine.<br />
Step 6:<br />
Define Dependencies<br />
Use the REQUIRES, EXCLUDES, and INCLUDE_WHEN properties to explicitly<br />
declare dependencies among components. (See Step 2 to learn how the project<br />
facility automatically configures object module-related dependencies.)<br />
The project facility does not detect implicit dependencies when a component is not<br />
shipped in object module format. Likewise, no dependencies are detected when<br />
symbols are referenced by pointers at run-time. Both circumstances require you to<br />
declare dependencies explicitly.<br />
...<br />
REQUIRES<br />
EXCLUDES<br />
INCLUDE_WHEN<br />
...<br />
INCLUDE_LOGGING<br />
INCLUDE_SPY<br />
INCLUDE_POSIX_AIO INCLUDE_POSIX_MQ<br />
In the example, REQUIRES declares that INCLUDE_LOGGING must be configured<br />
along with INCLUDE_FOO. EXCLUDES declares the INCLUDE_SPY cannot be<br />
configured with INCLUDE_FOO. And INCLUDE_WHEN tells the system that<br />
whenever the components INCLUDE_POSIX_AIO and INCLUDE_POSIX_MQ are<br />
included, then INCLUDE_FOO must also be included.<br />
131
VxWorks 5.5<br />
<strong>BSP</strong> Developer’s <strong>Guide</strong><br />
NOTE: In general, the project facility is designed to increase flexibility when<br />
selecting components, that is, to increase scalability; specifying a REQUIRES<br />
relationship reduces flexibility. Be sure that using REQUIRES is the best course of<br />
action in your situation before implementing it.<br />
Step 7:<br />
List Associated Parameters<br />
In the component object, use the CFG_PARAMS property to declare all associated<br />
parameters, for example, FOO_MAX_COUNT.<br />
...<br />
CFG_PARAMS<br />
...<br />
FOO_MAX_COUNT<br />
Step 8:<br />
Define Parameters<br />
For each parameter declared by CFG_PARAMS, create a parameter object to<br />
describe it. Provide a name using the NAME property.<br />
Use the TYPE property to specify the data type, either int, uint, bool, string, exists,<br />
or untyped.<br />
Use the DEFAULT property to specify a default value for each parameter.<br />
Parameter FOO_MAX_COUNT {<br />
NAME<br />
Foo maximum<br />
TYPE<br />
uint<br />
DEFAULT 50<br />
}<br />
! CAUTION: A component is considered misconfigured if it contains a parameter<br />
without an assigned value. Be sure to assign default values, unless there is no<br />
reasonable default and you want to force the user to set it explicitly.<br />
Step 9:<br />
Define Group Membership<br />
A component must be associated with either a folder or selection, otherwise it is<br />
not visible in the project facility GUI. Assign a component to a folder because of its<br />
logical inclusion in the group defined by the folder, based on similar or shared<br />
functionality, for example. By including a component in a folder, you make it<br />
possible for the user to load it simultaneously with other components in its group<br />
by declaring them as default values for the folder, using the folder object’s<br />
DEFAULTS property.<br />
...<br />
_CHILDREN<br />
...<br />
FOLDER_ROOT<br />
132
6<br />
Components<br />
The _CHILDREN property declares that INCLUDE_FOO is a child component of<br />
folder FOLDER_ROOT. The prepended underscore (“_”) serves to reverse the<br />
relationship declared by the property CHILDREN. You can also use _DEFAULTS in<br />
conjunction with _CHILDREN to specify a component as a default component of a<br />
folder. For more information about this CDL convention, see 6.4 Releasing<br />
Components, p.135.<br />
If you think a component is becoming too complex, you can divide it into a set of<br />
components assigned to a folder or selection object. In the following example,<br />
INCLUDE_FOO has been specified as part of a selection. You can add or remove the<br />
group from your configuration as a unit rather than by its individual components.<br />
For folders, the DEFAULTS property specifies the base set of components that are<br />
included if the group is configured without any overrides.<br />
For selections, the DEFAULTS property specifies the components that are included<br />
to satisfy the count (declared by the COUNT property), if you provide no<br />
alternative values.<br />
In a selection group, the COUNT property specifies the minimum and maximum<br />
number of included components. If the user exceeds these limits the system flags<br />
the selection as misconfigured.<br />
6<br />
Selection SELECT_FOO {<br />
NAME<br />
Foo type<br />
SYNOPSIS Select the type of desired FOO support<br />
COUNT 0-1<br />
CHILDREN INCLUDE_FOO_TYPE1 \<br />
INCLUDE_FOO_TYPE2 \<br />
INCLUDE_FOO_TYPE3<br />
DEFAULTS INCLUDE_FOO_TYPE1<br />
}<br />
Step 10:<br />
Create a Dummy Component<br />
The project facility analyzes archives only when they are associated with included<br />
components. This creates a chicken and egg problem: in order to know about a<br />
particular archive, the project facility would need to analyze components before<br />
they are actually added. In other words, if you add a component declared with an<br />
ARCHIVE property, the configuration analysis is done without knowing what the<br />
value of ARCHIVE is. So, if your component includes an archive with several object<br />
modules, you should create a dummy component that is always included, making<br />
it possible for the project facility to know that a new archive should be read. Call<br />
such a component INSTALL_FOO. It should contain only NAME, SYNOPSIS, and<br />
ARCHIVE properties. The user cannot add other components from the same<br />
archive until INSTALL_FOO is added.<br />
133
VxWorks 5.5<br />
<strong>BSP</strong> Developer’s <strong>Guide</strong><br />
! CAUTION: Do not alter Wind River-supplied CDFs directly. Use the naming<br />
convention to create a file whose higher precedence overrides the default<br />
properties of Wind River-supplied components.<br />
Step 11:<br />
Generate the Project Files<br />
The project configuration file (prjConfig.c) for each project is generated by the<br />
project facility based on two things:<br />
■<br />
the set of components selected by the user from the component hierarchy<br />
■<br />
the information in the related component description files<br />
To generate this file, click the Build button in the Build tab of the project facility.<br />
NOTE: Generated project files (prjConfig.c) are free of the preprocessor #ifdefs<br />
found in the traditional static configuration files, and, therefore, are easier to read.<br />
6.3.4 Modifying a Component<br />
Modify the properties of existing components by re-specifying them in any higher<br />
priority CDF file. Third-party CDF files are by convention read last and therefore<br />
have the highest priority. Use the naming convention to create a high-precedence<br />
CDF file that overrides the default properties of Wind River components. See<br />
6.3.2 CDF Precedence and Paths, p.126 for the file naming and precedence<br />
conventions.<br />
In the following example, the default number of open file descriptors<br />
(NUM_FILES) in the standard Wind River component INCLUDE_IO_SYSTEM has<br />
been modified. The normal default value is 50.<br />
Parameter NUM_FILES {<br />
DEFAULT 75<br />
}<br />
By adding these example lines of code to a third-party CDF file, by removing and<br />
adding the component if it is already in the configuration, and by re-building the<br />
project, the value of NUM_FILES is changed to 75. The original Wind River CDF<br />
file, 00vxWorks.cdf, is not changed; the default property value is changed because<br />
the third-party file has higher precedence. Other property values remain the same<br />
unless specifically redefined.<br />
134
6<br />
Components<br />
! CAUTION: Do not alter the Wind River-supplied source configlette files in<br />
target/config/comps/src. If necessary, use a <strong>BSP</strong>- or project-specific CDF to cancel<br />
its declaration as CONFIGLETTES and to define <strong>BSP</strong>_STUB (available for Tornado<br />
2.2 only) instead. A copy of the generic file is then placed into the <strong>BSP</strong> directory,<br />
and it can be altered without impacting other <strong>BSP</strong>s, or changing the original file.<br />
! CAUTION: Do not alter Wind River-supplied CDFs directly. Use the naming<br />
convention to create a file whose higher precedence overrides the default<br />
properties of Wind River-supplied components.<br />
6<br />
6.4 Releasing Components<br />
The process of releasing a Tornado component has been designed to preclude<br />
modification of existing configuration files. New component description files<br />
should be independent of existing files, with two exceptions:<br />
■<br />
New component objects must be bound into an existing folder or selection.<br />
■<br />
New component object initialization routines must be associated with an<br />
existing initGroup.<br />
A particular CDL convention makes it possible to bind a new component object to<br />
an existing folder or selection and to an existing initGroup without modifying the<br />
existing elements. By prepending an underscore (“_”) to certain component<br />
properties, you can reverse the meaning of the property. For example, if there is<br />
already a folder FOLDER_EXISTING and an initGroup initExisting, you can bind<br />
a new component to them (without modifying them), as follows:<br />
Component INCLUDE_FOO<br />
...<br />
_CHILDREN FOLDER_EXISTING<br />
_INIT_ORDER initExisting<br />
}<br />
The property _CHILDREN has the opposite relationship to FOLDER_EXISTING as<br />
CHILDREN; that is, _CHILDREN identifies the “parent.” In other words, it<br />
produces the same effect as FOLDER_EXISTING having the component<br />
INCLUDE_FOO on its list of children—without any modifications being made to<br />
the CDF containing the FOLDER_EXISTING object.<br />
135
VxWorks 5.5<br />
<strong>BSP</strong> Developer’s <strong>Guide</strong><br />
If your project or VxWorks system image includes Tornado components from a<br />
previous release (that is, earlier than version 2.0), then, to ensure backwards<br />
compatibility, use the old INCLUDE_XXX format to create the component ID. In<br />
6.3.3 Defining a Component, p.127, INCLUDE_FOO is both a component ID, as well<br />
as the name of the preprocessor macro used in the old-style configuration.<br />
You can release more than one component at a time, because more than one<br />
component can be defined by a single CDF. You can release any number of CDFs<br />
simultaneously.<br />
6.4.1 Testing New Components<br />
There are several tests one can run to verify that components have been written<br />
correctly:<br />
■<br />
Check Syntax and Semantics<br />
This command-line test is the simplest verification test. First edit the file<br />
installDir/host/resource/tcl/app-config/Project/cmpTestLib.tcl, setting the<br />
TCL variable bspFile to a valid <strong>BSP</strong> directory name (for example, mv162).<br />
Then run the cmpTest script.<br />
% cd $(WIND_BASE)/host/resource/tcl/app-config/Project<br />
% wtxtcl<br />
wtxtcl> source cmpTestLib.tcl<br />
wtxtcl> cmpTest<br />
The cmpTest script tests for syntax and semantics errors in your .cdf files (in<br />
fact, in all .cdf files). Based on test output, make the required modifications.<br />
Keep running the script until you have removed the errors.<br />
■<br />
Check Component Dependencies<br />
You can test for “scalability bugs” in your component by running the cmpInfo<br />
script as follows:<br />
wtxtcl> cmpInfo <br />
This reports back to you the component’s subtree (other components needed<br />
by your component) and its supertree (other components that need your<br />
component).<br />
136
6<br />
Components<br />
■<br />
Check the Project Facility Component Hierarchy<br />
Verify that selections, folders, and new components you have added are<br />
properly included by making a visual check of the project facility component<br />
hierarchy.<br />
Open the project facility and go to the VxWorks view.<br />
Look at how your new elements appear in the folder tree. Check the<br />
parameters associated with a component and their parameter default values<br />
by invoking the Properties window.<br />
If you have added a folder containing components, and have included that<br />
folder in your configuration, the project facility component hierarchy should<br />
display in boldface all components listed as defaults for that folder (that is,<br />
values for the DEFAULTS property). Verify that the resulting image builds and<br />
boots.<br />
6<br />
6.4.2 Packaging a Component<br />
For details on packaging, see 10.3 Component Packaging, p.200.<br />
137
VxWorks 5.5<br />
<strong>BSP</strong> Developer’s <strong>Guide</strong><br />
138
7<br />
Validation Testing<br />
7.1 Introduction<br />
This chapter describes the Board Support Package (<strong>BSP</strong>) Validation Test Suite (<strong>BSP</strong><br />
VTS). The <strong>BSP</strong> VTS is a collection of host-initiated test programs that exercise a<br />
target machine. The purpose of these tests is provide an objective (although not<br />
exhaustive) report that you can use to judge the basic functionality of a VxWorks<br />
<strong>BSP</strong>. To help ensure the repeatability of the tests, the <strong>BSP</strong> VTS is highly automated.<br />
Once started, a <strong>BSP</strong> test requires no user intervention.<br />
This version of the <strong>BSP</strong> VTS runs in a Tornado environment only, and it supports<br />
both UNIX and Windows hosts. To provide portability between UNIX and<br />
Windows hosts, the <strong>BSP</strong> VTS scripts are written in Tcl/WTX functions. These tests<br />
exercise the basic functionality of <strong>BSP</strong>s and detect and report defects found in<br />
them.<br />
If these basic tests are inadequate to your needs, you can edit the source code to<br />
enhance the existing tests or to add new tests of your own. However, if you choose<br />
to modify the <strong>BSP</strong> VTS, you should leave the basic set of tests intact. These basic<br />
tests are the standard by which <strong>BSP</strong>s are judged.<br />
Other Documentation<br />
For reference information on the <strong>BSP</strong> VTS and its component tests, see the<br />
reference entries provided in J. <strong>BSP</strong> Validation Test Suite Reference Entries. For<br />
information on the Tcl language, see the Tornado User’s <strong>Guide</strong>: Tcl or any standard<br />
Tcl reference, such as Practical Programming in Tcl and TK by Brent B. Welch, or Tcl<br />
and the Tk Toolkit by John Ousterhout.<br />
139
VxWorks 5.5<br />
<strong>BSP</strong> Developer’s <strong>Guide</strong><br />
7.2 Background<br />
This section is intended to provide background information on the <strong>BSP</strong> VTS,<br />
including design goals, the tools used to implement them, and the general<br />
configuration of a test environment.<br />
7.2.1 Design Goals<br />
The following is a list of design goals that guided the implementation of the <strong>BSP</strong><br />
VTS. Being aware of these goals should help you better understand how to set up<br />
the tests, run the tests, and interpret the results. You should also keep these design<br />
goals in mind if you decide to modify the <strong>BSP</strong> VTS.<br />
■<br />
■<br />
■<br />
■<br />
■<br />
■<br />
■<br />
Tornado Compatible. The <strong>BSP</strong> VTS should be run on Tornado release 2.0 or<br />
later.<br />
Broadly Usable. The <strong>BSP</strong> VTS should be usable by as wide a range of users as<br />
possible (board vendors, end-user customers, and Wind River developers). In<br />
addition, the tests should be able to handle both bus-full (VME) and standalone<br />
configurations.<br />
Portable. The <strong>BSP</strong> VTS should be both target- and host-architecture portable.<br />
Repeatable. All the tests should be repeatable. Thus, for a given test<br />
environment, the tests should behave the same no matter where or when they<br />
are run.<br />
Automatic. The user should be able to run <strong>BSP</strong> VTS from a single invocation<br />
(command), and the test results should be collected in a test log. The user<br />
should be able to run a subset of the tests from a single invocation.<br />
<strong>BSP</strong>-Specific. The <strong>BSP</strong> VTS should only be concerned with those aspects of<br />
VxWorks pertaining to <strong>BSP</strong> implementation and configuration.<br />
Host-Controlled. The test environment should include a single test host, a<br />
VxWorks-supported host computer suitably equipped and configured with<br />
the necessary hardware and software to permit the <strong>BSP</strong> VTS to execute<br />
correctly. This includes:<br />
– appropriate host tools (compilers and the like)<br />
– a complete Tornado development environment<br />
– a complete <strong>BSP</strong> Developer’s Kit at the correct release level<br />
– the complete source to the <strong>BSP</strong> under test<br />
140
7<br />
Validation Testing<br />
■<br />
■<br />
The test host should control the execution of the tests. This is necessary,<br />
because no assumptions can be made about the target, other than that it is<br />
capable of running VxWorks and interacting with the target server on the host<br />
and the target’s console serial port.<br />
Second Target Capable. The network, busTas, and rlogin tests require the use<br />
of a second target board, the reference board. This reference board must run a<br />
previously validated <strong>BSP</strong>.<br />
Target Shell Capable. The target server <strong>BSP</strong> VTS rlogin test requires a<br />
VxWorks target shell.<br />
7<br />
7.2.2 Validation Test Suite Software Architecture<br />
Single Target<br />
This section describes the typical <strong>BSP</strong> VTS software architecture for a single target<br />
and for multiple targets.<br />
Figure 7-1 shows the overall configuration for a single target.<br />
Figure 7-1<br />
Example <strong>BSP</strong> VTS Software Architecture: Single Target<br />
Host (UNIX/Windows)<br />
Target (VxWorks)<br />
target server<br />
connection<br />
test<br />
script<br />
target<br />
server<br />
ttya or<br />
com1<br />
target<br />
agent<br />
VxWorks<br />
/tyCo/0<br />
The typical test scenario is as follows:<br />
1. The Tcl/WTX test script runs on the UNIX /Windows host.<br />
2. The script attaches to the target server, which uses the target server back end<br />
communication link to communicate with the target through the target agent.<br />
If serial communication is required, the script uses a serial line on the host (ttya<br />
141
VxWorks 5.5<br />
<strong>BSP</strong> Developer’s <strong>Guide</strong><br />
on UNIX or com1 on Windows) to open a channel to the target’s /tyCo/0 or any<br />
other port that is configured as console.<br />
3. When console interaction with the target is required, the script communicates<br />
with each target by sending WTX or WindSh commands and reading the<br />
console output.<br />
Multiple Targets<br />
Figure 7-2 shows the overall configuration of a two-target test system.<br />
Figure 7-2<br />
Example <strong>BSP</strong> VTS Software Architecture: Two Targets<br />
Host (UNIX/Windows)<br />
Target 0 (VxWorks)<br />
target<br />
server<br />
target server<br />
connection<br />
ttya or<br />
com1<br />
target<br />
agent<br />
VxWorks<br />
test<br />
script<br />
/tyCo/0<br />
Target 1 (VxWorks)<br />
target<br />
server<br />
target server<br />
connection<br />
target<br />
agent<br />
VxWorks<br />
ttyb or<br />
com2<br />
/tyCo/0<br />
The typical test scenario is as follows:<br />
1. The Tcl/WTX test script runs on the UNIX or Windows host.<br />
142
7<br />
Validation Testing<br />
2. The script attaches to the first target server, which uses the target server back<br />
end communication link to communicate with Target 0 through the target<br />
agent. If serial communication is required, a channel from ttya (UNIX) or com1<br />
(Windows) to Target 0’s /tyCo/0 or any other port that is configured as console<br />
is opened via the first serial line.<br />
3. The script attaches to the second target server, which uses the target server<br />
back end communication link to communicate with Target 1 through the target<br />
agent. If serial communication is required, a channel from ttyb (UNIX) or com2<br />
(Windows) to Target 1’s /tyCo/0 or any other port that is configured as console<br />
is opened via the second serial line.<br />
4. When console interaction with the target is required, the script communicates<br />
with each target by sending WTX or WindSh commands and reading the<br />
console output.<br />
7<br />
7.3 Configuring the <strong>BSP</strong> VTS<br />
This section describes the following:<br />
■<br />
■<br />
■<br />
the required hardware configuration<br />
installing the <strong>BSP</strong> VTS<br />
configuring the system: the host, the target, VxWorks, and the <strong>BSP</strong> VTS itself<br />
Read this section in conjunction with Tornado User’s <strong>Guide</strong>: Setup and Startup.<br />
7.3.1 Hardware Setup<br />
Bus-full<br />
The <strong>BSP</strong> VTS assumes a minimum target system setup. This can be either a bus-full<br />
environment (traditional) or a standalone configuration. For some tests, such as<br />
the backplane tests, a second CPU board is required.<br />
Figure 7-3 shows a typical bus-full configuration, which consists of the following:<br />
Chassis<br />
A card cage with backplane, typically a VMEbus, and a power supply.<br />
143
VxWorks 5.5<br />
<strong>BSP</strong> Developer’s <strong>Guide</strong><br />
CPU board<br />
The single-board computer (the target) to which VxWorks has been ported.<br />
This board runs the <strong>BSP</strong> under test.<br />
Ethernet board<br />
An Ethernet controller board (some CPU boards include an on-board Ethernet<br />
controller).<br />
Serial port<br />
One or more serial ports on the workstation and target. This is required for<br />
initial setup and test execution and for the serial port tests.<br />
Figure 7-3<br />
Typical <strong>BSP</strong> Test Configuration: VME<br />
File Server Workstation Chassis<br />
VxWorks<br />
target CPU<br />
Ethernet<br />
board<br />
RS-232<br />
Ethernet<br />
Standalone Board<br />
Figure 7-4 shows a typical standalone configuration:<br />
CPU board<br />
The standalone computer board (the target) to which VxWorks has been<br />
ported. This board runs the <strong>BSP</strong> under test. It can include an Ethernet<br />
controller.<br />
Serial port<br />
One or more serial ports on the workstation and target. This is required for<br />
initial setup and test execution and for the serial port tests.<br />
144
7<br />
Validation Testing<br />
Figure 7-4<br />
Typical <strong>BSP</strong> Test Configuration: Standalone<br />
File Server Workstation Standalone Board<br />
VxWorks<br />
target CPU<br />
RS-232<br />
7<br />
Ethernet<br />
The <strong>BSP</strong> VTS supports VxWorks in standalone ROM. To do this, the <strong>BSP</strong> VTS<br />
checks for and uses a standalone ROM image when booting the target. However,<br />
the <strong>BSP</strong> VTS can do this only if you have built the VxWorks standalone image with<br />
the necessary configuration macros for allowing a target server connection with<br />
the target. For example, for a network connection between a VxWorks standalone<br />
target and the target server, the macros INCLUDE_NETWORK,<br />
STANDALONE_NET, and INCLUDE_WDB must be defined.<br />
All tests applied to a VxWorks target require a target server running on the host for<br />
that target. Target server back end communication with the target can be through<br />
Ethernet or serial connection using SLIP or any other valid communication<br />
mechanism for which the target server can be configured. For more information<br />
about configuring the target server, see the Tornado User’s <strong>Guide</strong>: Target Server<br />
(Windows Version) or the Tornado User’s <strong>Guide</strong>: Setup and Startup (UNIX Version).<br />
Given this connection, the <strong>BSP</strong> VTS can build and load the test library (pkLib.o)<br />
through the target server. For more information, see Configuring VxWorks, p.148.<br />
7.3.2 Installing the <strong>BSP</strong> VTS<br />
The general procedures for installing the <strong>BSP</strong> VTS are the same as those for<br />
installing any other Wind River product. See the Tornado Getting Started <strong>Guide</strong> for<br />
145
VxWorks 5.5<br />
<strong>BSP</strong> Developer’s <strong>Guide</strong><br />
software installation instructions. If the reference <strong>BSP</strong> has not previously been<br />
installed, refer to the installation instructions that came with that <strong>BSP</strong>.<br />
Directories and Files<br />
Host Support<br />
The <strong>BSP</strong> VTS tests are in the host/src/test/bspVal/src/tests directory. The Tcl source<br />
files on which the <strong>BSP</strong> VTS is built reside in the host/src/tcl directory. The source<br />
files for the tclserial library reside in host/src/test/tclserial. The binaries for tools<br />
and the execution script that runs the <strong>BSP</strong> VTS reside in the host/hostType/bin<br />
directory. The configuration files for <strong>BSP</strong> VTS reside in the<br />
host/resource/test/bspVal directory.<br />
The <strong>BSP</strong> VTS is implemented in Tcl, version 7.6. The <strong>BSP</strong> VTS script starts as a<br />
UNIX shell script and later runs a Tcl script under the wtxtcl shell, which is a<br />
binding of the WTX protocol to the Tcl language. In essence, the <strong>BSP</strong> VTS script<br />
runs as a tool attached to the target server(s).<br />
The tclserial library provides a set of functions that allow communication with a<br />
serial port. There is no need to generate the Tcl binary and tclserial libraries if you<br />
are using a supported host configuration. Wind River pre-installs the Tcl binaries<br />
and the tclserial libraries in host/hostType/bin for the supported host<br />
configurations. 1<br />
Complete source code is included to facilitate maintenance and extension. Tcl and<br />
the tclserial library are portable and can be compiled on hosts other than the<br />
supported hosts.<br />
The complete source code for Tcl is available in the host/src/tcl directory. To build<br />
and test Tcl for a host not supported by Wind River, run make for the selected<br />
hostType in this directory. Although Tcl should build without errors, the self-test<br />
may report certain errors that do not significantly affect the operation of the <strong>BSP</strong><br />
VTS.<br />
To build the tclserial library, run make for the selected hostType in the<br />
host/src/test/tclserial directory.<br />
1. The tclserial library is a shared or dynamically linked library, whichever is appropriate to<br />
the platform (pkgtclserial.so on a Solaris or SunOS system, pkgtclserial.sl on HP-UX,<br />
pkgtclserial.dll on Windows).<br />
146
7<br />
Validation Testing<br />
NOTE: Wind River made several modifications to the Tcl source files, to allow Tcl<br />
to be ported to various hosts. Wind River makes no guarantee regarding the<br />
validity of the changes. Because Tcl is public domain software, it is not completely<br />
supported by Wind River. The porting of Tcl to various hosts is complete to the<br />
extent that the supplied test scripts have been run and tested on the specified hosts.<br />
Any use of Tcl beyond this purpose has not been tested, and is not supported.<br />
7.3.3 System Configuration<br />
This section describes how to configure the host system, the target hardware,<br />
VxWorks, and the <strong>BSP</strong> VTS itself.<br />
7<br />
Configuring the Host System<br />
In addition to the <strong>BSP</strong> VTS, the host requires the standard Tornado development<br />
environment. For information on configuring the host system, see Tornado User’s<br />
<strong>Guide</strong>: Setup and Startup.<br />
Configuring the Target Hardware<br />
The VxWorks target hardware requires only minimal configuration. The <strong>BSP</strong> VTS<br />
runs in a Tornado environment. For the most part, it uses the target server<br />
connection to communicate with the target. The tests that use console output<br />
require that the serial console be connected to the host. 2 The rlogin, network, and<br />
busTas tests require that the host be connected to two serial consoles.<br />
NOTE: The target server(s) must be up and running before starting the <strong>BSP</strong> VTS.<br />
A few tests, such as error1.tcl and bootline.tcl, must reboot the target. Therefore,<br />
before running <strong>BSP</strong> VTS for the first time, you should boot VxWorks manually to<br />
check that the boot parameters are set correctly. In addition, before starting the <strong>BSP</strong><br />
VTS, make sure the VxWorks target is powered up and responding to the console.<br />
However, the target need not be booted.<br />
2. You must be able to reboot the target and communicate with it over the serial console from<br />
the host. Remember this when you configure and build the boot ROM image for the target.<br />
147
VxWorks 5.5<br />
<strong>BSP</strong> Developer’s <strong>Guide</strong><br />
The serial.tcl test requires a loopback connection to terminate all free serial ports<br />
(those not used by the VxWorks console or SLIP). To do this, run a jumper from the<br />
transmit/output line to the receive/input line. For ports with hardware<br />
handshaking, you might also need to run a jumper from the RTS to the CTS line.<br />
! WARNING: The scsi.tcl test works by writing and then reading back each location<br />
on the SCSI drive. This erases the drive. Make sure you specify the appropriate<br />
SCSI drive before running this test.<br />
Configuring VxWorks<br />
Running the <strong>BSP</strong> VTS requires a number of supplemental C functions. The source<br />
for these functions is supplied in target/src/test/bspVal/pkLib.c. The <strong>BSP</strong> VTS<br />
looks for the object version of this code in target/config/bspname/pkLib.o. If the<br />
<strong>BSP</strong> VTS does not find this object file, it automatically copies the source to the<br />
target/config/bspname directory and compiles it. If you make any changes to<br />
pkLib.c, you must copy the file to target/config/bspname and recompile it.<br />
The majority of the <strong>BSP</strong> VTS tests can work using the default VxWorks<br />
configuration. The exceptions are listed below:<br />
network<br />
Requires a second target that can run ping and pkUdpEchoTest. When<br />
building the VxWorks image for the reference board (slave target), define the<br />
INCLUDE_PING macro. The VxWorks image running on both the targets<br />
should have INCLUDE_NET_SHOW macro defined.<br />
timestamp<br />
Requires that you defined INCLUDE_TIMESTAMP before you built the<br />
VxWorks image and pkLib.o. If this macro is not defined, the <strong>BSP</strong> VTS skips<br />
the timestamp tests. No fatal error is generated.<br />
rlogin<br />
Requires the use of a target shell. Before you build the VxWorks image for this<br />
test, you must define the following macros:<br />
– INCLUDE_SHELL<br />
– INCLUDE_RLOGIN<br />
– INCLUDE_SHOW_ROUTINES<br />
– INCLUDE_NET_SYM_TBL<br />
– INCLUDE_LOADER<br />
148
7<br />
Validation Testing<br />
scsi<br />
Requires that VxWorks image and pkLib.o must be built with SCSI support<br />
included. For most <strong>BSP</strong>s, you can do this by defining INCLUDE_SCSI.<br />
busTas<br />
Requires that the VxWorks image for both targets include shared memory<br />
components. Define the following macros:<br />
– INCLUDE_SM_NET<br />
– INCLUDE_SM_SEQ_ADDR<br />
– INCLUDE_SM_NET_SHOW<br />
Also, the VxWorks image for one target should define SM_OFF_BOARD as<br />
TRUE, and the other as FALSE.<br />
For more information, see the test descriptions in J. <strong>BSP</strong> Validation Test Suite<br />
Reference Entries.<br />
7<br />
Configuring the <strong>BSP</strong> VTS<br />
The <strong>BSP</strong> VTS is configurable through several parameters implemented as shell<br />
environment variables. All of these parameters are defined in configuration files<br />
(explained below), with one exception. The optional environment variable<br />
TEST_LOG_FILE provides a means for the user to specify where the <strong>BSP</strong> VTS test<br />
logs should be saved. Use the appropriate shell command to set this variable to the<br />
filename (including a full path) to which the test results should be logged. When<br />
this variable is not set, the tests are logged to<br />
target/config/bspname/vtsLogs/bspValidationLog.PID. In either case, the screen<br />
output is copied to the same location as the log file, and is named the same as the<br />
log file with _screenDump appended to the filename.<br />
The configuration parameters that control the behavior of the <strong>BSP</strong> VTS on a single<br />
target reside in the host/resource/test/bspVal/bspName.T1 file. If a test requires two<br />
targets, the host/resource/test/bspVal/bspName.T2 file supplies the parameters for<br />
the second target. 3<br />
These parameters include the path to the VxWorks image to be booted, the<br />
characteristics of the host and target, and the details of how the test should<br />
proceed. Many of the parameters are optional or have default values that are<br />
reasonable in most situations. Some of the parameters are applicable only to<br />
3. When creating a bspname.T1 or bspname.T2 file, you can copy the mv147.T1 and mv147.T2<br />
files and edit the copies as needed.<br />
149
VxWorks 5.5<br />
<strong>BSP</strong> Developer’s <strong>Guide</strong><br />
certain tests. Target-specific parameters use the prefixes T1_ and T2_ to distinguish<br />
one target from another.<br />
Table 7-1 through Table 7-2 summarize the configuration parameters that can be<br />
set in the bspName.T1 or bspName.T2 files. For parameters whose default values are<br />
listed, the default values take effect even if the parameters are not defined. In<br />
addition, you might need to modify configuration parameters for your serial<br />
connections and timeout values. The rest of this section describes these<br />
parameters.<br />
For additional information on the configuration parameters, read the comments in<br />
the bspName.T1 or bspName.T2 files. For information on which parameters are<br />
relevant to specific tests, see the reference entries provided in J. <strong>BSP</strong> Validation Test<br />
Suite Reference Entries.<br />
Configuring Serial Connections<br />
You might need to modify the following serial-connection parameters to suit your<br />
host:<br />
{T1, T2}_SER_DEVICE<br />
The host name for the serial device connection.<br />
{T1, T2}_SER_BAUD<br />
The baud rate of the serial device connection.<br />
Alternatively, you may specify the serial connection parameters as command line<br />
options in bspVal. See the listing in J. <strong>BSP</strong> Validation Test Suite Reference Entries for<br />
details.<br />
Configuring Timeout Values<br />
The following configuration parameter determines how long the <strong>BSP</strong> tests should<br />
wait for VxWorks to boot:<br />
{T1, T2}_TMO_BOOT<br />
Timeout for booting.<br />
If the VxWorks prompt does not appear within the allotted time after attempting<br />
to boot, a FATAL ERROR is logged. Therefore, you might need to increase this<br />
timeout if, for example, the target boots over Serial Line Internet Protocol (SLIP).<br />
Additionally, there are optional timeout parameters associated with individual<br />
tests. These parameters contain the letters TMO in the macro name. You might<br />
need to increase these timeouts for boards with large devices, slow access times, or<br />
both. These parameters are set in the bspName.T1 and bspName.T2 files located in<br />
host/resource/test/bspVal.<br />
150
7<br />
Validation Testing<br />
Table 7-1<br />
Validation Test Suite Configuration Parameters: Target Boot Parameters<br />
Parameter Default Description<br />
{T1, T2}_BOOT_B N/A inet on backplane (b)<br />
{T1, T2}_BOOT_DEVICE N/A boot device<br />
{T1, T2}_BOOT_E N/A inet on Ethernet (e)<br />
{T1, T2}_BOOT_F N/A flags (f)<br />
{T1, T2}_BOOT_FILE N/A VxWorks image to boot<br />
7<br />
{T1, T2}_BOOT_G N/A gateway inet (g)<br />
{T1, T2}_BOOT_H N/A host inet (h)<br />
{T1, T2}_BOOT_HOST N/A host name<br />
{T1, T2}_BOOT_O N/A other (o)<br />
{T1, T2}_BOOT_PROCNUM N/A processor number<br />
{T1, T2}_BOOT_PW N/A password<br />
{T1, T2}_BOOT_S N/A startup script (s)<br />
{T1, T2}_BOOT_TN N/A target name (tn)<br />
{T1, T2}_BOOT_U N/A user (u)<br />
Table 7-2<br />
Validation Test Suite Configuration Parameters: Target-Specific Parameters<br />
Parameter Default Description<br />
T1_BOOT_LOCAL_BUS_ERR_MSG N/A Local bus error message keyword(s) at boot ROM<br />
level. See bootline.tcl.<br />
T1_BOOT_LOCAL_ERR_ADRS N/A Local memory address that causes bus error at the<br />
boot ROM level. See bootline.tcl.<br />
T1_BOOT_OFFBOARD_BUS_ERR_MSG N/A Off-board bus error message keyword(s) at boot ROM<br />
level. See bootline.tcl.<br />
T1_BOOT_OFFBOARD_ERR_ADRS N/A Off-board address that causes bus error at boot ROM<br />
level. See bootline.tcl.<br />
T1_BUS_MASTER TRUE Indicates which target is the bus master. See<br />
busTas.tcl.<br />
151
VxWorks 5.5<br />
<strong>BSP</strong> Developer’s <strong>Guide</strong><br />
Table 7-2<br />
Validation Test Suite Configuration Parameters: Target-Specific Parameters (Continued)<br />
Parameter Default Description<br />
T1_CATASTROPHIC_ERR_MSG N/A Catastrophic bus error message keyword(s). See<br />
error2.tcl.<br />
T1_COUNT_ADRS not used Master’s address of shared counter. See busTas.tcl.<br />
T1_DIV_ZERO_MSG N/A Divide by zero error message keyword(s). See<br />
error1.tcl.<br />
T1_EXTRA_AUXCLK 25 Another rate to test. See auxClock.tcl.<br />
T1_EXTRA_SYSCLK 20 Another rate to test. See sysClock.tcl.<br />
T1_LOCAL_BUS_ERR_MSG N/A Local bus error message keyword(s). See error1.tcl.<br />
T1_LOCAL_ERR_ADRS N/A Local memory address that causes a bus error. See<br />
error1.tcl.<br />
T1_MODEL N/A Expected result of sysModel( ). See model.tcl.<br />
T1_OFFBOARD_BUS_ERR_MSG N/A Off-board bus error message keyword(s). See<br />
error1.tcl.<br />
T1_OFFBOARD_ERR_ADRS N/A Off-board address that causes a bus error. See<br />
error1.tcl.<br />
T1_SCSI_BUFSIZE 65536 Buffer size (in bytes). See scsi.tcl.<br />
T1_SCSI_ID N/A ID of SCSI device to test. See scsi.tcl.<br />
T1_SCSI_LUN N/A Logical Unit Number of device to test. See scsi.tcl.<br />
T1_SCSI_NBBUF 0 Number of buffers used by SCSI test function. See<br />
scsi.tcl.<br />
T1_SCSI_NBLOOP 0 Number of loops used by SCSI test function. See<br />
scsi.tcl.<br />
T1_SEM_ADRS not used Master’s address of shared semaphore. See<br />
busTas.tcl.<br />
{T1, T2}_SER_BAUD N/A Default baud rate of target console. See bspVal.<br />
{T1, T2}_SER_DEVICE N/A Host name for the serial device connected to the target<br />
console. See bspVal.<br />
{T1, T2}_TAS_DELAY 20 Busy-wait delay used during test-and-set test. See<br />
busTas.tcl.<br />
152
7<br />
Validation Testing<br />
Table 7-2<br />
Validation Test Suite Configuration Parameters: Target-Specific Parameters (Continued)<br />
Parameter Default Description<br />
T1_TMO_SLICES 4 Timestamp test measurements intervals. See<br />
timestamp.tcl.<br />
T1_TMO_TIMESTAMP 300 Duration of timestamp timer test (in seconds). See<br />
timestamp.tcl.<br />
T1_TMO_SCSI 3600 Timeout for testing SCSI (in seconds). See scsi.tcl.<br />
{T1, T2}_TMO_BOOT 60 Timeout for booting VxWorks (in seconds).<br />
7<br />
T2_UDP_TRANS 5000 Number of UDP packets to send. See network.tcl.<br />
7.4 Running the <strong>BSP</strong> VTS<br />
Each test in the <strong>BSP</strong> VTS exercises one or more of the basic <strong>BSP</strong> functions. For the<br />
most part, the source for these tests (implemented as Tcl/WTX scripts) is contained<br />
in the host/src/test/bspVal/src/tests directory. However, if a procedure is shared by<br />
a number of tests, that code is stored in the host/src/test/bspVal/src/lib directory.<br />
These shared procedures handle things such as booting VxWorks, reporting<br />
PASS/FAIL results, and so forth.<br />
For example, <strong>BSP</strong> VTS tests for the system clock and the auxiliary clock are stored<br />
in the files tests/sysClock.tcl and tests/auxClock.tcl. Both of these files call<br />
procedures in lib/clockLib.tcl. In addition, many <strong>BSP</strong> tests use functions within<br />
target/src/test/bspVal/pkLib.c, a library of C functions that execute on the<br />
VxWorks target (although the host retains control of the progression of tests).<br />
These C functions serve as low-level support routines.<br />
7.4.1 Starting the <strong>BSP</strong> VTS<br />
The <strong>BSP</strong> VTS runs from either a Windows or a UNIX host. After starting a bash<br />
shell, running the <strong>BSP</strong> VTS from a Windows host is almost exactly the same as<br />
running it from a UNIX host.<br />
153
VxWorks 5.5<br />
<strong>BSP</strong> Developer’s <strong>Guide</strong><br />
NOTE: The <strong>BSP</strong> VTS needs exclusive access to the serial device specified as<br />
T1_SER_DEVICE in bspname.T1 (or T2_SER_DEVICE in bspname.T2). Thus, you<br />
must quit all applications or modules that access the specified serial device before<br />
you can run a <strong>BSP</strong> VTS test. In addition, the T1_SER_DEVICE (or T2_SER_DEVICE)<br />
serial device must be the one to which the target console is connected.<br />
Windows Hosts<br />
UNIX Hosts<br />
To run the <strong>BSP</strong> VTS on a Windows host:<br />
1. Change directories to:<br />
windbase\host\x86-win32\bin<br />
windbase is the directory pointed to by the WIND_BASE environment variable.<br />
2. Edit bashrc.bspVal to configure the Tornado environment. The instructions<br />
are in the file.<br />
3. Invoke the bash shell:<br />
bash -rcfile bashrc.bspVal<br />
After the bash shell responds with a prompt (bash$), type in the bspVal<br />
command exactly as you would on a UNIX host (described below). For example:<br />
bash$ bspVal tgtSvr1 -b mv147 -s tgtSvr2 -sb mv147 -all<br />
To start the <strong>BSP</strong> VTS test, run the UNIX shell script host/hostType/bin/bspVal on<br />
the host.<br />
For example:<br />
% bspVal tgtSvr1 -b mv147 -s tgtSvr2 -sb mv147 -all<br />
The host should respond:<br />
<strong>BSP</strong> VALIDATION TEST<br />
-------------------<br />
Target server<br />
: tgtSvr1<br />
<strong>BSP</strong><br />
: mv147<br />
Second target server<br />
: tgtSvr2<br />
Second <strong>BSP</strong><br />
: mv147<br />
Log file<br />
: /folk/lyle/bspValidationLog.671<br />
Model Test :<br />
sysModel() return value : PASS<br />
154
7<br />
Validation Testing<br />
sysProcNumGet Test :<br />
sysProcNumGet() return value : PASS<br />
. . .<br />
The bspVal shell script sets up a default environment and then calls bspVal.tcl, the<br />
Tcl script that runs the individual tests.<br />
The bspVal script runs in batch mode only. Using command-line options, you can<br />
specify the tests you want to run. The example above uses the -all option to run all<br />
the tests in the <strong>BSP</strong> VTS. For more information on running bspVal, see the<br />
reference entry provide in J. <strong>BSP</strong> Validation Test Suite Reference Entries.<br />
NOTE: To abort testing, enter the tty interrupt character (usually CTRL+C)fromthe<br />
host. This stops the test on the host, although the target board might continue to<br />
execute local tasks. In this case, you might need to reboot the target board.<br />
7<br />
7.4.2 Monitoring a <strong>BSP</strong> Test<br />
At startup, the <strong>BSP</strong> VTS prints a header to standard output. This header displays<br />
the names of the target server, the <strong>BSP</strong>, and the log file. At the start of each test, the<br />
<strong>BSP</strong> VTS prints the test name. As subtests within a test are completed, the <strong>BSP</strong> VTS<br />
prints the name of the subtest along with some PASS/FAIL status information. The<br />
PASS/FAIL messages are also written to a log file, which is also used to catch the<br />
output of commands such as ifShow or smNetShow.<br />
Normally, if a test fails, all the other tests still run. However, some errors are fatal.<br />
In this case, the <strong>BSP</strong> VTS aborts and displays a fatal error message, such as:<br />
FATAL ERROR: error in ioctl() command<br />
If you set the environment variable TEST_LOG_FILE to the name of a writable file,<br />
the <strong>BSP</strong> VTS appends its output to this file. To monitor the <strong>BSP</strong> VTS on a second<br />
terminal, run tail -f on the file. For more information on log files, see the bspVal<br />
reference entry provided in J. <strong>BSP</strong> Validation Test Suite Reference Entries.<br />
Example 7-1<br />
Testing the Auxiliary Clock<br />
This example demonstrates the use of the <strong>BSP</strong> VTS to test the auxiliary clock. Note<br />
that the example shown in this section is a test run on the MVME147 <strong>BSP</strong>. This<br />
example is useful for showing how to work with the <strong>BSP</strong> VTS on a single target.<br />
1. Verify that the target board can boot VxWorks. Using the Tornado launcher,<br />
start a target server and open a WindSh. From the WindSh, verify that there is<br />
communication with the target.<br />
155
VxWorks 5.5<br />
<strong>BSP</strong> Developer’s <strong>Guide</strong><br />
2. Modify the configuration parameters in host/resource/test/bspVal/mv147.T1.<br />
Parameters with the prefix T1_ must be set up appropriately for your<br />
environment and the mv147 <strong>BSP</strong>. (The T2_ parameters in mv147.T2 are for a<br />
second target and are not needed for the auxiliary clock test.) To match the<br />
mv147 <strong>BSP</strong>, set the auxiliary clock speed as follows:<br />
T1_EXTRA_AUXCLK=4321 ;<br />
export T1_EXTRA_AUXCLK<br />
3. Copy pkLib.c from target/src/test/bspVal to the VxWorks target directory<br />
(target/config/mv147 in this example), and use the VxWorks Makefile to make<br />
pkLib.o. The pkLib.o object file is loaded on to the target during the test. Note<br />
that the <strong>BSP</strong> VTS script handles these steps automatically if it does not find a<br />
pkLib.o in the bspname directory.<br />
4. Check that the mv147 target is connected to the appropriate serial port of the<br />
host, connected to the network, and turned on.<br />
5. Execute bspVal on the host, specifying the auxClock test on the command<br />
line. The running time of this test is approximately seven minutes.<br />
% bspVal tgtSvr -b mv147 auxClock<br />
The screen display is:<br />
<strong>BSP</strong> VALIDATION TEST<br />
-------------------<br />
Target server<br />
<strong>BSP</strong><br />
Log file<br />
: tgtSvr<br />
: mv1604<br />
: /tmp/bspValidationLog.19938<br />
Auxiliary Clock Test :<br />
auxClk at 4321 hertz (rate = 4327 error = 0%)<br />
auxClk at 40 hertz (rate = 40 error = 0%)<br />
auxClk at 5000 hertz (rate = 5001 error = 0%)<br />
auxClk at 60 hertz (rate = 60 error = 0%)<br />
sysAuxClkDisable() disables auxClk<br />
sysAuxClkRateSet() parameter checking<br />
sysAuxClkRateGet() return value<br />
: PASS<br />
: PASS<br />
: PASS<br />
: PASS<br />
: PASS<br />
: PASS<br />
: PASS<br />
Tests RUN 7<br />
Tests PASSED 7<br />
Tests FAILED 0<br />
Tests SKIPPED 0<br />
156
7<br />
Validation Testing<br />
The log file contents are:<br />
<strong>BSP</strong> Validation Test Suite version 2.0<br />
-------------------------------------<br />
<strong>BSP</strong> Validation Test Started : Wed Aug 27 08:14:25 PDT 1997<br />
Test started : Wed Aug 27 08:14:26 PDT 1997<br />
Auxiliary Clock Test :<br />
optional extra auxClk rate selected is 4321<br />
dafault auxClk rate is 60<br />
minimum auxClk rate is 40<br />
maximum auxClk rate is 5000<br />
## Starting auxClk test at 4321 hertz rate ##<br />
1 second through auxClk test: ticks1=4510<br />
11 seconds through auxClk test: ticks2=47804<br />
141 seconds through auxClk test: ticks3=610388<br />
corrected value for 120 ticks is 519290<br />
ticks divided by rate = 120<br />
auxClk at 4321 hertz (rate = 4327 error = 0%)<br />
## Starting auxClk test at 40 hertz rate ##<br />
1 second through auxClk test: ticks1=120<br />
11 seconds through auxClk test: ticks2=520<br />
141 seconds through auxClk test: ticks3=5722<br />
corrected value for 120 ticks is 4802<br />
ticks divided by rate = 120<br />
auxClk at 40 hertz (rate = 40 error = 0%)<br />
## Starting auxClk test at 5000 hertz rate ##<br />
1 second through auxClk test: ticks1=4995<br />
11 seconds through auxClk test: ticks2=55152<br />
141 seconds through auxClk test: ticks3=705447<br />
corrected value for 120 ticks is 600138<br />
ticks divided by rate = 120<br />
auxClk at 5000 hertz (rate = 5001 error = 0%)<br />
## Starting auxClk test at 60 hertz rate ##<br />
1 second through auxClk test: ticks1=150<br />
11 seconds through auxClk test: ticks2=750<br />
141 seconds through auxClk test: ticks3=8554<br />
corrected value for 120 ticks is 7204<br />
ticks divided by rate = 120<br />
auxClk at 60 hertz (rate = 60 error = 0%)<br />
sysAuxClkDisable() disables auxClk<br />
sysAuxClkRateSet() parameter checking<br />
sysAuxClkRateGet() return value<br />
End of test : Wed Aug 27 08:23:54 PDT 1997<br />
: PASS<br />
: PASS<br />
: PASS<br />
: PASS<br />
: PASS<br />
: PASS<br />
: PASS<br />
7<br />
157
VxWorks 5.5<br />
<strong>BSP</strong> Developer’s <strong>Guide</strong><br />
Final Results are :<br />
Tests RUN 7<br />
Tests PASSED 7<br />
Tests FAILED 0<br />
Tests SKIPPED 0<br />
End of <strong>BSP</strong> Validation Test : Wed Aug 27 08:23:54 PDT 1997<br />
6. Study the results. In the output shown above, the <strong>BSP</strong> passed all seven of the<br />
sub-tests in the auxiliary clock test. Thus, it passed the test as a whole. For<br />
more information on validating the results of the <strong>BSP</strong> VTS, see K. <strong>BSP</strong><br />
Validation Checklists.<br />
158
8<br />
Writing Portable C Code<br />
This chapter describes how to write compiler-independent portable C code. The<br />
goal is to write code that does not require changes in order to work correctly with<br />
different compilers.<br />
Wind River has conducted an analysis of its own VxWorks code base, with an eye<br />
to compiler independence issues. This chapter is based on the findings of that<br />
analysis.<br />
The code changes proposed in this chapter do not cover the native host tools,<br />
including VxSim and any other tools that are compiled both by native compilers<br />
and by cross-compilation.<br />
This chapter also does not cover C++ portability; there are fundamental differences<br />
in the GNU and Diab C++ implementations. Future editions of this document will<br />
address the portability of C++ code.<br />
Background<br />
While the ANSI C and compiler specifications are detailed, they still allow each<br />
compiler to implement the standard differently. The result is that much source<br />
code is not truly portable among compiler systems. In order for the compiler to<br />
generate code in a specific manner, engineers must insert special<br />
non-ANSI-defined instructions into the code.<br />
The information in this chapter is part of Wind River’s effort to support multiple<br />
compiler systems without requiring major source changes, and to add support for<br />
new compiler systems in the future without creating compatibility conflicts.<br />
159
VxWorks 5.5<br />
<strong>BSP</strong> Developer’s <strong>Guide</strong><br />
Analysis of Wind River’s existing code base reveals three main areas where<br />
non-ANSI compiler features are used to generate run-time code:<br />
■<br />
■<br />
■<br />
packed structure definitions<br />
in-line assembly code<br />
alignment of data elements<br />
NOTE: This chapter is limited in scope to insuring that code is portable specifically<br />
between the GNU and Diab compilers.<br />
NOTE: The scope of this chapter is further limited to specify GCC version 2.96 and<br />
Diab version 5.0 as the baseline compilers. Earlier versions are not truly compatible<br />
with each other and may not have all the necessary support to implement the<br />
conventions introduced here.<br />
8.1 Portable C Code<br />
8.1.1 Data Structures<br />
Some structure definitions are bound by external restrictions. It is common<br />
practice to use a structure definition to document the register layout of hardware<br />
devices. Using a structure to define the layout of data packet contents received<br />
from another system is also common. This can create problems because the ANSI<br />
specification allows compilers to insert padding elements within structure<br />
definitions in order to optimize data element accesses. In these situations, doing so<br />
would make the structure declaration incompatible with the expectations and<br />
restrictions of the outside world. The compiler offsets from the start of the structure<br />
to the start of the data element would not match what is expected. A method is<br />
required for identifying certain structures as requiring special compiler treatment,<br />
while allowing other structures to be optimized for efficiency.<br />
The common term for a structure definition without any padding is packed. Each of<br />
the major compilers has a means to specify packing for a structure, but there is no<br />
single recognized standard. GNU and Diab use an attribute statement as part of<br />
the declaration. Microsoft compilers use #pragma statements.<br />
To specify packing in a compiler-independent manner a macro has been created for<br />
use when defining the structure. The _WRS_PACK_ALIGN(x) macro is used as an<br />
160
8<br />
Writing Portable C Code<br />
attribute declaration. It is placed after the closing curly brace, but before any<br />
instance declarations or initializers. By including the vxWorks.h header file in your<br />
compilation, a toolchain specific header file is included to define this macro<br />
appropriately for the compiler tool being used.<br />
For example:<br />
struct aPackedStruct {<br />
UINT32 int1;<br />
INT16 aShort;<br />
INT8 aByte;<br />
} _WRS_PACK_ALIGN(1);<br />
struct aPackedStruct {<br />
UINT32 int1;<br />
INT16 aShort;<br />
INT8 aByte;<br />
} _WRS_PACK_ALIGN(1) anInstance = {0x1, 2,3};<br />
8<br />
typedef struct {<br />
UINT8 aByte;<br />
UINT16 aShort;<br />
UINT32 aLong;<br />
} _WRS_PACK_ALIGN(1) myPackedStruct;<br />
Specify Field Widths<br />
Always use specific field widths within a packed structure declaration. The basic<br />
data type int does not have a specific size and should be avoided. The same rule<br />
applies for long, unsigned, and char. The vxWorks.h header file defines basic data<br />
types with explicit sizes. Use these data types in any packed structure (INT8,<br />
INT16, INT32, UINT8, and so on). In general, think ahead to architectures with<br />
more than a 32-bit native integer.<br />
Avoid Bit Fields<br />
Do not include bit field definitions within a packed structure. Compilers are<br />
permitted to start labeling bits with either the least significant bit or the most<br />
significant bit. This issue can be dealt with easily by using macro constants to<br />
define the specific bit pattern within the data field.<br />
161
VxWorks 5.5<br />
<strong>BSP</strong> Developer’s <strong>Guide</strong><br />
For example:<br />
struct aPackedStruct {<br />
UINT32 int1;<br />
INT16 aShort;<br />
INT8 aByte;<br />
} _WRS_PACK_ALIGN(1) anInstance={0x1,2,3};<br />
/* Bits in the aByte field */<br />
#define ABYTE_ERROR<br />
#define ABYTE_OFLOW<br />
#define ABYTE_UFLOW<br />
#define ABYTE_DMA<br />
#define ABYTE_POLL<br />
0x01<br />
0x02<br />
0x04<br />
0x08<br />
0x10<br />
8.1.2 In-Line Assembly<br />
In-line assembly is a more difficult issue because it involves both the compiler and<br />
the assembler. In Wind River’s case, the code base fortunately uses MIT assembler<br />
syntax throughout, which many assemblers are compatible with. In-line assembly<br />
in portable C code is by its nature not portable across architectures. Thus, the real<br />
question for in-line assembly is compiler portability.<br />
The current compilers differ significantly about how to include assembly<br />
instructions without interfering with, or suffering interference from, the<br />
compiler’s optimization efforts. In the absence of an ideal solution, in-line<br />
assembly should only be used if it does not interact with the surrounding C code.<br />
This means that acceptable in-line assembly does not interact with C variables or<br />
return values. Code that cannot meet this limitation should be written entirely in<br />
assembly language.<br />
The vxWorks.h header file defines a _WRS_ASM macro to be used to insert in-line<br />
assembly instructions in a C function.<br />
For example (PowerPC):<br />
VOID foo (void)<br />
{<br />
routineA (args);<br />
_WRS_ASM(“ eieio; isync;”);<br />
routineB (args);<br />
}<br />
Assume that the compiler is not free to optimize or reorder in-line assembly code<br />
with respect to surrounding C code.<br />
162
8<br />
Writing Portable C Code<br />
8.1.3 Static Data Alignment<br />
Sometimes it is necessary to align a global static data element or structure on a<br />
specific boundary type. This typically happens with CPU-specific data structures<br />
that need cache boundary alignment.<br />
To handle this situation, another toolchain-specific macro has been introduced.<br />
The macro _WRS_DATA_ALIGN_BYTES(bytes) aligns the following data element<br />
with the byte alignment specified.<br />
For example:<br />
_WRS_DATA_ALIGN_BYTES(16) int myData = 0xFE00235F;<br />
This alignment macro should only be used with global data that has been<br />
initialized. Uninitialized data may not be placed in the data section, and the macro<br />
may not have the desired effect. Uninitialized data can be handled at runtime<br />
using memalign( ) or other suitable functions.<br />
8<br />
8.1.4 Runtime Alignment Checking<br />
Checking the Alignment of a Data Item<br />
You may need to know the alignment of a particular data item at runtime. Most<br />
compilers provide an extension for accessing this information, but there is no<br />
recognized standard for it. In the case of Wind River source code, the macro<br />
_WRS_ALIGNOF(x) is used to return the alignment of an item in byte units.<br />
if (WRS_ALIGNOF(itemA) < 4)<br />
{<br />
printf (“Error: itemA is not longword aligned”);<br />
}<br />
Verifying Pointer Alignment<br />
Pointers can be deliberately cast to be a pointer to a different type of object with<br />
different alignment requirements. Strict type checking at compile time is beneficial,<br />
but there are situations in which this checking must be performed at runtime. For<br />
this purpose, the macro _WRS_ALIGN_CHECK(ptr, type) is provided. This macro<br />
evaluates to either TRUE or FALSE. TRUE is returned if the pointer ptr is aligned<br />
163
VxWorks 5.5<br />
<strong>BSP</strong> Developer’s <strong>Guide</strong><br />
sufficiently for an item of type type. The test is normally done by examining<br />
low-order bits of the pointer’s value.<br />
void * pVoid;<br />
if (!WRS_ALIGN_CHECK(pVoid, long))<br />
{<br />
printf (“Error: pVoid is not longword aligned”);<br />
}<br />
Unaligned Accesses and Copying<br />
You may need to access data that may not be correctly aligned at runtime. It is<br />
recommended in this situation that you copy the data to a structure or other area<br />
that is properly aligned. After the data has been copied, it can be accessed without<br />
the possibility of causing unaligned access exceptions. The macro provided for this<br />
purpose is _WRS_UNALIGNED_COPY(pSrc, pDst, size). While the standard<br />
VxWorks bcopy( ) function could be used for this purpose, most compilers can do<br />
short copies more efficiently on their own. Using the macro is therefore desirable<br />
for performance reasons.<br />
The following example shows both _WRS_ALIGN_CHECK and<br />
_WRS_UNALIGNED_COPY used together to check an unknown pointer. If it is<br />
sufficiently aligned, the pointer can be cast to some other type and the item can be<br />
accessed directly. If the pointer is not aligned, the unaligned macro is used to copy<br />
the data element to a usable variable location.<br />
struct structA {<br />
long item1;<br />
long item2;<br />
char item3;<br />
} itemA;<br />
void * pVoid;<br />
long aLong;<br />
if (WRS_ALIGN_CHECK(pVoid, (struct structA)))<br />
{<br />
/* Alignment is okay, reference directly */<br />
aLongItem = ((struct structA *)pVoid)->item2;<br />
}<br />
else<br />
{<br />
/* alignment is not okay, use unaligned copy */<br />
_WRS_UNALIGNED_COPY(pVoid,&aLong,sizeof(aLong));<br />
}<br />
164
8<br />
Writing Portable C Code<br />
8.1.5 Other Issues<br />
Follow Strict ANSI Compilation<br />
Compilation units should be compiled with strict ANSI protocols in effect. This<br />
requires detailed prototype declarations. For the GNU compiler system, the<br />
compiler flags should include the following:<br />
-Wall -W -Wmissing-declarations -Wstrict-prototypes -Wmissing-prototypes<br />
Remove Compiler Warnings<br />
8<br />
Portable code must be as free of warnings as possible. Apply the strictest possible<br />
code checking and fix all reported warning situations. Compilers identify<br />
non-portable code issues well when doing error checking.<br />
Avoid Use of Casts<br />
Each and every cast represents a potential error. It is a common practice to use a<br />
cast to fix warnings reported by the compiler. However, each instance must be<br />
examined carefully to insure that a cast is the appropriate action. Often a warning<br />
indicates an actual error in argument passing that must be corrected. Using a cast<br />
overrides the compiler’s ability to detect an actual error in data usage that may<br />
prove to be significant.<br />
Avoid inline Keyword<br />
The C inline keyword is to be avoided until the GNU and Diab compilers can<br />
implement it in a consistent manner. The current ANSI Specification, C99, does call<br />
for an inline keyword. However, at this time, neither compiler fully supports this<br />
specification. Although each accepts the inline keyword, there are subtle but<br />
significant differences in the implementation. An update to this document will be<br />
issued when support for the inline keyword is available.<br />
165
VxWorks 5.5<br />
<strong>BSP</strong> Developer’s <strong>Guide</strong><br />
Avoid alloca( ) Function<br />
Many compilers support the alloca( ) function as an extension to the C language.<br />
This normally allocates storage from the stack, as any declared variable would.<br />
Since the storage area is on the stack, this area does not need to be freed, as the<br />
stack is restored upon exiting the function.<br />
While alloca( ) is widely used in code from other OS programming models, it does<br />
not suit VxWorks very well. While other OSs may support automatic stack<br />
expansion and stack checking, VxWorks does not. In embedded programming,<br />
predictable timing and stack usage can be very important. Code for VxWorks<br />
should definitely avoid the use of the alloca( ) function. Allocate the storage<br />
directly on the stack, or use malloc( ) and free( ) if necessary.<br />
Take Care with void Pointer Arithmetic<br />
It is common to use pointer arithmetic on void pointer data types. Because the size<br />
of a void item should be unspecified, the ANSI standard does not allow this<br />
practice. The GNU compiler, however, did allow it and assumed the data size to be<br />
one byte, the same as a char data type.<br />
For example, the following code fragment is faulty:<br />
{<br />
void * pVoid;<br />
pVoid += 1; /* WRONG */<br />
pVoid++; /* WRONG */<br />
pVoid = pVoid + sizeof(char); /* WRONG */<br />
}<br />
The example above is faulty because ANSI pointer arithmetic is based on the size<br />
of the object pointed to. In the case of a pointer to a void, the size is undefined. For<br />
the first faulty statement in the example above, the only correct implementation is<br />
as follows:<br />
{<br />
void * pVoid;<br />
pVoid = (char *)pVoid + 1; /* RIGHT */<br />
(char *)pVoid++; /* WRONG */<br />
(char *)pVoid += 1 /* WRONG */<br />
}<br />
166
8<br />
Writing Portable C Code<br />
The last two statements in the example above are still faulty because ANSI does<br />
not allow casts to be used for an lval type expression.<br />
Use volatile and const Attributes<br />
Proper use of the volatile and const attributes can result in better error detection<br />
by the compiler. The volatile keyword is essential for all data elements whose<br />
value can be changed by an agent outside of the current thread of execution. (For<br />
example, a device performing DMA, another task sharing the data, or an interrupt<br />
routine sharing the data.) Failure to tag a shared data element with volatile can<br />
generate intermittent system faults that are difficult to track.<br />
VxWorks 5.4 and earlier always used the –fvolatile compiler option to force all<br />
pointers to be treated as pointing to a volatile data item. Portable code should not<br />
rely on this mechanism in the future. The compiler can optimize much more<br />
effectively when the correct attributes of all data elements are known.<br />
The const attribute should be used to indicate to the compiler that an argument is<br />
strictly an input argument, and that its value is unchanged by this routine. This<br />
helps the compiler to perform error detection and allows it to better optimize the<br />
code.<br />
8<br />
Misuse of the register Attribute<br />
The misuse of the register (that is, FAST) attribute is quite common. In Wind<br />
River’s case, analysis of the code base revealed that a number of subroutines have<br />
been coded where the input arguments were all labeled with the FAST attribute, as<br />
well as a number of local routine values. The current compilers are able to do very<br />
good optimization of routines without requiring any use of the FAST attribute in<br />
the code base. Overuse of the attribute can actually prevent the compiler from<br />
performing effective optimization of the code. For the large majority of code now,<br />
the FAST attribute is simply unnecessary. It should only be used sparingly in<br />
situations where there is a large number of local variables, only a few of which are<br />
referenced often.<br />
Avoid vector Name<br />
A Motorola extension to the ANSI C specification makes the word vector a<br />
keyword. Runtime code should not use vector as a variable name. This change in<br />
167
VxWorks 5.5<br />
<strong>BSP</strong> Developer’s <strong>Guide</strong><br />
the compilers supports the Altivec processor and the built-in DSP functions it<br />
provides. Your code should avoid the use of vector as a variable name.<br />
Statement Labels<br />
The ANSI specification requires labels to be associated with statements. It is not<br />
uncommon to place labels at the end of a code block without any associated<br />
statement at all. With strict ANSI checking this is an error. In the code below the<br />
default label is not connected to a statement. To correct this problem, either remove<br />
the label or add a null statement to give the label a proper point of connection.<br />
switch (xxx)<br />
{<br />
case X: statement;<br />
case Y: statement;<br />
default: /* WRONG – no statement here */<br />
}<br />
Summary of Compiler Macros<br />
For each supported C toolchain, the macros described in this section are defined<br />
when vxWorks.h is included in your compilation.<br />
_WRS_PACK_ALIGN(n)<br />
This macro is used to specify the packing and alignment attributes for a structure.<br />
Packing insures that no padding is inserted and that the minimum field alignment<br />
within the structure is one byte. The user can specify the assumed alignment for<br />
the structure as a whole with the argument x, in bytes. The value x is expected to<br />
be a power of two value (1,2,4,8,…). The size of the structure is then a multiple of<br />
this value. If the overall structure alignment is 1, the compiler assumes that this<br />
structure, and any pointer to this structure, can exist on any possible alignment.<br />
For an architecture that cannot handle misaligned data transfers, the compiler is<br />
forced to generate code to access each byte separately and then to assemble the<br />
data into larger word and longword units.<br />
The macro is placed after the closing brace of the structure field description and<br />
before any variable item declarations, or typedef name declarations.<br />
168
8<br />
Writing Portable C Code<br />
Always specify fields with explicit widths, such as UINT8, UINT16, INT32, and so<br />
on. Do not use bitfields in a packed structure.<br />
_WRS_ASM(“X”)<br />
This macro is used to insert assembly code within a C function declaration. The<br />
inserted code must not interact with C variables or try to alter the return value of<br />
the function. The code uses the MIT assembly-language mnemonics and syntax.<br />
It is assumed that the compiler does not optimize or reorder any specified in-line<br />
assembly code. The insertion of a null in-line assembly statement can be used to<br />
prevent the compiler from reordering C code before the statement with C code that<br />
follows the statement.<br />
8<br />
_WRS_DATA_ALIGN_BYTES(n)<br />
This macro is used in prefix notation to declare an initialized C data element with<br />
a special alignment. The argument n is the alignment in byte units (1, 2, 4, 8, 16, and<br />
so on). This is normally used only with initialized global data elements. Use this<br />
macro with caution: overuse of this macro can result in poor memory utilization.<br />
If large numbers of variables require special alignment, it may be best to declare<br />
them in separate sections directly in assembler. The linker loader could then fit<br />
them together in an optimal fashion.<br />
_WRS_GNU_VAR_MACROS<br />
The GNU compiler system created a means to pass a variable number of<br />
arguments to pre-processor macro functions, and there are a few special instances<br />
in the VxWorks code base that use the GNU-defined syntax. Since then, the ANSI<br />
standards committee has defined an ANSI standard that is different from this<br />
practice. Currently, the GNU compiler 2.96 does not yet support the ANSI<br />
standard, and the Diab compiler supports only the ANSI standard.<br />
Code that does use variadic macros should define them both for GNU and for the<br />
ANSI standard (Diab). Rather than select upon the toolchain or compiler name, a<br />
new macro feature name, _WRS_GNU_VAR_MACROS, has been created. The GNU<br />
toolchain defines this macro; the Diab toolchain does not.<br />
If you want to port your code to another toolchain, you must choose between<br />
supporting the GNU-style syntax or the ANSI standard syntax. For example, the<br />
following code fragment demonstrates the use of an #ifdef statement to make this<br />
choice between GNU and ANSI:<br />
169
VxWorks 5.5<br />
<strong>BSP</strong> Developer’s <strong>Guide</strong><br />
#ifdef _WRS_GNU_VAR_MACROS /* GNU Syntax */<br />
#define MY_MACRO(x, y, args...) printf (x, y, args)<br />
#else /* ANSI Syntax */<br />
#define MY_MACRO(x, y, ...) printf (x, y, __VA_ARG__)<br />
#endif<br />
In the future, when the GNU toolchain does support the ANSI standard, the<br />
#ifdefs based on this macro can be removed from the code base.<br />
_WRS_ALIGNOF(item)<br />
This macro returns the alignment of the specified item, or item type, in byte units.<br />
Most structures have alignment values of 4, which is the normal alignment of a<br />
longword data value. Data items or types with greater alignment values return an<br />
appropriate alignment value, which is expected to be a power of two (1, 2, 4, 8, 16,<br />
and so on).<br />
_WRS_ALIGN_CHECK(ptr, type)<br />
This macro returns a boolean value, either TRUE or FALSE. A return of TRUE<br />
indicates that the pointer value is sufficiently aligned to be a valid pointer to the<br />
data item or type. The expected implementation is to examine the low-order bits<br />
of the pointer value to see whether it is a proper modulo of the alignment for the<br />
given type.<br />
_WRS_UNALIGNED_COPY(pSrc, pDst, size)<br />
This macro is a compiler-optimized version of the standard Wind River bcopy<br />
operation. It moves a data block from the source location to the destination<br />
location. This macro allows the compiler to optimize the copy operation based on<br />
the data types of the pointers and the size of the block. This macro is designed to<br />
be used in high-performance situations; the size of the block is expected to be<br />
small. Misuse of the macro for other situations should be avoided.<br />
170
8<br />
Writing Portable C Code<br />
8.2 Tool Implementation<br />
This section discusses how the current VxWorks runtime code is organized to<br />
facilitate the addition and maintenance of new compiler tools.<br />
8.2.1 New Tool Macros File<br />
The definition of the new tool-based macros must be placed into the compilation<br />
units. This has been achieved by modifying the target/h/vxWorks.h file to include<br />
a new toolMacros.h file. This file defines the new macros, and any other tool-based<br />
options, that apply globally to run-time compilations. All run-time compiled files<br />
must include vxWorks.h so that the new tool macro definitions are also included.<br />
8<br />
8.2.2 New Tool Directories<br />
Each toolchain provides the toolMacros.h file in a separate directory. Changes<br />
have been made in vxWorks.h to find the toolMacros.h file based on the<br />
preprocessor variable TOOL_FAMILY. For backward compatibility, if<br />
TOOL_FAMILY is not explicitly defined, its value is generated from the value of the<br />
build macro TOOL.<br />
This new toolchain-specific directory structure is intended to make it easy for all<br />
tool-related files to be located in a common directory separate from other tool<br />
system files. It also makes it unnecessary to modify any common files in the system<br />
just to add a new tool system. Add the new tool directory target/h/tool/newTool and<br />
then perform a system build; this triggers the system to reanalyze all toolchains<br />
and rebuild the toolchain database.<br />
8.2.3 <strong>BSP</strong> Makefile Changes<br />
All VxWorks 5.5 (Tornado 2.2) <strong>BSP</strong> makefiles require modification to replace the<br />
old make tool include file path with the new tool-based path. For this release, all<br />
changes are made to the platform release files.<br />
Comment out the following lines from each <strong>BSP</strong> makefile by inserting a # in front<br />
of them. The remaining include lines pull in all the needed make files.<br />
#include $(TGT_DIR)/h/make/make.$(CPU)$(TOOL)<br />
#include $(TGT_DIR)/h/make/defs.$(WIND_HOST_TYPE)<br />
#include $(TGT_DIR)/h/make/rules.$(WIND_HOST_TYPE)<br />
171
VxWorks 5.5<br />
<strong>BSP</strong> Developer’s <strong>Guide</strong><br />
8.2.4 Macro Definitions for GNU and Diab<br />
The current implementation of the required macros for the GNU toolchain is as<br />
follows (this assumes GCC 2.96):<br />
#define _WRS_PACK_ALIGN(x) __attribute__((packed,aligned(x)))<br />
#define _WRS_ASM(x)<br />
__asm__ volatile (x)<br />
#define _WRS_DATA_ALIGN_BYTES(x) __attribute__((aligned(x)))<br />
#define _WRS_GNU_VAR_MACROS<br />
#define _WRS_ALIGNOF(x)<br />
__alignof__(x)<br />
#define _WRS_ALIGN_CHECK(ptr,type) \<br />
(((int)(ptr) & (WRS_ALIGNOF(type) – 1)) == 0 ? TRUE : FALSE)<br />
#define WRS_UNALIGNED_COPY(pSrc,pDst,size) \<br />
(__builtin_memcpy((pDst, (void *)(pSrc), size))<br />
The current implementation of the required macros for the Diab toolchain is as<br />
follows (this assumes Diab 5.0):<br />
#define _WRS_PACK_ALIGN(x) __attribute__((packed,aligned(x)))<br />
#define _WRS_ASM(x)<br />
__asm volatile (x)<br />
#define _WRS_DATA_ALIGN_BYTES(x) __attribute__((aligned(x)))<br />
#undef _WRS_GNU_VAR_MACROS<br />
#define _WRS_ALIGNOF(x)<br />
sizeof(x,1)<br />
#define _WRS_ALIGN_CHECK(ptr,type) \<br />
(((int)(ptr) & (WRS_ALIGNOF(type) – 1)) == 0 ? TRUE : FALSE)<br />
#define _WRS_UNALIGNED_COPY(pSrc,pDst,size) \<br />
(memcpy((pDst), (pSrc), size))<br />
172
9<br />
Documentation <strong>Guide</strong>lines<br />
9.1 Introduction<br />
Reference documentation for Wind River board support packages (<strong>BSP</strong>s) consists<br />
of UNIX-style reference entries (formerly known as man pages) for the module<br />
sysLib.c and the file target.nr. Documentation in HTML format is generated from<br />
these files using the Wind River tool refgen. During a <strong>BSP</strong> build, make runs refgen<br />
and places the HTML output in the Tornado/VxWorks docs directory. The<br />
resulting reference pages can be displayed online with an HTML browser.<br />
This chapter covers Wind River conventions for style and format, and the<br />
procedures for generating <strong>BSP</strong> documentation. The <strong>BSP</strong> templates supplied with<br />
the VxWorks <strong>BSP</strong> Developer’s Kit provide examples of the writing style, text<br />
format, module layout, and text commands discussed throughout this chapter.<br />
Modules formatted with the conventions discussed here will be compatible with<br />
all Wind River documentation macros and formatting scripts, should your <strong>BSP</strong> be<br />
turned over to Wind River for distribution.<br />
9.2 Written Style<br />
This section describes a few of the general requirements for written style in Wind<br />
River technical publications. The items below are only a portion of the standards<br />
described in Wind River’s style guide, but are chosen for inclusion here based on<br />
their frequent misuse.<br />
173
VxWorks 5.5<br />
<strong>BSP</strong> Developer’s <strong>Guide</strong><br />
Specific requirements for <strong>BSP</strong>s are in 9.4 Subsections, p.183.<br />
Sentences<br />
■<br />
■<br />
■<br />
■<br />
■<br />
Keep sentences brief and to the point, presenting information in a simple,<br />
straightforward manner.<br />
Always use complete sentences.<br />
Keep sentences in present tense. Do not use future or past tense unless they<br />
are necessary to convey the idea.<br />
Do not use abbreviated English—do not exclude articles (the, a, an) for brevity.<br />
Separate sentences by two spaces.<br />
Punctuation<br />
■<br />
■<br />
■<br />
Always use a colon after the phrase or sentence introducing an example,<br />
display, itemized list, or table.<br />
A comma should always precede the conjunction and, or, or nor when it<br />
separates the last of a series of three or more words or phrases. This comma<br />
is not optional. For example:<br />
apples, oranges, and bananas<br />
Avoid the use of quotation marks. If they are necessary, form quotations using<br />
the straight double-quote ( " ) only. Use single quotes only as described in<br />
Special Elements, p.180. Do not create quotations with the old troff convention<br />
of double back-quotes and apostrophes.<br />
Word Usage<br />
■<br />
■<br />
■<br />
■<br />
Do not use capital letters to convey emphasis; use italics. For information on<br />
how to apply font changes, see Table 9-3. In general, avoid applying italics for<br />
emphasis—the best way to convey emphasis is a well cast sentence.<br />
Do not use the word so to mean thus or therefore. However, the construction so<br />
that is acceptable.<br />
Do not use contractions (don’t, doesn’t, can’t, and so on).<br />
Do not exclude articles (the, a, an) for brevity.<br />
174
9<br />
Documentation <strong>Guide</strong>lines<br />
Spelling<br />
Table 9-1 defines the Wind River standard for terms that are spelled inconsistently,<br />
particularly in the computer industry. This table also includes a few words or<br />
abbreviations which are commonly misspelled, and words whose spelling is<br />
frequently misunderstood because it may depend on context.<br />
Table 9-1<br />
Spelling Conventions<br />
Use...<br />
and so forth, among others<br />
back end<br />
boot line<br />
boot ROM<br />
bps<br />
caching<br />
cacheable<br />
callback<br />
cannot<br />
CD-ROM<br />
coprocessor<br />
countdown<br />
cross-compiler<br />
cross-development<br />
cross-reference<br />
data type<br />
dialog<br />
e-mail<br />
Ethernet<br />
Excelan<br />
Not...<br />
etc.<br />
backend<br />
bootline, boot-line<br />
bootrom<br />
BPS, baud<br />
cacheing<br />
cachable<br />
call-back<br />
can not<br />
CDROM, cdrom<br />
co-processor<br />
count-down<br />
cross compiler<br />
cross development<br />
cross reference<br />
datatype<br />
dialogue<br />
email, E-mail, Email<br />
ethernet<br />
Excellan<br />
9<br />
175
VxWorks 5.5<br />
<strong>BSP</strong> Developer’s <strong>Guide</strong><br />
Table 9-1<br />
Spelling Conventions (Continued)<br />
Use...<br />
fax<br />
fd<br />
filename<br />
for example<br />
FTP<br />
HP-UX<br />
I/O<br />
ID<br />
Internet<br />
intertask<br />
inline<br />
ioctl<br />
Iostreams (no bold)<br />
log in (v.)<br />
login (n., adj.)<br />
lowercase<br />
MC680x0<br />
Not...<br />
FAX<br />
FD<br />
file name<br />
e.g.<br />
ftp<br />
HP/UX, HPUX<br />
i/o, IO, io<br />
id<br />
internet<br />
inter-task<br />
in-line<br />
IOCTL, IOctl, IOCtl<br />
IOStreams, iostreams, IoStreams<br />
login, log-in<br />
log in, log-in<br />
lower-case<br />
M68000, M68k<br />
MC68020... M68020, 68020...<br />
MS-DOS<br />
motherboard<br />
multiprocessor<br />
multitasking<br />
multi-user<br />
nonvolatile<br />
MSDOS, MS DOS<br />
mother-board, mother board<br />
multi-processor<br />
multi-tasking<br />
multiuser<br />
non-volatile<br />
176
9<br />
Documentation <strong>Guide</strong>lines<br />
Table 9-1<br />
Spelling Conventions (Continued)<br />
Use...<br />
nonzero<br />
on-board<br />
online<br />
PAL<br />
pop-up<br />
preemptive<br />
printout<br />
real-time, Real-time<br />
reentrant<br />
RSH<br />
run-time, Run-time<br />
SBus<br />
SCSI<br />
set up (v.)<br />
setup (n., adj.)<br />
shell script<br />
single-stepping<br />
standalone<br />
start up (v.)<br />
startup (n., adj.)<br />
stdio<br />
sub-class<br />
subdirectory<br />
SunOS<br />
Not...<br />
non-zero<br />
on board, onboard<br />
on-line<br />
pal<br />
popup<br />
pre-emptive<br />
print-out<br />
realtime, Real-Time<br />
re-entrant<br />
rsh<br />
runtime, Run-Time<br />
S-Bus, Sbus<br />
Scsi, scsi<br />
set-up<br />
set-up<br />
shellscript<br />
single stepping<br />
stand-alone<br />
startup, start-up<br />
start-up<br />
STDIO<br />
subclass<br />
sub-directory<br />
SUN OS<br />
9<br />
177
VxWorks 5.5<br />
<strong>BSP</strong> Developer’s <strong>Guide</strong><br />
Table 9-1<br />
Spelling Conventions (Continued)<br />
Use...<br />
super-class<br />
task ID<br />
Tcl<br />
TFTP<br />
that is<br />
timeout<br />
timestamp<br />
tty<br />
UNIX<br />
uppercase<br />
Users’ Group<br />
VxWorks<br />
workaround (n.)<br />
Not...<br />
superclass<br />
task id<br />
TCL, tcl<br />
tftp<br />
i.e.<br />
time-out<br />
time stamp, time-stamp<br />
TTY<br />
Unix<br />
upper-case, upper case<br />
User’s Group Users Group<br />
VxWORKS, VXWORKS<br />
work-around<br />
Acronyms<br />
Define acronyms at first usage, except for widely recognized acronyms (see<br />
Table 9-2). At first usage, give the full definition, followed by the acronym in<br />
parentheses, for example:<br />
Internet Control Message Protocol (ICMP)<br />
Do not use an apostrophe ( ’ ) to form the plural of an acronym. The plural of CPU<br />
is CPUs.<br />
Table 9-2<br />
Common Acronyms<br />
Acronym<br />
ASCII<br />
ANSI<br />
Definition<br />
American Standard Code for Information Interchange<br />
American National Standards Institute<br />
178
9<br />
Documentation <strong>Guide</strong>lines<br />
Table 9-2<br />
Common Acronyms<br />
Acronym<br />
CPU<br />
EOF<br />
fd<br />
FTP<br />
IP<br />
NFS<br />
PPP<br />
pty<br />
RAM<br />
ROM<br />
RSH<br />
TCP<br />
TFTP<br />
tty<br />
Definition<br />
Central Processing Unit<br />
End-Of-File<br />
file descriptor<br />
File Transfer Protocol<br />
Internel Protocol<br />
Network File System<br />
Point-to-Point Protocol<br />
pseudo terminal device<br />
Random Access Memory<br />
Read-Only Memory<br />
Remote Shell<br />
Transmission Control Protocol<br />
Trivial File Transfer Protocol<br />
terminal device<br />
9<br />
Board Names<br />
Names used for target VME boards should correspond to the names used by their<br />
suppliers; for example, MV135 is not an acceptable name for the MVME135.<br />
When multiple board models are covered by the same board support package, and<br />
the portion of their names that differs is separated by a slash ( / ) or a hyphen ( - ),<br />
these portions can be repeated, each separated by a comma and a space. See the<br />
examples below:<br />
Force SYS68K/CPU-21, -29, -32<br />
Heurikon HK68/V2F, V20, V2FA<br />
However:<br />
Motorola MVME147, MVME147S-1<br />
179
VxWorks 5.5<br />
<strong>BSP</strong> Developer’s <strong>Guide</strong><br />
9.3 Format<br />
This section discusses general formatting requirements of Wind River reference<br />
documentation. Specific requirements relevant to <strong>BSP</strong>s are discussed in<br />
9.4 Subsections, p.183.<br />
Layout<br />
■<br />
Module Layout. To work with refgen, the documentation in source modules<br />
must be laid out in accordance with a few simple principles. These layout<br />
requirements are described in the Tornado User’s <strong>Guide</strong>: Coding Conventions.<br />
■<br />
General. Text should fill out the full line length (assume about 75<br />
characters). Do not start every sentence on a new line.<br />
Special Elements<br />
■<br />
Subroutines. Include parentheses with all subroutine names, even those<br />
generally construed as shell commands. Do not put a space between the<br />
parentheses or after the name (unlike the Wind River convention for code):<br />
CORRECT:<br />
taskSpawn()<br />
INCORRECT:<br />
taskSpawn( ), taskSpawn (), taskSpawn<br />
Note that there is one major exception to this rule: In the subroutine title, do<br />
not include the parentheses in the name of the subroutine being defined:<br />
CORRECT:<br />
/*************************************************<br />
*<br />
* xxxFunc - do such and such<br />
INCORRECT:<br />
/*************************************************<br />
*<br />
* xxxFunc() - do such and such<br />
180
9<br />
Documentation <strong>Guide</strong>lines<br />
■<br />
Avoid using a routine or module name as the first word in a sentence, but if<br />
you must, do not capitalize it.<br />
Parameters. When referring to parameters in text, surround the argument<br />
name with the angle brackets < and >. For example, if a routine getName( )<br />
had the following declaration:<br />
VOID getName<br />
(<br />
int tid, /* task ID */<br />
char * pTname /* task name */<br />
)<br />
You might say something like the following:<br />
This routine gets the name associated with the specified task ID and<br />
copies it to .<br />
9<br />
■<br />
Commands, Files, Tasks, Global Variables, Operators, C Keywords, Network<br />
Interfaces, and so on. Place names for these elements in single-quotes; for<br />
example:<br />
This routine maps an error number in ‘errno’ to an error message.<br />
■<br />
■<br />
Terminal Keys. Enter the names of terminal keys in all uppercase; for example,<br />
RETURN, ESC. Prefix the names of control characters with CTRL+; for example,<br />
CTRL+C.<br />
References to Publications. References to chapters of publications should take<br />
the form Publication Title: Chapter Name. For example, you might say:<br />
For more information, see the<br />
.I "VxWorks Programmer’s <strong>Guide</strong>: I/O System."<br />
■<br />
Do not include the chapter number. References to documentation volumes<br />
should be set off in italics. For general cases, use the .I macro. However, in<br />
SEE ALSO sections, use the .pG and .tG macros for the VxWorks Programmer’s<br />
<strong>Guide</strong> and Tornado User’s <strong>Guide</strong>, respectively. For more information, see Markup<br />
Commands, p.190.<br />
Section-Number Cross-References. Do not use the UNIX<br />
parentheses-plus-number scheme to cross-reference the documentation<br />
sections for libraries and routines:<br />
CORRECT:<br />
sysLib, vxTas()<br />
181
VxWorks 5.5<br />
<strong>BSP</strong> Developer’s <strong>Guide</strong><br />
INCORRECT:<br />
sysLib(1), vxTas(2)<br />
Table 9-3<br />
Format of Special Elements<br />
Component Input Output (mangen + troff)<br />
library in title sysLib.c sysLib<br />
library in text sysLib sysLib<br />
subroutine in title sysMemTop sysMemTop( )<br />
subroutine in text sysMemTop() sysMemTop( )<br />
subroutine parameter ptid<br />
publication, not in SEE<br />
ALSO<br />
.I "Tornado User’s <strong>Guide</strong>" Tornado User’s <strong>Guide</strong><br />
VxWorks Programmer’s<br />
<strong>Guide</strong> in SEE ALSO<br />
Tornado User’s <strong>Guide</strong> in<br />
SEE ALSO<br />
.pG "Configuration"<br />
.tG "Cross-Development"<br />
VxWorks Programmer’s <strong>Guide</strong>:<br />
Configuration<br />
Tornado User’s <strong>Guide</strong>:<br />
Cross-Development<br />
emphasis .I must must<br />
Displays<br />
The macros and commands for creating the following displays are discussed more<br />
fully in 9.5.3 Text Formatting, p.190.<br />
■<br />
Code. Use the .CS and .CE macros for displays of code or terminal<br />
input/output. Indent such displays by four spaces from the left margin. 1 For<br />
example:<br />
* .CS<br />
* struct stat statStruct;<br />
* fd = open ("file", READ);<br />
* status = ioctl (fd, FIOFSTATGET, &statStruct);<br />
* .CE<br />
*<br />
1. For library entries, this means the display text starts at column 5; for subroutines, column 7<br />
(because for subroutines the effective line starts in column 3, because the initial star and<br />
space character are stripped off by refgen).<br />
182
9<br />
Documentation <strong>Guide</strong>lines<br />
■<br />
■<br />
■<br />
Board Diagrams. Use the .bS and .bE macros to display board diagrams under<br />
the BOARD LAYOUT heading in the target.nr module.<br />
Tables. Tables built with tbl mark-up are easy as long as you stick to basics,<br />
which will suffice in almost all cases. For information on the commands for<br />
building tables, see Tables, p.192. General stylistic considerations are as<br />
follows:<br />
– Set column headings in bold.<br />
– Separate column headings from the table body with a single rule.<br />
Lists. Mark list items with the standard man macro .IP. Do not use the .CS/.CE<br />
macros to create lists.<br />
9<br />
9.4 Subsections<br />
This section discusses special stylistic considerations for <strong>BSP</strong> documentation on a<br />
section-by-section basis. For more information and specific examples, refer to the<br />
<strong>BSP</strong> templates provided.<br />
In the examples below, mfr&board means the manufacturer’s name plus the full<br />
model name of the board, as described in Board Names, p.179.<br />
The target-information reference page (target.nr) has special requirements, and is<br />
thus described separately from standard library and subroutine reference pages.<br />
Library and Subroutine Reference Pages<br />
A template showing documentation for sysLib.c is provided in<br />
target/config/templateCPU/sysLib.c. Reference pages for libraries and<br />
subroutines always contain the following subsections in the order shown; other<br />
subsections can be included as needed:<br />
NAME<br />
the name of the library or subroutine<br />
SYNOPSIS<br />
for libraries, the summary of subroutines; for subroutines, the declaration<br />
(generated automatically by refgen).<br />
183
VxWorks 5.5<br />
<strong>BSP</strong> Developer’s <strong>Guide</strong><br />
NAME Section<br />
DESCRIPTION<br />
an overall description of the library or subroutine<br />
INCLUDE FILES<br />
the included .h files (libraries only)<br />
RETURNS<br />
the values returned (subroutines only)<br />
SEE ALSO<br />
cross-references to documentation for other libraries and routines, or other<br />
user manuals<br />
Special considerations for these subsections are discussed below.<br />
■<br />
Libraries. Describe briefly what this collection of routines does. The hyphen<br />
must appear exactly as indicated (space-hyphen-space)—do not use<br />
backslashes or double hyphens. The general format is:<br />
nameLib.c - the such-and-such library<br />
For example:<br />
sysALib.s - mfr&board system-dependent assembly routines<br />
sysLib.c - mfr&board system-dependent library<br />
■<br />
Be sure to include the file-name extension (.c, .s); but note that the refgen<br />
process strips it off so that it does not appear in the final reference page entry.<br />
Subroutines. For the one-line heading/definition, use the imperative mood<br />
and convey action. The general format is:<br />
name - do such and such<br />
For example:<br />
DESCRIPTION Section<br />
sysMemTop - get the address of the top of memory<br />
Do not include the subroutine parentheses in the heading; the refgen process<br />
adds them in so that they appear in the final reference page entry.<br />
Start off the description section by saying: “This library...” or “This routine...”—do<br />
not repeat the module or subroutine name here; it has already been made<br />
clear. The remainder of the sentence should be a summary of what the library or<br />
routine does or provides (and in more depth than the NAME line).<br />
184
9<br />
Documentation <strong>Guide</strong>lines<br />
INCLUDE FILES Section<br />
Every library and driver entry should have a subheading INCLUDE FILES, which<br />
lists any relevant header files, for example:<br />
RETURNS Section<br />
INCLUDE FILES: sysLib.h<br />
The RETURNS section should be the last section before the SEE ALSO section.<br />
■<br />
Include a RETURNS section in all subroutines. If there is no return value (as in<br />
the case of a void) simply enter:<br />
■<br />
■<br />
■<br />
■<br />
■<br />
RETURNS: N/A<br />
Mention only true returns in the RETURNS section—not values copied to a<br />
buffer given as an argument.<br />
Always start a return-value statement with a capital and end it with a period;<br />
and again, do not use abbreviated English. For example:<br />
RETURNS: The address of the top of memory.<br />
Despite the general rule of style, we do not treat return values as complete<br />
sentences; the subject and verb are understood.<br />
Keep return statements in present tense. (Even if the conditions that cause an<br />
ERROR may be thought of as “past” once ERROR is returned.)<br />
In STATUS returns, ERROR must be followed by a qualifying statement.<br />
Always enter a comma after OK, because it must be clear that the qualifier<br />
belongs to the ERROR condition and not the OK. For example:<br />
RETURNS: OK, or ERROR if memory is insufficient.<br />
Do not preface lines of text with extra leading spaces—input lines whose first<br />
characters is a space cause a fill break. In the past, some authors applied this<br />
technique in RETURNS sections to force line breaks for separate elements of a<br />
return—we do not follow this convention. For example:<br />
CORRECT:<br />
* RETURNS: OK, or ERROR if the tick rate is invalid or the timer<br />
* cannot be set.<br />
9<br />
185
VxWorks 5.5<br />
<strong>BSP</strong> Developer’s <strong>Guide</strong><br />
SEE ALSO Section<br />
INCORRECT:<br />
* RETURNS: OK, or ERROR<br />
* if the tick rate is invalid or<br />
* the timer cannot be set.<br />
The SEE ALSO section should be the last section of a reference-page entry.<br />
■<br />
■<br />
If the entry is a subroutine, refgen automatically includes the parent library in<br />
the SEE ALSO section.<br />
Do not cross-reference manual section numbers using the UNIX<br />
parentheses-plus-number scheme:<br />
CORRECT:<br />
SEE ALSO: sysLib, vxTas()<br />
INCORRECT:<br />
SEE ALSO: sysLib(1), vxTas(2)<br />
■<br />
In the SEE ALSO section, include cross-references to chapters of the VxWorks<br />
Programmer’s <strong>Guide</strong> or the Tornado User’s <strong>Guide</strong> by using the .pG macro or the<br />
.tG macro, respectively. The dot must be the first character on the effective line<br />
(for a subroutine section, refgen strips the star plus space); for example:<br />
* SEE ALSO: someLib, anotherLib,<br />
* .pG "Basic OS, Cross-Development,"<br />
* .tG "Setup and Startup"<br />
*/<br />
As this example illustrates, the cross-reference to another volume should come<br />
after cross-references to other libraries or subroutines. The .pG and .tG macros<br />
should only be used in SEE ALSO sections.<br />
Target Information Reference Page: target.nr<br />
A template for the target-information reference page is provided in<br />
target/config/templateCPU/target.nr. This reference entry always contains the<br />
subsections described below, and others as needed. Summary:<br />
NAME<br />
the name of the board<br />
186
9<br />
Documentation <strong>Guide</strong>lines<br />
INTRODUCTION<br />
summary of scope and assumptions<br />
FEATURES<br />
supported and unsupported features of the board<br />
HARDWARE DETAILS<br />
driver and hardware details for the board<br />
SPECIAL CONSIDERATIONS<br />
special features or restrictions<br />
BOARD LAYOUT<br />
the board layout in ASCII format<br />
SEE ALSO<br />
references to Wind River documentation<br />
BIBLIOGRAPHY<br />
references to additional documentation<br />
9<br />
NAME Section<br />
The information in the NAME section should all be on a single line and entered as<br />
a single argument to the .aX macro in the following format:<br />
.aX "mfr&board"<br />
mfr&board stands for the manufacturer’s name plus the manufacturer’s name for<br />
the board model, as described previously. For example:<br />
INTRODUCTION Section<br />
.aX "Motorola MVME147, MVME147S-1"<br />
This section includes getting started information, including subsections detailing<br />
ROM installation and jumper settings for VxWorks operation.<br />
FEATURES Section<br />
This section describes all the features of the board whether or not they are<br />
supported. Every feature of the board should be identified in either of the<br />
subsections, Supported Features or Unsupported Features. Each board configuration<br />
option should be considered a feature. A third subsection, Feature Interactions,<br />
describes how one feature or board configuration affects others.<br />
187
VxWorks 5.5<br />
<strong>BSP</strong> Developer’s <strong>Guide</strong><br />
HARDWARE DETAILS Section<br />
This section discusses hardware elements and device drivers, such as serial,<br />
Ethernet, and SCSI. It also includes memory maps for each bus and lists of<br />
interrupt levels and/or vector numbers for each interrupting source.<br />
SPECIAL CONSIDERATIONS Section<br />
This section identifies the unique characteristics of the board. It includes all<br />
information needed by the user that does not fit in any other section.<br />
For customers who have the <strong>BSP</strong> Validation Test Suite, this section must also<br />
address known failures of VTS tests. Presumably the board doesn’t have a special<br />
feature or it implements it in a special manner. The <strong>BSP</strong> writer is responsible for<br />
documenting all exceptions noted during VTS testing of the <strong>BSP</strong>.<br />
BOARD LAYOUT Section<br />
Use the .bS/.bE macros to display board diagrams. See the template <strong>BSP</strong> for<br />
guidelines on diagramming jumper positions, or see target.nr, p.27.<br />
SEE ALSO Section<br />
This section always references the Setup and Startup chapter of the Tornado User’s<br />
<strong>Guide</strong>. Other Wind River manuals can be referenced as necessary.<br />
Use the .tG macro for Tornado User’s <strong>Guide</strong> references. Use the .pG macro for<br />
VxWorks Programmer’s <strong>Guide</strong> references. (See Markup Commands, p.190.) Use the .iB<br />
macro for other manuals. For example:<br />
BIBLIOGRAPHY Section<br />
.SH "SEE ALSO"<br />
.tG "Setup and Startup,"<br />
.pG "Configuration, Motorola MC680x0"<br />
This section references any additional technical manuals, data sheets, or<br />
supplements that the user should have at hand. Use the .iB macro for these<br />
references. (See Markup Commands, p.190.) For example:<br />
.SH "BIBLIOGRAPHY"<br />
.iB "Motorola MC68020 User’s Manual"<br />
.iB "Motorola MC68030 User’s Manual"<br />
188
9<br />
Documentation <strong>Guide</strong>lines<br />
9.5 Generating Reference Pages<br />
This section discusses the mechanics of generating <strong>BSP</strong> documentation: the files<br />
and tools used, the text formatting commands, and the makefile system used to<br />
process documentation from source code to printable reference pages.<br />
9.5.1 Files<br />
File-name extensions indicate the following types of files:<br />
.s assembly-language source files.<br />
.c C-language source files.<br />
.nr nroff/troff source file.<br />
.html generated HTML file.<br />
9<br />
Source Directory<br />
target/config/bspname<br />
This directory contains the C and assembly sources and documentation<br />
sources for a particular <strong>BSP</strong>; bspname is a directory name reflecting the maker<br />
and model of the board; for example, mv147 = Motorola MVME147. The files<br />
relevant to documentation are:<br />
Makefile<br />
Master makefile for building <strong>BSP</strong> and VxWorks modules. Three constants<br />
must be defined for documentation: TARGET_DIR, VENDOR, and<br />
BOARD. See 9.5.4 Processing, p.193 for more information.<br />
depend.bspname<br />
Dependency rules generated by Makefile.<br />
sysLib.c<br />
Library of board-dependent C routines.<br />
target.nr<br />
Source for the target-information reference page, containing general<br />
information about a board’s installation requirements or capabilities<br />
as they relate to VxWorks. This file is “manually” created nroff/troff<br />
source.<br />
189
VxWorks 5.5<br />
<strong>BSP</strong> Developer’s <strong>Guide</strong><br />
Documentation Directories<br />
docs/vxworks/bsp/bspname<br />
This directory contains the HTML reference-page files for <strong>BSP</strong>s. All files are<br />
generated from the source files in target/config/bspname by the make process,<br />
which runs refgen. The files are:<br />
bspname.html<br />
Target-information reference page generated from target.nr.<br />
sysLib.html<br />
Reference page for sysLib.c.<br />
libIndex.html<br />
Index of the <strong>BSP</strong>s library-level reference pages.<br />
rtnIndex.html<br />
Index of the <strong>BSP</strong>s subroutine reference pages.<br />
9.5.2 Tools<br />
host/host/bin/refgen<br />
This tool is a Tcl script that generates HTML files from specially formatted<br />
source code, which may be C language modules, assembly language modules,<br />
or target.nr files. The command-line syntax and options for refgen are<br />
summarized in the reference page shown in L. Refgen.<br />
9.5.3 Text Formatting<br />
Markup Commands<br />
This section describes the use of the UNIX nroff/troff man macros that form the<br />
basis of the formatting mark-up used in source files.<br />
Understanding the mark-up commands is necessary for constructing the target.nr<br />
file. However, in .c and .s files, mark-up should be restricted to .CS/.CE for<br />
showing examples, or .IP for building lists—mark-up should be used only<br />
sparingly in these modules, since most are added automatically.<br />
The list below shows the mark-up used in Wind River reference documentation.<br />
Mark-up commands inherited from the UNIX man macros are named with two<br />
190
9<br />
Documentation <strong>Guide</strong>lines<br />
uppercase letters. Those added by Wind River are named with a lowercase letter<br />
followed by an uppercase letter.<br />
Each command argument should be enclosed in quotation marks ("); for example:<br />
.SH "BOARD LAYOUT"<br />
.TH 12345<br />
Title Heading. This macro is used to fill in running header and footer<br />
fields. It is always the first macro called for a given manual entry. Its<br />
arguments are as follows:<br />
1 - module name (for target.nr, the target directory name)<br />
2 - section number of letter (“T” for target.nr documentation)<br />
3 - board manufacturer and model (middle part of running footer)<br />
4 - current date in the form “Rev: 01 Jan 97”<br />
5 - “VXWORKS REFERENCE MANUAL” (middle of running head)<br />
.SH heading<br />
Subheading (NAME, DESCRIPTION, and so on).<br />
9<br />
.CS<br />
.CE<br />
.bS<br />
.bE<br />
.IP x<br />
Code Start / Code End. This pair of macros is used to set off code displays—<br />
output appears in no-fill mode (exactly as typed) and is set in a<br />
fixed-width font.<br />
Board Start / Board End. This pair of macros is used to set off displays of<br />
board diagrams in target.nr. They are similar to .CS/.CE but output<br />
appears in a smaller font size. See target.nr, p.27 for guidelines on<br />
diagramming jumper positions using ASCII characters.<br />
Indented Paragraph. This macro is useful for creating itemized<br />
lists. Argument x is the item mark. Indentation ends when a .LP is<br />
encountered.<br />
.IP "FIODISKFORMAT"<br />
Formats the entire disk with appropriate hardware track and<br />
sector marks. No file system is initialized on the disk by<br />
this request.<br />
.IP "FIODISKINIT"<br />
Initializes a DOS file system on the disk volume.<br />
.LP<br />
Any other ioctl() function codes are passed to the block<br />
device driver for handling.<br />
191
VxWorks 5.5<br />
<strong>BSP</strong> Developer’s <strong>Guide</strong><br />
.LP<br />
Example output:<br />
FIODISKFORMAT<br />
Formats the entire disk with appropriate hardware track and sector<br />
marks. No file system is initialized on the disk by this request.<br />
FIODISKINIT<br />
Initializes a DOS file system on the disk volume.<br />
Any other ioctl( ) function codes are passed to the block device driver for<br />
handling.<br />
Left Paragraph. This macro restores the left indent set by .IP. See the<br />
example above.<br />
.pG chapter<br />
Programmer’s <strong>Guide</strong> Chapter. This macro is used in a SEE ALSO section to<br />
specify a cross-reference to a chapter of the VxWorks Programmer’s<br />
<strong>Guide</strong>. See SEE ALSO Section, p.186.<br />
.tG chapter<br />
Tornado User’s <strong>Guide</strong> Chapter. This macro is used in a SEE ALSO section to<br />
specify a cross-reference to a chapter of the Tornado User’s <strong>Guide</strong>. See SEE<br />
ALSO Section, p.186.<br />
.iB text Bibliography. This macro is used in SEE ALSO and BIBLIOGRAPHY sections<br />
to reference documents other than the VxWorks Programmer’s <strong>Guide</strong> or the<br />
Tornado User’s <strong>Guide</strong>.<br />
.I text Italics. This macro is used to set text in italics.<br />
.aX text This macro causes no special formatting; wrs.an outputs its arguments<br />
verbatim. However, it is used by Wind River macro packages and scripts<br />
to collect data for tables of contents and indexes. Call directly in target.nr<br />
only. See NAME Section, p.184.<br />
Tables<br />
Building tables is easy as long as you stick to basics, which will suffice in almost all<br />
cases. General stylistic considerations are described in Displays, p.182.<br />
NOTE: Do not use the .CS/.CE macros to build tables. These macros are reserved<br />
for code examples.<br />
192
9<br />
Documentation <strong>Guide</strong>lines<br />
The following example demonstrates our general style:<br />
.TS<br />
expand;<br />
l l l .<br />
Column Head 1 | Column Head 2 | Column Head 3<br />
_<br />
Row 1 Col 1 | Row 1 Col 2 | Row 1 Col 3<br />
Row 2 Col 1 | Row 2 Col 2 | Row 2 Col 3<br />
.TE<br />
Alternatively, in the target.nr file only you can instead use tab characters as the<br />
column separator in place of “|”.<br />
9.5.4 Processing<br />
9<br />
The steps below describe how to generate <strong>BSP</strong> documentation using the makefiles<br />
based on the templates delivered with the <strong>BSP</strong> Developer’s Kit.<br />
1. In target/config/bspname, check for the existence of the three required constants<br />
in Makefile:<br />
TARGET_DIR<br />
target directory name (bspname); for example, “mv147”<br />
VENDOR<br />
vendor name; for example, “Motorola”<br />
BOARD<br />
board model name; for example, “MVME147, MVME147S-1”<br />
2. Generate the reference pages by running:<br />
make man<br />
This does the following:<br />
– Builds an appropriate depend.bspname.<br />
– Runs sysLib.c through the C preprocessor to collect any drivers included<br />
by #include directives.<br />
– Runs refgen -mg.<br />
– Distributes HTML reference pages to the appropriate WIND_BASE/docs<br />
directories.<br />
193
VxWorks 5.5<br />
<strong>BSP</strong> Developer’s <strong>Guide</strong><br />
The flow chart in Figure 9-1 shows how the make process distributes <strong>BSP</strong><br />
reference pages in the docs/vxworks/bsp directory.<br />
Figure 9-1 Production Flow for <strong>BSP</strong> Documentation<br />
target/config/bspname<br />
target.nr<br />
sysLib.c<br />
make man<br />
(mg & mangen)<br />
docs/vxworks/bsp/bspname<br />
bspname.html<br />
sysLib.html<br />
libIndex.html<br />
rtnIndex.html<br />
194
10<br />
Product Packaging<br />
10.1 SETUP Developer’s Kit<br />
The current method of delivery for Wind River products uses the SETUP utility to<br />
create CD-ROM images. Products are encrypted and accessible only through<br />
installation keys. The SETUP utility is compatible with all supported host<br />
platforms.<br />
A SETUP CD-ROM image contains the appropriate unpacking routines for all host<br />
platforms. It also contains some text files: README.TXT, FIXED.TXT, and<br />
PROBLEMS.TXT.<br />
For more information, see the Tornado SETUP SDK Developer’s <strong>Guide</strong> (available<br />
from WindSurf).<br />
10.2 <strong>BSP</strong> Packaging<br />
Packaging involves both content and format of the delivered product. At Wind<br />
River, all <strong>BSP</strong>s are now formatted on CD-ROMs installable on any host. In the past,<br />
<strong>BSP</strong>s have been delivered on UNIX tar tapes or CD-ROMs containing a UNIX<br />
installation script and a Windows self-extracting utility.<br />
All VxWorks <strong>BSP</strong>s have similar directory structures and include several common<br />
files, which are described below. Strict adherence to the standards described in the<br />
195
VxWorks 5.5<br />
<strong>BSP</strong> Developer’s <strong>Guide</strong><br />
following subsections is required to ensure smooth integration of the <strong>BSP</strong> into the<br />
VxWorks development system.<br />
<strong>BSP</strong> Contents<br />
Determining the files and directories that are delivered as part of a <strong>BSP</strong> product is<br />
one of the last and most important steps in creating a <strong>BSP</strong>. The <strong>BSP</strong> must include<br />
all the files needed to recompile the <strong>BSP</strong>. It must not contain any files that would<br />
cause another <strong>BSP</strong> to fail to compile on the user’s system.<br />
Default Configuration<br />
Before beginning the <strong>BSP</strong> packaging phase, you must establish and set the default<br />
configuration for the <strong>BSP</strong>. This means setting the configuration options in config.h<br />
and selecting the default deliverables using the RELEASE variable in the makefile.<br />
In some cases, the target board for which the <strong>BSP</strong> is written may be available in<br />
several different configurations. For example, it may be available with different<br />
memory modules, peripheral controllers, processor types, or revision levels. One<br />
<strong>BSP</strong> that supports all possible configurations is usually the desired solution.<br />
To this end, you are encouraged to configure the final <strong>BSP</strong> for the default case with<br />
the minimum configuration possible. This allows the ROM set and VxWorks image<br />
to run, as shipped, on most all variations of the target board. Thus, the default<br />
memory size should be the minimum available, and all optional peripheral<br />
controllers should be configured out of the <strong>BSP</strong>. If end users have more memory or<br />
an optional module, they can then configure in the appropriate support and<br />
rebuild the VxWorks image and VxWorks boot ROMs when necessary.<br />
Any <strong>BSP</strong> configuration mechanisms for tuning target board support should be<br />
accessible through parameters in config.h. These parameters are typically either<br />
macros or conditional compilation directives. Any uncommon or complex<br />
configuration mechanisms should be explained fully in config.h and in the<br />
SPECIAL CONSIDERATIONS section of target.nr.<br />
The standard delivered makefile targets for Wind River <strong>BSP</strong>s include bootrom,<br />
vxWorks, and vxWorks.st. The standard make variable RELEASE is defined to be<br />
these targets. If a different set of targets (say, bootrom_uncmp.hex instead of<br />
bootrom.hex) is to be delivered, RELEASE should be redefined in the makefile. For<br />
example:<br />
196
10<br />
Product Packaging<br />
...<br />
include $(TGT_DIR)/h/make/defs.$(WIND_HOST_TYPE)<br />
...<br />
RELEASE +=bootrom_uncmp.hex<br />
...<br />
include $(TGT_DIR)/h/make/rules.bsp<br />
...<br />
The purpose of delivering executable images to the customer is for demonstration<br />
and verification only. It is presumed that all customers will reconfigure and rebuild<br />
all executables in-house. This includes boot ROM images.<br />
Projects for the supported toolchains should also be delivered. The default name<br />
for these projects is bspName_gnu or bspName_diab. Third parties may use other<br />
naming schemes. These projects are built by default with the RELEASE macro.<br />
They can be built individually by using the make targets prj_gnu or prj_diab.<br />
10<br />
Included Files<br />
For details on the files included in a <strong>BSP</strong> product, see M. <strong>BSP</strong> Product Contents.<br />
<strong>BSP</strong> files fall into these categories:<br />
■<br />
Target-specific files: all files in the target/config/bspname and target reference<br />
page entries in the docs/vxworks/bsp/bspName directory.<br />
■<br />
■<br />
Files associated with the default projects generated from the <strong>BSP</strong>. This project<br />
can be created from the project facility or from the traditional command line<br />
using make release.<br />
Documentation files using HTML format. See the reference entry for the<br />
htmlBook command (Tornado User’s <strong>Guide</strong>: Utilities Reference).<br />
Excluded Files<br />
The following files should not be delivered with a <strong>BSP</strong> product:<br />
■<br />
VxWorks Files<br />
The product should not include any files that are provided to the user by any<br />
other Wind River product.<br />
target/config/all/....<br />
target/config/comps/...<br />
target/src/...<br />
target/h/...<br />
197
VxWorks 5.5<br />
<strong>BSP</strong> Developer’s <strong>Guide</strong><br />
■<br />
The files in these directories are part of the VxWorks architecture/toolchain<br />
product and should not be altered by any third-party product.<br />
The <strong>BSP</strong> dependency file, target/config/bspname/depend.bspname, should not<br />
be delivered with the other <strong>BSP</strong> files. By not including this file, the system is<br />
forced to recreate it the first time a user issues any make command to compile<br />
anything.<br />
Driver Directories<br />
The product should not include any-third party files in the directories listed<br />
below. These directories are reserved for Wind River-original files only. Third<br />
parties should not add to, or modify, any file from these directories. If the <strong>BSP</strong><br />
includes a <strong>BSP</strong>-specific version of a Wind River driver, the driver should be<br />
distributed in the <strong>BSP</strong> directory, not the target/src/drv directory.<br />
target/h/drv/...<br />
target/src/drv/...<br />
■<br />
Modified Wind River object files<br />
The <strong>BSP</strong> writer should not deliver any object file that overwrites or replaces a<br />
Wind River-supplied object file. Unique or special object files shall be<br />
delivered in the <strong>BSP</strong> directory itself.<br />
■<br />
Copyright Protected Files<br />
Wind River reserves all rights to its network and SCSI drivers. No third party<br />
may distribute the source code to these drivers, or to any derivative driver<br />
without the express written consent of Wind River Systems. Source code for<br />
Wind River component releases is normally protected.<br />
target/src/drv/netif/any.c<br />
target/src/drv/scsi/any.c<br />
target/src/drv/end/any.c<br />
Source of the Files<br />
The template <strong>BSP</strong> included in the <strong>BSP</strong> Kit product is not the source for the generic<br />
driver or architecture-specific driver files. The sample <strong>BSP</strong> is supplied primarily as<br />
an aid to developers who are creating target-specific files and new drivers.<br />
Developers typically copy common files from a reference <strong>BSP</strong> (one <strong>BSP</strong> is bundled<br />
with each VxWorks object license).<br />
198
10<br />
Product Packaging<br />
Vendor-Supplied Shared Files<br />
Some files can appear to be target-specific when in fact they are shared by multiple<br />
<strong>BSP</strong>s. These shared files include those described above as “generic” and<br />
“architecture-specific,” as well as files included on the Device Driver Object<br />
product.<br />
The following directories are distributed with the Tornado architecture product<br />
and the Tornado driver component product:<br />
target/config/all<br />
target/src/config<br />
target/src/drv/antyhing<br />
target/h/drv/anything<br />
target/h/make<br />
target/h/tool/anything<br />
Under no circumstances may these directories and files be altered and shipped by<br />
third-party developers. Although <strong>BSP</strong> developers are encouraged to create generic<br />
device drivers, they must not place the source code in the target/src/drv and<br />
target/h/drv directories; all existing Wind River drivers must not be modified. If an<br />
end user were to install a Wind River <strong>BSP</strong> or a new VxWorks version after<br />
installing a third-party <strong>BSP</strong> with altered shared files, the third-party changes<br />
would be overwritten by the Wind River files.<br />
Typically, <strong>BSP</strong>s can be written so that all target-specific files reside in<br />
target/config/bspname, and target reference pages in docs/vxworks/bsp/bspName.<br />
In the few cases where this is not possible, the <strong>BSP</strong> must include altered versions<br />
of the shared files. However, the shared files themselves must not be altered;<br />
instead, a copy of the needed file is modified and placed in an appropriate location<br />
(for example, target/config/bspname). Then the <strong>BSP</strong> make files are updated to point<br />
to the developer’s version; see the makefile mechanisms described in the Tornado<br />
User’s <strong>Guide</strong>, 2.2.<br />
The <strong>BSP</strong> developer can use the CONFIG_ALL makefile variable to direct the <strong>BSP</strong><br />
make files to search for modified versions of the target/config/all files. First, the<br />
developer should make copies of the Wind River versions of these files and place<br />
them in the <strong>BSP</strong> bspname directory, modifying them as necessary. (Note that this<br />
mechanism only works for traditional command-line building and does not have<br />
any effect on project configuration or building.)<br />
By customizing the VxWorks build, the <strong>BSP</strong> developer can create target-specific<br />
versions of shared files without conflicting with other <strong>BSP</strong>s.<br />
Beginning with Tornado 2.0, each architecture CD-ROM contains a “Driver<br />
Objects/Headers” product. This product contains all the compiled Ethernet and<br />
10<br />
199
VxWorks 5.5<br />
<strong>BSP</strong> Developer’s <strong>Guide</strong><br />
SCSI drivers for that architecture, and their headers. Also included are all the<br />
unprotected Wind River drivers in source form. It is expected that customers will<br />
be able to download updated driver products from the Web.<br />
10.2.1 <strong>BSP</strong> Media<br />
Beginning with Tornado 1.0.1, all Wind River products have been packaged onto<br />
CD-ROM media using a new combined UNIX/Windows SETUP utility. Both<br />
UNIX and Windows users begin the installation process with the SETUP<br />
command. All users are then presented with a consistent graphical user interface<br />
that guides them through the product and license manager installations.<br />
For more information, see the Tornado SETUP SDK Developer’s <strong>Guide</strong> (available<br />
from WindSurf).<br />
10.3 Component Packaging<br />
Component packaging is a problem area. Wind River delivers the parts of its<br />
components in their traditional locations:<br />
– Source code modules are usually found in the target/src or target/config<br />
directories.<br />
– Headers are found in target/h; object modules are delivered in<br />
target/lib/objARCH.<br />
– Component description files are in target/config/comps/vxWorks.<br />
– Component configlettes (source fragments) are in target/config/comps/src.<br />
Third parties are not limited to this arrangement, and the location of component<br />
elements can be fully described in the component description file. It is<br />
recommended that third parties place their component source and object elements<br />
in a directory, such as target/config/vendor_name. The location of the component<br />
description file (CDF) depends on where in the system the components should be<br />
integrated.<br />
To integrate the new component into the full system, the CDF should be located in<br />
target/config/comps/vxWorks. If it is a <strong>BSP</strong>-specific component, the file should be<br />
located in the <strong>BSP</strong> directory. If it is specific to a single project, it should be located<br />
200
10<br />
Product Packaging<br />
in the project directory (target/proj/project_name). Be sure to follow the proper<br />
naming conventions. All third-party CDF names must begin with a sequence<br />
number between 50 and 99 (See 6.3.2 CDF Precedence and Paths, p.126).<br />
Third-party components should not overwrite a Wind River-supplied file. They<br />
may override the description of a Wind River component within their own<br />
component description file. It is not necessary to overwrite a file to change a<br />
component’s behavior, because of file precedence.<br />
10.4 Project Packaging<br />
Projects are normally packaged together as a group of files in a single directory.<br />
Projects can be built using the project creation wizard or from the command line<br />
using make release.<br />
Here is a typical file listing of a standard Wind River <strong>BSP</strong> project:<br />
10<br />
bsp_gnu<br />
bsp_gnu/bsp_gnu.wpj<br />
bsp_gnu/usrAppInit.c<br />
bsp_gnu/prjParams.h<br />
bsp_gnu/linkSyms.c<br />
bsp_gnu/prjConfig.c<br />
bsp_gnu/Makefile<br />
bsp_gnu/default<br />
bsp_gnu/default/vxWorks<br />
bsp_gnu/default_rom/vxWorks_rom<br />
bsp_gnu/default_romCompressed/vxWorks_romCompressed<br />
bsp_gnu/default_romResident/vxWorks_romResident<br />
(intermediate .o files have been omitted)<br />
Any special components and CDFs that a project requires should be built into the<br />
project. If a project is transferred from one installation to another, the component<br />
description files at the new installation are used when the project is rebuilt.<br />
Third parties should package their projects for delivery to customers in a similar<br />
manner. You can use the target/proj directory provided your project directory<br />
names do not conflict with those of any Wind River-provided projects.<br />
201
VxWorks 5.5<br />
<strong>BSP</strong> Developer’s <strong>Guide</strong><br />
202
A<br />
Upgrading a <strong>BSP</strong> for<br />
Tornado 2.0<br />
This appendix describes how to port a <strong>BSP</strong> from Tornado 1.0.1/VxWorks 5.3.1 to<br />
Tornado 2.0/VxWorks 5.4.<br />
<strong>BSP</strong>s written for VxWorks 5.2, or earlier releases, are designated as version 1.0<br />
<strong>BSP</strong>s. <strong>BSP</strong>s written for Tornado 1.0.1, or earlier, are designated as version 1.1 <strong>BSP</strong>s.<br />
<strong>BSP</strong>s written to the standard outlined in this document, specifically for Tornado<br />
2.0, are designated as version 1.2 <strong>BSP</strong>s.<br />
All version 1.1 <strong>BSP</strong>s that have been modified to use END drivers and the SENS<br />
network stack are compatible with Tornado 2.0. Third-party <strong>BSP</strong>s using<br />
specialized make sequences and modified versions of kernel files may or may not<br />
translate well to projects. They will work correctly if the traditional command line<br />
is used to build the project.<br />
A.1 Porting Issues<br />
Porting an existing Tornado 1.0.1 <strong>BSP</strong> to Tornado 2.0 involves three main steps:<br />
■<br />
■<br />
Update the <strong>BSP</strong> for the SENS network stack. If an END-style driver is available<br />
for the <strong>BSP</strong>, then it should become the default network driver. Any custom<br />
network drivers that are not END or BSD 4.4 compatible must be upgraded for<br />
SENS. See C. Upgrading a <strong>BSP</strong> for the VxWorks Network Stack.<br />
Create a default project and the HTML documentation for the <strong>BSP</strong>. This is done<br />
using the command make release man.<br />
203
VxWorks 5.5<br />
<strong>BSP</strong> Developer’s <strong>Guide</strong><br />
■<br />
Create a <strong>BSP</strong> product. This applies only to customers who intend to distribute<br />
their <strong>BSP</strong> to other Wind River customers. See A.4 Product Contents, p.205 for<br />
information on how to package a <strong>BSP</strong> product for delivery to customers.<br />
A.2 Code Interface Changes<br />
None of the standard APIs used in <strong>BSP</strong>s have been changed since Tornado 1.0.1.<br />
The Tornado Release Notes, 2.0, mentions changes to the API for pciConfigLib and<br />
access mechanism 0; however, these modifications should affect very few<br />
customers, if any at all.<br />
The version numbers of Wind River <strong>BSP</strong>s have been updated to version 1.2 as a<br />
result of changes to product packaging. Wind River uses a <strong>BSP</strong> identification<br />
scheme of the form X.X/Y, where X.X is the <strong>BSP</strong> version identification, and Y is the<br />
revision ID. The revision ID is incremented by one each time a <strong>BSP</strong> is updated or<br />
re-released. The first revision number for any new <strong>BSP</strong> is zero (0), not one (1). The<br />
config.h file includes the macro <strong>BSP</strong>_REV, which is a string indicating the revision<br />
number of the <strong>BSP</strong>, for example:<br />
#define <strong>BSP</strong>_VER_1_2 1<br />
#define <strong>BSP</strong>_VER_1_1 1<br />
#define <strong>BSP</strong>_VERSION "1.2" /* A Tornado 2.0 <strong>BSP</strong> */<br />
#define <strong>BSP</strong>_REV "/0" /* First Tornado 2.0 revision */<br />
The config.h file also declares the <strong>BSP</strong> version number in both string and macro<br />
form. The <strong>BSP</strong>_VERSION macro is a string, for example “1.2”. The macro<br />
<strong>BSP</strong>_VER_1_2 is defined to be the integer 1 and can be used in both #if and #ifdef<br />
expressions. Since version 1.2 <strong>BSP</strong>s are otherwise compatible with version 1.1<br />
<strong>BSP</strong>s, the macro <strong>BSP</strong>_VER_1_1 can also be defined.<br />
At the end of config.h, add directives that #include the project parameters header<br />
file when building from the project facility.<br />
#if defined(PRJ_BUILD)<br />
# include "prjParams.h"<br />
#endif<br />
204
A<br />
Upgrading a <strong>BSP</strong> for Tornado 2.0<br />
A.3 Project Issues<br />
The project facility is the major difference between Tornado 1.0.1 and Tornado 2.0.<br />
For command-line operations, there is no difference between a Tornado 1.0.1 and<br />
a Tornado 2.0 <strong>BSP</strong>. In Tornado 2.0, project builds are completely new, and they do<br />
not involve files in target/config/all. The old usrConfig.c file has been pulled apart<br />
into initialization groups and component configlettes, which are compiled and<br />
linked together by the project build mechanism. Building with the project facility<br />
differs greatly from building from the command line.<br />
Building from the command line uses the <strong>BSP</strong> Makefile as well as the config.h and<br />
configAll.h header files to control most of the configuration of the object being<br />
built. When building from the project facility, the configuration is determined by<br />
the project header files instead. Project building does not involve the <strong>BSP</strong> makefile.<br />
If there is an item in config.h or configAll.h that is described to the project facility<br />
through a CDF file, that item is controlled solely by the project information;<br />
changes to config.h and configAll.h do not affect it, nor do they affect an existing<br />
project.<br />
Note, if there is something in config.h or configAll.h that the project tool is not<br />
aware of, then the config.h and configAll.h selections will prevail during project<br />
builds.<br />
There are two methods for generating a default project from a <strong>BSP</strong><br />
■<br />
Invoke the project facility wizard. To open the wizard, select the File>New<br />
Project command from the menubar, or, if the Create Project or Open Workspace<br />
window is open, select the New tab.<br />
■<br />
Use the command line, as follows:<br />
A<br />
make release<br />
A.4 Product Contents<br />
The most obvious change for version 1.2 <strong>BSP</strong>s is the product contents list, which is<br />
provided in M. <strong>BSP</strong> Product Contents.<br />
In Tornado 1.0.1, each <strong>BSP</strong> product carried a large number of driver files that were<br />
also delivered as part of the base Tornado product. This redundancy caused<br />
problems for customers, who were uncertain what version of a file was being used.<br />
205
VxWorks 5.5<br />
<strong>BSP</strong> Developer’s <strong>Guide</strong><br />
In Tornado 2.0, neither the <strong>BSP</strong> nor the base product includes any generic Wind<br />
River driver elements. Generic driver elements are a separate product on the<br />
CD-ROM, where they are usually listed in the contents as “Driver<br />
objects/headers”. This product contains all the object modules for network and<br />
SCSI drivers. It also contains all the source for other drivers, as well as the header<br />
files.<br />
Also new for Tornado 2.0 is the <strong>BSP</strong> project. Each <strong>BSP</strong> should include a default<br />
project that represents the default configuration of the <strong>BSP</strong>. End-users should be<br />
encouraged to base the new projects on a <strong>BSP</strong>’s default project; they should not be<br />
developed directly from a <strong>BSP</strong>.<br />
Documentation deliverables have also changed. The new documentation standard<br />
is based on HTML pages that can be browsed. This replaces UNIX-style man<br />
pages. For more information, see L. Refgen.<br />
A.4.1 Product Restrictions<br />
■<br />
Do not provide any files or modules that overwrite anything provided by<br />
Wind River in any product:<br />
target/config/anything<br />
target/lib/obj$(CPU)$(TOOL)vx/anything<br />
target/config/all/anything<br />
target/src/drv/any.c<br />
target/h/drv/any.c<br />
■<br />
Do not include any <strong>BSP</strong>-specific file or module in a restricted Wind River<br />
directory. (that is, third parties must deliver files in target/config/xxxx<br />
directories only):<br />
target/config/all/*<br />
target/src/*<br />
target/h/*<br />
target/lib/*<br />
■<br />
Do not include the <strong>BSP</strong> dependency file used with command-line building. By<br />
not including this file, the make system is forced to rebuild the information the<br />
first time the user gives a make command:<br />
target/config/target/depend.target<br />
206
A<br />
Upgrading a <strong>BSP</strong> for Tornado 2.0<br />
■<br />
Do not include old-style man pages:<br />
target/man/*.*<br />
target/man/manX/*.*<br />
A.4.2 Product Requirements<br />
■<br />
Include the <strong>BSP</strong>-specific files that are always part of the <strong>BSP</strong> product (a typical<br />
<strong>BSP</strong> is shown):<br />
target/config/bspname/Makefile<br />
target/config/bspname/README<br />
target/config/bspname/bootrom.hex<br />
target/config/bspname/config.h<br />
target/config/bspname/configNet.h<br />
target/config/bspname/romInit.s<br />
target/config/bspname/sysALib.s<br />
target/config/bspname/sysLib.c<br />
target/config/bspname/sysScsi.c<br />
target/config/bspname/sysSerial.c<br />
target/config/bspname/target.nr<br />
target/config/bspname/vxWorks<br />
target/config/bspname/vxWorks.st<br />
target/config/bspname/vxWorks.sym<br />
A<br />
■<br />
Include project files generated by the project facility wizard:<br />
target/proj/bspname_vx/Makefile<br />
target/proj/bspname_vx/prjComps.h<br />
target/proj/bspname_vx/prjObjs.lst<br />
target/proj/bspname_vx/usrAppInit.c<br />
target/proj/bspname_vx/bspname_vx.wpj<br />
target/proj/bspname_vx/linkSyms.c<br />
target/proj/bspname_vx/prjConfig.c<br />
target/proj/bspname_vx/prjParams.h<br />
■<br />
Include the default build files generated by the project facility wizard:<br />
target/proj/bspname_vx/default/*.*<br />
207
VxWorks 5.5<br />
<strong>BSP</strong> Developer’s <strong>Guide</strong><br />
■<br />
Include the <strong>BSP</strong> help files created by make man:<br />
docs/vxworks/bsp/bspname/*.*<br />
A.5 Summary<br />
You can model your porting activities on the following steps, which were taken at<br />
Wind River Systems, to update 1.1 <strong>BSP</strong>s to version 1.2:<br />
1. All Wind River <strong>BSP</strong>s were updated to use END-style drivers or modified BSD<br />
4.4 drivers compatible with the SENS 1.1 product. This occurred when the<br />
SENS product for Tornado 1.0.1 was delivered.<br />
2. Some <strong>BSP</strong>s and drivers received normal maintenance patches. These had<br />
nothing to do with the implementation of projects or components.<br />
3. The macros <strong>BSP</strong>_VERSION, <strong>BSP</strong>_VER_1_2, and <strong>BSP</strong>_REV were added to<br />
config.h. These macros must be inserted prior to the statement #include<br />
"configAll.h", as it appears in the following file excerpt:<br />
...<br />
/* New <strong>BSP</strong> version/revision id */<br />
#define <strong>BSP</strong>_VER_1_2 1<br />
#define <strong>BSP</strong>_VER_1_1 1 /* compatible with 1.2 */<br />
#define <strong>BSP</strong>_VERSION "1.2"<br />
#define <strong>BSP</strong>_REV "/0" /* increment with each revision */<br />
#include "configAll.h"<br />
...<br />
4. The prjParams.h file was included conditionally at the end of the config.h file,<br />
as follows:<br />
#if defined(PRJ_BUILD)<br />
# include "prjParams.h"<br />
#endif<br />
5. The README file was modified to reflect the new release of the <strong>BSP</strong>. A new<br />
entry was added to the top of the list to identify the new version and revision<br />
of the <strong>BSP</strong>, for example:<br />
1.2/0 - First release for Tornado 2.0.<br />
208
A<br />
Upgrading a <strong>BSP</strong> for Tornado 2.0<br />
6. The default project files were generated:<br />
make release<br />
7. The default help files were generated:<br />
make man<br />
8. The new product was created. All driver elements were removed from the file<br />
lists for the <strong>BSP</strong>. The new project-based files were added to the file list. New<br />
HTML documentation files were also added, replacing old-style man pages<br />
held in the directories target/man/manX.<br />
A<br />
209
VxWorks 5.5<br />
<strong>BSP</strong> Developer’s <strong>Guide</strong><br />
210
B<br />
Upgrading a <strong>BSP</strong> for<br />
Tornado 2.2<br />
This chapter discusses the migration of a <strong>BSP</strong> to VxWorks 5.5. It includes<br />
information on both architecture-independent and architecture-dependent issues.<br />
B.1 Architecture-Independent Changes to <strong>BSP</strong>s<br />
<strong>BSP</strong> Makefile Changes and the bspCnvtT2_2 Tool<br />
The <strong>BSP</strong> makefile has been simplified by minimizing the number of include<br />
statements needed. In particular, prior to Tornado 2.2, a makefile needed several<br />
includes, as shown in Example B-1.<br />
Example B-1 Makefile includes Prior to Tornado 2.2<br />
...<br />
include $(TGT_DIR)/h/make/defs.bsp<br />
include $(TGT_DIR)/h/make/make.$(CPU)$(TOOL)<br />
include $(TGT_DIR)/h/make/defs.$(WIND_HOST_TYPE)<br />
...<br />
include $(TGT_DIR)/h/make/rules.bsp<br />
include $(TGT_DIR)/h/make/rules.$(WIND_HOST_TYPE)<br />
...<br />
In Tornado 2.2, only two of these include statements are necessary:<br />
211
VxWorks 5.5<br />
<strong>BSP</strong> Developer’s <strong>Guide</strong><br />
...<br />
include $(TGT_DIR)/h/make/defs.bsp<br />
...<br />
include $(TGT_DIR)/h/make/rules.bsp<br />
...<br />
The defs.bsp and rules.bsp files now include any other files necessary to build<br />
your <strong>BSP</strong>. To modify your <strong>BSP</strong>, simply comment out the unnecessary includes in<br />
your makefile.<br />
In addition, a makefile conversion tool, bspCnvtT2_2, has been provided in the<br />
installDir/host/$(WIND_HOST_TYPE)/bin directory. You can invoke<br />
bspCnvtT2_2 with the following syntax:<br />
% bspCnvtT2_2 bspName1 bspName2 ...<br />
bspCnvtT2_2 converts your makefile by performing the following actions:<br />
■<br />
■<br />
■<br />
Saving your old makefile to a file named Makefile.old in your <strong>BSP</strong> directory.<br />
Commenting out the unnecessary includes.<br />
Warning you about the use of any hex build flags. (See Hex Utilities and objcopy,<br />
p.212.)<br />
Hex Utilities and objcopy<br />
The use of Wind River-provided hex and binary utilities, such as aoutToBinDec or<br />
coffHexArm, has been deprecated in favor of the GNU utility objcopy. See the<br />
GNU Toolkit User’s <strong>Guide</strong> chapter on binary utilities for details. It is recommended<br />
that you modify your <strong>BSP</strong> build settings as necessary to use objcopy.<br />
New Default Value of WDB_COMM_TYPE<br />
The WDB_COMM_TYPE default value has been changed from<br />
WDB_COMM_NETWORK to WDB_COMM_END. If you plan to use a different<br />
communication mode, define it explicitly in config.h. For example, if by default<br />
your <strong>BSP</strong> sets up WDB communication on a serial line, you should include the<br />
following line in config.h:<br />
...<br />
/* make sure this appears after inclusion of configAll.h */<br />
#define WDB_COMM_TYPE WDB_COMM_SERIAL<br />
...<br />
212
B<br />
Upgrading a <strong>BSP</strong> for Tornado 2.2<br />
Changes in the Shared Memory Subsystem<br />
A <strong>BSP</strong> for VxWorks 5.5 requires several modest changes to config.h and possibly<br />
to sysLib.c in order to support the shared memory network and the optional<br />
component VxMP. In past releases of VxWorks, you could ensure that the shared<br />
memory components were included simply by verifying the inclusion of the<br />
shared memory backplane network. But in VxWorks 5.5, VxMP can be configured<br />
without support for the shared memory network.<br />
A new component with the inclusion macro INCLUDE_SM_COMMON has been<br />
added to VxWorks 5.5. Use this macro to test for shared memory support. The<br />
majority of <strong>BSP</strong>s that support shared memory use conditional compilation<br />
statements such as the following:<br />
#ifdef INCLUDE_SM_NET<br />
/* shared memory-specific code */<br />
#endif<br />
For VxWorks 5.5, these statements must be updated to test for<br />
INCLUDE_SM_COMMON:<br />
B<br />
#ifdef INCLUDE_SM_COMMON<br />
/* shared memory-specific code */<br />
#endif<br />
When you modify sysLib.c, follow the simple rule of replacing all instances of<br />
INCLUDE_SM_NET with INCLUDE_SM_COMMON.<br />
With a few exceptions, you can use the same rule in changing config.h. A test for<br />
INCLUDE_SM_NET is still valid in network-related statements, but is not valid as<br />
a test for the common shared memory parameters:<br />
SM_ANCHOR_ADRS SM_ANCHOR_OFFSET SM_CPUS_MAX<br />
SM_INT_ARG1 SM_INT_ARG2 SM_INT_ARG3<br />
SM_INT_TYPE SM_MASTER SM_MAX_WAIT<br />
SM_MEM_ADRS SM_MEM_SIZE SM_OBJ_MEM_SIZE<br />
SM_OFF_BOARD SM_TAS_TYPE<br />
These shared memory parameters do not require conditional compilation and can<br />
be left defined at all times. (Note that some are defined by default in configAll.h<br />
and must be undefined before being redefined in config.h.)<br />
The definition of INCLUDE_SM_NET in config.h may also bring in components<br />
that have changed in VxWorks 5.5, such as INCLUDE_NET_SHOW and<br />
INCLUDE_BSD. These components are no longer needed; the smNetShow( )<br />
routine is now in a separate component, called INCLUDE_SM_NET_SHOW, and<br />
proper BSD or other network configuration is contained in other files.<br />
213
VxWorks 5.5<br />
<strong>BSP</strong> Developer’s <strong>Guide</strong><br />
Changes in Other Run-time Facilities<br />
Several optional products for Tornado 2.2/VxWorks 5.5 have undergone changes<br />
that necessitate <strong>BSP</strong> revisions:<br />
■<br />
■<br />
■<br />
True Flash File System (TrueFFS). For details, see the VxWorks Programmer’s<br />
<strong>Guide</strong> chapter on the Flash Memory Device Interface. Also consult the library<br />
entries for tffsConfig and tffsDrv in the VxWorks API Reference.<br />
USB. For details, see the USB Developer’s Kit Programmer’s <strong>Guide</strong>, 1.1.2, and the<br />
USB Developer’s Kit Release Notes, 1.1.2.<br />
DosFs 2.0. This updated version of the DOS file system support for VxWorks<br />
necessitates changes to your <strong>BSP</strong>. Because dosFsNLib version 2.0 has been<br />
available since shortly after the Tornado 2.0 release, many Tornado 2.0.x and<br />
later <strong>BSP</strong>s may already support it, and do not require modification.<br />
B.2 Architecture-Dependent <strong>BSP</strong> Issues<br />
The following sections provide the specific steps required to upgrade your <strong>BSP</strong> to<br />
Tornado 2.2/VxWorks 5.5 as well as architecture-specific information related to<br />
upgrading a <strong>BSP</strong>. For additional architecture-specific information, refer to the<br />
appropriate VxWorks Architecture Supplement manual for your target<br />
architecture (available on WindSurf).<br />
NOTE: Architecture information provided in this section is accurate at the time of<br />
publication. For current architecture information, see the Tornado Migration<br />
<strong>Guide</strong>, 2.2 (available on the Wind River Support Web site).<br />
B.2.1 Migration Changes Common to All Architectures<br />
NOTE: Some material in this section overlaps with the information in<br />
B.1 Architecture-Independent Changes to <strong>BSP</strong>s, p.211.<br />
The following changes are required for all <strong>BSP</strong>s, regardless of architecture:<br />
214
B<br />
Upgrading a <strong>BSP</strong> for Tornado 2.2<br />
■<br />
■<br />
Makefile update. This step is required for all users. Use the bspCnvtT2_2 script<br />
to update the <strong>BSP</strong> makefile. This script comments out unnecessary include<br />
lines and any existing HEX_FLAGS value.<br />
TFFS support. This step is required for <strong>BSP</strong>s with TFFS support. Remove the<br />
inclusion of sysTffs.c from the syslib.c file.<br />
B.2.2 68K/CPU32<br />
All Wind River-supplied <strong>BSP</strong>s for the 68K/CPU32 architecture released with the<br />
Tornado 2.2 product have been upgraded for use with VxWorks 5.5. Custom<br />
VxWorks 5.4-based <strong>BSP</strong>s require only the modifications described in<br />
B.2.1 Migration Changes Common to All Architectures, p.214 to upgrade to VxWorks<br />
5.5. No architecture-specific modifications are required.<br />
For more information on using VxWorks with 68K/CPU32 targets, see the<br />
VxWorks for 68K/CPU32 Architecture Supplement.<br />
B<br />
B.2.3 ARM<br />
NOTE: This section describes <strong>BSP</strong> migration from Tornado 2.1\VxWorks 5.4 to<br />
Tornado 2.2\VxWorks 5.5. For information on migrating a <strong>BSP</strong> from Tornado 2.0.x<br />
to Tornado 2.1, see the Tornado for ARM Release Notes and Architecture Supplement<br />
manual available on WindSurf.<br />
In addition to the steps described in B.2.1 Migration Changes Common to All<br />
Architectures, p.214, the following ARM-specific migration changes are required:<br />
■<br />
For assembly files only. The new macros GTEXT, GDATA, FUNC, and<br />
FUNC_LABEL have been added to assist in porting assembly files. The leading<br />
underscores in global assembly label names should be removed. Using these<br />
macros allows source compatibility between Tornado 2.1.x and Tornado 2.2.<br />
■<br />
Diab support. Due to differences in assembler syntax between the GNU and<br />
Diab toolchains, you need to change any GNU assembly macros to Diab<br />
syntax. For more information on Diab assembly syntax, see the Diab C/C++<br />
Compiler for ARM User’s <strong>Guide</strong>.<br />
For more information on using VxWorks with ARM targets, see the VxWorks for<br />
ARM Architecture Supplement.<br />
215
VxWorks 5.5<br />
<strong>BSP</strong> Developer’s <strong>Guide</strong><br />
B.2.4 ColdFire<br />
In addition to the steps described in B.2.1 Migration Changes Common to All<br />
Architectures, p.214, the following ColdFire-specific issues should be considered<br />
when migrating your custom <strong>BSP</strong>:<br />
■<br />
Diab support. This release of VxWorks for ColdFire includes the same basic<br />
layout and functionality included with the previous Tornado 2.1/VxWorks 5.4<br />
release. However, the GNU toolchain is no longer supported.<br />
For more information on using VxWorks with ColdFire targets, see the VxWorks for<br />
ColdFire Architecture Supplement.<br />
B.2.5 MIPS<br />
NOTE: This section describes <strong>BSP</strong> migration from Tornado 2.1\VxWorks 5.4 to<br />
Tornado 2.2\VxWorks 5.5. For information on migrating a <strong>BSP</strong> from Tornado 2.0.x<br />
to Tornado 2.1, see the Tornado for MIPS Release Notes and Architecture Supplement<br />
manual available on WindSurf.<br />
In addition to the steps described in B.2.1 Migration Changes Common to All<br />
Architectures, p.214, the following MIPS-specific issues should be considered when<br />
migrating your custom <strong>BSP</strong> to Tornado 2.2/VxWorks 5.5:<br />
■<br />
CPU variants. MIPS CPUs are now organized by CPU variant. This allows the<br />
VxWorks kernel to take advantage of the specific architecture characteristics of<br />
one variant without negatively impacting another. As a result, all MIPS <strong>BSP</strong>s<br />
must now include a CPU_VARIANT line in the Makefile after the<br />
MACH_EXTRA line. For example, CPUs which fall into the category of Vr54xx<br />
variants, use the following line:<br />
CPU_VARIANT<br />
=_vr54xx<br />
■<br />
■<br />
See the VxWorks for MIPS Architecture Supplement for a list of MIPS CPUs and<br />
their respective CPU_VARIANT values.<br />
MIPS64 Libraries. The MIPS64 libraries (MIPS64gnu, MIPS64diab,<br />
MIPS64gnule, and MIPS64diable) now support 64-bit MIPS devices with ISA<br />
Level III and above. In previous versions of VxWorks, these libraries only<br />
supported MIPS devices with ISA Level IV and above. For more information<br />
on compiler options for MIPS libraries, refer to the Architecture Supplement.<br />
Alchemy Semiconductor <strong>BSP</strong>s. The Alchemy Semiconductor <strong>BSP</strong>, pb1000, has<br />
been altered to provide additional support to the pb1500 <strong>BSP</strong>. As a result, some<br />
216
B<br />
Upgrading a <strong>BSP</strong> for Tornado 2.2<br />
changes have been made to the API of the common support for these two <strong>BSP</strong>s.<br />
All macro, driver, and file names previously using au1000 have been changed<br />
to simply au. For example, the cache library cacheAu1000Lib is now known as<br />
cacheAuLib. For more details on these changes, refer to the <strong>BSP</strong> and its<br />
supporting drivers.<br />
For more information on using VxWorks with MIPS targets, see the VxWorks for<br />
MIPS Architecture Supplement.<br />
B.2.6 Pentium<br />
In addition to the steps described in B.2.1 Migration Changes Common to All<br />
Architectures, p.214, the following Pentium-specific issues should be considered<br />
when migrating your custom <strong>BSP</strong> to Tornado 2.2/VxWorks 5.5:<br />
■<br />
■<br />
■<br />
■<br />
■<br />
■<br />
■<br />
The new CPU types PENTIUM2, PENTIUM3, and PENTIUM4 have been added<br />
and CPU_VARIANT has been removed. Thus, CPU_VARIANT should be<br />
replaced with a new CPU type that is appropriate for your processor.<br />
Three new code selectors, sysCsSuper, sysCsExc, and sysCsInt, have been<br />
added for this release, and sysCodeSelector has been removed. In existing<br />
<strong>BSP</strong>s, sysCodeSelector should be replaced with sysCsSuper.<br />
The ROM_IDTR, ROM_GDTR, ROM_GDT, ROM_INIT2 offset macros have<br />
been removed due to improvements in the GNU assembler (GAS). These<br />
macros are no longer used by romInit.s.<br />
For assembly files only: the new macros GTEXT, GDATA, FUNC, and<br />
FUNC_LABEL have been added to assist in porting assembly files. The leading<br />
underscores in global assembly label names should be removed. Using these<br />
macros allows source compatibility between Tornado 2.0.2 and Tornado 2.2.<br />
For assembly files only: replace .align with .balign.<br />
The PC host utility mkboot now works with known VxWorks names, but may<br />
not work with user-provided names unless they are of type binary (*.bin). For<br />
all other images, there are two options:<br />
■<br />
■<br />
Rename your image to bootrom.dat before running mkboot.<br />
Modify mkboot.dat to support your names. Follow the examples given in<br />
the mkboot.bat file.<br />
Power management is enabled by default. To disable it, modify config.h:<br />
B<br />
#undef VX_POWER_MANAGEMENT<br />
217
VxWorks 5.5<br />
<strong>BSP</strong> Developer’s <strong>Guide</strong><br />
■<br />
The default console is now set to COM1. In prior versions of VxWorks, x86<br />
targets set the default console to the VGA console. To use the VGA console,<br />
change config.h:<br />
■<br />
■<br />
■<br />
#define INCLUDE_PC_CONSOLE<br />
The configuration parameters for the IDE driver, ideDrv, have been removed<br />
in favor of the ATA driver, ataDrv, that is already used as the default<br />
configuration in Tornado 2.0.<br />
The CPUID structure (sysCpuId) has been updated to support Pentium III and<br />
Pentium 4 processors. sysCpuId.version, sysCpuId.vendor, and<br />
sysCpuId.feature are replaced respectively with sysCpuId.signature,<br />
sysCpuId.vendorId, and sysCpuId.featuresEdx.<br />
INT_VEC_GET( )/XXX_INT_VEC have been replaced with<br />
INT_NUM_GET( )/INT_NUM_XXX, respectively. Although older macros are<br />
available in this release for backward compatibility, they will be removed in<br />
the next release.<br />
■<br />
The routine sysCpuProbe( ) now understands Pentium III and Pentium 4<br />
processors.<br />
■<br />
The routine sysIntEoiGet( ) has been updated.<br />
■<br />
The local and IO APIC/xAPIC drivers, loApicIntr.c, ioApicIntr.c, and<br />
loApicTimer.c, now support the xAPIC in Pentium 4. The show routines for<br />
these drivers have been separated and contained in loApicIntrShow.c and<br />
ioApicIntrShow.c, respectively.<br />
For more information on using VxWorks with Pentium targets, see the VxWorks for<br />
Pentium Architecture Supplement.<br />
B.2.7 PowerPC<br />
In addition to the steps described in B.2.1 Migration Changes Common to All<br />
Architectures, p.214, the following PowerPC-specific changes are required to<br />
migrate your custom <strong>BSP</strong> to Tornado 2.2/VxWorks 5.5:<br />
■<br />
Use of the vxImmrGet( ) routine is deprecated. Existing <strong>BSP</strong>s implement this<br />
routine differently; some return the entire IMMR register, while others mask<br />
off the PARTNUM bits. <strong>BSP</strong>s’ existing behavior is unchanged.<br />
218
B<br />
Upgrading a <strong>BSP</strong> for Tornado 2.2<br />
■<br />
The preferred replacements for this routine are vxImmrIsbGet( ) and<br />
vxImmrDevGet( ), which are implemented in vxALib.s and should not be<br />
overridden by the <strong>BSP</strong>. Standard Wind River drivers use the new interface.<br />
Some early MPC74xx/AltiVec support included a routine, typically<br />
vmxExcLoad( ), to initialize the AltiVec exception vectors. For example:<br />
{<br />
bcopy ((char*)(LOCAL_MEM_LOCAL_ADRS + 0x0100),<br />
(char*)(LOCAL_MEM_LOCAL_ADRS + _EXC_VMX_UNAVAIL),<br />
SIZEOF_EXCEPTION);<br />
bcopy ((char*)(LOCAL_MEM_LOCAL_ADRS + 0x0100),<br />
(char*)(LOCAL_MEM_LOCAL_ADRS + _EXC_VMX_ASSIST),<br />
SIZEOF_EXCEPTION);<br />
}<br />
Such code must be removed. AltiVec exception vectors are initialized by<br />
altivecInit( ).<br />
The following change is optional for PowerPC <strong>BSP</strong>s:<br />
■<br />
Assembly files can be converted to use the Wind River standard macros<br />
defined in installDir/target/h/arch/ppc/toolsPpc.h:<br />
B<br />
FUNC_EXPORT<br />
FUNC_IMPORT<br />
_WRS_TEXT_SEG_START<br />
FUNC_BEGIN<br />
FUNC_LABEL<br />
FUNC_END<br />
Converting assembly files in this way is not generally required. However,<br />
conversion (especially to _WRS_TEXT_SEG_START) occasionally fixes a silent<br />
bug.<br />
For more information on using VxWorks with PowerPC targets, see the VxWorks<br />
for PowerPC Architecture Supplement.<br />
B.2.8 XScale/StrongARM<br />
NOTE: This section describes <strong>BSP</strong> migration from Tornado 2.1\VxWorks 5.4 to<br />
Tornado 2.2\VxWorks 5.5. For information on migrating a <strong>BSP</strong> from Tornado 2.0.x<br />
to Tornado 2.1, see the Tornado for StrongARM/XScale Release Notes and Architecture<br />
Supplement manual available on WindSurf.<br />
219
VxWorks 5.5<br />
<strong>BSP</strong> Developer’s <strong>Guide</strong><br />
In addition to the steps described in B.2.1 Migration Changes Common to All<br />
Architectures, p.214, the following XScale/StrongARM-specific changes are<br />
required to migrate your custom <strong>BSP</strong> to Tornado 2.2/VxWorks 5.5:<br />
■<br />
For assembly files only: the new macros GTEXT, GDATA, FUNC, and<br />
FUNC_LABEL have been added to assist in porting assembly files. The leading<br />
underscores in global assembly label names should be removed. Using these<br />
macros allows source compatibility between Tornado 2.1.x and Tornado 2.2.<br />
■<br />
Diab support. Due to differences in assembler syntax between the GNU and<br />
Diab toolchains, you need to change any GNU assembly macros to Diab<br />
syntax. For more information on Diab assembly syntax, see the Diab C/C++<br />
Compiler for ARM User’s <strong>Guide</strong>.<br />
For more information on using VxWorks with XScale/StrongARM targets, see the<br />
VxWorks for Intel XScale/StrongARM Architecture Supplement.<br />
B.2.9 SuperH<br />
In addition to the steps described in B.2.1 Migration Changes Common to All<br />
Architectures, p.214, the following SuperH-specific changes are required to migrate<br />
your custom <strong>BSP</strong> to Tornado 2.2/VxWorks 5.5:<br />
■<br />
■<br />
■<br />
Power management setup. This step is required for <strong>BSP</strong>s where processor<br />
power management is enabled. In the sysHwInit( ) routine in sysLib.c.<br />
initialize the vxPowerModeRegs structure depending on the SuperH<br />
processor used.<br />
Diab support. This step is only required if the <strong>BSP</strong> will be built with the Diab<br />
toolchain. Assembler files should be updated to use the .short directive instead<br />
of the .word directive.<br />
Use of NULL. In previous releases, NULL was defined as integer zero. This<br />
definition has been changed to match the C standard to a void pointer. To<br />
avoid compiler warnings, make sure NULL is only used for pointer<br />
assignments.<br />
For more information on using VxWorks with SuperH targets, see the VxWorks for<br />
Hitachi SuperH Architecture Supplement.<br />
220
C<br />
Upgrading a <strong>BSP</strong> for the<br />
VxWorks Network Stack<br />
Adding your driver to the target VxWorks system is much like adding any other<br />
application. The first step is to compile and include the driver code in the VxWorks<br />
image. For a description of the general procedures, see the Tornado User’s <strong>Guide</strong>:<br />
Projects, which tells you how to compile source code to produce target-suitable<br />
object code.<br />
Including most software modules in the VxWorks image is usually just a matter of<br />
setting a few #define statements. Adding a network interface driver does not<br />
require much more. However, because VxWorks allows you to create more than<br />
one network device, you must also set up a table that groups the #define<br />
statements into device-specific groups. This table is defined in<br />
target/src/config/<strong>BSP</strong>/configNet.h, where <strong>BSP</strong> is the name of your board support<br />
package, such as mv162 and pc486.<br />
For example, if you wanted VxWorks to create two network devices, one that<br />
supported buffer loaning and one that did not, you would first edit configNet.h to<br />
include the following statements:<br />
/* Parameters for loading the driver supporting buffer loaning. */<br />
#define LOAD_FUNC_0 ln7990EndLoad<br />
#define LOAD_STRING_0 "0xfffffe0:0xffffffe2:0:1:1"<br />
#define <strong>BSP</strong>_0 NULL<br />
/* Parameters for loading the driver NOT supporting buffer loaning. */<br />
#define LOAD_FUNC_1 LOAD_FUNC_0<br />
#define LOAD_STRING_1 "0xffffee0:0xfffffee2:4:1:1"<br />
#define <strong>BSP</strong>_1 NULL<br />
221
VxWorks 5.5<br />
<strong>BSP</strong> Developer’s <strong>Guide</strong><br />
To set appropriate values for these constants, consider the following:<br />
END_LOAD_FUNC<br />
Specify the name of your driver’s endLoad( ) entry point. For example, if your<br />
driver’s endLoad( ) entry point is ln7990EndLoad( ), you would edit config.h<br />
to include the line:<br />
#define END_LOAD_FUNC ln7990EndLoad<br />
END_LOAD_STRING<br />
Specify the initialization string passed into muxDevLoad( ) as the initString<br />
parameter.<br />
You must also edit the definition of endTbl (a table in configNet.h that specifies<br />
the ENDs included in the image) to include the following:<br />
END_TBL_ENTRY endTbl<br />
{<br />
{ 0, LOAD_FUNC_0, LOAD_STRING_0, <strong>BSP</strong>_0, FALSE},<br />
{ 1, LOAD_FUNC_1, LOAD_STRING_1, <strong>BSP</strong>_1, FALSE},<br />
{ 0, END_TBL_END, 0, NULL},<br />
};<br />
The first number in each table entry specifies the unit number for the device. The<br />
first entry in the example above specifies a unit number of 0. Thus, the device it<br />
loads is deviceName0. The FALSE at the end of each entry indicates that the entry<br />
has not been processed. After the system successfully loads a driver, it changes this<br />
value to TRUE in the run-time version of this table. To prevent the system from<br />
automatically loading your driver, set this value to TRUE.<br />
Finally, you must edit your <strong>BSP</strong>’s config.h file to define INCLUDE_END. This tells<br />
the build process to include the END/MUX interface. A this point, you are ready<br />
to rebuild VxWorks to include your new drivers. When you boot this rebuilt image,<br />
it calls muxDevLoad( ) for each device specified in the table in the order listed. 1<br />
1. For a description of the parameters to muxDevLoad( ), see the appropriate reference entry.<br />
222
D<br />
VxWorks Boot Sequence<br />
Table D-1 documents the sequence of initialization for a ROMmed VxWorks or<br />
boot ROM image. This sequence only applies to images built from the traditional<br />
command line.<br />
NOTE: You can expect, in a future release, that this old initialization sequence will<br />
be obsoleted in favor of project and component initialization groups.<br />
Images built from the project facility follow a different but similar initialization<br />
sequence based on initGroups described in the component description files. See<br />
E.3 Project Initialization Order, p.238 for the project component initialization order.<br />
Table D-1<br />
VxWorks Boot Sequence<br />
Functions Activity File<br />
1. romInit( ) (a) disable interrupts romInit.s<br />
(b)<br />
(c)<br />
save boot type (cold/warm)<br />
enable DRAM and DRAM refresh<br />
(hardware independent)<br />
(d) branch to romStart( )<br />
(position independent code)<br />
2. romStart( ) (a) copy text (and data) segment from ROM to<br />
RAM<br />
bootInit.c<br />
(b)<br />
(c)<br />
clear memory (if necessary)<br />
decompress (if necessary)<br />
223
VxWorks 5.5<br />
<strong>BSP</strong> Developer’s <strong>Guide</strong><br />
Table D-1<br />
VxWorks Boot Sequence (Continued)<br />
Functions Activity File<br />
(d)<br />
if (i960 CPU)<br />
invoke sysInitAlt(bootType)<br />
else<br />
invoke usrInit(bootType)<br />
3. sysInitAlt( )<br />
(i960 only)<br />
(a) invalidate caches, if any sysALib.s<br />
(b)<br />
(c)<br />
(d)<br />
(e)<br />
(f)<br />
initialize system interrupt tables with default<br />
stubs<br />
initialize system fault tables with default stubs<br />
initialize all processor registers to known<br />
default values<br />
enable tracing<br />
clear all pending interrupts<br />
(g) usrInit(bootType) usrConfig.c<br />
4. usrInit( ) (a) Verify correct data segment position. Infinite<br />
loop if not aligned correctly<br />
(b)<br />
(c)<br />
(d)<br />
(e)<br />
if (SPARC CPU)<br />
initialize register window management<br />
if (SYS_HW_INIT_0)<br />
execute SYS_HW_INIT_0 macro<br />
if (CACHE_SUPPORT)<br />
cacheLibInit( )<br />
if (MIPS CPU)<br />
sysGpInit( ), to initialize the global pointer<br />
usrConfig.c<br />
sysALib.s<br />
(f) zero bss (uninitialized data) usrConfig.c<br />
(g)<br />
save bootType in sysStartType<br />
(h) intVecBaseSet( ), to set vector base table lib/*.a<br />
(i)<br />
excVecInit( ), to initialize all system and<br />
default interrupt vectors<br />
lib/*.a<br />
224
D<br />
VxWorks Boot Sequence<br />
Table D-1<br />
VxWorks Boot Sequence (Continued)<br />
Functions Activity File<br />
(j)<br />
sysHwInit( ), to initialize board dependent<br />
hardware<br />
sysLib.c<br />
(k) usrKernelInit( ), to configure the wind kernel usrKernel.c<br />
(l)<br />
if (instruction cache)<br />
enable the instruction cache<br />
if (data cache)<br />
enable the data cache<br />
(m) kernelInit( ) lib/*.a<br />
5. kernelInit( ) Initialize and start the kernel. lib/*.a<br />
(a) intLockLevelSet( ) lib/*.a<br />
(b)<br />
(c)<br />
if (interrupt stack)<br />
create interrupt stack from beginning of memory<br />
pool<br />
create root stack and TCB from end of memory<br />
pool<br />
D<br />
(d) taskInit(tRootTask) lib/*.a<br />
(e) taskActivate(usrRoot) lib/*.a<br />
(f) usrRoot( ) usrConfig.c<br />
6. usrRoot( ) Initialize I/O system, install drivers, create devices,<br />
and set up network as configured in configAll.h and<br />
config.h.<br />
usrConfig.c<br />
(a)<br />
memInit( ) to initialize memory pool<br />
if (show routines)<br />
memShowInit( )<br />
if (virtual memory)<br />
usrMmuInit( )<br />
lib/*.a<br />
lib/*.a<br />
usrMmuInit.c<br />
(b) sysClkConnect( ) sysLib.c<br />
(c) sysClkRateSet( ) sysLib.c<br />
(d) sysClkEnable( ) sysLib.c<br />
(e) selectInit( )<br />
225
VxWorks 5.5<br />
<strong>BSP</strong> Developer’s <strong>Guide</strong><br />
Table D-1<br />
VxWorks Boot Sequence (Continued)<br />
Functions Activity File<br />
(f) iosInit( ) lib/*.a<br />
(g)<br />
(h)<br />
(i)<br />
if (INCLUDE_TTY_DEV)<br />
and (NUM_TTY)<br />
ttyDrv( )<br />
establish console port, standard input, standard<br />
output, standard error<br />
if (target symbol table)<br />
hashLibInit( ) and symLibInit( )<br />
if (LSTLIB)<br />
lstLibInit( )<br />
ttyDrv.c<br />
lib/*.a<br />
(j) initialize exception handling excInit( )<br />
if (logging)<br />
logInit( )<br />
if (signals)<br />
sigInit( )<br />
lib/*.a<br />
lib/*.a<br />
lib/*.a<br />
(k)<br />
(l)<br />
(m)<br />
(n)<br />
(o)<br />
(p)<br />
(q)<br />
if (native debugging)<br />
dbgInit( )<br />
if (pipes)<br />
pipeDrv( )<br />
if (standard I/O)<br />
stdioInit( )<br />
if (POSIX_SIGNALS)<br />
sigqueueInit( )<br />
if (POSIX semaphores)<br />
semPxLibInit( )<br />
if (show routines)<br />
semPxShowInit( )<br />
if (POSIX_THREADS)<br />
pthreadLibInit( )<br />
if (POSIX message queues)<br />
mqPxLibInit( )<br />
if (show routines)<br />
mqPxShowInit( )<br />
lib/*.a<br />
lib/*.a<br />
lib/*.a<br />
lib/*.a<br />
lib/*.a<br />
226
D<br />
VxWorks Boot Sequence<br />
Table D-1<br />
VxWorks Boot Sequence (Continued)<br />
Functions Activity File<br />
(r)<br />
(s)<br />
(t)<br />
(u)<br />
(v)<br />
(w)<br />
if (POSIX asynchronous I/O)<br />
aioPxLibInit( )<br />
if (show routines)<br />
aioPxShowInit( )<br />
if (CBIO)<br />
cbioLibInit( )<br />
if (DOS file system)<br />
dosFsInit( )<br />
if (raw file system)<br />
rawFsInit( )<br />
if (rt11 file system)<br />
rt11FsInit( )<br />
if (RAM disk)<br />
ramDrv( )<br />
lib/*.a<br />
lib/*.a<br />
lib/*.a<br />
lib/*.a<br />
lib/*.a<br />
(x)<br />
if (USB)<br />
usbInit( )<br />
D<br />
(y)<br />
(z)<br />
if (SCSI-2 support)<br />
scsi2IfInit( )<br />
else if (SCSI-1 support)<br />
scsi1IfInit( )<br />
sysScsiInit( )<br />
usrScsiConfig( )<br />
if (floppy disk support)<br />
fdDrv( )<br />
sysLib.c<br />
usrScsi.c<br />
sysScsi.c<br />
(aa) if (IDE disk support)<br />
ideDrv( )<br />
(ab) if (ATA driver support)<br />
ataDrv( )<br />
(ac)<br />
if (parallel printer support)<br />
lptDrv( )<br />
(ad) if (PCMCIA support)<br />
pcmciaInit( )<br />
227
VxWorks 5.5<br />
<strong>BSP</strong> Developer’s <strong>Guide</strong><br />
Table D-1<br />
VxWorks Boot Sequence (Continued)<br />
Functions Activity File<br />
(ae)<br />
(af)<br />
if (flash file system support)<br />
tffsDrv( )<br />
if (formatted I/O support)<br />
fioLibInit( )<br />
(ag) if (floating point support)<br />
floatInit( )<br />
(ah) if (software floating-point)<br />
mathSoftInit( )<br />
if (hardware floating-point)<br />
mathHardInit( )<br />
if (hardware floating-point and show routines)<br />
fppShowInit( )<br />
lib/*.a<br />
lib/*.a<br />
lib/*.a<br />
lib/*.a<br />
(ai)<br />
(aj)<br />
if (DSP)<br />
usrDspInit( )<br />
if (AltiVec)<br />
usrAltivecInit( )<br />
(ak) if (spy)<br />
spyStop( )<br />
lib/*.a<br />
(al)<br />
if (timex)<br />
timexInit( )<br />
lib/*.a<br />
(am) if (environment variables)<br />
envLibInit( )<br />
(an) if (loader)<br />
moduleLibInit( )<br />
(ao) if (a.out format)<br />
loadAoutInit( )<br />
else if (ecoff format)<br />
loadEcoffInit( )<br />
else if (coff format)<br />
loadCoffInit( )<br />
else if (ELF format)<br />
loadElfInit( )<br />
lib/*.a<br />
lib/*.a<br />
lib/*.a<br />
lib/*.a<br />
lib/*.a<br />
lib/*.a<br />
228
D<br />
VxWorks Boot Sequence<br />
Table D-1<br />
VxWorks Boot Sequence (Continued)<br />
Functions Activity File<br />
(ap) if (SYM_TBL_SYNC)<br />
symSyncLibInit( )<br />
(aq) if (network initialization)<br />
usrBootLineInit( )<br />
usrNetInit( )<br />
usrNetwork.c<br />
usrNetwork.c<br />
(ar)<br />
(as)<br />
(at)<br />
if (shared memory objects)<br />
usrSmObjInit( )<br />
if (VxFusion)<br />
usrVxFusionInit( )<br />
if (text protect and VxVMI)<br />
vmTextProtect( )<br />
usrSmObj.c<br />
lib/*.a<br />
(au) if (vector table protect and VxVMI)<br />
intVecTableWriteProtect( )<br />
(av) if (select)<br />
selTaskDeleteHookAdd( )<br />
(aw) if (symbol table)<br />
symTblCreate( )<br />
netLoadSymTbl( )<br />
(ax) if (C++)<br />
cplusCtorsLink( )<br />
cplusLibInit( )<br />
(ay) if (COM)<br />
comLibInit( )<br />
(az) if (DCOM)<br />
dcomLibInit( )<br />
(ba) if (http)<br />
httpd( )<br />
(bb) if (WindView)<br />
windviewConfig( )<br />
(bc) wdbConfig( ):<br />
confirm and initialize target agent<br />
lib/*.a<br />
lib/*.a<br />
lib/*.a<br />
usrLoadSym.c<br />
lib/*.a<br />
lib/*.a<br />
lib/*.a<br />
D<br />
229
VxWorks 5.5<br />
<strong>BSP</strong> Developer’s <strong>Guide</strong><br />
Table D-1<br />
VxWorks Boot Sequence (Continued)<br />
Functions Activity File<br />
(bd) if (shell)<br />
shellInit( )<br />
lib/*.a<br />
(be) if (WindML)<br />
usrWindMlInit( )<br />
(bf)<br />
if (Java)<br />
javaConfig( )<br />
lib/*.a<br />
(bg) if (HTML)<br />
usrHtmlInit( )<br />
(bh) if (USER_APPL)<br />
execute USER_APP_INIT macro<br />
lib/*.a<br />
sysLib.o<br />
230
E<br />
Component Language<br />
E.1 Component Description Language (CDL)<br />
This appendix provides a technical summary of the Component Description<br />
Language (CDL) used to describe a component to the project configuration tool.<br />
CDL uses a component description file (CDF) to describe one or more components.<br />
By convention, a CDF has the file extension .cdf. This appendix provides the<br />
syntax for each of the five CDL objects types; for additional information, see<br />
6.2.2 CDL Object Types, p.115.<br />
Properties essentially define their objects, and, more broadly, the associated<br />
component. In this appendix, if a property does not specify that it has a default<br />
value, none exists.<br />
The appendix also includes the default folder hierarchy for Tornado 2.x, as well as<br />
the default initialization group ordering. The folder hierarchy determines where a<br />
component appears in the project facility’s hierarchy of components. Sequencing<br />
by initialization group determines the order in which a component is initialized<br />
during system startup.<br />
231
VxWorks 5.5<br />
<strong>BSP</strong> Developer’s <strong>Guide</strong><br />
E.1.1 Component Properties<br />
Component component { // required for all components<br />
NAME name // readable name (e.g., "foo manager").<br />
// should be in all lower case.<br />
SYNOPSIS desc // one-line description<br />
MODULES m1 m2 .. // object modules making up the service.<br />
// used to generate dependency<br />
// information.<br />
// it is important to keep this list<br />
// small,since the tool’s dependency<br />
// engine assumes that the component is<br />
// included if *any* of the modules are<br />
// dragged in by dependency. It may make<br />
// sense to split a large number of<br />
// modules into several distinct<br />
// components.<br />
CONFIGLETTES 1 s2 .. // source files in the component that are<br />
// #included in the master configuration<br />
// file.<br />
// file paths are assumed to be relative<br />
// to $(WIND_BASE)/target/config/comps/src<br />
<strong>BSP</strong>_STUBS s1 s2 .. // source file stubs that should be copied<br />
// into the <strong>BSP</strong> and customized for the<br />
// component to work.<br />
// file paths are assumed to be relative<br />
// to $(WIND_BASE)/target/config/comps/src<br />
// (<strong>BSP</strong>_STUBS are supported for Tornado 2.2<br />
// only; they are not supported in earlier<br />
// Tornado 2.x releases)<br />
HDR_FILES h1 h1 .. // header files that need to be included<br />
// to use this component. Typically<br />
// contains prototypes for the<br />
// initialization routine.<br />
CFG_PARAMS p1 p2 .. // configuration parameters, typically<br />
// macros defined in config[All].h, that<br />
// can change the way a component works.<br />
// see Parameters, below, for more info.<br />
INIT_RTN init(..) // one-line initialization routine.<br />
// if it needs to be more than one line,<br />
// put the code in a CONFIGLETTE.<br />
LINK_SYMS s1 s2 .. // reference these symbols in order to drag<br />
// in the component from the archive.<br />
// this tells the code generator how to<br />
// drag in components that don’t need to<br />
// be initialized.<br />
232
E<br />
Component Language<br />
REQUIRES r1 r2 .. // other components required. Note:<br />
// dependencies are automatically calculated<br />
// based on a components MODULES and<br />
// LINK_SYMS. For example, because nfsLib.o<br />
// calls rpcLib.o, the tool is able to<br />
// figure out that INCLUDE_NFS requires<br />
// INCLUDE_RPC. One only needs to list<br />
// requirements that cannot be detected from<br />
// MODULE dependencies. Typically only needed<br />
// for components that don’t have associated<br />
// MODULES (e.g., ones with just<br />
// configlettes).<br />
EXCLUDES e1 e1 .. // other components that cannot<br />
// coexist with this component<br />
HELP h1 h2 .. // reference pages associated with the<br />
// component.<br />
// The default is the MODULES and INIT_RTN<br />
// of the component. For example, if the<br />
// component has MODULE fooLib.o, then the<br />
// manual page for fooLib is automatically<br />
// associated with the component (if the<br />
// manual page exists). Similary for the<br />
// components INIT_RTN. If there are any<br />
// other relevant manual pages, they can<br />
// be specified here.<br />
MACRO_NEST expr // This is for Wind River internal use only.<br />
// It is used to tell the bsp2prj script<br />
// how to create a project corresponding<br />
// to a given <strong>BSP</strong>.<br />
// The "bsp2prj" script assumes that if<br />
// a <strong>BSP</strong> has macro INCLUDE_FOO defined,<br />
// the corresponding component INCLUDE_FOO<br />
// should be included in the project.<br />
// That is not always the case. For example,<br />
// The INCLUDE_AOUT component should only<br />
// be included if both INCLUDE_AOUT *and*<br />
// INCLUDE_LOADER are defined.<br />
// So for the INCLUDE_AOUT component, we set<br />
// MACRO_NEST = INCLUDE_LOADER.<br />
// SImilarly all WDB subcomponents have<br />
// MACRO_NEST = INCLUDE_WDB.<br />
E<br />
ARCHIVE a1 // archive in which to find the MODULES.<br />
// default is lib$(CPU)$(TOOL)vx.a.<br />
// file path is assumed to be relative<br />
// to $(WIND_BASE)/target/lib.<br />
// any archive listed here is<br />
// automatically added to the VxWorks<br />
// link-line when the component is<br />
// included.<br />
// Note: the tool only analyzes archives<br />
// associated with included components.<br />
233
VxWorks 5.5<br />
<strong>BSP</strong> Developer’s <strong>Guide</strong><br />
// This creates a chicken-and-egg problem,<br />
// because the tool analyzes components<br />
// before they are actually added.<br />
// So if you add a component with an ARCHIVE,<br />
// analysis will be done without the ARCHIVE.<br />
// As a work-around, if a separate archive is<br />
// used, create a dummy component that<br />
// lets the tool know that a new archive<br />
// should be read. Such a component<br />
// should be called INSTALL_something.<br />
// It should contain only NAME, SYNOPSIS,<br />
// and ARCHIVE attributes. Only after the<br />
// user adds it can he or she add other<br />
// components from the archive.<br />
INCLUDE_WHEN c1 c2 .. // automatically include this component<br />
// when some other components are included.<br />
// All listed components must be included to<br />
// activate the INCLUDE_WHEN (AND<br />
// relationship). This allows, for example,<br />
// msgQShow to be included whenever msgQ and<br />
// show are included. Similarly, WDB fpp<br />
// support can be included when WDB and fpp<br />
// are included.<br />
INIT_BEFORE c1 // if component c1 is present, our init<br />
// routine must be called before c1.<br />
// Only needed for component releases.<br />
_CHILDREN fname // Component is a child of folder or<br />
// selection fname.<br />
_INIT_ORDER gname // Component is a member of init group gname<br />
// and is added to the end of the<br />
// initialization sequence by default (see<br />
// INIT_BEFORE).<br />
}<br />
E.1.2 Parameter Properties<br />
Parameter parameter {<br />
NAME name // readable name (e.g., "max open files")<br />
SYNOPSIS desc // one-line description.<br />
STORAGE storage // MACRO, REGISTRY, ... Default is MACRO.<br />
TYPE type // type of parameter:<br />
// int, uint, bool, string, exists.<br />
// Default is untyped.<br />
// more types will be added later.<br />
DEFAULT value // default value of the parameter.<br />
234
E<br />
Component Language<br />
}<br />
// default is none - in which case the user<br />
// must define a value to use the component.<br />
// for parameters of type "exists," the<br />
// value is TRUE if the macro should be<br />
// defined, or FALSE if undefined.<br />
E.1.3 Folder Properties<br />
The project facility component hierarchy uses folders to group components<br />
logically. Instead of presenting all components in a flat list, as in configAll.h, the<br />
project facility presents them hierarchically. For example, top-level folders might<br />
organize components under headings such as network, drivers, OS, and<br />
application.<br />
Folder folder {<br />
NAME name // readable name (e.g., "foo libraries").<br />
SYNOPSIS desc // one-line description<br />
CHILDREN i1 i2 .. // containers and components<br />
// that belong to this container.<br />
}<br />
DEFAULTS i1 i2 .. // default CHILDREN.<br />
// if the folder represents a complex<br />
// subsystem (such as the WDB agent),<br />
// this is used to suggest to the user<br />
// which components in the folder are<br />
// considered "default." That way the user<br />
// can add the whole subsystem at once,<br />
// and a reasonable set of subcomponents<br />
// will be chosen.<br />
E<br />
E.1.4 Selection Properties<br />
Selection selection {<br />
NAME name // readable name (for example , "foo<br />
// communication path")<br />
SYNOPSIS desc // one-line description<br />
COUNT min-max // range of allowed subcomponents.<br />
// 1-1 means exactly one.<br />
// 1- means one or more.<br />
CHILDREN i1 i2 .. // components from which to select<br />
DEFAULTS i1 i2 .. // default CHILDREN.<br />
235
VxWorks 5.5<br />
<strong>BSP</strong> Developer’s <strong>Guide</strong><br />
}<br />
// this is not used for anything except to<br />
// to suggest to the user which components<br />
// in the selection we consider "default."<br />
E.1.5 InitGroup Properties<br />
InitGroup group {<br />
INIT_RTN rtn(..) // initialization routine definition<br />
INIT_ORDER i1 i2 .. // ordered list of init groups and<br />
// components that belong to this init group<br />
}<br />
INIT_AFTER i2 i2 .. // Only needed for component releases.<br />
E.2 Folder Hierarchy<br />
The following hierarchy is the default folder directory for Tornado 2.x and should<br />
be referred to only in the context of Tornado 2.x development.<br />
NOTE: Do not presume that future releases will preserve the names or nature of<br />
any folders included in the Tornado 2.x folder hierarchy, except FOLDER_ROOT.<br />
FOLDER_ROOT<br />
{// all components<br />
FOLDER_APPLICATION // user application component(s)<br />
FOLDER_TOOLS // Development Tools<br />
{<br />
FOLDER_WDB // WDB agent components<br />
{<br />
FOLDER_WDB_OPTIONS // optional WDB agent services<br />
}<br />
FOLDER_SHELL // Target shell components<br />
FOLDER_LOADER // OMF loader components<br />
FOLDER_SYMTBL // symbol table components<br />
{<br />
FOLDER_SYM_TBL_INIT // Symbol table initialization<br />
}<br />
FOLDER_SHOW_ROUTINES // Kernel show routine components<br />
236
E<br />
Component Language<br />
FOLDER_WINDVIEW // WindView components<br />
}<br />
FOLDER_NETWORK // Network components<br />
{<br />
FOLDER_CORE_COMPONENTS // basic network initialization options<br />
{<br />
FOLDER_BOOTLINE_SETUP // network init from bootline<br />
}<br />
FOLDER_NET_DEV // Support for network device types<br />
{<br />
FOLDER_SMNET_COMPONENTS // Shared memory component<br />
FOLDER_BSD_NET_DRV // BSD Ethernet drivers<br />
}<br />
FOLDER_NET_PROTOCOLS // networking protocols<br />
{<br />
FOLDER_NET_FS // Network file systems<br />
{<br />
FOLDER_NET_REM_IO // Network remote I/O components<br />
}<br />
FOLDER_NET_APP // Network applications<br />
{<br />
FOLDER_MIB2 // MIB2 application<br />
FOLDER_STREAMS // Streams application<br />
}<br />
FOLDER_NET_API // Networking APIs<br />
FOLDER_NET_ROUTE // Network routing protocols<br />
FOLDER_NET_DEBUG // Network show routines<br />
FOLDER_TCP_IP // Core TCP/IP components<br />
{<br />
FOLDER_TCPIP_CONFIG // TCP/IP configuration components<br />
}<br />
}<br />
}<br />
FOLDER_CPLUS // C++ class libraries<br />
{<br />
FOLDER_CPLUS_STDLIB // C++ Standard Library<br />
FOLDER_CPLUS_WFC // Wind Foundation Classes<br />
}<br />
FOLDER_OS // Operating system components<br />
{<br />
FOLDER_IO_SYSTEM // IO system components<br />
FOLDER_KERNEL // kernel components<br />
E<br />
237
VxWorks 5.5<br />
<strong>BSP</strong> Developer’s <strong>Guide</strong><br />
FOLDER_ANSI // ANSI libraries<br />
FOLDER_POSIX // POSIX components<br />
FOLDER_UTILITIES // Utility components<br />
}<br />
FOLDER_OBSOLETE // Obsolete components<br />
FOLDER_HARDWARE // Hardware components<br />
{<br />
FOLDER_MEMORY // Memory components<br />
{<br />
FOLDER_MMU // MMU options<br />
}<br />
FOLDER_BUSES // Bus components<br />
{<br />
FOLDER_SCSI // SCSI components<br />
}<br />
FOLDER_PERIPHERALS // Peripheral components<br />
{<br />
FOLDER_HD // Hard Disk components<br />
FOLDER_CLOCK // System and Aux Clock component<br />
FOLDER_SERIAL // SIO driver support<br />
FOLDER_FPP // Floating Point libraries<br />
}<br />
FOLDER_<strong>BSP</strong>_CONFIG // <strong>BSP</strong> configuration components<br />
}<br />
FOLDER_GRAPHICS // Graphic components<br />
{<br />
FOLDER_UGL // Optional product<br />
FOLDER_HTML // Optional product<br />
}<br />
}<br />
E.3 Project Initialization Order<br />
Images built from a project are initialized according to initialization groups or init<br />
groups. Through the CDF, a component can declare that it belongs to a named<br />
238
E<br />
Component Language<br />
initialization group. It can also declare that it should be initialized before or after<br />
other components within that group.<br />
The two primary initGroups for project compilation are usrInit and usrRoot. Each<br />
initialization group translates to a C function declaration where the body of the<br />
function is the initialization code from each of the constituent components.<br />
In the initialization sequences that follow, names appearing all in uppercase are<br />
component names. Names appearing in all lowercase are routine names. Each<br />
initialization group has a routine with the same name as the initialization group.<br />
Indentation is used in this chart to represent the hierarchy of the standard<br />
components as defined by Tornado 2.x. When the prjConfig.c file is generated,<br />
each included component is replaced by its initialization code fragment, as defined<br />
in the CDF for that component. Excluded components do not contribute code<br />
fragments to their initialization group.<br />
NOTE: The project facility build process does not apply to boot ROMs. Boot ROMs<br />
for Tornado 2.x can only be built from the traditional command line.<br />
E.3.1 romInit.s<br />
Only used for ROMmed VxWorks images, this assembly code initializes the<br />
processor and memory. This code always ends by calling romStart( ).<br />
E<br />
E.3.2 romStart.c<br />
Only used for ROMmed VxWorks images, this code relocates text and data from<br />
within the ROM itself into RAM. It terminates by calling the routine located at<br />
RAM_DST_ADRS. This is normally the address of usrEntry( ).<br />
E.3.3 usrEntry.c<br />
Only used for ROMmed VxWorks images, this routine does some<br />
architecture-specific initialization and terminates by calling usrInit( ) in<br />
prjConfig.c.<br />
239
VxWorks 5.5<br />
<strong>BSP</strong> Developer’s <strong>Guide</strong><br />
E.3.4 sysALib.s<br />
For downloaded images only, execution begins with sysInit( ), instead of<br />
romInit( ), romStart( ), and usrEntry( ). This routine should repeat all the<br />
processor and hardware initialization done by romInit( ), except for main memory.<br />
This routine terminates by calling usrInit( ) in prjConfig.c.<br />
E.3.5 prjConfig.c<br />
NOTE: Do not presume that future releases will preserve the names or nature of<br />
any initGroups included in Tornado 2.x, except usrInit and usrRoot.<br />
usrInit<br />
{// pre-multitasking init group<br />
INCLUDE_SYS_START<br />
INCLUDE_CACHE_SUPPORT<br />
INCLUDE_EXC_HANDLING<br />
INCLUDE_SYSHW_INIT<br />
INCLUDE_CACHE_ENABLE<br />
INCLUDE_WINDVIEW_CLASS<br />
INCLUDE_KERNEL // DO NOT REMOVE.<br />
} // end of usrInit<br />
The required element INCLUDE_KERNEL must always be the last component<br />
initialized in usrInit( ). It starts multitasking by creating the root task and<br />
scheduling it to execute the routine usrRoot( ).<br />
usrRoot<br />
{// post-multitasking init group<br />
usrKernelCoreInit<br />
{// kernel core features init group<br />
INCLUDE_SEM_BINARY<br />
INCLUDE_SEM_MUTEX<br />
INCLUDE_SEM_COUNTING<br />
INCLUDE_MSG_Q<br />
INCLUDE_WATCHDOGS<br />
INCLUDE_TASK_HOOKS<br />
} // end of usrKernelCoreInit<br />
INCLUDE_MEM_MGR_BASIC<br />
INCLUDE_MEM_MGR_FULL<br />
240
E<br />
Component Language<br />
INCLUDE_MMU_BASIC<br />
INCLUDE_MMU_FULL<br />
INCLUDE_SYSCLK_INIT // makes indirect call to sysHwInit2.<br />
usrIosCoreInit<br />
{// I/O system core init group<br />
INCLUDE_HW_FP<br />
INCLUDE_SW_FP<br />
INCLUDE_BOOT_LINE_INIT<br />
INCLUDE_TTY_DEV<br />
INCLUDE_TYCODRV_5_2<br />
INCLUDE_SIO<br />
INCLUDE_PC_CONSOLE<br />
} // end of usrIosCoreInit<br />
usrKernelExtraInit<br />
{// kernel extra features init group<br />
INCLUDE_HASH<br />
INCLUDE_SYM_TBL<br />
INCLUDE_ENV_VARS<br />
INCLUDE_SIGNALS<br />
INCLUDE_POSIX_AIO<br />
INCLUDE_POSIX_AIO_SYSDRV<br />
INCLUDE_POSIX_MQ<br />
INCLUDE_POSIX_MEM<br />
INCLUDE_POSIX_SIGNALS<br />
INCLUDE_SM_OBJ<br />
INCLUDE_PROTECT_TEXT<br />
INCLUDE_PROTECT_VEC_TABLE<br />
usrIosExtraInit<br />
{// I/O system extras init group<br />
INCLUDE_EXC_TASK<br />
INCLUDE_LOGGING<br />
INCLUDE_PIPES<br />
INCLUDE_STDIO<br />
INCLUDE_DOSFS<br />
INCLUDE_RAWFS<br />
INCLUDE_RT11FS<br />
INCLUDE_RAMDRV<br />
INCLUDE_SCSI<br />
INCLUDE_FD<br />
INCLUDE_IDE<br />
INCLUDE_ATA<br />
E<br />
241
VxWorks 5.5<br />
<strong>BSP</strong> Developer’s <strong>Guide</strong><br />
INCLUDE_LPT<br />
INCLUDE_PCMCIA<br />
INCLUDE_TFFS<br />
INCLUDE_FORMATTED_IO<br />
INCLUDE_FLOATING_POINT<br />
} // end of usrIosExtraInit<br />
} // end of usrKernelExtraInit<br />
usrNetworkInit<br />
{// network system init group<br />
INCLUDE_NET_SETUP<br />
usrNetProtoInit<br />
{// Network Protocol initializations<br />
INCLUDE_BSD_SOCKET<br />
INCLUDE_ZBUF_SOCK<br />
BSD43_COMPATIBLE<br />
INCLUDE_ROUTE_SOCK<br />
INCLUDE_HOST_TBL<br />
INCLUDE_IP<br />
INCLUDE_IP_FILTER<br />
INCLUDE_UDP<br />
INCLUDE_UDP_SHOW<br />
INCLUDE_TCP<br />
INCLUDE_TCP_SHOW<br />
INCLUDE_ICMP<br />
INCLUDE_ICMP_SHOW<br />
INCLUDE_IGMP<br />
INCLUDE_IGMP_SHOW<br />
INCLUDE_SM_NET_SHOW<br />
INCLUDE_MCAST_ROUTING<br />
INCLUDE_OSPF<br />
INCLUDE_NET_LIB<br />
INCLUDE_TCP_DEBUG<br />
INCLUDE_ARP_API<br />
INCLUDE_NET_SHOW<br />
}// end of usrNetProtoInit<br />
INCLUDE_MUX<br />
INCLUDE_END<br />
INCLUDE_PPP<br />
INCLUDE_PPP_CRYPT<br />
INCLUDE_SLIP<br />
242
E<br />
Component Language<br />
INCLUDE_NETWORK<br />
usrNetworkBoot<br />
{// configure the network boot device, if specified<br />
INCLUDE_NET_INIT<br />
usrNetworkAddrInit<br />
{// get a network address<br />
INCLUDE_DHCPC_LEASE_GET<br />
INCLUDE_DHCPC_LEASE_CLEAN<br />
}// end of usrNetworkAddrInit<br />
INCLUDE_PPP_BOOT<br />
INCLUDE_SLIP_BOOT<br />
INCLUDE_NETMASK_GET<br />
INCLUDE_NETDEV_NAMEGET<br />
INCLUDE_SM_NET_ADDRGET<br />
usrNetworkDevStart<br />
{// attach and configure the network device(s)<br />
INCLUDE_SM_NET<br />
INCLUDE_END_BOOT<br />
INCLUDE_BSD_BOOT<br />
INCLUDE_LOOPBACK<br />
}// end of usrNetworkDevStart<br />
INCLUDE_SECOND_SMNET<br />
}// end of usrNetworkBoot<br />
usrNetworkAddrCheck<br />
{// verify IP address<br />
INCLUDE_DHCPC<br />
INCLUDE_DHCPC_LEASE_TEST<br />
}// end of usrNetworkAddrCheck<br />
usrNetRemoteInit<br />
{// network remote I/O access<br />
INCLUDE_NET_HOST_SETUP<br />
INCLUDE_NET_REM_IO<br />
INCLUDE_NFS<br />
INCLUDE_NFS_MOUNT_ALL<br />
}// end of usrNetRemoteInit<br />
usrNetAppInit<br />
{// start network applications<br />
INCLUDE_RPC<br />
INCLUDE_RLOGIN<br />
E<br />
243
VxWorks 5.5<br />
<strong>BSP</strong> Developer’s <strong>Guide</strong><br />
INCLUDE_TELNET<br />
INCLUDE_SECURITY<br />
INCLUDE_TFTP_SERVER<br />
INCLUDE_FTP_SERVER<br />
INCLUDE_FTPD_SECURITY<br />
INCLUDE_NFS_SERVER<br />
INCLUDE_DHCPC_SHOW<br />
INCLUDE_DHCPR<br />
INCLUDE_DHCPS<br />
INCLUDE_SNTPC<br />
INCLUDE_SNTPS<br />
INCLUDE_PING<br />
INCLUDE_RIP<br />
INCLUDE_DNS_RESOLVER<br />
INCLUDE_SNMPD<br />
INCLUDE_MIB2_ALL<br />
INCLUDE_STREAMS<br />
INCLUDE_STREAMS_ALL<br />
INCLUDE_STREAMS_AUTOPUSH<br />
INCLUDE_STREAMS_DEBUG<br />
INCLUDE_STREAMS_DLPI<br />
INCLUDE_STREAMS_SOCKET<br />
INCLUDE_STREAMS_STRACE<br />
INCLUDE_STREAMS_STRERR<br />
INCLUDE_STREAMS_TLI<br />
}// end of usrNetAppInit<br />
} // end of usrNetworkInit<br />
INCLUDE_SELECT<br />
usrToolsInit<br />
{// user tools init group<br />
INCLUDE_SPY<br />
INCLUDE_TIMEX<br />
INCLUDE_MODULE_MANAGER<br />
INCLUDE_LOADER<br />
INCLUDE_NET_SYM_TBL<br />
INCLUDE_STANDALONE_SYM_TBL<br />
INCLUDE_STAT_SYM_TBL<br />
INCLUDE_TRIGGERING<br />
usrWdbInit<br />
{// WDB init group<br />
INCLUDE_WDB<br />
244
E<br />
Component Language<br />
INCLUDE_WDB_MEM<br />
INCLUDE_WDB_SYS<br />
INCLUDE_WDB_TASK<br />
INCLUDE_WDB_EVENTS<br />
INCLUDE_WDB_EVENTPOINTS<br />
INCLUDE_WDB_DIRECT_CALL<br />
INCLUDE_WDB_CTXT<br />
INCLUDE_WDB_REG<br />
INCLUDE_WDB_GOPHER<br />
INCLUDE_WDB_EXIT_NOTIFY<br />
INCLUDE_WDB_EXC_NOTIFY<br />
INCLUDE_WDB_FUNC_CAL<br />
INCLUDE_WDB_VIO_LIB<br />
INCLUDE_WDB_VIO<br />
INCLUDE_WDB_BP<br />
INCLUDE_WDB_TASK_BP<br />
INCLUDE_WDB_START_NOTIFY<br />
INCLUDE_WDB_USER_EVENT<br />
INCLUDE_WDB_HW_FP<br />
INCLUDE_WDB_TASK_HW_FP<br />
INCLUDE_WDB_SYS_HW_FP<br />
INCLUDE_WDB_BANNER<br />
INCLUDE_SYM_TBL_SYNC<br />
} // end of usrWdbInit<br />
usrShellInit<br />
{// target shell init group<br />
INCLUDE_DEBUG // brkpts and stack tracer on target<br />
INCLUDE_SHELL_BANNER // display the Wind River banner on startup<br />
INCLUDE_STARTUP_SCRIPT<br />
INCLUDE_SHELL<br />
}// end of usrShellInit<br />
usrWindviewInit<br />
{// WindView init group<br />
INCLUDE_WINDVIEW<br />
INCLUDE_SYS_TIMESTAMP<br />
INCLUDE_USER_TIMESTAMP<br />
INCLUDE_SEQ_TIMESTAMP<br />
INCLUDE_RBUFF<br />
INCLUDE_WV_BUFF_USER<br />
INCLUDE_WDB_TSFS<br />
INCLUDE_WVUPLOAD_SOCK<br />
E<br />
245
VxWorks 5.5<br />
<strong>BSP</strong> Developer’s <strong>Guide</strong><br />
INCLUDE_WVUPLOAD_TSFSSOCK<br />
INCLUDE_WVUPLOAD_FILE<br />
} // end of usrWindviewInit<br />
usrShowInit<br />
{// show routines init group<br />
INCLUDE_TASK_SHOW<br />
INCLUDE_CLASS_SHOW<br />
INCLUDE_MEM_SHOW<br />
INCLUDE_TASK_HOOKS_SHOW<br />
INCLUDE_SEM_SHOW<br />
INCLUDE_MSG_Q_SHOW<br />
INCLUDE_WATCHDOGS_SHOW<br />
INCLUDE_SYM_TBL_SHOW<br />
INCLUDE_MMU_FULL_SHOW<br />
INCLUDE_POSIX_MQ_SHOW<br />
INCLUDE_POSIX_SEM_SHOW<br />
INCLUDE_HW_FP_SHOW<br />
INCLUDE_ATA_SHOW<br />
INCLUDE_TRIGGER_SHOW<br />
INCLUDE_RBUFF_SHOW<br />
INCLUDE_STDIO_SHOW<br />
} // end of usrShowInit<br />
}// end of usrToolsInit<br />
INCLUDE_CPLUS<br />
INCLUDE_CPLUS_DEMANGLER<br />
INCLUDE_HTTP<br />
INCLUDE_USER_APPL // start user application<br />
} // end of usrRoot<br />
246
F<br />
Generic Drivers<br />
F.1 Introduction<br />
This appendix provides guidelines for writing generic drivers for the handful of<br />
devices that are common to most <strong>BSP</strong>s. Although <strong>BSP</strong>s can differ considerably in<br />
detail, there are some needs that are common to almost all. For example, most <strong>BSP</strong>s<br />
require a serial device driver or a timer driver. Ideally, the drivers for these devices<br />
would be generic enough to port to a new <strong>BSP</strong> with a simple recompilation. This<br />
reuse of code reduces your maintenance overhead and lets you focus your testing<br />
efforts, which results in better tested code. For example, using generic drivers let<br />
Wind River save 500 lines of C source code in three similar <strong>BSP</strong>s. 1<br />
To help you use generic drivers across multiple similar <strong>BSP</strong>s, the <strong>BSP</strong> kit includes<br />
source for generic drivers in the target/src/drv directory. At compile time, sysLib.c<br />
(a file duplicated in every <strong>BSP</strong>) can include generic drivers from the target/src/drv<br />
directory as needed. As you develop drivers for your <strong>BSP</strong>s, you should strive to<br />
create drivers that are generic enough to service multiple <strong>BSP</strong>s. You can add such<br />
drivers to those in the target/src/drv directory.<br />
However, when dealing with atypical hardware or legacy code, it might not be<br />
practical to use a generic driver. Some hardware designs are just too different to<br />
work with a generic driver. In the case of legacy code, it might be possible to use a<br />
generic driver. Unfortunately, reworking the <strong>BSP</strong> to use a generic driver might not<br />
be worth the effort, especially if you are just upgrading the <strong>BSP</strong> to a new release of<br />
VxWorks. In either case, you must create or maintain a <strong>BSP</strong>-specific driver. Such a<br />
1. VxWorks network and SCSI device drivers (distributed in object form) are not discussed<br />
here, but are covered in other appendices in this manual.<br />
247
VxWorks 5.5<br />
<strong>BSP</strong> Developer’s <strong>Guide</strong><br />
driver would not reside in the target/src/drv directory but in a <strong>BSP</strong>-specific<br />
directory (from which the <strong>BSP</strong>’s sysLib.c can include the driver when needed).<br />
F.2 Serial Drivers<br />
Generic serial drivers reside in the directory target/src/drv/serial. Included in this<br />
directory is templateSerial.c and its corresponding header file, templateSerial.h.<br />
These files contain very detailed information on the design and construction of a<br />
typical serial driver. When writing a serial driver, base the driver on this template,<br />
then modify the <strong>BSP</strong>’s sysLib.c or sysSerial.c files to include the driver as needed.<br />
NOTE: Serial drivers are provided for backward compatibility with VxWorks 5.2<br />
and earlier. All Tornado-era <strong>BSP</strong>s should instead use the SIO drivers.<br />
To manage information about a serial device, sysLib.c uses a device descriptor.<br />
This device descriptor also encapsulates board-specific information. For example,<br />
it typically includes the frequency of the clock and the addresses of the registers,<br />
although the details are dictated by the device in question. In sysLib.c, the serial<br />
device descriptor is declared outside the function definitions as:<br />
TY_CO_DEV tyCoDv [NUM_TTY]; /* structure for serial ports */<br />
This array is initialized at run-time in sysHwInit( ). The TY_CO_DEV structure is<br />
defined in the device header file (for example, target/h/drv/serial/z8530.h). The<br />
following members of the TY_CO_DEV structure are common to all serial drivers:<br />
tyDev<br />
Required by tyLib, the VxWorks tty driver support library.<br />
created<br />
A flag that must be initialized to FALSE in sysHwInit( ).<br />
numChannels<br />
Used for parameter checking.<br />
The following macros must be defined for all <strong>BSP</strong>s:<br />
NUM_TTY<br />
Defines the number of serial channels supported. In configAll.h, the default<br />
defined as 2. To override the default, first undefine then define NUM_TTY in<br />
config.h. If there are no serial channels, define NUM_TTY as NONE.<br />
248
F<br />
Generic Drivers<br />
CONSOLE_TTY<br />
This macro defines the channel number of the console. In configAll.h, the<br />
default defined as 0. To override the default, first undefine then define<br />
CONSOLE_TTY in config.h.<br />
F.3 Multi-Mode Serial (SIO) Drivers<br />
The generic multi-mode serial drivers reside in the directory target/src/drv/sio.<br />
These drivers are called SIO drivers to distinguish them from the older serial<br />
drivers that only have a single interrupt mode of operation.<br />
SIO drivers provide an interface for setting hardware options, such as the number<br />
of stop bits, data bits, parity, and so on. In addition, these drivers provide an<br />
interface for polled communication that can provide external mode debugging<br />
(such as ROM-monitor style debugging) over a serial line. Currently only<br />
asynchronous-mode SIO drivers are supported.<br />
Every SIO device is controlled by an SIO_CHAN structure. This structure contains<br />
a single member, a pointer to an SIO_DRV_FUNCS structure. These structures are<br />
defined in target/h/sioLib.h as:<br />
typedef struct sio_chan /* a serial channel */<br />
{<br />
SIO_DRV_FUNCS * pDrvFuncs;<br />
/* device data */<br />
} SIO_CHAN;<br />
F<br />
typedef struct sio_drv_funcs SIO_DRV_FUNCS;<br />
struct sio_drv_funcs /* driver functions */<br />
{<br />
int (*ioctl)<br />
(<br />
SIO_CHAN * pSioChan,<br />
int<br />
cmd,<br />
void *<br />
arg<br />
);<br />
int (*txStartup)<br />
(<br />
SIO_CHAN *<br />
);<br />
pSioChan<br />
int (*callbackInstall)<br />
(<br />
249
VxWorks 5.5<br />
<strong>BSP</strong> Developer’s <strong>Guide</strong><br />
int (*pollInput)<br />
int (*pollOutput)<br />
};<br />
SIO_CHAN *<br />
int<br />
STATUS<br />
void *<br />
);<br />
(<br />
SIO_CHAN *<br />
char *<br />
(<br />
SIO_CHAN *<br />
char outChar<br />
);<br />
pSioChan,<br />
callbackType,<br />
(*callback)(),<br />
callbackArg<br />
pSioChan,<br />
inChar);<br />
pSioChan,<br />
The members of the SIO_DRV_FUNCS structure function as follows:<br />
ioctl<br />
Points to the standard I/O control interface function for the driver. This<br />
function provides the primary control interface for any driver. To access the<br />
I/O control services for a standard SIO device, use the following symbolic<br />
constants:<br />
SIO_BAUD_SET<br />
SIO_BAUD_GET<br />
SIO_HW_OPTS_SET<br />
SIO_HW_OPTS_GET<br />
SIO_MODE_SET<br />
SIO_MODE_GET<br />
SIO_AVAIL_MODES_GET<br />
SIO_OPEN<br />
SIO_HUP<br />
Set a new baud rate.<br />
Get the current baud rate.<br />
Set new hardware settings.<br />
Get current hardware settings.<br />
Set a new operating mode.<br />
Get the current mode.<br />
Get available modes.<br />
Open a channel.<br />
Close a channel.<br />
txStartup<br />
Provides a pointer to the function that the system calls when new data is<br />
available for transmission. Typically, this routine is called only from the<br />
ttyDrv.o module. This module provides a higher level of functionality that<br />
makes a raw serial channel behave with line control and canonical character<br />
processing).<br />
callbackInstall<br />
Provides the driver with pointers to callback functions that the driver can call<br />
asynchronously to handle character puts and gets. The driver is responsible for<br />
saving the callback routines and arguments that it receives from the<br />
callbackInstall( ) function.The available callbacks are<br />
SIO_CALLBACK_GET_TX_CHAR and SIO_CALLBACK_PUT_RCV_CHAR.<br />
250
F<br />
Generic Drivers<br />
Define SIO_CALLBACK_GET_TX_CHAR to point to a function that fetches a<br />
new character for output. The driver calls this callback routine with the<br />
supplied argument and an additional argument that is the address to receive<br />
the new output character if any. The called function returns OK to indicate that<br />
a character was delivered, or ERROR to indicate that no more characters are<br />
available.<br />
Define SIO_CALLBACK_PUT_RCV_CHAR to point to a function the driver can<br />
use to send characters upward. For each incoming character, the callback<br />
routine is called with the supplied argument, and the new character as a<br />
second argument. Drivers normally do not care about the return value from<br />
this call. There is usually nothing that the driver could do but to drop a<br />
character if the higher level is not able to receive it.<br />
pollInput and pollOutput<br />
Provide an interface to polled mode operations of the driver. Do not call these<br />
functions unless the device has already been placed into polled mode<br />
operation by an SIO_MODE_SET operation.<br />
See target/src/drv/sio/templateSio.c for more information on the internal<br />
workings of a typical SIO device driver.<br />
F.4 Timer<br />
F<br />
The generic timer drivers reside in the directory target/src/drv/timer. Included in<br />
this directory is templateTimer.c. When writing a timer driver, base the driver on<br />
this template, then modify the <strong>BSP</strong>’s sysLib.c file to include the driver as needed.If<br />
a <strong>BSP</strong> has access to only a single timer, that <strong>BSP</strong> must support the system clock and<br />
not the auxiliary clock. This means that sysAuxClkConnect( ) must return<br />
ERROR.<br />
The following macros are used for parameter checking in VxWorks timer drivers,<br />
and must be defined in each <strong>BSP</strong>’s bspname.h file:<br />
SYS_CLK_RATE_MIN<br />
Defines the minimum rate at which the system clock can run. Unless hardware<br />
constraints dictate otherwise, SYS_CLK_RATE_MIN must be less than or equal<br />
to 60 Hz.<br />
251
VxWorks 5.5<br />
<strong>BSP</strong> Developer’s <strong>Guide</strong><br />
SYS_CLK_RATE_MAX<br />
Defines the maximum rate at which the system clock can run. Unless hardware<br />
constraints dictate otherwise, SYS_CLK_RATE_MAX must be greater than or<br />
equal to 60 Hz.<br />
AUX_CLK_RATE_MIN<br />
Defines the minimum rate at which the auxiliary clock can run. To support<br />
spy( ), AUX_CLK_RATE_MIN must be less than or equal to 100 Hz.<br />
AUX_CLK_RATE_MAX<br />
Defines the maximum rate at which the auxiliary clock can run. To support<br />
spy( ), AUX_CLK_RATE_MAX must be greater than or equal to 100 Hz.<br />
F.5 Non-Volatile Memory<br />
The generic NVRAM and flash drivers reside in the directory target/src/drv/mem.<br />
Included in this directory is templateNvRam.c. This file provides the template<br />
driver to be used as the basis of non-volatile memory drivers, including flash.<br />
However, do not use this template for the optional True Flash File System (TFFS)<br />
product. For TFFS, refer to documentation accompanying special MTD drivers for<br />
flash devices.<br />
All <strong>BSP</strong>s are required to have some type of non-volatile memory interface, even if<br />
non-volatile memory is not available. The two required routines are<br />
sysNvRamGet( ) and sysNvRamSet( ). These routines both require an offset<br />
parameter. Internally, these routines use the offset parameter as follows:<br />
offset += NV_BOOT_OFFSET; /* boot line begins at = 0 */<br />
if ((offset < 0) || (strLen < 0) || ((offset + strLen) ><br />
NV_RAM_SIZE))<br />
return (ERROR);<br />
Thus, the offset parameter is biased so that an offset of 0 points to the first byte of<br />
the VxWorks boot line. This is always true even if the boot line is not at the<br />
beginning of the non-volatile memory area.<br />
All <strong>BSP</strong>s must define the following macros:<br />
252
F<br />
Generic Drivers<br />
NV_RAM_SIZE<br />
Defines the total bytes of NVRAM available. Define NV_RAM_SIZE in<br />
config.h,orbspname.h. For boards without NVRAM, define NV_RAM_SIZE as<br />
NONE.<br />
BOOT_LINE_SIZE<br />
Defines the number of bytes of NVRAM that are reserved for the VxWorks<br />
boot line. The default value is 255 and is defined in configAll.h.<br />
BOOT_LINE_SIZE must be less than or equal to NV_RAM_SIZE. To override the<br />
default value of BOOT_LINE_SIZE, first undefine then define the macro in<br />
config.h or bspname.h.<br />
NV_BOOT_OFFSET<br />
Defines the byte offset to the beginning of the VxWorks boot line in NVRAM.<br />
The default value is 0 and is defined in configAll.h. This is distinct from<br />
BOOT_LINE_OFFSET, the offset of the boot line stored in RAM.<br />
The routines sysNvRamSet( ) and sysNvRamGet( ) have an offset parameter.<br />
If NV_BOOT_OFFSET is greater than zero, you can access the bytes before the<br />
boot line by specifying a negative offset. To override the default value of<br />
NV_BOOT_OFFSET, first undefine then define the macro.<br />
For boards without NVRAM, include the file mem/nullNvRam.c for stubbed<br />
out versions of the routines that return ERROR.<br />
F<br />
F.6 VMEbus<br />
The generic VMEbus drivers reside in the directory target/src/drv/vme. Included<br />
in this directory is the templateVme.c. Use the driver in this file as the template for<br />
VME drivers. Included in this template file is detailed information on VME driver<br />
construction.<br />
For boards without a VMEbus interface, use the nullVme.c driver. If the<br />
application does not use network support, you can skip the VME driver altogether.<br />
Although, in this case, you might need to provide a sysBusTas( ) function that<br />
always returns FALSE.<br />
Wind River does not currently offer the kind of plug-and-play support published<br />
in the VME-64 specification and its extensions.<br />
253
VxWorks 5.5<br />
<strong>BSP</strong> Developer’s <strong>Guide</strong><br />
F.7 DMA<br />
VxWorks does not currently impose a DMA driver model. DMA support is<br />
optional, and the architecture of such support is left to the implementation.<br />
F.8 Interrupt Controllers<br />
The generic interrupt controller device drivers reside in the directory<br />
target/src/drv/intrCtl. See the template driver templateIntrCtl.c for detailed<br />
information on interrupt controller driver design and construction.<br />
Some CPU architectures use external interrupt controllers to receive and prioritize<br />
external device interrupts. Wind River has prepared a draft document to define a<br />
standard interrupt controller device interface. To see this document, check<br />
WindSurf online, under Wind River Technical Notes.<br />
F.9 Multi-Function<br />
Historically, there has been a directory target/src/drv/multi for drivers used with<br />
ASIC chips that incorporate more than one area of functionality. Wind River no<br />
long supports this driver model.<br />
Drivers for ASIC chips and multi-function daughter boards should be divided into<br />
individual drivers for each functional area. Some of these drivers might need to<br />
depend on features in another driver. If this is necessary, it should be well<br />
documented in the dependent driver source code.<br />
With separate drivers for different functional areas, users can scale out support for<br />
functional areas that are not used by their application.<br />
254
F<br />
Generic Drivers<br />
F.10 PCI Bus<br />
The libraries pciConfigLib.c, pciConfigShow.c, pciIntLib.c, and pciAutoCfg.c<br />
provide support for the PCI Bus Specification 2.1. These libraries support basic and<br />
automatic configuration. For technical information on how to use these libraries’<br />
routines, refer to Wind River Technical Note #49 and related reference entries.<br />
F<br />
255
VxWorks 5.5<br />
<strong>BSP</strong> Developer’s <strong>Guide</strong><br />
256
G<br />
Upgrading 4.3 BSD<br />
Network Drivers<br />
G.1 Introduction<br />
This appendix describes two upgrade paths for 4.3 BSD network drivers. One path<br />
simply ports the 4.3 BSD network driver to the BSD 4.4 model. The other path<br />
upgrades the 4.3 BSD network driver to an END driver (described in<br />
H. Implementing a MUX-Based Network Interface Driver).<br />
Porting a network driver to the 4.4 BSD model should require only minimal<br />
changes to the code. In fact, porting some drivers has taken less than a day’s work.<br />
However, an older driver that does not already use a transmission startup routine<br />
can take longer to port.<br />
Porting a network driver to an END requires more extensive changes. However, it<br />
is worth the effort if the driver must handle the following:<br />
■<br />
■<br />
■<br />
■<br />
multicasting<br />
polled-mode Ethernet (necessary for WDB debugging of the kernel over a<br />
network, a mode that is several orders of magnitude faster than the serial link)<br />
zero-copy transmission<br />
support for network protocols other than IP<br />
NOTE: This chapter assumes that you are already familiar with BSD network<br />
device drivers. You should also have already read H. Implementing a MUX-Based<br />
Network Interface Driver.<br />
257
VxWorks 5.5<br />
<strong>BSP</strong> Developer’s <strong>Guide</strong><br />
G.1.1 Structure of a 4.3 BSD Network Driver<br />
The network drivers currently shipped with VxWorks are based on those available<br />
in BSD UNIX version 4.3. These drivers define only one global (user-callable)<br />
routine, the driver’s attach( ) routine. Typically, the name of this routine contains<br />
the word, attach, prefixed with two letters from the device name. For example, the<br />
AMD Lance driver’s attach routine is called lnattach( ). The xxattach( ) routine<br />
hooks in five function pointers that are mapped into an ifnet structure. These<br />
functions, listed in Table G-1, are all called from various places in the IP protocol<br />
stack, which has intimate knowledge of the driver.<br />
Table G-1<br />
Network Interface Procedure Handles<br />
Function Function Pointer Driver-Specific Routine<br />
initialization if_init xxInit( )<br />
output if_output xxOutput( )<br />
control if_ioctl xxIoctl( )<br />
reset if_reset xxReset( )<br />
watchdog if_watchdog (optional) xxWatchdog( )<br />
Packet reception begins when the driver’s interrupt routine is invoked. The<br />
interrupt routine does the least work necessary to get the packet off the local<br />
hardware, schedules an input handler to run by calling netJobAdd( ), and then<br />
returns. The tNetTask calls the function that was added to its work queue. In the<br />
case of packet reception, this the driver’s xxReceive( ) function.<br />
The xxReceive( ) function eventually sends the packet up to a protocol by calling<br />
do_protocol_with_type( ). This routine is a switch statement that figures out<br />
which protocol to hand the packet off to. This calling sequence is shown in<br />
Figure G-1.<br />
Figure G-2 shows the call graph for packet transmission. After a protocol has<br />
picked an interface on which to send a packet, it calls the xxOutput( ) routine for<br />
that interface. The output routine calls the generic ether_output( ) function,<br />
passing it a pointer to addressing information (usually an arpcom structure) as<br />
well as the data to be sent. After the data is properly packed, it is placed on the<br />
output queue (using the IF_ENQUEUE macro), and the driver’s start routine is<br />
called. The xxTxStartup( ) routine dequeues as many packets as it can and<br />
transmits them on the physical medium.<br />
258
G<br />
Upgrading 4.3 BSD Network Drivers<br />
Figure G-1<br />
Packet Reception Call Graph<br />
etherInputHook( )<br />
[1]<br />
xxReceive( )<br />
[2]<br />
do_protocol_with_type( )<br />
xxHandleRecvInt( )<br />
xxInt( )<br />
[1] The xxReceive( ) first shows the packet to etherInputHook( ).<br />
[2] If etherInputHook( ) does not take delivery of the packet, xxReceive( ) hands<br />
the packet to do_protocol_with_type( ).<br />
Figure G-2<br />
Packet Transmission Call Graph<br />
xxOutput( )<br />
ether_output( )<br />
xxTxStartup( )<br />
G<br />
[1] [2]<br />
etherOutputHook( )<br />
transmit on medium<br />
[1] The xxTxStartup( ) first shows the packet to etherOutputHook( ).<br />
[2] If etherOutputHook( ) does not take delivery of the packet, xxTxStartup( )<br />
transmits the packet on the medium.<br />
G.1.2 Etherhook Routines Provide Access to Raw Packets<br />
You can use the etherInputHook( ) and etherOutputHook( ) routines to bypass the<br />
TCP/IP stack and thus get access to raw packets. On packet reception, if an<br />
etherInputHook( ) function is installed, it receives the packet just after the driver<br />
has completed reception but before the packet goes to the protocol. If<br />
259
VxWorks 5.5<br />
<strong>BSP</strong> Developer’s <strong>Guide</strong><br />
etherInputHook( ) decides to prevent others from seeing the packet,<br />
etherInputHook( ) returns a non-zero value and the driver considers the packet to<br />
be delivered. If the etherInputHook( ) returns 0, the driver hands the packet to the<br />
TCP/IP stack.<br />
On packet transmission, an installed etherOutputHook( ) receives a packet just<br />
before it would have been transmitted. If etherOutputHook( ) decides to prevent<br />
the packet from passing on, etherOutputHook( ) returns a non-zero value and the<br />
driver considers the packet to be transmitted. If the etherOutputHook( ) returns 0,<br />
the driver transmits the packet.<br />
It is only possible to install one etherInputHook( ) and one etherOutputHook( )<br />
function per driver. This limits the number of alternate protocols to one, unless<br />
these ether*Hook( ) routines then act as a multiplexor for more protocols.<br />
For more information on etherhooks, see the Tornado User’s <strong>Guide</strong>, 1.0.1:<br />
G.4 Network Interface Hook Routines.<br />
NOTE: Future versions of VxWorks will not support etherhooks.<br />
G.2 Upgrading to 4.4 BSD<br />
To upgrade a driver from 4.3 BSD to 4.4 BSD you must change how the driver uses<br />
ether_attach( ). This routine is almost always called from the driver’s own<br />
xxattach( ) routine and is responsible for placing the driver’s entry points, listed in<br />
Table G-1, into the ifnet structure that the TCP/IP protocol to track drivers.<br />
Consider the call to ether_attach( ) shown below:<br />
ether_attach(<br />
(IFNET *) & pDrvCtrl->idr,<br />
unit,<br />
"xx",<br />
(FUNCPTR) NULL,<br />
(FUNCPTR) xxIoctl,<br />
(FUNCPTR) xxOutput,<br />
(FUNCPTR) xxReset<br />
);<br />
As arguments, this routine expects an Interface Data Record (IDR), a unit number,<br />
and a quoted string that is the name of the device, in this case, “xx”. The next four<br />
arguments are the function pointers to relevant driver routines.<br />
260
G<br />
Upgrading 4.3 BSD Network Drivers<br />
The first function pointer references this driver’s init( ) routine, which this driver<br />
does not need or have. The second function pointer references the driver’s ioctl( )<br />
interface, which allows the upper layer to manipulate the device state. The third<br />
function pointer references the routine that outputs packets on the physical<br />
medium. The last function pointer references a routine that can reset the device if<br />
the TCP/IP stack decides that this needs to be done.<br />
In 4.4 BSD, there is a generic output routine called ether_output( ) that all Ethernet<br />
device drivers can use. Thus, to convert the above ether_attach( ) call to a 4.4-style<br />
call, you would call ether_attach( ) as follows:<br />
ether_attach(<br />
(IFNET *) & pDrvCtrl->idr,<br />
unit,<br />
"xx",<br />
(FUNCPTR) NULL,<br />
(FUNCPTR) xxIoctl,<br />
(FUNCPTR) ether_output, /* generic ether_output */<br />
(FUNCPTR) xxReset<br />
);<br />
pDrvCtrl->idr.ac_if.if_start = (FUNCPTR)xxTxStartup;<br />
This time, there is an extra line following the call to ether_attach( ). This line of<br />
code adds a transmit startup routine to the Interface Data Record. The transmit<br />
startup routine is called by the TCP/IP stack after the generic ether_output( )<br />
routine is called. This extra line of code assumes that the driver already has a<br />
transmit startup routine. If a driver lacks a separate transmit startup routine, you<br />
must write one. See the template in G.2.4 Creating a Transmit Startup Routine.<br />
G<br />
G.2.1 Removing the xxOutput( ) Routine<br />
If a 4.3 BSD driver has an xxOutput( ) routine, it should look something like the<br />
following:<br />
static int xxOutput<br />
(<br />
IDR * pIDR,<br />
MBUF * pMbuf,<br />
SOCK * pDestAddr<br />
)<br />
{<br />
return (ether_output ((IFNET *)pIDR,pMbuf, pDestAddr,<br />
(FUNCPTR) xxTxStartup, pIDR));<br />
}<br />
Internally, this routine calls the ether_output( ) routine, which expects a pointer to<br />
the startup routine as one of its arguments. However, in the 4.4 BSD model, all that<br />
261
VxWorks 5.5<br />
<strong>BSP</strong> Developer’s <strong>Guide</strong><br />
work that is now handled in the TCP/IP stack. Thus, in a 4.4 BSD driver, this code<br />
is unnecessary and should be removed.<br />
G.2.2 Changing the Transmit Startup Routine<br />
Under 4.3 BSD, the function prototype for a transmit startup routine is as follows:<br />
static void xxTxStartup (int unit);<br />
Under 4.4 BSD, the prototype has changed to the following:<br />
static void xxTxStartup (struct ifnet * pDrvCtrl);<br />
The 4.4 BSD version expects a pointer to a driver control structure. This change<br />
eases the burden on the startup routine. Instead of having to find its own driver<br />
control structure, it receives a pointer to a driver control structure as input.<br />
If the driver uses netJobAdd( ) to schedule the transmit startup routine for<br />
task-level execution, edit the netJobAdd( ) call to pass in a DRV_CTRL structure<br />
pointer instead of a unit number.<br />
G.2.3 Changes in Receiving Packets<br />
Under 4.3 BSD, the driver calls do_protocol_with_type( ). For example:<br />
do_protocol_with_type (etherType, pMbuf, &pDrvCtrl->idr, len);<br />
This call expects an etherType (which the driver had to discover previously), a<br />
pointer to an mbuf containing the packet data, the Interface Data Record, and the<br />
length of the data.<br />
Under 4.4 BSD, replace the call above with a call to do_protocol( ). For example:<br />
do_protocol (pEh, pMbuf, &pDrvCtrl->idr, len);<br />
The first parameter expects a pointer to the very beginning of the packet (including<br />
the link level header). All the other parameters remain the same. The driver no<br />
longer needs to figure out the etherType for the protocol.<br />
262
G<br />
Upgrading 4.3 BSD Network Drivers<br />
G.2.4 Creating a Transmit Startup Routine<br />
Some 4.3 BSD drivers did not have a transmit startup routine. For such a driver,<br />
you must create one. The template is as follows:<br />
void templateStartup<br />
(<br />
DRV_CTRL *pDrvCtrl<br />
)<br />
{<br />
MBUF * pMbuf;<br />
int length;<br />
TFD * pTfd;<br />
/*<br />
* Loop until there are no more packets ready to send or we<br />
* have insufficient resources left to send another one.<br />
*/<br />
while (pDrvCtrl->idr.ac_if.if_snd.ifq_head)<br />
{<br />
/* Deque a packet from the send queue. */<br />
IF_DEQUEUE (&pDrvCtrl->idr.ac_if.if_snd, pMbuf);<br />
/*<br />
* Device specific code to get transmit resources, such as a<br />
* transmit descriptor, goes here.<br />
*<br />
*/<br />
if (Insufficient Resources)<br />
{<br />
m_freem (pMbuf);/* Make sure to free the packet. */<br />
return;<br />
}<br />
G<br />
/*<br />
* pData below is really the place in your descriptor,<br />
* transmit descriptor, or equivalent, where the data is<br />
* to be placed.<br />
*/<br />
copy_from_mbufs (pData, pMbuf, length);<br />
if ((etherOutputHookRtn != NULL) &&<br />
(* etherOutputHookRtn)<br />
(&pDrvCtrl->idr, (ETH_HDR *)pTfd->enetHdr, length))<br />
continue;<br />
/*<br />
* Do hardware manipulation to set appropriate bits<br />
* and other stuff to get the packet to actually go.<br />
*/<br />
263
VxWorks 5.5<br />
<strong>BSP</strong> Developer’s <strong>Guide</strong><br />
/*<br />
* Update the counter that determines the number of<br />
* packets that have been output.<br />
*/<br />
pDrvCtrl->idr.ac_if.if_opackets++;<br />
} /* End of while loop. */<br />
} /* End of transmit routine. */<br />
G.3 Porting a Network Interface Driver to the END Model<br />
The MUX-based model for network drivers contains standardized entry points<br />
that are not present in the BSD model. Table G-2 shows some of the analogies<br />
between functions found in BSD 4.3 drivers and those necessary for ENDs.<br />
Fortunately, you should be able to reuse much of the code from the BSD 4.3<br />
network driver.<br />
Table G-2<br />
Required Driver Entry Points and their Derivations<br />
END Entry Points<br />
BSD 4.3 Style Entry Points<br />
endLoad( ) xxattach( )<br />
endUnload( )<br />
N/A<br />
N/A xxReceive( )<br />
endSend( ) xxOutput( )<br />
endIoctl( ) xxIoctl( )<br />
endMCastAddrAdd( )<br />
endMCastAddrDel( )<br />
endMCastAddrGet( )<br />
endPollSend( )<br />
endPollReceive( )<br />
N/A<br />
N/A<br />
N/A<br />
N/A<br />
N/A<br />
264
G<br />
Upgrading 4.3 BSD Network Drivers<br />
! CAUTION: When converting a BSD 4.3 network driver code to an END, you must<br />
replace all calls into the protocol with appropriate calls to the MUX. Also, you must<br />
remove all code that implements or uses the etherInputHook( ) and<br />
etherOutputHook( ) routines.<br />
Rewrite xxattach( ) to Use an endLoad( ) Interface<br />
Rewrite the interface of your xxattach( ) to match the endLoad( ) entry point<br />
described in Loading the Device: endLoad( ), p.290.<br />
Much of the code that handles the specifics of hardware initialization should be the<br />
same. However, when allocating the memory for packet reception buffers that are<br />
passed up to the protocol, you should use the MUX buffer management utilities.<br />
See H.3.1 Setting Up and Using a Memory Pool for Receive and Transmit Buffers, as well<br />
as the reference entry for muxBufInit( ).<br />
Remove any code your xxattach( ) included to support the implementation of the<br />
etherInputHook( ) and etherOutputHook( ) routines.<br />
xxReceive( ) Still Handles Task-Level Packet Reception<br />
Because the MUX does not directly call the driver’s packet reception code, there is<br />
no endReceive( ) entry point. However, your driver still needs to handle packet<br />
reception at the task level. Unfortunately, most of the code in this driver routine<br />
requires extensive revision. Instead of calling the protocol directly, this routine<br />
uses a MUX-supplied function to pass a packet up to the protocol (see<br />
H.3 <strong>Guide</strong>lines for Handling Packet Reception in Your Driver). Also, your receive<br />
routine should use the MUX-managed memory pool as its receive buffer area.<br />
G<br />
Rewrite xxOutput( ) to Use an endSend( ) Interface<br />
Rewrite the interface of your xxOutput( ) to match the endSend( ) routine<br />
described in Sending Data Out on the Device: endSend( ), p.293.<br />
Much of the code that dealt directly with putting the packet on the hardware<br />
should need little if any revision. However, you should change your code to use<br />
mblk chains allocated out of an endBufLib-managed memory pool. For more<br />
information, see the reference entry for netBufLib.<br />
265
VxWorks 5.5<br />
<strong>BSP</strong> Developer’s <strong>Guide</strong><br />
xxIoctl( ) is the Basis of endIoctl( )<br />
Rewrite the interface of your xxIoctl( ) to match the endIoctl( ) routine described<br />
in Providing an Opaque Control Interface to Your Driver: endIoctl( ), p.292. If your<br />
driver used xxIoctl( ) to implement multicasting, you must separate those<br />
operations into the separate endMCastAddrAdd( ), endMCastAddrDel( ), and<br />
endMCastAddrGet( ) routines.<br />
266
H<br />
Implementing a MUX-Based<br />
Network Interface Driver<br />
H.1 Introduction<br />
A network interface driver written especially for use with the network stack is<br />
known as an Enhanced Network Driver (END). This chapter describes how to<br />
write an END as well as how to write a protocol that knows how to use an END.<br />
This chapter assumes that you are a software developer familiar with general<br />
networking principles—including protocol layering. Familiarity with 4.4 BSD<br />
networking internals is also helpful. This chapter is not a tutorial on writing<br />
network interface drivers. Instead, you should use this chapter as a guide to the<br />
specifics of writing a network interface driver that runs under VxWorks.<br />
If this is the first time you have written a network interface driver, consider taking<br />
an existing driver and modifying it to meet your needs. For more information on<br />
TCP/IP, Wind River recommends the following Addison Wesley publications:<br />
■<br />
■<br />
TCP/IP Illustrated, Volume 1, The Protocols, by W. Richard Stevens<br />
TCP/IP Illustrated, Volume 2, The Implementation,<br />
by Gary R. Wright and W. Richard Stevens<br />
NOTE: If you are using IPv6, you should also consult the WindNet IPv6<br />
Programmer’s <strong>Guide</strong>, 1.0 or a future version of the VxWorks Network Programmer’s<br />
<strong>Guide</strong> (that is, a version released after WindNet IPv6 1.0).<br />
NOTE: The src/drv/end directory contains templateEnd.c as well as ln7990End.c,<br />
a sample END driver for use with the Lance chip.<br />
267
VxWorks 5.5<br />
<strong>BSP</strong> Developer’s <strong>Guide</strong><br />
The MUX Is an Interface Joining the Data Link and Protocol Layers<br />
One feature of the network stack is an API between the data link and network<br />
protocol layers. This API multiplexes access to the networking hardware for<br />
multiple network protocols. This interface is known as the MUX. Figure H-1 shows<br />
the MUX in relationship to protocol and data link layers.<br />
Figure H-1<br />
The MUX Is the Interface Between the Data Link and Protocol Layers<br />
Protocol Layer:<br />
IP + ICMP<br />
Streams<br />
(custom<br />
protocol)<br />
MUX<br />
Data Link Layer:<br />
Ethernet<br />
Backplane<br />
CSLIP<br />
(other)<br />
At the protocol layer, VxWorks typically uses IP, although you can port and use<br />
other protocols. At the data link layer, VxWorks typically uses Ethernet, although<br />
VxWorks does support other physical media for data transmission. For example,<br />
VxWorks supports the use of serial lines for long-distance connections. In more<br />
closely coupled environments, VxWorks Internet protocols can also use the shared<br />
memory on a common backplane as the physical medium. However, whatever the<br />
medium, the network interface drivers all use the MUX to communicate with the<br />
protocol layer.<br />
NOTE: The data link layer is an abstraction. A network interface driver is code that<br />
implements the functionality described by that abstraction. Likewise, the protocol<br />
layer is an abstraction. The code that implements the functionality of the protocol<br />
layer could be called a protocol interface driver. However, this document refers to<br />
such code simply as “the protocol.”<br />
The MUX Decouples Network Interface Drivers and Protocols<br />
Under the BSD 4.3 model, VxWorks network drivers and protocols are tightly<br />
coupled. Both the protocol and the network driver depend on an intimate<br />
knowledge of each other’s data structures. Under the MUX-based model, network<br />
drivers and protocols have no knowledge of each other’s internals. Network<br />
interface drivers and protocols interact only indirectly—through the MUX.<br />
268
H<br />
Implementing a MUX-Based Network Interface Driver<br />
For example, after receiving a packet, the network interface driver does not<br />
directly access any structure within the protocol. Instead, when the driver is ready<br />
to pass data up to the protocol, the driver calls a MUX-supplied function. This<br />
function then handles the details of passing the data up to the protocol.<br />
The purpose of the MUX is to decouple the protocol and network driver, thus<br />
making the network driver and protocol nearly independent of each another. This<br />
independence makes it much easier to add a new drivers or protocols. For<br />
example, if you add a new END, all existing MUX-based protocols can use the new<br />
driver. Likewise, if you add a new MUX-based protocol, any existing END can use<br />
the MUX to access the new protocol.<br />
An Overview of the MUX, Protocol, and Driver API<br />
Figure H-2 shows a protocol, the MUX, and a network interface driver. The<br />
protocol implements the following entry points:<br />
■<br />
stackShutdownRtn( )<br />
■<br />
stackError( )<br />
■<br />
stackRcvRtn( )<br />
■<br />
stackTxRestartRtn( )<br />
The MUX calls these entry points when it needs to interact with a protocol. To port<br />
a protocol to use the MUX, you must implement at least all the entry points listed<br />
above.<br />
The MUX implements the entry points muxBind( ), muxUnbind( ),<br />
muxDevLoad( ), and so on. Both the protocol and the driver call the MUX entry<br />
points as needed. Because the MUX is already implemented for you, it requires no<br />
additional coding work on your part.<br />
The network interface driver implements the entry points endLoad( ),<br />
endUnload( ), endSend( ), and so on. The MUX uses these entry points to interact<br />
with the network interface driver. When writing or porting a network interface<br />
driver to use the MUX, you must implement all the entry points listed in<br />
Table H-1.<br />
H<br />
269
VxWorks 5.5<br />
<strong>BSP</strong> Developer’s <strong>Guide</strong><br />
Figure H-2<br />
The MUX Interface<br />
muxBind( )<br />
stackShutdownRtn( ) muxUnbind( )<br />
muxDevLoad( )<br />
muxDevUnload( )<br />
endLoad( )<br />
endUnload( )<br />
stackRcvRtn( )<br />
stackError( )<br />
muxReceive( )<br />
muxError( )<br />
muxSend( )<br />
endSend( )<br />
stackTxRestartRtn( ) muxTxRestartRtn( ) endTxRestartRtn( )<br />
muxMCastAddrDel( )<br />
muxMCastAddrGet( )<br />
endMCastAddrDel( )<br />
endMCastAddrGet( )<br />
muxPollSend( )<br />
muxMCastAddrAdd( )<br />
endPollSend( )<br />
endMCastAddrAdd( )<br />
muxPollReceive( )<br />
endPollReceive( )<br />
muxIoctl( ) endIoctl( )<br />
endStart( )<br />
endStop( )<br />
Protocol MUX END<br />
The arrows indicate calls to an entry point. For example, the top-most arrow tells you that the protocol<br />
calls muxBind( ), a routine implemented in the MUX. If the MUX-based API specifies both ends of the<br />
call, the figure specifies a routine name at each end of an arrow. For example, muxSend( ) calls<br />
endSend( ). Note that, although the protocol started the send by calling muxSend( ), the figure does<br />
not name the protocol routine that called muxSend( ). That routine is outside the standardized API.<br />
H.2 How VxWorks Launches and Uses Your Driver<br />
The primary focus of this chapter is on the MUX utilities and the standard END<br />
entry points. However, when designing or debugging your driver’s entry points,<br />
270
H<br />
Implementing a MUX-Based Network Interface Driver<br />
you need to know the context in which the entry point executes. Thus, you need to<br />
know the following:<br />
■<br />
■<br />
■<br />
The task that makes the calls that actually load and start your driver.<br />
The task that typically registers the interrupt handler for your driver.<br />
The task that uses your driver to do most of the processing on a packet.<br />
H.2.1 Launching Your Driver<br />
At system startup, VxWorks spawns the task tUsrRoot to handle the following:<br />
■<br />
■<br />
■<br />
■<br />
Initializing the network task’s job queue.<br />
Spawning tNetTask to process items on the network task’s job queue.<br />
Calling muxDevLoad( ) to load your network driver.<br />
Calling muxDevStart( ) to start your driver.<br />
Loading Your Driver into the MUX<br />
To load your network driver, tUsrRoot calls muxDevLoad( ). As input to the call,<br />
tUsrRoot specifies your driver’s endLoad( ) entry point. Internally, the<br />
muxDevLoad( ) call executes the specified endLoad( ) entry point. This<br />
endLoad( ) entry point is analogous to the xxattach( ) entry point, the only public<br />
entry point into the 4.3 BSD style drivers.<br />
The endLoad( ) routine handles any device-specific initialization and returns an<br />
END_OBJ structure. Your endLoad( ) must populate most of this structure (see,<br />
Providing Network Device Abstraction: END_OBJ, p.283). This includes providing a<br />
pointer to a NET_FUNCS structure populated with function pointers to your<br />
driver’s entry points for handling sends, receives, and so on.<br />
After control returns from endLoad( ) to muxDevLoad( ), the MUX completes the<br />
END_OBJ structure (by giving it a pointer to a function your driver can use to pass<br />
packets up to the MUX). The MUX then adds the returned END_OBJ to a linked list<br />
of END_OBJ structures. This list maintains the state of all the currently active<br />
network devices on the system. After control returns from muxDevLoad( ), your<br />
driver is loaded and ready to use.<br />
H<br />
Registering Your Driver’s Interrupt Routine<br />
To register your driver’s interrupt handler, you must call sysIntConnect( ). The<br />
most typical place to make this call is in your driver’s endStart( ) entry point.<br />
271
VxWorks 5.5<br />
<strong>BSP</strong> Developer’s <strong>Guide</strong><br />
When muxDevLoad( ) loads your driver, it calls muxDevStart( ), which then calls<br />
your driver’s endStart( ) entry point.<br />
H.2.2 Your ISR Puts Work on the Network Job Queue<br />
Upon arrival of an interrupt on the network device, VxWorks invokes your<br />
driver’s previously registered interrupt service routine. Your interrupt service<br />
routine should do the minimum amount of work necessary to get the packet off the<br />
local hardware. To minimize interrupt lock-out time, your interrupt service routine<br />
should handle only those tasks that require minimal execution time, such as error<br />
or status change. Your interrupt service routine should queue all time-consuming<br />
work for processing at the task level.<br />
To queue packet-reception work for processing at the task level, your interrupt<br />
service routine must call netJobAdd( ). As input, this routine accepts a function<br />
pointer and up to five additional arguments (parameters to the function referenced<br />
by the function pointer).<br />
STATUS netJobAdd<br />
(<br />
FUNCPTR routine, /* routine to add to netTask work queue */<br />
int param1, /* first arg to added routine */<br />
int param2, /* second arg to added routine */<br />
int param3, /* third arg to added routine */<br />
int param4, /* fourth arg to added routine */<br />
int param5 /* fifth arg to added routine */<br />
)<br />
In your call to netJobAdd( ), you should specify your driver’s entry point for<br />
processing packets at the task level. The netJobAdd( ) routine then puts the<br />
function call (and arguments) on tNetTask’s work queue. VxWorks uses tNetTask<br />
to handle task-level network processing.<br />
NOTE: You can use netJobAdd( ) to queue up work other than processing for<br />
received packets.<br />
! CAUTION: Use netJobAdd( ) sparingly. The netJobRing is a finite resource that is<br />
also used by the network stack. If it overflows, this implies a general network stack<br />
corruption.<br />
272
H<br />
Implementing a MUX-Based Network Interface Driver<br />
H.2.3 Executing Calls Waiting in the Network Job Queue<br />
The tNetTask task sleeps on an incoming work queue. In response to an incoming<br />
packet, your interrupt service routine calls netJobAdd( ). As parameters to<br />
netJobAdd( ), your interrupt service routine specifies your driver’s entry point for<br />
handling task-level packet reception. The netJobAdd( ) call adds this entry point<br />
to tNetTask’s work queue. The netJobAdd( ) call also automatically gives the<br />
appropriate semaphore for awakening tNetTask.<br />
Upon awakening, tNetTask dequeues function calls and associated arguments<br />
from its work queue. It then executes these functions in its context. The tNetTask<br />
task runs as long as there is work on its queue. When the queue is empty and all<br />
packets have been successfully handed off to the MUX, tNetTask goes back to<br />
sleep on the queue.<br />
H.2.4 Adding Your Network Interface Driver to VxWorks<br />
Adding your driver to the target VxWorks system is much like adding any other<br />
application. The first step is to compile and include the driver code in the VxWorks<br />
image. For a description of the general procedures, see the Tornado User’s <strong>Guide</strong>.It<br />
tells you how to compile source code to produce target-suitable object code.<br />
Including most software modules in the VxWorks image is usually just a matter of<br />
setting a few #define statements. Adding a network interface driver does not<br />
require much more. However, because VxWorks allows you to create more than<br />
one network device, you must also set up a table that groups the #define<br />
statements into device-specific groups. This table is defined in<br />
target/src/config/<strong>BSP</strong>/configNet.h where <strong>BSP</strong> is the name of your Board Support<br />
Package, such as mv162, pc486, and the like.<br />
For example, if you wanted VxWorks to create two network devices, one that<br />
supported buffer loaning and one that did not, you would first edit configNet.h to<br />
include the following statements:<br />
H<br />
/* Parameters for loading the driver supporting buffer loaning. */<br />
#define LOAD_FUNC_0 ln7990EndLoad<br />
#define LOAD_STRING_0 "0xfffffe0:0xffffffe2:0:1:1"<br />
#define <strong>BSP</strong>_0 NULL<br />
/* Parameters for loading the driver NOT supporting buffer loaning. */<br />
#define LOAD_FUNC_1 LOAD_FUNC_0<br />
#define LOAD_STRING_1 "0xffffee0:0xfffffee2:4:1:1"<br />
#define <strong>BSP</strong>_1 NULL<br />
273
VxWorks 5.5<br />
<strong>BSP</strong> Developer’s <strong>Guide</strong><br />
To set appropriate values for these constants, consider the following:<br />
END_LOAD_FUNC<br />
Specifies the name of your driver’s endLoad( ) entry point. For example, if<br />
your driver’s endLoad( ) entry point were ln7990EndLoad( ), you would edit<br />
config.h to include the line:<br />
#define END_LOAD_FUNC ln7990EndLoad<br />
END_LOAD_STRING<br />
Specifies the initialization string passed into muxDevLoad( ) as the initString<br />
parameter.<br />
You must also edit the definition of the endTbl (a table in configNet.h that specifies<br />
the ENDs included in the image) to include the following:<br />
END_TBL_ENTRY endTbl<br />
{<br />
{ 0, LOAD_FUNC_0, LOAD_STRING_0, <strong>BSP</strong>_0, FALSE},<br />
{ 1, LOAD_FUNC_1, LOAD_STRING_1, <strong>BSP</strong>_1, FALSE},<br />
{ 0, END_TBL_END, 0, NULL},<br />
};<br />
The number at the beginning of each line specifies the unit number for the device.<br />
The first line specifies a unit number of 0. Thus, the device it loads is deviceName0.<br />
The FALSE at the end of each entry indicates that the entry has not been processed.<br />
After the system has successfully loaded a driver, it changes this value to TRUE in<br />
the run-time version of this table. If you want to prevent the system from<br />
automatically loading your driver, set this value to TRUE.<br />
Finally, you must edit your <strong>BSP</strong>’s config.h file to define INCLUDE_END. 1 This tells<br />
the build process to include the END/MUX interface. A this point, you are ready<br />
to rebuild VxWorks to include your new drivers. When you boot this rebuilt image,<br />
it calls muxDevLoad( ) for each device specified in the table in the order listed. 2<br />
NOTE: If you do not rebuild your boot ROMs, they cannot contain your new END.<br />
This means you must boot from a non-END driver already resident in the boot<br />
ROMs. To do this, you must define END_OVERRIDE in your <strong>BSP</strong>’s config.h. After<br />
the system actually boots, it can use the new END device that you included in the<br />
VxWorks image.<br />
1. By default, the config.h file for an END <strong>BSP</strong> undefines INCLUDE_END.<br />
2. For a description of the parameters to muxDevLoad( ), see the appropriate reference entry.<br />
274
H<br />
Implementing a MUX-Based Network Interface Driver<br />
H.3 <strong>Guide</strong>lines for Handling Packet Reception in Your Driver<br />
The list of END entry points (see Table H-1) makes no mention of an endReceive( )<br />
entry point. That is because an END does not require one. Of course, your driver<br />
must include code that handles packet reception, but the MUX never calls this code<br />
directly. Thus, the specifics of the code for packet reception are left to you.<br />
However, even if the MUX API does not require an endReceive( ) entry point, you<br />
need to consider the VxWorks system when designing your driver’s packet<br />
reception code. For example, your network interface driver must include an entry<br />
point that acts as your device’s interrupt service routine. In addition, your driver<br />
also needs a different entry point for completing packet reception at the task level.<br />
Internally, your task-level packet-reception entry point should do whatever is<br />
necessary to prepare the packet for handing off to the MUX, such as assuring data<br />
coherency. Likewise, this entry point might use a level of indirection in order to<br />
check for and avoid race conditions before it attempts to do any processing on the<br />
received data. 3 When all is ready, your driver should pass the packet up to the<br />
MUX. To do this, it calls the function referenced in the receiveRtn member of the<br />
END_OBJ structure (see Providing Network Device Abstraction: END_OBJ, p.283).<br />
Although your driver’s endLoad( ) entry point allocated this END_OBJ structure<br />
and set the values of most of its members, it did not and could not set the value of<br />
the receiveRtn member. The MUX does this for you upon completion of the<br />
muxDevLoad( ) call that loaded your driver. However, there is a very brief interval<br />
between the time the driver becomes active and the completion of muxDevLoad( ).<br />
During that time, receiveRtn might not be set. Thus, it is a good practice always to<br />
check receiveRtn for NULL before you try to execute the function referenced there.<br />
H<br />
Removing Etherhook Code in Ported Drivers<br />
The BSD 4.3 model for a VxWorks network interface drivers support a set of input<br />
and output hooks that you can use to intercept packets as they pass between the<br />
driver and protocol. These input and output hooks are referred to as the etherhooks.<br />
When porting a driver to the END model, you must remove the code (if any) that<br />
implements etherhooks. ENDs have no need of etherhooks. That functionality is<br />
built into the MUX. For more information, see the discussion of etherhooks in the<br />
Tornado User’s <strong>Guide</strong>, 1.0.1.<br />
3. See the sample driver in target/src/drv/end/ln7990End.c.<br />
275
VxWorks 5.5<br />
<strong>BSP</strong> Developer’s <strong>Guide</strong><br />
H.3.1 Setting Up and Using a Memory Pool for Receive and Transmit Buffers<br />
Included with the network stack is netBufLib, a library that you can use to set up<br />
and manage a memory pool specialized to the buffering needs of networking<br />
applications such as ENDs and network protocols. To support buffer loaning and<br />
other features, netBufLib routines deal with data in terms of mBlks, clBlks, and<br />
clusters. As a consequence, a memory pool established using netPoolInit( ) is<br />
organized around a pool of mBlk structures, a pool of clBlk structures, and one or<br />
more pools of clusters.<br />
The netBufLib routines use the mBlk and clBlk structures to track information<br />
necessary to manage the data in the clusters. The clusters contain the data<br />
described by the mBlk and clBlk structures. The mBlk structure is the primary<br />
vehicle through which you access or pass the data that resides in a memory pool<br />
established by netPoolInit( ). Because an mBlk merely references the data, this lets<br />
network layers communicate data without actually having to copy the data.<br />
Another mBlk feature is chaining. This lets you pass an arbitrarily large amount of<br />
data by passing the mBlk at the head of an mBlk chain. See Figure H-3.<br />
In addition, because the mBlk structure references data through a clBlk structure,<br />
this makes it easy for multiple mBlks to share the same cluster. This ability is<br />
useful if you want to duplicate an mBlk without having to copy the referenced<br />
data. For example, mBlk 1 in Figure H-4 is a duplicate of mBlk A. Both are joined<br />
to the same clBlk. Thus, both share the same cluster.<br />
Please note that using a clBlk structure instead of a pointer to provide a level of<br />
indirection is not an extravagance. The clBlk structure tracks how many mBlks<br />
share its underlying cluster. This is critical when it comes time to free an<br />
mBlk/clBlk/cluster construct. If you use netMblkClFree( ) to free the construct,<br />
the mBlk is freed back to the pool and the reference count in the clBlk is<br />
decremented. If the reference count drops to zero, the clBlk and cluster are also<br />
freed back to the memory pool.<br />
Setting Up a Memory Pool<br />
Each END unit requires its own memory pool. How you configure a memory pool<br />
differs slightly depending on whether you intend the memory pool to be used by<br />
a network protocol, such as IPv4, or an END.<br />
As was mentioned above, all memory pools are organized around pools of mBlk<br />
structures, clBlk structures, and clusters. However, because a network protocol<br />
typically requires clusters of several different sizes, its memory pool must contain<br />
several cluster pools (one cluster pool for each cluster size). In addition, each<br />
276
H<br />
Implementing a MUX-Based Network Interface Driver<br />
Figure H-3<br />
Presentation of Two Packets to the TCP Layer<br />
mBlk mBlk mBlk null<br />
clBlk clBlk clBlk<br />
Cluster<br />
64 bytes<br />
Cluster<br />
512<br />
bytes<br />
Cluster<br />
2048<br />
bytes<br />
Packet 1<br />
mBlk mBlk null<br />
clBlk<br />
Cluster<br />
64 bytes<br />
clBlk<br />
Cluster<br />
2028<br />
bytes<br />
Packet 2<br />
Figure H-4<br />
Two mBlks Can Share the Same Cluster<br />
H<br />
mBlk 1<br />
mBlk 2<br />
null<br />
mBlk A<br />
mBlk Bb<br />
null<br />
clBlk<br />
clBlk<br />
Cluster<br />
64 bytes<br />
Cluster<br />
2028<br />
bytes<br />
277
VxWorks 5.5<br />
<strong>BSP</strong> Developer’s <strong>Guide</strong><br />
cluster size must be a power of two. Common cluster sizes for this style of memory<br />
pool are 64, 128, 256, 512, 1024 and 2048 bytes. See Figure H-5.<br />
Figure H-5<br />
A Protocol Memory Pool<br />
Memory Pool for a Protocol Stack<br />
Pool of mBlks<br />
mBlk mBlk mBlk<br />
mBlk mBlk mBlk<br />
mBlk mBlk mBlk<br />
mBlk mBlk ...<br />
Pool of Clusters<br />
64 64 64<br />
64 64 64<br />
64 64 64<br />
64 64 ...<br />
Pool of clBlks<br />
clBlk clBlk clBlk<br />
clBlk clBlk clBlk<br />
clBlk clBlk clBlk<br />
clBlk clBlk ...<br />
Pool of Clusters<br />
128 128 128<br />
128 128 128<br />
128 128 128<br />
128 128 ...<br />
Pool of Clusters<br />
...<br />
By contrast, a memory pool intended for an END typically contains only one<br />
cluster pool (in addition to the mBlk pools and clBlk pools), and the cluster size is<br />
not limited to a power of two. Thus, you are free to choose whatever cluster size is<br />
most convenient, which is typically something close to the MTU of the network.<br />
For example, in the Lance Ethernet END, the cluster size is 1520 bytes, which is the<br />
Ethernet MTU plus some slack. See Figure H-6.<br />
NOTE: It is recommended that there be at least a 3:1 ratio of mBlks to clusters.<br />
Figure H-6<br />
An END Memory Pool<br />
Memory Pool for an END<br />
Pool of mBlks<br />
mBlk mBlk mBlk<br />
mBlk mBlk mBlk<br />
mBlk mBlk mBlk<br />
mBlk mBlk ...<br />
Pool of clBlks<br />
clBlk clBlk clBlk<br />
clBlk clBlk clBlk<br />
clBlk clBlk clBlk<br />
clBlk clBlk ...<br />
Pool of Clusters<br />
1520 1520 1520<br />
1520 1520 1520<br />
1520 1520 1520<br />
1520 1520 ...<br />
278
H<br />
Implementing a MUX-Based Network Interface Driver<br />
To establish a memory pool, call netPoolInit( ). For an END, make the<br />
netPoolInit( ) call during the driver’s initialization phase. From out of this pool,<br />
your driver should reserve the mBlk/clBlk/cluster constructs it needs to receive<br />
a packet. For more information, see the reference entry for netBufLib.<br />
Receiving Data into Clusters<br />
During the initialization phase of your END, call netClusterGet( ) to reserve some<br />
reasonable number of clusters to receive incoming packets (store references to<br />
these reserved clusters in a buffer ring or some other structure appropriate to your<br />
needs). When a packet arrives, your END should receive it directly into one of<br />
these clusters.<br />
When your END is ready to pass a received packet up to the MUX, it does so using<br />
an mBlk/clBlk/cluster construct. To create this construct:<br />
1. Call netClBlkGet( ) to reserve a clBlk structure.<br />
2. Call netClBlkJoin( ) to join the clBlk to the cluster containing the packet.<br />
3. Call netMblkGet( ) to reserve a mBlk structure.<br />
4. Call netMblkClJoin( ) to join the mBlk structure to the clBlk/cluster<br />
construct.<br />
Now that the packet is contained within an mBlk/clBlk/cluster construct, the<br />
END can use various netBufLib routines to adjust or inspect the data in the<br />
mBlk/clBlk/cluster construct. For example, to read the packet data in the<br />
construct, your END can call netMblkToBufCopy( ). In addition, your END can<br />
use the mBlk chaining feature to prepend or append data to the packet.<br />
H<br />
NOTE: The various net*Get( ) routines reserve memory from a pre-allocated pool.<br />
Internally, they do not use semaphores. Thus, they are safe to call from places<br />
where a call to malloc( ) would be impossible.<br />
Freeing mBlks, clBlks, and Clusters<br />
When you are done with an mBlk/clBlk/cluster chain and want to return it to the<br />
memory pool, call netMblkClChainFree( ). This frees all mBlks in the chain. It<br />
also decrements the reference counters in all the clBlks in the chain. If the reference<br />
counter for a clBlk drops to zero, that clBlk and its associated cluster are also freed<br />
back to the pool. To free a single mBlk/clBlk/cluster back to the memory pool, use<br />
netMblkClFree( ). For more information on these and other free routines, see the<br />
reference entry for netBufLib.<br />
279
VxWorks 5.5<br />
<strong>BSP</strong> Developer’s <strong>Guide</strong><br />
H.3.2 Swapping Buffers Between Protocol and Driver<br />
To pass a buffer up to the MUX, a driver calls muxReceive( ), which, in turn, calls<br />
the protocol’s stackRcvRtn( ) routine (see Passing a Packet Up to the Protocol:<br />
stackRcvRtn( ), p.307). When control returns from muxReceive( ), the driver can<br />
consider the data delivered and can forget about the buffers it handed up to the<br />
MUX. When the upper layers are done with the data, they free the buffers back to<br />
the driver’s memory pool.<br />
This system is implicitly a buffer loaning system. If a device cannot receive data<br />
directly into clusters, it must first allocate its own memory (apart from a network<br />
buffer pool) and explicitly copy the data from its private memory into a cluster<br />
before passing it in an mBlk up to the MUX.<br />
H.3.3 Using Private Memory Management Routines<br />
If your device does not allow you to use the MUX memory-management utilities,<br />
you can write replacements for the ones provided by netBufLib. However, your<br />
replacements must conform to the API for these routines.<br />
H.3.4 Supporting Scatter-Gather in Your Driver<br />
Some devices support breaking up a single network packet into separate chunks<br />
of memory. This makes it possible to pass a packet (such as a list of mbufs from a<br />
Berkeley-type TCP/IP protocol) as a chain of mBlk/clBlk/cluster constructs.<br />
When a driver gets a chain of mBlks, it can decide at that point to transmit the<br />
clusters in the chain in any way it likes. If it can do a gather-write, then it need not<br />
do any data copying. If it cannot, then it has to put all of the data from the chain<br />
into a single memory area before transmitting it. This decision is driven by the type<br />
of network device for which the driver is implemented.<br />
H.4 Indicating Error Conditions<br />
Sometimes an END encounters errors or other events that are of interest to the<br />
protocols using that END. For example, the device could have gone down, or the<br />
280
H<br />
Implementing a MUX-Based Network Interface Driver<br />
device was down but is now back on line. When such situations arise, the END<br />
should call muxError( ). This routine passes error information up to the MUX,<br />
which, in turn, passes the information on to all protocols that have registered a<br />
routine to receive it. The muxError( ) routine is declared as follows:<br />
void muxError<br />
(<br />
void* pCookie, /* pointer to END_OBJ */<br />
END_ERR* pError /* pointer to END_ERR structure */<br />
)<br />
Among its input, this routine expects a pointer to an end_err structure, which is<br />
declared in end.h as follows:<br />
typedef struct end_err<br />
{<br />
INT32 errCode; /* error code, see above */<br />
char* pMesg; /* NULL-terminated error message, can be NULL */<br />
void* pSpare; /* pointer to user defined data, can be NULL */<br />
} END_ERR;<br />
The error-receive routine that the protocol registers with the MUX must be of the<br />
following prototype:<br />
void xxError<br />
(<br />
END_OBJ* pEnd, /* pointer to END_OBJ */<br />
END_ERR* pError, /* pointer to END_ERR */<br />
void* pSpare /* pointer to protocol private data passed in muxBind */<br />
)<br />
The errCode member of an end_err structure is 32 bits long. Wind River reserves<br />
the lower 16 bits of errCode for its own error messages. However, the upper 16 bits<br />
are available to user applications. Use these bits to encode whatever error<br />
messages you need to pass between drivers and protocols. The currently defined<br />
error codes are as follows:<br />
H<br />
#define END_ERR_INFO 1 /* information only */<br />
#define END_ERR_WARN 2 /* warning */<br />
#define END_ERR_RESET 3 /* device has reset */<br />
#define END_ERR_DOWN 4 /* device has gone down */<br />
#define END_ERR_UP 5 /* device has come back on line */<br />
#define END_ERR_FLAGS 6 /* device flags have changed */<br />
#define END_ERR_NO_BUF 7 /* device’s cluster pool is exhausted */<br />
281
VxWorks 5.5<br />
<strong>BSP</strong> Developer’s <strong>Guide</strong><br />
These error codes have the following meaning:<br />
END_ERR_INFO<br />
This error is information only.<br />
END_ERR_WARN<br />
A non-fatal error has occurred.<br />
END_ERR_RESET<br />
An error occurred that forced the device to reset itself, but the device has<br />
recovered.<br />
END_ERR_DOWN<br />
A fatal error occurred that forced the device to go down. The device can no<br />
longer send or receive packets.<br />
END_ERR_UP<br />
The device was down but is now up again and can receive and send packets.<br />
END_ERR_BLOCK<br />
The device is busy, the transaction should be tried again later.<br />
END_ERR_FLAGS<br />
The device flags have changed.<br />
END_ERR_NO_BUF<br />
The device’s cluster pool is exhausted.<br />
H.5 Required Driver Entry Points and Structures<br />
This section describes the API for an END. It describes the structures that are<br />
essential to such a driver and the entry points you must implement in the driver.<br />
NOTE: The organization of an END does not follow the model for a standard<br />
VxWorks I/O driver. The driver is not accessible through the open( ) routine or<br />
other file I/O routines. The driver is organized to communicate with the MUX. The<br />
MUX then handles communication with the network protocols.<br />
282
H<br />
Implementing a MUX-Based Network Interface Driver<br />
H.5.1 Required Structures for a Driver<br />
Within your driver, you must allocate and initialize an END_OBJ. Your driver also<br />
needs to allocate and initialize the structures referenced in END_OBJ structures,<br />
such as DEV_OBJ, NET_FUNCS, and M2_INTERFACETBL. To pass packets up to the<br />
MUX, use an mBlk structure.<br />
Providing Network Device Abstraction: END_OBJ<br />
Your endLoad( ) entry point must allocate, initialize, and return an END_OBJ<br />
structure. The MUX uses this END_OBJ structure as a place to store the tools it<br />
needs to manipulate the stack and the device driver. These tools include data as<br />
well as pointers to functions. The END_OBJ structure is defined in end.h as follows:<br />
typedef struct end_object<br />
{<br />
NODE node; /* root of the device hierarchy */<br />
DEV_OBJ devObject; /* accesses your device’s ctrl struct */<br />
FUNCPTR receiveRtn; /* routine to call on reception */<br />
BOOL attached; /* indicates unit is attached */<br />
SEM_ID txSem; /* transmitter semaphore */<br />
long flags; /* various flags */<br />
struct net_funcs *pFuncTable; /* function table */<br />
M2_INTERFACETBL mib2Tbl; /* MIBII counters */<br />
struct ETHER_MULTI *pAddrList; /* head of the multicast address list */<br />
int nMulti; /* number of elements in the list */<br />
LIST protocols; /* protocol node list */<br />
BOOL snarfProto; /* is someone snarfing us? */<br />
void* pMemPool; /* memory cookie used by MUX bufr mgr. */<br />
M2_ID* pMib2Tbl; /* RFC 2233 MIB objects */<br />
} END_OBJ;<br />
H<br />
Your driver must set and manage some of these members. Other members are<br />
MUX-managed. To know which are which, read the following member<br />
descriptions:<br />
node<br />
The root of the device hierarchy. The MUX sets the value of this member. Your<br />
driver should treat it as opaque.<br />
devObject<br />
The DEV_OBJ structure for this device. Your driver must set this value at load<br />
time. See Tracking Your Device’s Control Structure: DEV_OBJ, p.285.<br />
receiveRtn<br />
A function pointer that references a muxReceive( ) function. The MUX<br />
supplies this pointer by the completion of the muxDevLoad( ) call that loads<br />
283
VxWorks 5.5<br />
<strong>BSP</strong> Developer’s <strong>Guide</strong><br />
this driver. Your driver uses this function pointer to pass data up to the<br />
protocol.<br />
attached<br />
A BOOL indicating whether or not the device is attached. The MUX sets and<br />
manages this value.<br />
txSem<br />
A semaphore that controls access to this device’s transmission facilities. The<br />
MUX sets and manages this value.<br />
flags<br />
A value constructed from ORing in IFF_* flag constants. Except for IFF_LOAN<br />
and IFF_SCAT, these constants are the same IFF_* flags associated with the<br />
TCP/IP stack.<br />
IFF_UP<br />
IFF_BROADCAST<br />
IFF_DEBUG<br />
IFF_LOOPBACK<br />
IFF_POINTOPOINT<br />
IFF_NOTRAILERS<br />
IFF_RUNNING<br />
IFF_NOARP<br />
IFF_PROMISC<br />
IFF_ALLMULTI<br />
IFF_OACTIVE<br />
IFF_SIMPLEX<br />
IFF_LINK0<br />
IFF_LINK1<br />
IFF_LINK2<br />
IFF_MULTICAST<br />
IFF_LOAN<br />
IFF_SCAT<br />
The interface driver is up.<br />
The broadcast address is valid.<br />
Debugging is on.<br />
This is a loopback net.<br />
The interface is a point-to-point link.<br />
The device must avoid using trailers.<br />
The device has successfully allocated needed<br />
resources.<br />
There is no address resolution protocol.<br />
This device receives all packets. n<br />
This device receives all multicast packets.<br />
Transmission in progress.<br />
The device cannot hear its own transmissions.<br />
A per link layer defined bit.<br />
A per link layer defined bit.<br />
A per link layer defined bit.<br />
The device supports multicast.<br />
The device supports buffer loaning.<br />
The device supports scatter/gather.<br />
pFuncTable<br />
A pointer to a net_funcs structure. This structure contains function pointers to<br />
your driver’s entry points for handling standard requests such as unload or<br />
send. Your driver must allocate and initialize this structure when the device is<br />
loaded. See Identifying the Entry Points into Your Network Driver: NET_FUNCS,<br />
p.286.<br />
284
H<br />
Implementing a MUX-Based Network Interface Driver<br />
mib2Tbl<br />
An M2_INTERFACETBL structure for tracking the MIB-II variables used in<br />
your driver. Your driver must initialize the structure referenced here, although<br />
both your driver and the MUX will later adjust the values stored in the table.<br />
NOTE: The mib2Tbl field is retained for backwards compatibility with RFC 1213.<br />
It is not recommended for new drivers. For new drivers, use the RFC 2233<br />
interface. For more information, see H.7 Converting an END Driver from RFC 1213<br />
to RFC 2233, p.311.<br />
pAddrList<br />
A pointer to the head of a list of multicast addresses. The MUX sets and<br />
manages this list, but it uses your driver’s endMCastAddrAdd( ),<br />
endMCastAddrDel( ), and endMCastAddrGet( ) entry points to do so.<br />
nMulti<br />
A value indicating the number of addresses on the list referenced in the<br />
multiList member. The MUX sets this value using the information returned by<br />
your driver’s endMCastAddrGet( ).<br />
protocols<br />
The head of the list of protocols that have bound themselves to this network<br />
driver. The MUX manages this list.<br />
snarfProto<br />
A BOOL indicating whether a packet-snarfing protocol has bound itself to this<br />
driver. Such a protocol can prevent the packet from passing on to lower<br />
priority protocols (see Snarfing Protocols Block Packets to Lower Priority Protocols,<br />
p.302). The MUX sets and manages this value.<br />
pMemPool<br />
A pointer to a netBufLib-managed memory pool. The MUX sets the value of<br />
this member. Treat it as opaque.<br />
pMib2Tbl<br />
The interface table for RFC 2233 compliance.<br />
H<br />
Tracking Your Device’s Control Structure: DEV_OBJ<br />
Your driver uses the DEV_OBJ structure to tell the MUX the name of your device<br />
and to hand the MUX a pointer to your device’s control structure. This control<br />
structure is a device-specific structure that you define according to your needs.<br />
Your driver uses this control structure to track things such as flags, memory pool<br />
285
VxWorks 5.5<br />
<strong>BSP</strong> Developer’s <strong>Guide</strong><br />
addresses, and so on. The information stored in the control structure is typically<br />
essential to just about every driver entry point. The DEV_OBJ structure is defined<br />
in end.h as follows:<br />
typedef struct dev_obj<br />
{<br />
char name[END_NAME_MAX]; /* device name */<br />
int unit; /* to support multiple units */<br />
char description[END_DESC_MAX]; /* text description */<br />
void* pDevice; /* pointer back to the device data. */<br />
} DEV_OBJ;<br />
name<br />
A pointer to a string of up to eight characters. This string specifies the name for<br />
this network device.<br />
pDevice<br />
A pointer to your driver’s internal control structure. To preserve the<br />
separation of the protocol and data link layers, the MUX treats the pDevice<br />
pointer as opaque. Thus, the MUX never needs know anything about your<br />
control structure. However, when calling your driver’s entry points, the MUX<br />
passes in a cookie (in all calls except the endLoad( ) call). This cookie is a<br />
pointer to the END_OBJ that you allocated in endLoad( ). Through this cookie,<br />
your entry point can get to its device control structure in<br />
pCookie.devObject.pDevice.<br />
unit<br />
This is the unit number for the particular named device. Unit numbers start at<br />
0 and increase for every device controlled by the same driver. For example, if<br />
a system has two Lance Ethernet devices (named ln) then the first one is ln0<br />
and the second is ln1. If the same system also has a DEC 21x40 Ethernet then<br />
that device (whose name is dc) is dc0.<br />
description<br />
This is a text description of the device driver. For example, the Lance Ethernet<br />
driver puts the string, “AMD 7990 Lance Ethernet Enhanced Network Driver”<br />
into this location. This string is displayed if muxShow( ) is called.<br />
Identifying the Entry Points into Your Network Driver: NET_FUNCS<br />
The MUX uses the NET_FUNCS structure to maintain a table of entry points into<br />
your END. The NET_FUNCS structure is defined as follows:<br />
286
H<br />
Implementing a MUX-Based Network Interface Driver<br />
typedef struct net_funcs<br />
{<br />
STATUS (*start) (void*); /* driver’s start func */<br />
STATUS (*stop) (void*); /* driver’s stop func */<br />
STATUS (*unload) (void*); /* Driver’s unload func */<br />
int (*ioctl) (void*, int, caddr_t); /* driver’s ioctl func */<br />
STATUS (*send) (void* , M_BLK_ID); /* driver’s send func */<br />
STATUS (*mCastAddrAdd) (void*, char*); /* driver’s mcast add func */<br />
STATUS (*mCastAddrDel) (void*, char*); /* driver’s mcast delete func */<br />
STATUS (*mCastAddrGet) (void*, MULTI_TABLE*);<br />
/* driver’s mcast get fun. */<br />
STATUS (*pollSend) (void*, M_BLK_ID); /* driver’s poll send func */<br />
STATUS (*pollRcv) (void*, M_BLK_ID); /* driver’s poll receive func */<br />
STATUS (*addressForm) (M_BLK_ID, M_BLK_ID, M_BLK_ID);<br />
/* driver’s addr formation func */<br />
STATUS (*packetDataGet) (M_BLK_ID, M_BLK_ID);<br />
/* driver’s pkt data get func */<br />
STATUS (*addrGet) (M_BLK_ID, M_BLK_ID, M_BLK_ID, M_BLK_ID, M_BLK_ID);<br />
/* driver’s pkt addr get func */<br />
} NET_FUNCS;<br />
Within your endLoad( ), initialize these members to point to the appropriate<br />
driver entry points. Thus, start should contain a pointer to your endStart( ), stop<br />
to your endStop( ), unload to your endUnload( ), and so on.<br />
Tracking Link-Level Information: LL_HDR_INFO<br />
The MUX uses LL_HDR_INFO structures to keep track of link-level header<br />
information associated with packets passed from an END to the MUX and from<br />
there up to a protocol. An LL_HDR_INFO structure is passed as an argument to all<br />
stack receive routines (see, Passing a Packet Up to the Protocol: stackRcvRtn( ), p.307).<br />
H<br />
typedef struct llHdrInfo<br />
{<br />
int destAddrOffset; /* destination addr offset in mBlk */<br />
int destSize; /* destination address size */<br />
int srcAddrOffset; /* source address offset in mBlk */<br />
int srcSize; /* source address size */<br />
int ctrlAddrOffset; /* control info offset in mBlk */<br />
int ctrlSize; /* control info size */<br />
int pktType; /* type of the packet */<br />
int dataOffset; /* data offset in the mBlk */<br />
} LL_HDR_INFO;<br />
destAddrOffset<br />
Offset into mBlk structure at which the destination address starts.<br />
destSize<br />
Size of destination address.<br />
287
VxWorks 5.5<br />
<strong>BSP</strong> Developer’s <strong>Guide</strong><br />
srcAddrOffset<br />
Offset into mBlk structure at which the source address starts.<br />
srcSize<br />
Size of source address.<br />
ctrlAddrOffset<br />
Reserved for future use.<br />
ctrlSize<br />
Reserved for future use.<br />
pktType<br />
Type of packet. For a list of valid packet types, see RFC 1700.<br />
dataOffset<br />
Offset into mBlk structure at which the packet data starts.<br />
Tracking Data That Passes Between the Driver and the Protocol: mBlk<br />
Use mBlk structures as a vehicle for passing packets between the driver and<br />
protocol layers. The mBlk structure is defined in netBufLib.h as follows:<br />
typedef struct mBlk<br />
{<br />
M_BLK_HDR mBlkHdr; /* header */<br />
M_PKT_HDR mBlkPktHdr; /* pkthdr */<br />
CL_BLK * pClBlk; /* pointer to cluster blk */<br />
} M_BLK;<br />
mBlkHdr<br />
Contains a pointer to an mHdr structure. For the most part, you should have<br />
no need to access or set this member directly and can treat it as opaque. The<br />
only exception is when you must chain this mBlk to another. In that case, you<br />
need to set the value of mBlk.mHdr.mNext or mBlk.mBlkHdr.mNextPkt or<br />
both. Use mBlk.mBlkHdr.mNext to point to the next mBlk in a chain of<br />
mBlks. Use mBlk.mHdr.mNextPkt to point to an mBlk that contains the head<br />
of the next packet.<br />
mBlkPktHdr<br />
Contains a pointer to an pktHdr structure. You should have no need to access<br />
or set this member directly and can treat it as opaque.<br />
pClBlk<br />
Contains a pointer to an clBlk structure. You should have no need to access or<br />
set this member directly and can treat it as opaque. However, if you are not<br />
288
H<br />
Implementing a MUX-Based Network Interface Driver<br />
using netBufLib to manage the driver’s memory pool, you must provide your<br />
own memory free routine for its associated cluster. To do this, you must update<br />
mBlk.pClBlk.pClFreeRtn to point to your customized free routine. This<br />
routine must use the same API as the netBufLib free routine. This means that<br />
the mBlk.pClBlk.pFreeArg1, mBlk.pClBlk.pFreeArg2, and<br />
mBlk.pClBlk.pFreeArg3 members must also be updated.<br />
Setting appropriate values for the members shown above (and the members of all<br />
the referenced structures) is just a matter of calling the appropriate netBufLib<br />
routines for the creation of an mBlk/clBlk/cluster construct. For more<br />
information, see H.3.1 Setting Up and Using a Memory Pool for Receive and Transmit<br />
Buffers, p.276.<br />
H.5.2 Required Driver Entry Points<br />
The names of all entry points described in this section begin with the prefix end.<br />
This indicates that they are generic driver entry points. Within your particular<br />
network driver, the specific entry points should use a prefix that indicates the<br />
driver of which they are a part. For example, you would use an ln prefix in the<br />
entry points associated with the AMD Lance driver. Thus, your network interface<br />
driver would define the entry points lnLoad( ), lnUnload( ), lnReceive( ), and so<br />
on.<br />
This naming convention for driver entry point is a matter of good coding practice.<br />
Because VxWorks references these entry points using the function pointers you<br />
loaded into a NET_FUNCS structure, you are free to follow other conventions for<br />
assigning names to entry points.<br />
H<br />
Table H-1<br />
Required Driver Entry Points<br />
Routine<br />
endLoad( )<br />
endUnload( )<br />
endStart( )<br />
endStop( )<br />
endSend( )<br />
endIoctl( )<br />
endMCastAddrAdd( )<br />
Purpose<br />
Initialize the driver and load it into the MUX.<br />
Free driver resources.<br />
Start the driver.<br />
Stop the driver.<br />
Send a packet out on the hardware.<br />
Access driver control functions.<br />
Add an address to the device’s multicast address list.<br />
289
VxWorks 5.5<br />
<strong>BSP</strong> Developer’s <strong>Guide</strong><br />
Table H-1<br />
Required Driver Entry Points (Continued)<br />
Routine<br />
endMCastAddrDel( )<br />
endMCastAddrGet( )<br />
endPollSend( )<br />
endPollReceive( )<br />
endAddressForm( )<br />
endPacketDataGet( )<br />
endPacketAddrGet( )<br />
Purpose<br />
Delete an address from the device’s multicast address list.<br />
Get the list of multicast addresses maintained for this device.<br />
Do a polling send.<br />
Do a polling receive.<br />
Add the appropriate link-level information into a mBlk in<br />
preparation for transmission.<br />
Extract packet data (omitting link-level information) from one<br />
mBlk and write it to another.<br />
Extract address information (omitting packet data) from one<br />
mBlk and write out each source and destination address to its<br />
own mBlk. For an Ethernet packet, this requires two output<br />
mBlks. However, for some non-Ethernet packets, this could<br />
require as many as four output mBlks because the local source<br />
and destination addresses can differ from the ultimate source and<br />
destination addresses.<br />
! WARNING: If you are porting a driver from the BSD 4.3 model, you might be<br />
tempted to use the existing xxIoctl( ) entry point as your endIoctl( ) entry point,<br />
skipping the creation of separate entry points for the various MCastAddr entry<br />
points. Do not do this. Your driver must implement all entry points shown in<br />
Table H-1.<br />
Loading the Device: endLoad( )<br />
Your endLoad( ) entry point serves the same function that the attach( ) entry points<br />
do under the 4.3 BSD based system. endLoad( ) is the initial entry point into every<br />
network interface driver. The tUserRoot task specifies your endLoad( ) as an input<br />
parameter when it calls muxDevLoad( ) to load your driver.<br />
Your endLoad( ) must take the following form:<br />
290
H<br />
Implementing a MUX-Based Network Interface Driver<br />
END_OBJ* endLoad<br />
(<br />
char* initString<br />
)<br />
/* a string encoded for the device to use for its<br />
/* initialization arguments. */<br />
Within your endLoad( ), you must handle any device-specific initialization. You<br />
should also set values for most of the members of the END_OBJ. Of particular<br />
interest are the END_OBJ members receiveRtn, pFuncTable, and devObject. See<br />
the member descriptions provided in Providing Network Device Abstraction:<br />
END_OBJ, p.283.<br />
endLoad( ) should return a pointer to an initialized END_OBJ structure. If an error<br />
occurred, return ERROR.<br />
The parameter is:<br />
initString<br />
Passes in any initialization arguments needed.<br />
Unloading the Device: endUnload( )<br />
Your endUnload( ) entry point should handle everything needed to remove this<br />
network driver from the system. Within your endUnload( ), you should handle<br />
things such as cleanup for all the local data-structures. Your endUnload( ) does not<br />
need to worry about notifying protocols about unloading the device. Before calling<br />
your endUnload( ), the MUX sends a shutdown notice to each protocol attached to<br />
the device.<br />
Your endUnload( ) must take the following form:<br />
H<br />
void endUnload<br />
(<br />
void* pCookie /* pointer to device-identifying END_OBJ */<br />
)<br />
This function is declared as void and thus should return no function value.<br />
The parameters are:<br />
pCookie<br />
Passes a pointer to the END_OBJ structure returned by endLoad( ). In your<br />
endUnload( ), you will probably want to free its associated memory.<br />
Be sure to delete any semaphores that were created in the driver.<br />
291
VxWorks 5.5<br />
<strong>BSP</strong> Developer’s <strong>Guide</strong><br />
Providing an Opaque Control Interface to Your Driver: endIoctl( )<br />
Your endIoctl( ) entry point should handle all requests for changes to the state of<br />
the device, such as bringing it up, shutting it down, turning on promiscuous mode,<br />
and so on. You can also use your endIoctl( ) is to provide access to MIB-II interface<br />
statistics.<br />
! WARNING: If you are porting a driver from the BSD 4.3 model, you might be<br />
tempted to use the existing xxIoctl( ) entry point as your endIoctl( ) entry point,<br />
skipping the creation of separate entry points for the MCastAddr entry points. Do<br />
not do this! Your driver must implement all entry points shown in Table H-1.<br />
Your endIoctl( ) must take the following form:<br />
STATUS endIoctl<br />
(<br />
void* pCookie, /* pointer to device-identifying END_OBJ */<br />
int cmd, /* value identifying command */<br />
caddr_t data /* data needed to complete command */<br />
)<br />
This function should return OK or ERROR. If an error occurs, it should set errno.<br />
The parameters are:<br />
pCookie<br />
Passes a pointer to the END_OBJ structure returned by endLoad( ).<br />
cmd<br />
Can pass any of the values shown in the first column of Table H-2. Your<br />
endIoctl( ) must have an appropriate response to each.<br />
data<br />
Passes the data or a pointer to the data that your endIoctl( ) needs to carry out<br />
the command specified in cmd.<br />
Table H-2<br />
Ioctl Commands and Data Types<br />
Command Function Data Type<br />
EIOCSFLAGS Set device flags. int; see description of<br />
END_OBJ.flags (flags, p.284)<br />
EIOCGFLAGS Get device flags. int<br />
EIOCSADDR Set device address. char*<br />
EIOCGADDR Get device address. char*<br />
292
H<br />
Implementing a MUX-Based Network Interface Driver<br />
Table H-2<br />
Ioctl Commands and Data Types (Continued)<br />
Command Function Data Type<br />
EIOCMULTIADD Add multicast address. char*<br />
EIOCMULTIDEL Delete multicast address. char*<br />
EIOCMULTIGET Get multicast list. MULTI_TABLE*<br />
EIOCPOLLSTART Set device into polling mode. NULL<br />
EIOCPOLLSTOP Set device into interrupt mode. NULL<br />
EIOCGFBUF Get minimum first buffer for chaining. int<br />
EIOCGMIB2<br />
Get the MIB-II counters from the<br />
driver.<br />
M2_INTERFACETBL*<br />
Sending Data Out on the Device: endSend( )<br />
The MUX calls your endSend( ) entry point when it has data to send out on the<br />
device. Your endSend( ) must take the following form:<br />
STATUS endSend<br />
(<br />
void* pCookie, /* device structure */<br />
M_BLK_ID pMblk, /* data to send */<br />
)<br />
This function should return OK, ERROR, or END_ERR_BLOCK.<br />
The value END_ERROR_BLOCK should be returned if the packet cannot be<br />
transmitted at this time because it is in polling mode, or because of a lack of<br />
resources. In either case, the packet is not freed from the mBlk chain.<br />
The value OK is returned upon successful acceptance of the data packet. If an error<br />
occurs then ERROR is returned and errno should be set. In these cases, the data<br />
packet is freed from the mBlk chain.<br />
The parameters are:<br />
pCookie<br />
Passes a pointer to the END_OBJ structure returned by endLoad( ).<br />
H<br />
293
VxWorks 5.5<br />
<strong>BSP</strong> Developer’s <strong>Guide</strong><br />
pMblk<br />
Passes a pointer to an mBlk structure containing the data you want to send.<br />
For more information on how to setup an mBlk, see H.3.1 Setting Up and Using<br />
a Memory Pool for Receive and Transmit Buffers, p.276.<br />
Starting a Stopped but Loaded Driver: endStart( )<br />
Your endStart( ) entry point should do whatever is necessary to make the driver<br />
active. For example, it should register your device driver’s interrupt service<br />
routine.Your endStart( ) must take the following form:<br />
Status endStart<br />
(<br />
void* pCookie /* pointer to device-identifying END_OBJ structure */<br />
)<br />
This function should return OK or ERROR. If an error occurs, it should set errno.<br />
The parameters are:<br />
pCookie<br />
Passes a pointer to the END_OBJ structure returned by endLoad( ).<br />
However, your endStart( ) should probably include this pointer as a<br />
parameter to the sysIntConnect( ) call that it uses to register your ISR. Your<br />
ISR might not have any direct use for this END_OBJ pointer, but it should pass<br />
it in to the driver entry point that handles task-level processing for packet<br />
reception.<br />
When it comes time to pass the packet up to the MUX, your driver must call<br />
the MUX-supplied function referenced in pCookie.receiveRtn. See Providing<br />
Network Device Abstraction: END_OBJ, p.283.<br />
Stopping the Driver Without Unloading It: endStop( )<br />
Your endStop( ) entry point can assume that the driver is already loaded and that<br />
somebody has already called endLoad( ). Within your endStop( ), you should do<br />
whatever is necessary to make the driver inactive without actually unloading the<br />
driver. Your endStop( ) must take the following form:<br />
STATUS endStop<br />
(<br />
void* pCookie /* pointer to a device-identifying END_OBJ structure */<br />
)<br />
294
H<br />
Implementing a MUX-Based Network Interface Driver<br />
This function should return OK or ERROR. If an error occurs, it should set errno.<br />
The parameters are:<br />
pCookie<br />
Passes in a pointer to the END_OBJ structure returned by endLoad( ).<br />
Handling a Polling Send: endPollSend( )<br />
Your endPollSend( ) is used by any task (such as the debug agent) that wants to<br />
do a polling send. Thus, your endPollSend( ) must be able to put a packet directly<br />
onto the network stack without queuing a packet on an output queue.<br />
NOTE: When the system calls your endPollSend( ), it is probably in a mode that<br />
cannot service kernel calls. Thus, this entry point should not call any kernel<br />
functions, such as taking a semaphore or allocating memory. Likewise, this entry<br />
point should not block or busy wait because that would probably hang the entire<br />
system.<br />
Your endPollSend( ) must take the following form:<br />
STATUS endPollSend<br />
(<br />
void* pCookie, /* device structure */<br />
M_BLK_ID pMblk, /* data to send */<br />
)<br />
Within your endPollSend( ), check that the device is set to polled mode (by a<br />
previous endIoctl( ) call). Your endPollSend( ) should then put the packet (passed<br />
using pNBuff) directly onto the network. Your endPollSend( ) bypasses queuing<br />
the packet on any output queue.<br />
This function should return OK or ERROR. If an error occurs, it should set errno.<br />
The parameters are:<br />
pCookie<br />
Passes a pointer to the END_OBJ structure returned by endLoad( ).<br />
pMblk<br />
Passes a pointer to an mBlk structure containing the data you want to send.<br />
For information on setting up an mBlk, see H.3.1 Setting Up and Using a<br />
Memory Pool for Receive and Transmit Buffers, p.276.<br />
H<br />
295
VxWorks 5.5<br />
<strong>BSP</strong> Developer’s <strong>Guide</strong><br />
Handling a Polling Receive: endPollReceive( )<br />
Your endPollReceive( ) is used by any task (such as the debug agent) that wants<br />
to do a polling receive.<br />
NOTE: When the system calls your endPollReceive( ), it is probably in a mode that<br />
cannot service kernel calls. Thus, this entry point should not call any kernel<br />
functions, such as taking a semaphore or allocating memory. Likewise, this entry<br />
point should not block or busy wait because that would probably hang the entire<br />
system.<br />
Your endPollReceive( ) must take the following form:<br />
int endPollReceive<br />
(<br />
void* pCookie, /* device structure */<br />
M_BLK_ID pMblk /* place to return the data */<br />
)<br />
Your endPollReceive( ) should check that the device is set to polled mode (by a<br />
previous endIoctl( ) call). Your endPollReceive( ) should then get a packet directly<br />
from the network and copy it to the mBlk passed in by the pMblk parameter.<br />
Your endPollReceive( ) entry point should return OK or an appropriate error<br />
value. One likely error return value is EAGAIN. Your endPollReceive( ) should<br />
return EAGAIN if the submitted mBlk was not big enough to contain the received<br />
packet, or if no packet is available.<br />
The parameters are:<br />
pCookie<br />
Passes a pointer to the END_OBJ structure returned by endLoad( ).<br />
pMblk<br />
Passes in a pointer to an mBlk structure. This parameter is an output<br />
parameter. Your endPollReceive( ) must copy the data from the stack to the<br />
mBlk structure referenced here.<br />
Adding a Multicast Address: endMCastAddrAdd( )<br />
Your endMCastAddAddr( ) entry point must add an address to the multicast table<br />
that is maintained by the device. Your endMCastAddAddr( ) must take the<br />
following form:<br />
296
H<br />
Implementing a MUX-Based Network Interface Driver<br />
STATUS endMCastAddAddr<br />
(<br />
void* pCookie, /* pointer to a device-identifying END_OBJ structure */<br />
char* pAddress /* pointer to address to add */<br />
)<br />
To help you manage a list of multicast addresses, VxWorks provides the library<br />
etherMultiLib.<br />
This function should return OK or ERROR. If an error occurs, it should set errno.<br />
The parameters are:<br />
pCookie<br />
Passes in a pointer to the END_OBJ structure returned by endLoad( ).<br />
pAddress<br />
Passes in a pointer to the address you want to add to the list. To help you<br />
manage a list of multicast addresses, VxWorks includes the library,<br />
etherMultiLib.<br />
Within your endMCastAddrAdd( ), you must reconfigure the interface in a<br />
hardware-specific way. This reconfiguration should let the driver receive<br />
frames from the specified address and then pass those frames up to the higher<br />
layer.<br />
Deleting a Multicast Address: endMCastAddrDel( )<br />
Your endMCastAddrDel( ) entry point must delete an address from the multicast<br />
table maintained by the device. Your endMCastAddrDel( ) must take the<br />
following form:<br />
H<br />
STATUS endMCastDelAddr<br />
(<br />
void* pCookie, /* pointer to a device-identifying END_OBJ structure */<br />
char* pAddress /* pointer to address to delete */<br />
)<br />
This function should return OK or ERROR. If an error occurred, it should set errno.<br />
The parameters are:<br />
pCookie<br />
Passes a pointer to the END_OBJ structure returned by endLoad( ).<br />
pAddress<br />
Passes a pointer to the address you must delete. To help you manage a list of<br />
multicast addresses, VxWorks includes the library, etherMultiLib.<br />
297
VxWorks 5.5<br />
<strong>BSP</strong> Developer’s <strong>Guide</strong><br />
Your endMCastAddrDel( ) must also reconfigure the driver (in a<br />
hardware-specific way) so that the driver longer receives frames with the<br />
specified address.<br />
Getting the Multicast Address Table: endMCastAddrGet( )<br />
Your endMCastAddrGet( ) must get a table of multicast addresses and return it in<br />
the buffer referenced in the pMultiTable parameter. These addresses are the list of<br />
multicast addresses to which the interface is currently listening. Your<br />
endMCastAddrGet( ) must take the following form:<br />
STATUS endMCastGetAddr<br />
(<br />
void* pCookie,<br />
MULTI_TABLE* pMultiTable<br />
)<br />
To get the list of multicast address, use the routines provided in etherMultiLib.<br />
This function should return OK or ERROR. If an error occurs, it should set errno.<br />
The parameters are:<br />
pCookie<br />
Passes in a pointer to the END_OBJ structure you returned from your<br />
endLoad( ).<br />
pMultiTable<br />
Passes in a pointer to a buffer. This is an output parameter. Your<br />
endMCastAddrGet( ) must write a MULTI_TABLE structure into the<br />
referenced buffer. end.h defines MULTI_TABLE as follows:<br />
typedef struct<br />
{<br />
long len; /* length of table in bytes */<br />
char *pTable; /* pointer to entries */<br />
} MULTI_TABLE;<br />
Modify the len member of the MULTI_TABLE to indicate just how many<br />
addresses you are returning. Write the addresses to the buffer referenced in the<br />
pTable member of the MULTI_TABLE.<br />
298
H<br />
Implementing a MUX-Based Network Interface Driver<br />
Forming an Address into a Packet for Transmission: endAddressForm( )<br />
The endAddressForm( ) routine must take a source address and a destination<br />
address and copy the information into the data portion of the mBlk structure in a<br />
fashion appropriate to the link level. Implementing this functionality is the<br />
responsibility of the driver writer, although some common cases are provided for<br />
in endLib. After adding the addresses to mBlk, your endAddressForm( ) routine<br />
should adjust the mBlk.mBlkHdr.mLen and mBlk.mBlkHdr.mData members<br />
accordingly. This routine must take the following form:<br />
M_BLK_ID endAddressForm<br />
(<br />
M_BLK_ID pMblk, /* packet data */<br />
M_BLK_ID pSrcAddress, /* source address */<br />
M_BLK_ID pDstAddress /* destination address */<br />
)<br />
This function returns an M_BLK_ID, which is potentially the head of a chain of<br />
mBlk structures.<br />
If the cluster referenced by pMblk does not have enough room to contain both the<br />
header and the packet data, this routine must reserve an additional<br />
mBlk/clBlk/cluster construct to contain the header. This routine must then chain<br />
the mBlk in pMblk onto the just-reserved header mBlk and returns a pointer to the<br />
header mBlk as the function value.<br />
The parameters are:<br />
pMblk<br />
The mBlk that contains the packet to be transmitted.<br />
pSrcAddress<br />
The mBlk that contains the link-level address of the source.<br />
pDstAddress<br />
The mBlk that contains the link-level address of the destination.<br />
H<br />
Getting a Data-Only mBlk: endPacketDataGet( )<br />
This routine must provide a duplicate mBlk that contains packet data in the<br />
original but skips the header information. Some common cases are provided for in<br />
endLib. This routine should return OK or ERROR and set errno if an error occurs.<br />
299
VxWorks 5.5<br />
<strong>BSP</strong> Developer’s <strong>Guide</strong><br />
The routine is of the following form:<br />
STATUS endPacketDataGet<br />
(<br />
M_BLK_ID pBuff, /* packet data and address information */<br />
LL_HDR_INFO* pLinkHdrInfo /* structure to hold link-level info. */<br />
)<br />
The parameters are:<br />
pBuff<br />
Expects a pointer to the mBlk that still contains both header and packet data.<br />
pLinkHdrInfo<br />
Returns an LL_HDR_INFO structure containing header information that is<br />
dependent upon the particular data-link layer that the END implements. For<br />
more information, see Tracking Link-Level Information: LL_HDR_INFO, p.287.<br />
Return Addressing Information: endPacketAddrGet( )<br />
This routine must retrieve the address information associated with a packet. Some<br />
common cases are provided in endLib. The last two parameters are used for<br />
networks where the hardware source and destination addresses at the ultimate<br />
endpoint can differ from the local source and destination addresses. This routine<br />
should return OK or ERROR. If there is an error, it must set errno.<br />
The routine is of the following form:<br />
STATUS endPacketAddrGet<br />
(<br />
M_BLK_ID pMblk, /* M_BLK_ID of the packet */<br />
M_BLK_ID pSrc, /* local source of packet */<br />
M_BLK_ID pDst, /* local destination of packet */<br />
M_BLK_ID pESrc, /* end source of packet */<br />
M_BLK_ID pEDst /* end destination of packet */<br />
)<br />
pMblk<br />
Expects a pointer to the mBlk structure from which you want to extract<br />
address information.<br />
pSrc<br />
Expects NULL or a pointer to the mBlk structure into which to write the<br />
extracted source address (local) of the packet.<br />
300
H<br />
Implementing a MUX-Based Network Interface Driver<br />
pDst<br />
Expects NULL or a pointer to the mBlk structure into which to write the<br />
extracted destination address (local) of the packet.<br />
pESrc<br />
Expects NULL or a pointer to the mBlk structure into which to write the<br />
extracted source address (end, if different) of the packet.end source of packet.<br />
pEDst<br />
Expects NULL or a pointer to the mBlk structure into which to write the<br />
extracted destination address (end, if different) of the packet.<br />
H.6 Writing Protocols That Use the MUX API<br />
This section describes how to port protocols to the MUX-based model. As shown<br />
in Figure H-1, MUX-based protocols bind themselves to the MUX from above and<br />
network interface drivers (ENDs) bind themselves to the MUX from below. Thus,<br />
a protocol is layered on top of the MUX, which is layered on top of a network<br />
interface driver. The responsibilities of each is given in Table H-3.<br />
Table H-3<br />
Layers and Responsibilities<br />
Layer<br />
Protocol<br />
MUX<br />
Network<br />
Interface Driver<br />
Responsibilities<br />
Interface to the transport layer, and, through it, to application programs.<br />
Copying packet data if needed.<br />
Loading and unloading drivers.<br />
Binding and unbinding protocols.<br />
Calling each bound protocol’s receive routine.<br />
Managing memory for buffer loaning.<br />
Dealing with hardware.<br />
Loading a driver into the system.<br />
Unloading a driver from the system.<br />
Loaning buffers to upper layers.<br />
H<br />
301
VxWorks 5.5<br />
<strong>BSP</strong> Developer’s <strong>Guide</strong><br />
A protocol writer has to deal only with calls to the MUX. Everything<br />
device-specific is handled in the drivers of the data link layer, the layer below the<br />
MUX.<br />
Protocol Startup<br />
Each protocol that wants to receive packets must first attach itself to the MUX. To<br />
do this, the protocol calls muxBind( ). The returned function value is a “cookie”<br />
that identifies the network interface driver to which the MUX has bound the<br />
protocol. The protocol must save this cookie for use in subsequent calls to the<br />
MUX.<br />
As input to the muxBind( ), you must specify the name of a network device (for<br />
example, ln and 0, ln and 1, ei and 0, and so on), the appropriate receive, restart,<br />
and shutdown functions for the protocol, a protocol type (from RFC 1700), and a<br />
name for the attaching protocol.<br />
The MUX uses the protocol type to prioritize the protocols. This priority<br />
determines which protocol sees packets first. When a driver passes a packet up to<br />
the MUX, the driver includes a pointer to its END_OBJ structure. Included in this<br />
structure is the member, protocols, the head of the list of protocols (a list of<br />
NET_PROTOCOL structures) listening to this device. The order of the protocols in<br />
this list determines the order in which the protocols see the packet. Maintaining<br />
this list is the responsibility of the MUX.<br />
If a protocol specifies a type of MUX_PROTO_SNARF in its muxBind( ), the MUX<br />
adds the protocol to the top of the list in END_OBJ.protocols. At any given<br />
moment, the MUX allows only one active protocol of type MUX_PROTO_SNARF.If<br />
a protocol specifies a type of MUX_PROTO_PROMISC in its muxBind( ), the MUX<br />
adds the protocol to the bottom of the list in END_OBJ.protocols. If a protocol<br />
specifies any other type in its muxBind( ), the MUX adds the protocol to the list just<br />
after the MUX_PROTO_SNARF protocol (or the top of the list if there is no protocol<br />
of type MUX_PROTO_SNARF).<br />
This shuffling of protocols ensures that lower priority protocols cannot steal or<br />
damage a packet before a higher priority protocol gets to see the packet.<br />
Snarfing Protocols Block Packets to Lower Priority Protocols<br />
If the receive routine for a protocol returns TRUE, and, if the protocol is not of type<br />
MUX_PROTO_PROMISC, the MUX lets the protocol snarf the packet (that is, the<br />
MUX lets the protocol take delivery of the packet). If a protocol takes delivery of<br />
302
H<br />
Implementing a MUX-Based Network Interface Driver<br />
the packet, the MUX does not show the packet to any of the other protocols further<br />
down on the END_OBJ.protocols list.<br />
If you want a protocol to act as a firewall, the protocol should register as type<br />
MUX_PROTO_SNARF and should return TRUE from its receive function. If you<br />
want a protocol to see all uneaten packets that show up on the device, register the<br />
protocol with type MUX_PROTO_PROMISC.<br />
Protocols and Network Addressing<br />
The system is written to support both RFC 894 type Ethernet packets as well as<br />
802.3 encoded packets. If a protocol wants to use 802.3 style packets, it must<br />
register SAP (Service Access Point) as its protocol type. Otherwise, the protocol<br />
must use one of the accepted protocol types from RFC 1700.<br />
Output Protocols<br />
A single protocol can be bound to each device for the filtering of output packets.<br />
This functionality is provided for applications that want to look at every packet<br />
that is output on a particular device. The type MUX_PROTO_OUTPUT is passed<br />
into muxBind( ) when this protocol is registered. Only the stackRcvRtn parameter<br />
is valid with this type.<br />
Sending Data<br />
To put the appropriate address header information into the buffer, the protocol<br />
calls muxAddressForm( ). Finally, to send the packet, the protocol calls<br />
muxSend( ), passing in the cookie returned from the muxBind( ) as well as the<br />
mBlk that contains the packet it wants to send. The MUX then hands the packet to<br />
the driver.<br />
H<br />
Receiving Data<br />
In response to an interrupt from the network device, VxWorks executes the<br />
device’s previously registered interrupt service routine. This routine gets the<br />
packet off the device and queues it for processing the task level, where the driver<br />
prepares the packet for hand-off to the MUX. For a more detailed description of<br />
this process, see H.3 <strong>Guide</strong>lines for Handling Packet Reception in Your Driver, p.275.<br />
To hand the packet off to the MUX, the driver calls muxReceive( ). The<br />
muxReceive( ) routine determines the protocol type of the packet (0x800 for IP,<br />
303
VxWorks 5.5<br />
<strong>BSP</strong> Developer’s <strong>Guide</strong><br />
0x806 for ARP, and so on) and then searches its protocol list to see if any have<br />
registered using this protocol type.<br />
If there is a protocol that can handle this packet, the MUX passes the packet into<br />
the stackRcvRtn( ) specified in the protocol’s muxBind( ) call. Before passing the<br />
packet to a numbered protocol (that is, a protocol that is neither a<br />
MUX_PROTO_SNARF nor a MUX_PROTO_PROMISC protocol) muxReceive( ) calls<br />
the muxPacketDataGet( ) routine and passes two mBlks into the protocol.<br />
The first mBlk contains all the link-level information. The second mBlk contains<br />
all the information that comes just after the link-level header. This partitioning of<br />
the data lets the protocol skip over the header information (it also breaks the BSD<br />
4.3 model at the do_protocol_with_type( ) interface). The protocol then takes over<br />
processing the packet.<br />
This new method of multiplexing received packets does away with the method<br />
based on the etherInputHook( ) and etherOutputHook( ) routines. If a protocol<br />
wants to see all the undelivered packets received on an interface, it specifies its<br />
type as MUX_PROTO_PROMISC.<br />
If a protocol needs to modify data received from the network, it should copy that<br />
data first. Because other protocols might also want to see the raw data, the data<br />
should not be modified in place (that is, in the received buffer).<br />
Supporting Scatter/Gather Devices<br />
Some devices support breaking up a single network packet into separate chunks<br />
of memory. This makes it possible to pass a packet down (such as list of mbufs from<br />
a Berkeley-type TCP/IP protocol) as a chain of mBlk/clBlk/cluster constructs.<br />
Each mBlk in the chain is linked to the next mBlk using the<br />
mBlk.mBlkHdr.mNext member. The driver deals with the chain appropriately on<br />
transmission.<br />
Protocol Transmission Restart<br />
One of the features of the MUX/END API is to allow a device to tell a protocol<br />
when it has run out of resources. Protocols usually have a queue of packets that<br />
they are trying to transmit. If the device returns an END_ERR_BLOCK from a<br />
muxSend( ) call, the device is out of the resources necessary to send the data. The<br />
protocol should now stop transmitting. After the device knows that it has the<br />
resources necessary to transmit again, it can call the muxTxRestart( ) routine<br />
which in turn calls the stackTxRestartRtn( ) of each protocol attached to that<br />
304
H<br />
Implementing a MUX-Based Network Interface Driver<br />
particular device. Your protocol should implement a restart routine so that it can<br />
take advantage of this system.<br />
Protocol Shutdown<br />
When a protocol is finished using an interface, or for some reason wants to shut<br />
itself down, it calls the muxUnbind( ) routine. This routine tells the MUX to<br />
deallocate the NET_PROTOCOL and other memory allocated specifically for the<br />
protocol.<br />
H.6.1 Protocol to MUX API<br />
This section presents the routines and data structures that the protocol uses to<br />
interact with the MUX. Most of the work is handled by the MUX routines (listed in<br />
Table H-4). Unlike the driver entry points described earlier, you do not implement<br />
the MUX routines. These routines are utilities that you can call from within your<br />
protocol. For specific information on these MUX routines, see the appropriate<br />
reference entry.<br />
However, these MUX routines do not comprise the entire MUX/protocol interface.<br />
In addition, a protocol must implement a set of standardized routines that handle<br />
things such as shutting down the protocol, restarting the protocol, passing data up<br />
to the protocol, and passing error messages up to the protocol.<br />
Table H-4<br />
MUX Interface Routines<br />
MUX Routine<br />
muxDevLoad( )<br />
muxDevStart( )<br />
muxBind( )<br />
muxSend( )<br />
muxDataPacketGet( )<br />
muxAddressForm( )<br />
muxIoctl( )<br />
muxMCastAddrAdd( )<br />
Purpose<br />
Loads a device into the MUX.<br />
Starts a device from the MUX.<br />
Hooks a protocol to the MUX.<br />
Accepts a packet from the protocol and passes it to the device.<br />
Gets an mBlk containing packet data only. The link-level<br />
header information is omitted.<br />
Forms an address into an outgoing packet.<br />
Accesses control functions.<br />
Adds a multicast address to the list maintained for a device.<br />
H<br />
305
VxWorks 5.5<br />
<strong>BSP</strong> Developer’s <strong>Guide</strong><br />
Table H-4<br />
MUX Interface Routines (Continued)<br />
MUX Routine<br />
muxMCastAddrDel( )<br />
muxMCastAddrGet( )<br />
muxUnbind( )<br />
muxDevStop( )<br />
muxDevUnload( )<br />
muxPacketDataGet( )<br />
muxPacketAddrGet( )<br />
muxTxRestart( )<br />
muxReceive( )<br />
muxShutdown( )<br />
muxAddrResFuncAdd( )<br />
muxAddrResFuncGet( )<br />
muxAddrResFuncDel( )<br />
Purpose<br />
Deletes a multicast address from the list maintained for a<br />
device.<br />
Gets the multicast address table maintained for a device.<br />
Disconnects a protocol from the MUX.<br />
Stops a device.<br />
Unloads a device.<br />
Extracts the packet data (omitting the link-level data) from a<br />
submitted mBlk and writes it to a fresh mBlk.<br />
Extracts source and destination address data (omitting the<br />
packet data) from a submitted mBlk and writes each address<br />
to its own mBlk. If the local source/destination addresses<br />
differ from the end source/destination addresses, this routine<br />
writes to as many as four mBlks.<br />
If a device unblocks transmission after having blocked it, this<br />
routine calls the stackTxRestartRtn( ) routine associated with<br />
each interested protocol.<br />
Sends a packet up to the MUX from the device.<br />
Shuts down all protocols above this device.<br />
Adds an address resolution function to the address resolution<br />
function list.<br />
Gets a particular address resolution function from the list.<br />
Deletes a particular address resolution function from the list.<br />
The Protocol Data Structure NET_PROTOCOL<br />
For each protocol that binds to a device, the MUX allocates a NET_PROTOCOL<br />
structure. The MUX uses this structure to store information relevant to the<br />
protocol, such as the protocol’s type, its receive routine, and its shutdown routine.<br />
These are chained in a linked list whose head rests in the protocols member of the<br />
END_OBJ structure the MUX uses to manage a device. The NET_PROTOCOL<br />
structure is defined in end.h as follows:<br />
306
H<br />
Implementing a MUX-Based Network Interface Driver<br />
typedef struct net_protocol<br />
{<br />
NODE node; /* How we stay in a list. */<br />
char name[32]; /* String name for this protocol. */<br />
long type; /* Protocol type from RFC 1700 */<br />
int flags; /* Is protocol in a promiscuous mode? */<br />
BOOL (*stackRcvRtn) (void *, long, M_BLK_ID, M_BLK_ID, void*);<br />
/* The routine to call when we get */<br />
/* a packet. */<br />
STATUS (*stackShutdownRtn) (void*, void*);<br />
/* The routine to call to shutdown */<br />
/* the protocol stack. */<br />
STATUS (*stackTxRestartRtn) (void*, void*);<br />
/* Callback for restarting on blocked tx. */<br />
void (*stackErrorRtn) (END_OBJ*, END_ERR*, void*);<br />
/* Callback for device errors. */<br />
void* pSpare; /* Spare pointer that can be passed to */<br />
/* the protocol. */<br />
} NET_PROTOCOL;<br />
Passing a Packet Up to the Protocol: stackRcvRtn( )<br />
Each protocol must provide the MUX with a routine that the MUX can use to pass<br />
packets up to the protocol. This routine must take the following form:<br />
void stackRcvRtn<br />
(<br />
void* pCookie, /* returned by muxBind() call */<br />
long type, /* protocol type from RFC 1700 */<br />
M_BLK_ID pNetBuff, /* packet with link level info */<br />
LL_HDR_INFO* pLinkHdr, /* link-level header info structure */<br />
void* pSpare /* a void* the protocol can use to get info */<br />
/* on receive. This was passed to muxBind().*/<br />
)<br />
H<br />
Your protocol must declare its stackRcvRtn( ) as void. Thus, this function returns<br />
no value.<br />
The parameters are:<br />
pCookie<br />
Expects the pointer returned from the muxBind( ) call. This pointer identifies<br />
the device to which the MUX has bound this protocol.<br />
type<br />
Expects the protocol type from RFC1700 or the SAP.<br />
pNetBuff<br />
Expects a pointer to an mBlk structure that contains the packet data and the<br />
link-level information.<br />
307
VxWorks 5.5<br />
<strong>BSP</strong> Developer’s <strong>Guide</strong><br />
pLinkHdr<br />
Returns an LL_HDR_INFO structure containing header information that is<br />
dependent upon the particular data-link layer that the END implements. For<br />
more information, see Tracking Link-Level Information: LL_HDR_INFO, p.287.<br />
pSpare<br />
Expects a pointer to the spare information (if any) that was passed down to the<br />
MUX using the pSpare parameter of the muxBind( ) call. This information is<br />
passed back up to the protocol by each receiveRtn call. The use of this<br />
information is optional and protocol-specific.<br />
Passing Error Messages Up to the Protocol: stackError( )<br />
The MUX uses the stackError( ) routine to pass error messages from the device to<br />
the protocol. Your code for this routine must have an appropriate response for all<br />
possible error messages. The prototype for the stackError( ) routine is as follows:<br />
void stackError<br />
(<br />
END_OBJ* pEnd, /* pointer to END_OBJ */<br />
END_ERR* pError, /* pointer to END_ERR */<br />
void* pSpare /* pointer to protocol private data passed in muxBind */<br />
)<br />
You must declare your stackShutdownRtn( ) as returning void. Thus, there is no<br />
returned function value for this routine. The parameters are:<br />
pEnd<br />
Expects the pointer returned as the function value of the muxBind( ) for this<br />
protocol. This pointer identifies the device to which the MUX has bound this<br />
protocol.<br />
pError<br />
Expects a pointer to an END_ERR structure, which end.h defines as follows:<br />
typedef struct end_err<br />
{<br />
INT32 errCode; /* error code, see above */<br />
char* pMesg; /* NULL-terminated error message, can be NULL */<br />
void* pSpare; /* pointer to user defined data, can be NULL */<br />
} END_ERR;<br />
308
H<br />
Implementing a MUX-Based Network Interface Driver<br />
Within your code for the stackError( ) routine, you must have appropriate<br />
responses to the flags stored in the errCode member. Wind River reserves the<br />
lower 16 bits of errCode for its own error messages, which are as follows:<br />
END_ERR_INFO<br />
END_ERR_WARN<br />
END_ERR_RESET<br />
END_ERR_DOWN<br />
END_ERR_UP<br />
This error is information only.<br />
A non-fatal error has occurred.<br />
An error occurred that forced the device to reset<br />
itself, but the device has recovered.<br />
A fatal error occurred that forced the device to go<br />
down. The device can no longer send or receive<br />
packets.<br />
The device was down but is now up again and can<br />
receive and send packets.<br />
The upper 16 bits of the errCode member are available to user applications.<br />
Use these bits to encode whatever error messages you need to pass between<br />
drivers and protocols.<br />
pSpare<br />
Expects pointer to protocol-specific data. Originally, the protocol passed this<br />
data to the MUX when it called muxBind( ). This data is optional and<br />
protocol-specific.<br />
Shutting Down a Protocol: stackShutdownRtn( )<br />
The MUX uses stackShutdownRtn( ) to shut down a protocol. Within this routine,<br />
you must do everything necessary to shut down your protocol in an orderly<br />
manner. Your stackShutdownRtn( ) must take the following form:<br />
H<br />
void stackShutdownRtn<br />
(<br />
void* pCookie /* Returned by muxBind() call. */<br />
void* pSpare /* a void* that can be used by the protocol to get<br />
/* info on receive. This was passed to muxBind().*/<br />
)<br />
You must declare your stackShutdownRtn( ) as returning void. Thus, there is no<br />
returned function value for this routine.<br />
The parameters are:<br />
pCookie<br />
Expects the pointer returned as the function value of the muxBind( ) for this<br />
protocol. This pointer identifies the device to which the MUX has bound this<br />
protocol.<br />
309
VxWorks 5.5<br />
<strong>BSP</strong> Developer’s <strong>Guide</strong><br />
pSpare<br />
Expects the pointer passed into muxBind( ) as pSpare.<br />
Restarting Protocols: stackTxRestartRtn( )<br />
The MUX uses the stackTxRestartRtn( ) to restart protocols that had to stop<br />
transmitting because the device was out of resources. In high-traffic situations, a<br />
muxSend( ) can return END_ERR_BLOCK. This error return indicates that the<br />
device is out of resources for transmitting more packets and that the protocol<br />
should wait before trying to transmit any more packets.<br />
When the device has determined that it has enough resources to start transmitting<br />
again, it can call the muxTxRestart( ) function, which, in turn, calls the protocol’s<br />
stackTxRestartRtn( ).<br />
Your stackTxRestartRtn( ) must take the following form:<br />
void muxTxRestart<br />
(<br />
void* pCookie /* Returned by muxBind() call. */<br />
)<br />
The parameters are:<br />
pCookie<br />
Expects the pointer returned as the function value of the muxBind( ) for this<br />
protocol. This pointer identifies the device to which the MUX has bound this<br />
protocol.<br />
H.6.2 Network Layer to Data Link Layer Address Resolution<br />
The MUX provides several functions for adding network layer to data link layer<br />
address resolution functions. Resolving a network layer address into a data link<br />
layer address is usually carried out by a separate protocol. In most IP over Ethernet<br />
environments this is carried out by ARP (the Address Resolution Protocol).<br />
Using the MUX any protocol/datalink can register its own address resolution<br />
function. The functions are added and deleted by the following pair of routines:<br />
STATUS muxAddrResFuncAdd<br />
(<br />
long ifType, /* Media interface type from m2Lib.h */<br />
long protocol, /* Protocol type from RFC 1700 */<br />
FUNCPTR addrResFunc /* Function to call. */<br />
)<br />
310
H<br />
Implementing a MUX-Based Network Interface Driver<br />
STATUS muxAddrResFuncDel<br />
(<br />
long ifType,/* Media interface type from m2Lib.h */<br />
long protocol /* Protocol type from RFC 1700 */<br />
)<br />
These functions add and delete address resolution routines. The exact arguments<br />
to that routine are the responsibility of the protocol writer to ascertain. Currently<br />
the only address resolution routine provided by Wind River is arpresolve( ).<br />
To find out what address resolution routine to use for a particular<br />
network/datalink pair, call the following routine:<br />
FUNCPTR muxAddrResFuncGet<br />
(<br />
long ifType, /* ifType from m2Lib.h */<br />
long protocol /* protocol from RFC 1700 */<br />
)<br />
This routine returns a pointer to a function that you can call to resolve data link<br />
addresses for the network protocol specified as the second argument.<br />
H.7 Converting an END Driver from RFC 1213 to RFC 2233<br />
To convert an END driver to use RFC 2233, perform the following steps:<br />
(1) Modify the END load routine to set up the RFC 2233-type MIB in the END_OBJ.<br />
(2) Modify the END unload routine to delete the RFC 2233-type MIB from the<br />
END_OBJ.<br />
(3) Change the hardware address macro to point to the new location of the<br />
physical address.<br />
(4) Add the EIOCGMIB2233 case in the ioctl routine.<br />
(5) Replace the old RFC 1213 interface API with the RFC 2233 interface API; then<br />
delete the old RFC 1213 interface API.<br />
It is vital that all MIB calls be located such that their validity can be guaranteed. In<br />
other words, do not log a successful receipt or send of a packet until it is absolutely<br />
certain that the packet will be successfully received or sent.<br />
Take special care to ensure that all failure conditions are properly logged.<br />
H<br />
311
VxWorks 5.5<br />
<strong>BSP</strong> Developer’s <strong>Guide</strong><br />
Step 1:<br />
Modify the END load routine to set up the RFC 2233-type MIB in the END_OBJ.<br />
In the xxxEndLoad( ) routine, initialize the MIB-II entries (for RFC 2233). For<br />
example:<br />
pDrvCtrl->endObj.pMib2Tbl = m2IfAlloc(M2_ifType_ethernet_csmacd,<br />
(UINT8*) enetAddr, 6,<br />
ETHERMTU, speed,<br />
DEV_NAME, pDrvCtrl->unit);<br />
if (pDrvCtrl->endObj.pMib2Tbl == NULL)<br />
{<br />
logMsg ("%s%d - MIB-II initializations failed\n",<br />
DEV_NAME, pDrvCtrl->unit,0,0,0,0);<br />
goto errorExit;<br />
}<br />
/*<br />
* Set the RFC2233 flag bit in the END object flags field and<br />
* install the counter update routines.<br />
*/<br />
m2IfPktCountRtnInstall(pDrvCtrl->endObj.pMib2Tbl, m2If8023PacketCount);<br />
/*<br />
* Make a copy of the data in the mib2Tbl struct as well. We do this<br />
* mainly for backward compatibility issues. There might be some<br />
* code that references the END pointer and does lookups on the mib2Tbl,<br />
* which causes all sorts of problems.<br />
*/<br />
bcopy ((char *)&pDrvCtrl->endObj.pMib2Tbl->m2Data.mibIfTbl,<br />
(char *)&pDrvCtrl->endObj.mib2Tbl, sizeof (M2_INTERFACETBL));/*<br />
Mark the device ready */<br />
END_OBJ_READY (&pDrvCtrl->endObj,<br />
IFF_NOTRAILERS | IFF_MULTICAST | IFF_BROADCAST |<br />
END_MIB_2233);<br />
Step 2:<br />
Modify the END unload routine to delete the RFC 2233-type MIB from the END_OBJ.<br />
In the xxxEndUnload( ) routine, add MIB-II free routine entries. For example:<br />
m2IfFree(pDrvCtrl->endObj.pMib2Tbl);<br />
pDrvCtrl->endObj.pMib2Tbl = NULL;<br />
Step 3:<br />
Change the hardware address macro to point to the new location of the<br />
physical address.<br />
The hardware address macro is usually defined with the name<br />
END_HADDR(pEnd) but may be defined with the prefix reflecting the actual<br />
driver, such as in the fei82557End driver, where it is FEI_HADDR(pEnd).<br />
312
H<br />
Implementing a MUX-Based Network Interface Driver<br />
Set the hardware address macro to point to where the physical address is stored in<br />
the RFC 2233-type MIB. For RFC 2233-type MIBs, the physical address for an<br />
Ethernet device is stored in the pMib2Tbl in the END_OBJ. For example:<br />
#define END_HADDR(pEnd) \<br />
((pEnd)->pMib2Tbl->m2Data.mibIfTbl.ifPhysAddress.phyAddress)<br />
Step 4:<br />
Add the EIOCGMIB2233 case in the ioctl routine.<br />
For example:<br />
/* New RFC 2233 mib2 interface */<br />
case EIOCGMIB2233:<br />
if ((data == NULL) || (pEndObj->pMib2Tbl == NULL))<br />
error = EINVAL;<br />
else<br />
*((M2_ID **)data) = pEndObj->pMib2Tbl;<br />
break;<br />
Step 5:<br />
Replace the old RFC 1213 interface API with the RFC 2233 interface API; then delete<br />
the old RFC 1213 interface API.<br />
RFC 1213 interface API. The old RFC 1213 interface used the END_ERR_ADD<br />
macro for both updating packet counts and for counting error conditions.<br />
(a) Replace all instances of END_ERR_ADD calls. After an END_ERR_ADD<br />
instance is replaced, it can be deleted. For example:<br />
END_ERR_ADD (&pDrvCtrl->endObj, MIB2_IN_UCAST, +1);<br />
(b) Replace the deleted RFC 1213 interface.<br />
H<br />
RFC 2233 Interface API. The RFC 2233 interface API consists of<br />
m2IfGenericPacketCount( ) and m2IfCounterUpdate( ). These routines are<br />
accessed through pointers stored in pMib2Tbl of the END_OBJ. The pointer to<br />
m2IfGenericPacketCount( ) is held in pDrvCtrl-> endObj.pMib2Tbl-><br />
m2PktCountRtn. The pointer to m2IfCounterUpdate( ) is in pDrvCtrl-><br />
endObj.pMib2Tbl-> m2CtrUpdateRtn.<br />
The APIs for these routines are as follows:<br />
m2If8023PacketCount. Increment the interface packet counters for an 802.3 device.<br />
This function is used to update basic interface counters for a packet. The ctrl<br />
argument specifies whether the packet is being sent or received<br />
(M2_PACKET_IN or M2_PACKET_OUT). This function works for the 802.3<br />
313
VxWorks 5.5<br />
<strong>BSP</strong> Developer’s <strong>Guide</strong><br />
device only, because it understands the Ethernet packet format. The following<br />
counters are updated:<br />
ifInOctets<br />
ifInNUcastPkts<br />
ifOutUcastPkts<br />
ifInMulticastPkts<br />
ifOutMulticastPkts<br />
ifHCInOctets<br />
ifHCOutOctets<br />
ifHCInMulticastPkts<br />
ifHCOutMulticastPkts<br />
ifCounterDiscontinuityTime<br />
ifInUcastPkts<br />
ifOutOctets<br />
ifOutNUcastPkts<br />
ifInBroadcastPkts<br />
ifOutBroadcastPkts<br />
ifHCInUcastPkts<br />
ifHCOutUcastPkts<br />
ifHCInBroadcastPkts<br />
ifHCOutBroadcastPkts<br />
This function should be called immediately after the netMblkToBufCopy( )<br />
function has been completed. The first 6 bytes in the resulting buffer must<br />
contain the destination MAC address; the second 6 bytes of the buffer must<br />
contain the source MAC address.<br />
The type of MAC address (that is, broadcast, multicast, or unicast) is<br />
determined by the following:<br />
broadcast address<br />
multicast address<br />
unicast address<br />
ff:ff:ff:ff:ff:ff<br />
The first bit is set<br />
Any other address not matching the above<br />
RETURNS: ERROR if the M2_ID is NULL or the ctrl is invalid, OK if the<br />
counters were updated.<br />
STATUS m2If8023PacketCount<br />
(<br />
M2_ID * pId, /* The pointer to the device M2_ID object */<br />
UINT ctrl, /* Update In or Out counters */<br />
UCHAR * pPkt, /* The incoming/outgoing packet */<br />
ULONG pktLen /* Length of the packet */<br />
)<br />
m2IfCounterUpdate. Increment interface counters.<br />
This function is used to directly update an interface counter. The counter is<br />
specified by ctrId and the amount by which to increment it is specified by value.<br />
If the counter rolls over, the ifCounterDiscontinuityTime is updated with the<br />
current system uptime.<br />
RETURNS: ERROR if the M2_ID is NULL, OK if the counter was updated.<br />
314
H<br />
Implementing a MUX-Based Network Interface Driver<br />
STATUS m2IfCounterUpdate<br />
(<br />
M2_ID * pId, /* The pointer to the device M2_ID object */<br />
UINT ctrId, /* Counter to update */<br />
ULONG value /* Amount to update the counter by */<br />
)<br />
Code Conversion from RFC 1213 to RFC 2233<br />
■<br />
Send Routines<br />
In the Send( ) and PollSend( ) routines, add an RFC 2233 MIB-II counter<br />
update for outgoing packets.<br />
For example, change a Send( ) routine as follows:<br />
■<br />
if (pDrvCtrl->endObj.pMib2Tbl != NULL)<br />
{<br />
pDrvCtrl->endObj.pMib2Tbl->m2PktCountRtn(pDrvCtrl->endObj.pMib2Tbl,<br />
M2_PACKET_OUT, pEnetHdr,<br />
len);<br />
}<br />
For example, change a PollSend routine as follows:<br />
if (pDrvCtrl->endObj.pMib2Tbl != NULL)<br />
{<br />
pDrvCtrl->endObj.pMib2Tbl->m2PktCountRtn(pDrvCtrl->endObj.pMib2Tbl,<br />
M2_PACKET_OUT, pEnetHdr,<br />
len);<br />
}<br />
Receive Routines<br />
In Receive( ) and PollReceive( ) routines, add an RFC 2233 MIB-II counter<br />
update for incoming packets.<br />
For example, change a Receive( ) routine as follows:<br />
if (pDrvCtrl->endObj.pMib2Tbl != NULL)<br />
{<br />
pDrvCtrl->endObj.pMib2Tbl->m2PktCountRtn(pDrvCtrl->endObj.pMib2Tbl,<br />
M2_PACKET_IN,<br />
pMblk->mBlkHdr.mData,<br />
pMblk->mBlkHdr.mLen);<br />
}<br />
For example, change a PollReceive( ) routine as follows:<br />
if (pDrvCtrl->endObj.pMib2Tbl != NULL)<br />
{<br />
pDrvCtrl->endObj.pMib2Tbl->m2PktCountRtn(pDrvCtrl->endObj.pMib2Tbl,<br />
M2_PACKET_IN,<br />
H<br />
315
VxWorks 5.5<br />
<strong>BSP</strong> Developer’s <strong>Guide</strong><br />
}<br />
pMblk->mBlkHdr.mData,<br />
pMblk->mBlkHdr.mLen);<br />
Step 6:<br />
Take special care to ensure that all failure conditions be properly logged.<br />
The RFC 2233 interface provides the routine m2IfCounterUpdate( ) to maintain<br />
the various counters relevant for failure conditions. All failure conditions are<br />
considered errors. However, there are two general classes of failure conditions. The<br />
device can return an error status either because of failure to accomplish a requested<br />
action, or because of the driver’s inability to handle a packet due to a lack of<br />
available resources.<br />
Device failure conditions can be further categorized into errors-only and<br />
errors-with-discards, based on whether the failure causes packets to be dropped or<br />
not. If no packet is dropped, the failure is only an error; if data is dropped, the<br />
failure is both an error and a discard. Most device errors are both.<br />
If the driver receives a packet that was corrupted at receipt, this constitutes an error<br />
only. However, if a driver is unable to handle a perfectly good packet due to a lack<br />
of resources, this is always both an error and a discard.<br />
The RFC 2233 interface maintains counters for both incoming and outgoing errors<br />
and discards. The API provides selection by providing corresponding flags that<br />
designate each particular counter. This flag is passed as the second argument to<br />
m2IfCounterUpdate( ).<br />
The relevant flags are:<br />
M2_ctrId_ifInDiscards<br />
M2_ctrId_ifInErrors<br />
M2_ctrId_ifOutDiscards<br />
M2_ctrId_ifOutErrors<br />
For example:<br />
/* New RFC 2233 mib2 interface */<br />
if (pDrvCtrl->endObj.pMib2Tbl != NULL)<br />
{<br />
pDrvCtrl->endObj.pMib2Tbl->m2CtrUpdateRtn(pDrvCtrl->endObj.pMib2Tbl,<br />
M2_ctrId_ifInErrors, 1);<br />
pDrvCtrl->endObj.pMib2Tbl->m2CtrUpdateRtn(pDrvCtrl->endObj.pMib2Tbl,<br />
M2_ctrId_ifInDiscards, 1);<br />
}<br />
316
I<br />
Writing a SCSI-2 Device Driver<br />
I.1 Introduction<br />
The VxWorks SCSI-2 subsystem consists of the following components:<br />
■<br />
■<br />
SCSI libraries, an architecture-independent component<br />
SCSI controller driver, an architecture-specific component<br />
■<br />
SCSI-2 subsystem initialization code, a board-specific component<br />
You must first understand the basic functionality of each of these components<br />
before you can extend the functionality of the SCSI libraries or add new SCSI<br />
controller drivers. To help you gain that understanding, this chapter describes the<br />
general layout of the various SCSI modules, discusses the internals of the SCSI<br />
libraries (and their programming interface with the SCSI controller drivers), and<br />
describes the process of developing a controller-specific SCSI driver.<br />
For information on the interface between the I/O system and the SCSI libraries,<br />
including configuring SCSI peripheral devices within VxWorks, see the VxWorks<br />
Programmer’s <strong>Guide</strong>: I/O System.<br />
NOTE: In this chapter, the term SCSI refers to SCSI-2 in all cases. The SCSI library<br />
interfaces and SCSI controller drivers described in this chapter refer to SCSI-2 only.<br />
VxWorks offers only limited support for SCSI-1. Eventually, VxWorks will<br />
eliminate all SCSI-1 support.<br />
317
VxWorks 5.5<br />
<strong>BSP</strong> Developer’s <strong>Guide</strong><br />
I.2 Overview of SCSI<br />
This section describes the relationships between the various SCSI modules,<br />
introduces the different SCSI objects and data structures, and tells you how to form<br />
SCSI commands.<br />
Layout of SCSI Modules<br />
Figure I-1 shows all the SCSI library modules and the relationship between them<br />
and several typical drivers. The SCSI libraries contain a variety of data structures.<br />
The important data structures and their relationships are described in the<br />
following subsections. The general design of the data structures is object-oriented;<br />
data structures represent real and abstract SCSI objects such as peripheral devices,<br />
controllers, and block devices.<br />
Figure I-1<br />
Layout of SCSI Modules<br />
direct access file system<br />
(example: dosFs)<br />
sequential access file system<br />
(example: tapeFs)<br />
scsiDirectLib<br />
scsiCommonLib<br />
scsiSeqLib<br />
scsiLib<br />
scsi1Lib<br />
scsi2Lib<br />
scsiMgrLib<br />
wd33c93Lib1<br />
ncr710Lib1<br />
ncr810Lib<br />
scsiCtrlLib<br />
ncr710init<br />
ncr810init<br />
wd33c93Lib2<br />
318
I<br />
Writing a SCSI-2 Device Driver<br />
SCSI Objects and Data Structures<br />
Figure I-2 illustrates the relationship between the various physical and logical<br />
SCSI objects and the corresponding data structures.<br />
Figure I-2<br />
Relationship of SCSI Devices and Data Structures<br />
hardware<br />
data structures<br />
representing<br />
SCSI logical<br />
devices<br />
disk drive<br />
tape drive<br />
BLK_DEV<br />
SEQ_DEV<br />
SCSI_PHYS_DEV<br />
SCSI_PHYS_DEV<br />
data structures<br />
representing<br />
SCSI physical<br />
devices<br />
SCSI_BVS<br />
SCSI_CTRL<br />
SCSI controller<br />
CPU<br />
DRAM<br />
data structure<br />
representing<br />
SCSI controller<br />
Figure I-3 describes the contents of these data structures and their relationships in<br />
more detail.<br />
I<br />
SCSI_CTRL<br />
This structure contains a list of all physical devices and all allocated SCSI<br />
threads.<br />
SCSI_THREAD<br />
Each thread is represented by a dynamic data structure, which is manipulated<br />
at various levels in scsi2Lib, scsiMgrLib, and the device drivers. It contains a<br />
SCSI_TRANSACTION and the rest of the thread-state information.<br />
SCSI_TRANSACTION<br />
Each SCSI command from the I/O system is translated into one of these<br />
structures, which consists of a SCSI command descriptor block plus all the<br />
required pointer addresses.<br />
319
VxWorks 5.5<br />
<strong>BSP</strong> Developer’s <strong>Guide</strong><br />
SCSI_PHYS_DEV<br />
This structure contains information about available logical devices plus<br />
information about the various threads.<br />
SEQ_DEV<br />
This structure represents a sequential logical device such as a tape drive.<br />
BLK_DEV<br />
This structure represents a block device such as a disk drive.<br />
Figure I-3<br />
Controller- and Driver-Specific Data Structures<br />
SCSI_CTRL<br />
LIST<br />
UINT<br />
RING_ID<br />
RING_ID<br />
RING_ID<br />
RING_ID<br />
SCSI_PHYS_DEV *<br />
{virtual function pointers}<br />
.<br />
.<br />
{other state information}<br />
.<br />
.<br />
SCSI_THREAD<br />
SCSI_CTRL<br />
SCSI_PHYS_DEV<br />
MSG_Q_ID<br />
WDOG_ID<br />
UINT<br />
{thread state information}<br />
{replication of<br />
SCSI_TRANSACTION<br />
information}<br />
.<br />
.<br />
freeThreads<br />
nThreads<br />
requestQ<br />
replyQ<br />
eventQ<br />
timeoutQ<br />
physDevArr[ ]<br />
*pScsiCtrl<br />
*pScsiPhysDev<br />
replyQ<br />
wdog<br />
tagNumber<br />
SCSI_PHYS_DEV<br />
{device information from INQUIRY}<br />
LIST<br />
blkDevList<br />
SEQ_DEV *pScsiSeqDev<br />
LIST<br />
waitingThreads<br />
LIST<br />
activeThreads<br />
{other state information}<br />
.<br />
.<br />
SEQ_DEV<br />
.<br />
.<br />
.<br />
BLK_DEV<br />
.<br />
.<br />
.<br />
{command description block}<br />
UINT8 *dataAddress<br />
UINT8 *cmdAddress<br />
.<br />
.<br />
SCSI_TRANSACTION<br />
320
I<br />
Writing a SCSI-2 Device Driver<br />
Forming SCSI Commands<br />
Within the SCSI libraries, the SCSI commands all work in a similar fashion. All<br />
information needed by the command is delivered by passing in appropriate<br />
parameters. The command first builds a SCSI command descriptor block with<br />
pointers to all required data and stores the block in a SCSI_TRANSACTION<br />
structure. The command then calls the scsiTransact( ) routine, passing it the<br />
structures SCSI_TRANSACTION and SCSI_PHYS_DEV.<br />
The scsiTransact( ) routine is the general routine in scsi2Lib that handles<br />
processing of all SCSI commands originating in scsiDirectLib, scsiCommonLib,<br />
and scsiSeqLib. This paradigm should be used to extend SCSI library support to<br />
other device classes (scsiXXXLib).<br />
STATUS scsiXxxCmd<br />
(<br />
char * buf<br />
SCSI_PHYS_DEV * pScsiPhysDev<br />
:<br />
)<br />
SCSI_COMMAND xxxCommand;<br />
SCSI_TRANSACTION scsiXaction;<br />
...<br />
/* build a SCSI command descriptor block in xxxComand */<br />
...<br />
scsiXaction.cmdAddress = xxxComand;<br />
scsiXaction.dataAddress = buf;<br />
scsiXaction.dataLength = strLen(buf);<br />
...<br />
return ((*pScsiPhysDev->pScsiCtrl->scsiTransact)<br />
(pScsiPhysDev, &scsiXaction));<br />
...<br />
I<br />
I.3 The SCSI Libraries<br />
This section describes the following libraries:<br />
■<br />
■<br />
■<br />
■<br />
■<br />
The SCSI Manager (scsiMgrLib)<br />
SCSI Controller Library (scsiCtrlLib)<br />
SCSI Direct Access Library (scsiDirectLib)<br />
SCSI Sequential Access Library (scsiSeqLib)<br />
SCSI Common Access Library (scsiCommonLib)<br />
321
VxWorks 5.5<br />
<strong>BSP</strong> Developer’s <strong>Guide</strong><br />
This section ends with a brief discussion of how VxWorks typically handles the<br />
execution of a SCSI command.<br />
I.3.1 SCSI Manager (scsiMgrLib)<br />
The SCSI manager functions as a task within VxWorks. There is one SCSI manager<br />
per SCSI controller, and it is responsible for managing all SCSI interaction between<br />
VxWorks tasks and the SCSI controller. Any number of VxWorks tasks can request<br />
services from SCSI peripheral devices. The SCSI bus is a shared critical resource<br />
which requires multitasking support and synchronization.<br />
For the sake of performance and efficiency, the SCSI manager controls all the SCSI<br />
traffic within the operating system. SCSI traffic includes requests for SCSI services<br />
by VxWorks tasks. These requests are asynchronous events from the SCSI bus and<br />
include SCSI reconnects, SCSI connection timeouts, and SCSI responses to requests<br />
by VxWorks tasks. This work flow is managed by SCSI threads, which are<br />
SCSI-library-specific abstractions. A SCSI thread is assigned to each unit of SCSI<br />
work. In other words, one SCSI thread is assigned per SCSI request.<br />
Each SCSI thread is created in the context of the calling VxWorks task. The thread<br />
is managed by the SCSI manager, while the calling VxWorks task remains blocked.<br />
When the SCSI thread completes, the VxWorks task is unblocked and the SCSI<br />
thread is deleted.<br />
A SCSI thread has its own context or state variables, which are manipulated by the<br />
SCSI libraries and the controller driver. A maximum of one SCSI thread can be<br />
executing at any one time. In addition to managing the SCSI-thread state<br />
information, the SCSI manager is responsible for scheduling these SCSI threads.<br />
When there are multiple threads in existence, the different threads can be in<br />
various states representing different requirements. A SCSI thread can represent a<br />
new request for service, a connection timeout, a completion of service, or an event<br />
from the SCSI bus. As requests for service are submitted to the SCSI manager by<br />
VxWorks tasks, the associated threads must be processed based on priority or on a<br />
first-come-first-serves basis if their priority is the same.<br />
When multiple threads are eligible for activation, the SCSI manager follows a strict<br />
hierarchy of processing. Asynchronous bus events have the highest priority and<br />
are processed before any other type of SCSI thread. The order of processing is:<br />
events, timeouts, requests, and finally responses. The SCSI manager handles any<br />
race condition that develops between activation of a request and the asynchronous<br />
occurrence of an event from the SCSI bus.<br />
322
I<br />
Writing a SCSI-2 Device Driver<br />
Once an appropriate SCSI thread is selected for execution, the SCSI manager<br />
despatches that thread and actual execution is handled by the controller-specific<br />
driver.<br />
Limitations<br />
The SCSI manager uses standard VxWorks ring buffers to manage SCSI requests.<br />
Using ring buffers is fast and efficient. The amount of SCSI work that can be<br />
queued depends upon the size of the allocated ring buffers. The SCSI manager also<br />
has some limitations such as the maximum number of threads allowed<br />
(scsiMaxNumThreads), the maximum number of SCSI requests from VxWorks<br />
tasks that can be put on the SCSI manager’s request queue<br />
(scsiMgrRequestQSize), the maximum number of SCSI bus events that can be put<br />
on the SCSI manager’s event queue (scsiMgrEventQSize), the maximum number<br />
of replies that can be put on the reply queue (scsiMgrReplyQSize), the maximum<br />
number of timeouts that can be put on the timeout queue (scsiMgrTimeoutQSize),<br />
and timeout values.<br />
Configuration<br />
It is possible to tune the size of the ring buffers and the number of SCSI threads to<br />
optimize a specific environment. In most cases, however, the default values are<br />
sufficient. These parameters—scsiMaxNumThreads, scsiMgrRequestQSize,<br />
scsiMgrReplyQSize, scsiMgrEventQSize, scsiMgrTimeoutQSize—are defined<br />
as global variables within the SCSI library and are assigned default values defined<br />
in scsiLib.h. These values can be reassigned in the <strong>BSP</strong> routine sysScsiInit( ) prior<br />
to the invocation of the driver’s xxxCtrlInit( ) routine. Then when scsiCtrlInit( )is<br />
invoked by the driver’s xxxCtrlInit( )routine, the new parameters are used for data<br />
structure allocation.<br />
The name, priority, and stack size of the scsiMgr task can also be customized from<br />
the controller driver’s xxxCtrlCreate( ) routine. Defaults are provided in scsiLib.h.<br />
For example, the default task name SCSI_DEF_TASK_NAME is tScsiTask, the<br />
default priority, SCSI_DEF_TASK_PRIORITY, is 5, and the default stack size,<br />
SCSI_DEF_TASK_STACK_SIZE, is 4000.<br />
I<br />
NOTE: The larger the number of expected VxWorks SCSI tasks, the larger the stack<br />
space required. Thought should be given to the stack size parameter when<br />
customizing the SCSI manager.<br />
323
VxWorks 5.5<br />
<strong>BSP</strong> Developer’s <strong>Guide</strong><br />
I.3.2 SCSI Controller Library (scsiCtrlLib)<br />
The SCSI controller library is designed for the older generation of SCSI-2<br />
controllers that require the protocol state machine (and transitions) to be handled<br />
by a higher level of software.These basic SCSI controller drivers (those that need<br />
to use the SCSI state machine provided by the SCSI library) use the SCSI controller<br />
library. More advanced SCSI controllers allow such protocol state machines to be<br />
implemented at the SCSI controller level. This significantly reduces the number of<br />
SCSI interrupts to the CPU per I/O process which improves performance.<br />
There is a well defined interface between the SCSI libraries and the controller<br />
driver of such drivers, and this interface is defined in I.4 The SCSI Driver<br />
Programming Interface, p.325.<br />
I.3.3 SCSI Direct Access Library (scsiDirectLib)<br />
The SCSI direct access library scsiDirectLib encapsulates all the routines that<br />
implement the SCSI direct access commands as defined in the SCSI ANSI<br />
Specification I. In addition to all the direct access commands, scsiDirectLib<br />
provides the routines that supply the BLK_DEV abstraction for SCSI direct access<br />
peripheral devices.<br />
I.3.4 SCSI Sequential Access Library (scsiSeqLib)<br />
The SCSI sequential access library scsiSeqLib provides all the routines that<br />
implement the mandatory SCSI sequential access commands as defined in the<br />
SCSI ANSI Specification I. Some optional features are also implemented. Routines<br />
that manipulate the SEQ_DEV abstraction are also supplied in this library.<br />
I.3.5 SCSI Common Access Library (scsiCommonLib)<br />
SCSI commands that are common to all SCSI peripheral device types are provided<br />
in the common access library. These commands are described in the SCSI ANSI<br />
Specification I. The programming interface to such commands can be found in the<br />
relevant reference entries or by looking at the header file scsi2Lib.h.<br />
324
I<br />
Writing a SCSI-2 Device Driver<br />
I.3.6 An Execution Example<br />
Let us take a brief look at what happens when a VxWorks task requests SCSI<br />
service by invoking a SCSI library routine such as scsiInquiry( ). Since we are<br />
assuming a SCSI-2 configuration, first the scsi2Inquiry( ) routine is invoked which<br />
in turn invokes scsiTransact( ) (see Forming SCSI Commands, p.321). scsiTransact( )<br />
invokes scsiCommand( ), the routine that allocates a SCSI thread, executes the<br />
thread, and then deletes it.<br />
The execution of the thread via scsiThreadExecute( ) causes the SCSI manager to<br />
be informed of a new thread to execute, and subsequent blocking of that VxWorks<br />
task on a message queue until a response has been received. This is the boundary<br />
where a VxWorks task is blocked and the SCSI manager is awakened to start the<br />
execution of a new thread as well as management of any other threads that it may<br />
be dealing with.<br />
After the SCSI thread has executed and has received a response, the calling<br />
VxWorks task is unblocked and eventually the SCSI thread associated with that<br />
task is deleted.<br />
I.4 The SCSI Driver Programming Interface<br />
To better explain the interface between the controller driver and the SCSI libraries<br />
for the two types of SCSI controllers (basic and advanced), this section discusses<br />
each type of driver separately. A skeletal driver is provided along with the<br />
programming interface between the SCSI libraries and the controller driver. The<br />
controller driver routines provide all the hardware register accesses and<br />
controller-specific functionality. For the sake of simplicity, such accesses and<br />
controller-specific information have not been shown. It is the purpose of the<br />
template drivers to show the overall structure and programming interface<br />
between the driver, the SCSI libraries, and the <strong>BSP</strong>.<br />
I<br />
I.4.1 Basic SCSI Controller Driver<br />
This section presents the basic programming interface SCSI controller and the SCSI<br />
libraries. Following that description, this section presents a template you should<br />
use when writing your own SCSI controller driver.<br />
325
VxWorks 5.5<br />
<strong>BSP</strong> Developer’s <strong>Guide</strong><br />
The Programming Interface<br />
A well-defined programming interface exists between the controller driver of any<br />
basic SCSI controller and the SCSI libraries. Every basic controller driver must<br />
provide the following functions to the SCSI libraries:<br />
xxxDevSelect( )<br />
This routine selects a SCSI peripheral device with the Attention (ATN) signal<br />
asserted.<br />
xxxInfoXfer( )<br />
All information transfer phases are handled by this routine, including the<br />
DATA_IN, DATA_OUT, MSG_IN, MSG_OUT, and STATUS phases.<br />
xxxXferParamsQuery( )<br />
This routine updates the synchronous data transfer parameters to match the<br />
capabilities of the driver and returns the optimal synchronous offset and<br />
period.<br />
xxxXferParamsSet( )<br />
This routine sets the synchronous data transfer parameters on the SCSI<br />
controller.<br />
xxxBusControl( )<br />
This routine controls some of the SCSI bus lines from the controller. This<br />
routine must reset the SCSI bus, assert ATN, or negate ACK.<br />
Similarly, the controller driver invokes the following routines in order to get SCSI<br />
library services:<br />
scsiCtrlInit( )<br />
This routine initializes the SCSI library data structures. It is called only once<br />
per SCSI controller.<br />
scsiMgrEventNotify( )<br />
This routine notifies the SCSI manager of a SCSI event that has occurred.<br />
Events are defined in scsi2Lib.h. However, more events can be defined by the<br />
controller driver, and events can also be bundled by the driver. In this case, the<br />
SCSI_CTRL field scsiEventProc must be set to this driver-specific routine<br />
during driver initialization.<br />
326
I<br />
Writing a SCSI-2 Device Driver<br />
A Template Driver<br />
The following example shows a template for a basic SCSI controller driver, without<br />
any specific hardware constraints. The basic structure of the driver is like any other<br />
VxWorks driver. The main routines consist of the following:<br />
– AxxxCtrlCreate( ) routine, that is invoked from the <strong>BSP</strong> routine sysScsiInit( )<br />
located in the <strong>BSP</strong> file sysScsi.c.<br />
– An ISR called xxxIntr( ) that handles all the interrupts, deciphers what SCSI<br />
event has occurred, and passes that event information to the SCSI manager via<br />
the scsiMgrEventNotify( ) routine.<br />
The SCSI libraries instruct the driver via the xxxDevSelect( ) and xxxInfoXfer( )<br />
routines, and the controller driver communicates back to the libraries by means of<br />
the scsiMgrEventNotify( ) routine.<br />
Example I-1<br />
Basic SCSI Controller Driver<br />
/* xxxLib.c - XXX SCSI-Bus Interface Controller library (SCSI-2) */<br />
/* Copyright 1989-1996 Wind River Systems, Inc. */<br />
#include "copyright_wrs.h"<br />
/*<br />
modification history<br />
--------------------<br />
01a,12sep96,dds written<br />
*/<br />
/*<br />
DESCRIPTION<br />
This library contains part of the I/O driver for the XXX family of SCSI-2<br />
Bus Interface Controllers (SBIC). It is designed to work with scsi2Lib.<br />
The driver routines in this library depend on the SCSI-2 ANSI specification;<br />
for general driver routines and for overall SBIC documentation, see xxxLib.<br />
I<br />
INCLUDE FILES<br />
xxx.h<br />
SEE ALSO: scsiLib, scsi2Lib,<br />
.pG "I/O System"<br />
*/<br />
#include "vxWorks.h"<br />
#include "drv/scsi/xxx.h"<br />
typedef XXX_SCSI_CTRL SBIC; /* SBIC: SCSI Bus Interface Controller struct */<br />
/* globals */<br />
327
VxWorks 5.5<br />
<strong>BSP</strong> Developer’s <strong>Guide</strong><br />
int xxxXferDoneSemOptions = SEM_Q_PRIORITY;<br />
char *xxxScsiTaskName = SCSI_DEF_TASK_NAME;<br />
IMPORT SCSI_CTRL *pSysScsiCtrl;<br />
/***************************************************************************<br />
*<br />
* xxxCtrlCreate - create and partially initialize a SCSI controller structure<br />
*<br />
* This routine creates a SCSI controller data structure and must be called<br />
* before using a SCSI controller chip. It should be called once and only<br />
* once for a specified SCSI controller. Since it allocates memory for a<br />
* structure needed by all routines in xxxLib, it must be called before<br />
* any other routines in the library.<br />
* After calling this routine, at least one call to xxxCtrlInit() should<br />
* be made before any SCSI transaction is initiated using the SCSI controller.<br />
*<br />
* RETURNS: A pointer to the SCSI controller structure, or NULL if memory is<br />
* insufficient or parameters are invalid.<br />
*/<br />
XXX_SCSI_CTRL *xxxCtrlCreate<br />
(<br />
FAST UINT8 *sbicBaseAdrs, /* base address of the SBIC */<br />
int regOffset, /* address offset between SBIC registers */<br />
UINT clkPeriod, /* period of the SBIC clock (nsec) */<br />
FUNCPTR sysScsiBusReset, /* function to reset SCSI bus */<br />
int sysScsiResetArg, /* argument to pass to above function */<br />
UINT sysScsiDmaMaxBytes, /* maximum byte count using DMA */<br />
FUNCPTR sysScsiDmaStart, /* function to start SCSI DMA transfer */<br />
FUNCPTR sysScsiDmaAbort, /* function to abort SCSI DMA transfer */<br />
int sysScsiDmaArg /* argument to pass to above functions */<br />
)<br />
{<br />
FAST SBIC *pSbic; /* ptr to SBIC info */<br />
/* calloc the controller info structure; return NULL if unable */<br />
pSbic = (SBIC *) calloc (1, sizeof (SBIC))<br />
/*<br />
* Set up sizes of event and thread structures. Must be done before<br />
* calling "scsiCtrlInit()".<br />
*/<br />
/* fill in driver-specific routines for scsiLib interface */<br />
pSbic->scsiCtrl.scsiDevSelect = xxxDevSelect;<br />
pSbic->scsiCtrl.scsiInfoXfer = xxxInfoXfer;<br />
pSbic->scsiCtrl.scsiXferParamsQuery = xxxXferParamsQuery;<br />
pSbic->scsiCtrl.scsiXferParamsSet = (FUNCPTR)xxxXferParamsSet;<br />
/* Fill in driver specific variables for scsiLib interface */<br />
pSbic->scsiCtrl.maxBytesPerXfer = sysScsiDmaMaxBytes;<br />
328
I<br />
Writing a SCSI-2 Device Driver<br />
/* fill in generic SCSI info for this controller */<br />
xxxCtrlInit (&pSbic->scsiCtrl);<br />
/* initialize SBIC info transfer synchronization semaphore */<br />
if (semBInit (&pSbic->xferDoneSem, xxxXferDoneSemOptions, SEM_EMPTY)<br />
== ERROR)<br />
{<br />
(void) free ((char *) pSbic);<br />
return ((XXX_SCSI_CTRL *) NULL);<br />
}<br />
/* initialize state variables */<br />
/* fill in board-specific SCSI bus reset and DMA xfer routines */<br />
/* spawn SCSI manager - use generic code from "scsiLib.c" */<br />
pSbic->scsiCtrl.scsiMgrId = taskSpawn (xxxTaskName,<br />
xxxTaskPriority,<br />
xxxTaskOptions,<br />
xxxTaskStackSize,<br />
(FUNCPTR) scsiMgr,<br />
(int) pSbic,<br />
0, 0, 0, 0, 0, 0, 0, 0, 0);<br />
return (pSbic);<br />
}<br />
/***************************************************************************<br />
*<br />
* xxxCtrlInit - initialize a SCSI controller structure<br />
*<br />
* After a SCSI controller structure is created with xxxCtrlCreate, but<br />
* before using the SCSI controller, it must be initialized by calling this<br />
* routine.<br />
* It may be called more than once if desired. However, it should only be<br />
* called while there is no activity on the SCSI interface.<br />
*<br />
* RETURNS: OK, or ERROR if out-of-range parameter(s).<br />
*/<br />
I<br />
LOCAL STATUS xxxCtrlInit<br />
(<br />
FAST SBIC *pSbic, /* ptr to SBIC info */<br />
FAST int scsiCtrlBusId, /* SCSI bus ID of this SBIC */<br />
FAST UINT defaultSelTimeOut /* default dev. select timeout (microsec) */<br />
)<br />
{<br />
pSbic->scsiCtrl.scsiCtrlBusId = scsiCtrlBusId;<br />
/* initialize the SBIC hardware */<br />
xxxHwInit (pSbic);<br />
329
VxWorks 5.5<br />
<strong>BSP</strong> Developer’s <strong>Guide</strong><br />
return (OK);<br />
}<br />
/***************************************************************************<br />
*<br />
* xxxHwInit - initialize the SCSI controller to a known state<br />
*<br />
* This routine puts the SCSI controller into a known quiescent state. It<br />
* does not reset the SCSI bus (and any other devices thereon).<br />
*/<br />
LOCAL void xxxHwInit<br />
(<br />
SBIC *pSbic /* ptr to an SBIC structure */<br />
)<br />
{<br />
/*<br />
* Initialize the SCSI controller hardware registers and place the<br />
* chip in a known quiescent state<br />
*/<br />
}<br />
/***************************************************************************<br />
*<br />
* xxxDevSelect - attempt to select a SCSI device<br />
*<br />
* RETURNS: OK (no error conditions)<br />
*/<br />
LOCAL STATUS xxxDevSelect<br />
(<br />
SCSI_CTRL *pScsiCtrl, /* ptr to SCSI controller info */<br />
int devBusId, /* SCSI bus ID of device to select */<br />
UINT selTimeOut, /* select t-o period (usec) */<br />
UINT8 *msgBuf, /* ptr to identification message */<br />
UINT msgLen /* maximum number of message bytes */<br />
)<br />
{<br />
int lockKey; /* saved interrupt lock key */<br />
lockKey = intLock ();<br />
/* Select device */<br />
intUnlock (lockKey);<br />
}<br />
/***************************************************************************<br />
*<br />
* xxxXferParamsQuery - get (synchronous) transfer parameters<br />
*<br />
* Updates the synchronous transfer parameters suggested in the call to match<br />
* the SCSI controller's capabilities. Transfer period is in SCSI units<br />
* (multiples of 4 ns).<br />
*<br />
* RETURNS: OK<br />
330
I<br />
Writing a SCSI-2 Device Driver<br />
*/<br />
LOCAL STATUS xxxXferParamsQuery<br />
(<br />
SCSI_CTRL *pScsiCtrl, /* ptr to SBIC info */<br />
UINT8 *pOffset, /* max REQ/ACK offset [in/out] */<br />
UINT8 *pPeriod /* min transfer period [in/out] */<br />
)<br />
{<br />
/* read offset and period values */<br />
return (OK);<br />
}<br />
/***************************************************************************<br />
*<br />
* xxxXferParamsSet - set transfer parameters<br />
*<br />
* Programs the SCSI controller to use the specified transfer parameters. An<br />
* offset of zero specifies asynchronous transfer (period is then irrelevant).<br />
*<br />
* RETURNS: OK if transfer parameters are OK, else ERROR.<br />
*/<br />
LOCAL STATUS xxxXferParamsSet<br />
(<br />
SCSI_CTRL *pScsiCtrl, /* ptr to SBIC info */<br />
UINT8 offset, /* max REQ/ACK offset */<br />
UINT8 period /* min transfer period */<br />
)<br />
{<br />
/* set the appropriate SCSI controller registers */<br />
return (OK);<br />
}<br />
/***************************************************************************<br />
*<br />
* xxxInfoXfer - transfer information bytes to/from target via SCSI bus<br />
*<br />
* Executes a "Transfer Info" command to read (write) bytes from (to) the<br />
* SCSI bus. If the transfer phase is DATA IN or DATA OUT and there is a<br />
* DMA routine available, DMA is used - otherwise it's a tight programmed<br />
* i/o loop.<br />
*<br />
* RETURNS: Number of bytes transferred across SCSI bus, or ERROR.<br />
*/<br />
I<br />
LOCAL int xxxInfoXfer<br />
(<br />
FAST SCSI_CTRL *pScsiCtrl, /* ptr to SCSI controller info */<br />
int phase, /* SCSI phase being transferred */<br />
FAST UINT8 *pBuf, /* ptr to byte buffer for i/o */<br />
UINT bufLength /* number of bytes to be transferred */<br />
)<br />
{<br />
331
VxWorks 5.5<br />
<strong>BSP</strong> Developer’s <strong>Guide</strong><br />
pSbic = (SBIC *) pScsiCtrl;<br />
/* Handle phase changes */<br />
/* Start DMA, if used, or programmed i/o loop to transfer data */<br />
/* Wait for transfer to complete: find out how many bytes transferred */<br />
semTake (&pSbic->xferDoneSem, WAIT_FOREVER);<br />
/*<br />
* If there are bytes left to be transferred return ERROR<br />
* If DMA is used for tranfer do a SCSI DMA Abort<br />
*/<br />
xxxXferCountGet (pSbic, &bytesLeft);<br />
return (bufLength - bytesLeft);<br />
}<br />
/***************************************************************************<br />
*<br />
* xxxXferCountSet - load the SCSI controller transfer counter with count.<br />
*<br />
* RETURNS: OK if count is in range 0 - 0xffffff, otherwise ERROR.<br />
*<br />
*/<br />
LOCAL STATUS xxxXferCountSet<br />
(<br />
FAST SBIC *pSbic, /* ptr to SBIC info */<br />
FAST UINT count /* count value to load */<br />
)<br />
{<br />
/* set the appropriate SCSI controller registers */<br />
}<br />
/***************************************************************************<br />
*<br />
* xxxXferCountGet - fetch the SCSI controller transfer count<br />
*<br />
* The value of the transfer counter is copied to *pCount.<br />
*<br />
*/<br />
LOCAL void xxxXferCountGet<br />
(<br />
FAST SBIC *pSbic, /* ptr to SBIC info */<br />
FAST UINT *pCount /* ptr to returned value */<br />
)<br />
{<br />
/* read the appropriate SCSI controller registers */<br />
}<br />
/***************************************************************************<br />
*<br />
332
I<br />
Writing a SCSI-2 Device Driver<br />
* xxxCommand - write a command code to the SCSI controller Command Register<br />
*<br />
*/<br />
LOCAL void xxxCommand<br />
(<br />
SBIC *pSbic, /* ptr to SBIC info */<br />
UINT8 cmdCode /* new command code */<br />
)<br />
{<br />
/* set the appropriate SCSI controller registers */<br />
}<br />
/***************************************************************************<br />
*<br />
* xxxIntr - interrupt service routine for the SCSI controller<br />
*<br />
*/<br />
LOCAL void xxxIntr<br />
(<br />
SBIC *pSbic /* ptr to SBIC info */<br />
)<br />
{<br />
SCSI_EVENT event;<br />
/* Check the SCSI status. Handle state transitions */<br />
switch (scsiStatus)<br />
{<br />
...<br />
/* the list of event types is defined is scsi2Lib.h */<br />
case ...<br />
event.type = SCSI_EVENT_XFER_REQUEST;<br />
event.phase = busPhase;<br />
break;<br />
I<br />
case ...<br />
}<br />
/* Synchronize with task-level code */<br />
semGive (&pSbic->xferDoneSem);<br />
/* Post event to SCSI manager for further processing */<br />
scsiMgrEventNotify ((SCSI_CTRL *)pSbic, &event, sizeof (event));<br />
}<br />
/***************************************************************************<br />
*<br />
* xxxRegRead - Get the contents of a specified SCSI controller register<br />
*/<br />
333
VxWorks 5.5<br />
<strong>BSP</strong> Developer’s <strong>Guide</strong><br />
LOCAL void xxxRegRead<br />
(<br />
SBIC *pSbic, /* ptr to an SBIC structure */<br />
UINT8 regAdrs, /* address of register to read */<br />
int *pDatum /* buffer for return value */<br />
)<br />
{<br />
/* read the appropriate SCSI controller registers */<br />
}<br />
/***************************************************************************<br />
*<br />
* xxxRegWrite - write a value to a specified SCSI controller register<br />
*<br />
*/<br />
LOCAL void xxxRegWrite<br />
(<br />
SBIC *pSbic, /* ptr to an SBIC structure */<br />
UINT8 regAdrs, /* address of register to write */<br />
UINT8 datum /* value to be written */<br />
)<br />
{<br />
/* write the appropriate SCSI controller registers */<br />
}<br />
I.4.2 Advanced SCSI Controller Driver<br />
The advanced SCSI controller incorporates all the low-level state machine<br />
functions within the driver. This functionality replaces that provided by<br />
scsiCtrlLib. Most advanced SCSI controllers have their own SCSI I/O processor<br />
which enhances performance by managing all the low-level activities on the SCSI<br />
bus, such as phase changes and DMA data transfers. Usually the instructions to the<br />
I/O processor are machine language instructions which are written in a higher<br />
level assembly language and compiled into machine instructions. These machine<br />
instructions reside in the main DRAM area and are fetched by the I/O processor<br />
from DRAM by using a SCSI program counter and some form of indirect<br />
addressing.<br />
In the case of advanced SCSI controllers, there is usually additional event<br />
information described in a driver-specific structure such as XXX_EVENT (where<br />
XXX refers to the SCSI driver module prefix). Many thread management routines<br />
are part of the controller driver, which is not true of the basic SCSI controller<br />
drivers.<br />
334
I<br />
Writing a SCSI-2 Device Driver<br />
The Programming Interface<br />
The programming interface between the advanced SCSI controller driver and the<br />
SCSI libraries consists of routines that must be supplied by the driver and library<br />
routines which are invoked by the driver. The driver routines are not required to<br />
conform to the naming convention used here, because the routines are accessed by<br />
means of function pointers which are set in the xxxCtrlCreate( ) routine. However,<br />
this naming convention is recommended. The routines (or equivalents) that the<br />
driver must supply are:<br />
xxxEventProc( ) 1<br />
This routine is invoked by the SCSI manager to parse events and take<br />
appropriate action.<br />
xxxThreadInit( )<br />
This routine initializes the SCSI thread structures and adds any driver-specific<br />
initialization required beyond what is provided by scsiThreadInit( ).<br />
xxxThreadActivate( )<br />
This routine activates a SCSI connection, setting the appropriate thread context<br />
in the SCSI_THREAD data structure and setting all the controller registers with<br />
the appropriate values. It may call other driver routines as well as SCSI library<br />
routines.<br />
xxxThreadAbort( )<br />
If the thread is not actually connected, this routine does nothing. If the thread<br />
is connected, it sends an ABORT TAG message which causes the SCSI target to<br />
disconnect.<br />
xxxBusControl( )<br />
This routine controls some of the SCSI bus lines from the controller. This<br />
routine must reset the SCSI bus, assert ATN, or negate ACK.<br />
xxxXferParamsQuery( )<br />
This routine updates the synchronous data transfer parameters to match the<br />
capabilities of the driver and returns the optimal synchronous offset and<br />
period.<br />
xxxXferParamsSet( )<br />
This routine sets the synchronous data transfer parameters on the SCSI<br />
controller.<br />
I<br />
1. The xxx in the function name is just a place holder for whatever prefix you assign to your<br />
SCSI driver module.<br />
335
VxWorks 5.5<br />
<strong>BSP</strong> Developer’s <strong>Guide</strong><br />
xxxWideXferParamsQuery( )<br />
This routine updates the wide data transfer parameters in the call to match<br />
those of the SCSI controller.<br />
xxxWideXferParamsSet( )<br />
This routine sets the wide data transfer parameters on the SCSI controller.<br />
The advanced controller driver also uses many of the facilities provided by the<br />
SCSI libraries. All the routines invoked by the SCSI controller library can also be<br />
invoked by the driver. Examining the SCSI controller library and the header file<br />
scsi2Lib.h shows all the routines available for the controller driver. The following<br />
list is a typical but not exhaustive list of routines that can be invoked by the driver:<br />
scsiCtrlInit( )<br />
This routine initializes the SCSI library data structures. It is called only once<br />
per SCSI controller.<br />
scsiMgrEventNotify( )<br />
This routine notifies the SCSI manager of an event that occurred on the SCSI<br />
bus.<br />
scsiWideXferNegotiate( )<br />
This routine initiates or continues wide data transfer negotiation. See the<br />
relevant reference entries and scsi2Lib.h for more details. It is typically<br />
invoked from the xxxThreadActivate( ) routine.<br />
scsiSyncXferNegotiate( )<br />
This routine initiates or continues synchronous data transfer negotiations. See<br />
the relevant reference entries and scsi2Lib.h for more details. It is typically<br />
invoked from the xxxThreadActivate( ) routine.<br />
scsiMgrCtrlEvent( )<br />
This routine sends an event to the SCSI controller state machine. It is usually<br />
called by the driver xxxEventProc( ) routine after a selection, reselection, or<br />
disconnection.<br />
scsiMgrBusReset( )<br />
This routine resets all physical devices in the SCSI library upon a bus-initiated<br />
reset. It is typically invoked from xxxEventProc( ).<br />
scsiMgrThreadEvent( )<br />
This routine sends an event to the thread state machine. It is called by the<br />
thread management routines within the driver; the entry point to the thread<br />
routines is by way of xxxEventProc( ). In general, xxxEventProc( ) is the<br />
general routine which calls other driver-specific thread-management routines.<br />
336
I<br />
Writing a SCSI-2 Device Driver<br />
For a better understanding, look at the advanced SCSI controller driver<br />
template and also examine an actual driver.<br />
scsiMsgOutComplete( )<br />
This routine performs post-processing after a SCSI message out has been sent.<br />
It is also invoked from the driver thread management routines.<br />
scsiMsgInComplete( )<br />
This routine performs post-processing after a SCSI message in is received. It is<br />
invoked from the driver thread management routines.<br />
scsiMsgOutReject( )<br />
This routine performs post-processing when an outgoing message has been<br />
rejected.<br />
scsiIdentMsgParse( )<br />
This routine parses an incoming identify message when VxWorks has been<br />
selected or reselected.<br />
scsiIdentMsgBuild( )<br />
This routine builds an identify message in the caller’s buffer.<br />
scsiCacheSnoopEnable( )<br />
This routine informs the library that hardware cache snooping is enabled and<br />
that it is unnecessary to call cache-specific routines.<br />
scsiCacheSnoopDisable( )<br />
This routine informs the library that hardware snooping has been disabled or<br />
does not exist and that the library must perform cache coherency.<br />
scsiCacheSynchronize( )<br />
This routine is called by the driver for all cache-coherency needs.<br />
scsiThreadInit( )<br />
This routine performs general thread initialization; it is invoked by the driver<br />
xxxThreadInit( ) routine.<br />
Example I-2 provides an advanced SCSI controller driver template and<br />
Example I-3 shows a SCSI I/O processor assembly language template. These<br />
examples show how such drivers may be structured. Many details are not<br />
included in the templates; these templates simply serve to provide a high-level<br />
picture of what is involved. Once the basic structure of the template is understood,<br />
examining an actual advanced controller driver will clarify the issues involved,<br />
especially thread management.<br />
I<br />
337
VxWorks 5.5<br />
<strong>BSP</strong> Developer’s <strong>Guide</strong><br />
Example I-2<br />
Template: Advanced Controller Driver<br />
/* xxxLib.c - XXX SCSI I/O Processor (SIOP) library */<br />
/* Copyright 1989-1996 Wind River Systems, Inc. */<br />
#include "copyright_wrs.h"<br />
/*<br />
modification history<br />
--------------------<br />
01g,19aug96,dds written<br />
*/<br />
/*<br />
DESCRIPTION<br />
This is the I/O driver for the XXX SCSI I/O Processor (SIOP).<br />
It is designed to work with scsiLib and scsi2Lib. This driver<br />
runs in conjunction with a script program for the XXX controller.<br />
These scripts use DMA transfers for all data, messages and status.<br />
This driver supports cache functions through scsi2Lib.<br />
USER-CALLABLE ROUTINES<br />
Most of the routines in this driver are accessible only through the I/O<br />
system. The following routines must be called directly: xxxCtrlCreate()<br />
to create a controller structure, and xxxCtrlInit() to initialize it.<br />
The XXX SCSI Controller's hardware registers need to be configured according<br />
to the hardware implementation. If the default configuration is not proper,<br />
the routine xxxSetHwRegister() should be used to properly configure<br />
the registers.<br />
INTERNAL<br />
This driver supports multiple initiators, disconnect/reconnect, tagged<br />
command queueing, synchronous data transfer and wide data transfer protocols.<br />
In general, the SCSI system and this driver automatically choose the<br />
best combination of these features to suit the target devices used.<br />
However, the default choices may be over-ridden by using the function<br />
"scsiTargetOptionsSet()" (see scsi2Lib).<br />
There are debug variables to trace events in the driver.<br />
scsiLib debug variable, trace event in scsiLib, xxxScsiPhase(),<br />
and xxxTransact().<br />
prints interrupt informations.<br />
INCLUDE FILES<br />
xxx.h, xxxScript.h and scsiLib.h<br />
*/<br />
#define INCLUDE_SCSI2<br />
#include "vxWorks.h"<br />
#include "memLib.h"<br />
#include "ctype.h"<br />
#include "stdlib.h"<br />
#include "string.h"<br />
#include "stdio.h"<br />
#include "logLib.h"<br />
338
I<br />
Writing a SCSI-2 Device Driver<br />
#include "semLib.h"<br />
#include "intLib.h"<br />
#include "errnoLib.h"<br />
#include "cacheLib.h"<br />
#include "taskLib.h"<br />
#include "drv/scsi/xxx.h"<br />
#include "drv/scsi/xxxScript.h"<br />
/* defines */<br />
typedef XXX_SCSI_CTRL SIOP;<br />
/* Configurable options */<br />
int xxxSingleStepSemOptions = SEM_Q_PRIORITY;<br />
char *xxxScsiTaskName<br />
= SCSI_DEF_TASK_NAME;<br />
int xxxScsiTaskOptions = SCSI_DEF_TASK_OPTIONS;<br />
int xxxScsiTaskPriority = SCSI_DEF_TASK_PRIORITY;<br />
int xxxScsiTaskStackSize = SCSI_DEF_TASK_STACK_SIZE;<br />
/***************************************************************************<br />
*<br />
* xxxCtrlCreate - create a control structure for the XXX SCSI controller<br />
*<br />
* This routine creates a SCSI controller data structure and must be called<br />
* before using a SCSI controller chip. It should be called once and only<br />
* once for a specified SCSI controller. Since it allocates memory<br />
* for a structure needed by all routines in xxxLib, it must be called before<br />
* any other routines in the library. After calling this routine,<br />
* xxxCtrlInit() should be called at least once before any SCSI transactions<br />
* are initiated using the SCSI controller.<br />
*<br />
* RETURNS: A pointer to XXX_SCSI_CTRL structure, or NULL if memory<br />
* is unavailable or there are invalid parameters.<br />
*/<br />
XXX_SCSI_CTRL *xxxCtrlCreate<br />
(<br />
UINT8 *baseAdrs, /* base address of the SCSI controller */<br />
UINT clkPeriod, /* clock controller period (nsec*100) */<br />
UINT16 devType /* XXX SCSI device type */<br />
)<br />
I<br />
{<br />
FAST SIOP *pSiop; /* ptr to SCSI controller info */<br />
/* check that dma buffers are cache-coherent */<br />
/* cacheDmaMalloc the controller structure and other driver structures */<br />
pScsiCtrl = (SCSI_CTRL *) pSiop;<br />
/* inform the SCSI libraries about the size of an XXX event and thread */<br />
pScsiCtrl->eventSize = sizeof (XXX_EVENT);<br />
pScsiCtrl->threadSize = sizeof (XXX_THREAD);<br />
339
VxWorks 5.5<br />
<strong>BSP</strong> Developer’s <strong>Guide</strong><br />
pScsiCtrl->scsiTransact = (FUNCPTR) scsiTransact;<br />
pScsiCtrl->scsiEventProc<br />
= (VOIDFUNCPTR) xxxEvent;<br />
pScsiCtrl->scsiThreadInit = (FUNCPTR) xxxThreadInit;<br />
pScsiCtrl->scsiThreadActivate = (FUNCPTR) xxxThreadActivate;<br />
pScsiCtrl->scsiThreadAbort = (FUNCPTR) xxxThreadAbort;<br />
pScsiCtrl->scsiBusControl = (FUNCPTR) xxxScsiBusControl;<br />
pScsiCtrl->scsiXferParamsQuery = (FUNCPTR) xxxXferParamsQuery;<br />
pScsiCtrl->scsiXferParamsSet = (FUNCPTR) xxxXferParamsSet;<br />
pScsiCtrl->scsiWideXferParamsQuery = (FUNCPTR) xxxWideXferParamsQuery;<br />
pScsiCtrl->scsiWideXferParamsSet = (FUNCPTR) xxxWideXferParamsSet;<br />
/* the following virtual functions are not used with this driver */<br />
pScsiCtrl->scsiDevSelect = NULL;<br />
pScsiCtrl->scsiInfoXfer = NULL;<br />
/* fill in generic SCSI info for this controller */<br />
scsiCtrlInit (&pSiop->scsiCtrl);<br />
/* fill in SCSI controller specific data for this controller */<br />
/* initialize controller state variables */<br />
/*<br />
* Initialize fixed fields in client shared data area. This "shared"<br />
* area of memory is shared between this driver and the scripts I/O<br />
* processor. Fields like data pointers, data size, message pointer,<br />
* message size, status pointer and size, etc. are typically the<br />
* pieces of information shared. These fields are updated and managed<br />
* before and after an I/O process.<br />
*/<br />
xxxSharedMemInit (pSiop, pSiop->pClientShMem);<br />
/* spawn SCSI manager - use generic code from "scsiLib.c" */<br />
pScsiCtrl->scsiMgrId = taskSpawn (xxxScsiTaskName,<br />
xxxScsiTaskPriority,<br />
xxxScsiTaskOptions,<br />
xxxScsiTaskStackSize,<br />
(FUNCPTR) scsiMgr,<br />
(int) pSiop, 0, 0, 0, 0, 0, 0, 0, 0, 0);<br />
return (pSiop);<br />
}<br />
/***************************************************************************<br />
*<br />
* xxxCtrlInit - initialize a XXX SCSI controller structure<br />
*<br />
* This routine initializes an SCSI controller structure, after the structure<br />
* is created with xxxCtrlCreate(). This structure must be initialized before<br />
* the SCSI controller can be used. It may be called more than once if<br />
* needed;however,it should only be called while there is no activity on the<br />
* SCSI interface. A detailed description of the input parameters follows:<br />
340
I<br />
Writing a SCSI-2 Device Driver<br />
*<br />
* RETURNS: OK, or ERROR if parameters are out of range.<br />
*/<br />
STATUS xxxCtrlInit<br />
(<br />
FAST XXX_SCSI_CTRL *pSiop, /* ptr to SCSI controller struct */<br />
int scsiCtrlBusId /* SCSI bus ID of this SCSI controller */<br />
)<br />
{<br />
SCSI_CTRL * pScsiCtrl = (SCSI_CTRL *) pSiop;<br />
/* initialize the SCSI controller */<br />
xxxHwInit (pSiop);<br />
/*<br />
* Put the scripts I/O processor in a state whereby it is ready for<br />
* selections or reselection from the SCSI bus. Such a state continues<br />
* until either a selection or selection occurs or the driver interrupts<br />
* the scripts processor and resets its program counter to begin<br />
* execution elsewhere.<br />
*/<br />
xxxScriptStart (pSiop, (XXX_THREAD *) pScsiCtrl->pIdentThread,<br />
XXX_SCRIPT_WAIT);<br />
return (OK);<br />
}<br />
/***************************************************************************<br />
*<br />
* xxxHwInit - initialize the SCSI controller chip to a known state<br />
*<br />
* RETURNS: N/A<br />
*/<br />
LOCAL void xxxHwInit<br />
(<br />
FAST SIOP *pSiop /* ptr to a SCSI controller info structure */<br />
)<br />
{<br />
/* initialize hardware independent registers */<br />
}<br />
I<br />
/***************************************************************************<br />
*<br />
* xxxScsiBusReset - assert the RST line on the SCSI bus<br />
*<br />
* Issue a SCSI Bus Reset command to the XXX SCSI controller. This should put<br />
* all devices on the SCSI bus in an initial quiescent state.<br />
*<br />
* RETURNS: N/A<br />
*/<br />
341
VxWorks 5.5<br />
<strong>BSP</strong> Developer’s <strong>Guide</strong><br />
LOCAL void xxxScsiBusReset<br />
(<br />
FAST SIOP *pSiop /* ptr to SCSI controller info */<br />
)<br />
{<br />
/* set appropriate register values in order to reset the SCSI bus */<br />
}<br />
/***************************************************************************<br />
*<br />
* xxxIntr - interrupt service routine for the SCSI controller<br />
*<br />
* Find the event type corresponding to this interrupt, and carry out any<br />
* actions which must be done before the SCSI controller is re-started.<br />
* Determine whether or not the SCSI controller is connected to the bus<br />
* (depending on the event type - see note below). If not, start a client<br />
* script if possible or else just make the SCSI controller wait for something<br />
* else to happen.<br />
*<br />
* Notify the SCSI manager of a controller event.<br />
*<br />
* RETURNS: N/A<br />
*/<br />
void xxxIntr<br />
(<br />
SIOP *pSiop<br />
)<br />
{<br />
XXX_EVENT<br />
SCSI_EVENT<br />
event;<br />
pScsiEvent = (SCSI_EVENT *) &event;<br />
BOOL connected = FALSE;<br />
BOOL notify = TRUE;<br />
int oldState = (int) pSiop->state;<br />
/* Save (partial) SCSI controller register context in current thread */<br />
/* Get event type */<br />
pScsiEvent-type = xxxEventTypeGet (pSiop);<br />
/* fill in event information based upon the nature of the event */<br />
/* controller is now idle: if possible, make it run a script. */<br />
xxxScriptStart (pSiop, (XXX_THREAD *) pScsiCtrl->pIdentThread,<br />
XXX_SCRIPT_WAIT);<br />
/* Send the event to the SCSI manager to be processed. */<br />
scsiMgrEventNotify ((SCSI_CTRL *) pSiop, pScsiEvent, sizeof (event));<br />
}<br />
342
I<br />
Writing a SCSI-2 Device Driver<br />
/***************************************************************************<br />
*<br />
* xxxEventTypeGet - parse SCSI and DMA status registers at interrupt time<br />
*<br />
* RETURNS: an interrupt (event) type code<br />
*/<br />
LOCAL int xxxEventTypeGet<br />
(<br />
SIOP * pSiop<br />
)<br />
{<br />
/* Read interrupt status registers */<br />
key = intLock ();<br />
/* Check for fatal errors first */<br />
/* No fatal errors; try the rest (order of tests is important) */<br />
return (INTERRUPT_TYPE);<br />
}<br />
/***************************************************************************<br />
*<br />
* xxxThreadActivate - activate a SCSI connection for an initiator thread<br />
*<br />
* Set whatever thread/controller state variables need to be set. Ensure that<br />
* all buffers used by the thread are coherent with the contents of the<br />
* system caches (if any).<br />
*<br />
* Set transfer parameters for the thread based on what its target device<br />
* last negotiated.<br />
*<br />
* Update the thread context (including shared memory area) and note that<br />
* there is a new client script to be activated (see "xxxActivate()").<br />
*<br />
* Set the thread's state to ESTABLISHED.<br />
* Do not wait for the script to be activated. Completion of the script is<br />
* signalled by an event which is handled by "xxxEvent()".<br />
*<br />
* RETURNS: OK or ERROR<br />
*/<br />
LOCAL STATUS xxxThreadActivate<br />
(<br />
SIOP * pSiop, /* ptr to controller info */<br />
XXX_THREAD * pThread /* ptr to thread info */<br />
)<br />
{<br />
scsiCacheSynchronize (pScsiThread, SCSI_CACHE_PRE_COMMAND);<br />
I<br />
scsiWideXferNegotiate (pScsiCtrl, pScsiTarget, WIDE_XFER_NEW_THREAD);<br />
scsiSyncXferNegotiate (pScsiCtrl, pScsiTarget, SYNC_XFER_NEW_THREAD);<br />
if (xxxThreadParamsSet (pThread, pScsiTarget->xferOffset,<br />
pScsiTarget->xferPeriod) != OK)<br />
return (ERROR);<br />
343
VxWorks 5.5<br />
<strong>BSP</strong> Developer’s <strong>Guide</strong><br />
/* Update thread context; activate the thread */<br />
xxxThreadUpdate (pThread);<br />
if (xxxActivate (pSiop, pThread) != OK)<br />
return (ERROR);<br />
pScsiCtrl->pThread = pScsiThread;<br />
xxxThreadStateSet (pThread, SCSI_THREAD_ESTABLISHED);<br />
return (OK);<br />
}<br />
/***************************************************************************<br />
*<br />
* xxxThreadAbort - abort a thread<br />
*<br />
* If the thread is not currently connected, do nothing and return FALSE to<br />
* indicate that the SCSI manager should abort the thread.<br />
*<br />
* RETURNS: TRUE if the thread is being aborted by this driver (i.e. it is<br />
* currently active on the controller, else FALSE.<br />
*/<br />
LOCAL BOOL xxxThreadAbort<br />
(<br />
SIOP * pSiop, /* ptr to controller info */<br />
XXX_THREAD * pThread /* ptr to thread info */<br />
)<br />
{<br />
xxxAbort (pSiop);<br />
xxxThreadStateSet (pThread, SCSI_THREAD_ABORTING);<br />
return (TRUE);<br />
}<br />
/***************************************************************************<br />
*<br />
* xxxEvent - XXX SCSI controller event processing routine<br />
*<br />
* Parse the event type and act accordingly. Controller-level events are<br />
* handled within this function, and the event is then passed to the current<br />
* thread (if any) for thread-level processing.<br />
*<br />
* RETURNS: N/A<br />
*/<br />
LOCAL void xxxEvent<br />
(<br />
SIOP * pSiop,<br />
XXX_EVENT * pEvent<br />
)<br />
{<br />
SCSI_CTRL * pScsiCtrl = (SCSI_CTRL *) pSiop;<br />
SCSI_EVENT * pScsiEvent = (SCSI_EVENT *) pEvent;<br />
XXX_THREAD * pThread = (XXX_THREAD *) pScsiCtrl->pThread;<br />
344
I<br />
Writing a SCSI-2 Device Driver<br />
/* Do controller-level event processing */<br />
/* If there's a thread on the controller, forward the event to it */<br />
if (pThread != 0)<br />
xxxThreadEvent (pThread, pEvent);<br />
}<br />
/***************************************************************************<br />
*<br />
* xxxThreadEvent - SCSI controller thread event processing routine<br />
*<br />
* Forward the event to the proper handler for the thread's current role.<br />
*<br />
* If the thread is still active, update the thread context (including<br />
* shared memory area) and resume the thread.<br />
*<br />
* RETURNS: N/A<br />
*/<br />
LOCAL void xxxThreadEvent<br />
(<br />
XXX_THREAD * pThread,<br />
XXX_EVENT * pEvent<br />
)<br />
{<br />
SCSI_EVENT * pScsiEvent = (SCSI_EVENT *) pEvent;<br />
SCSI_THREAD * pScsiThread = (SCSI_THREAD *) pThread;<br />
SIOP * pSiop = (SIOP *) pScsiThread->pScsiCtrl;<br />
XXX_SCRIPT_ENTRY entryPt;<br />
switch (pScsiThread->role)<br />
{<br />
case SCSI_ROLE_INITIATOR:<br />
xxxInitEvent (pThread, pEvent);<br />
entryPt = XXX_SCRIPT_INIT_CONTINUE;<br />
break;<br />
case SCSI_ROLE_IDENT_INIT:<br />
xxxInitIdentEvent (pThread, pEvent);<br />
I<br />
entryPt = XXX_SCRIPT_INIT_CONTINUE;<br />
break;<br />
case SCSI_ROLE_IDENT_TARG:<br />
xxxTargIdentEvent (pThread, pEvent);<br />
entryPt = XXX_SCRIPT_TGT_DISCONNECT;<br />
break;<br />
case SCSI_ROLE_TARGET:<br />
default:<br />
logMsg ("xxxThreadEvent: thread 0x%08x: invalid role (%d)\n",<br />
(int) pThread, pScsiThread->role, 0, 0, 0, 0);<br />
345
VxWorks 5.5<br />
<strong>BSP</strong> Developer’s <strong>Guide</strong><br />
}<br />
entryPt = XXX_SCRIPT_TGT_DISCONNECT;<br />
break;<br />
/* Resume thread if it is still connected */<br />
xxxResume (pSiop, pThread, entryPt);<br />
}<br />
/***************************************************************************<br />
*<br />
* xxxResume - resume a script corresponding to a suspended thread<br />
*<br />
* NOTE: the script can only be resumed if the controller is currently idle.<br />
* To avoid races, interrupts must be locked while this is checked and the<br />
* script re-started.<br />
*<br />
* Reasons why the controller might not be idle include SCSI bus reset and<br />
* unexpected disconnection, both of which might occur in practice. Hence<br />
* this is not considered to be a major software error.<br />
*<br />
* RETURNS: OK, or ERROR if the controller is in an invalid state (this<br />
* should not be treated as a major software failure).<br />
*/<br />
LOCAL STATUS xxxResume<br />
(<br />
SIOP * pSiop, /* ptr to controller info */<br />
XXX_THREAD * pThread, /* ptr to thread info */<br />
XXX_SCRIPT_ENTRY entryId /* entry point of script to resume */<br />
)<br />
{<br />
STATUS status;<br />
int key;<br />
/*<br />
* Check validity of connection and start script if OK<br />
*/<br />
key = intLock ();<br />
xxxScriptStart (pSiop, pThread, entryId);<br />
pSiop->state = NCR810_STATE_ACTIVE;<br />
status = OK;<br />
intUnlock (key);<br />
return (status);<br />
}<br />
/***************************************************************************<br />
*<br />
* xxxInitEvent - XXX SCSI controller initiator thread event processing rout<br />
*<br />
* Parse the event type and handle it accordingly. This may result in state<br />
* changes for the thread, state variables being updated, etc.<br />
346
I<br />
Writing a SCSI-2 Device Driver<br />
*<br />
* RETURNS: N/A<br />
*/<br />
LOCAL void xxxInitEvent<br />
(<br />
XXX_THREAD * pThread,<br />
XXX_EVENT * pEvent<br />
)<br />
{<br />
}<br />
/***************************************************************************<br />
*<br />
* xxxSharedMemInit - initialize the fields in a shared memory area<br />
*<br />
* Initialize pointers and counts for all message transfers. These are<br />
* always directed to buffers provided by the SCSI_CTRL structure.<br />
*<br />
* RETURNS: N/A<br />
*/<br />
LOCAL void xxxSharedMemInit<br />
(<br />
SIOP *<br />
pSiop,<br />
XXX_SHARED * pShMem<br />
)<br />
{<br />
}<br />
/***************************************************************************<br />
*<br />
* xxxThreadInit - initialize a client thread structure<br />
*<br />
* Initialize the fixed data for a thread (i.e., independent of the command).<br />
* Called once when a thread structure is first created.<br />
*<br />
* RETURNS: OK, or ERROR if an error occurs<br />
*/<br />
LOCAL STATUS xxxThreadInit<br />
(<br />
SIOP *<br />
pSiop,<br />
XXX_THREAD * pThread<br />
)<br />
{<br />
scsiThreadInit (&pThread->scsiThread);<br />
I<br />
return (OK);<br />
}<br />
/***************************************************************************<br />
*<br />
* xxxActivate - activate a script corresponding to a new thread<br />
*<br />
* Request activation of (the script for) a new thread, if possible; do not<br />
* wait for the script to complete (or even start) executing. Activation<br />
* is requested by signalling the controller, which causes an interrupt.<br />
347
VxWorks 5.5<br />
<strong>BSP</strong> Developer’s <strong>Guide</strong><br />
* The script is started by the ISR in response to this event.<br />
*<br />
* NOTE: Interrupt locking is required to ensure that the correct action<br />
* is taken once the controller state has been checked.<br />
*<br />
* RETURNS: OK, or ERROR if the controller is in an invalid state (this<br />
* indicates a major software failure).<br />
*/<br />
LOCAL STATUS xxxActivate<br />
(<br />
SIOP *<br />
pSiop,<br />
XXX_THREAD * pThread<br />
)<br />
{<br />
key = intLock ();<br />
/* Activate controller for the current thread */<br />
intUnlock (key);<br />
return (status);<br />
}<br />
/****************************************************************************<br />
*<br />
* xxxAbort - abort the active script corresponding to the current thread<br />
*<br />
* Check that there is currently an active script running. If so, set the<br />
* SCSI controller Abort flag which halts the script and causes an<br />
* interrupt.<br />
*<br />
* RETURNS: N/A<br />
*/<br />
LOCAL void xxxAbort<br />
(<br />
SIOP * pSiop /* ptr to controller info */<br />
)<br />
{<br />
STATUS status;<br />
int key;<br />
key = intLock ();<br />
/* Abort the active script corresponding to the current thread */<br />
intUnlock (key);<br />
}<br />
/***************************************************************************<br />
*<br />
* xxxScriptStart - start the SCSI controller executing a script<br />
*<br />
* Restore the SCSI controller register context, including the shared memory<br />
* area, from the thread context. Put the address of the script entry point<br />
348
I<br />
Writing a SCSI-2 Device Driver<br />
* into the DSP register. If not in single-step mode, start the script.<br />
*<br />
* NOTE: should always be called with SCSI controller's interrupts locked.<br />
*<br />
* RETURNS: N/A<br />
*/<br />
LOCAL void xxxScriptStart<br />
(<br />
SIOP *pSiop, /* pointer to SCSI controller info */<br />
XXX_THREAD *pThread, /* ncr thread info */<br />
XXX_SCRIPT_ENTRY entryId /* routine address entry point */<br />
)<br />
{<br />
static ULONG * xxxScriptEntry [] =<br />
{<br />
xxxWait, /* wait for re-select or host cmd */<br />
xxxInitStart, /* start an initiator thread */<br />
xxxInitContinue, /* continue an initiator thread */<br />
xxxTgtDisconnect, /* disconnect a target thread */<br />
};<br />
/* Restore the SCSI controller register context for this thread. */<br />
/*<br />
* Set the shared data address, load the script start address,<br />
* then start the SCSI controller.<br />
*/<br />
}<br />
/***************************************************************************<br />
*<br />
* xxxXferParamsQuery - get (synchronous) transfer parameters<br />
*<br />
* Updates the synchronous transfer parameters suggested in the call to match<br />
* the XXX SCSI controller's capabilities. Transfer period is in SCSI units<br />
* (multiples * of 4 ns).<br />
*<br />
* RETURNS: OK<br />
*/<br />
I<br />
LOCAL STATUS xxxXferParamsQuery<br />
(<br />
SCSI_CTRL *pScsiCtrl, /* ptr to controller info */<br />
UINT8 *pOffset, /* max REQ/ACK offset [in/out] */<br />
UINT8 *pPeriod /* min transfer period [in/out] */<br />
)<br />
{<br />
return (OK);<br />
}<br />
349
VxWorks 5.5<br />
<strong>BSP</strong> Developer’s <strong>Guide</strong><br />
/***************************************************************************<br />
*<br />
* xxxWideXferParamsQuery - get wide data transfer parameters<br />
*<br />
* Updates the wide data transfer parameters suggested in the call to match<br />
* the XXX SCSI controller's capabilities. Transfer width is in the units<br />
* of the WIDE DATA TRANSFER message's transfer width exponent field. This is<br />
* an 8 bit field where 0 represents a narrow transfer of 8 bits, 1 represents<br />
* a wide transfer of 16 bits and 2 represents a wide transfer of 32 bits.<br />
*<br />
* RETURNS: OK<br />
*/<br />
LOCAL STATUS xxxWideXferParamsQuery<br />
(<br />
SCSI_CTRL *pScsiCtrl, /* ptr to controller info */<br />
UINT8 *xferWidth /* suggested transfer width */<br />
)<br />
{<br />
}<br />
/***************************************************************************<br />
*<br />
* xxxXferParamsSet - set transfer parameters<br />
*<br />
* Validate the requested parameters, convert to the XXX SCSI controller's<br />
* native format and save in the current thread for later use (the chip's<br />
* registers are not actually set until the next script activation for this<br />
* thread).<br />
*<br />
* Transfer period is specified in SCSI units (multiples of 4 ns). An offset<br />
* of zero specifies asynchronous transfer.<br />
*<br />
* RETURNS: OK if transfer parameters are OK, else ERROR.<br />
*/<br />
LOCAL STATUS xxxXferParamsSet<br />
(<br />
SCSI_CTRL *pScsiCtrl, /* ptr to controller info */<br />
UINT8 offset, /* max REQ/ACK offset */<br />
UINT8 period /* min transfer period */<br />
)<br />
{<br />
}<br />
/***************************************************************************<br />
*<br />
* xxxWideXferParamsSet - set wide transfer parameters<br />
*<br />
* Assume valid parameters and set the XXX's thread parameters to the<br />
* appropriate values. The actual registers are not written yet, but will<br />
* be written from the thread values when it is activated.<br />
*<br />
* Transfer width is specified in SCSI transfer width exponent units.<br />
*<br />
* RETURNS: OK<br />
350
I<br />
Writing a SCSI-2 Device Driver<br />
*/<br />
LOCAL STATUS xxxWideXferParamsSet<br />
(<br />
SCSI_CTRL *pScsiCtrl, /* ptr to controller info */<br />
UINT8 xferWidth /* wide data transfer width */<br />
)<br />
{<br />
}<br />
Example I-3<br />
Template: Advanced I/O Processor Driver<br />
; xxxInit.n Script I/O processor assembly code for xxxLib Driver<br />
;<br />
; Copyright 1989-1996 Wind River Systems, Inc.<br />
;<br />
;/*<br />
;Modification history<br />
;--------------------<br />
;01a,28jun95,jds Created. Adapted from ncr710init.n<br />
;<br />
;<br />
;INTERNAL<br />
;This file contains the assembly level SCSI scripts instructions which are<br />
;used in conjunction with a higher level controller driver. To operate in<br />
;SCSI SCRIPTS mode the SCSI I/O Processor requires only a SCRIPTS start<br />
;address and a signal to begin operation. At that point, the processor<br />
;begins fetching instructions from external memory and then executes them.<br />
;The start address is written to the DMA SCRIPTS Pointer (DSP) register,<br />
;which acts like a typical program counter. All SCRIPT instructions are<br />
;fetched from external memory. The SCSI I/O Processor fetches and executes<br />
;its own instructions by becoming a bus master on the host bus. Instructions<br />
;are executed until a SCSI SCRIPTS interrupt instruction is encountered or<br />
;until an unexpected interrupt causes an interrupt to the external<br />
;processor. Once an interrupt is generated, the SCSI I/O Processor halts all<br />
;operations until the interrupt is serviced. The further execution of<br />
;SCRIPTS is then controlled by the SCSI controller driver which decides<br />
;at which entry point should the SCRIPT processor start executing.<br />
;<br />
;There are four SCRIPT entry points which could be used by the controller<br />
;driver. Execution thereafter is a function of the logic flow within the<br />
;SCRIPTS and cannot be controlled by the driver. Thus, controll is<br />
;transferred to the SCRIPTS processor by the controller driver at well known<br />
;entry points and this control is returned to the controller driver by the<br />
;SCRIPTS by generating a SCRIPTS interrupt. The four SCRIPTS entry points<br />
;are described below:<br />
;<br />
;1) xxxWait<br />
; If the SCSI controller is not connected to the bus, this entry point is<br />
; used. The SCRIPTS processor waits for selection or re-selection by a SCSI<br />
; target device (which acts as an initiator during selection), or can be<br />
; interrupted by a new command from the host. This is done by signalling<br />
; the processor via register bits. Thus this entry point puts the SCRIPTS<br />
; processor into a passive mode.<br />
I<br />
351
VxWorks 5.5<br />
<strong>BSP</strong> Developer’s <strong>Guide</strong><br />
;<br />
;2) xxxInitStart<br />
; This entry point is used to start a new initiator thread or I/O process<br />
; (in SCSI parlance), selecting a target, sending the identify message and<br />
; thus establishing the ITL nexus, and then continuing to follow the SCSI<br />
; protocol as dictated by the SCSI target, which drives the bus; thus,<br />
; transferring the command, data, messages and status. This processing is<br />
; actually done, within the code of the xxxInitContinue entry point. i.e<br />
; if no stopping condition is encountered, execution continues on into the<br />
; next logical entry point.<br />
;<br />
;3) xxxInitContinue<br />
; This entry point resumes a suspended SCSI thread. SCSI threads are<br />
; when futher processing is required by the controller driver and an int<br />
; instruction is executed. However, when the higher level management has<br />
; been worked out, control comes back to a suspended thread and the process<br />
; of cycling through all the SCSI infromation tranfer phases continues. In<br />
; essence, this entry point is the "meat" of an I/O process. The following<br />
; phases are managed by this entry point.<br />
; DATA_OUT<br />
; DATA_IN<br />
; COMMAND<br />
; STATUS<br />
; MSG_OUT<br />
; MSG_IN<br />
; XXX_ILLEGAL_PHASE<br />
;<br />
;4) xxxTgtDisconnect<br />
; Disconnects a target from the SCSI bus. It is the last entry point in<br />
; an I/O process.<br />
;<br />
;<br />
;The description level of the code is close to assembly language and is<br />
;infact the language of the SCRIPTS processor. The assembly code is compiled<br />
;using an NCR compiler which generates opcodes in the form of a static C<br />
;language structure, which is then compiled and loaded into memory.<br />
;<br />
;The opcode is a pair of 32bit words, that allow operations and offsets for<br />
;the SCRIPTS processor. A deailed discussion can be found in the chip's<br />
;programmer's guide. Some of the important instructions and their formats<br />
;are listed below.<br />
;<br />
;block move instruction.<br />
; move from when PHASE_NAME<br />
; ........<br />
;I/O instructions<br />
; set target<br />
; wait DISCONNECT<br />
; wait RESELECT<br />
; select from ,@jump<br />
; .........<br />
;read/write register instructions<br />
; move REG_NAME to SFBR<br />
;SFBR acts like an accumulator allowing branch instructions based on its<br />
;value<br />
; .........<br />
352
I<br />
Writing a SCSI-2 Device Driver<br />
;<br />
;control transfer instructions<br />
; jump <br />
; int when PHASE_NAME<br />
; ...........<br />
;<br />
;INTERRUPT SOURCES<br />
;The SCSI I/O Processor has three main kind of interrupt, scsi, dma interrupt<br />
;and script interrupt. The int instruction allows the controller driver to<br />
;be interrupted with an interrupt value which is stored in the DSPS register.<br />
;*/<br />
#define NCR_COMPILE<br />
#include "xxxScript.h"<br />
;/**************************************************************************<br />
;*<br />
;* xxxWait - wait for re-selection by target, selection by initiator, or<br />
;* new command from host<br />
;*/<br />
PROC xxxWait:<br />
;setup instuctions here<br />
wait<br />
reselect REL(checkNewCmd)<br />
;<br />
; have been re-selected by a SCSI target<br />
;<br />
reselected:<br />
; handle reselects, insert the reselect logic<br />
int XXX_RESELECTED ; all seems OK so far<br />
;<br />
; May have a new host command to handle<br />
;<br />
checkNewCmd:<br />
I<br />
; insert logic for checking if the processor is connected to the bus<br />
int XXX_READY ; processor is ready for a new thread<br />
;/**************************************************************************<br />
;*<br />
;* xxxInitStart - start new initiator thread, selecting target and<br />
;* continuing to transfer command, data, messages as requested.<br />
;*<br />
;* At this point the script requires some data in the scratch registers.<br />
;* This is the threads context information.<br />
;*<br />
;* When the script finishes, these registers are updated with the new context<br />
;* information<br />
353
VxWorks 5.5<br />
<strong>BSP</strong> Developer’s <strong>Guide</strong><br />
;*<br />
;*/<br />
PROC xxxInitStart:<br />
;<br />
; If required to identify, select w. ATN and try to transfer IDENTIFY message<br />
; (if this fails, continue silently). Otherwise, select without ATN.<br />
;<br />
select atn from OFFSET_DEVICE, REL(checkNewCmd)<br />
; add code to test various processor states and conditions interrupt driver<br />
; if neccessary.<br />
jump<br />
REL(nextPhase)<br />
;/**************************************************************************<br />
;*<br />
;* xxxInitContinue - resume an initiator thread<br />
;*<br />
;* At this point the script requires the threads context information in<br />
;* scratch registers<br />
;*<br />
;* When the script finishes, these scratch registers are updated with the<br />
;* the latest context information<br />
;*/<br />
PROC xxxInitContinue:<br />
; some setup code...<br />
nextPhase:<br />
;<br />
; Normal info transfer request processing<br />
;<br />
phaseSwitch:<br />
jump REL(doDataOut), when DATA_OUT<br />
jump REL(doDataIn) if DATA_IN<br />
jump REL(doCommand) if COMMAND<br />
jump REL(doStatus) if STATUS<br />
jump REL(doMsgOut) if MSG_OUT<br />
jump REL(doMsgIn) if MSG_IN<br />
int XXX_ILLEGAL_PHASE<br />
;/**************************************************************************<br />
;*<br />
;* doDataOut - handle DATA OUT phase<br />
;*/<br />
doDataOut:<br />
;...<br />
jump<br />
REL(nextPhase)<br />
354
I<br />
Writing a SCSI-2 Device Driver<br />
;/**************************************************************************<br />
;*<br />
;* doDataIn - handle DATA IN phase<br />
;*/<br />
doDataIn:<br />
;...<br />
jump<br />
REL(nextPhase)<br />
;/**************************************************************************<br />
;*<br />
;* doCommand - handle COMMAND phase<br />
;*/<br />
doCommand:<br />
;...<br />
jump<br />
REL(nextPhase)<br />
;/**************************************************************************<br />
;*<br />
;* doStatus - handle STATUS phase<br />
;*/<br />
doStatus:<br />
;...<br />
jump<br />
REL(nextPhase)<br />
;/***************************************************************************<br />
;*<br />
;* doMsgOut - handle MSG OUT phase<br />
;*/<br />
doMsgOut:<br />
I<br />
;...<br />
jump<br />
REL(nextPhase)<br />
;/**************************************************************************<br />
;*<br />
;* doMsgIn - handle MSG IN phase<br />
;*<br />
;* Note: there is little point in having the '810 parse the message type<br />
;* unless it can save the host some work by doing so; DISCONNECT and<br />
;* COMMAND COMPLETE are really the only cases in point. Multi-byte messages<br />
;* are handled specially - see the comments below.<br />
;*/<br />
doMsgIn:<br />
355
VxWorks 5.5<br />
<strong>BSP</strong> Developer’s <strong>Guide</strong><br />
;...<br />
int XXX_MESSAGE_IN_RECVD ; driver handles all others<br />
;<br />
; Have received a DISCONNECT message<br />
;<br />
disconn:<br />
;...<br />
int<br />
XXX_DISCONNECTED<br />
;<br />
; Have received a COMMAND COMPLETE message<br />
;<br />
complete:<br />
;...<br />
int<br />
XXX_CMD_COMPLETE<br />
extended:<br />
int<br />
XXX_EXT_MESSAGE_SIZE<br />
contExtMsg:<br />
int XXX_MESSAGE_IN_RECVD ; at last !<br />
/****************************************************************************<br />
*<br />
* xxxTgtDisconnect - disconnect from SCSI bus<br />
*<br />
*/<br />
PROC xxxTgtDisconnect:<br />
;...<br />
disconnect<br />
int<br />
XXX_DISCONNECTED<br />
356
I<br />
Writing a SCSI-2 Device Driver<br />
I.5 The <strong>BSP</strong> Interface<br />
Example I-4<br />
The <strong>BSP</strong> provides the board information to the driver in its invocations of the<br />
initialization routines. The main tasks of the <strong>BSP</strong> sysScsiInit( ) routine, which is<br />
located in a file named sysScsi.c (included from the standard sysLib.c), are as<br />
follows:<br />
■<br />
Address all preliminary board-specific hardware initializations.<br />
■<br />
Create a controller driver object by invoking the driver’s xxxCtrlCreate( )<br />
routine and supplying the board-specific hardware information such as the<br />
base address to the SCSI controller registers.<br />
■<br />
■<br />
Connect the SCSI controller’s interrupt vector to the driver’s interrupt service<br />
routine (ISR).<br />
Perform additional driver initializations by invoking the xxxCtrlInit( ) routine<br />
and optionally the driver’s xxxHwInit( ) routine supplying board-specific<br />
information such as the SCSI initiator bus ID, and specific hardware register<br />
values.<br />
■<br />
Supply any DMA routines if an external DMA controller is being used and is<br />
not part of the SCSI controller driver.<br />
Any other board-specific configurations to initialize SCSI peripheral devices such<br />
as hard disks and tapes or block/sequential devices and file systems must also be<br />
accomplished by sysScsi.c. Such configuration initialization shall be located in<br />
sysScsiConfig( ).<br />
The following subsection introduces a template sysScsiInit( ) routine located in<br />
sysScsi.c.<br />
Template for SCSI Initialization in the <strong>BSP</strong> (sysScsi.c)<br />
/* sysScsi.c - XXX <strong>BSP</strong> SCSI-2 initialization for sysLib.c */<br />
/* Copyright 1984-1996 Wind River Systems, Inc. */<br />
#include "copyright_wrs.h"<br />
/*<br />
modification history<br />
--------------------<br />
01a,29nov95,jds written<br />
*/<br />
/*<br />
Description<br />
This file contains the sysScsiInit() and related routines necessary for<br />
I<br />
357
VxWorks 5.5<br />
<strong>BSP</strong> Developer’s <strong>Guide</strong><br />
initializing the SCSI subsystem for this <strong>BSP</strong>.<br />
*/<br />
#ifdef INCLUDE_SCSI<br />
/* external inclusions */<br />
#include "drv/scsi/xxx.h"<br />
#include "tapeFsLib.h"<br />
/****************************************************************************<br />
*<br />
* sysScsiInit - initialize XXX SCSI chip<br />
*<br />
* This routine creates and initializes an SIOP structure, enabling use of the<br />
* on-board SCSI port. It also connects the proper interrupt service routine<br />
* to the desired vector, and enables the interrupt at the desired level.<br />
*<br />
* RETURNS: OK, or ERROR if the control structure is not created or the<br />
* interrupt service routine cannot be connected to the interrupt.<br />
*/<br />
STATUS sysScsiInit ()<br />
{<br />
/* perform preliminary board specific hardware initializations */<br />
/* Create the SCSI controller */<br />
if ((pSysScsiCtrl = (SCSI_CTRL *) xxxCtrlCreate<br />
(<br />
(UINT8 *) SCSI_BASE_ADRS,<br />
(UINT) XXX_40MHZ,<br />
devType<br />
{<br />
return (ERROR);<br />
}<br />
)) == NULL)<br />
/* connect the SCSI controller's interrupt service routine */<br />
if (intConnect (INUM_TO_IVEC (SCSI_INT_VEC),<br />
xxxIntr, (int) pSysScsiCtrl) == ERROR)<br />
{<br />
return (ERROR);<br />
}<br />
/* Enable SCSI interrupts */<br />
intEnable (SCSI_INT_LVL);<br />
/* initialize SCSI controller with default parameters (user tuneable) */<br />
if (xxxCtrlInit ((XXX_SCSI_CTRL *)pSysScsiCtrl,<br />
SCSI_DEF_CTRL_BUS_ID) == ERROR)<br />
358
I<br />
Writing a SCSI-2 Device Driver<br />
return (ERROR);<br />
#if (USER_D_CACHE_MODE & CACHE_SNOOP_ENABLE)<br />
#else<br />
#endif<br />
scsiCacheSnoopEnable ((SCSI_CTRL *) pSysScsiCtrl);<br />
scsiCacheSnoopDisable ((SCSI_CTRL *) pSysScsiCtrl);<br />
/* Set the appropriate board specific hardware registers for the SIOP */<br />
if (xxxSetHwRegister ((XXX_SCSI_CTRL *)pSysScsiCtrl, &hwRegs)<br />
== ERROR)<br />
return(ERROR);<br />
/* Include tape support if configured in config.h */<br />
#ifdef INCLUDE_TAPEFS<br />
tapeFsInit (); /* initialize tapeFs */<br />
#endif /* INCLUDE_TAPEFS */<br />
return (OK);<br />
}<br />
I.6 <strong>Guide</strong>lines for Developing a SCSI Driver<br />
This section provides useful tips on how to develop a new SCSI controller.<br />
Breaking the project up into small easily managed steps is generally the best<br />
approach.<br />
1. Understand the template drivers and the interfaces with the SCSI libraries.<br />
2. Copy the template driver into your new driver directory. Replace the variable<br />
routine and macro names with your chosen driver name (for example,<br />
xxxShow( ) might become myDriverShow( )).<br />
3. Make sure that the interrupt mechanism is working correctly so that upon<br />
getting a SCSI interrupt, the driver’s ISR is invoked. A good method to ensure<br />
that the ISR is invoked is to write to a well known location in memory or<br />
NVRAM so that upon re-initialization of the board the developer can tell that<br />
the ISR was entered. Getting the ISR to work is a major milestone.<br />
I<br />
359
VxWorks 5.5<br />
<strong>BSP</strong> Developer’s <strong>Guide</strong><br />
4. Get the driver to select a SCSI peripheral device. A SCSI bus analyzer can<br />
clarify what is really happening on the bus, and a xxxShow( ) routine is also<br />
extremely helpful. Selecting a device is the next major milestone.<br />
5. Refine the driver using a standard programming step-wise process until the<br />
desired result is achieved.<br />
6. Run the standard Wind River SCSI tests in order to test various aspects of the<br />
SCSI bus, including multiple threads, multiple initiators, and multiple<br />
peripheral devices working concurrently as well as the performance and<br />
throughput of the driver.<br />
I.7 Test Suites<br />
The following sections list and describe the tests provided by Wind River. The<br />
source code for these test routines is located in the directory target/src/test/scsi.<br />
scsciDiskThruputTest( )<br />
This test partitions a 16MB block device into blocks of sizes 4,096, 65,536, or<br />
1,048,576 bytes. Sectors consist of blocks of 512 bytes. This test writes and reads the<br />
block size to the disk drive and calculates the time taken, thus computing the<br />
throughput.<br />
Invoke this test as follows:<br />
scsiDiskThruputTest "scsiBusId devLun numBlocks blkOffset"<br />
The individual parameters must fit the guidelines described below:<br />
scsBusId<br />
Target device ID<br />
devLun<br />
Device logical unit ID<br />
numBlocks<br />
Number of blocks in block device<br />
blkOffset<br />
Address of first block in volume<br />
360
I<br />
Writing a SCSI-2 Device Driver<br />
For example:<br />
scsiDiskThruputTest "4 0 0x0000 0x0000"<br />
scsiDiskTest( )<br />
This test performs any or all of the tests described below. The invocation for<br />
scsiDiskTest( ) is as follows:<br />
scsiDiskTest "test scsiBusId devLun Iterations numBlocks blkOffset"<br />
The individual parameters must fit the guidelines described below:<br />
test<br />
One of the following:<br />
#1: runs only commonCmdsTest( )<br />
#2: runs only directRwTest( )<br />
#3: runs only directCmdsTest( )<br />
-[a]: runs all disk tests<br />
scsBusId<br />
Target device ID<br />
devLun<br />
Device logical unit ID<br />
Iterations<br />
Number of times to execute read/write tests<br />
numBlocks<br />
Number of blocks in block device<br />
blkOffset<br />
Address of first block in volume<br />
For example, the following invocation exercises all disk tests, repeating the<br />
read/write exercise 10 times:<br />
I<br />
scsiDiskTest "-a 4 0 10 0x0000 0x0000"<br />
The default test mode is to execute all of the following three tests.<br />
361
VxWorks 5.5<br />
<strong>BSP</strong> Developer’s <strong>Guide</strong><br />
commonCmdsTest( )<br />
This test exercises all mandatory SCSI common-access commands for SCSI<br />
peripheral devices. These common access commands are:<br />
– TEST UNIT READY<br />
– REQUEST SENSE<br />
– INQUIRY<br />
directRwTest( )<br />
This test exercises write, read, and check data pattern for:<br />
– 6-byte SCSI commands<br />
– 10-byte SCSI commands<br />
directCmdsTest( )<br />
This test exercises all of the direct-access commands listed below. Optionally,<br />
the FORMAT command can be tested by specifying a value of TRUE for the<br />
parameter doFormat.<br />
– MODE SENSE<br />
– MODE SELECT<br />
– RESERVE<br />
– RELEASE<br />
– READ CAPACITY<br />
– READ<br />
– WRITE<br />
– START STOP UNIT<br />
– FORMAT (optional)<br />
scsiSpeedTest( )<br />
This test initializes a block device for use with a dosFs file system. The test uses a<br />
large buffer to read and write from and to contiguous files with both buffered and<br />
non-buffered I/O.<br />
scsiSpeedTest( ) runs a number of laps, and uses timex to time the write and read<br />
operations. The speed test should be run on only one drive at a time to obtain<br />
maximum throughput.<br />
Invoke this test as follows:<br />
scsiSpeedTest "scsiBusId devLun numBlocks blkOffset"<br />
362
I<br />
Writing a SCSI-2 Device Driver<br />
The individual parameters must fit the guidelines described below:<br />
scsBusId<br />
Target device ID<br />
devLun<br />
Device logical unit ID<br />
numBlocks<br />
Number of blocks in block device<br />
blkOffset<br />
Address of first block in volume<br />
For example:<br />
scsiSpeedTest "4 0 0x0000 0x0000"<br />
tapeFsTest( )<br />
This test creates a tape file system and issues various commands to test the tape<br />
device. You can choose to test fixed-block-size tape devices, variable-block-size<br />
tape devices, or both. Fixed-block tests assume 512-byte blocks.<br />
The invocation for tapeFsTest( ) is as follows:<br />
tapeFsTest "test scsiBusId devLun"<br />
The individual parameters must fit the guidelines described below:<br />
test<br />
One of the following:<br />
-f runs only the fixed-block-size test<br />
-v runs only the variable-block-size test<br />
-a runs both tests<br />
scsBusId<br />
Target device ID<br />
devLun<br />
Device logical unit ID<br />
For example, the following invocation exercises both tests:<br />
I<br />
tapeFsTest "-a 1 0"<br />
363
VxWorks 5.5<br />
<strong>BSP</strong> Developer’s <strong>Guide</strong><br />
I.8 Troubleshooting and Debugging<br />
This section provides several suggestions for troubleshooting techniques and<br />
debugging shortcuts.<br />
SCSI Cables and Termination<br />
A poor cable connection or poor SCSI termination is one of the most common<br />
sources of erratic behavior, of the VxWorks target hanging during SCSI execution,<br />
and even of unknown interrupts. The SCSI bus must be terminated at both ends,<br />
but make sure that no device in the middle of the daisy chain has pull-up<br />
terminator resistors or some other form of termination.<br />
SCSI Library Configuration<br />
Check to see that the test does not exceed the memory constraints within the<br />
library, such as the permitted number of SCSI threads, the size of the ring buffers,<br />
and the stack size of the SCSI manager. In most cases, the default values are<br />
appropriate.<br />
Data Coherency Problems<br />
Data coherency problems usually occur in hardware environments where the CPU<br />
supports data caching. First disable the data caches and verify that data corruption<br />
is occurring. If the problem disappears with the caches disabled, then the<br />
coherency problem is related to caches. (Caches can usually be turned off in the<br />
<strong>BSP</strong> by #undef USER_D_CACHE_ENABLE.) In order to further troubleshoot the<br />
data cache coherency problem, use cacheDmaMalloc( ) in the driver for all<br />
memory allocations. However, if hardware snooping is enabled then the problem<br />
may lie elsewhere.<br />
Data Address in Virtual Memory Environments<br />
If the CPU board has a Memory Management Unit (MMU), then the driver<br />
developer has to be careful when setting data address pointers during Direct<br />
Memory Access (DMA) transfers. When DMA is used in this environment, the<br />
physical memory address must be used instead of the virtual memory address.<br />
This is because during DMA transfers from the SCSI bus, the SCSI or DMA<br />
controller is the bus master and therefore the MMU on the CPU cannot translate<br />
the virtual address to the physical address. Instead, the macro<br />
CACHE_DMA_VIRT_TO_PHYS must be used when providing the data address to<br />
the DMA controller.<br />
364
J<br />
<strong>BSP</strong> Validation Test Suite<br />
Reference Entries<br />
This chapter presents the reference entries for the main <strong>BSP</strong> VTS script, bspVal,<br />
and all its subsidiary scripts.<br />
bspVal – shell script to configure and run <strong>BSP</strong> Validation Test Suite................................ 366<br />
auxClock – auxiliary clock tests ................................................................................................... 372<br />
baudConsole – console baud rate test................................................................................................ 374<br />
bootline – functionality test for bootline................................................................................... 376<br />
busTas – bus test-and-set test................................................................................................... 377<br />
eprom – EPROM tests............................................................................................................... 380<br />
error1 – error handling tests ................................................................................................... 381<br />
error2 – error handling tests ................................................................................................... 382<br />
model – sysModel( ) test ......................................................................................................... 384<br />
network – I/O tests for network ................................................................................................ 385<br />
nvRam – non-volatile RAM tests ............................................................................................. 387<br />
procNumGet – sysProcNumGet( ) test ............................................................................................. 389<br />
ram – RAM tests.................................................................................................................... 390<br />
rlogin – testing rlogin .............................................................................................................. 391<br />
scsi – SCSI test ...................................................................................................................... 393<br />
serial – serial I/O tests............................................................................................................ 395<br />
sysClock – system clock tests....................................................................................................... 397<br />
timestamp – tests timestamp timer................................................................................................ 399<br />
365
VxWorks 5.5<br />
<strong>BSP</strong> Developer’s <strong>Guide</strong><br />
bspVal<br />
NAME<br />
SYNOPSIS<br />
DESCRIPTION<br />
bspVal – shell script to configure and run <strong>BSP</strong> Validation Test Suite<br />
bspVal [-h] [-all] [-r] [-c] serverID -b bspName<br />
[-s secondServerID] [-sb secondBspname]<br />
[-t1SerDev T1SerialDevice] [-t1SerBaud T1SerialBaud]<br />
[-t2SerDev T2SerialiDevice] [-t2SerBaud T2SerialBaud]<br />
[testName ... ] "<br />
This script provides the high-level user interface to the <strong>BSP</strong> Validation Test Suite (VTS).<br />
After initializing the environment required for the test, this script executes a Tcl script that<br />
runs the specified <strong>BSP</strong> test, testName, on the target. To run all possible tests, use the -all<br />
option.<br />
This VTS is designed to use the host-based windsh to run the tests. Internally, these tests<br />
use a combination of windsh commands and WTX Tcl API calls. This allows the same<br />
scripts to run under UNIX and as well as Windows. Also referenced is a specialized set of<br />
functions that the tests use to access host serial ports for target/console interaction. See<br />
the Tornado API <strong>Guide</strong>, for information on the WTX protocol functions and WTX Tcl API.<br />
NOTE: The target has to be connected with a target server by some type of WDB<br />
connection to run VTS. Please refer to Tornado manuals for different types of WDB<br />
connection if the target does not support ethernet connectivity, the default connection.<br />
NOTE: VTS can also run on targets booting VxWorks ROM images but the target has to<br />
be connected to a target server. If the target is booting a VxWorks ROM image, certain<br />
tests (like bootline) that require the VxWorks boot prompt will fail.<br />
Under UNIX, this script can be directly invoked from the command line. Under Windows,<br />
you must first invoke bash:<br />
1. Change directories to:<br />
windbasehost+<br />
Where windbase is the directory pointed to by the WIND_BASE environment<br />
variable.<br />
2. Edit bashrc.bspVal to configure the Tornado environment. (The instructions are in<br />
the file.)<br />
3. Invoke the bash shell:<br />
bash -rcfile bashrc.bspVal<br />
After the bash shell responds with a prompt (bash$), type in the bspVal command<br />
exactly as you would on a UNIX host (described below). For example:<br />
bash$ bspVal tgtSvr1 -b mv147 -s tgtSvr2 -sb mv147 -all<br />
366
J<br />
<strong>BSP</strong> Validation Test Suite Reference Entries<br />
OPTIONS<br />
If you specify a two-target test, make sure that the second target (reference board) is a<br />
valid <strong>BSP</strong>. In addition, the required command-line arguments for bspVal varies according<br />
to whether you select a single-target or a two-target test. For single-target tests, the<br />
required parameters are:<br />
serverID<br />
Specifies the target server name.<br />
-b bspName<br />
Specifies the name of the <strong>BSP</strong> being validated.<br />
testName<br />
Specifies the name of the test to be performed.<br />
For two-target tests, you must specify all the parameters shown above, as well as the<br />
following:<br />
-s secondServerID<br />
Specifies the reference board target server name.<br />
-sb secondBspName<br />
Specifies the reference board <strong>BSP</strong> name<br />
Use the other bspVal options as follows:<br />
-t1SerDev T1SerialDevice<br />
Specifies the host serial device of the main target.<br />
-t1SerBaud T1SerialBaud<br />
Specifies baud rate of the host serial device of the main target.<br />
-t2SerDev T2SerialDevice<br />
Specifies the host serial device of the reference board target.<br />
-t2SerBaud T2SerialBaud<br />
Specifies baud rate of the host serial device of the reference board target.<br />
-h<br />
Print the usage information about VTS.<br />
-r<br />
Cancel Reboot of target(s) before starting the test.<br />
-c<br />
Delete the previous log files.<br />
-all<br />
Run all tests.<br />
J<br />
CONFIGURATION FILES<br />
The VTS uses a configuration file called bspName.T1. Where bspName is the name of the<br />
<strong>BSP</strong> you want to validate. It must reside in the $WIND_BASE/host/resource/test/bspVal<br />
directory. If you want to perform tests involving two targets (network, rlogin, busTas),<br />
367
VxWorks 5.5<br />
<strong>BSP</strong> Developer’s <strong>Guide</strong><br />
you must also specify an additional configuration file called secondBspName.T2. Where<br />
secondBspName is the name of the <strong>BSP</strong> running on the reference board used by the second<br />
target. All the configuration parameters for the first target should use a T1_ prefix and all<br />
parameters for the reference board should use a T2_ prefix. See the sample set of<br />
configuration files provided in the $WIND_BASE/host/resource/test/bspVal directory.<br />
Parameters referred to as optional need not be defined because the <strong>BSP</strong> tests have default<br />
values associated with these macros. All other parameters must be defined, even if they<br />
are set to "".<br />
If two target tests are run with the targets on a common VME backplane then the test<br />
assumes T1 target as the system controller by default. The user can set an optional<br />
configuration parameter T1_BUS_MASTER to FALSE for overriding this default<br />
configuration. This is particularly useful to run busTas test with T2 target as a slave on<br />
the common VME backplane. This has an impact on the rebooting sequence of targets<br />
since the system controller is required to reboot before any slaves on the VME backplane<br />
are rebooted.<br />
The VTS configuration parameters T1_SER_DEVICE, T1_SER_BAUD, T2_SER_DEVICE<br />
and T2_SER_BAUD can be optionally specified as command line parameters to the<br />
bspVal command. If any of these configuration parameters are specified as command line<br />
parameters to the bspVal command, the default values specified in the configuration files<br />
are overwritten.<br />
LOG FILES<br />
By default, the bspVal script creates a directory named vtsLogs in the <strong>BSP</strong> directory. In<br />
this directory a log file of the form bspValidationLog.PID, where PID is the ID of the<br />
process associated with the bspVal script execution, is created for each run of VTS. Make<br />
sure that the <strong>BSP</strong> directory has required permissions to allow creation of the vtsLogs<br />
directory.<br />
Alternatively, you can use the TEST_LOG_FILE environment variable to specify the full<br />
path name of a user-defined log file. Note that as long as the TEST_LOG_FILE<br />
environment variable remains defined, all subsequent runs of the bspVal will append<br />
their log output to this file. To return to the default log-file location, unset<br />
TEST_LOG_FILE.<br />
VTS ORGANIZATION<br />
The organization of the VTS over the Tornado tree is as shown below:<br />
$WIND_BASE/<br />
target/src/test/bspVal/ (pklib.c, the target test library)<br />
host/<br />
resource/test/bspVal/ (configuration files)<br />
src/test/<br />
tclserial/ (all, required source files)<br />
bspVal/<br />
src/tests/ (all tests)<br />
src/lib/ (all library routines)<br />
368
J<br />
<strong>BSP</strong> Validation Test Suite Reference Entries<br />
TEST LIST<br />
The target test library pkLib.c is compiled for each <strong>BSP</strong> by copying the file into the <strong>BSP</strong><br />
directory. The bspVal script checks for the existence of pkLib.o, copies the source file to<br />
the <strong>BSP</strong> directory if necessary, generates pkLib.o, and loads it onto the target. If you make<br />
any changes to the files in $WIND_BASE/target/src/test/bspVal, you must delete pkLib.o<br />
and unload the previous object module from the target so that the latest code is used.<br />
The tclserial directory contains the source files for the functions used to access the serial<br />
port on the host that is bound to Tcl. The serLib.tcl file contains a set of library functions<br />
that are an extension of tclserial.<br />
Every test has to be invoked using the bspVal command with required options. Tests<br />
involving single target and no reboot are run first, followed by tests involving two targets,<br />
followed by clock tests, followed by tests that reboot the target. Within these limitations,<br />
you can specify the order in which the tests are run.<br />
After parsing through the command line parameters, bspVal:<br />
1. Checks the validity of the target server(s) specified using a checkServerName library<br />
function.<br />
2. Sources the configuration parameters from the resource directory.<br />
3. Reboots the target(s) if necessary (an option you can specify).<br />
4. Loads pkLib.o on the target.<br />
5. Opens a pipeline to windsh to send commands to source the Tcl scripts and run the<br />
tests.<br />
You can abort the test scripts at any time using an interrupt signal (normally CTRL+c).<br />
However, the target board might continue to execute local tasks. This situation could<br />
leave the board in such a state that a power-cycle reset is necessary.<br />
This section lists all the tests currently included in the <strong>BSP</strong> validation test suite. Some tests<br />
run stand-alone. Some require a reference board. The tests listed below run stand-alone.<br />
auxClock<br />
Tests auxiliary clock’s functionality.<br />
baudConsole<br />
Tests console’s ability to communicate at all supported serial baud rates.<br />
bootline<br />
Verifies commands executable from vxWorks boot prompt.<br />
eprom<br />
Verifies ROM read operations.<br />
error1<br />
Verifies the target local bus access, off-board bus access and divide by zero exceptions<br />
initiated from the target shell.<br />
J<br />
369
VxWorks 5.5<br />
<strong>BSP</strong> Developer’s <strong>Guide</strong><br />
error2<br />
Another set of error tests involving testing of reboot and catastrophic errors.<br />
model<br />
Tests return value of sysModel( ) routine.<br />
nvRam<br />
Verifies non-volatile RAM manipulation routines functionality.<br />
procNumGet<br />
Verifies return value of sysProcNumGet( ) routine.<br />
ram<br />
Verifies RAM read operations.<br />
scsi<br />
Verifies scsi read/write operations.<br />
serial<br />
Tests serial driver functionality.<br />
sysClock<br />
Tests system clock’s functionality.<br />
timestamp<br />
Verifies <strong>BSP</strong> timestamp timer functionality.<br />
The following tests require a reference board, a valid <strong>BSP</strong>.<br />
busTas<br />
Verifies sysBusTas( ) operation between 2 vxWorks target boards in a common VME<br />
backplane.<br />
network<br />
Verifies basic network functionality.<br />
rlogin<br />
Verifies ability to rlogin.<br />
TARGET CONFIGURATION USING <strong>BSP</strong> CONFIGURATION FILE<br />
Most bspVal tests should run under the default VxWorks 5.4 configuration, but some<br />
tests require that the target include utilities not typically included in the default<br />
configuration. The list below shows which tests require which macros. Add these macros<br />
to target’s config.h prior to building its VxWorks image. These requirements are as<br />
follows:<br />
auxClock<br />
busTas<br />
error2<br />
INCLUDE_AUXCLK<br />
INCLUDE_SHOW_ROUTINES<br />
INCLUDE_AUXCLK<br />
370
J<br />
<strong>BSP</strong> Validation Test Suite Reference Entries<br />
network<br />
INCLUDE_PING<br />
INCLUDE_NET_SHOW<br />
rlogin<br />
INCLUDE_SHOW_ROUTINES<br />
INCLUDE_RLOGIN<br />
INCLUDE_SHELL<br />
INCLUDE_NET_SYM_TBL<br />
INCLUDE_LOADER<br />
timestamp<br />
INCLUDE_TIMESTAMP<br />
TARGET CONFIGURATION USING PROJECT FACILITY<br />
If the Tornado project facility is used to configure the target the components required for<br />
each test differ slightly from target configuration using config.h file in the <strong>BSP</strong>. The list<br />
below shows the components that are required to be configured for each test.<br />
auxClock<br />
busTas<br />
error2<br />
network<br />
INCLUDE_AUX_CLK<br />
INCLUDE_SM_NET_SHOW<br />
INCLUDE_AUX_CLK<br />
INCLUDE_PING<br />
INCLUDE_NET_SHOW<br />
rlogin<br />
INCLUDE_RLOGIN<br />
INCLUDE_SHELL<br />
INCLUDE_NET_SYM_TBL<br />
J<br />
INCLUDE_LOADER<br />
INCLUDE_SM_NET_SHOW<br />
INCLUDE_SYM_TBL_SHOW<br />
INCLUDE_SHELL_BANNER<br />
timestamp<br />
INCLUDE_TIMESTAMP<br />
Additionally, the scsi test (not listed above) requires that the target be configured for SCSI<br />
and that a SCSI drive be connected.<br />
371
VxWorks 5.5<br />
<strong>BSP</strong> Developer’s <strong>Guide</strong><br />
ERRORS<br />
The following is the list of errors the user might come across while running the VTS.<br />
FATAL ERROR<br />
This error message is displayed whenever any important functionality of the test<br />
fails.<br />
SKIP count<br />
Certain tests may be skipped if the test detects that the target is not configured for the<br />
test (for example, timestamp)<br />
FAIL count<br />
Count indicating tests failed.<br />
target server ambiguity<br />
This error occurs when target server with the same name is run on different<br />
machines.<br />
networking<br />
If there is highly active networking over the subnet then the user may get different<br />
kinds of WTX error messages due to network problems and the tests may fail.<br />
file error messages<br />
If the test detects that required files are missing, these messages may come up.<br />
abnormal termination (CTRL+c)<br />
The user is notified of the abnormal termination of test.<br />
auxClock<br />
NAME<br />
SYNOPSIS<br />
DESCRIPTION<br />
auxClock – auxiliary clock tests<br />
bspVal options auxClock<br />
This test verifies the functionality of the auxiliary clock for the <strong>BSP</strong>. Its run-time is seven<br />
to ten minutes. See bspVal.sh for an explanation of options.<br />
The tests within this script connect a routine to the auxiliary clock interrupt handler using<br />
the sysAuxClkConnect( ) routine. This disconnects any routine previously connected to<br />
the auxiliary clock ISR by the <strong>BSP</strong>.<br />
In order to run this test, the target has to be configured with auxiliary clock. To do this,<br />
add INCLUDE_AUXCLK to config.h file of the <strong>BSP</strong> or include the component<br />
INCLUDE_AUX_CLK, if using project facility.<br />
NOTE: This reference entry lists the most likely reasons for a test’s failure. However, it<br />
does not list all possible reasons.<br />
372
J<br />
<strong>BSP</strong> Validation Test Suite Reference Entries<br />
Tests 1 through 4 check the accuracy of the auxiliary clock at several frequencies: an<br />
optional extra rate, minimum, maximum, and the default rate, respectively. To measure<br />
the rate of the auxiliary clock, a simple callback routine is connected to the auxiliary clock<br />
ISR using sysAuxClkConnect( ). This callback routine increments a counter on every<br />
clock tick. The counter is then cleared, and the auxiliary clock is enabled at the rate being<br />
tested. The counter is read after 10 seconds and again after 130 seconds. The counter<br />
values are used to calculate the average interrupt rate of the auxiliary clock. Three<br />
measurements are taken to cancel the fixed portion of measurement latency error. The<br />
computed clock rate error is reported with one percent resolution. If the measured clock<br />
rate is more than 10 percent off the value being tested, the test for that rate fails.<br />
If any of these tests fail, check that the timer chip is properly initialized and is<br />
programmed with an appropriate scaling factor, if necessary. Interrupts should be<br />
enabled in sysAuxClkEnable( ) before the timer is started. Check that the<br />
sysAuxClkRoutine( ) is getting connected by sysAuxClkConnect( ), and that the<br />
sysAuxClkRoutine( ) is being called on every auxiliary clock interrupt.<br />
The fifth test verifies the operation of sysAuxClkDisable( ). This is done by periodically<br />
checking the same counter incremented by the first four tests. After sysAuxClkDisable( )<br />
is called, this counter should not continue to increment. If this test fails, check that the<br />
sysAuxClkDisable( ) routine is disabling timer interrupts, turning off the timer, and<br />
setting the running flag to FALSE.<br />
The sixth test performs parameter checking of the sysAuxClkRateSet( ) routine. This test<br />
checks that the proper return value is given for erroneous input parameters. If this test<br />
fails, check that sysAuxClkRateSet( ) performs error checking based on the<br />
AUX_CLK_RATE_MIN and AUX_CLK_RATE_MAX macros.<br />
The seventh test checks the return values of the sysAuxClkRateSet( ) and<br />
sysAuxClkRateGet( ) routines when first passed valid rates followed by erroneous rates.<br />
If this test fails, check that sysAuxClkRateSet( ) is setting the global rate variable, and that<br />
sysAuxClkRateGet( ) is reading the same variable.<br />
Barring serious hardware or software limitations (such as an identifiable VxWorks<br />
problem), the target board must pass all tests for the <strong>BSP</strong> to be validated.<br />
J<br />
CONFIGURATION PARAMETERS<br />
T1_EXTRA_AUXCLK<br />
Another rate to test (optional).<br />
EXAMPLE<br />
Output consists of:<br />
<strong>BSP</strong> VALIDATION TEST<br />
-------------------<br />
Target server : t53-160<br />
<strong>BSP</strong><br />
: mv147<br />
Log file<br />
: /tmp/bspValidationLog.5219<br />
Auxiliary Clock Test :<br />
373
VxWorks 5.5<br />
<strong>BSP</strong> Developer’s <strong>Guide</strong><br />
auxClk at 4321 hertz (rate = 4325 error = 0%)<br />
auxClk at 3 hertz (rate = 3 error = 0%)<br />
auxClk at 5000 hertz (rate = 5002 error = 0%)<br />
auxClk at 60 hertz (rate = 60 error = 0%)<br />
sysAuxClkDisable() disables auxClk<br />
sysAuxClkRateSet() parameter checking<br />
sysAuxClkRateGet() return value<br />
Tests RUN 7<br />
Tests PASSED 7<br />
Tests FAILED 0<br />
Tests SKIPPED 0<br />
: PASS<br />
: PASS<br />
: PASS<br />
: PASS<br />
: PASS<br />
: PASS<br />
: PASS<br />
SEE ALSO<br />
bspVal.sh, cloclkLib.tcl, bspPkCommonProc.tcl, envLib.tcl, pkLib.c<br />
baudConsole<br />
NAME<br />
SYNOPSIS<br />
DESCRIPTION<br />
baudConsole – console baud rate test<br />
bspVal options baudConsole<br />
This test verifies the target console’s ability to communicate at all supported serial baud<br />
rates. It has a run-time of several minutes. See bspVal.sh for an explanation of options.<br />
NOTE: This reference entry lists the most likely reasons for a test’s failure. However, it<br />
does not list all possible reasons.<br />
This script consists of one test for each serial baud rate supported by both the host and the<br />
target. The host’s supported rates are given in the macro <strong>BSP</strong>TEST_HOST_RATES. The<br />
target’s supported rates are determined by the return value of an ioctl( ) call to the serial<br />
driver. A return of OK (0) indicates that the requested baud rate is supported. A return of<br />
ERROR (-1) indicates that the rate is unsupported. Baud rates supported by the target but<br />
not by the host cannot be tested. The actual communication verification amounts to<br />
simply being able to check the present baud rate from the shell, and calling ioctl( ) to set<br />
the console to the next baud rate. If any of these tests fail, check that the serial device is<br />
capable of supporting the given rate. The baud rate generator must be properly initialized<br />
and enabled, if present. Also check that the serial driver’s ioctl( ) routine performs error<br />
checking consistent with intended baud rate support.<br />
If the test execution ends prematurely, the target board might be left set to a baud rate<br />
other than T1_SER_BAUD. This situation could leave the board in such a state that a<br />
power cycle reset would be necessary to continue with other tests.<br />
374
J<br />
<strong>BSP</strong> Validation Test Suite Reference Entries<br />
Barring serious hardware or software limitations (such as an identifiable VxWorks<br />
problem), the target board must pass all tests for the <strong>BSP</strong> to be validated.<br />
CONFIGURATION PARAMETERS<br />
<strong>BSP</strong>TEST_HOST_RATES<br />
Host supported baud rates (required).<br />
T1_SER_DEVICE<br />
Serial device to be used on host (required).<br />
T1_SER_BAUD<br />
Default serial baud rate (required).<br />
EXAMPLE<br />
SEE ALSO<br />
Output consists of:<br />
<strong>BSP</strong> VALIDATION TEST<br />
-------------------<br />
Target server : t53-160<br />
<strong>BSP</strong><br />
: mv147<br />
Log file<br />
: /tmp/bspValidationLog.5219<br />
Baud Console Test :<br />
console at 150 baud<br />
: PASS<br />
console at 300 baud<br />
: PASS<br />
console at 600 baud<br />
: PASS<br />
console at 1200 baud<br />
: PASS<br />
console at 1800 baud<br />
: PASS<br />
console at 2400 baud<br />
: PASS<br />
console at 4800 baud<br />
: PASS<br />
console at 9600 baud<br />
: PASS<br />
console at 19200 baud<br />
: PASS<br />
console at 38400 baud<br />
: PASS<br />
Tests RUN 10<br />
Tests PASSED 10<br />
Tests FAILED 0<br />
Tests SKIPPED 0<br />
bspVal.sh, bspCommonProc.tcl, serLib.tcl, envLib.tcl, pkLib.c<br />
J<br />
375
VxWorks 5.5<br />
<strong>BSP</strong> Developer’s <strong>Guide</strong><br />
bootline<br />
NAME<br />
SYNOPSIS<br />
DESCRIPTION<br />
bootline – functionality test for bootline<br />
bspVal options bootline<br />
This test verifies the commands executable from the VxWorks boot ROM prompt. It has a<br />
run-time of up to a few minutes. See bspVal.sh for an explanation of options.<br />
NOTE: This reference entry lists the most likely reasons for a test’s failure. However, it<br />
does not list all possible reasons.<br />
The first test reboots the target while sending characters to the serial console, causing<br />
possible problems with pending serial interrupts. If this test fails, check that CPU<br />
interrupts are properly disabled in romInit( ), a routine defined in romInit.s, and that all<br />
serial device interrupts are disabled and cleared in the sysLib routine, sysSerialHwInit( ).<br />
The second and third tests check the bus error exception handling functionality (local and<br />
off-board addresses, respectively). If these tests fail, check that the memory controller is<br />
initialized properly and that any memory watchdog timers are configured to reasonable<br />
values (if present).<br />
If there is not a local (on-board) memory address that can cause a bus error when<br />
accessed, the macro T1_BOOT_LOCAL_ERR_ADRS should be set to an invalid off-board<br />
address.<br />
The fourth test checks that the bootline commands and booting mechanisms all act as<br />
expected. This test can fail for a variety of reasons. Check that the memory controller is set<br />
up properly and that the network connection is attached.<br />
This test script does not work properly with a VxWorks standalone image in ROM. If the<br />
target can execute VxWorks only out of ROM, this test script should not be part of the <strong>BSP</strong><br />
validation procedure.<br />
Make sure that all the boot line parameters in the configuration file represent the actual<br />
target boot parameters. Failing to do so can leave target in a state where a power cycle<br />
reset is necessary with change in boot parameters.<br />
Barring serious hardware or software limitations (such as an identifiable VxWorks<br />
problem), the target board must pass all tests for the <strong>BSP</strong> to be validated.<br />
CONFIGURATION PARAMETERS<br />
T1_BOOT_LOCAL_ERR_ADRS<br />
Local memory address that causes bus error. (required)<br />
T1_BOOT_OFFBOARD_ERR_ADRS<br />
Off-board address that causes bus error. (required)<br />
376
J<br />
<strong>BSP</strong> Validation Test Suite Reference Entries<br />
T1_BOOT_LOCAL_BUS_ERR_MSG<br />
Local bus error message keyword. (required)<br />
T1_BOOT_OFFBOARD_BUS_ERR_MSG<br />
Off-board bus error message keyword. (required)<br />
T1_SER_DEVICE<br />
Serial device to be used on host. (required)<br />
T1_SER_BAUD<br />
Default serial baud rate. (required)<br />
T1_TMO_BOOT<br />
Timeout value for booting vxWorks. (required)<br />
EXAMPLE<br />
SEE ALSO<br />
Output consists of:<br />
<strong>BSP</strong> VALIDATION TEST<br />
-------------------<br />
Target server : t53-160<br />
<strong>BSP</strong><br />
: mv147<br />
Log file<br />
: /tmp/bspValidationLog.5219<br />
Bootline Test :<br />
Control X test<br />
: PASS<br />
Bus error test for local error address<br />
: PASS<br />
Bus error test for off-board error address<br />
: PASS<br />
boot commands test<br />
: PASS<br />
Tests RUN 4<br />
Tests PASSED 4<br />
Tests FAILED 0<br />
Tests SKIPPED 0<br />
bspVal.sh, bspPkCommonProc.tcl, serLib.tcl, envLib.tcl, pkLib.c<br />
J<br />
busTas<br />
NAME<br />
SYNOPSIS<br />
DESCRIPTION<br />
busTas – bus test-and-set test<br />
bspVal options busTas<br />
This module is the Tcl code for the test-and-set test. It verifies the sysBusTas( ) operation<br />
between two VxWorks target boards in a common VME backplane. This module is<br />
implemented in Tcl and WTX protocols functions. The entire test takes approximately 10<br />
minutes to run. See bspVal.sh for an explanation of options.<br />
377
VxWorks 5.5<br />
<strong>BSP</strong> Developer’s <strong>Guide</strong><br />
If this test is run between two targets using shared memory, make sure the target is<br />
configured to include shared memory show routines. To do this, add<br />
INCLUDE_SHOW_ROUTINES to config.h of the <strong>BSP</strong>s or include the component<br />
INCLUDE_SM_NET_SHOW, if using project facility.<br />
NOTE: This reference entry lists the most likely reasons for a test’s failure. However, it<br />
does not list all possible reasons.<br />
The script does not reboot the targets. It assumes that the two targets and their respective<br />
target servers are up and running.<br />
By default the test assumes that T1 target is the system controller on the common VME<br />
backplane. An optional configuration parameter T1_BUS_MASTER can be set to FALSE<br />
to override this default configuration. In this case the T2 target is assumed to be the<br />
system controller. It is necessary to make sure that T1_BUS_MASTER has the correct<br />
value in case targets have to be rebooted before running any test.<br />
The test starts by obtaining two cache-coherent memory locations by calls to<br />
cacheDmaMalloc( ) on the master. These two memory locations are used for the<br />
semaphore and the access counter. The pkTestRamByte function checks that the<br />
addresses returned by cacheDmaMalloc( ) are readable and writable.<br />
Next, the local addresses are used to compute the bus addresses by calling the function<br />
sysLocalToBusAdrs( ) on the master. The bus addresses returned by<br />
sysLocalToBusAdrs( ) are passed to the slave, which uses the function<br />
sysBusToLocalAdrs( ) to get its own local addresses that it must apply to access the<br />
semaphore and counter locations on the master’s shared memory. The smAdrsFind<br />
procedure is called to verify that the counter and semaphore locations are seen by both the<br />
master and the slave. The memory locations are then initialized and the test is started by<br />
spawning the pkTasTest task on both master and slave. The functions<br />
wtxContextCreate( ) and wtxContextResume( ) are used here to spawn and start the<br />
tasks. The function pkTasTest( ) uses the semaphore location for mutual exclusion. When<br />
the master gets the semaphore, it increments the counter, if it is odd, and runs a busy-wait<br />
loop until it finally clears the semaphore. The slave runs the same way except that it<br />
increments the counter if it is even. This scheme ensures that the two tasks take turns<br />
grabbing the semaphore and incrementing the counter.<br />
The counter is monitored from the script, which takes two readings of the counter one<br />
second apart. If the second reading is larger than the first one, the short-term test is<br />
successful. After a pause of ten minutes, the two readings are retaken. If the counter is still<br />
increasing, the long-term test is successful.<br />
If this test fails, check that the master and slave are both accessing the same two master<br />
memory locations. If the master sysLocalToBusAdrs( ) or the slave sysBusToLocalAdrs( )<br />
routines are not functioning properly, the test will not be able to find appropriate slave<br />
addresses that access the master memory locations. The master memory locations must be<br />
cache-coherent and must be writable. The VME controller chips must be initialized to<br />
378
J<br />
<strong>BSP</strong> Validation Test Suite Reference Entries<br />
CONFIGURATION PARAMETERS<br />
proper values. For fast target boards, it might be necessary to increase the busy-wait<br />
delays given by the T1_TAS_DELAY (T2_TAS_DELAY) macro.<br />
The two tests in this script require two unique cache-coherent memory locations on master<br />
that can be accessed by both master and slave. By default, these locations are obtained by<br />
calls to cacheDmaMalloc( ) on the master. Alternatively, the macros T1_COUNT_ADRS<br />
and/or T1_SEM_ADRS can be changed from the default of “-1” to point to unique shared<br />
memory addresses on master. In this case, the user must make sure that these are free<br />
cache-coherent memory locations. The ability to explicitly declare these locations is<br />
provided for debugging purposes and for boards with hardware limitations. The final<br />
validation should leave the macros set to “-1”, and allocate the memory dynamically by<br />
calling cacheDmaMalloc( ).<br />
Barring serious hardware or software limitations (such as an identifiable VxWorks<br />
problem), the target board must pass all tests for the <strong>BSP</strong> to be validated. Of course, if the<br />
VME backplane is not supported by the target board, then this test is not a <strong>BSP</strong> validation<br />
requirement.<br />
T1_COUNT_ADRS<br />
Address of master’s shared counter (optional).<br />
T1_SEM_ADRS<br />
Address of master’s shared semaphore (optional).<br />
T1_TAS_DELAY<br />
Busy delay during TAS on master (optional).<br />
T2_TAS_DELAY<br />
Busy delay during TAS on slave (optional).<br />
EXAMPLE<br />
SEE ALSO<br />
Output consists of:<br />
<strong>BSP</strong> VALIDATION TEST<br />
-------------------<br />
Target server : t53-160<br />
<strong>BSP</strong><br />
: mv147<br />
Second target server : t214-2<br />
Second <strong>BSP</strong><br />
: mv147<br />
Log file<br />
: /tmp/bspValidationLog.6425<br />
busTas:<br />
short-term TAS test<br />
: PASS<br />
long-term TAS test<br />
: PASS<br />
Tests RUN 2<br />
Tests PASSED 2<br />
Tests FAILED 0<br />
Tests SKIPPED 0<br />
bspVal.sh, smLib.tcl, pkLib.c<br />
J<br />
379
VxWorks 5.5<br />
<strong>BSP</strong> Developer’s <strong>Guide</strong><br />
eprom<br />
NAME<br />
SYNOPSIS<br />
DESCRIPTION<br />
eprom – EPROM tests<br />
bspVal options eprom<br />
This test verifies ROM read operations. The execution time of the tests run by this script<br />
depends on the CPU speed and the amount of ROM being tested. See bspVal.sh for an<br />
explanation of options.<br />
NOTE: This reference entry lists the most likely reasons for a test’s failure. However, it<br />
does not list all possible reasons.<br />
The three tests in this script call pkRead( ) to perform read operations of the ROM<br />
locations between ROM_BASE_ADRS and (ROM_BASE_ADRS + ROM_SIZE). The<br />
reads are done using 1-, 2-, or 4-byte accesses, depending on which test is being run. If any<br />
of these tests fail, but the memory hardware is known to be functioning properly, check<br />
that the memory controller is initialized to the correct values. Make sure that<br />
ROM_BASE_ADRS and ROM_SIZE are set to the correct values. If an MMU is present, it<br />
might need to be configured so that the entire ROM space is accessible.<br />
Barring serious hardware or software limitations (such as an identifiable VxWorks<br />
problem), the target board must pass all tests for the <strong>BSP</strong> to be validated.<br />
CONFIGURATION PARAMETERS<br />
None.<br />
EXAMPLE<br />
SEE ALSO<br />
Output consists of:<br />
<strong>BSP</strong> VALIDATION TEST<br />
-------------------<br />
Target server : t53-160<br />
<strong>BSP</strong><br />
: mv147<br />
Log file<br />
: /tmp/bspValidationLog.5219<br />
EPROM Test :<br />
1-byte read of EPROM<br />
: PASS<br />
2-byte read of EPROM<br />
: PASS<br />
4-byte read of EPROM<br />
: PASS<br />
Tests RUN 3<br />
Tests PASSED 3<br />
Tests FAILED 0<br />
Tests SKIPPED 0<br />
bspVal.sh, bspPkCommonProc.tcl, pkLib.c<br />
380
J<br />
<strong>BSP</strong> Validation Test Suite Reference Entries<br />
error1<br />
NAME<br />
SYNOPSIS<br />
DESCRIPTION<br />
error1 – error handling tests<br />
bspVal options error1<br />
This script tests the target’s local bus access. The off-board bus access and divide by zero<br />
exceptions are initiated from the target shell. See bspVal.sh for an explanation of options.<br />
NOTE: This reference entry lists the most likely reasons for a test’s failure. However, it<br />
does not list all possible reasons.<br />
The first and second tests check the bus error exception handling functionality (local and<br />
off-board addresses, respectively). If these tests fail, check that the memory controller is<br />
initialized properly and that any memory watchdog timers are configured to reasonable<br />
values (if present).<br />
If there is not a local (on-board) memory address that causes a bus error when accessed,<br />
set the T1_LOCAL_ERR_ADRS macro to an invalid off-board address.<br />
The third test causes a divide by zero exception and checks for the return messages from<br />
the console.<br />
CONFIGURATION PARAMETERS<br />
T1_LOCAL_ERR_ADRS<br />
Local error address that causes a bus error (required).<br />
T1_OFFBOARD_ERR_ADRS<br />
Off-board error address that causes a bus error (required).<br />
T1_DIV_ZERO_MSG<br />
Bus error message keyword (required).<br />
T1_LOCAL_BUS_ERR_MSG<br />
Local bus error message keyword (required).<br />
T1_OFFBOARD_BUS_ERR_MSG<br />
Off-board bus error message keyword (required).<br />
T1_SER_DEVICE<br />
Serial device on host (required).<br />
T1_SER_BAUD<br />
Default serial baud rate (required).<br />
T1_TMO_BOOT<br />
Timeout value for booting VxWorks (required).<br />
J<br />
381
VxWorks 5.5<br />
<strong>BSP</strong> Developer’s <strong>Guide</strong><br />
EXAMPLE<br />
SEE ALSO<br />
Output consists of:<br />
<strong>BSP</strong> VALIDATION TEST<br />
-------------------<br />
Target server : t53-160<br />
<strong>BSP</strong><br />
: mv147<br />
Log file<br />
: /tmp/bspValidationLog.5219<br />
First Error Test :<br />
bus-error test for local address<br />
: PASS<br />
bus-error test for offboard address<br />
: PASS<br />
Divide by zero test<br />
: PASS<br />
Tests RUN 3<br />
Tests PASSED 3<br />
Tests FAILED 0<br />
Tests SKIPPED 0<br />
bspVal.sh, bspPkCommonProc.tcl, serLib.tcl, envLib.tcl, pkLib.c<br />
error2<br />
NAME<br />
SYNOPSIS<br />
DESCRIPTION<br />
error2 – error handling tests<br />
bspVal options error2<br />
This test verifies that the target board does not hang while handling errors initiated from<br />
the VxWorks shell. The entire test can take several minutes to run. See bspVal.sh for an<br />
explanation of options.<br />
In order to run this test, the target has to be configured with auxiliary clock. To do this,<br />
add INCLUDE_AUXCLK to config.h file of the <strong>BSP</strong> or include the component<br />
INCLUDE_AUX_CLK, if using project facility.<br />
NOTE: This reference entry lists the most likely reasons for a test’s failure. However, it<br />
does not list all possible reasons.<br />
The first test connects a routine that causes a bus error to the target’s system clock<br />
interrupt. This causes an exception at interrupt level, known as a “catastrophic” error.<br />
This exception should result in a reboot of the board. An appropriate error message<br />
should be displayed by the target. If this test fails, check that the sysToMonitor( ) routine<br />
in sysLib.c is functioning properly. Also check that the address of sysExcMsg is set<br />
correctly in sysLib.c.<br />
382
J<br />
<strong>BSP</strong> Validation Test Suite Reference Entries<br />
The second test reboots the target from the shell while characters are sent to the serial<br />
console and the auxiliary clock is enabled at the maximum rate. This checks that pending<br />
interrupts do not cause problems while rebooting. If this test fails, check that CPU<br />
interrupts are properly disabled in romInit( ), which is defined in romInit.s, and that all<br />
serial device interrupts are disabled and cleared in sysSerialHwInit( ). Also, check that<br />
the auxiliary clock routine sysAuxClkRoutine( ) is initialized to NULL and, if it is NULL,<br />
that the auxiliary clock is not called in sysAuxClkInt( ).<br />
Make sure that all the boot-line parameters in the configuration file represent the actual<br />
target boot parameters. Failing to do so could leave target in a state where a power cycle<br />
reset would be necessary with change in boot parameters.<br />
Barring serious hardware or software limitations (such as an identifiable VxWorks<br />
problem), the target board must pass all tests for the <strong>BSP</strong> to be validated.<br />
CONFIGURATION PARAMETERS<br />
T1_OFFBOARD_ERR_ADRS<br />
Off-board address that causes a bus error. (required)<br />
T1_CATASTROPHIC_ERR_MSG<br />
catastrophic error message keyword (required)<br />
T1_SER_DEVICE<br />
Serial device that is used on host. (required)<br />
T1_SER_BAUD<br />
Serial baud rate used. (required)<br />
T1_TMO_BOOT<br />
Timeout value for booting vxWorks. (required)<br />
EXAMPLE<br />
SEE ALSO<br />
Output consists of:<br />
<strong>BSP</strong> VALIDATION TEST<br />
-------------------<br />
Target server : t53-160<br />
<strong>BSP</strong><br />
: mv147<br />
Log file<br />
: /tmp/bspValidationLog.5219<br />
Second Error Test :<br />
catastrophic error test<br />
: PASS<br />
reboot with interrupts<br />
: PASS<br />
Tests RUN 2<br />
Tests PASSED 2<br />
Tests FAILED 0<br />
Tests SKIPPED 0<br />
bspVal.sh, bspPkCommonProc.tcl, serLib.tcl, envLib.tcl<br />
J<br />
383
VxWorks 5.5<br />
<strong>BSP</strong> Developer’s <strong>Guide</strong><br />
model<br />
NAME<br />
SYNOPSIS<br />
DESCRIPTION<br />
model – sysModel( ) test<br />
bspVal options model<br />
This test verifies that the target board matches the target configuration file. To do this, it<br />
verifies the return value of the sysModel( ) routine. This value is extracted from the target<br />
information stored at target server. The entire test should not take more than a few<br />
seconds to run. See bspVal.sh for an explanation of options.<br />
This is the first test run if the -all option is specified for bspVal.<br />
NOTE: This reference entry lists the most likely reason for this test’s failure. However, it<br />
does not list all possible reasons.<br />
The first (and only) test compares the return value of sysModel( ) to the string specified<br />
by T1_MODEL. If this test fails, check that the sysModel( ) routine in sysLib.c returns the<br />
correct target model information.<br />
Barring serious hardware or software limitations (such as an identifiable VxWorks<br />
problem), the target board must pass all tests for the <strong>BSP</strong> to be validated.<br />
CONFIGURATION PARAMETERS<br />
T1_MODEL<br />
Expected result of sysModel( ). (required)<br />
EXAMPLE<br />
SEE ALSO<br />
Output consists of:<br />
<strong>BSP</strong> VALIDATION TEST<br />
-------------------<br />
Target server : t53-160<br />
<strong>BSP</strong><br />
: mv147<br />
Log file<br />
: /tmp/bspValidationLog.5219<br />
Model Test :<br />
sysModel() return value<br />
: PASS<br />
Tests RUN 1<br />
Tests PASSED 1<br />
Tests FAILED 0<br />
Tests SKIPPED 0<br />
bspVal.sh, bspPkCommonProc.tcl, envLib.tcl<br />
384
J<br />
<strong>BSP</strong> Validation Test Suite Reference Entries<br />
network<br />
NAME<br />
SYNOPSIS<br />
DESCRIPTION<br />
network – I/O tests for network<br />
bspVal options network<br />
This test verifies basic network functionality, independent of network media. This script is<br />
written in Tcl and uses some WTX protocol functions. It also uses tclSerial library<br />
functions for accessing the serial port(s). The entire test can take several minutes to run.<br />
See bspVal.sh for an explanation of options.<br />
NOTE: This reference entry lists the most likely reasons for a test’s failure. However, it<br />
does not list all possible reasons.<br />
This test requires two targets. The target being tested is the master. The second target, the<br />
slave, is used to run ping and udpEchoTest. The VxWorks image running on the slave<br />
must be built with the macro INCLUDE_PING defined. Both the targets require a<br />
VxWorks image built with INCLUDE_NET_SHOW defined. If using project facility, add<br />
components INCLUDE_PING and INCLUDE_NET_SHOW to respective VxWorks<br />
images.<br />
The first test uses ping to send approximately 50 ICMP packets (datagrams) to the ICMP<br />
server resident on the master. Each packet contains a request for a response from the<br />
server; the response should be received by the slave. The round-trip time, from sending to<br />
receiving, is displayed for each packet. As long as approximately 50 responses are logged<br />
by the slave, this test passes. If this test fails, check the network connection and make sure<br />
that the target IP address is correct.<br />
The first test requires that ping be present on the slave. A check is done to make sure that<br />
it is in the path. If ping is missing, the test aborts because the UDP test uses the ping<br />
statistics.<br />
The second test spawns the pkUdpEchoTest( ), a pkLib.c routine, on the slave to send a<br />
quantity of UDP packets to a UDP echo daemon running on the master, which is started<br />
by spawning pkUdpEchod( ), also a pkLib.c routine. Each UDP packet is sent by the slave<br />
to the master, echoed, read back in by the slave, then checked for correct size and content.<br />
Sixteen different size packets are sent and received. If pkUdpEchoTest( ) times out<br />
waiting for the echo, the packet is resent once. If the resent packet does not make it, the<br />
test is marked as a failure. The timeout value for individual UDP packets is derived from<br />
the statistics displayed in the ping test. This value depends on the network media being<br />
used. The actual packet round-trip time, however, should be considerably less than the<br />
calculated timeout value used. If this test fails, make sure that a reliable host is being used<br />
and that the network is not being overloaded by other packet traffic.<br />
The UDP/IP networking protocol is used in the second test. UDP/IP makes no guarantees<br />
with regard to packet delivery, thus the host and/or target might occasionally drop<br />
J<br />
385
VxWorks 5.5<br />
<strong>BSP</strong> Developer’s <strong>Guide</strong><br />
packets. Although several dropped packets does not constitute a failed test, a large<br />
number of dropped packets (greater than one percent of the total sent) could indicate a<br />
problem with any of the following: network configuration, network device, device driver,<br />
networking software.<br />
Barring serious hardware or software limitations (such as an identifiable VxWorks<br />
problem), the target board must pass all tests for the <strong>BSP</strong> to be validated.<br />
A target that continually fails the second test might or might not be functioning properly.<br />
If it can be proven that the host is responsible for dropping the packets (for example, by<br />
running etherfind), then the target cannot be declared to have passed or failed this test.<br />
Hardware and network environment limitations need to be taken into consideration when<br />
evaluating the results of this test.<br />
CONFIGURATION PARAMETERS<br />
T1_BOOT_TN<br />
Master target name (required).<br />
T1_BOOT_E<br />
Master target IP address (required).<br />
T1_BOOT_B<br />
Master target backplane address (required).<br />
T2_BOOT_TN<br />
Slave target name (required).<br />
T2_BOOT_E<br />
Slave target IP address (required).<br />
T2_BOOT_B<br />
Slave target backplane address (required).<br />
T2_UDP_TRANS<br />
Number of packets used in UDP test.<br />
EXAMPLE<br />
Output consists of:<br />
<strong>BSP</strong> VALIDATION TEST<br />
-------------------<br />
Target server : t53-160<br />
<strong>BSP</strong><br />
: mv147<br />
Second target server : t214-2<br />
Second <strong>BSP</strong><br />
: mv147<br />
Log file<br />
: /tmp/bspValidationLog.6425<br />
network :<br />
ping target test<br />
: PASS<br />
UDP packet echo test<br />
: PASS<br />
Tests RUN 2<br />
386
J<br />
<strong>BSP</strong> Validation Test Suite Reference Entries<br />
Tests PASSED 2<br />
Tests FAILED 0<br />
Tests SKIPPED 0<br />
SEE ALSO<br />
bspVal.sh, networkLib.tcl, pkLib.c<br />
nvRam<br />
NAME<br />
SYNOPSIS<br />
DESCRIPTION<br />
nvRam – non-volatile RAM tests<br />
bspVal options nvRam<br />
This test verifies sysNvRamGet( ) and sysNvRamSet( ), the sysLib.c routines that<br />
manipulate non-volatile memory. See bspVal.sh for an explanation of options.<br />
NOTE: This reference entry lists the most likely reasons for a test’s failure. However, it<br />
does not list all possible reasons.<br />
On targets without non-volatile RAM, NV_RAM_SIZE should be set to NONE (-1) in the<br />
<strong>BSP</strong>. On such boards, only parameter checking of sysNvRamSet( ) and sysNvRamGet( )<br />
is performed. If only a portion of NVRAM is writable, or some amount is reserved for<br />
hardware operations, be sure to specify the writable size with the<br />
NV_RAM_SIZE_WRITEABLE macro in config.h.<br />
The execution time of the tests run by this script is dependent on the size of NVRAM<br />
being tested and the CPU speed. The entire test script should not take more than a few<br />
minutes to run to completion.<br />
This script merely calls pkTestNvRam( ) eight times to perform different non-volatile<br />
RAM functionality tests.<br />
The first test verifies the operation of a sysNvRamGet( ) read of NV_RAM_SIZE bytes. If<br />
this test fails, check that NV_RAM_SIZE is set to the size of NVRAM and that<br />
NV_BOOT_OFFSET is defined and used properly. Also check that sysNvRamGet( ) is<br />
copying the entire length requested from NVRAM into the passed-in buffer.<br />
The second test reads, writes, and reads NV_RAM_SIZE bytes of NVRAM to check<br />
sysNvRamSet( ) functionality. If this test fails, check the same problem areas as the first<br />
test. Also check that sysNvRamSet( ) is copying the entire length requested from the<br />
passed-in buffer into NVRAM.<br />
The third test checks the operation of a sysNvRamGet( ) read of zero bytes. If this test<br />
fails, check that reads of zero length are allowed by sysNvRamGet( ). The buffer should<br />
be properly terminated with EOS, and the routine should return OK.<br />
J<br />
387
VxWorks 5.5<br />
<strong>BSP</strong> Developer’s <strong>Guide</strong><br />
The fourth test performs parameter checking of sysNvRamSet( ). This test checks that the<br />
proper return value is given for erroneous input parameters. If this test fails, check that<br />
error checking is provided by sysNvRamSet( ), which should return ERROR for a<br />
negative offset or a length parameter. Also, the value of the offset plus length parameters<br />
must be less than NV_RAM_SIZE.<br />
The fifth test performs parameter checking of sysNvRamGet( ). This test checks that the<br />
proper return value is given for erroneous input parameters. If this test fails, check that<br />
error checking is provided by sysNvRamGet( ), which should return ERROR for a<br />
negative offset or length parameter. Also, the value of the offset plus length parameters<br />
must be less than NV_RAM_SIZE.<br />
The sixth test writes several bytes of data (0xff), then reads back from the same NVRAM<br />
location. This operation checks that the same data is read back, and that the buffer is<br />
returned with a NULL termination. If this test fails, check that writing 0xff to NVRAM<br />
does not cause a problem and that the passed-in buffer is properly terminated with EOS.<br />
The seventh test writes several bytes of data (0x00), then reads back from the same<br />
NVRAM location. This operation checks that the same data is read back, and that the<br />
buffer is returned with a NULL termination. If this test fails, check that writing 0x00 to<br />
NVRAM does not cause a problem and that the passed-in buffer is properly terminated<br />
with EOS.<br />
The eighth test returns NV_RAM_SIZE bytes of NVRAM back to the values read in the<br />
first test. If this test fails, check that NV_RAM_SIZE bytes of NVRAM can be written and<br />
read with sysNvRamSet( ) and sysNvRamGet( ).<br />
Barring serious hardware or software limitations (such as an identifiable VxWorks<br />
problem), the target board must pass all tests for the <strong>BSP</strong> to be validated.<br />
CONFIGURATION PARAMETERS<br />
None.<br />
EXAMPLE<br />
Output consists of:<br />
<strong>BSP</strong> VALIDATION TEST<br />
-------------------<br />
Target server : t53-160<br />
<strong>BSP</strong><br />
: mv147<br />
Log file<br />
: /tmp/bspValidationLog.5219<br />
Non-Volatile RAM Test :<br />
sysNvRamGet() of boot line<br />
: PASS<br />
sysNvRamSet() and sysNvRamGet() of complemented bootline : PASS<br />
sysNvRamGet() with length zero<br />
: PASS<br />
sysNvRamSet() parameter checking<br />
: PASS<br />
sysNvRamGet() parameter checking<br />
: PASS<br />
sysNvRamSet() and sysNvRamGet() of 0xff data<br />
: PASS<br />
sysNvRamSet() and sysNvRamGet() of 0x00 data<br />
: PASS<br />
388
J<br />
<strong>BSP</strong> Validation Test Suite Reference Entries<br />
sysNvRamSet() and sysNvRamGet() of boot line<br />
Tests RUN 8<br />
Tests PASSED 8<br />
Tests FAILED 0<br />
Tests SKIPPED 0<br />
: PASS<br />
SEE ALSO<br />
bspVal.sh, bspPkCommonProc.tcl, pkLib.c<br />
procNumGet<br />
NAME<br />
SYNOPSIS<br />
DESCRIPTION<br />
procNumGet – sysProcNumGet( ) test<br />
bspVal options procNumGet<br />
This test verifies the return value of the sysProcNumGet( ) routine. The entire test should<br />
not take more than a few seconds to run. See bspVal.sh for an explanation of options.<br />
NOTE: This reference entry lists the most likely reasons for a test’s failure. However, it<br />
does not list all possible reasons.<br />
The first (and only) test compares the return value of sysProcNumGet( ) to the number<br />
specified by T1_BOOT_PROCNUM. If this test fails, check that sysProcNumGet( )<br />
returns the correct target processor number information.<br />
Barring serious hardware or software limitations (such as an identifiable VxWorks<br />
problem), the target board must pass all tests for the <strong>BSP</strong> to be validated.<br />
CONFIGURATION PARAMETERS<br />
T1_BOOT_PROCNUM<br />
Expected result of sysProcNumGet( ). (required)<br />
J<br />
EXAMPLE<br />
Output consists of:<br />
<strong>BSP</strong> VALIDATION TEST<br />
-------------------<br />
Target server : t53-160<br />
<strong>BSP</strong><br />
: mv147<br />
Log file<br />
: /tmp/bspValidationLog.5219<br />
sysProcNumGet Test :<br />
sysProcNumGet() return value<br />
: PASS<br />
Tests RUN 1<br />
Tests PASSED 1<br />
389
VxWorks 5.5<br />
<strong>BSP</strong> Developer’s <strong>Guide</strong><br />
Tests FAILED 0<br />
Tests SKIPPED 0<br />
SEE ALSO<br />
bspVal.sh, bspPkCommonProc.tcl, envLib.tcl<br />
ram<br />
NAME<br />
SYNOPSIS<br />
DESCRIPTION<br />
ram – RAM tests<br />
bspVal options ram<br />
This test verifies RAM read operations. See bspVal.sh for an explanation of options.<br />
NOTE: This reference entry lists the most likely reasons for a test’s failure. However, it<br />
does not list all possible reasons.<br />
The three tests in this script call pkRead( ) to perform read operations of the RAM<br />
locations between LOCAL_MEM_LOCAL_ADRS and sysMemTop( ). The reads are<br />
done using 1-, 2-, and 4-byte accesses, depending on which test is being run. If any of<br />
these tests fail, but the memory hardware is known to be functioning properly, check that<br />
the memory controller is initialized to the correct values. Make sure that<br />
LOCAL_MEM_LOCAL_ADRS and LOCAL_MEM_SIZE are set to the correct values. If<br />
an MMU is present, it might need to be configured so that the entire RAM space is<br />
accessible. Check that sysMemTop( ) returns the correct values.<br />
Barring serious hardware or software limitations (such as an identifiable VxWorks<br />
problem), the target board must pass all tests for the <strong>BSP</strong> to be validated.<br />
CONFIGURATION PARAMETERS<br />
None.<br />
EXAMPLE<br />
Output consists of:<br />
<strong>BSP</strong> VALIDATION TEST<br />
-------------------<br />
Target server : t53-160<br />
<strong>BSP</strong><br />
: mv147<br />
Log file<br />
: /tmp/bspValidationLog.5219<br />
RAM Test :<br />
1-byte read of RAM<br />
: PASS<br />
2-byte read of RAM<br />
: PASS<br />
4-byte read of RAM<br />
: PASS<br />
Tests RUN 3<br />
390
J<br />
<strong>BSP</strong> Validation Test Suite Reference Entries<br />
Tests PASSED 3<br />
Tests FAILED 0<br />
Tests SKIPPED 0<br />
SEE ALSO<br />
bspVal.sh, bspPkCommonProc.tcl, pkLib.c<br />
rlogin<br />
NAME<br />
SYNOPSIS<br />
DESCRIPTION<br />
rlogin – testing rlogin<br />
bspVal options rlogin<br />
This test verifies the ability to rlogin between two VxWorks target boards. The entire test<br />
should not take more than a few minutes to run. See bspVal.h for an explanation of<br />
options.<br />
NOTE: This reference entry lists the most likely reasons for a test’s failure. However, it<br />
does not list all possible reasons.<br />
In order to run this test, the configuration file used to create the VxWorks image must<br />
have defined the following macros:<br />
INCLUDE_SHELL<br />
INCLUDE_RLOGIN<br />
INCLUDE_SHOW_ROUTINES<br />
INCLUDE_NET_SYM_TBL<br />
INCLUDE_LOADER<br />
If the project facility is used to create VxWorks image, add the following components to<br />
VxWorks configuration:<br />
INCLUDE_RLOGIN<br />
INCLUDE_SHELL<br />
INCLUDE_NET_SYM_TBL<br />
INCLUDE_LOADER<br />
INCLUDE_SM_NET_SHOW<br />
INCLUDE_SYM_TBL_SHOW<br />
INCLUDE_SHELL_BANNER<br />
J<br />
391
VxWorks 5.5<br />
<strong>BSP</strong> Developer’s <strong>Guide</strong><br />
All tests run by this script are concerned with verifying the rlogin process. After issuing<br />
an rlogin to the target on the reference board, the first test verifies that “IN USE” appears<br />
on the console of the target board. The second test confirms the rlogin session by calling<br />
version( ) from the VxWorks shell and attempting to match the address for the target<br />
board. The third test exercises the pty by spawning printLogo( ). The fourth test checks<br />
the operation of logout( ). This process is then repeated for rlogin from the target to the<br />
reference board and the rlogin session is confirmed with tests five through eight. If any of<br />
these tests fail, check that the IP address or backplane address for the target board<br />
(T1_BOOT_E or T1_BOOT_B) and reference board IP or backplane address<br />
(T2_BOOT_E or T2_BOOT_B) are set correctly. Check also that their respective target<br />
names (T1_BOOT_TN and T2_BOOT_TN) are set to their proper values.<br />
Barring serious hardware or software limitations (such as an identifiable VxWorks<br />
problem), the target board must pass all tests for the <strong>BSP</strong> to be validated.<br />
NOTE: This test does not require a backplane. It is enough if there is a network<br />
connection between the two targets. If the boards reside on separate sub-nets, the routing<br />
tables for each must be set up appropriately.<br />
CONFIGURATION PARAMETERS<br />
T1_BOOT_TN<br />
Target name (required).<br />
T1_BOOT_E<br />
Target IP address (required).<br />
T2_BOOT_B<br />
Target backplane address (required if T1_BOOT_E is not set).<br />
T2_BOOT_TN<br />
Reference target name (required).<br />
T2_BOOT_E<br />
Reference target IP address (required if T2_BOOT_B is not set).<br />
T2_BOOT_B<br />
Reference target backplane address (required if T2_BOOT_E is not set). Because the<br />
default is to use the Ethernet, if you set both T2_BOOT_E and T2_BOOT_B, the test<br />
uses the reference target IP address.<br />
EXAMPLE<br />
Output consists of:<br />
<strong>BSP</strong> VALIDATION TEST<br />
-------------------<br />
Target server : t53-160<br />
<strong>BSP</strong><br />
: mv147<br />
Second target server : t214-2<br />
Second <strong>BSP</strong><br />
: mv147<br />
392
J<br />
<strong>BSP</strong> Validation Test Suite Reference Entries<br />
Log file<br />
: /tmp/bspValidationLog.6425<br />
rlogin :<br />
IN USE message when rlogin to t53-160<br />
: PASS<br />
reach shell of t53-160<br />
: PASS<br />
rlogin pty usage on t53-160<br />
: PASS<br />
logout from t53-160<br />
: PASS<br />
IN USE message when rlogin to t214-2<br />
: PASS<br />
reach shell of t214-2<br />
: PASS<br />
rlogin pty usage on t214-2<br />
: PASS<br />
logout from t214-2<br />
: PASS<br />
Tests RUN 8<br />
Tests PASSED 8<br />
Tests FAILED 0<br />
Tests SKIPPED 0<br />
SEE ALSO<br />
bspVal.sh, loginLib.tcl<br />
scsi<br />
NAME<br />
scsi – SCSI test<br />
SYNOPSIS<br />
DESCRIPTION<br />
bspVal options scsi<br />
This test verifies SCSI read and write operations. See bspVal.sh for an explanation of<br />
options.<br />
In order to run this test, the target has to be configured for SCSI support. The target has to<br />
be configured for scsi show routines either by defining INCLUDE_SCSI_SHOW in<br />
config.h of the <strong>BSP</strong> or adding component INCLUDE_SCSI_SHOW, if using project<br />
facility.<br />
WARNING: All data on the SCSI device under test is overwritten.<br />
The execution time of the test run by this script depends on the size and speed of SCSI<br />
device being tested, the CPU speed, and the test buffer size (T1_SCSI_BUFSIZE). A small<br />
buffer slows the test. For particularly slow targets, slow devices, large SCSI devices,<br />
and/or small buffers, it might be necessary to increase the timeout value specified by the<br />
macro T1_TMO_SCSI. The entire script could take more than one hour to complete.<br />
For target boards with limited RAM, it might be necessary to reduce T1_SCSI_BUFSIZE<br />
from its default of 64 kilobytes. The buffer size must be a multiple of the block size of the<br />
device under test.<br />
J<br />
393
VxWorks 5.5<br />
<strong>BSP</strong> Developer’s <strong>Guide</strong><br />
NOTE: This reference entry lists the most likely reasons for a test’s failure. However, it<br />
does not list all possible reasons.<br />
The first test verifies the return value of scsiShow( ) routine. If this test fails, it is assumed<br />
that SCSI is not configured properly and the next test (for read/write operations on the<br />
device) is skipped.<br />
The second test calls pkTestOneUnit( ) to test the SCSI device specified by T1_SCSI_ID<br />
and T1_SCSI_LUN. A pattern is written to every block of the device, then each block is<br />
read to verify the pattern. If this test fails, check that the SCSI ID and LUN are properly<br />
configured and that the device appears in the output from the scsiShow( ) command.<br />
Barring serious hardware or software limitations (such as an identifiable VxWorks<br />
problem), the target board must pass all tests for the <strong>BSP</strong> to be validated. Of course, if<br />
SCSI is not supported by the target board, then SCSI testing is not a <strong>BSP</strong> validation<br />
requirement.<br />
CONFIGURATION PARAMETERS<br />
T1_SER_DEVICE<br />
Serial device used for target.<br />
T1_SER_BAUD<br />
Serial baud rate used for target.<br />
T1_SCSI_ID<br />
SCSI ID of the device under test.<br />
T1_SCSI_LUN<br />
SCSI LUN of the device under test.<br />
T1_SCSI_BUFSIZE<br />
Buffer size, in bytes (optional).<br />
T1_SCSI_NBBUF<br />
Number of buffers to write (optional).<br />
T1_SCSI_NBLOOP<br />
Number of loops to perform (optional).<br />
T1_TMO_SCSI<br />
Timeout value, in seconds (optional).<br />
EXAMPLE<br />
Output consists of:<br />
<strong>BSP</strong> VALIDATION TEST<br />
-------------------<br />
Target server : t53-160<br />
<strong>BSP</strong><br />
: mv147<br />
Log file<br />
: /tmp/bspValidationLog.5219<br />
SCSI Test :<br />
394
J<br />
<strong>BSP</strong> Validation Test Suite Reference Entries<br />
scsiShow() test<br />
SCSI write/read/verify device<br />
Tests RUN 2<br />
Tests PASSED 2<br />
Tests FAILED 0<br />
Tests SKIPPED 0<br />
: PASS<br />
: PASS<br />
SEE ALSO<br />
bspVal.sh, serLib.tcl, pkLib.c, bspPkCommonProc.tcl, envLib.tcl<br />
serial<br />
NAME<br />
SYNOPSIS<br />
DESCRIPTION<br />
serial – serial I/O tests<br />
bspVal options serial<br />
This test verifies serial driver functionality under adverse conditions. See bspVal.sh for an<br />
explanation of options. The entire test can take several minutes to run.<br />
NOTE: This reference entry lists the most likely reasons for a test’s failure. However, it<br />
does not list all possible reasons.<br />
The first test stresses the serial console port by having a target function repeatedly send<br />
output to the console, tty, while input is coming in from the host. The test checks that the<br />
target does not hang and that all the input sent was received intact by the target. This test<br />
is run at the highest baud rate supported by both host and target. If this test fails, check<br />
the serial connection. The serial driver’s receive and transmit facilities must be stable and<br />
functioning properly. Generally, the driver should handle the receive interrupts before<br />
servicing transmit interrupts if both events are handled by the same ISR.<br />
The second test also stresses the serial console port. The pkConsoleEcho( ) routine puts<br />
the console port in echo mode, where all characters sent by the host are immediately<br />
echoed. The test makes sure that every character sent to the console is received back by<br />
the host in the correct order and quantity. This test is run at the highest baud rate<br />
supported by both host and target. If this test fails, check for any possible interrupt race<br />
conditions in the serial driver.<br />
The next two tests require that all free serial ports (other than the ttys used for the console<br />
and SLIP) be connected to run in loopback mode. This can usually be accomplished by<br />
running a jumper wire from the transmit/output line to the receive/input line. It might<br />
also be necessary to run a jumper from the RTS to the CTS line for ports with hardware<br />
handshaking.<br />
J<br />
395
VxWorks 5.5<br />
<strong>BSP</strong> Developer’s <strong>Guide</strong><br />
The third test spawns a single pkLoopbackTest( ) task for each serial port connected in<br />
loopback mode. Each port sees a pattern of sequential characters sent and received at the<br />
maximum baud rate. All characters must be received in the order sent. If this test fails,<br />
check that all serial ports under test are set up correctly for loopback mode. Make sure<br />
that the serial driver is handling receive and transmit interrupts properly. Make sure that<br />
all serial channels under test have been configured and initialized to the correct values.<br />
The fourth test spawns several pkLoopbackTest( ) tasks for each serial port connected in<br />
loopback mode. Each task repeatedly sends a particular character to one of the ports.<br />
There are several tasks for each serial port under test. Each port should receive all the<br />
characters that were sent. If this test fails, check the same problem areas suggested for the<br />
third test.<br />
The third and fourth tests spawn one or more pkLoopbackTest( ) tasks for each serial<br />
device connected in loopback mode. These tasks run concurrently, sending and receiving<br />
characters at the highest baud rate supported by both host and target. It is possible that<br />
target boards with slower CPUs and many serial devices might not possess the raw<br />
processing power required to keep up with the tests. If hardware limitations are causing<br />
the loopback tests to fail, the tests can be configured to lighten the processor load. The<br />
serial.tcl tests run at the highest baud specified in the bspVal macro,<br />
<strong>BSP</strong>TEST_HOST_RATES (provided that the rate is supported by both the host and<br />
target).<br />
Modifying <strong>BSP</strong>TEST_HOST_RATES to exclude the higher common baud rates will cause<br />
the tests to run at a lower rate, thus avoiding possible hardware- related problems.<br />
Additionally, the pkLib.c constant PK_LOOP_TASK_NUM can be changed from the<br />
default value of 4 to decrease the number of concurrent tasks running in the fourth test. In<br />
this case, the object code file pkLib.o must be rebuilt from the changed pkLib.c source<br />
file.<br />
Target boards with several serial devices and a small amount of local RAM (1Mbyte or<br />
under) might run out of memory while executing the tests. In this case, either configure<br />
the target to use an external memory card or decrease the number of tasks running as<br />
described above.<br />
If the test script execution ends prematurely, the target board might be left set to a baud<br />
rate other than T1_TIP_BAUD. This situation could leave the board in such a state that a<br />
power cycle reset would be necessary to continue with other tests.<br />
Barring serious hardware or software limitations (such as an identifiable VxWorks<br />
problem), the target board must pass all tests for the <strong>BSP</strong> to be validated.<br />
CONFIGURATION PARAMETERS<br />
<strong>BSP</strong>TEST_HOST_RATES<br />
Baud rates supported on host. (required)<br />
T1_SER_DEVICE<br />
Serial device to be used on host. (required)<br />
396
J<br />
<strong>BSP</strong> Validation Test Suite Reference Entries<br />
T1_SER_BAUD<br />
Default serial baud rate to be used. (required)<br />
EXAMPLE<br />
SEE ALSO<br />
Output consists of:<br />
<strong>BSP</strong> VALIDATION TEST<br />
-------------------<br />
Target server : t53-160<br />
<strong>BSP</strong><br />
: mv147<br />
Log file<br />
: /tmp/bspValidationLog.5219<br />
Serial Test :<br />
console I/O test<br />
: PASS<br />
console echo test<br />
: PASS<br />
sequential loopback test<br />
: PASS<br />
multiple loopback test<br />
: PASS<br />
Tests RUN 4<br />
Tests PASSED 4<br />
Tests FAILED 0<br />
Tests SKIPPED 0<br />
bspVal.sh, bspPkCommonProc.tcl, envLib.tcl, serLib.tcl, pkLib.c<br />
sysClock<br />
NAME<br />
sysClock – system clock tests<br />
SYNOPSIS<br />
DESCRIPTION<br />
bspVal options sysClock<br />
This test verifies the functionality of the <strong>BSP</strong>’s system clock. The entire test takes<br />
approximately 7-10 minutes to run. See bspVal.sh for an explanation of options.<br />
The tests within this script connect a routine to the system clock interrupt handler using<br />
the sysClkConnect( ) routine, which uses the sysClkRoutine function pointer variable.<br />
This call to sysClkConnect( ) for sysClkRoutine disconnects any routine the <strong>BSP</strong> might<br />
have previously connected as the system clock ISR.<br />
NOTE: This reference entry lists the most likely reasons for a test’s failure. However, it<br />
does not list all possible reasons.<br />
Tests one through four check the accuracy of the system clock at several frequencies: an<br />
optional extra rate, minimum, maximum, and the default rate, respectively. To measure<br />
the rate of the system clock, a simple callback routine is connected to the system clock ISR<br />
using sysClkConnect( ). This callback routine increments a counter on every clock tick.<br />
J<br />
397
VxWorks 5.5<br />
<strong>BSP</strong> Developer’s <strong>Guide</strong><br />
The counter is then cleared, and the system clock is enabled at the rate being tested. The<br />
counter is read after 10 seconds and again after 130 seconds. The counter values are used<br />
to calculate the average interrupt rate of the system clock. Three measurements are taken<br />
to cancel the fixed portion of measurement latency error. The computed clock rate error is<br />
reported with one percent resolution. If the measured clock rate is more than 10 percent<br />
off the value being tested, the test for that rate fails.<br />
If any of these tests fail, check that the timer chip is properly initialized and, if<br />
appropriate, that it is programmed with an appropriate scaling factor. Interrupts should<br />
be enabled in sysClkEnable( ) before the timer is started. Check that the sysClkRoutine is<br />
getting connected by sysClkConnect( ), and that sysClkRoutine( ) is called on every<br />
system clock interrupt.<br />
The fifth test verifies the operation of sysClkDisable( ). This is done by periodically<br />
checking the same counter incremented by the first four tests. After sysClkDisable( ) is<br />
called, this counter should not continue to increment. If this test fails, check that the<br />
sysClkDisable( ) routine is disabling timer interrupts, turning off the timer, and setting<br />
the running flag to FALSE.<br />
The sixth test performs parameter checking of the sysClkRateSet( ) routine. This test<br />
checks that the proper return value is given for erroneous input parameters. If this test<br />
fails, check that sysClkRateSet( ) performs error checking based on the<br />
SYS_CLK_RATE_MIN and SYS_CLK_RATE_MAX macros.<br />
The seventh test checks the return values of the sysClkRateSet( ) and sysClkRateGet( )<br />
routines when first passed valid rates followed by erroneous rates. If this test fails, check<br />
that sysClkRateSet( ) is setting the global rate variable and that sysClkRateGet( ) is<br />
reading the same variable.<br />
Barring serious hardware or software limitations (such as an identifiable VxWorks<br />
problem), the target board must pass all tests for the <strong>BSP</strong> to be validated.<br />
CONFIGURATION PARAMETERS<br />
T1_EXTRA_SYSCLK<br />
Another rate to test (optional).<br />
EXAMPLE<br />
Output consists of:<br />
<strong>BSP</strong> VALIDATION TEST<br />
-------------------<br />
Target server : t53-160<br />
<strong>BSP</strong><br />
: mv147<br />
Log file<br />
: /tmp/bspValidationLog.5219<br />
System Clock Test :<br />
sysClk at 4321 hertz (rate = 4325 error = 0%)<br />
: PASS<br />
sysClk at 3 hertz (rate = 3 error = 0%)<br />
: PASS<br />
sysClk at 5000 hertz (rate = 5002 error = 0%)<br />
: PASS<br />
sysClk at 60 hertz (rate = 60 error = 0%)<br />
: PASS<br />
398
J<br />
<strong>BSP</strong> Validation Test Suite Reference Entries<br />
sysClkDisable() disables sysClk<br />
sysClkRateSet() parameter checking<br />
sysClkRateGet() return value<br />
Tests RUN 7<br />
Tests PASSED 7<br />
Tests FAILED 0<br />
Tests SKIPPED 0<br />
: PASS<br />
: PASS<br />
: PASS<br />
SEE ALSO<br />
bspVal.sh, bspPkCommonProc.tcl, envLib.tcl, clockLib.tcl, pkLib.c<br />
timestamp<br />
NAME<br />
SYNOPSIS<br />
DESCRIPTION<br />
timestamp – tests timestamp timer<br />
bspVal options timestamp<br />
This test verifies the <strong>BSP</strong> timestamp timer functionality. This entire test takes<br />
approximately 5 minutes (default timeout value) to run. See bspVal.sh for an explanation<br />
of options.<br />
In order to run this test, the target has to be configured with timestamp timer. To do this,<br />
add INCLUDE_TIMESTAMP to config.h file of the <strong>BSP</strong> or include the component<br />
INCLUDE_TIMESTAMP, if using project facility.<br />
NOTE: This reference entry lists the most likely reasons for a test’s failure. However, it<br />
does not list all possible reasons.<br />
The script starts by making sure that the timestamp timer is not running. If found<br />
running, the function sysTimestampDisable( ) is called and a verification that the timer<br />
stopped is made.<br />
The first test verifies that sysTimestampEnable( ) works. It calls the function and does a<br />
short term test to check that the timer is incrementing.<br />
The second and third tests verify the long-term timestamp operation using<br />
sysTimestamp( ) or sysTimestampLock( ). At regular intervals, the tests take a number of<br />
readings of the timestamp timer. The value of T1_TMO_TIMESTAMP specifies the<br />
period of time over which the tests take their readings. The T1_TMO_SLICES value<br />
specifies the number of readings. The number of timestamp ticks for each interval is<br />
measured against the calculated number. The test fails if the timer error exceeds 1%.<br />
The fourth test verifies that sysTimestampDisable( ) works. It calls the function and<br />
verifies that the timer stopped incrementing.<br />
J<br />
399
VxWorks 5.5<br />
<strong>BSP</strong> Developer’s <strong>Guide</strong><br />
The fifth test verifies that the timer can be re-enabled after it was disabled. It calls<br />
sysTimestampEnable( ) and verifies that the timer starts incrementing.<br />
Barring serious hardware or software limitations (such as an identifiable VxWorks<br />
problem), the target board must pass all tests for the <strong>BSP</strong> to be validated.<br />
CONFIGURATION PARAMETERS<br />
T1_BOOT_TN<br />
Target name (required).<br />
T1_TMO_TIMESTAMP<br />
Long-term test duration (optional).<br />
T1_TMO_SLICES<br />
Long-term test time intervals (optional).<br />
EXAMPLE<br />
SEE ALSO<br />
Output consists of:<br />
<strong>BSP</strong> VALIDATION TEST<br />
-------------------<br />
Target server : t53-160<br />
<strong>BSP</strong><br />
: mv147<br />
Second target server : t214-2<br />
Second <strong>BSP</strong><br />
: mv147<br />
Log file<br />
: /tmp/bspValidationLog.6425<br />
enable the timestamp timer<br />
: PASS<br />
sysTimestamp() long-term test<br />
: PASS<br />
sysTimestampLock() long-term test<br />
: PASS<br />
disable the timestamp timer<br />
: PASS<br />
re-enable after disable<br />
: PASS<br />
Tests RUN 5<br />
Tests PASSED 5<br />
Tests FAILED 0<br />
Tests SKIPPED 0<br />
bspVal.sh, timestampLib.tcl, pkLib.c<br />
400
K<br />
<strong>BSP</strong> Validation Checklists<br />
This appendix contains two checklists: the <strong>BSP</strong> Validation Checklist and the VTS<br />
(Validation Test Suite) Checklist. Wind River uses these checklists when testing<br />
and validating a new <strong>BSP</strong>.<br />
Use the <strong>BSP</strong> Validation Checklist as a guide through the verification of all aspects<br />
of the <strong>BSP</strong> product: installation, testing, and package verification. Use the VTS<br />
Checklist to document the <strong>BSP</strong> VTS test results. The VTS Checklist is just one small<br />
element in the overall <strong>BSP</strong> Validation Checklist.<br />
For working copies of these checklists, print the PDF files:<br />
host/src/test/bspVal/validation.cklist.pdf<br />
host/src/test/bspVal/bspVts.cklist.pdf<br />
401
VxWorks 5.5<br />
<strong>BSP</strong> Developer’s <strong>Guide</strong><br />
<strong>BSP</strong> Validation Checklist<br />
Architecture Product ID:<br />
Architecture Patches:<br />
Optional Product 1:<br />
Optional Product 2:<br />
Optional Product 3:<br />
Functional Test<br />
<strong>BSP</strong> Product ID:<br />
Item Date Status<br />
1. Install all relevant patches to a fresh copy of the architecture<br />
product.<br />
2. Install the <strong>BSP</strong> product.<br />
3. Make a copy of the installed <strong>BSP</strong> directory. Make a copy of the<br />
installed project directory for this <strong>BSP</strong>. The project for each <strong>BSP</strong><br />
is named <strong>BSP</strong>_toolchain and can be found in the target/proj<br />
directory.<br />
4. Test all installed images (a simple test of basic functionality).<br />
This includes all images installed in the project directory.<br />
5. Rebuild the <strong>BSP</strong> components. Make sure all images build<br />
correctly. Compare the new and old images for any size<br />
differences.<br />
vxWorks ................................................................................... ................................. .........................<br />
vxWorks.st ............................................................................... ................................. .........................<br />
vxWorks_rom .......................................................................... ................................. .........................<br />
vxWorks.st_rom ....................................................................... ................................. .........................<br />
vxWorks.res_rom ..................................................................... ................................. .........................<br />
vxWorks.res_rom_res_low ...................................................... ................................. .........................<br />
bootrom ................................................................................... ................................. .........................<br />
bootrom_uncmp ...................................................................... ................................. .........................<br />
bootrom_res ............................................................................. ................................. .........................<br />
6. Rebuild all the project facility images for this <strong>BSP</strong>. Make sure all<br />
images build correctly for both GNU and Diab toolchains.<br />
Compare the new and old images for any size differences.<br />
GNU<br />
vxWorks ................................................................................... ................................. .........................<br />
vxWorks_rom .......................................................................... ................................. .........................<br />
vxWorks_romCopy .................................................................. ................................. .........................<br />
402
K<br />
<strong>BSP</strong> Validation Checklists<br />
<strong>BSP</strong> Validation Checklist<br />
vxWorks_romResident ............................................................ ................................ .........................<br />
Diab<br />
vxWorks .................................................................................... ................................ .........................<br />
vxWorks_romCopy .................................................................. ................................ .........................<br />
vxWorks_romCopy .................................................................. ................................ .........................<br />
vxWorks_romResident ............................................................ ................................ .........................<br />
Build Test<br />
Item Date Status<br />
1. Build and test any standard images not previously built and<br />
tested. Verify that any images that fail to build or run are noted<br />
in target.nr under the SPECIAL CONSIDERATIONS heading.<br />
vxWorks ................................................................................... ................................ .........................<br />
vxWorks.st ............................................................................... ................................ .........................<br />
vxWorks_rom ........................................................................... ................................ .........................<br />
vxWorks.st_rom ....................................................................... ................................ .........................<br />
vxWorks.res_rom ..................................................................... ................................ .........................<br />
vxWorks.res_rom_nosym ........................................................ ................................ .........................<br />
vxWorks.res_rom_res_low ...................................................... ................................ .........................<br />
vxWorks.res_rom_nosym_res_low .......................................... ................................ .........................<br />
bootrom .................................................................................... ................................ .........................<br />
bootrom_uncmp ...................................................................... ................................ .........................<br />
bootrom_res ............................................................................. ................................ .........................<br />
bootrom_res_high .................................................................... ................................ .........................<br />
2. Build and test the following images for the GNU toolchain<br />
from the project facility. Verify that any images that fail to build<br />
or run are noted in target.nr under the SPECIAL<br />
CONSIDERATIONS heading.<br />
vxWorks ................................................................................... ................................ .........................<br />
vxWorks_rom ........................................................................... ................................ .........................<br />
vxWorks_romCopy .................................................................. ................................ .........................<br />
vxWorks_romResident ............................................................ ................................ .........................<br />
K<br />
403
VxWorks 5.5<br />
<strong>BSP</strong> Developer’s <strong>Guide</strong><br />
3. Build and test the following images for the Diab toolchain from<br />
the project facility. Verify that any images that fail to build or<br />
run are noted in target.nr under the SPECIAL<br />
CONSIDERATIONS heading.<br />
vxWorks ................................................................................... ................................. .........................<br />
vxWorks_rom .......................................................................... ................................. .........................<br />
vxWorks_romCopy .................................................................. ................................. .........................<br />
vxWorks_romResident ............................................................ ................................. .........................<br />
4. Check for the inline assembly macro __asm__ in all C files of<br />
the <strong>BSP</strong>. All files that use this macro should use the new macro,<br />
_WRS_ASM. Please see the <strong>BSP</strong> Developer’s <strong>Guide</strong>: Portable C<br />
Coding Standard for more details.<br />
Product Packaging Test<br />
<strong>BSP</strong> Validation Checklist<br />
1. Generate a list of all files installed by the <strong>BSP</strong> product.<br />
Item Date Status<br />
2. Verify that the <strong>BSP</strong> does not deliver any WRS generic driver<br />
header files, source files, or object modules.<br />
3. Verify that the dependency file depend.bspname is not part of<br />
the list of files installed by the <strong>BSP</strong> product.<br />
4. (Optional) Verify that the <strong>BSP</strong> does not deliver any<br />
unnecessary deliverables such as object files (all .o files), ctdt.c,<br />
or symTbl.c in either the <strong>BSP</strong> or project directories.<br />
5. Check for the correct version of the <strong>BSP</strong>. The valid <strong>BSP</strong> version<br />
numbers are<br />
VxWorks 5.2 <strong>BSP</strong> or earlier version - 1.0/x<br />
Tornado 1.0 and 1.0.1 <strong>BSP</strong> version - 1.1/x<br />
Tornado 2.X <strong>BSP</strong> version - 1.2/x<br />
where x is the <strong>BSP</strong> revision number.<br />
Verify that the README file in the <strong>BSP</strong> directory has the<br />
correct version number. Verify that the macros <strong>BSP</strong>_VERSION<br />
and <strong>BSP</strong>_REV in config.h also reflect the same <strong>BSP</strong> version.<br />
6. Verify that there are no third-party files in target/h,<br />
target/src/drv/, target/config/all, or target/src/config.<br />
404
K<br />
<strong>BSP</strong> Validation Checklists<br />
7. Verify that any special drivers unique to the <strong>BSP</strong> are part of<br />
MACH_EXTRA or sysLib.c (either literally or pulled in by a<br />
#include statement).<br />
8. Verify that the <strong>BSP</strong> contains no copyrighted files or any files<br />
derived from restricted Wind River sources. Wind River does<br />
not release the source code for Ethernet or SCSI drivers to<br />
users.<br />
Configuration Test<br />
Item Date Status<br />
1. Test each boot method supported by the default <strong>BSP</strong><br />
configuration. Install and boot the boot ROM and check that it<br />
can download an image using each boot method.<br />
Also for each boot method, attempt to download an invalid<br />
VxWorks image (a nonexistent image or one in an improper<br />
format) and then verify that the boot ROM can still download<br />
and execute a valid image after a failed attempt. Attach a<br />
separate sheet with details on the boot methods tested and the<br />
results.<br />
2. Based on the target.nr information, build and boot different<br />
configurations of the <strong>BSP</strong> that include support for features not<br />
included in the delivered <strong>BSP</strong> configuration. Attach a separate<br />
sheet with details on the different configurations tested, what<br />
features were covered, what features were not covered, and the<br />
results of testing. Test each boot method as in step 1.<br />
<strong>BSP</strong> Validation Test Suite<br />
<strong>BSP</strong> Validation Checklist<br />
Item Date Status<br />
1. Verify that all applicable tests are successful.<br />
Attach a printout of the VTS checklist.<br />
2. If a test does not run successfully for this <strong>BSP</strong>, verify that the<br />
fact is noted in target.nr.<br />
K<br />
405
VxWorks 5.5<br />
<strong>BSP</strong> Developer’s <strong>Guide</strong><br />
Optional Product Test<br />
Item Date Status<br />
1. If the <strong>BSP</strong> has support for USB, test USB support for this <strong>BSP</strong>.<br />
To do this, follow the steps below, using the project facility to<br />
configure USB. For further information on USB, please see the<br />
USB documentation.<br />
Project Facility Configuration:<br />
- Select the USB host stack component.<br />
- Select at least one host controller, OHCI or UHCI depending on<br />
the <strong>BSP</strong> support.<br />
- Include either mouse or keyboard peripheral components if the<br />
hardware is available.<br />
NOTE: Do not include any initialization components.<br />
If you intend to use the target shell for testing, make sure a symbol<br />
table is available on the target.<br />
USB Testing:<br />
- Boot the target with USB support.<br />
- From either the target or the host shell, invoke the USB tool by<br />
calling the usbTool( ) command. This produces the usb tool<br />
prompt. Run the following commands from the usb tool prompt:<br />
usb> usbi (initialize stack)<br />
usb> attach ohci (or uhci depending on your configuration)<br />
This ensures that USB is configured properly on the target.<br />
If a keyboard or mouse USB peripheral is available, test them as<br />
follows:<br />
Mouse Testing:<br />
- Attach the mouse device at one of the ports.<br />
- Ensure that the device has been detected by enumerating the<br />
bus. Call the usbenum command from the usb tool.<br />
- Run the mouse test by calling the mousete command from the<br />
usb tool. The coordinates of the mouse should be displayed as<br />
the mouse is moved.<br />
Keyboard Testing:<br />
<strong>BSP</strong> Validation Checklist<br />
- Attach the keyboard device and initialize the keyboard by<br />
invoking kbdi from the usb tool.<br />
- Run the keyboard test by calling the kbdpo command from the<br />
usb tool. Keys pressed on the keyboard are displayed at the<br />
shell.<br />
406
K<br />
<strong>BSP</strong> Validation Checklists<br />
2. If the <strong>BSP</strong> has support for TrueFFS, test TrueFFS support for<br />
this <strong>BSP</strong>. To do this, follow the steps below. For further<br />
information on TrueFFS, please see the TrueFFS<br />
documentation. You can use either a command-line build or<br />
the project facility to test TrueFFS.<br />
Command-Line Configuration:<br />
- Define INCLUDE_TFFS in config.h.<br />
- Define appropriate media and translation layers by defining the<br />
MTD and TL macros in sysTffs.c.<br />
- Define INCLUDE_SHOW_ROUTINES if you need TrueFFS<br />
show routines.<br />
Project Facility Configuration:<br />
- Configure the INCLUDE_TFFS component.<br />
- Select appropriate media and translation layers with the MTD<br />
and TL components.<br />
- Select the TFFS_SHOW component if you need TrueFFS show<br />
routines.<br />
Testing TrueFFS:<br />
<strong>BSP</strong> Validation Checklist<br />
- Boot the target with the TrueFFS configuration.<br />
- Run sysTffsFormat( ) (if one exists in sysTffs.c) or<br />
tffsDevFormat( ) from either the target shell or the host shell.<br />
- Run usrTffsConfig( ).<br />
- Copy files from the host to the Flash device you have created, and<br />
check that the copy operation was successful.<br />
3. Configure the WDB agent with serial communication and a<br />
target server to use the serial backend. Set up the target<br />
appropriately with correct serial connections and test the WDB<br />
connection by opening a windsh shell and trying a few shell<br />
commands such as i and version.<br />
K<br />
407
VxWorks 5.5<br />
<strong>BSP</strong> Developer’s <strong>Guide</strong><br />
Target Information Worksheet<br />
<strong>BSP</strong> Validation Checklist<br />
Item Date Status<br />
1. Print and attach the <strong>BSP</strong> Target Information Worksheet to this<br />
checklist. Typically, this worksheet is provided in target.nr,<br />
although some developers might supply it in a different file.<br />
See <strong>BSP</strong> Developer’s <strong>Guide</strong>: Target Information Reference Page:<br />
target.nr.<br />
2. Generate the documentation for the <strong>BSP</strong>. Verify that your<br />
documents are complete and conform to the Wind River<br />
documentation standards. Attach a printout of the<br />
documentation.<br />
3. Verify that the attached documentation for this <strong>BSP</strong> contains<br />
marketing, engineering, and support contact points<br />
(both e-mail and voice).<br />
4. Add any comments that help to explain the nature and severity<br />
of any deviations noted during the testing.<br />
<strong>BSP</strong> Validation: PASS: FAIL: Checklist Completed:<br />
Engineer:<br />
Date:<br />
Signature:<br />
408
K<br />
<strong>BSP</strong> Validation Checklists<br />
Validation Test Suite Checklist<br />
VxWorks Version:<br />
<strong>BSP</strong> Version:<br />
Manufacturer:<br />
Model:<br />
Part Number:<br />
Serial Number:<br />
Revision: Bar Code Tag #:<br />
PROMS used for testing<br />
PROMS Socket ID Checksum<br />
0<br />
1<br />
2<br />
3<br />
Notes:<br />
K<br />
Engineer:<br />
Signature:<br />
Date:<br />
409
VxWorks 5.5<br />
<strong>BSP</strong> Developer’s <strong>Guide</strong><br />
Manufacturer:<br />
Validation Test Suite Checklist<br />
Model:<br />
Test Date Checked<br />
1. auxClock.tcl<br />
auxClock at extra-test frequency<br />
auxClock at min-test frequency<br />
auxClock at max-test frequency<br />
auxClock at default-test frequency<br />
sysAuxClkDisable( ) test<br />
sysAuxClkRateSet( ) parameter checking<br />
sysAuxClkRateGet( ) return value<br />
2. baudConsole.tcl<br />
Console at 150 baud<br />
Console at 300 baud<br />
Console at 600 baud<br />
Console at 1200 baud<br />
Console at 1800 baud<br />
Console at 2400 baud<br />
Console at 4800 baud<br />
Console at 9600 baud<br />
Console at 19200 baud<br />
Console at 38400 baud<br />
3. bootline.tcl<br />
Control/X test<br />
Bus error test for local error address<br />
Bus error test for off-board error address<br />
Boot commands test<br />
4. busTas.tcl slave:<br />
Short-term TAS test<br />
Long-term TAS test<br />
410
K<br />
<strong>BSP</strong> Validation Checklists<br />
Manufacturer:<br />
Validation Test Suite Checklist<br />
Model:<br />
Test Date Checked<br />
5. eprom.tcl<br />
1-byte read of eprom<br />
2-byte read of eprom<br />
4-byte read of eprom<br />
6. error1.tcl<br />
Bus-error test for local address<br />
Bus-error test for offboard address<br />
Divide-by-zero test<br />
7. error2.tcl<br />
Catastrophic error test<br />
Reboot with interrupts<br />
8. model.tcl<br />
sysModel( ) return value<br />
9. network.tcl slave:<br />
Ping target test<br />
UDP packet echo test<br />
10. nvRam.tcl<br />
sysNvRamGet( ) of boot line<br />
sysNvRamSet( ) and sysNvRamGet( )<br />
of complemented boot line<br />
sysNvRamGet( ) with length zero<br />
sysNvRamSet( ) parameter checking<br />
sysNvRamGet( ) parameter checking<br />
sysNvRamSet( ) and sysNvRamGet( ) of 0xff data<br />
sysNvRamSet( ) and sysNvRamGet( ) of 0x00 data<br />
sysNvRamSet( ) and sysNvRamGet( ) of boot line<br />
11. procNumGet.tcl<br />
sysProcNumGet( ) return value<br />
K<br />
411
VxWorks 5.5<br />
<strong>BSP</strong> Developer’s <strong>Guide</strong><br />
Manufacturer:<br />
Validation Test Suite Checklist<br />
Model:<br />
Test Date Checked<br />
12. ram.tcl<br />
1-byte read of RAM<br />
2-byte read of RAM<br />
4-byte read of RAM<br />
13. rlogin.tcl slave:<br />
IN USE message when rlogin to target0<br />
Reach shell of target0<br />
rlogin pty usage on target0<br />
logout from target0<br />
IN USE message when rlogin to target1<br />
Reach shell of target1<br />
rlogin pty usage on target1<br />
logout from target1<br />
14. scsi.tcl<br />
scsiShow( ) test<br />
SCSI write/read/verify device<br />
15. serial.tcl<br />
Console I/O test<br />
Console echo test<br />
Sequential loopback test<br />
Multiple loopback test<br />
16. sysClock.tcl<br />
sysClk at extra-freq hertz<br />
sysClk at min-freq hertz<br />
sysClk at max-freq hertz<br />
sysClk at default-freq hertz<br />
sysClkDisable( ) disables sysClk<br />
sysClkRateSet( ) parameter checking<br />
sysClkRateGet( ) return value<br />
412
K<br />
<strong>BSP</strong> Validation Checklists<br />
Manufacturer:<br />
Validation Test Suite Checklist<br />
Model:<br />
Test Date Checked<br />
17. timestamp.tcl<br />
Enable the timestamp timer<br />
sysTimestamp( ) long-term test<br />
sysTimestampLock( ) long-term test<br />
Disable the timestamp timer<br />
Re-enable after disable<br />
18. Identify backplane modes tested:<br />
Polling<br />
Bus interrupt<br />
Mailboxes<br />
COMMENTS (refer to the item number above):<br />
K<br />
413
VxWorks 5.5<br />
<strong>BSP</strong> Developer’s <strong>Guide</strong><br />
414
L<br />
Refgen<br />
NOTE: In Tornado 1.0.1 and earlier releases, UNIX-style man pages were<br />
generated from source code using two awk scripts, mg and mangen. As of Tornado<br />
2.0, UNIX-style man pages are no longer distributed. They have been replaced by<br />
HTML files generated by a new Tcl script called refgen, which, like its<br />
predecessors, is run by make as part of the build process. For more information,<br />
see 9. Documentation <strong>Guide</strong>lines.<br />
NAME<br />
SYNOPSIS<br />
DESCRIPTION<br />
refgen – Tornado reference documentation generator<br />
refgen [-book bookName] [-chapter chapterName] [-config configFile]<br />
[-cpp] [-expath pathList] [-exbase basedir] [-h] [-int]<br />
[-l logFile] [-mg] [-out outDir] [-verbose] fileList<br />
This tool implements a table-driven process for the extraction of documentation from<br />
source. Input tables define a “meta-syntax” that specifies the details of how<br />
documentation is embedded in source files for a particular programming language.<br />
Similarly, output tables define the markup details of the documentation output.<br />
OVERALL CONVENTIONS<br />
Some conventions about how documentation is embedded in source code do not depend<br />
on the source language, and can therefore not be changed from the configuration tables.<br />
Overall Input Conventions<br />
Routines are organized into libraries, and each library begins with a DESCRIPTION<br />
section. If a DESCRIPTION heading is not present, the description section is taken to be<br />
the first comment block after the modification history. Some input languages (such as<br />
shellscript) may begin instead with a section headed SYNOPSIS.<br />
415
VxWorks 5.5<br />
<strong>BSP</strong> Developer’s <strong>Guide</strong><br />
The first line in a library source file is a one-line title in the following format:<br />
sourceFileName - simple description<br />
That is, the line begins (after whatever start-of-comment character is required) with the<br />
name of the file containing it, separated by a space, a hyphen, and another space from a<br />
simple description of the library.<br />
The first line in a routine’s description (after the source-language-dependent routine<br />
delimiter) is a one-line title in the same format.<br />
Routine descriptions are taken to begin after the routine-title line, whether or not a<br />
DESCRIPTION tag is present explicitly.<br />
Section headings are specified by all-caps strings beginning at a newline and ending with<br />
either a newline or a colon.<br />
Italics, notably including text variables—that is, words in the documentation that are not<br />
typed literally, but are instead meant to be replaced by some value specific to each<br />
instance of use—-are marked in the source by paired angle brackets. Thus, to produce the<br />
output textVar, type .<br />
Boldface words are obtained as follows: General mechanism: surround a word with<br />
single quotes in the source. For example, ‘sysIntIdtType’ produces sysIntIdtType. Special<br />
words: words ending in “Lib” or in a recognized filename suffix are automatically<br />
rendered in bold. For example, fileName.c, object.o, and myStuff.tcl all appear in<br />
boldface.<br />
Simple lists can be constructed by indenting lines in the source from the margin (or from<br />
the comment-continuation character, if one is required in a particular source language).<br />
For example:<br />
line one<br />
line two<br />
Overall Output Conventions<br />
Library descriptions are automatically prefaced by a synopsis of the routines in that<br />
library, constructed from the title lines of all routines.<br />
For some input languages, a SYNOPSIS section is supplied automatically for each routine<br />
as well, extracted from the routine definition in a language-dependent manner specified<br />
in the input meta-syntax tables. Input languages that do not support this have empty<br />
strings for $SYNTAX(declDelim); in such languages, the SYNOPSIS section must be<br />
explicitly present as part of the subroutine comments. For example, both Assembly and<br />
Tcl require an explicit SYNOPSIS section following the DESCRIPTION. The following<br />
example shows the correct markup for Assembly:<br />
416
L<br />
Refgen<br />
* SYNOPSIS<br />
* \cs<br />
* void xxxMemoryInit(void)<br />
* \ce<br />
For some languages, the routine definition is also used to create a PARAMETERS section<br />
automatically.<br />
The online form of documentation is assumed to fit into a structure involving a parent file<br />
(which includes a list of libraries) and a routine index. Several of the procedures in this<br />
library require names or labels for these files, in order to include links to them in the<br />
output. The parent file and routine index need not actually exist at the time that<br />
procedures in this library execute.<br />
DESCRIPTION tags are supplied automatically for all description sections, whether or<br />
not the tag is present in the source file.<br />
SEE ALSO sections are always present in the output for routine descriptions, whether or<br />
not they are present in the source. SEE ALSO sections for routine descriptions<br />
automatically include a reference to the containing library.<br />
OUTPUT DIRECTIVES<br />
The following keywords, always spelled in all capital letters and appearing at the start of<br />
a line, alter the text that is considered for output. Some directives accept an argument in a<br />
specific format, on the same line.<br />
NOROUTINES<br />
Indicates that subroutine documentation should not be generated (must appear in the<br />
library section).<br />
NOMANUAL<br />
Suppresses the section where it appears: either an entire routine’s documentation, or<br />
the library documentation. Routine documentation can also be suppressed in<br />
language-specific ways, specified by matching a regular expression in the<br />
meta-syntactic list LOCALdecls. See refDocGen for a command-line option that<br />
overrides this.<br />
INTERNAL<br />
Suppresses a section (that is, all text from the directive until the next heading, if any).<br />
See refDocGen for a command-line option that overrides this.<br />
APPEND filename<br />
Includes documentation from filename in the output, as if its source were appended to<br />
the file containing the APPEND keyword.<br />
L<br />
EXPLICIT MARKUP<br />
The refgen utility supports a simple markup language that is meant to be inconspicuous<br />
in source files, while supporting most common output needs.<br />
417
VxWorks 5.5<br />
<strong>BSP</strong> Developer’s <strong>Guide</strong><br />
The following table summarizes refgen explicit markup (numbered notes appear below<br />
the table):<br />
Note Markup Description<br />
\" text to end of line Comment in documentation.<br />
’text ...’ or ‘text ...’ Boldface text.<br />
Italicized text.<br />
[1] \\ or \/ The character \.<br />
[2] \< \> \& \‘ \’ The characters < > & ‘ ’.<br />
\| The character | within a table.<br />
[3] \ss ... \se Preformatted text.<br />
\cs ... \ce<br />
Literal text (code).<br />
\bs ... \be<br />
Literal text, with smaller display.<br />
[4] \is \i ... \i ... \ie Itemized list.<br />
[5] \ml \m ... \m ... \me Marker list.<br />
[6] \ts ... \te A table.<br />
\sh text<br />
A subheading.<br />
\tb reference A reference followed by newline.<br />
Notes on Markup [1] The escape sequence \\ is easier to remember for backslash, but \⁄ is sometimes<br />
required if the literal backslash is to appear among other text that might be confused<br />
with escape sequences. \⁄ is always safe.<br />
[2] < and > must be escaped to distinguish from embedded HTML tags. The & must be<br />
escaped to distinguish from HTML character entities. Single quotes must be escaped<br />
to distinguish from the refgen automatic bolding convention.<br />
[3] Newlines and whitespace are preserved between \ss and \se, but formatting is not<br />
otherwise disabled. These are useful for including references to text variables in<br />
examples.<br />
[4] \is and \ie mark the beginning and end of a list of items. \i is only supported<br />
between \ıs and \ıe. It marks the start of an item: that is, it forces a paragraph break,<br />
and exempts the remainder of the line where it appears from an increased<br />
indentation otherwise applied to paragraphs between \is and \ie.<br />
Thus, the following:<br />
\is<br />
\i Boojum<br />
A boojum is a rare<br />
tree found in Baja<br />
California.<br />
\i Snark<br />
A snark is a different<br />
matter altogether.<br />
\ie<br />
418
L<br />
Refgen<br />
Yields output approximately like the following:<br />
Boojum<br />
A boojum is a rare tree found in Baja California.<br />
Snark<br />
A snark is a different matter altogether.<br />
[5] \ml and \me delimit marker lists; they differ from itemized lists in the output<br />
format—the marker beside \m appears on the same line as the start of the following<br />
paragraph, rather than above.<br />
[6] Between \ts and \te, a whole region of special syntax reigns, though it is somewhat<br />
simplified from the original mangen table syntax.<br />
Three conventions are central:<br />
(a) Tables have a heading section and a body section; these are delimited by a line<br />
containing only the characters - (hyphen), + (plus) and | (stile or bar), and horizontal<br />
whitespace.<br />
(b) Cells in a table, whether in the heading or the body, are delimited by the |<br />
character. \| may be used to represent the | character.<br />
(c) Newline marks the end of a row in either heading or body.<br />
Thus, for example, the following specifies a three-column table with a single heading<br />
row:<br />
\ts<br />
Key | Name | Meaning<br />
----|------------|------------<br />
\& | ampersand | bitwise AND<br />
\| | stile | bitwise OR<br />
# | octothorpe | bitwise NAND<br />
\te<br />
The cells need not align in the source, though it is easier to read it (and easier to avoid<br />
errors while editing) if they do.<br />
The above input yields the following:<br />
L<br />
Key Name Meaning<br />
& ampersand bitwise AND<br />
| stile bitwise OR<br />
# octothorpe bitwise NAND<br />
PARAMETERS<br />
-book<br />
This option allows you to define which book the documented routine or library<br />
belongs to. The default value is “Wind River Systems Reference Manual.”<br />
419
VxWorks 5.5<br />
<strong>BSP</strong> Developer’s <strong>Guide</strong><br />
-chapter<br />
Related to the -book option, this option allows you to set the documented routine or<br />
library chapter. The default value is set to “Wind River Systems Reference Libraries.”<br />
-category<br />
Related to the -book option, this option allows you to set the documented routine or<br />
library category. It can be used, for example, to differentiate routines available for<br />
different host platforms.<br />
-config configname<br />
Reads configuration information from the file configname if this optional parameter is<br />
present; the default configuration is C2html.<br />
-cpp<br />
This option specifies that the list of given files is to be treated as C++ files. Special<br />
processing is then performed to recover all the class members.<br />
-expath pathList<br />
Preempts EXPANDPATH settings recorded within files with the explicitly-supplied<br />
colon-delimited path list.<br />
-exbase basedir<br />
To simplify working under incomplete trees, this option uses basedir rather than<br />
WIND_BASE as the root for expand-file searching.<br />
-int<br />
If this optional parameter is present, it formats all available documentation, even if<br />
marked INTERNAL or NOMANUAL, and even for local routines.<br />
-l logFile<br />
Specifies that logFile is to be used to log refgen errors. If the -l option is not specified,<br />
standard output is used.<br />
-mg<br />
Converts from mangen markup “on the fly” (in memory, without saving the<br />
converted source file).<br />
-out outputDirectoryName<br />
Saves the output documentation file in outputDirectoryName.<br />
-verbose<br />
Prints reassuring messages to indicate that something is happening.<br />
sourceFileList<br />
Any other parameters are taken as names of source files from which to extract and<br />
format documentation.<br />
420
L<br />
Refgen<br />
EXAMPLE<br />
INCLUDES<br />
SEE ALSO<br />
Generate HTML reference pages for a <strong>BSP</strong> sysLib.c file:<br />
% cd $WIND_BASE/target/config/myBsp<br />
% refgen -mg -book <strong>BSP</strong>_Reference -chapter myBsp -category myBsp \<br />
-out $WIND_BASE/vxworks/bsp/myBsp sysLib.c<br />
refLib.tcl<br />
VxWorks Programmer’s <strong>Guide</strong>: C Coding Conventions, htmlLink, htmlBook, windHelpLib<br />
L<br />
421
VxWorks 5.5<br />
<strong>BSP</strong> Developer’s <strong>Guide</strong><br />
422
M<br />
<strong>BSP</strong> Product Contents<br />
When you are finished with your <strong>BSP</strong>, the contents of your product should be<br />
similar to the contents shown in this appendix. The <strong>BSP</strong> contains files relevant only<br />
to the particular board type. This list is a sample only and is not expected to be a<br />
final list of required or excluded files.<br />
The traditional <strong>BSP</strong> directory contents follows:<br />
target/config/bspname/Makefile<br />
target/config/bspname/README<br />
target/config/bspname/bootrom<br />
target/config/bspname/config.h<br />
target/config/bspname/bspname.h<br />
target/config/bspname/romInit.s<br />
target/config/bspname/sysALib.s<br />
target/config/bspname/sysScsi.c<br />
target/config/bspname/sysLib.c<br />
target/config/bspname/sysSerial.c<br />
target/config/bspname/target.nr<br />
target/config/bspname/vxWorks<br />
target/config/bspname/vxWorks.st<br />
target/config/bspname/vxWorks.sym<br />
Include any <strong>BSP</strong>-specific drivers in the appropriate format: source, object, or<br />
library. Do not include source for Wind River restricted network or SCSI drivers:<br />
target/config/bspname/specialDrvr.c<br />
target/config/bspname/specialDrvr.obj<br />
target/config/bspname/specialLib.a<br />
423
VxWorks 5.5<br />
<strong>BSP</strong> Developer’s <strong>Guide</strong><br />
The following files are the new HTML documentation pages:<br />
docs/vxworks/bsp/bspname/*.html<br />
docs/vxworks/bsp/bspname/*.lib<br />
docs/vxworks/bsp/bspname/*.rtn<br />
The following files represent the default projects for a <strong>BSP</strong>:<br />
target/proj/bspname_gnu/Makefile<br />
target/proj/bspname_gnu/linkSyms.c<br />
target/proj/bspname_gnu/prjObjs.lst<br />
target/proj/bspname_gnu/bspname_gnu.wpj<br />
target/proj/bspname_gnu/prjComps.h<br />
target/proj/bspname_gnu/prjParams.h<br />
target/proj/bspname_gnu/prjConfig.c<br />
target/proj/bspname_diab/usrAppInit.c<br />
target/proj/bspname_diab/Makefile<br />
target/proj/bspname_diab/linkSyms.c<br />
target/proj/bspname_diab/prjObjs.lst<br />
target/proj/bspname_diab/bspname_diab.wpj<br />
target/proj/bspname_diab/prjComps.h<br />
target/proj/bspname_diab/prjParams.h<br />
target/proj/bspname_diab/prjConfig.c<br />
target/proj/bspname_diab/usrAppInit.c<br />
The following files represent the default build output of the project:<br />
target/proj/bspname_gnu/default/vxWorks<br />
target/proj/bspname_gnu/default_rom/vxWorks_rom<br />
target/proj/bspname_gnu/default_romCompressed/vxWorks_romCompressed<br />
target/proj/bspname_gnu/default_romResident/vxWorks_romResident<br />
target/proj/bspname_diab/default/vxWorks<br />
target/proj/bspname_diab/default_rom/vxWorks_rom<br />
target/proj/bspname_diab/default_romCompressed/vxWorks_romCompressed<br />
target/proj/bspname_diab/default_romResident/vxWorks_romResident<br />
424
M<br />
<strong>BSP</strong> Product Contents<br />
Do not include any of the following in a <strong>BSP</strong> product:<br />
target/config/bspname/depend.bspname<br />
target/config/all/anything<br />
target/config/comps/anything<br />
target/h/anything<br />
target/src/anything<br />
target/lib/objARCHgnuvx/anything<br />
With Tornado 2.2, Wind River no longer includes any intermediate object files in a<br />
normal <strong>BSP</strong> product. This change was introduced simply to reduce the size of<br />
distributed <strong>BSP</strong>s. Third parties may continue to deliver intermediate object files<br />
(*.o) as part of their <strong>BSP</strong> distributions.<br />
M<br />
425
VxWorks 5.5<br />
<strong>BSP</strong> Developer’s <strong>Guide</strong><br />
426
Index<br />
A<br />
abort button 82<br />
addressing<br />
memory 69<br />
VMEbus 70<br />
architecture-specific development 64–67<br />
ARCHIVE property (component object) 121<br />
dummy component, creating a 133<br />
using 129<br />
AUX_CLK_RATE_MAX 252<br />
AUX_CLK_RATE_MIN 252<br />
auxiliary clocks 79<br />
adding 58<br />
generic timer driver, in 252<br />
validation testing 155<br />
B<br />
bash shells (Windows) 153<br />
BLK_DEV data structure 320<br />
BOARD 15<br />
makefile, creating a 45<br />
board support packages (<strong>BSP</strong>) 11–39<br />
architecture-specific development 64–67<br />
boot ROMs, using 60<br />
building VxWorks 49<br />
contents 423–425<br />
creating 41–61<br />
cleaning up 58<br />
debugging initialization code 50–53<br />
files, writing 44–49<br />
timers, adding 58<br />
WDB agent before kernel, starting 53<br />
default configuration 196<br />
directories<br />
packaging 195–200<br />
driver templates 100<br />
interrupt controllers 254<br />
NVRAM 252<br />
serial 248<br />
timers 251<br />
END drivers, writing 267–311<br />
files 423–425<br />
#include 16–23<br />
excluded 197–198<br />
hardware-dependent 15<br />
included 197<br />
packaging 195–200<br />
project, <strong>BSP</strong> 30<br />
shared 199<br />
source 12–28<br />
hardware considerations 63–87<br />
kernel, using a minimal 55<br />
media, distribution 200<br />
memory considerations 67–76<br />
network stack, upgrading for VxWorks 221<br />
networking 58<br />
427
VxWorks 5.5<br />
<strong>BSP</strong> Developer’s <strong>Guide</strong><br />
NVRAM storage, adding 58<br />
packaging 195–201<br />
revision ID number 16<br />
SCSI-2 drivers, writing 317–364<br />
target.nr 27<br />
testing, validation 139–158<br />
Tornado 2.0, upgrading to 203–209<br />
user LEDs 82<br />
Validation Test Suite 139–158<br />
version number 16<br />
boot ROMs 60<br />
entry point 23<br />
initializing 13<br />
BOOT_COLD 23<br />
BOOT_EXTRA<br />
using 24<br />
BOOT_LINE_SIZE 21<br />
generic drivers, in 253<br />
bootConfig.c 13<br />
booting<br />
sequence of events, VxWorks 32–38<br />
command line, from 223–230<br />
project facility, from 238–246<br />
variations 32<br />
bootInit.c 13<br />
debugging initialization 50<br />
bootInit.o 28<br />
bootInit_res.o 28<br />
bootInit_uncmp.o 28<br />
bootline parameters, default 21<br />
bootrom 29<br />
differences from vxWorks image 60<br />
bootrom.hex 29<br />
bootrom.Z.o 29<br />
bootrom.Z.s 29<br />
<strong>BSP</strong> 121<br />
<strong>BSP</strong> Validation Checklist 402<br />
<strong>BSP</strong> VTS, see Validation Test Suite<br />
<strong>BSP</strong>, see board support packages<br />
<strong>BSP</strong>_STUBS property (component object) 121<br />
<strong>BSP</strong>_VERSION 17<br />
bspname.h 26<br />
clocks, system and auxiliary 26<br />
creating <strong>BSP</strong>s 46<br />
device register bits 26<br />
interrupt vectors and levels 26<br />
I/O addresses 26<br />
troubleshooting 39<br />
bspVal script 365<br />
bss segment 35<br />
busTas test 147<br />
special configuration 149<br />
byte order 67<br />
C<br />
cache 65<br />
see also cacheLib(1)<br />
coherency issues 65<br />
driver considerations 103–106<br />
SCSI support 364<br />
configuring 18<br />
drivers, working with 101–110<br />
flush and invalidate macros, using 107–110<br />
initializing 35<br />
memory regions, sharing 104<br />
MMUs, working with 102<br />
snooping 65<br />
write pipelining 66<br />
CACHE_DMA_FLUSH 108<br />
CACHE_DMA_INVALIDATE 108<br />
CACHE_DMA_IS_WRITE_COHERENT 109<br />
CACHE_DMA_PHYS_TO_VIRT 110<br />
CACHE_DMA_VIRT_TO_PHYS 110<br />
CACHE_DRV_FLUSH 109<br />
CACHE_DRV_INVALIDATE 109<br />
CACHE_PIPE_FLUSH 107<br />
CACHE_USER_FLUSH 108<br />
CACHE_USER_INVALIDATE 109<br />
cacheDmaMalloc( ) 103<br />
cache coherency issues 102<br />
SHARED_POINTERS attribute, and the 110<br />
CFG_PARAMS property (component object) 121<br />
CHILDREN property<br />
folder object 117<br />
selection object 119<br />
_CHILDREN property (component object)<br />
using 132<br />
clBlk structures 276<br />
428
Index<br />
clocks<br />
see also individual clock types<br />
auxiliary 79<br />
setting rates 26<br />
system 79<br />
timestamp 79<br />
code examples<br />
SCSI-2 drivers<br />
advanced controller 337<br />
advanced I/O processor 351<br />
basic controller 327<br />
sysScsiInit( ) template 357<br />
virtual memory support 84<br />
commonCmdsTest( ) 362<br />
component description files (CDF)<br />
binding new CDFs to existing objects 135<br />
conventions 126<br />
directories<br />
configlettes 14<br />
VxWorks kernel 14<br />
paths, assigning 127<br />
precedence 126<br />
Component Description Language (CDL) 113–125<br />
conventions 126<br />
object types 115<br />
syntax 231–236<br />
component object<br />
contents 120<br />
header files, specifying 129<br />
naming 128<br />
object code, specifying 128<br />
parameters. declaring 132<br />
source code, specifying 129<br />
synopsis, providing a 128<br />
syntax 232<br />
components 111<br />
archives, working with 133<br />
backwards compatibility 136<br />
creating 127–134<br />
dependencies<br />
object module, analyzing 128<br />
setting, explicitly 131<br />
group membership, defining 132<br />
IDs 136<br />
initialization routine, specifying an 130<br />
initialization sequence, setting 238–246<br />
properties, using CDL object 130<br />
modifying 134<br />
packaging (in directories) 200<br />
parameters, defining 132<br />
reference entries, linking 131<br />
releasing 135<br />
testing 136<br />
config.h 16–23<br />
bootline parameters, default 21<br />
bspname.h 23<br />
bus addresses 23<br />
cache, configuring 18<br />
configAll.h 17<br />
interrupt vectors 23<br />
MMU, configuring 18<br />
non-volatile memory 20<br />
PCI macros 22<br />
RAM addresses 19<br />
RAM size 19<br />
revision ID number 16<br />
ROM addresses 20<br />
ROM size 20<br />
shared-memory network drivers,<br />
configuring 18<br />
timestamp support 21<br />
troubleshooting 39<br />
using in <strong>BSP</strong> 46<br />
version number 16<br />
virtual memory, enabling 85<br />
VMEbus mapping 21<br />
configAll.h 17<br />
CONFIGLETTES property (component<br />
object) 121<br />
initialization routine, specifying an 130<br />
using 129<br />
configNet.h<br />
network stack, upgrading <strong>BSP</strong>s for the 221<br />
configuring<br />
<strong>BSP</strong>, default 196<br />
cache 18<br />
END 274<br />
MMU 18<br />
MUX 274<br />
Validation Test Suite (<strong>BSP</strong> VTS) 143–153<br />
IX<br />
429
VxWorks 5.5<br />
<strong>BSP</strong> Developer’s <strong>Guide</strong><br />
CONSOLE_BAUD_RATE 37<br />
CONSOLE_TTY 37<br />
generic serial driver, in 249<br />
conventions<br />
documentation 7–9<br />
reference entries 183–194<br />
writing 173–183<br />
COUNT property (selection object) 119<br />
CPU 15<br />
creating <strong>BSP</strong>s 45<br />
ctdt.o 29<br />
D<br />
daemons<br />
network tNetTask 271<br />
root tUsrRoot 271<br />
data link layer 268<br />
network protocol layer, link to 268<br />
dataSegPad.o 29<br />
dataSegPad.s 14<br />
debugging<br />
initialization code 50–53<br />
SCSI-2 drivers 364<br />
DEFAULT property (parameter object) 124<br />
DEFAULT_BOOT_LINE 21<br />
DEFAULTS property<br />
folder object 117<br />
selection object 119<br />
_DEFAULTS property (component object) 122<br />
#define statements<br />
drivers to a target, adding 273–274<br />
depend.bspname<br />
delivering 198<br />
depend.bspname file 15<br />
depend.cputool 49<br />
dependency files 49<br />
delivering 198<br />
dependency, component<br />
object modules, analyzing 128<br />
setting, explicitly 131<br />
derived files 28<br />
<strong>BSP</strong> project files 30<br />
default build output 30<br />
make man help files 30<br />
DEV_OBJ 285<br />
development environment<br />
setting up 43<br />
device drivers, see drivers<br />
DEVICE_WRITES_ASYNCHRONOUSLY 106<br />
SHARED_CACHE_LINES, using with 109<br />
devices, hardware 76–83<br />
see also drivers and individual hardware devices<br />
DIP switches 82<br />
directCmdsTest( ) 362<br />
directRwTest( ) 362<br />
DMA devices 82<br />
support for 254<br />
do_protocol( ) 262<br />
do_protocol_with_type( ) 258<br />
documentation guidelines 173–194<br />
conventions 7–9<br />
online reference entries 8<br />
reference entries 183–194<br />
written style 173–183<br />
downloading code 43<br />
testing 43<br />
drivers 89–110<br />
attributes 105–110<br />
auxiliary clock 79<br />
generic 251<br />
buffers<br />
swapping between driver and<br />
protocol 280<br />
vehicle for 288<br />
cache, working with 101–110<br />
designing 100–101<br />
buses, working with 94<br />
code, writing 101<br />
compile-time flexibility 90<br />
data structures, using 97<br />
documenting 96<br />
goals 90–92<br />
interrupt controllers 94<br />
interrupt service routines, defining 97<br />
I/O-mapped chips, working with 93<br />
macros, using access 98<br />
memory-mapped chips, working with 92<br />
multi-function chips, working with 93<br />
430
Index<br />
naming conventions 95<br />
performance issues 90<br />
portability 90<br />
problems 92–94<br />
re-entrancy 91<br />
routines, declaring 100–101<br />
templates, using 100<br />
testing 101<br />
DMA support 254<br />
Enhanced Network Driver (END) 282–298<br />
entry points, required 289–298<br />
Ethernet controllers 80<br />
flash 252<br />
generic 247–255<br />
END template 267<br />
interrupt controller template 254<br />
NVRAM template 252<br />
serial template 248<br />
timer template 251<br />
timers 251<br />
initializing 25<br />
installing 36<br />
interrupt controllers 254<br />
avoiding design problems 94<br />
interrupt handlers, registering 271<br />
launching 270–274<br />
multi-function (ASIC chips) 254<br />
multi-mode serial, generic and template 249<br />
network 58<br />
4.3 BSD, structure of 258<br />
4.4 BSD, porting 4.3 BSD to 260–264<br />
loading 271<br />
MUX, upgrading 4.3 BSD to 257<br />
non-volatile RAM (NVRAM) 252<br />
packets, receiving 275–280<br />
PCI bus 255<br />
required 56<br />
scatter-gather, supporting 280<br />
SCSI support 81<br />
writing a driver 317–364<br />
serial 56<br />
generic and template 248<br />
system clock 79<br />
generic 251<br />
minimal kernels, using 56<br />
E<br />
target system, adding to a 273–274<br />
template versions 100<br />
timestamp 79<br />
troubleshooting<br />
improperly delivered 38<br />
printf( ) 102<br />
VMEbus 253<br />
END_LOAD_FUNC 274<br />
END_LOAD_STRING 274<br />
END_OBJ 283–285<br />
members 283–285<br />
END_OVERRIDE 274<br />
endFormAddresst( ) 299<br />
endIoctl( ) 292<br />
endLoad( )<br />
END_OBJ structures, and 283<br />
entry point, specifying the 274<br />
endMCastAddrAdd( ) 296<br />
endMCastAddrDel( ) 297–298<br />
endMCastAddrGet( ) 298<br />
endPacketDatarGet( ) 299<br />
endPollReceive( ) 296<br />
endPollSend( ) 295<br />
endSend( ) 293<br />
endStart( ) 294<br />
interrupt handlers, registering driver 271<br />
endStop( ) 294<br />
endTbl table 274<br />
endUnload( ) 291<br />
Enhanced Network Driver (END) 282–298<br />
buffered data, vehicle for 288<br />
configuring 274<br />
control structures, tracking device 285<br />
entry points, required 289–298<br />
errors, indicating 280<br />
network devices, manipulating 283–285<br />
porting 4.3 BSD drivers to 264–266<br />
entry points, required 264–266<br />
IX<br />
431
VxWorks 5.5<br />
<strong>BSP</strong> Developer’s <strong>Guide</strong><br />
structures, required 283–289<br />
DEV_OBJ 285<br />
END_OBJ 283–285<br />
LL_HDR_INFO 287<br />
mBlk structures 288<br />
NET_FUNCS 286–287<br />
table of entry points 286–287<br />
entry points, driver 289–298<br />
see also specific entry points<br />
4.3 BSD upgrades, for 264–266<br />
forming an address into a packet 299<br />
getting actual data 299<br />
multicast addresses<br />
adding 296<br />
deleting 297–298<br />
table of, getting 298<br />
polling receives, handling 296<br />
polling sends, handling 295<br />
sending data 293<br />
starting loaded drivers 294<br />
state of drivers, controlling the 292<br />
stopping drivers without unloading 294<br />
unloading devices 291<br />
ether_attach( ) 260<br />
ether_output( ) 261<br />
etherHook 259<br />
etherInputHook( ) 259<br />
Ethernet 268<br />
controllers 80<br />
polled-mode 257<br />
RAM 68<br />
etherOutputHook( ) 260<br />
excInit( ) 37<br />
EXCLUDES property (component object) 122<br />
using 131<br />
excVecInit( ) 35<br />
F<br />
files, see dependency files; derived files; include files;<br />
source files<br />
floating point support 66<br />
folder object 116<br />
syntax 235<br />
folders (project facility)<br />
component hierarchy 236<br />
H<br />
hardware 63–87<br />
devices 76–83<br />
initializing system 35<br />
HDR_FILES property (component object) 121<br />
help<br />
make man HTML files 30<br />
HELP property (component object) 122<br />
using 131<br />
HEX_FLAGS<br />
creating <strong>BSP</strong>s 46<br />
I<br />
i960 development<br />
boot sequence 32<br />
IACK, see interrupt acknowledgment<br />
ifnet structure 258<br />
In-Circuit emulator 76<br />
INCLUDE 149<br />
include files 16–23<br />
INCLUDE_END 274<br />
INCLUDE_IO_SYSTEM 37<br />
INCLUDE_LOADER 148<br />
INCLUDE_MMU_BASIC 85<br />
INCLUDE_NET_SYM_TBL 148<br />
INCLUDE_NETWORK 145<br />
INCLUDE_PING 148<br />
INCLUDE_RLOGIN 148<br />
INCLUDE_SCSI 149<br />
INCLUDE_SHELL 148<br />
INCLUDE_SHOW_ROUTINES 148<br />
INCLUDE_SM_NET 149<br />
INCLUDE_SM_NET_SHOW 149<br />
INCLUDE_SM_NET_SHOW 149<br />
INCLUDE_SM_SEQ_ADDR 149<br />
INCLUDE_TIMESTAMP 21<br />
INCLUDE_TTY_DEV 37<br />
432
Index<br />
INCLUDE_USR_APPL 38<br />
INCLUDE_VME 21<br />
INCLUDE_WDB 145<br />
defining 37<br />
INCLUDE_WHEN property (component<br />
object) 122<br />
using 131<br />
INIT_AFTER property (component object)<br />
using 130<br />
INIT_BEFORE property (component object) 122<br />
using 130<br />
INIT_ORDER property (initGroup object) 125<br />
_INIT_ORDER property (component object) 122<br />
using 130<br />
INIT_RTN property<br />
component object 122<br />
using 130<br />
initGroup object 125<br />
initGroups, see initialization group object<br />
initialization group object 124<br />
order, setting 238–246<br />
syntax 236<br />
initialization routine<br />
specifying 130<br />
initialization sequence<br />
see also booting<br />
setting with CDL object properties 130<br />
VxWorks image<br />
RAM-based 51<br />
ROM-based 50<br />
initializing<br />
boot ROMs 13<br />
cache 35<br />
drivers 25<br />
hardware, system 35<br />
interrupt vectors 35<br />
I/O system 36<br />
SCSI-2 in <strong>BSP</strong> 357–359<br />
subsystem 14<br />
VxWorks images 14<br />
installing<br />
drivers 36<br />
Validation Test Suite (<strong>BSP</strong> VTS) 145<br />
intConnect( )<br />
sysHwInit( ), not using with 102<br />
interrupt acknowledgment (IACK) 64<br />
VMEbus 73<br />
interrupt controllers 77<br />
avoiding design problems 94<br />
drivers, generic 254<br />
interrupt service routines (ISR)<br />
drivers, designing into 97<br />
minimal kernels, using with 55<br />
work, queuing 272–273<br />
interrupts 77–78<br />
architecture-specific handling 64<br />
latency 64<br />
levels 78<br />
mailbox 73<br />
vectored 64<br />
initializing 35<br />
VMEbus 73<br />
intLock( ), troubleshooting 39<br />
intLockLevelSet( ) 36<br />
intVecBaseSet( ) 35<br />
I/O system<br />
addresses 26<br />
initializing 36<br />
iosInit( ) 37<br />
IP (Internet Protocol) 268<br />
K<br />
kernelInit( ) 36<br />
generic initialization 52<br />
kernels<br />
execution, start of 34<br />
minimal size 55<br />
WDB agent before, starting 53<br />
L<br />
LEDs, using 82<br />
libcputoolvx.a 36<br />
LINK_SYMS property (component object) 122<br />
using 130<br />
LL_HDR_INFO 287<br />
IX<br />
433
VxWorks 5.5<br />
<strong>BSP</strong> Developer’s <strong>Guide</strong><br />
LOCAL_MEM_AUTOSIZE 20<br />
LOCAL_MEM_LOCAL_ADRS 19<br />
troubleshooting 38<br />
LOCAL_MEM_SIZE 19<br />
location monitors, see mailbox interrupts<br />
M<br />
MACH_EXTRA<br />
creating <strong>BSP</strong>s 46<br />
mailbox interrupts 73<br />
make man 30<br />
make utility 15<br />
Makefile<br />
contents 15<br />
generating reference pages 189<br />
writing 45<br />
mark-up commands 190–193<br />
mBlk structures 288<br />
loaning buffers 276<br />
MC68040<br />
boot sequence 33<br />
MC683xx<br />
boot sequence 33<br />
media, distribution 200<br />
memory 67–76<br />
see also non-volatile memory<br />
address maps 69<br />
cache, working with 104<br />
parity checking 69<br />
MMU<br />
architecture considerations 66<br />
cache control issues 102<br />
configuring 18<br />
MMU_TAGGING 105<br />
working with 108<br />
MODULES property (component object) 121<br />
using 128<br />
Multibus II 74–76<br />
multicasting 257<br />
multi-mode serial drivers, see serial drivers<br />
MUX interface 267–311<br />
4.3 BSD upgrades<br />
drivers, porting 257<br />
buffers, swapping between driver and<br />
protocol 280<br />
configuring 274<br />
data structures 306<br />
driver-protocol interaction 268–270<br />
memory management utilities, alternative 280<br />
memory pool, creating a 276<br />
network driver, loading the 271<br />
routines 305–310<br />
error messages to protocols, passing 308<br />
packets to protocols, passing 307<br />
restarting protocols 310<br />
shutting down protocols 309<br />
writing protocols 301–311<br />
attaching to the MUX 302<br />
receiving data 303<br />
restarting 304<br />
scatter-gather, supporting 304<br />
seeing protocols 302–303<br />
sending data 303<br />
shutting down 305<br />
starting up 302–303<br />
muxBind( ) 302<br />
restarting a protocol 310<br />
shutting down a protocol 309<br />
muxBufReceive( ) 280<br />
muxDevLoad( ) 271<br />
initialization string, specifying the 274<br />
muxDevStart( ) 271<br />
muxReceive( ) 303<br />
N<br />
NAME property<br />
component object 121<br />
folder object 117<br />
initGroup object 125<br />
parameter object 123<br />
selection object 119<br />
NET_FUNCS 286–287<br />
NET_PROTOCOL 306<br />
netBufLib 276<br />
netJobAdd( ) 272–273<br />
NetROM emulator 76<br />
434
Index<br />
network drivers 58<br />
network interface devices (sysNet.c) 26<br />
network protocol layer 268<br />
data link layer, link to 268<br />
network test 147<br />
special configuration 148<br />
networks<br />
work, queuing 272–273<br />
NMI 67<br />
non-maskable interrupts (NMI) 67<br />
troubleshooting 39<br />
non-volatile memory (NVRAM) 69<br />
adding 58<br />
boards without, for 21<br />
config.h, in 20<br />
drivers, generic and template 252<br />
nroff/troff<br />
macros 190–192<br />
working with 190–193<br />
NUM_TTY 37<br />
generic serial driver 248<br />
NV_BOOT_OFFSET 21<br />
generic drivers, in 253<br />
NV_RAM_SIZE 21<br />
generic drivers, in 253<br />
NVRAM, see non-volatile memory<br />
O<br />
object code, specifying 128<br />
archive, from an 129<br />
online documentation<br />
reference entries 8<br />
P<br />
packaging 195–201<br />
components 200<br />
projects 201<br />
packet reception 275–280<br />
4.3 BSD network drivers 258<br />
etherHooks, using 259<br />
packet transmission 258<br />
etherHooks, using 260<br />
parallel ports (unsupported) 83<br />
parameter object 123<br />
syntax 234<br />
working with 132<br />
parity checking 69<br />
PCI bus 76<br />
chaining compatibility 94<br />
libraries, driver 255<br />
PCI macros 22<br />
PCI_MSTR_MEMIO 23<br />
precedence, component description file 126<br />
printf( )<br />
drivers, not using with 102<br />
prjConfig.c 125<br />
files, generating 134<br />
initialization order, component 240<br />
projects 111<br />
see also component objects<br />
files, generating 134<br />
initialization order 238–246<br />
packaging 201<br />
protocols<br />
IP (Internet Protocol) 268<br />
MUX-based, writing 301<br />
attaching to the MUX 302<br />
receiving data 303<br />
restarting 304<br />
scatter-gather, supporting 304<br />
seeing protocols 302–303<br />
sending data 303<br />
shutting down 305<br />
starting up 302–303<br />
R<br />
RAM 68<br />
addresses 19<br />
Ethernet 68<br />
size 19<br />
IX<br />
435
VxWorks 5.5<br />
<strong>BSP</strong> Developer’s <strong>Guide</strong><br />
RAM_HIGH_ADRS<br />
config.h 20<br />
creating <strong>BSP</strong>s 45<br />
Makefile 16<br />
RAM_LOW_ADRS 16<br />
writing <strong>BSP</strong>s 45<br />
README file 15<br />
reference entries 173<br />
developing 183–194<br />
linking to a component 131<br />
online 8<br />
Validation Test Suite (<strong>BSP</strong> VTS) 365–400<br />
refgen tool (Wind River)<br />
reference entry 415–421<br />
REQUIRES property (component object) 122<br />
using 131<br />
reset button 82<br />
revision numbers 204<br />
rlogin test 147<br />
special configuration 148<br />
ROM 68<br />
addresses 20<br />
size 20<br />
ROM_ADRS 24<br />
ROM_BASE_ADRS 20<br />
ROM_LINK_ADRS 20<br />
ROM_SIZE 45<br />
config.h 20<br />
Makefile 16<br />
ROM_TEXT_ADRS 15<br />
config.h, in 20<br />
creating <strong>BSP</strong>s 45<br />
ROM_WARM_ADRS 20<br />
creating <strong>BSP</strong>s 45<br />
romInit( ) 23<br />
debugging initialization 50<br />
second-stage initialization 13<br />
romInit.o 29<br />
romInit.s 23<br />
creating <strong>BSP</strong>s 47<br />
debugging initialization 50<br />
troubleshooting 38<br />
romStart( ) 23<br />
debugging initialization 50<br />
second-stage initialization 13<br />
routines<br />
optional 31<br />
required 30<br />
target-specific, system-dependent<br />
assembler source (sysALib.s) 24<br />
C source (sysLib.c) 25<br />
S<br />
SCSI support 61<br />
commands<br />
common 324<br />
direct access 324<br />
forming 321<br />
sequential access 324<br />
controller library 324<br />
controllers 81<br />
data structures 319<br />
drivers, SCSI-2 317–364<br />
advanced controller 334–351<br />
code example 337<br />
advanced I/O processor<br />
code example 351<br />
basic controller 325–334<br />
code example 327<br />
developing 359<br />
programming interface 325–356<br />
termination issues 364<br />
testing 360–363<br />
files 25<br />
initializing in <strong>BSP</strong> 357–359<br />
libraries 321–325<br />
manager, SCSI 322<br />
modules 318<br />
objects 319<br />
troubleshooting 364<br />
validation testing 149<br />
scsi test<br />
special configuration 149<br />
SCSI_CTRL data structure 319<br />
SCSI_PHYS_DEV data structure 320<br />
SCSI_THREAD data structure 319<br />
SCSI_TRANSACTION data structure 319<br />
scsiCommonLib 324<br />
436
Index<br />
scsiCtrlLib 324<br />
scsiDirectLib 324<br />
scsiDiskTest( ) 361<br />
scsiDiskThruputTest( ) 360<br />
scsiMgrLib 322<br />
scsiSeqLib 324<br />
scsiSpeedTest( ) 362<br />
scsiTransact( ) 321<br />
selection object 118<br />
count, setting the 133<br />
syntax 235<br />
SEQ_DEV data structure 320<br />
serial drivers 56<br />
files 25<br />
generic and template 248<br />
multi-mode<br />
generic and template 249<br />
serial ports 79<br />
SETUP utility 195<br />
SHARED_CACHE_LINES 106<br />
working with 109<br />
SHARED_POINTERS 106<br />
cacheDmaMalloc( ), and 110<br />
shared-memory networks<br />
drivers, configuring 18<br />
interrupt types 19<br />
SIO drivers, see serial drivers<br />
SIO_CHAN structure 249<br />
SIO_DRV_FUNCS structure 249<br />
SM_ANCHOR_ADRS 18<br />
SM_INT_TYPE 19<br />
SM_MEM_ADRS 18<br />
SM_MEM_SIZE 19<br />
SNOOPED 106<br />
working with 108<br />
snooping 65<br />
source files 12–28<br />
see also derived files; include files<br />
target/config/all 13<br />
bootConfig.c 13<br />
bootInit.c 13<br />
dataSegPad.s 14<br />
usrConfig.c 14<br />
target/config/bspname 15<br />
bspname.h 26<br />
config.h 16–23<br />
depend.bspname file 15<br />
Makefile<br />
contents 15<br />
README 15<br />
romInit.s 23<br />
sysALib.s 24<br />
sysLib.c 25<br />
sysNet.c 26<br />
sysScsi.c 25<br />
sysSerial.c 25<br />
target.nr 27<br />
target/config/comps/src 14<br />
target/config/comps/vxWorks 14<br />
SPARC/SPARClite development<br />
virtual memory 85<br />
stackError( ) 308<br />
stackRcvRtn( ) 307<br />
passing buffers to the MUX 280<br />
stackShutdownRtn( ) 309<br />
stackTxRestartRtn( ) 310<br />
STANDALONE_NET 145<br />
symTbl.o 29<br />
SYNOPSIS property<br />
component object 121<br />
folder object 117<br />
initGroup object 125<br />
selection object 119<br />
SYS_CLK_RATE_MAX 252<br />
SYS_CLK_RATE_MIN 251<br />
sysAbortInt( ) 31<br />
sysALib.o 29<br />
sysALib.s 24<br />
creating <strong>BSP</strong>s 48<br />
initialization, RAM 51<br />
troubleshooting 38<br />
sysAuxClkConnect( ) 31<br />
single timer, using a 251<br />
sysAuxClkDisable( ) 31<br />
sysAuxClkEnable( ) 31<br />
sysAuxClkInt( ) 31<br />
sysAuxClkRateGet( ) 31<br />
sysAuxClkRateSet( ) 31<br />
IX<br />
437
VxWorks 5.5<br />
<strong>BSP</strong> Developer’s <strong>Guide</strong><br />
sysBspRev( ) 30<br />
sysBusIntAck( ) 31<br />
sysBusIntGen( ) 31<br />
sysBusTas( ) 31<br />
sysBusTasClear( ) 31<br />
sysBusToLocalAdrs( ) 31<br />
sysClkConnect( ) 30<br />
sysClkDisable( ) 30<br />
sysClkEnable( ) 30<br />
sysClkInt( ) 30<br />
sysClkRateGet( ) 30<br />
sysClkRateSet( ) 30<br />
sysHwInit( ) 35<br />
generic initialization 52<br />
initialization load, easing 24<br />
required 30<br />
system crashes, and 102<br />
sysHwInit2( ) 30<br />
sysInit( ) 51<br />
sysIntConnect( ) 271<br />
sysIntDisable( ) 31<br />
sysIntEnable( ) 31<br />
sysLib.c 25<br />
creating <strong>BSP</strong>s 46<br />
generic initialization 52<br />
virtual memory, enabling 83<br />
sysLib.o 29<br />
routines, required 30<br />
sysLocalToBusAdrs( ) 31<br />
sysMailboxConnect( ) 32<br />
sysMailboxEnable( ) 32<br />
sysMailboxInt( ) 32<br />
sysMemTop( ) 30<br />
sysModel( ) 30<br />
sysNanoDelay( ) 32<br />
sysNet.c 26<br />
sysNvRamGet( ) 30<br />
generic drivers, in 252<br />
sysNvRamSet( ) 30<br />
generic drivers, in 252<br />
sysPhysMemDesc[ ] 102<br />
sysPhysMemTop( ) 31<br />
sysProcNumGet( ) 31<br />
sysProcNumSet( ) 31<br />
sysScsi.c 25<br />
sysScsiConfig( ) 357<br />
sysScsiInit( ) 357<br />
code example, template 357<br />
sysSerialChanGet( ) 31<br />
sysSerialHwInit( ) 31<br />
sysSerialHwInit2( ) 31<br />
system clock 79<br />
generic timer driver, in 251<br />
minimal kernels, using 56<br />
system images 49–53<br />
see also individual images<br />
bootrom 60<br />
initializing 14<br />
vxWorks 49<br />
vxWorks.st 58<br />
vxWorks_resrom_nosym 49<br />
vxWorks_rom 49<br />
sysToMonitor( ) 31<br />
T<br />
T1_SER_BAUD 150<br />
T1_SER_DEVICE 150<br />
T1_TMO_BOOT 150<br />
T2_SER_BAUD 150<br />
T2_SER_DEVICE 150<br />
T2_TMO_BOOT 150<br />
tapeFsTest( ) 363<br />
target boot parameters 151<br />
target directory tree 13<br />
target.nr 27<br />
TARGET_DIR 15<br />
creating <strong>BSP</strong>s 45<br />
tasks<br />
see also daemons<br />
network (tNetTask) 271<br />
root (tUsrRoot) 271<br />
Tcl (tool command language)<br />
Validation Test Suite (<strong>BSP</strong> VTS),<br />
writing the 146<br />
tclserial library 146<br />
test-and-set (TAS) instruction 67<br />
validation testing 147<br />
438
Index<br />
testing, validation 139–158<br />
see also Validation Test Suite<br />
TGT_DIR<br />
creating <strong>BSP</strong>s 45<br />
timeout 150<br />
target boot parameters 151<br />
timers<br />
adding 58<br />
generic 251<br />
timestamp 79<br />
config.h support 21<br />
timestamp test<br />
special configuration 148<br />
tNetTask task 271<br />
TOOL 15<br />
creating <strong>BSP</strong>s 45<br />
Tornado 1.0.1<br />
Tornado 2.0, upgrading <strong>BSP</strong>s to 203–209<br />
Tornado 2.0<br />
upgrading <strong>BSP</strong>s to 203–209<br />
troff/nroff<br />
macros 190–192<br />
working with 190–193<br />
troubleshooting<br />
<strong>BSP</strong>s, writing 38–39<br />
drivers 102<br />
SCSI-2 drivers 364<br />
True Flash File System (TFFS)<br />
drivers for, writing 252<br />
ttyDevCreate( ) 37<br />
ttyDrv( ) 37<br />
tUsrRoot task 271<br />
TY_CO_DEV 248<br />
TYPE property (parameter object) 123<br />
U<br />
upgrading <strong>BSP</strong>s 203–209<br />
USER_APPL_INIT 38<br />
USER_D_CACHE_MOD 18<br />
USER_DATA_UNKNOWN 105<br />
cache coherency, maintaining 108<br />
USER_I_CACHE_MODE 18<br />
USER_RESERVED_MEM 20<br />
usrConfig.c 14<br />
creating <strong>BSP</strong>s 48<br />
initialization 52<br />
usrInit( ) 52<br />
terminating 36<br />
usrRoot( ) 52<br />
V<br />
Validation Test Suite (<strong>BSP</strong> VTS) 139–158<br />
see also individual tests<br />
architecture<br />
multiple-target 142<br />
single-target 141<br />
bash shell, using a (Windows) 153<br />
bspVal script 365<br />
busTas test 147<br />
checklists 401–413<br />
configuring 143–153<br />
bspVal directory 149<br />
bus-full setup 143<br />
host system 147<br />
serial connections 150<br />
standalone setup 144<br />
target hardware 147<br />
timeout 150<br />
VxWorks 148<br />
design goals 140<br />
example test 155<br />
installing 145<br />
monitoring 155<br />
network test 147<br />
parameters, configuration 149<br />
target booting 151<br />
target-specific 151<br />
reference entries 365–400<br />
rlogin test 147<br />
scsi test 149<br />
starting 153<br />
test results, tracking 409<br />
tests 365–400<br />
timestamp test 148<br />
verifying the product 402<br />
Validation Test Suite Checklist 409<br />
IX<br />
439
VxWorks 5.5<br />
<strong>BSP</strong> Developer’s <strong>Guide</strong><br />
variables, uninitialized 35<br />
VENDOR 15<br />
creating <strong>BSP</strong>s 45<br />
versions numbers 204<br />
virtual memory 83–85<br />
see also vmBaseLib(1); vmLib(1)<br />
architecture considerations 66<br />
code example 84<br />
config.h, modifying 85<br />
SCSI troubleshooting 364<br />
SPARC, for 85<br />
sysLib.c, modifying 83<br />
VMEbus 70–74<br />
access windows 70<br />
addressing 70<br />
arbitration 72<br />
drivers 253<br />
dual-porting 71<br />
extractors 74<br />
interrupt acknowledgment 73<br />
interrupts 73<br />
mailbox interrupts 73<br />
mapping 21<br />
power usage 74<br />
read-modify-write (RMW) 71<br />
system controller 72<br />
VLSI chips 74<br />
VxVMI (option) 83<br />
see also virtual memory; vmBaseLib(1);<br />
vmLib(1)<br />
text segment protection 14<br />
VxWorks<br />
boot sequence 32–38<br />
command line, from 223–230<br />
project facility, from 238–246<br />
downloading images 49<br />
entry points<br />
RAM-based 48<br />
ROM-based 23<br />
system images 49<br />
vxWorks 29, 30<br />
creating <strong>BSP</strong>s 49<br />
vxWorks.st 30<br />
creating <strong>BSP</strong>s 58<br />
vxWorks.sym 29, 30<br />
vxWorks_resrom_nosym 49<br />
initialization sequence 50<br />
vxWorks_rom 49<br />
initialization sequence 50<br />
W<br />
WDB agent 41<br />
starting before kernel 53<br />
wdbConfig( ) 37<br />
Wind Debug target agent, see WDB agent<br />
write pipelining 105<br />
hardware consideration 66<br />
working with 107<br />
WRITE_PIPING 105<br />
working with 107<br />
Z<br />
zero-copy TCP 257<br />
440