Motorola DCT6412 or DCT6416 - MetroCast
Motorola DCT6412 or DCT6416 - MetroCast
Motorola DCT6412 or DCT6416 - MetroCast

Create successful ePaper yourself
Turn your PDF publications into a flip-book with our unique Google optimized e-Paper software.
Software LicenseIMPORTANT: PLEASE READ THIS SOFTWARE LICENSE (“LICENSE”) CAREFULLY BEFORE YOUUSE ANY SOFTWARE, FIRMWARE AND RELATED DOCUMENTATION (“SOFTWARE”) PROVIDEDWITH MOTOROLA’S DIGITAL CABLE RECEIVER OR HOME THEATER SYSTEM (EACH SHALL BEREFERRED TO IN THIS LICENSE AS A “RECEIVER”). BY USING THE RECEIVER AND/OR USINGANY OF THE SOFTWARE, YOU INDICATE YOUR ACCEPTANCE OF EACH OF THE TERMS OFTHIS LICENSE. UPON ACCEPTANCE, THIS LICENSE WILL BE A LEGALLY BINDING AGREEMENTBETWEEN YOU AND MOTOROLA. THE TERMS OF THIS LICENSE APPLY TO YOU AND TO ANYSUBSEQUENT USER OF THIS SOFTWARE.IF YOU DO NOT AGREE TO ALL OF THE TERMS OF THIS LICENSE (I) DO NOT USE THESOFTWARE AND (II) RETURN THE RECEIVER AND THE SOFTWARE (COLLECTIVELY,“PRODUCT”), INCLUDING ALL COMPONENTS, DOCUMENTATION AND ANY OTHER MATERIALSPROVIDED WITH THE PRODUCT, TO YOUR POINT OF PURCHASE OR SERVICE PROVIDER, ASTHE CASE MAY BE, FOR A FULL REFUND.The Software includes associated media, any printed materials, and any “on-line” <strong>or</strong> electronicdocumentation. Software provided by third parties may be subject to separate end-user licenseagreements from the manufacturers of such Software. The Software is never sold. <strong>Mot<strong>or</strong>ola</strong> licenses theSoftware to the <strong>or</strong>iginal customer and to any subsequent licensee f<strong>or</strong> personal use only on the terms ofthis License. <strong>Mot<strong>or</strong>ola</strong> and its third party licens<strong>or</strong>s retain the ownership of the Software.You may:USE the Software only in connection with the operation of the Product.TRANSFER the Software (including all component parts and printed materials) permanently to anotherperson, but only if the person agrees to accept all of the terms of this License. If you transfer theSoftware, you must at the same time transfer the Product and all copies of the Software (if applicable) tothe same person <strong>or</strong> destroy any copies not transferred.TERMINATE this License by destroying the <strong>or</strong>iginal and all copies of the Software (if applicable) inwhatever f<strong>or</strong>m.You may not:(1) Loan, distribute, rent, lease, give, sublicense <strong>or</strong> otherwise transfer the Software, in whole <strong>or</strong> in part,to any other person, except as permitted under the TRANSFER paragraph above. (2) Copy <strong>or</strong> translatethe User Guide included with the Software, other than f<strong>or</strong> personal use. (3) Copy, alter, translate,decompile, disassemble <strong>or</strong> reverse engineer the Software, including but not limited to, modifying theSoftware to make it operate on non-compatible hardware. (4) Remove, alter <strong>or</strong> cause not to bedisplayed, any copyright notices <strong>or</strong> startup message contained in the Software programs <strong>or</strong>documentation. (5) Exp<strong>or</strong>t the Software <strong>or</strong> the Product components in violation of any United Statesexp<strong>or</strong>t laws.The Product is not designed <strong>or</strong> intended f<strong>or</strong> use in on-line control of aircraft, air traffic, aircraft navigation<strong>or</strong> aircraft communications; <strong>or</strong> in design, construction, operation <strong>or</strong> maintenance of any nuclear facility.MOTOROLA AND ITS THIRD PARTY LICENSORS DISCLAIM ANY EXPRESS OR IMPLIEDWARRANTY OF FITNESS FOR SUCH USES. YOU REPRESENT AND WARRANT THAT YOU SHALLNOT USE THE PRODUCT FOR SUCH PURPOSES.Title to this Software, including the ownership of all copyrights, mask w<strong>or</strong>k rights, patents, trademarksand all other intellectual property rights subsisting in the f<strong>or</strong>egoing, and all adaptations to andmodifications of the f<strong>or</strong>egoing shall at all times remain with <strong>Mot<strong>or</strong>ola</strong> and its third party licens<strong>or</strong>s.<strong>Mot<strong>or</strong>ola</strong> retains all rights not expressly licensed under this License. The Software, including anyimages, graphics, photographs, animation, video, audio, music and text inc<strong>or</strong>p<strong>or</strong>ated therein is owned by<strong>Mot<strong>or</strong>ola</strong> <strong>or</strong> its third party licens<strong>or</strong>s and is protected by United States copyright laws and internationaltreaty provisions. Except as otherwise expressly provided in this License, the copying, reproduction,distribution <strong>or</strong> preparation of derivative w<strong>or</strong>ks of the Software, any p<strong>or</strong>tion of the Product <strong>or</strong> thedocumentation is strictly prohibited by such laws and treaty provisions. Nothing in this Licenseconstitutes a waiver of <strong>Mot<strong>or</strong>ola</strong>’s rights under United States copyright law.This License and your rights regarding any matter it addresses are governed by the laws of theCommonwealth of Pennsylvania, without reference to conflict of laws principles. THIS LICENSE SHALLTERMINATE AUTOMATICALLY if you fail to comply with the terms of this License.<strong>Mot<strong>or</strong>ola</strong> is not responsible f<strong>or</strong> any third party software that is provided as a bundled application, <strong>or</strong>otherwise, with the Software <strong>or</strong> that is downloaded to, <strong>or</strong> otherwise installed on, the Product.U.S. GOVERNMENT RESTRICTED RIGHTSThe Product and documentation is provided with RESTRICTED RIGHTS. The use, duplication <strong>or</strong>disclosure by the Government is subject to restrictions as set f<strong>or</strong>th in subdivision (c)(1)(ii) of The Rightsin Technical Data and Computer Software clause at 52.227-7013. The contract<strong>or</strong>/manufacturer is<strong>Mot<strong>or</strong>ola</strong>, Inc., Broadband Communications Sect<strong>or</strong>, 101 Tournament Drive, H<strong>or</strong>sham, PA 19044.
Contact UsF<strong>or</strong> technical supp<strong>or</strong>t f<strong>or</strong> your DCT6400 cable terminal, call <strong>Mot<strong>or</strong>ola</strong>Supp<strong>or</strong>t at 1-866-668-2271 <strong>or</strong> 1-866-MOT-BCS1.F<strong>or</strong> questions about your cable TV service, call your cable provider.F<strong>or</strong> <strong>Mot<strong>or</strong>ola</strong> consumer cable products, education, and supp<strong>or</strong>t:http://www.mot<strong>or</strong>ola.com/broadbandF<strong>or</strong> an overview of high definition television (HDTV):http://broadband.mot<strong>or</strong>ola.com/consumers/hdtv/default.asp___________________________________________________________________________________Copyright © 2005 <strong>Mot<strong>or</strong>ola</strong>, Inc.All rights reserved. No part of this publication may be reproduced in any f<strong>or</strong>m <strong>or</strong> by any means <strong>or</strong> usedto make any derivative w<strong>or</strong>k (such as translation, transf<strong>or</strong>mation <strong>or</strong> adaptation) without writtenpermission from <strong>Mot<strong>or</strong>ola</strong>, Inc.<strong>Mot<strong>or</strong>ola</strong> reserves the right to revise this publication and to make changes in content from time to timewithout obligation on the part of <strong>Mot<strong>or</strong>ola</strong> to provide notification of such revision <strong>or</strong> change. <strong>Mot<strong>or</strong>ola</strong>provides this guide without warranty of any kind, either implied <strong>or</strong> expressed, including but not limited to,the implied warranties of merchantability and fitness f<strong>or</strong> a particular purpose. <strong>Mot<strong>or</strong>ola</strong> may makeimprovements <strong>or</strong> changes in the product(s) described in this manual at any time.MOTOROLA and the Stylized M Logo are registered in the US Patent & Trademark Office. Dolby Digitalmanufactured under license from Dolby Lab<strong>or</strong>at<strong>or</strong>ies Licensing C<strong>or</strong>p<strong>or</strong>ation. Dolby, Dolby Digital,ProLogic and the double-D symbol are registered trademarks of Dolby Lab<strong>or</strong>at<strong>or</strong>ies. All other product <strong>or</strong>service names are the property of their respective owners.© <strong>Mot<strong>or</strong>ola</strong>, Inc. 2005
DCT6400 Phase III User GuideCONTENTSIntroduction .............................................................................................3Operation .................................................................................................6Turning Power On and Off...............................................................6Changing Channels..........................................................................6Adjusting the Volume.......................................................................6Interactive Program Guide...............................................................6Digital Video Rec<strong>or</strong>der (DVR).................................................................7Optimizing Your DCT6400 F<strong>or</strong> High Definition TV...............................8On-Screen Graphics .............................................................................12Connecting Your DCT6400...................................................................13Video Connection Options ............................................................14Imp<strong>or</strong>tant Safety Considerations..................................................15Connecting Your DCT6400 to aN HDTV – Video Only.......................16Connecting HDTV – Video Only ....................................................17Connecting Your DCT6400 to a HDTV – Audio Only .........................18Connecting HDTV – Audio Only....................................................19Connecting Your DCT6400 to an A/V Receiver – Audio Only...........20Connecting an A/V Receiver – Audio Only ..................................21Connecting Your DCT6400 to a Stereo TV ........................................22Connecting a Stereo TV .................................................................23Connecting Your DCT6400 to a Stereo TV and Stereo VCR ............24Connecting a Stereo TV and Stereo VCR.....................................25Connecting Your DCT6400 to an A/V Receiver, TV, and VCR .........26Connecting an A/V Receiver, TV, and VCR..................................271
Rec<strong>or</strong>ding Your Connections ..............................................................28Data Devices..........................................................................................29Troubleshooting....................................................................................302
DCT6400 Phase III User GuideINTRODUCTIONCongratulations on receiving a <strong>Mot<strong>or</strong>ola</strong> DCT6400 Series Phase III HighDefinition Advanced DVR Cable Terminal. <strong>Mot<strong>or</strong>ola</strong> has merged theextra<strong>or</strong>dinary features of digital cable – the seemingly endless programmingoptions, interactive program guides, video on demand (VoD), andcommercial free, CD quality music – with the flexibility of a dual tunerdigital video rec<strong>or</strong>der (DVR) and the incredible picture quality and soundof high definition TV (HDTV). HDTV provides up to twice the col<strong>or</strong>resolution and up to six times the sharpness of standard definition TV.The DCT6400 enables a direct digital connection to consumer audio andvideo devices through IEEE-1394 DTV and HDMI interfaces. It containsa hard drive f<strong>or</strong> hours of DVR functionality, including rec<strong>or</strong>ding highdefinition (HD) programs and watch and rec<strong>or</strong>d functionality.This User Guide introduces the basic features, outlines imp<strong>or</strong>tantsafeguards, and provides options f<strong>or</strong> integrating your DCT6400 into yourentertainment system. Please take a few moments to read through thisUser Guide. The configuration diagrams, on-screen menu description,and troubleshooting section will help you make the most of your homeentertainment experience.To determine which digital cable features are provided in your area,please check with your cable operat<strong>or</strong>. They will be happy to provideinstructions f<strong>or</strong> these optional services.In this guide, “DCT6400” refers to all DCT6400 Series Phase III cableterminals, including the <strong>DCT6412</strong> and <strong>DCT6416</strong>. They functionidentically, but have different size hard drives. F<strong>or</strong> example:ModelDriveSizeAnalogChannelsEstimated Rec<strong>or</strong>ding Hours F<strong>or</strong>Standard DigitalChannelsHDTVChannels<strong>DCT6412</strong> 120 GB 24 to 32 38 to 73 10 to 15<strong>DCT6416</strong> 160 GB 35 to 43 55 to 100 14 to 21All times are approximate. The actual hours you can rec<strong>or</strong>d depends onmultiple fact<strong>or</strong>s.3
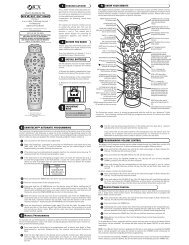
FRONT PANELMessage Indicat<strong>or</strong>Lights when message is waitingPOWER switchTurns unit on <strong>or</strong> offMENU switchDisplays menuINFO switchDisplays current channel and program inf<strong>or</strong>mationCURSO RINFOMSGS.MENUONPO W ERUSB 2 .0 VIDEO IN L AUDIO IN RDu a l Tuner DVR / HDTV CapableUSB 2.0Connect<strong>or</strong>VIDEO IN*Video input from VCR,camc<strong>or</strong>der, <strong>or</strong> other deviceAUDIO IN (L/R)*Audio input fromCD player <strong>or</strong> tunerCURSORMoves curs<strong>or</strong> around guideand menu screensPOWER indicat<strong>or</strong>Lights whenunit is onAUDIO IN (R/L)*Audio input from CD player <strong>or</strong> tunerOPTICAL SPDIF®Provides Dolby Digital 5.1 audio <strong>or</strong> PCM audioOPTICALSPDIFRAUDIOINLRF OUTRF IN 2CM INRF IN 1CABLERPT INOUTIRS-VIDEORAUDIOOUTLCABLE INInput from cable providerIREnables you to control VCRwhile rec<strong>or</strong>ding selected program(Not supp<strong>or</strong>ted by all program guides)RF OUTOutput to TVS-VIDEOOutput toTV <strong>or</strong> VCRAUDIO OUT (R/L)Audio output to stereo receiver4
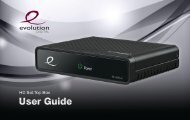
DCT6400 Phase III User GuideRECORD Indicat<strong>or</strong>Lights when DVR is rec<strong>or</strong>dingSELECT switchSelects menu optionsGUIDE switchDisplays program guideOPTION switchReservedCHANNELOPTIONRECORDREM OTESELECTGUIDESM A RT CA RDDCT6400 IIIDisplay REMOTE indicat<strong>or</strong> CHANNELDisplays channel Lights when remote Scrolls up <strong>or</strong> downnumber and time of day control is in use through the channelsSMART CARD*Supp<strong>or</strong>ts Smart CardfunctionalitySPDIF (coaxial)®Provides Dolby Digital 5.1 audio <strong>or</strong> PCM audioVIDEO IN*Video input from VCR, camc<strong>or</strong>der, <strong>or</strong> other deviceVIDEO OUTVideo output to TV, VCR, <strong>or</strong> other deviceETHERNET*RJ-45 connect<strong>or</strong>BACK PANELAC Switched OutletProvides AC power to TV,VCR, <strong>or</strong> other deviceSPDIFVIDEOETHERNETYINPbPrOUTHDMIUSBSATATV PASS CARDIEEE1394SWITCHED105-125V60Hz4A MAX500W MAXY Pb PrHDTV videooutputHDMIHDTV outputUSB 2.0Connect<strong>or</strong>IEEE 1394HDTV outputSATAConnects to external hard drive* Your DCT6400 may not supp<strong>or</strong>t all of the inputs and outputs shown.5
OPERATIONTurning Power On and OffPress POWER on the front panel to turn the DCT6400 on <strong>or</strong> off. Whenusing the remote control, be sure it is in cable mode by pressing CABLEbef<strong>or</strong>e pressing POWER.Changing ChannelsYou can change channels in two ways:• Press CHANNEL <strong>or</strong> on the DCT6400 front panel, <strong>or</strong>press CHANNEL + <strong>or</strong> - on the remote control to step through thechannel selection.• Enter the number of the channel you wish to view using the numberkeys on the remote control.Adjusting the VolumePress VOLUME + <strong>or</strong> – on the remote control to adjust the volume. Whenyou adjust the volume, the volume scale is displayed on the screen.Press MUTE on the remote control to turn the sound off and on again.F<strong>or</strong> best audio quality, use the remote control to set the DCT6400 toapproximately ¾ of the maximum volume level and then adjust the audiolevels on external devices such as your TV <strong>or</strong> A/V Receiver.Interactive Program GuideThe interactive program guide (IPG) displays inf<strong>or</strong>mation about TVprograms and enables you to access features such as Parental Control<strong>or</strong> Pay-Per-View. IPGs can vary with each cable service provider. Referto your IPG manual f<strong>or</strong> detailed instructions.6
DCT6400 Phase III User GuideDIGITAL VIDEO RECORDER (DVR)The DCT6400 contains a hard drive f<strong>or</strong> the digital video rec<strong>or</strong>der (DVR)to rec<strong>or</strong>d standard- and high-definition TV (HDTV) programs.A standard VCR rec<strong>or</strong>ds and plays analog video. DVR rec<strong>or</strong>ds and playsdigital video. Unlike an analog tape, the hard drive allows simultaneousrec<strong>or</strong>ding and playback.A DVR offers the ability to control your viewing experience by pausing(time shifting) live TV and providing trick playback modes (pause, fastf<strong>or</strong>ward, slow f<strong>or</strong>ward, fast rewind, slow rewind). You may experience aslight delay between time shifted and live TV.With the DCT6400, you can:Rec<strong>or</strong>d ProgrammingRec<strong>or</strong>d hours of TV programming. The total hours of rec<strong>or</strong>ded contentdepends on your hard drive capacity and content type (digital, analog, <strong>or</strong>HD) that you rec<strong>or</strong>d.Maintain a Personal Program LibraryMaintain a personal library of rec<strong>or</strong>ded programming, accessed using theinteractive program guide (IPG).Control Live TVPause, rewind, <strong>or</strong> fast-f<strong>or</strong>ward live TV.Simultaneously Watch Two ProgramsWatch two programs and easily switch between them using the SWAPkey on your remote control. (Dependent upon program guide supp<strong>or</strong>t.)Simultaneous Watch and Rec<strong>or</strong>dRec<strong>or</strong>d one program in the background while viewing another livebroadcast at the same time.Simultaneously Rec<strong>or</strong>d Two ShowsRec<strong>or</strong>d two programs from two different channels at the same time.Simultaneously Rec<strong>or</strong>d Two Shows and Watch a Rec<strong>or</strong>ded ProgramWatch a rec<strong>or</strong>ded program while rec<strong>or</strong>ding up to two other programs atthe same time. You can also easily switch viewing the pre-rec<strong>or</strong>dedprogram and either of the programs you’re rec<strong>or</strong>ding.7
OPTIMIZING YOUR DCT6400 FOR HIGH DEFINITION TVThe DCT6400 outputs HD video through its Y Pb Pr (component), HDMI,<strong>or</strong> IEEE 1394 connect<strong>or</strong>s. This section describes how to optimizestandard and HD video based on your HDTV and personal preferences.If you use the IEEE 1394 output, no adjustments to the settings are required.F<strong>or</strong> a TV with an HDMI connection, be sure the TV is on and connectedto the DCT6400 HDMI OUT connect<strong>or</strong> bef<strong>or</strong>e adjusting the settings.<strong>Mot<strong>or</strong>ola</strong> recommends using HDMI cables less than 20 meters long.You can configure the TV type, HDMI and/<strong>or</strong> Y Pb Pr video output, andclosed captioning.To optimize the output settings:1 Be sure your DCT6400 is plugged into a power outlet andconnected to your TV.2 Power off the DCT6400 and then immediately press the MENU keyon the front panel. If your TV is on, the on-screen menu lists thesettings you can configure:USER SETTINGS> TV TYPE 16:9HDMI/YpbPr OUTPUT 1080I4:3 OVERRIDE 480ICLOSED CAPTIONSERVICE SELECTIONANALOGDIGITALFONT SIZEFONT COLORFONT OPACITYFONT EDGE TYPEFONT EDGE COLORBACKGROUND COLORBACKGROUND OPACITYSETTINGSRESTORE ALL DEFAULTSDISABLEDCC1PRIMARY LANGUAGEAUTOAUTOAUTOAUTOAUTOAUTOAUTOAUTO8
DCT6400 Phase III User GuideUse your remote control <strong>or</strong> the curs<strong>or</strong> keys on the front panel to navigatethe on-screen display:• Press the ▲ and ▼ keys to highlight the setting you wish tochange.• Press the ► key to select an option.• To exit the setting and move to another setting, use the ▲ and ▼keys.If the User Settings menu does not display on the HDTV screen, the TVmay not supp<strong>or</strong>t the default video output setting. Use the front panel LEDto adjust the settings as described in “There is no video on the TVscreen” in “Troubleshooting.”F<strong>or</strong> a TV with an HDMI connection, be sure the TV is on and connectedto the DCT6400 HDMI OUT connect<strong>or</strong> bef<strong>or</strong>e adjusting the settings.The User Settings menu options are:SettingDescriptionTV TypeHDMI/YPbPrOutputSets the aspect ratio. The front panel display indicates thetype you select. Defaults to 16:9. Options are 16:9 f<strong>or</strong> widescreen TVs <strong>or</strong> 4:3 LETTERBOX <strong>or</strong> 4:3 PAN/SCAN f<strong>or</strong>standard TVs:• 4:3 LETTERBOX fits widescreen programming on thescreen by placing black bars at the top and bottom.• 4:3 PAN/SCAN fills the screen by cropping the left andright edges of widescreen programming.Sets the video display f<strong>or</strong>mat f<strong>or</strong> the HDMI <strong>or</strong> componentvideo outputs. The front panel display indicates the f<strong>or</strong>matyou select. Defaults to 1080i. Options are 1080i, 720p, 480p,<strong>or</strong> 480i. F<strong>or</strong> HDMI only, additional options you can use todisplay video on a computer monit<strong>or</strong> are PC1-VGA(640x480) and PC2-XVGA (800x600).Some TVs only supp<strong>or</strong>t certain display f<strong>or</strong>mats. Check yourTV user manual f<strong>or</strong> m<strong>or</strong>e inf<strong>or</strong>mation.If you are not using the HDMI connection, the HDMI/YPbPrOUTPUT setting displays as YPbPr OUTPUT.9
SettingDescription4:3 Override Sets the display f<strong>or</strong>mat f<strong>or</strong> 4:3 standard-definitionprogramming. If the YPbPr Output is set to 1080i, 720p, <strong>or</strong>480p, this setting defaults to 480i. If the YPbPr Output is setto 480i, this setting defaults to OFF and cannot be changed.Options are:• OFF displays non-high-definition programs having a 4:3aspect ratio in wide screen f<strong>or</strong>mat. On an HDTV, blackbars display on the left and right of the picture. SelectingOFF f<strong>or</strong> a 4:3 TV may result in a small picture with blackbars around it.• 480i displays non-high-definition programs in their<strong>or</strong>iginal 480i f<strong>or</strong>mat. Some TVs cannot display 480if<strong>or</strong>mat on their component video inputs (YPbPr). Checkthe TV user manual f<strong>or</strong> m<strong>or</strong>e inf<strong>or</strong>mation.• 480p converts non-high-definition TV programs to ahigher-quality 480p f<strong>or</strong>mat. Some TVs cannot display480p f<strong>or</strong>mat on their component video inputs (YPbPr).Check the TV user manual f<strong>or</strong> m<strong>or</strong>e inf<strong>or</strong>mation.Closed CaptionClosed CaptionServiceSelectionFont SizeFont Style• Stretch automatically stretches all standard definitionprogramming to fill your widescreen display. Stretch canonly be selected if you have TV Type set to 16:9.Turns closed captions off <strong>or</strong> on. The front panel displayindicates the status of the closed captions. Defaults toDISABLED. Options are ENABLED <strong>or</strong> DISABLED.Turns closed captions off <strong>or</strong> on. The LED panel displays thestatus of the closed captions. Defaults to DISABLED.Options are ENABLED <strong>or</strong> DISABLED.Sets the service used f<strong>or</strong> closed captions:• Analog: CC1, CC2, CC3, CC4, T1, T2, T3, <strong>or</strong> T4. Thedefault is CC1.• Digital: PRIMARY LANGUAGE, SECONDARYLANGUAGE, 3, 4, 5, <strong>or</strong> 6. The default is PRIMARYLANGUAGE.Sets the font size f<strong>or</strong> closed captions. Defaults to AUTO.Options are AUTO, STANDARD, LARGE, <strong>or</strong> SMALL.Sets the font style. Defaults to AUTO. Options are AUTO,MONO SERIF, PROPORTION SERIF, MONO NO SERIF,PROPORTION NO SERIF, CASUAL, CURSIVE, <strong>or</strong> SMALL.10
DCT6400 Phase III User GuideSettingDescriptionFont Col<strong>or</strong>Font OpacityFont Edge TypeFont Edge Col<strong>or</strong>BackgroundCol<strong>or</strong>BackgroundOpacitySettingsRest<strong>or</strong>e AllDefaultsSets the font col<strong>or</strong>. Defaults to AUTO. Options are AUTO,WHITE, BLACK, RED, GREEN, BLUE, YELLOW,MAGENTA, <strong>or</strong> CYAN.Sets the opacity. Defaults to AUTO. Options are AUTO,TRANSPARENT, TRANSLUCENT, SOLID, <strong>or</strong> FLASHING.Sets the edge appearance — AUTO, NONE, RAISED,DEPRESSED, UNIFORM, LEFT SHADOWED, <strong>or</strong> RIGHTSHADOWED. The default is AUTO.Sets the edge col<strong>or</strong> — AUTO, WHITE, BLACK, RED,GREEN, BLUE, YELLOW, MAGENTA, <strong>or</strong> CYAN. The defaultis AUTO.Sets the background col<strong>or</strong> f<strong>or</strong> closed captions. Defaults toAUTO. Options are AUTO, WHITE, BLACK, RED, GREEN,BLUE, YELLOW, MAGENTA, <strong>or</strong> CYAN.Sets the background opacity f<strong>or</strong> closed captions. Defaults toAUTO. Options are AUTO, TRANSPARENT,TRANSLUCENT, SOLID, <strong>or</strong> FLASHING.Sets the default settings f<strong>or</strong> closed captions (AUTO) <strong>or</strong> thesettings you have configured (USER). Defaults to AUTO.Options are AUTO <strong>or</strong> USER.To reset all User Settings to their defaults, select this optionand press the ► key.F<strong>or</strong> HDMI only, when you first connect a TV to the DCT6400using the HDMI connection, the TV and the DCT6400exchange inf<strong>or</strong>mation to automatically determine the bestpossible TV TYPE and HDMI/YPbPr OUTPUT settings. Youcan change these settings at any time:• To cause the HDMI TV and DCT6400 to re-exchangeinf<strong>or</strong>mation to rest<strong>or</strong>e the automatic settings, selectRest<strong>or</strong>e All Defaults with the HDMI connection in placeand the TV powered on.• If you connect another HDMI TV to the DCT6400, selectRest<strong>or</strong>e All Defaults. This causes the TV and DCT6400to exchange inf<strong>or</strong>mation, enabling settings suited to yournew TV.To exit the menu and save your settings, press the POWER <strong>or</strong> MENU key.11
ON-SCREEN GRAPHICSThe DCT6400 can generate on-screen graphics that overlay the videoprogramming <strong>or</strong> fill the entire television screen. Common examplesinclude on-screen menus (such as the User Setting menu), closedcaptions, and interactive program guides. The DCT6400 overlays thesegraphics whenever you display a menu, enable closed captions, <strong>or</strong> scrollthrough a program grid.On-screen graphics are available f<strong>or</strong> all DCT6400 video outputs exceptf<strong>or</strong> IEEE 1394.12
DCT6400 Phase III User GuideCONNECTING YOUR DCT6400This section describes connecting the DCT6400 to your homeentertainment system.Instructions and diagrams are included f<strong>or</strong> connections to:• High definition television (HDTV)• A/V Receiver – Audio• Stereo TV• Stereo TV and Stereo VCR• A/V Receiver, TV, and VCRBef<strong>or</strong>e you move <strong>or</strong> change components on your entertainment system,review the following:• F<strong>or</strong> basic cable connections, use 75-ohm coaxial cables equippedwith F-type connect<strong>or</strong>s.• Disconnect power from the cable terminal bef<strong>or</strong>e connecting <strong>or</strong>changing cable connections.F<strong>or</strong> inf<strong>or</strong>mation on connecting f<strong>or</strong> HDTV, see “Video Options” on the nextpage.CAUTION!Do not place anything on top of the cable terminal, especially other homeentertainment components. Be sure to provide adequate ventilation toprevent overheating.13
Video Connection OptionsThe DCT6400 offers the following video outputs:HDTV Component video, HDMI, <strong>or</strong> IEEE 1394StandardComposite video, S-Video, <strong>or</strong> RF coaxialTo determine the available inputs on your TV, check the manual suppliedwith the TV <strong>or</strong> the TV itself.Use the following guidelines to determine the best video connection f<strong>or</strong>your home entertainment system:• Component video (Y Pb Pr) – HDTV and standardThe Y Pb Pr connect<strong>or</strong>s on your DCT6400 provide componentvideo, which is the most widely supp<strong>or</strong>ted HDTV connection.• HDMI <strong>or</strong> IEEE 1394 – HDTV and standardHDMI and IEEE 1394 offer higher video quality than componentvideo. If your TV has an HDMI input, use the HDMI connections onyour DCT6400 instead of IEEE 1394. <strong>Mot<strong>or</strong>ola</strong> recommends usingHDMI cables less than 20 meters long.HDMI and IEEE 1394 are video and audio connections. If you useHDMI <strong>or</strong> IEEE 1394, no separate audio connection to your TV isrequired.HDMI is compatible with DVi. If your TV has a DVI input, you canuse an HDMI-to-DVI converter cable to connect to the DCT6400HDMI connect<strong>or</strong>.If you use IEEE 1394, on-screen graphics do not display.• S-Video – standard onlyIf your TV has an S-Video input, use S-Video. S-Video is thehighest quality standard-definition video output on the DCT6400.• Composite video – standard onlyIf your TV does not have an S-Video input, use the compositevideo (VIDEO) output.• RF coaxial – standard onlyIf your TV only has a coaxial RF input, connect it to the DCT6400RF OUT connect<strong>or</strong>.14
USB 2. 0 VIDEO IN L AUDIO IN RMENUINFOPOWERMSGS.ONMUT EPRECORDREM OTEOPTIONSELECTGUIDESM ART CARDDCT6400 Phase III User GuideImp<strong>or</strong>tant Safety Considerations2inchC URSORV E N T I L A T E2 inch spaceC HAN NEL2inchDua l Tune r DVR/ HDTVCapableDC T6416 IIIFollow these imp<strong>or</strong>tant safety guidelines when positioning andconnecting your cable terminal:• Position the DCT6400 with at least 2 inches of space above and onall sides• Do not block the slots and openings• Do not place anything on top of the DCT6400• Do not position the DCT6400 in an enclosed space that wouldrestrict airflow around the unit• Do not position the DCT6400 near any external heat source thatcould raise the temperature around the unit. Do not place theterminal on top of another heat-producing electronic device.• Allow f<strong>or</strong> adequate ventilation around the DCT6400 to maintainn<strong>or</strong>mal operating temperature. Do not place it in a sealed enclosurewithout providing f<strong>or</strong> adequate airflow.• Do not plug the AC power c<strong>or</strong>d into a switched power outlet.15
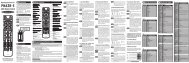
CONNECTING YOUR DCT6400 TO AN HDTV – VIDEO ONLYHDMIconnectionComponent videoconnectionIEEE 1394connectionDCT6400 Phase IIIOPTICALSPDIFRAUDIOINLSPDIFVIDEOETHERNETRF IN 2CM INRF IN 1CABLEINRPT OUTRF OUTIRS-VIDEORAUDIOOUTLYINPbPrOUTHDMIUSBSATATV PASS CARDIEEE1394SWITCHED105-125V60Hz4A500WMAXMAXCable inEither / <strong>or</strong>HDTVCo mpo nen tVideo InputHDM IYCABL E/ANTENNA INIEEE 1394PbPr16
DCT6400 Phase III User GuideConnecting HDTV – Video Only1 Connect an RF coaxial cable to the cable wall outlet and theCABLE IN connect<strong>or</strong> on the DCT6400.2 Connect the HDTV using component video, HDMI, <strong>or</strong> IEEE 1394.Component video (Y Pb Pr)Connect the component video cables to the Y, Pb, and Pr connect<strong>or</strong>s onyour DCT6400 and the HDTV.This connection carries video only. To connect the audio connections f<strong>or</strong>your HDTV, refer to the following page. To connect your audioconnections f<strong>or</strong> a home theater receiver, refer to “Connecting YourDCT6400 to an A/V Receiver – Audio Only.”HDMIIf your HDTV has a HDMI input, connect an HDMI cable less than 20meters long to the HDMI OUT connect<strong>or</strong> on your HDTV and the DCT6400.If you use the TV as the primary audio source <strong>or</strong> your home theaterreceiver has an HDMI input and output, the HDMI connection carriesvideo and audio.If your TV has a DVI input, you can use an HDMI-to-DVI converter cableto connect to the DCT6400 HDMI connect<strong>or</strong>.F<strong>or</strong> inf<strong>or</strong>mation on configuring your DCT6400 settings, see “OptimizingYour DCT6400 f<strong>or</strong> High Definition TV.”IEEE 1394If your HDTV has an IEEE 1394 connect<strong>or</strong>, you can connect an IEEE1394 cable to the IEEE 1394 connect<strong>or</strong> on your HDTV and the DCT6400.If you use the TV as the primary audio source, the IEEE 1394 connectioncarries video and audio.If you use the IEEE 1394 connection, on-screen graphics cannot display.17
CONNECTING YOUR DCT6400 TO A HDTV – AUDIO ONLYAudioconnectionOptical SPDIFconnectionSPDIF audioconnectionDCT6400 Phase IIIOPTICALSPDIFRAUDIOINLSPDIFVIDEOETHERNETRF IN 2CM INRF IN 1CABLERPT INOUTRF OUTIRS-VIDEORAUDIOOUTLYINPbPrOUTHDMIUSBSATATV PASS CARDIEEE1394SWITCHED105-125V60Hz4A MAX500W MAXCable inEither / <strong>or</strong>HDTVINPUTDIGITAL INPUTCOAXCABLE/ANTENNA INOPT ICALSPDIFAUDIO LEFTAUDIO RIGHT18
DCT6400 Phase III User GuideConnecting HDTV – Audio OnlyConnect the stereo audio cable to the AUDIO R and L connect<strong>or</strong>s on theDCT6400 and the c<strong>or</strong>responding connect<strong>or</strong>s on the HDTV.If your equipment supp<strong>or</strong>ts it, use the OPTICAL SPDIF <strong>or</strong> coaxial digitalSPDIF outputs instead of the AUDIO R and L outputs. In most cases,S/PDIF offers better audio quality, including supp<strong>or</strong>t f<strong>or</strong> Dolby 5.1Surround Sound.HDMI and IEEE1394 carry video and audio. If you connect the DCT6400to your HDTV using HDMI <strong>or</strong> IEEE1394, no additional audio connectionsto the TV are necessary.F<strong>or</strong> inf<strong>or</strong>mation on configuring your DCT6400 settings, see “OptimizingYour DCT6400 f<strong>or</strong> High Definition TV.”19
CONNECTING YOUR DCT6400 TO AN A/V RECEIVER – AUDIO ONLYAudioconnectionSPDIF audioconnectionOptical SPDIFconnectionDCT6400 Phase IIIOPTICALSPDIFRAUDIOINLSPDIFVIDEOETHERNETRF IN 2CM INRF IN 1CABLERPT INOUTRF OUTIRS-VIDEORAUDIOOUTLYINPbPrOUTHDMIUSBSATATV PASS CARDIEEE1394SWITCHED105-125V60Hz4A500WMAXMAXEither / <strong>or</strong>AUDIOVIDEORL VIDEO S-VIDEODIGITAL INPUTCOAXDVDCABL E/TVOPTICALVIDEO 2T V/M ONIT OROUT PUTSPEAKERCONNECTORSINVCRVIDEO S-VIDEOOUTA/V receiver20
DCT6400 Phase III User GuideConnecting an A/V Receiver – Audio OnlyThe audio connections options to your A/V receiver <strong>or</strong> home theaterreceiver are:• Optical SPDIF: Connect the optical SPDIF cable to the OPTICALSPDIF connect<strong>or</strong> on the DCT6400 and the c<strong>or</strong>responding connect<strong>or</strong>on the A/V receiver.• Coaxial SPDIF: Connect the digital audio cable to the SPDIFconnect<strong>or</strong> on the DCT6400 and the c<strong>or</strong>responding connect<strong>or</strong> onthe A/V receiver.• Stereo audio R and L: Connect the stereo audio cable to theAUDIO R and L connect<strong>or</strong>s on the DCT6400 and the c<strong>or</strong>respondingconnect<strong>or</strong>s on the A/V receiver.If you’re A/V receiver supp<strong>or</strong>ts it, use the OPTICAL SPDIF <strong>or</strong> coaxial SPDIFoutputs on the DCT6400 instead of its stereo AUDIO R and L outputs. Inmost cases, S/PDIF offers better audio quality, including supp<strong>or</strong>t f<strong>or</strong>Dolby 5.1 Surround Sound.F<strong>or</strong> inf<strong>or</strong>mation on configuring your DCT6400 settings, see “OptimizingYour DCT6400 f<strong>or</strong> High Definition TV.”21
CONNECTING YOUR DCT6400 TO A STEREO TVRF (75 ohm)connectionS-VideoconnectionVideoconnectionAudioconnectionDCT6400 Phase IIIOPTICALSPDIFRAUDIOINLSPDIFVIDEOETHERNETRF IN 2CM INRF IN 1CABLERPT INOUTRF OUTIRS-VIDEORAUDIOOUTLYINPbPrOUTHDMIUSBSATATV PASS CARDIEEE1394SWITCHED105-125V60Hz4A500WMAXMAXCable inStereo TVEither / <strong>or</strong>INPUTS-VIDEOVIDEOCABL E/ANTENNA INAUDIO LEFTAUDIO RIGHTDepending on the TV’s inputs:1 If possible, use the S-VIDEO and AUDIO connect<strong>or</strong>s on the DCT6400.2 If the TV has no S-Video input, use the composite VIDEO and AUDIOconnect<strong>or</strong>s on the DCT6400.3 If the TV has an RF input only, use the RF OUT connect<strong>or</strong> on theDCT6400. The RF connection carries video and audio.22
DCT6400 Phase III User GuideConnecting a Stereo TV1 Connect an RF coaxial cable to the cable wall outlet and theCABLE IN connect<strong>or</strong> on the DCT6400.2 Connect the stereo audio cable to the AUDIO R and L connect<strong>or</strong>s onthe DCT6400 and the c<strong>or</strong>responding connect<strong>or</strong>s on the stereo TV.3 Connect an S-video cable to the S-VIDEO connect<strong>or</strong>s on theDCT6400 and the TV.<strong>or</strong>Connect a video cable to the VIDEO OUT connect<strong>or</strong> on the DCT6400and the VIDEO IN connect<strong>or</strong> on the TV.OR1 Connect an RF coaxial cable to the cable wall outlet and theCABLE IN connect<strong>or</strong> on the DCT6400.2 Connect an RF coaxial cable to the RF OUT connect<strong>or</strong> on theDCT6400 and the RF connect<strong>or</strong> on the TV.This video connection method does not supp<strong>or</strong>t HD video. F<strong>or</strong> m<strong>or</strong>einf<strong>or</strong>mation, see “Connecting Your DCT6400 to an HDTV – Video Only.”23
CONNECTING YOUR DCT6400 TO A STEREO TV AND STEREO VCRRF (75 ohm)connectionVideoconnectionAudioconnectionDCT6400 Phase IIIOPTICALSPDIFRAUDIOINLSPDIFVIDEOETHERNETRF IN 2CM INRF IN 1CABLERPT INOUTRF OUTIRS-VIDEORAUDIOOUTLYINPbPrOUTHDMIUSBSATATV PASS CARDIEEE1394SWITCHED105-125V60Hz4A MAX500W MAXCable inStereo VCRStereo TVINPUTINPUTOUT PUTS-VIDEOCABL E/ANTENNA INAUDIOVIDEOAUDIOVIDEOVIDEOTo T VRLRLCABLE/ANTENNA INAUDIO LEFTAUDIO RIGHT24
DCT6400 Phase III User GuideConnecting a Stereo TV and Stereo VCR1 Connect an RF coaxial cable to the cable wall outlet and theCABLE IN connect<strong>or</strong> on the DCT6400.2 Connect a stereo audio cable to the AUDIO OUT R and L connect<strong>or</strong>son the DCT6400 and the INPUT AUDIO R and L connect<strong>or</strong>s on thestereo VCR.3 Connect a video cable to the VIDEO OUT connect<strong>or</strong> on the DCT6400and the INPUT VIDEO connect<strong>or</strong> on the stereo VCR.4 Connect a stereo audio cable to the OUTPUT AUDIO R and Lconnect<strong>or</strong>s on the stereo VCR and the INPUT AUDIO RIGHT and LEFTconnect<strong>or</strong>s on the stereo TV.5 Connect a video cable to the OUTPUT VIDEO connect<strong>or</strong> on the stereoVCR and the INPUT VIDEO connect<strong>or</strong> on the stereo TV.This video connection method does not supp<strong>or</strong>t HD video. F<strong>or</strong> m<strong>or</strong>einf<strong>or</strong>mation, see “Connecting Your DCT6400 to an HDTV – Video Only.”25
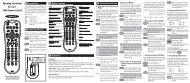
CONNECTING YOUR DCT6400 TO AN A/V RECEIVER, TV, AND VCRRF (75 ohm)connectionVideoconnectionAudioconnectionOptical SPDIFconnectionDCT6400 Phase IIIOPTICALSPDIFRAUDIOINLSPDIFVIDEOETHERNETRF IN 2CM INRF IN 1CABLERPT INOUTRF OUTIRS-VIDEORAUDIOOUTLYINPbPrOUTHDMIUSBSATATV PASS CARDIEEE1394SWITCHED105-125V60Hz4A500WMAXMAXCable inStereo VCRStereo TVINPUTINPUTOUT PUTS-VIDEOCABLE/ANTENNA INAUDIOVIDEOAUDIOVIDEOVIDEOTo T VRLRLCABLE/ANTENNA INAUDIO LEFTAUDIO RIGHTA/V receiverAUDIOVIDEORL VIDEO S-VIDEODIGITAL INPUTCOAXDVDCABLE/TVOPT ICALVIDEO 2T V/M ONIT OROUT PUTSPEAKERCONNECTORSINVCRVIDEO S-VIDEOOUT26
DCT6400 Phase III User GuideConnecting an A/V Receiver, TV, and VCR1 Connect an RF coaxial cable to the cable wall outlet and theCABLE IN connect<strong>or</strong> on the DCT6400.2 Connect a stereo audio cable to the AUDIO OUT R and L connect<strong>or</strong>son the DCT6400 and the INPUT R and L connect<strong>or</strong>s on theA/V receiver.3 Connect a video cable to the VIDEO OUT connect<strong>or</strong> on the DCT6400and the CABLE/TV VIDEO connect<strong>or</strong> on the A/V receiver.4 Connect a stereo audio cable to the VCR AUDIO OUT R and Lconnect<strong>or</strong>s on the A/V receiver and the INPUT AUDIO R and Lconnect<strong>or</strong>s on the stereo VCR.5 Connect a stereo audio cable to the OUTPUT AUDIO OUT R and Lconnect<strong>or</strong>s on the stereo VCR and the VCR AUDIO IN R and Lconnect<strong>or</strong>s on the A/V receiver.6 Connect a video cable to the INPUT VIDEO connect<strong>or</strong> on the stereoVCR and the VIDEO VCR OUT connect<strong>or</strong> on the A/V receiver.7 Connect a video cable to the OUTPUT VIDEO connect<strong>or</strong> on the stereoVCR and the VIDEO VCR IN connect<strong>or</strong> on the A/V receiver.8 Connect a video cable to the INPUT VIDEO connect<strong>or</strong> on the stereoTV and the TV/MONITOR OUTPUT video connect<strong>or</strong> on the A/Vreceiver.If you can:• Use the OPTICAL SPDIF <strong>or</strong> coaxial SPDIF outputs instead of the stereoAUDIO R and L outputs. In most cases, S/PDIF offers better audioquality, including supp<strong>or</strong>t f<strong>or</strong> Dolby 5.1 Surround Sound.• Use the S-video connections instead of the standard RCA videoconnections. In most cases, S-video offers better video quality.This video connection method does not supp<strong>or</strong>t HD video. F<strong>or</strong> m<strong>or</strong>einf<strong>or</strong>mation, see “Connecting Your DCT6400 to an HDTV – Video Only.”27
RECORDING YOUR CONNECTIONSUse this diagram to rec<strong>or</strong>d connections between your home entertainmentcomponents. You can use this diagram to reconnect your system if youmove the equipment <strong>or</strong> add new equipment.Disconnect the power from the DCT6400 bef<strong>or</strong>e connecting <strong>or</strong> changingcable connections. Do not place another component <strong>or</strong> object on top ofthe DCT6400.DCT6400 Phase IIIOPTICALSPDIFRAUDIOINLSPDIFVIDEOETHERNETRF IN 2CM INRF IN 1CABLERPT INOUTRF OUTIRS-VIDEORAUDIOOUTLYINPbPrOUTHDMIUSBSATATV PASS CARDIEEE1394SWITCHED105-125V60Hz4A MAX500W MAXVCRTVCABL E/ANTENNA INL/MONOOPT ICALSPDIF SPDIF DVI-HDTVCABL E/ANTENNA INAUDIOINPUTVIDEOAUDIOOUT PUTVIDEORLRYTo T VRLRLAUDIO INVIDEO INS-VIDEO INHDMIPbPrAUDIO OUTVIDEO OUTS-VIDEO OUTIEEE 1394Stereo receiverDVDRLCD INAUX INSPEAKERCONNECTORSCOAXAUDIO OUTOPT ICALRLVIDEOVIDEO OUTS-VIDEOINTAP E 1OUTDIGITALANALOGA/V receiverAUDIOVIDEOR L VIDEO S-VIDEODIGITAL INPUTCOAXDVDCABL E/TVOPT ICALVIDEO 2T V/M ONIT OROUT PUTSPEAKERCONNECTORSINVCRVIDEO S-VIDEOOUT28
DCT6400 Phase III User GuideDATA DEVICESDCT6400 Phase IIIOPTICALSPDIFRAUDIOINLSPDIFVIDEOETHERNETRF IN 2CM INRF IN 1CABLERPT INOUTRF OUTIRS-VIDEORAUDIOOUTLYINPbPrOUTHDMIUSBSATATV PA S S CA RDIEEE1394SWITCHED105-125V60Hz4A MAX500W MAXUSBdevicesExternal harddriveAudio/videodevicesDo not attempt to connect data devices without contacting your serviceprovider. Advanced data features require the proper application andnetw<strong>or</strong>k infrastructure to operate.In addition to high quality audio and video, the DCT6400 can deliverhigh-speed data services such as Internet access, e-mail, IP Telephony,E-Commerce, and home banking.The functionality of the illustrated interfaces depends on the servicesoffered by your service provider.29
TROUBLESHOOTINGBef<strong>or</strong>e calling your service provider, review this troubleshooting guide.This inf<strong>or</strong>mation is to help you quickly solve a problem. If your problemstill exists, contact your service provider.ProblemThe DCT6400 willnot power onThe remote controldoes not w<strong>or</strong>kPossible SolutionThe DCT6400 may have received a software update andmay not power on while the new software is beinginstalled. Try again in a few minutes.Verify that the AC power c<strong>or</strong>d is connected to the DCT6400and an AC outlet. Unplug the DCT6400 from the ACoutlet, plug it back in, and then press the POWER button.If the DCT6400 is connected to a switched outlet onanother unit, verify that that unit is powered on.Press the POWER button on the DCT6400 front panelinstead of the remote control. The batteries in the remotecontrol may be depleted.Verify that the remote control is in “Cable” mode.Verify that there are no obstructions between the remotecontrol and the DCT6400. Aim the remote control directlyat the DCT6400 front panel, not the TV <strong>or</strong> VCR.The angle between the remote control and the DCT6400may be too large. Stand in front of the DCT6400 and nottoo far to either side.Press and release operation keys one at a time, firmlyand deliberately.Try changing channels using the buttons on theDCT6400 front panel.Check the batteries in the remote control. Install newbatteries if needed.30
DCT6400 Phase III User GuideProblemThere is no audiowhen viewing cablechannelsThere is no audiofrom the centerand/<strong>or</strong> surroundspeakers of a hometheater receiverconnected to theDCT6400Possible SolutionVerify that the MUTE button on the DCT6400 <strong>or</strong> theremote control was not pressed. Press MUTE on theremote control to rest<strong>or</strong>e sound.If the DCT6400 audio output is connected to the TV,verify that the MUTE button on the TV was not pressed.If the DCT6400 audio output is connected to a hometheater receiver, verify that the receiver is set to theappropriate input source and the mute button on thereceiver was not pressed.Verify that you used the c<strong>or</strong>rect audio cables f<strong>or</strong> the p<strong>or</strong>ts.Verify that the audio cables are firmly connectedbetween the DCT6400 and the audio playback device(TV, receiver, DVD player, etc.).Not all Dolby Digital programs feature full 5.1 surroundsound. In some cases, the programs may only containleft and right stereo audio.Verify that the coaxial <strong>or</strong> optical SPDIF cable is firmlyconnected to the DCT6400 and the home theater receiver.Verify that the home theater receiver is set to a surroundsound audio mode (Dolby Digital, Dolby Pro Logic ® II, <strong>or</strong>Dolby Pro Logic).Verify that the receiver is properly configured to w<strong>or</strong>kwith all connected speakers.31
ProblemThere is no videoon the TV screenPossible SolutionVerify that the TV is powered on and set to theappropriate input source f<strong>or</strong> the DCT6400.Verify that the DCT6400 is powered on and tuned to anauth<strong>or</strong>ized cable channel.Verify that all video cables between the DCT6400 andthe TV are firmly connected.Verify that the coaxial cable feed is firmly connected tothe DCT6400 and the wall jack.If the DCT6400 is connected to a home theater unit,verify that the home theater unit is powered on and set tothe appropriate input source.If the DCT6400 is connected to a TV through its HDMIconnection, power off the TV and then power off theDCT6400. Wait one second and then power on thedevices.Not all HDTVs can display every output f<strong>or</strong>mat (1080i,720p, 480p, <strong>or</strong> 480i) available on the DCT6400. Toselect a different f<strong>or</strong>mat:1 Ensure that your DCT6400 is plugged into a poweroutlet and is turned off.2 Press the MENU key on the front panel. Yoursettings are displayed on the DCT6400 front paneldisplay.3 Press the ▲ and ▼ keys to display theHDMI/YPbPr OUTPUT setting.4 Press the ► key to cycle through the availableoutput f<strong>or</strong>mats until a picture displays on the TV.No graphics <strong>or</strong>program guidesappear on the TVscreenNo closed captionsdisplayIf you use the IEEE 1394 connection, on-screengraphics, including closed captions and program guides,are not displayed. If possible, use HDMI <strong>or</strong> componentvideo instead.Verify on the User Settings menu that closed captionsare enabled on the DCT6400.Verify that closed captions are enabled on the TV.32
DCT6400 Phase III User GuideProblemThere are blackbars to the rightand left of thepictureThere are blackbars above andbelow the picturePossible SolutionWide screen TVs display 4:3 programs in this f<strong>or</strong>matunless set to Stretch. Turn on the 4:3 OVERRIDE featurein the User Settings menu. This enables most widescreen TVs to stretch the video to fill the screen (seeyour TV manual f<strong>or</strong> inf<strong>or</strong>mation about stretching 4:3video).If the DCT6400 is connected to a wide screen TV, verifythat the TV TYPE is set to 16:9 in the User Settingsmenu.Many HD programs are broadcast in pillar-box f<strong>or</strong>matwith black bars to the left and right of the picture. Theseprograms are broadcast in 16:9 HD f<strong>or</strong>mats even thoughthe video is not 16:9.All 4:3 HDTVs display HD programs in letterbox f<strong>or</strong>mat(black bars above and below the picture) because of theshape of the display screen.Turn on the 4:3 OVERRIDE feature in the User Settingsmenu. This enables most standard screen TVs to displaya full screen picture when the DCT6400 is tuned to a 4:3program.Set the TV TYPE to 4:3 Pan-Scan. This enables theDCT6400 to remove the black bars above and below thepicture when possible.Some SD programs are broadcast in the letterbox f<strong>or</strong>matwith black bars above and below the picture. Some widescreens TVs offer a zoom feature that may be able t<strong>or</strong>emove the black bars (see your TV manual f<strong>or</strong>inf<strong>or</strong>mation about zooming 4:3 video).33
ProblemThere are blackbars on all foursides of the pictureThe DCT6400 ismaking a hummingnoise.Possible SolutionThis may occur on a 4:3 TV if the 4:3 OVERRIDE settingis OFF. To set 4:3 SD programming to fill the screen,depending on the capabilities of the TV, set4:3 OVERRIDE to 480i <strong>or</strong> 480p.This may occur on a 16:9 TV if the active video f<strong>or</strong> an SDbroadcast is in letterbox f<strong>or</strong>mat. To confirm, wait f<strong>or</strong> acommercial <strong>or</strong> look f<strong>or</strong> a graphic, such as a netw<strong>or</strong>k logo.If the commercial fills the screen from top to bottom, <strong>or</strong>the graphic appears below the active video, the programis being letterboxed by the broadcaster. You canminimize this by activating the zoom feature on the TV.A broadcaster may include black bars on either side of awide screen broadcast. This is called a “hybrid” aspectratio and results in a black b<strong>or</strong>der surrounding the videoon a 4:3 TV. Because this is part of the broadcast, theDCT6400 cannot c<strong>or</strong>rect the video. You may be able tominimize the b<strong>or</strong>der using the zoom feature on the TV.The DCT6400 includes an integrated hard drive and afan f<strong>or</strong> cooling. During n<strong>or</strong>mal operation, the DCT6400emits a low humming noise, similar to a personalcomputer. The noise varies in volume occasionally whenthe speed of the internal fan adjusts to changes in thetemperature around the DCT6400. Please note the harddrive will stay on even when the DCT6400 is turned off.34