
Social commerce is how eCommerce is moving these days. And Facebook Shops are one of the easiest ways small and mid-sized businesses can reach more customers.
If you already use Facebook to run ads to your website, setting up a shop page will remove a step for your customers. It gives you a storefront where Facebook shoppers can buy your products without leaving the platform. It'll also let you access everyone who uses Facebook Marketplace. This combination of visibility and seamless shopping experience can do wonders for your sales.
Here, I'll walk you through setting up a Facebook shop page using Facebook Commerce Manager, so you can tap into Facebook's ecosystem and boost your business. But before we get into the details, let's cover a few basics.
What are the requirements for setting up a Facebook shop page?
Here's what you need to know before you can set up a Facebook shop:
You need a Facebook account with a Facebook business Page linked to it.
You must have admin access enabled on the Facebook business Page.
You can only sell physical items on Facebook shop (digital products aren't allowed).
You need a valid bank account with the same name as your Facebook account.
You need to have an employer identification number (EIN), social security number (SSN), or tax identification number (TIN) available for verification (for U.S.-based stores).
You must have a working website for your business.
If you fulfill the requirements above, follow these steps to set up your Facebook shop.
How to set up a Facebook shop
Here's how to create a shop on Facebook:
Read on for details on each step.
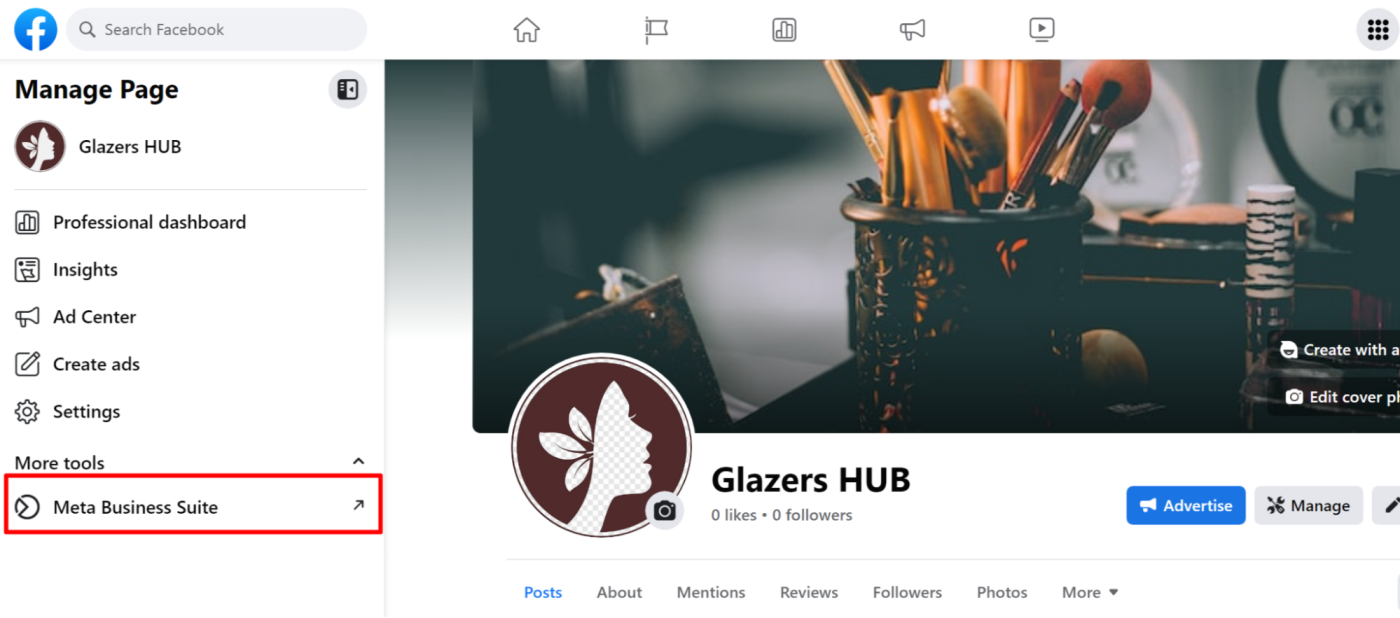
1. Log in to your Facebook business Page, and navigate to the shop page
The first step is to log in to your Facebook business Page and make sure you have admin access. Here's how to do that:
Click Meta Business Suite on the left.
On the next screen, select All tools. Then scroll down to Sell products and services, and select Commerce.

This will open the Facebook Commerce Manager. Click Get started, then click Create a shop to start setting up your store.
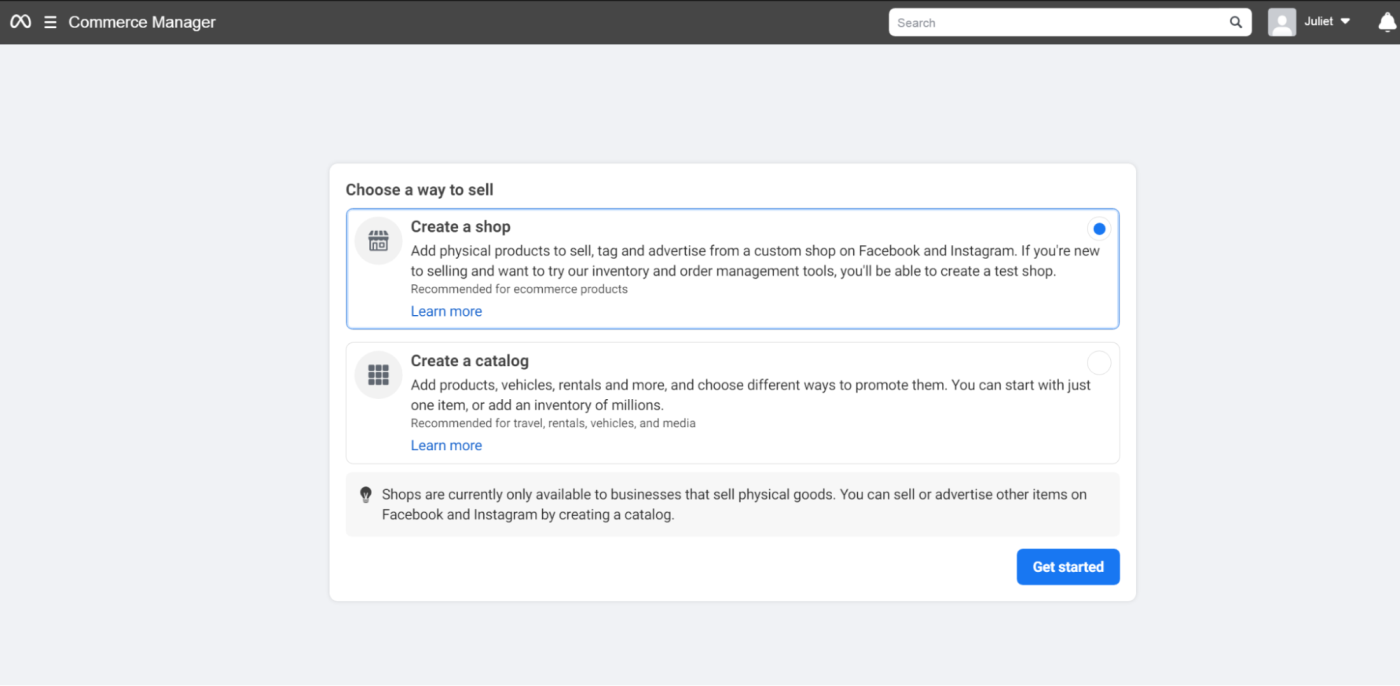


Alternatively, instead of going through your Facebook Page, you can visit https://business.facebook.com/commerce to access Commerce Manager.
2. Set up your Facebook shop profile
Clicking the Get started button reveals a screen explaining the process you're about to walk through. Read it, and then click Next.

Choose a sales channel
On the next screen, start setting up your shop profile by choosing the Facebook business Page you want to sell from. Once you select a page, Facebook will use the information and products on that page in creating your shop. If you're yet to set up a Facebook business Page, choose Create a new Facebook Page. Then click Next.

Connect a Business Manager Account
You need a Business Manager Account to manage sales and inventory, customize your shop, and get business insights. If you already have a Facebook Business Account set up, click on the existing account to link it to your shop. If not, select Create a new Business Account, then fill out your information.

The email address you add at this stage will receive all your customer emails, order notifications, and important inquiries, so make sure to use a working email.
Set up shipping and returns
This will be your default shipping profile and will automatically apply to all products you add to your shop, but you can always customize shipping for individual items as you build up your inventory later on.

Facebook automatically fills in the country you'll be selling from based on your account location, so you can't change that. For U.S. stores, the system automatically selects 51 states. Click on the states dropdown to deselect states you won't be shipping to. Also, set your preferred address type, and choose between standard, expedited, and rushed shipping. Then set your shipping cost, delivery, and return window.
A few things to remember:
Per Facebook's policies, you must fulfill an order within three business days of receiving it.
Customers must also receive their package no later than the delivery window you list in your product's description, and you must adhere to the 30-day minimum return policy.
Facebook doesn't support international sales, so you can only ship to customers within the country your shop is set up in.
If you're unsure about details like delivery cost or window, don't overthink it. You can always change them after setting up your shop. Complete the form, click Next, and move on to the next page.
Preview your information

It's time to review your shop details to ensure they're correct.
If your shop is U.S.-based, you'll notice that the checkout method is set to checkout with Facebook or Instagram. Facebook also automatically enables "Shop Pay" by Shopify to help your customers pay easily, but you can turn it off if you want shoppers to pay with another method.
If everything looks good, check the box to agree to the Seller Agreement, and submit your shop for review. Then click Finish setup.
With that done, you'll go into another stage where you have to provide financial information about your business to enable checkout on your shop. Click Get started to continue.
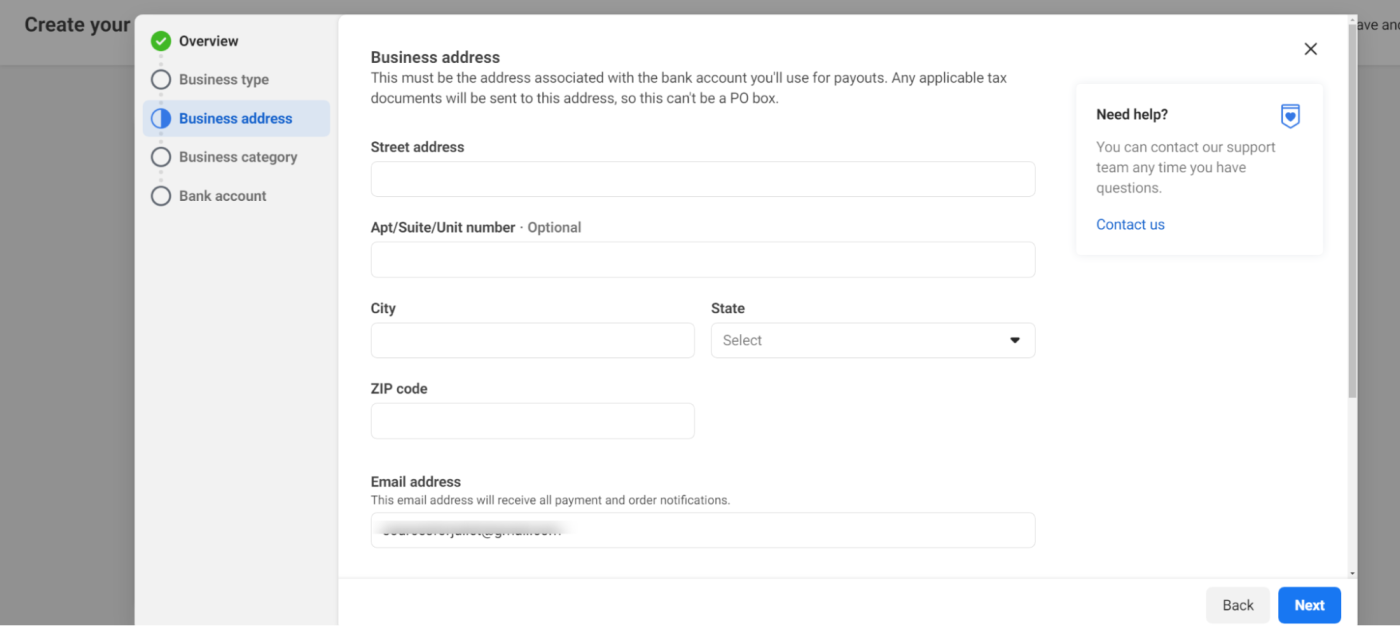
3. Configure payments
Depending on your location, Facebook may present you with different options for configuring payments. For U.S.-based stores, the typical setup is linking a business bank account where your payouts can be sent (Facebook uses Stripe and PayPal for other locations).
The setup process is simple. Hit Next on the Overview tab to start filling out general information about your business before linking your bank account.
The first screen asks for your business type. Click the dropdown, and select the correct option. Depending on the type, you'll need to provide the appropriate tax details—either an SSN, TIN, or EIN—including your business representative's legal name and date of birth. This information is necessary and cannot be edited later, so make sure you provide the correct details before clicking Next.

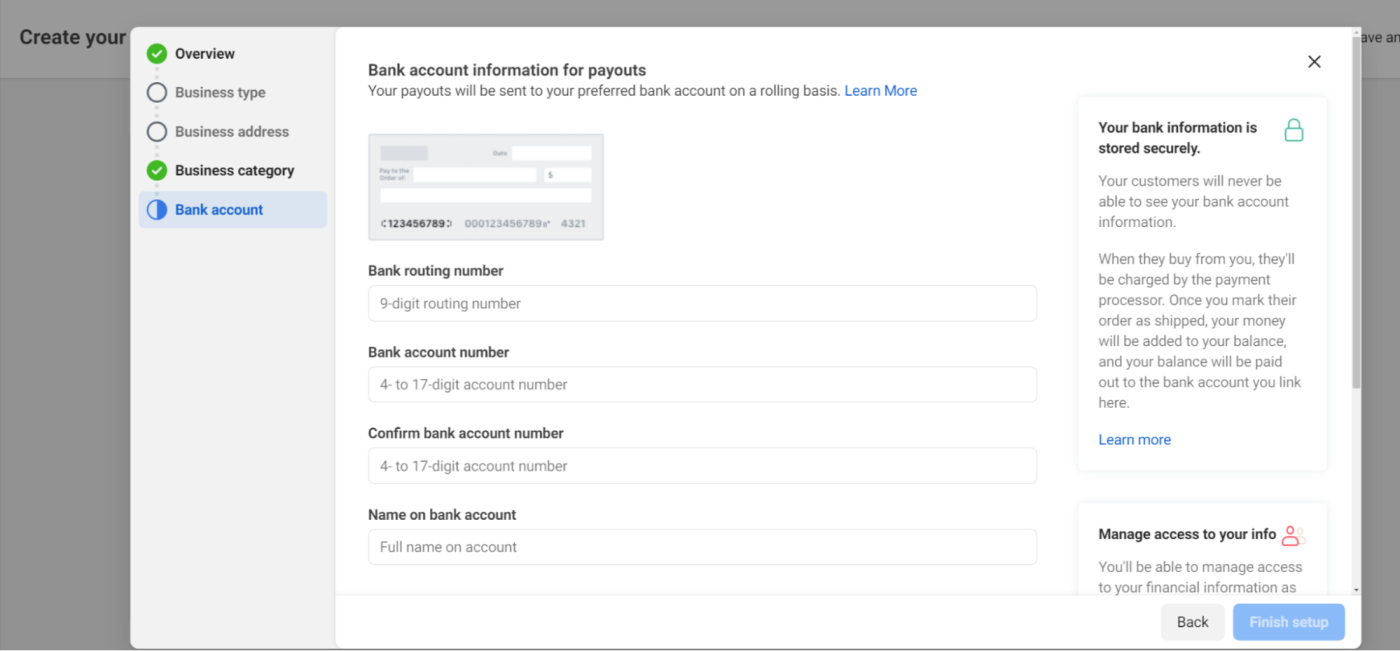
Provide a physical business address. This address should be linked to the bank account you'll use to receive your payments.
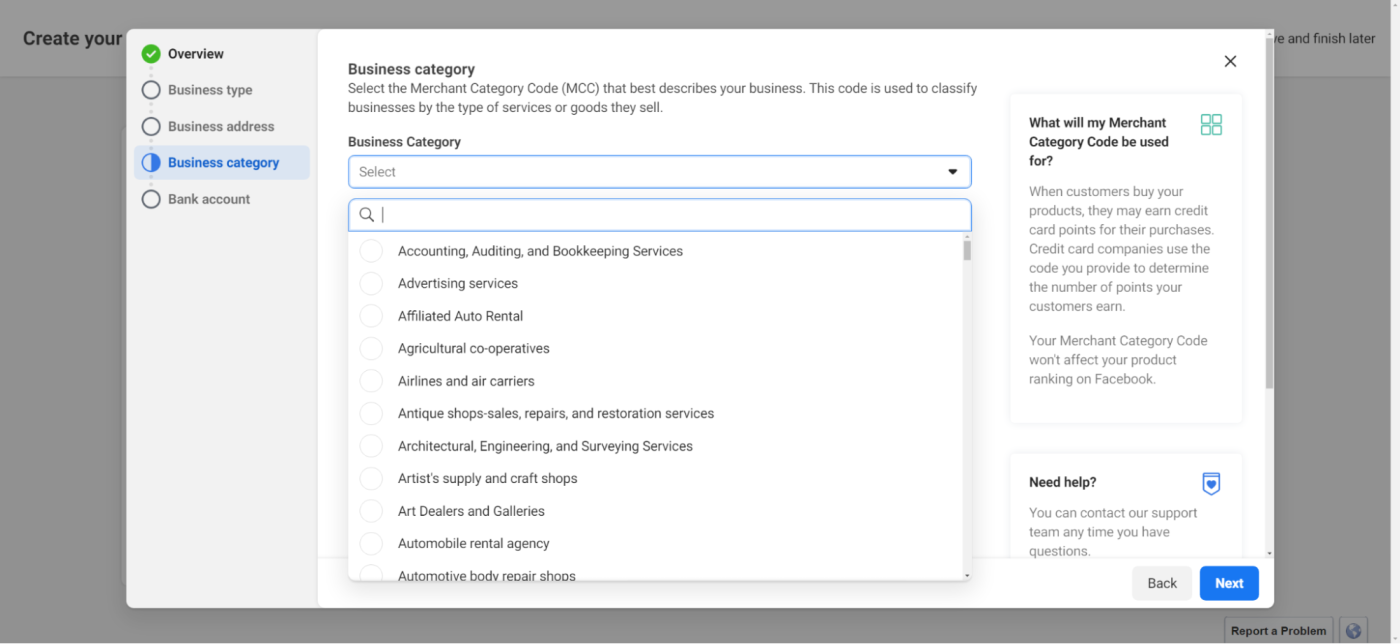
On the next screen, select the category that best describes your business.
Link your bank account to receive payouts. Enter your bank account number, routing number, and account name.
Click Finish setup to create your Facebook shop.
Once you've created your shop, you'll go into your Commerce Manager account, and Facebook will immediately ask you to verify your business identity. If you're unable to verify, Facebook will put your shop on hold, and customers won't be able to see it or make purchases.


In the meantime, you can go ahead and create product catalogs to get your shop ready for selling.

4. Create your product catalog
To make sure shoppers see your products when your shop goes live, add them to a catalog. Click on the blue Add items button from the dashboard, or click Catalog from the left side. It'll open a screen asking you to choose your preferred option for uploading product information.

If you're a small business with minimal inventory, select Manual and fill out the form. It's very straightforward and features the basic details for describing a product—image, product name, description, pricing, shipping, and so on. You'll be able to edit these details at any time as you manage your shop.

You can upload one product and do the rest after verifying your account. Click Upload items to finalize the process.
From here, you can create and group products into collections and customize them with your brand colors and font to better reflect your branding.
5. Publish your shop and start selling
You'll be able to publish your Facebook shop and see your products live after verifying your account. Usually, it takes around 7-8 days for Facebook to verify your identity, and once that's done, the shop page will be added as a tab on your Facebook business Page.

How to set up a Facebook shop: FAQ
Here are some answers to a few lingering questions about creating a Facebook shop:
How much does Facebook Shops cost?
Facebook Shops is free to use, but Facebook takes 5% from every shipment (or a flat fee of $0.40 for shipments of $8 or less).
Does Facebook Shops connect with other eCommerce platforms?
Yes, Facebook connects with platforms like Shopify and BigCommerce. If you already have a digital store on either of them, you can create your Facebook shop by importing and syncing your products. Just click Sync in the right-hand side of Commerce Manager, then follow the link to complete the setup.
Is Facebook Shops available in every country?
No. Unfortunately, Facebook Shops is only available in the U.S. and select other countries. Here's a full list of supported markets.
Facebook can streamline your eCommerce
With Facebook Shops, you'll be reaching potential customers right where they are—and when they're in shopping mood. This means better visibility, conversions, and profits. Learn more about how to automate Facebook, so you can focus on selling, and leave the rest to the robots.
Related reading:


