
Astrophotography has become more popular than ever, in no small part due to the global pandemic, but also due to the availability of inexpensive portable tracking mounts. If you have found yourself with the proper tools but are lacking inspiration, or if you have been thinking about getting into astrophotography, but have been overwhelmed by the sheer amount of objects to shoot, this article will hopefully put you on the right track to finding some of the night sky's most beautiful offerings.
Let's first start with what you’ll need to succeed. First off, you’re going to need a star tracker. I personally use the iOptron Skyguider Pro, but have found the Sky-Watcher Star Adventurer to be worthy of a mention as well. Next, you’ll need a camera and lens with an overall focal length of between 200 and 400mm. It does not matter if you choose a full frame, APS-C, micro four thirds, DSLR, or mirrorless camera. It’s okay to use what you already have. In the early stages, the camera and lens combo is less important than the tracker itself. Finally, you’ll need a sturdy tripod, again use what you have, but don’t assume that carbon fiber is king, that old steel Manfrotto tripod that's now collecting dust because it's too heavy will be a better pick than your shiny new carbon fiber one.
Next, I want to take a second to share my experience with proper settings. Assuming you can polar align your tracker decently, this will allow you to take fewer longer exposures, which will help you out a ton when you go to process them. I very often shoot wide open (maximum aperture), use ISO 1600, and shoot for 90 to 120 seconds at a time, for at least 2-3 hours. All of the targets listed below were taken using these settings. These settings are just examples of where to start. They have happened to work for me for the bulk of the images I take. Your settings will likely be different from mine.
The most variation I see in the quality of an imaging session boils down to something called “seeing quality.” You should use an astronomy weather tool like Astrospheric to tell you the quality of the “seeing” on the night of your planned shoot. I have my best results, and can literally see objects better in my viewfinder on “above average” nights. This will be the deciding factor in your images. So don't venture out in “below average” or “poor” conditions and assume you’ll get decent results.
Lastly, please be aware that light pollution has a huge influence on what you will see and the quality of images you will end up with. I live in a Bortle 9, but less than 30 minutes away is a Bortle 4. All of the examples below were shot in a Bortle 4 zone. If you are unfamiliar with the light pollution in your area you will need to use a Light Pollution Map and find an area nearest you with a Bortle 4 to get similar results. As a beginner, you will not be able to match the superior conditions of a darker site by adding more accumulated exposure time in a higher Bortle zone. So please consider light travel to improve your results under darker skies.
Here are the five best beginner targets for astrophotography:

The Orion Nebula, 64 x 90 second exposures, ISO 1600, f/6.1, 360mm, Canon 80D, Bortle 4 sky
IAU and Sky & Telescope magazine (Roger Sinnott & Rick Fienberg)


1. The Orion Nebula (M42)
Visibility: December - April
Constellation: Orion
The Orion Nebula is by far the easiest target for astrophotography, period. It’s positioned in arguably the most well-known constellation, making it very easy to find in the night sky. It's also super bright, so it doesn't require a lot of exposures to capture its nebulosity in full. Looking for it in-camera doesn't require too much precision as the bright portions are apparent even in poor visibility. Just look for Orion’s belt, and you'll find the nebula just below the two left stars, Alnitak and Alnilam. You don't even need a lot of exposure time to get decent results, 45 minutes is usually enough under suburban skies to process a great-looking image.
The Pleiades, 94 x 120 second exposures, ISO 1600, f/6.1, 360mm, Canon 80D, Bortle 4 sky
IAU and Sky & Telescope magazine (Roger Sinnott & Rick Fienberg)

2. The Pleiades (M45)
Visibility: October - March
Constellation: Taurus
The Pleiades or Seven Sisters is also a very easy target to find in the night sky. It was the second celestial object I ever learned about (the first being the constellation Orion). If you can spot Orion in the night sky, you can find The Pleiades, as they are just above and to the right. Even though this cluster is made up of more than a dozen bright stars, the real show is in the nebula surrounding them. To see the bright blue gaseous regions fully, you’ll need an accumulation of two or three hours of exposure to really bring out all the nebulosity under suburban skies.
Horsehead & Flame Nebulae, 90 x 120 second exposures, ISO 1600, f/6.1, 360mm, Canon 80D, Bortle 4 sky
IAU and Sky & Telescope magazine (Roger Sinnott & Rick Fienberg)


3. The Horsehead & Flame Nebula
Visibility: December - April
Constellation: Orion
There's another target in Orion that most people forget about but it's equally impressive. The combination of the Horsehead and Flame nebulae might even be easier to spot because they straddle the left-most star in Orion’s belt, Alnitak. Again, as Orion is the easiest constellation to find, you should have no problem framing up that left-most star. Just underneath it is the Flame Nebula, and just to the right is the Horsehead nebula. Like the Pleiades, the real show is the nebulosity, which will require more accumulation time to get the best results. If you can manage two or three hours, even under average skies you’ll have an amazing result.
The Andromeda Galaxy, 93 x 120 second exposures, ISO 1600, f/6.1, 360mm, Canon 80D, Bortle 4 sky
IAU and Sky & Telescope magazine (Roger Sinnott & Rick Fienberg)


4. The Andromeda Galaxy (M31)
Visibility: September - March
Constellation: Andromeda
The Andromeda Galaxy is the largest and brightest nebulous object in the night sky, only a fraction brighter than the Orion nebula. But it's not at the top of this list because it's difficult for beginners to find. The Constellation Andromeda isn’t as well known to laypeople as Orion, and its position in the night sky is rather isolated from bright stars, making direct spotting nearly impossible without star hopping.
The easiest method I've used to find Andromeda is to first find the constellation Cassiopeia, which looks like a large “W.” The right “V” portion forms an arrow that points straight toward another very bright star named Mirach, Andromeda is nearly in between the two. In the viewfinder of a camera, all you have to do is follow a straight line from that “V” to Mirach and Andromeda is so bright that you should see a faint smudgy blob along the way. Under average suburban skies, you can get a decent image after roughly 45 minutes of accumulated time.
The Rosette Nebula, 93 x 120 second exposures, ISO 1600, f/6.1, 360mm, Canon 80D, Bortle 4 sky
IAU and Sky & Telescope magazine (Roger Sinnott & Rick Fienberg)
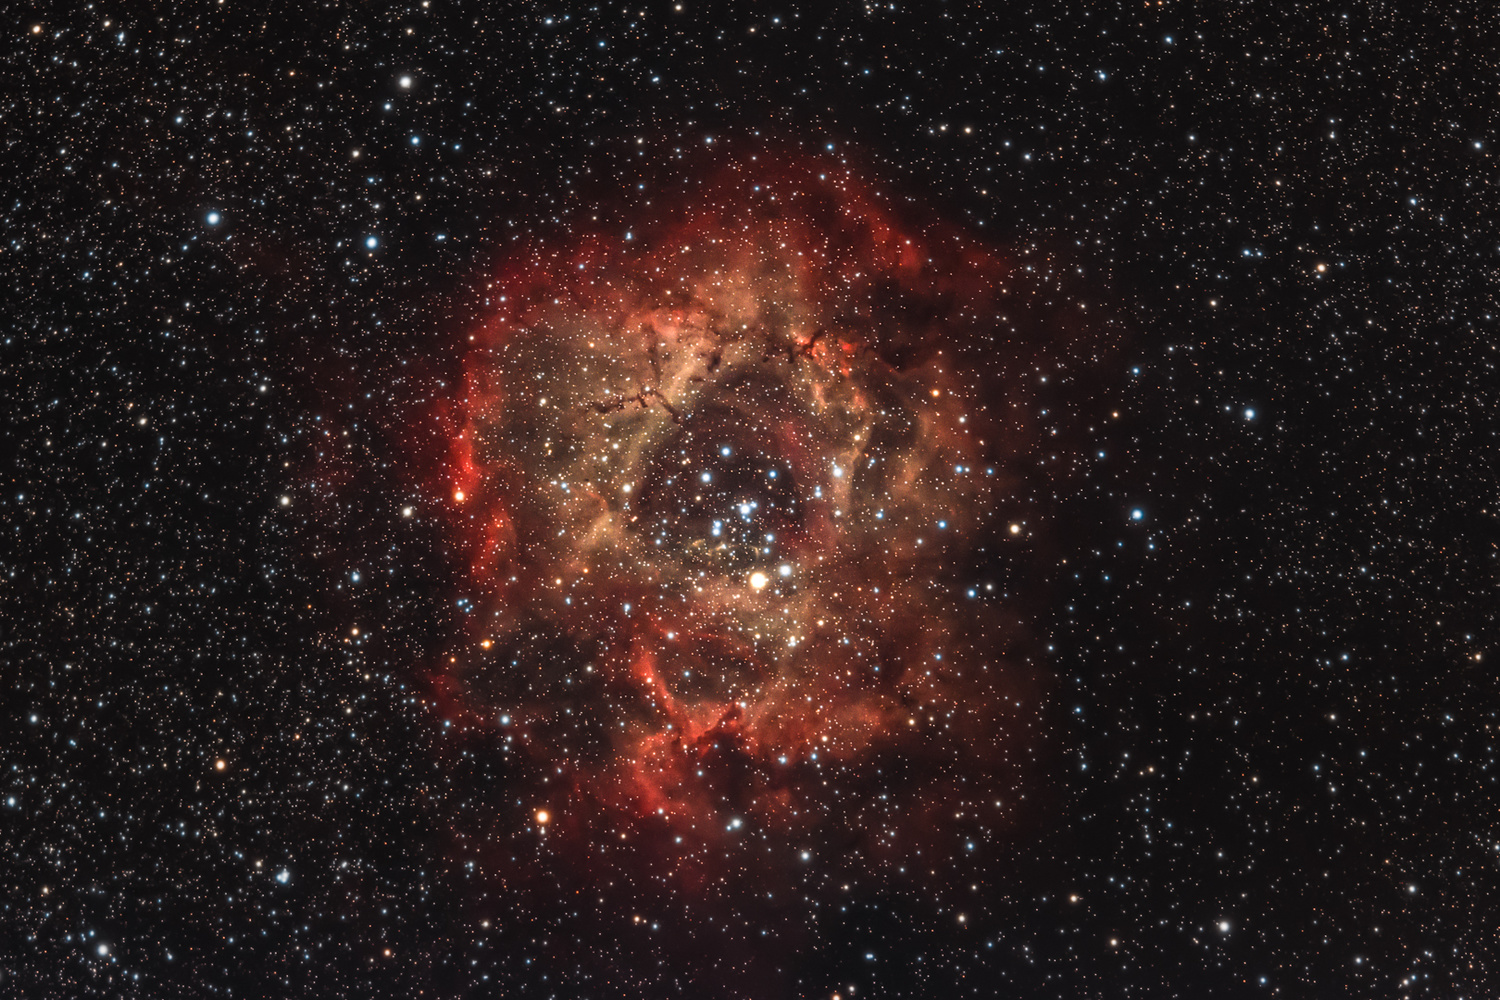

5. The Rosette Nebula (C49)
Visibility: December - April
Constellation: Monoceros
The final target any beginner should try is the Rosette Nebula. It is one of the larger, more stunningly beautiful deep space objects out there. As a bonus, it's pretty easy to find to boot. Once again, if you can spot the constellation Orion, you should be able to find the Rosette nebula. The star on the left shoulder of Orion is called Betelgeuse, and not too far to the left of that is the Rosette nebula. There's a small cluster of a dozen or so stars that make up the center of the nebula, and after a quick test shot at a high ISO, you should see some faint nebulosity to help with framing. Under ideal conditions, a highly respectable image can be achieved after two or three hours of accumulated time.
Now that you know what to shoot, here's a complete guide to processing them. And clear skies to you!
If you love night photography, consider checking out our Photographing the World Series with Elia Locardi where we go to some of the most beautiful locations in the world and teach the process of creating world class landscape images, many at night. Save 15% by using "ARTICLE" at checkout.


My very first astro photo was M51. Your list is a good one since the objects are fairly easy to find and are bright enough to make nice shots. M42 can be tricky due to the bright core if you really want to grab a lot of the nebulosity. Combining several 20 second exposures just to get the proper exposure on the core then grab longer exposures for the rest will result in a might impressive image.
Thank you for the kind words and the tips on M42 David!