
For many insects, examination of the genital structures is vital to understand species diversity. The genitalia of each species are often distinct, and species can be easier to distinguish using genitalia than other morphological traits. In carabid beetles, male genitalia tend to have more variation than female genitalia, and so we more often study the former. I’ve shown examples of the differences in male genitalia in my posts about “Morphological subtleties and the value of n>1”, Bembidion subgenus Lindrochthus, and Bembidion kuprianovii,
When one dissects male genitalia out of a small beetle, one needs a place to store the very small genitalia. A common means of storage is to place it in a drop of glycerol within a very small glass or plastic microvial with a cork or rubber stopper. One can then pin the microvial (through its stopper) on the same pin as the beetle. This has the great advantage that the genitalia is stored with the rest of the beetle, and they are less likely to be disconnected in the future. (One can store the genitalia separately, on microscope slides for example, but that risks their being irretrievably disconnected.)
Storing the genitalia in a microvial under the specimen works well, and allows a great deal of flexibility, but it has several problems. First, it’s a pain to get the very small genitalia of something like a Bembidion out of the microvial, and the very process of taking the genitalia out or putting it back in can lead to damage or loss. Second, every time one wants to compare two specimens, one needs to go through the lengthy process of getting the specimens placed onto microscope slides or the like. Third, given that the specimens are in a fluid, one has to handle them more delicately, and it is harder to compare a large number of specimens at once. Finally, the refractive index of glycerol is far enough away from that of insect cuticle that it is harder to see relevant structures than if the genitalia were in a medium that has a refractive index closer to cuticle.
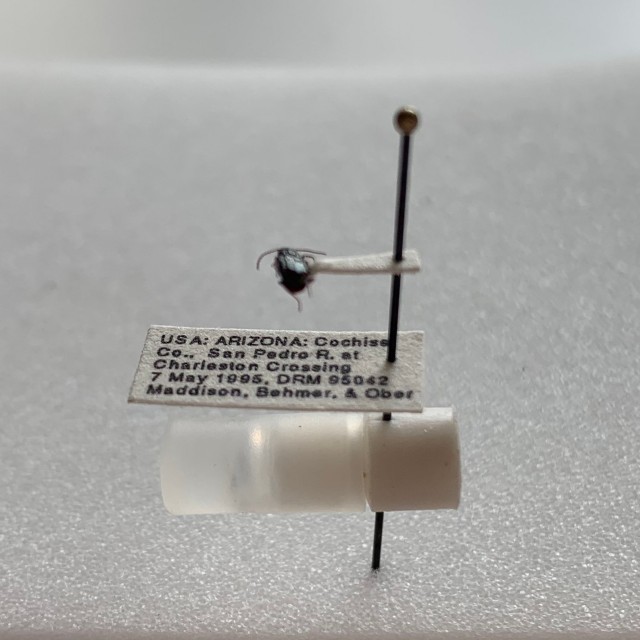
The genitalia of the carabid beetles I study are relatively flat. We typically study them by looking at their left or right sides, which are the flat sides. Because of this, there’s an alternative to storage in microvials that works quite well: mounting the genitalia in a semi-permanent mounting medium such as Euparal on cards that are pinned with the specimens, as shown in the following picture.

Here’s what the card looks like on its own:

Before I outline how these are made, I should point out that there are other ways to store the genitalia, including embedding them in drop of water-soluble glue on the same point that the beetle is glued to (this was Carl Lindroth’s approach) or by embedding them in a drop of Euparal on a clear sheet of acetate pinned along with the specimen. The approach Carl Lindroth used was not all that much different from placing them in a vial, in that the genitalia need to be extracted from the glue before they can be properly studied. I find placing them in a drop of Euparal on an acetate card also less than ideal, in part as it is more difficult to write a voucher code on the card (which means you can’t easily compare many at once under the scope as you might get them mixed up). There are surely improvements that could be made to the way I make the preps, but I find the method works well enough.
Making genitalic mini-preps
The following instructions presume that you already have dissected out the genitalia, and have cleared it appropriately, and that it is now stored in 100% or 95% ethanol.
Materials you will need
- heavy archival paper
- a printer (if you are going to print a design)
- 12 mm circular cover slips. I purchase item number CLS-1760-012 from Chemglass. I typically store them in a clean plastic box, for easy access – it will be important to be able to access them quickly, sometimes with forceps that have a bit of Euparal on them.
- Euparal. Euparal can be very fluid and not very viscous when brand new. This is not ideal, as that means it contains a lot of solvent. The ideal Euparal should be much more viscous. I have not fully explored how to make the Euparal more viscous quickly.
- 100% ethanol (ideally), or 95-96% ethanol
- very sharp, clean forceps
- Kimwipes or other tissue
- a slide warmer with a cover
- dissecting microscope with light
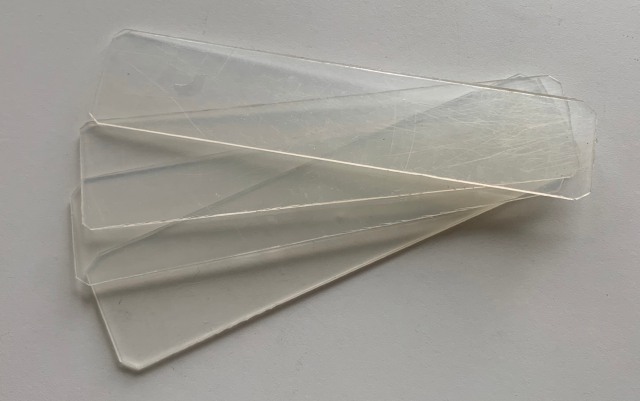
- flat, long “trays” for holding cards as you process them. You can use microscope slides for this, but I prefer longer, less slippery trays. The ones I use are shown below, and are about 12 cm x 2.5 cm. I made mine out of discarded plastics.

Preparing the cards
If you wish to use a card design, print it on archival, heavy paper. Here’s part of one of the designs I use:

I use Arches hot-pressed, 300 g/m2 (140 lb), watercolor paper. Below is a link to a template that you can use to print on 23 cm x 31 cm (9×12) sheets of the watercolor paper. (Note that when I print this template, I scale the printing to 103%.) I print on a Canon inkjet printer that has archival ink.
Cut the cards out. Then use a standard hole punch to punch out the circles.
Now take each individual card, and turn it over such that the printed side is upmost. This will be side that will have any writing on it, and it is the side that shows the primary view of the genitalia; it will also be the side that is eventually topmost. Using your sharp forceps, dip into the thick Euparal, and get a drop in between the tongs; use that to apply a ring of Euparal around the hole. Use viscous Euparal; thin Euparal will contract too much, forming bubbles, and eventually no longer stick to the cover slip. Even with fairly viscous Euparal, it is a good idea to let the ring of Euparal dry a bit before putting on the cover slip.
Once the Euparal had dried to be very thick, place the coverslip on the card so that is glued over the hole by the Euparal.
Here are some things to watch out for:
- Make sure the cover slip doesn’t stick out over one edge of the paper – that will make it more likely the cover slip will eventually come off or break
- Don’t put so much Euparal on that it covers the regions of the paper you plan to write on. If you do, the ink you write with may not absorb into the paper, and will be more likely to rub off
- Again, use viscous Euparal
Now place the card with cover slip onto your slide warmer. Don’t worry if there is a bit of Euparal that leaks down onto the slide warmer. Leave it there for at least 3 or 4 days, then flip over the card so that the cover slip is against the slide warmer. At this point it will be important that the slide warmer is covered, so that dust doesn’t get into the well of the card. Leave the card on the slide warmer for at least a week (ideally longer) to ensure the Euparal is dry.


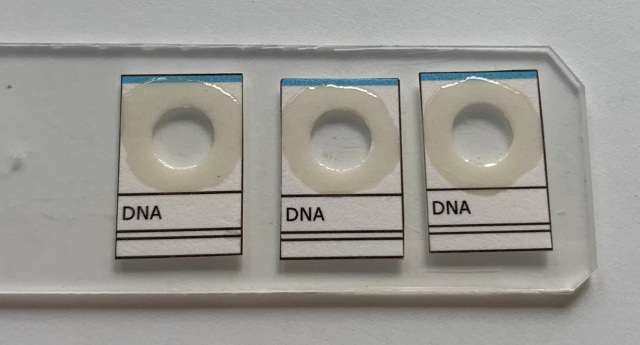
In the following figure, you can see the difference between cards whose coverslip was connected with different thicknesses of Euparal. On the left is a card for which thin Euparal was used to connect the coverslip; if you look at it at an angle, with light reflecting off the glass, you can see that most of the space under the cover slip is air, not Euparal; the cover slip will surely just fall right off if it any force is applied to it. The middle card has mostly Euparal connected it to the card; that one should be OK. The one on the right should definitely be good.

With the card completed, if you place it upside down (so that the cover slip is on the bottom), then the card is like a little well slide, with the cover slip forming the bottom of the well, and the sides of the paper hole being the sides of the well. It is into this well that you will place the genitalia.
Adding the genitalia to the card
Once the Euparal on the card is dry, you can add the genitalia to it.
Add the genitalia in standard places and in standard orientations; this is especially important for the parts you will regularly exam. Because the left side of carabid aedeagi is the side most often viewed, I put that side down against the glass. That way, when the preparation is complete, the part we want to view the most will be right up against the glass.
Under the microscope, I extract the genitalia from the ring sclerite, and remove the parameres from the aedeagus in a separate little dish containing 100% ethanol. Once the pieces are all ready, I dip the sharp forceps into a vial of Euparal, and put the drop in the well of the card (which, of course, is now upside down so that the cover slip is against the stage of the microscope). Without cleaning the forceps, I then grab the genitalic parts, ideally all at once, in the forceps (the Euparal on the forceps also helps pick things up), and then put them into the drop of Euparal in the card. I then position all the parts in the well. As you are doing this, consider the following:
- Don’t use too big of a drop of Euparal. If you use a lot, then you will not be able to easily position the aedeagus, as it will float around. Use as little as possible so that there is a layer of Euparal over the parts. The parts can stick up; that’s OK.
- If you move each piece individually, ethanol will be transferred each time, making the Euparal very liquidy, and potentially dissolving the Euparal that is holding the coverslip onto the paper. This should be avoided
- Make sure you use clean forceps.
Filling it with Euparal
Add layers of Euparal, slowly building up the embedding until the well is just full. This may take ten to twenty or more layers. Here are some important things to consider:
- As you move slides too and from the slide warmer, clean the sharp forceps. Many surfaces (including those of some slide warmers) will flake off slightly, and those particles can then get into your Euparal and make your preparations dirty.
- Make sure you clean off any dust on the surface of the dried Euparal before you add a new layer. You can do this with a clean, small paint brush
- Add thin layers. If you add thick layers, then the thicker layers will contain enough solvent to make it more likely the solvent will soften the dried layers the genitalia are in, causing them to float and move.
- If the Euparal you are adding is thin, and not viscous (i.e., it contains more solvent), then the layers should be thinner.
- If the genitalia are large they may be less likely to float around, and so you may be able to get away with thicker layers.
- If the side of the genitalia that is against the glass cover slip is flat, then it is a bit less likely to move around. If the side of the genitalia is rounded, then it can be more likely to move around, and you then need to be even more careful with your layering – make them very thin.
- Keep the temperature on the slide warmer low – ideally about 35°C. If it is much hotter than that, the Euparal will become softer, and the genitalia will be more likely to float around.
- Place a note next to the cards on the slide warmer saying when the last layer was added.
- You want the Euparal to dry between layers, so you will likely want to add new layers no more often than once a week.
- Don’t overfill the well. The Euparal in the end should just be flat – not convex. (But note below that sometimes I use much less Euparal – see the next section.)
After adding a layer, put it back onto the slide warmer. Once the well is full (if that is your goal), leave it on the slide warmer for at least a month (I usually leave it for at least 3 months), to ensure the Euparal is very dry.
Note that you can photograph the genitalia well before the preparation is complete.
Adding the second cover slip – or not
Typically I add a second cover slip once the well is full to the brim of dried Euparal. The main point of that second cover slip is to both protect the specimen, but also to make the preparation easier to clean. If dust gets on an open Euparal surface, it can be hard to clean. A clean dry brush can work, but a brush dipped in ethanol usually makes the surface uneven and cloudy, which can be resolved with another layer of Euparal. If the genitalia are really small (e.g., from a 1.5 mm beetle) or very tubular, the danger of their shifting orientation as you add layers is much higher. You may not want to complete the process, and instead simply add enough layers to have a flat surface above the beetle bits, and let it harden, without ever filling it full enough to add the second cover slip.
If you are going to add the second cover slip, you will need to fill up the depression, and you will first need to prepare the cards. Examine the areas around the edges of the hole under the microscope, and and see if there are bumps of dried Euparal or other protuberances that will force the coverslip to be raised off the flat surface. If so, scrape them off as best as you can (this can be done with your sharp forces). You will then need to brush off the surface of the Euparal with a clean, dry brush, to get rid of any dust and lint that has settled there.
Once the surface is clean, you are ready to add the second cover slip. Place a large drop of viscous Euparal onto the preparation (again, I use clean, sharp forceps to do this). You can then pick up the cover slip with forceps, and gently lower it onto the drop (do this at an angle by first having one edge of the cover slip make contact with the paper). If the Euparal is very viscous, enough to cause bubbles to get trapped as you lower the cover slip onto it, then you may wish to dip your forceps into 95-100% ethanol, and touch them to the surface of the Euparal. This will spread a thin layer of ethanol onto the surface, and allow the coverslip to be placed without bubbles. If the Euparal is quite viscous, you may need to push the coverslip down a bit.
You should then look at the preparation from an angle, with light reflecting off the glass (as you did above when you first made the card), and see if Euparal fills the contact area between the paper and the cover slip. If not, add Euparal drops to the edges of the cover slip, and encourage the Euparal to seep under the coverslip. This should also be relatively viscous Euparal.
Check the preparation every few hours for the first day, and add Euparal to the edges of the cover slip as needed. Then check it once a day for at least three days. Once it seems to stabilize, leave it somewhere at room temperature for at least three months before pinning it beneath the specimen.
What to do if it all goes wrong
Sometimes it goes wrong. The most common problem is that the Euparal the genitalia are in softens after a new layer is added, and the genitalia float around and are no longer in the correct orientation. This is frustratingly common, and seems to be usually caused by adding too much Euparal at one time for one or more of the layers. If so, you can simply start again. Place the card in a little dish with 95-100% ethanol, and after a couple of hours, the Euparal will have dissolved, and it will all come apart, and you can do it all again.


This is excellent methods info. It takes a lot of the misery out of the art. I hope you publish it in a journal David.
I would love it if someone but together a similar in-depth, lab technique/recipe book for inflating and preserving eversible sacs of Pterostichus (endophalli), which are now regularly used by taxonomists, often with great success for separating species in difficult groups (e.g. by Japanese carabidologists).
Thnaks for your great blogsite too.
James Bergdahl
Spokane, WA