

Introduction: How to Easily Rebind Any Book With Fabric


Ever since I was a little girl I loved reading books.I bought my first Harry Potter set second hand.The books weren't in great condition as one would expect but I was the happiest girl for finally having them.
One of the Harry Potter books got in an even worse shape later on - my toddler brother somehow managed to get his little hands on Harry Potter and the Order of the Phoenix and ripped the back cover off.I ended up just taping the back and leaving it.
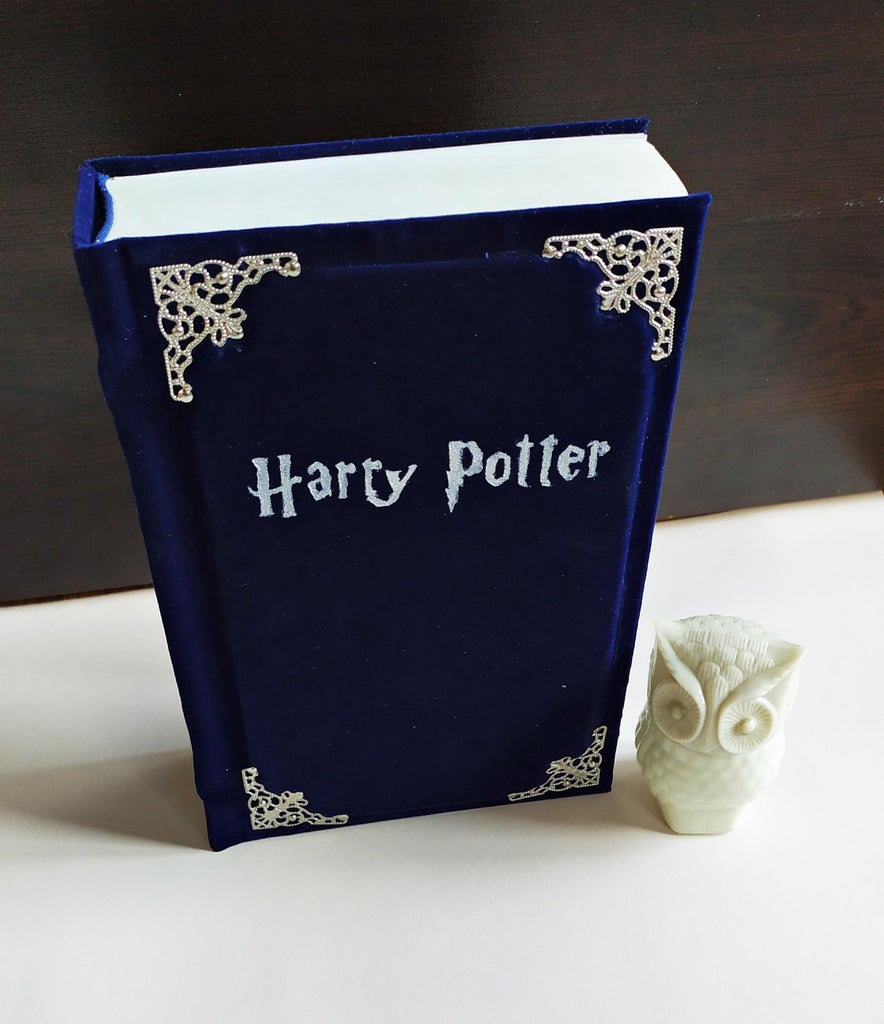
Today was the day I decided I would try to rebind that particular book.I loved the original covers so much but there was no way for me to salvage them.I ended up choosing to bind my book with fabric - a gorgeous blue velvet.It's because I'm a Ravenclaw!
Let's get started!
Supplies
- Chipboard
- Thick cardstock
- Scissors
- X-acto knife
- Fabric of your choice
- PVA glue
- Metal embelishments
- Brads
- Bone folder
- Brushes
- Metalic acrylic paint
- Book press or two wooden boards and two clamps
- Ruler
- Nail art dotting tool
Step 1: The ''Before''


The images above show the state of the book.It obviously needed some repairs.
Like I said,I got these books second hand.This one in particular was gifted to the receiver for Christmas - there was a lovely message glued to the first page.
The first step was to remove the front cover - I carefully cut along the spine and I was left with the book itself.Next,I gently peeled off the Santa.
Step 2: A New Life


The next step involves meauring the width and length of the book.Mine was 14 cm wide and 21.5 cm long.
Take some thick cardstock and cut it so that the length is the same as your book but make it two times wider.In my case I cut my carstock 21.5 cm long and 28 cm wide.Using a nail art dotting tool and a ruler score the cardstock at 14 cm and then fold.Repeat this twice so that you have two endpapers - one for the front of the book and one for its back.
Next,take your book and glue the endpapers.The glue should extend only to about 5-6 mm away from the spine of the book.Before gluing make sure the adhesive is evenly distributed - use a brush to smear it everywhere.Glue the endpapers and smooth them out with a bone folder.
Finally to ensure everything stays in place put the book on a book press.I don't have one so I ended up placing the book inbetween two wooden boards and clamping it.Worked perfectly fine.
Step 3: More Glue


Take the book out of the ''book press'' and glue down any other paper that's left.I glued some of the paper holding the spine and the thin strips left at the front and the back.
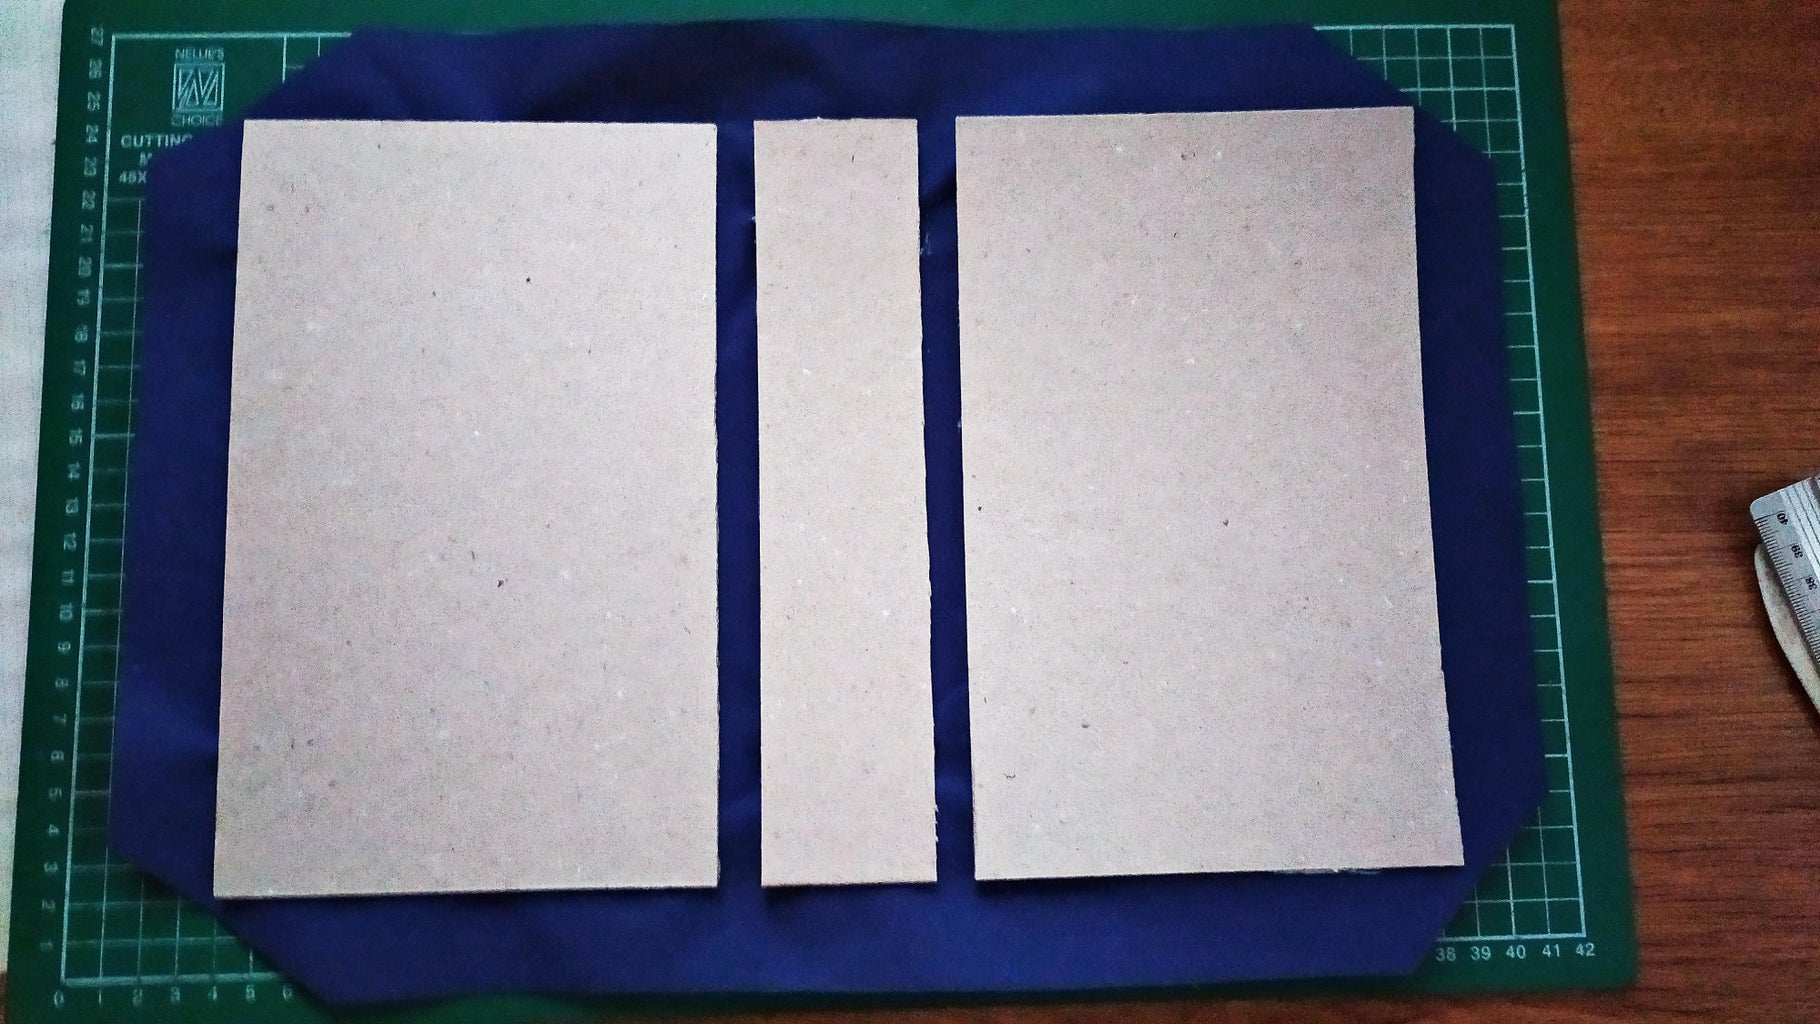
Step 4: Covers


While the glue is drying cut the new covers for your book.
They should measure:
Front and back cover - 0.5 cm longer in length and 0.5 cm shorter in width.
Spine - same length as the front and back cover but the width should include the thickness of the chipboard from the front and back cover.
My book measured 14 x 21.5 cm so the covers I cut were 13.5 cm x 22 cm.To measure the spine's width I highly recommend you to stack everything up.This way you''ll see the exact measurements.My spine was 22 cm long and about 4.7 cm wide.
Step 5: Make It Pretty


You can totally leave the front cover blank but I wanted to make it pretty.I had these metal corners and decided I would use them.
To have the 3D effect for the front of the cover cut another piece of chipboard,slightly smaller in size than the front cover.Next,place the metal corners,trace them and cut the chipboard.Glue that chipboard to the front cover chipboard.
To spice up the spine cut two small chipboards and glue them,each equally far from the top and bottom of the spine.
Step 6: Cover It Up


Once everything is dry it's time to glue the fabric.Start out by evenly applying glue to the front cover.Gently place the fabric on top and start smoothing everything out with a bone folder.Pay attention to the corners - they should be perfectly covered so that each metal embelishment fits nicely.
Place the spine of the book 1 cm away from the front.Repeat smoothing out with a bone folder.
Place the back cover of the book 1 cm away from the spine.
Next,trim the fabric down.There should be a 2.5 cm overhang.Trim the corners - cut four triangles.Glue the leftover fabric two by two.Hold the bone folder slightly longer on the corners while gluing,so that it's nice and tight.
Leave everything aside to dry.
Step 7: Put the Corners


I chose to put the corners with brads instead of glue to avoid any mess.
Pick where you want to put your brads.Lay the metal embelishment flat and using a nail dotting tool mark where your brads holes will be.Poke the holes with a needle.Largen the poked holes with the dotting tool so that the brads go easily in.
Put the metal corners with the brads.Turn the covers over and flatten the brads on the inside part of the book.Repeat with all four corners.
Step 8: Put the Book Together


Apply glue with a brush to the back cover first.Don't apply any glue to about 5-6 mm from the spine.Place the book and gently smooth with a bone folder.
Close the book and apply glue to the front endpaper.Again - glue should extend to 5-6 mm away.Glue the front cover.
DO NOT apply any glue to the spine.
Place the book on your ''book press'' and leave it there until it's completely dry.
Step 9: Put the Title


I thought long on how I would do the title.I thought about laser cutting some letters but I don't have a laser printer.If you have access to a laser printer I would highly recommend you to cut your letters using it.
In my case I ended up tracing the font on a piece of paper.I then cut it using an X-acto knife and painted the title with silver acrylic paint.It turned out okay but I would still go for the laser printer option if I could.I still have to finish painting the title but I couldn't wait to share this project with you.
Step 10: Time to Read


And with that your book is completely rebound! The only thing left to do now is make some tea and enjoy a few pages of magic.
Thank you for reading or scrolling through this Instructable.
Happy crafting!

Participated in the
Fix It Speed Challenge


