Tracking Table & Saving Payload As Is in Oracle Integration Cloud

In Oracle Integration Cloud 3 when you activate an integration, it allows three levels of tracking
Production, Audit and Debug. You will notice that in Audit and Debug some information about the payload is stored in the system and this is not recommended for production. Even in documentation there is clear warning about it.

Reason being, your payload might have some sensitive data that you shall not store on the integration platform or any third party system where it is not required. The data passing through integrations while encrypted in motion and rest, from activity stream you can view the payload. Thus this is not recommended.
But we know as part of operations, troubleshooting and support this information can be vital. In this case, usually we recommend customers to use a database audit table where you store this information. Maybe you choose to store only in case of error or you might choose to have an asynchronous integration that is called in every integration and store the data that can later help the support team with troubleshooting. Having this information in a database table, gives you full control as well as responsibility in safeguarding this information i.e. you will have to manage the access rights who can access this information etc.
Here is a high level structure of a table that I recommend my customers to have minimum information that help in troubleshooting, now you may add more or less information based on your requirement.

In OIC to create an integration that can insert records in a database table using the database adapter, this is a very common task and in case you are new to OIC, you can easily find this information in documentation or a simple google search.
But in the above table, one requirement is to save the payload as is and this requires a few steps that I will try to show you here.

In this integration, all we are doing is storing the payload into the database. Here are the 4 key steps.
- Integration Trigger
- Write payload using Stage File Activity
- Read Payload as Stage File Activity
- Insert into table using Database Adapter
Integration Trigger:
In this integration, I am using a Rest Adapter that receives the following JSON sample payload as request. And we want this payload as is to be stored in the database table. Now this is just a sample payload, any kind of payload can be here based on your requirement.

Write payload using Stage File Activity
Before we store this payload into a database, we need to first write it using StageFile Activity. The sample payload that you have provided as part of trigger, copy it and save it on local machine e.g. employee.json file.
Now in Stage File activity, you configure the operation as WriteFile and provide the key information like file name and output directory.

In Schema Options, as in our case it is a JSON document, we can select Sample JSON document option. If it was an xml, we would have selected sample xml.

In the next step i.e. Format Definition, we upload the sample file that we had copied earlier i.e. employee.json. The structure of this needs to be exactly as the sample request provided in trigger.

And final step, once you have configured the StageFile activity. We need to do a one to one mapping between the Trigger Request and Stage File Write

Read Payload as Stage File Activity
Now we need to read the file written in previous step but here we will use opaque.xsd, and using this opaque element we are able to read the JSON payload as is.
The structure of opaque.xsd looks as follows
<?xml version = '1.0' encoding = 'UTF-8'?>

<schema targetNamespace="http://xmlns.oracle.com/pcbpel/adapter/opaque/"

           xmlns="http://www.w3.org/2001/XMLSchema" >

     <element name="opaqueElement" type="base64Binary" />

   </schema>
So just copy the above and save it as opaque_schema.xsd in your local file system.
In integration add another StageFile activity, this time we will use it to Read Entire File. And use the File Reference where you can map from the writeStageFile Activity response that provides the File Reference of the file written in last step.

In Schema Options, select XML schema (XSD) document option.

And in Format Definition upload the opaque_schema.xsd as saved earlier and select opaqueElement as the schema element.
This will help read the payload written in last step as is and read it into opaqueElement as base64. You would have noticed in our schema, opaqueElement is of type base64Binary
<element name="opaqueElement" type="base64Binary" />

Insert into table using Database Adapter
In my example, I am using Oracle Autonomous Database, using OIC ATP Adapter is very simple. You can directly perform an operation on the table, in this case like Insert.

And in next step, select the table name. In my case the table name is OIC_Tracking

And finally we do the mapping.
For mapping the payload, we are mapping the opaqueElement that is coming from earlier StageFile Read Activity. And since the opaqueElement is storing the data as base64, we have used the decodeBase64 function here that will decode it and store the payload in the database in clear text. If you would like to store base64 than do not use this function.

Testing the Integration
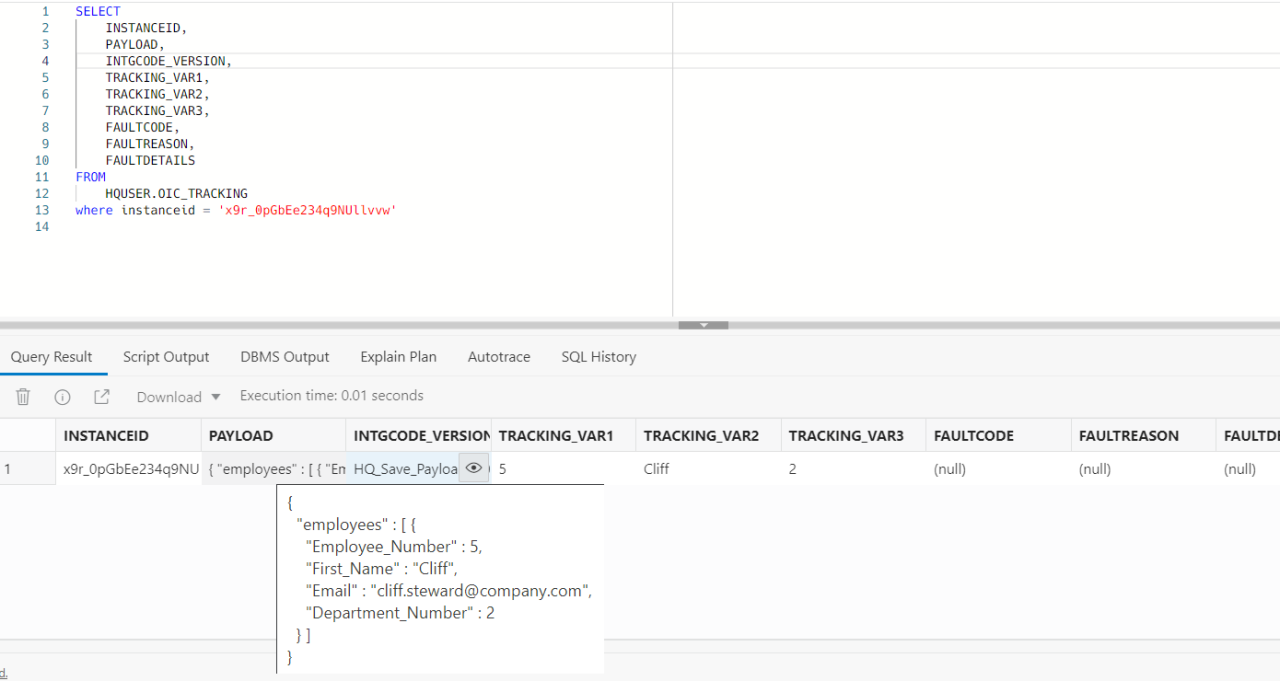
Now that we have developed this integration, if I activate and test it.

I can see that the above payload is saved in my database as is. That is what we wanted to achieve.

Conclusion
In this blog, I have tried to explain how you can create an audit table for tracking and save the payload as is. Opaque schema and element is kind of a magic bullet that helps in many different scenarios and for an integration developer, it’s important to know how to use it to meet your requirements.
I have used Oracle Integration 3 here for my screenshots. If you are currently using Oracle Integration 2, you can follow the exact same steps to achieve the goal.
Available late May - architect, tech. lead, solutions, LLM
1yI think you can do better. This is a common outcome from turn of the century solutions, before tools like Splunk and the ElasticSearch changed the game.
Thanks for sharing, this is a common requirement
Principal Presales Consultant at Oracle
1yexcellent blog :) Keep writing more.
Cloud transformation and Implementation Leader, Scoping Leader
1yHarris Qureshi amazing blog, thanks for sharing this great enhancement