
In this article, we will illustrate how to export SQL Server data into a Flat file, by using the SQL Server Import and Export Wizard. We will also explain some of the problems that may appear during the process of exporting SQL Server data into a Flat file.
To start the SQL Server Import and Export Wizard, use one of the following ways form the How to import/export data to SQL Server using the SQL Server Import and Export Wizard page.
Exporting data
After choosing how the SQL Server Import and Export Wizard will be started, the first page will be the Welcome page:

Press the Next button to proceed.
The Choose a Data Source page will be shown:

On this page, the source from which will be copied data can be chosen.
In the Data source drop-down, select the provider that can connect to a data source, in this case, to a SQL Server database.
From the list, pick the SQL Server Native Client 11.0 provider.
Under the Server name drop-down box, choose SQL Server where a desired database is located from which want to export data.
In the Authentication section, choose how a connection to a data source will be established, by using Windows or SQL Server authentication and under the Database drop-down box, choose a database from which will be exported data.
Also, check a minimum permissions in order to use the SQL Server Import and Export Wizard successfully.
When all that is set press the Next button. The next of the pages in the SQL Server Import and Export Wizard is the following one Choose a Destination page:

On this page, specify where data from the SQL Server database will be copied. In the Destination drop-down box, select the adequate data provider that can copy (import) data to the destination (.txt) file. That will be the Flat File Destination provider:

As soon as the Flat File Destination provider is chosen, additional options for settings a destination file under the Destination drop-down box will show:

In the File name box, enter location of the flat file. Also, the Browse button can be used to locate the flat file.

From the Locale drop-down box, pick the language for sorting and for date and time formats.

Check the Unicode check box if want to use Unicode, but if this check box is checked then the Code page drop-down box is disabled:

When the language is chosen, be sure that language is available on your system:

Otherwise, when trying to export data from a SQL Server to a flat file, the following error may appear:
– Validating (Error)
Messages
- Error 0xc00470b6: Data Flow Task 1: The LocaleID 4096 is not installed on this system.
(SQL Server Import and Export Wizard) - Error 0xc004706b: Data Flow Task 1: “Destination – Expot_Import_Data_txt” failed validation and returned validation status “VS_ISBROKEN”.
(SQL Server Import and Export Wizard) - Error 0xc004700c: Data Flow Task 1: One or more component failed validation.
(SQL Server Import and Export Wizard)
Error 0xc0024107: Data Flow Task 1: There were errors during task validation.
(SQL Server Import and Export Wizard)

From the Code page drop-down box, select the code page for non-Unicode text:

In this step, a common error that may appear when exporting a SQL Server data to a Flat file is this:
– Validating (Error)
Messages
- Error 0xc00470d4: Data Flow Task 1: The code page on Destination – Expot_Import_Data_txt.Inputs[Flat File Destination Input].Columns[Name] is 1252 and is required to be 65001.
(SQL Server Import and Export Wizard) - Error 0xc00470d4: Data Flow Task 1: The code page on Destination – Expot_Import_Data_txt.Inputs[Flat File Destination Input].Columns[LastName] is 1252 and is required to be 65001.
(SQL Server Import and Export Wizard) - Error 0xc004706b: Data Flow Task 1: “Destination – Expot_Import_Data_txt” failed validation and returned validation status “VS_ISBROKEN”.
(SQL Server Import and Export Wizard) - Error 0xc004700c: Data Flow Task 1: One or more component failed validation.
(SQL Server Import and Export Wizard) - Error 0xc0024107: Data Flow Task 1: There were errors during task validation.
(SQL Server Import and Export Wizard)

One of the solutions is to change the code page of the destination file in the Code page drop-down box from e.g. 65001 (UTF-8) to 1252 (ANSI – Latin I) and then try again to export data:

Or, for all SQL Server data that have char and varchar data type to convert into nchar and nvarchar data type using CAST function:

On this link, service errors, warnings and information messages can be found that may appear when exporting/importing data via the SQL Server Import and Export Wizard.
Under the Format drop-down box, one of the three options can be chosen for the formatting of the columns that will be exported in the destination file:

Delimited: when this option is selected, the column delimiter which delimits the columns in the destination file can be specified.
Note: The column separator can be set on the Column delimiter drop- down box:

Fixed width: When this option is selected, the columns in the destination file will have a fixed width.
Ragged right: Every column in the destination file will have fixed width except for the last column. The delimiter for the last column can be set in the Row delimiter drop-down box:

The next option on the Choose a Destination page of the SQL Server Import and Export Wizard is the Text qualifier text box where can be specified the text qualifier for the data in the destination file:

Note: This option is only available when the Delimited option in the Format drop-down box is selected, otherwise it will be disabled:

The last option on the Choose a Destination page of the SQL Server Import and Export Wizard is the Column names in the first data row check box:

When this option is checked, then the names of the columns for the chosen table will be exported to the destination file:

Otherwise, when this option is unchecked then the names of the columns for the chosen table will be omitted from the destination file:

When the all options are set in the Choose a Destination, click the Next button to proceed.
The next page of the SQL Server Import and Export Wizard is the Specify Table Copy or Query page:

On this page, it can be specified whether to copy data from one or more table/view to a destination file by checking the Copy data from one or more tables or views radio button or to copy data from an SQL query by using the Write a query to specify the data to transfer radio button.
For the purpose of the article, the first option will be used. More about these two options can be found on How to import/export data to SQL Server using the SQL Server Import and Export Wizard page.
The next page is Configure Flat File Destination:

On this page, options for formatting the destination flat file can be set. Additionally, you can preview the data that will be exported to a destination flat file or review/change mapping for the columns.
The first option on this page is the Source table or view drop-down box. In this box, all available tables and views form the SQL Server database will be in the list that is specified in the Choose a Data Source page:

But, if the Write a query to specify the data to transfer radio button on the Specify Table Copy or Query page is checked, then the word “Query” will appear as only option in the Source table or view drop-down box:

The next option is the Row delimiter drop-down box. In this drop-down box can be specified how each row in a destination file ends with. By default, the carriage return-line feed combination is set:

More about available row delimiters can be found from this link.
Under the Column delimiter drop-down box, the delimiter can be chosen which will separate columns of data for each row:

To see which data will be copied to a destination file, click the Preview button. The Preview Data dialog will appear that shows up to 200 rows from the data source

When click the Edit mappings button, the Column Mappings dialog will appear which shows columns mapping between the source and destination under the Mappings section. Also, can be set which subset of columns will not be copied from source to destination by setting the <ignore> option under the Destination column:

The Source shows from which source data will be copied.
The Destination shows where copied data from the source will be placed
The Create destination file radio button creates a destination flat file and this option is enabled only when a destination file does not exist in the specified destination path:

When this option is checked, you will be able to change the names under the Destination column:

The Delete rows in destination file radio button, when is checked, deletes data that exist in a destination file when a new one need to be inserted.
The Append rows to the destination file radio button, when is checked, placed a new data from a data source under the existing data in a destination file
Under the Type column, the Integration Services data types are shown in which source data types will be converted.
The SQL Server Import and Export Wizard uses the available XML mapping files from this location for SQL Server 2017:
- C:\Program Files\Microsoft SQL Server\140\DTS\MappingFiles\ for 64-bit version
- C:\Program Files (x86)\Microsoft SQL Server\140\DTS\MappingFiles\ for 32-bit version

Existing mapping files can be edited or new ones can be added:

Note, when you do that, the SQL Server Import and Export Wizard needs to be closed and reopened in order to load the new or changed mapping file.
After everything is set on the Column Mappings dialog, click the OK button and on the Configure Flat File Destination page, click the Next button to proceed with exporting data from a SQL Server database to a Flat file.
The next page of the SQL Server Import and Export Wizard is the Save and Run Package page:

On this page, it can be set whether to exporting data from a SQL Server database to a Flat file immediate by checking the Run immediately check box or to save the copied data from source as SSIS package by checking the Save SSIS Package check box.
In this case, we will check both options to export data from a SQL Server database to a Flat file.
As soon as the Save SSIS Package check box is checked, the additional options for setting the SSIS package will be available:

When the SQL Server radio button is checked, the SSIS package will be saved in SQL Server under the msdb database in the sysssispackages table:

When the File system radio button is checked, then the SSIS package will be saved as a file with the .dtsx extension:

From the Package protection level drop-down box, it can be chosen how the data in the SSIS package will be protected:

More about these options under the Package protection level drop-down box can be found on the Access Control for Sensitive Data in Packages page.
The Password and Retype password boxes are available only if the Encrypt all data with password or Encrypt sensitive data with password options from the Package protection level drop-down box is chosen:

The next page of the SQL Server Import and Export Wizard is Save SSIS Package page:

On this page, additional information can be set for the SSIS package like name of the SSIS package in the Name box, add description for the SSIS package in the Description box.
Target indicates the destination for the SSIS package, whether it will be File system or SQL Server destination. If it’s needed the destination to be changed, go to the Save and Run Package page and pick a different destination:

Depending on which destination is chosen SQL Server or File system, the options in the Save SSIS Package page will be a little bit different.
If the SQL Server radio button is selected, then the Save SSIS Package page will look like this:

In the Server name drop-down box, type or select from the drop-down list destination SQL Server for SSIS package and use Windows or SQL Server authentication to connect to SQL Server.
If the File system radio button, on the Save and Run Package page is chosen then the Save SSIS Package page will look like this:

In the File name, the path and filename of the destination file can be entered or click the Browse button to select the destination file:

When the path for SSIS package is set, press the Next button in order to continue with exporting SQL Server data to a flat file.
On the Complete the Wizard page can be reviewed all choses that are made in the wizard

This page is just for verifying settings, any changes cannot be performed here.
Click the Finish button to start coping SQL Server data to a flat file.
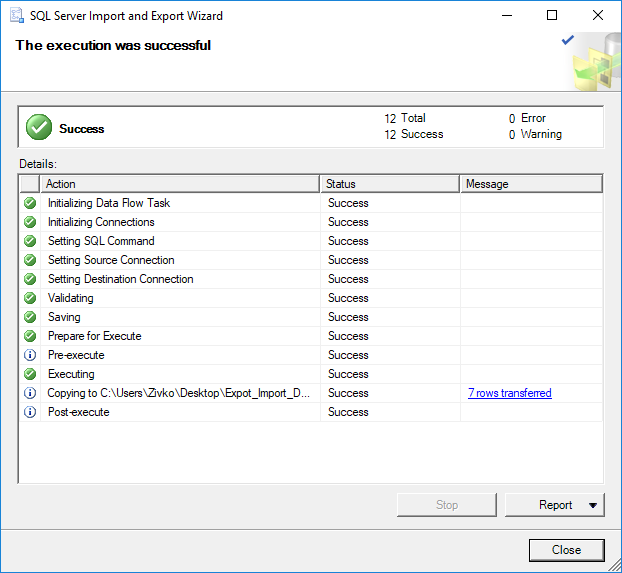
The Performing Operation page shows progress and results of the operations that are configured on the previously pages:


He is a prolific author of authoritative content related to SQL Server including a number of “platinum” articles (top 1% in terms of popularity and engagement). His writing covers a range of topics on MySQL and SQL Server including remote/linked servers, import/export, LocalDB, SSMS, and more.
In his part-time, Zivko likes basketball, foosball (table-soccer), and rock music.
See more about Marko at LinkedIn
View all posts by Marko Zivkovic
- How to connect to a remote MySQL server using SSL on Ubuntu - April 28, 2020
- How to install MySQL on Ubuntu - March 10, 2020
- Using SSH keys to connect to a remote MySQL Server - November 28, 2019