The CDs are piled on the floor, the paperbacks are doing an impression of the Leaning Tower of Pisa. It's time to put up a shelf and graduate to the top of the DIY class. Fiddly, a little tricky and a lot easier if you have four hands, this task is a rite of passage for the amateur Handy Andy.
It's tempting to suggest you put up a new shelf in your home just to practise your DIY skills and to have something to show off and say, "I did that!" Here, we'll work through the example of a simple, single shelf with brackets. These same principles and steps apply to putting up a shelving system with long vertical brackets.
Tools you will need
A drill, wood screws, a pencil, hammer and nail for marking up, and a stud detector. You will also need a spirit level. Get a level which works in both orientations and you can use it for a host of jobs around the house.
1. Find the studs
To put up a shelf on a plasterboard wall, you will need to find two studs (a stud is the upright wooden support in the wall to which the plasterboard is attached) to anchor your shelf brackets. Use your stud detector to find them, then draw two vertical guides along the lines of the studs.
2. Mark holes for the first bracket
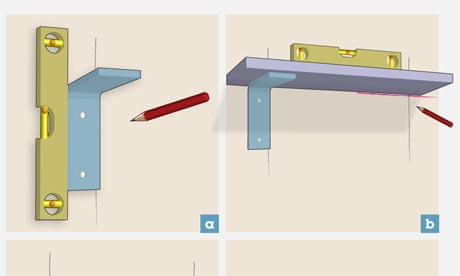
Take one of the shelf brackets and hold it up to one of the guide lines at the correct height. Use the spirit level to set it vertical and then mark through the holes with a pencil (or coat hanger wire if the bracket is too thick) to show where you need to make the holes. Add a cross and nail dent to each mark, for more accurate drilling.
3. Drill into the wall
Using a wood drill bit that is one size smaller than your screws, drill as far as the length of a screw (minus the depth of your bracket). Measure the screw and bracket against the drill bit first and mark the correct depth with tape. Choose the right length of screw to properly anchor the shelf to the stud. This will be around 20mm more than the depth of plasterboard and bracket. Plasterboard can be anything from 9mm to 13mm, so you will probably need to choose screws upwards of 30mm in length.
4. Screw in the first bracket
5. Mark holes for the second bracket
Take your shelf and balance it on the first bracket with your spirit level on top. Hold the shelf exactly level, then mark a short line along the underside of the shelf across the line you marked earlier for the second stud. You should now have intersecting lines on your wall, showing the correct spot for the top of the second bracket.
Put the shelf down and pick up the second bracket and spirit level. Place the bracket so that it will support the shelf at the level of the horizontal mark, and repeat the method that you used to mark the first bracket.
6. Drill holes and fix the second bracket.
Screw the second bracket securely into the stud, as before.
7. Put shelf in place and fix with screws, if needed
Depending on your bracket design, the shelf may need to be fixed on to the bracket, or it may just balance on top.
8. Check the level again
If you have worked carefully through the steps, your shelf should be perfectly level.
Notes on solid walls
If you are fixing a shelf to a brick or masonry wall, you should follow the same steps as above, though you will not need to worry about the studs. However, you will need to use plastic wall plugs to make sure the screws are secure. Drill holes to the correct size and depth for the plugs, using a masonry drill bit instead of a wood bit.
